Showing posts with label Breakfast. Show all posts

Wednesday, August 3, 2016

Blueberry Dutch Baby


Breakfast seems to be one of these meals we are often in a hurry to eat. Usually this means when going out for breakfast we set relatively short time parameters around the time it takes to place the order to the time it is brought to the table. Invariably we often avoid ordering any menu item requiring a twenty minute wait time. For some reason twenty minutes in the morning is considered an endless eternity. We need to convince ourselves we are much too busy to wait that long. Although we think nothing of waiting in endless lines at the coffee shop, at the ice cream shop on a really hot summer's day, or at an amusement park. Essentially our perception of 'too long' is consistently inconsistent. Because if we really want something badly enough, we usually manage to deal with the wait time.


Dutch Babies are those 'do I really have to wait twenty minutes?' breakfast menu items causing us some angst. As soon as we place a breakfast order for anything other than a Dutch Baby, it seems the universe conspires against us. Within seconds of the server leaving our table, another server delivers a a tray of Dutch Babies to the table sitting next to us. The sight of them immediately makes our mouths water or drool or both. Suddenly our perspective shifts and we silently admit a twenty minute wait is really not that long at all. So instead of going out for breakfast and not ordering what you  crave, why not just stay in and make some Dutch Babies!

With the possible exception of wild blueberries, you more than likely generally have all of the ingredients for the making of this Blueberry Dutch Baby on hand. Less time consuming than making traditional pancakes and with a greater visual wow factor at the table, Dutch Babies are an impressive breakfast or brunch dish. By using different seasonal ingredients (blueberries, apples) or simply topping with a homemade lemon curd you may never grow tired of either making and devouring them. 

A prior dutch baby recipe post (Dutch Baby, At Last) used slightly different ingredients in the batter. I would be hard pressed to say which one of these Dutch Babies I liked better. Although in one bite of this Blueberry Dutch Baby and I was immediately smitten with the flavor the smaller, wild blueberries, lightly sprinkled with fresh squeezed lemon juice and finished with a generous dusting of confectionary sugar brought to it. Unfortunately fresh wild blueberries (a much smaller version of the blueberries most of us are familiar with) are not readily available here in the midwest. Driving to Maine or Canada is not a feasible option, so I instead used frozen wild blueberries (with success!). The recipe in Yankee Magazine called for using only one half cup of wild blueberries, but I can tell you now your Blueberry Dutch Baby really needs somewhere between three-quarters to a full cup of them.


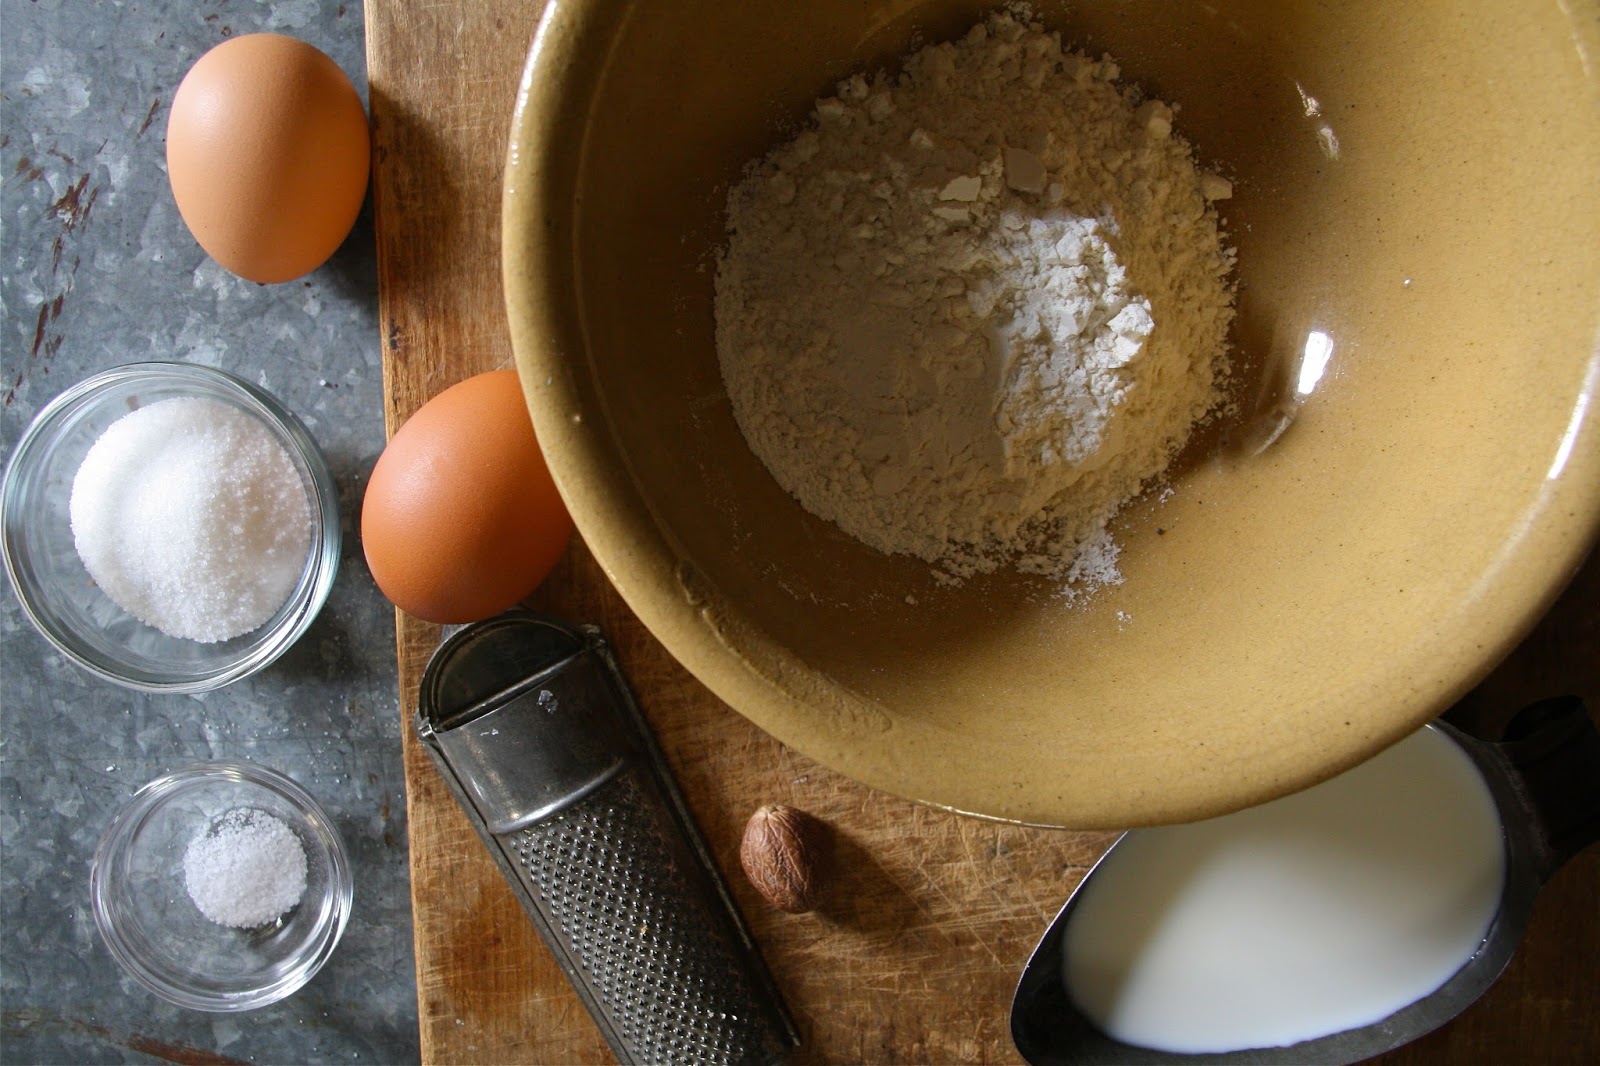
The key to making the batter for a Dutch Baby is three-fold: use the best possible ingredients, use room temperature eggs, and whatever you do, do not over blend the batter. A lumpy Dutch Baby batter is a really good batter.


Cast iron pans and Dutch Babies are inseparable. Not only do they conduct heat evenly, they can stand up to relatively high oven temperatures (like the 425 degrees (F) oven temperature called for in this recipe). Cast iron pans at antique stores or flea markets may be a little more expensive than the newer ones made today although either of them will work (this comes from someone who has both). Never ever use a non-stick pan when making a Dutch Baby. Both your pan and your Dutch Baby will be ruined.


Getting the cast iron pan hot is important when making this puffy pancake. The best way to accomplish that goal is to first preheat the oven before placing the pan with the three tablespoons of butter in it. Not only will your butter melt (within about a minute) perfectly, your pan will be evenly heated. Once the butter is melted, the batter is poured into the pan first and then topped with the blueberries. In about 20-22 minutes you will the most beautiful, insanely delicious golden browned, puffy pancake. 

As soon as the Dutch Baby has finished baking, remove from the oven and immediately squeeze a half of small lemon over the top and dust generously with confectionary sugar. Serve immediately! Because part of the experience of a eating a Dutch Baby is taking it in with your eyes make certain everyone is at the table ready and waiting as the Dutch Baby will slightly deflate in a relatively short period of time. While it is as delicious fully puffed as it is deflated, seeing it puffed might make everyone at the table think twice before passing on ordering a Dutch Baby the next time they go out for breakfast at a restaurant. Life may be short, but who wants a life without a Dutch Baby, especially a Blueberry one.

Recipe
Blueberry Dutch Baby (slight adaptation to Yankee Magazine's Blueberry Dutch Baby recipe, July/August 2016)
Serves 2 generously and 4 slightly less generously

Ingredients
1/2 cup (65g) all-purpose flour
1/2 cup whole milk
2 large eggs, room temperature
2 Tablespoons sugar
1/8 teaspoon kosher salt
1/8 teaspoon freshly grated nutmeg or ground nutmeg
3/4 to 1 cup wild blueberries (fresh or frozen)
3 Tablespoon unsalted butter
Juice of 1/2 lemon
Confectionary sugar for finishing
Optional: Maple syrup

Directions
1. Preheat oven to 425 degrees (F) and position rack to lower position in oven.
2. Lightly beat the flour, milk, eggs, sugar, salt and nutmeg. Do not over beat as batter should be slightly lumpy.
3. Place butter in 9 inch cast iron pan. Place in oven. Allow butter to melt (about 1 minute).
4. Carefully remove pan from oven, immediately pour batter into the heated skillet and sprinkle with wild blueberries. 
5. Place pan in oven and bake until puffed and golden, approximately 20-22 minutes. Remove from oven.
6. Immediately sprinkle with fresh lemon juice and generously dust with confectionary sugar.
7. Serve immediately.

Notes: (1) I used one cup of wild blueberries here, but 3/4 cup could work as well. Anything less and well, it wouldn't be as delicious, (2) In the midwest, finding fresh wild blueberries (from Maine or Canada) is a challenge. Most grocery stores sell smaller wild blueberries in the freezer section, (3) Serving with maple syrup is optional, but not necessary. Personally I prefer a Dutch Baby without maple syrup, (4) This recipe definitely calls for the use of a cast iron pan. You can find vintage cast iron pans in antique stores and some flea markets or you can find new ones in a good culinary store. If buying new would recommend Lodge cast iron pans. Everyone should have at least one cast iron pan and (5) Feel free to make the base of this Blueberry Dutch Baby using the Dutch Baby, At Last recipe posted on the blog.


Views in Bar Harbor and on Mt. Desert Island (Maine)

Saturday, July 30, 2016

Cardamom Pecan Coffee Cake


"Never photograph anything you are not passionately interested in." (Lisette Model) As I was reading "Diane Arbus: Portrait of a Photographer", a biography written by Arthur Lubow, I couldn't help but wonder why my very amateur photographic eye has been drawn more toward capturing landscapes, animals, and, of course, food rather than people. Of the thousands and thousands of photos I have taken over the last five years, there are relatively few having either familiar or unfamiliar people as the focal point. Often when photographing landscapes or the iconic images within them, I have positioned my lens or waited for the capture to be free of human life. Being unable to telepathically ask people to move slightly to the right or the left, I will shamelessly admit to, on a few occasions, kindly, yet boldly asking if they could please pause in place while I took a few photos. Fortunately I have yet to meet anyone telling me to, as they say, 'go jump in the lake'. Whatever the reason or reasons explaining my photographic interests, obsessions, and exclusions, something in this biography has opened my eyes to the possibilities of taking my photographic endeavors from a different, or rather, broadened vantage point. While I don't see myself going from one end of the continuum to the other, I can see myself experimenting with shifting away from, rather than staying only at the single end of it. Along with broadening and expanding the photographic concept of balance, who knows where some of this introspection might lead.


I would like to think I use the same kind of discerning eye when taking a photo as I do when reading new recipes. Rather than completing disregarding a recipe when I perceive something is a little 'off', I generally use a combination of my intuition and knowledge along with other recipes to come up with a version I think might work. Sometimes this works, and sometimes it doesn't (you don't ever get to see the things that don't). My path to the recipes I want to try are not alway linear, as something in my deeper search frequently leads me in a completely different direction. However, being side-tracked can sometimes be very good thing. Recently I came across a recipe for a Cardamom Coffee Cake made in a 9"x12" baking pan and piled high with a topping of sugars, butter, pecans and spices. Intrigued by this recipe, I began a search to see just how many other versions there were of a coffee cake having cardamom as its' main spice. Not many actually. However, I ultimately came across a recipe from the famous Moosewood Cafe, one made in either a bundt or tube pan with a nut filling sprinkled between the layers of cake's batter. This Cardamom Pecan Coffee Cake is a hybridized version of the Moosewood Cookbook recipe and the one initially peaking my baking interest.


If you search for the Mollie Katzen's Moosewood Cafe's Cardamom Coffee Cake recipe, you will discover that version and this one look very different. Instead of a light colored cake crumb with discernible streaks of nut filling, this one is darker with an almost invisible distinction between the cake and nut filling layers. Was it because I used sour cream instead of the other options of buttermilk or yogurt in the batter? Was it because the filling was made with toasted pecans instead of walnuts? Or was it because I added some melted butter, vanilla, and salt to the filling? I don't really know which one or ones were contributing factors. But what I do know is that I loved the deep, rich color of this moist, perfectly spiced coffee cake more than the ones I found on other foodblogs.

This is the kind of cake you want to make when you are having a brunch or weekend guests, needing to bring something to a gathering or a hostess gift if invited to spend a weekend at the home of a friend, as a gift for a friend or new neighbor, or whenever you have grown tired of the store bought bakery confections brought into your office. Easily made the night before, this moist cake actually improves in flavor if allowed to sit (well covered) overnight. Although I wouldn't pass up the chance to serve this cake while slightly warm.


With the exception of the cardamom, more than likely you have all of the ingredients for this Cardamom Pecan Coffee Cake in your pantry and refrigerator. Although, as luck would have it, when I began assembling the ingredients for this cake I discovered there were more than a half dozen boxes of dark brown rather than light brown sugar in the cabinet. Apparently I must not be able to keep an accurate mental inventory of brown sugars in my head or somehow think there will be a shortage of dark brown sugar when I go shopping. When making the cake batter, alway remember to give your eggs and butter time to come to room temperature. I generally take them out of the refrigerator the night before baking. The resulting cake batter will be very thick, so a standing mixer with a paddle attachment makes it easier on your arms to prepare.


The nut filling in the original Moosewood Cafe cookbook called for only for a quarter cup of packed brown sugar, one tablespoon cinnamon and one half cup chopped nuts. However, in this version I used one cup of (toasted) pecans, a combination of brown sugar and granulated sugar, some melted butter, cinnamon and kosher salt. I used almost four tablespoons of melted butter, however, would recommend scaling this back to 2 or 3 tablespoons. You want just enough to bind these ingredients together. Feel free to use walnuts instead of pecans, but you will definitely want the full tablespoon of cinnamon in this filling.

There are two recommended pan options for this Cardamom Pecan Coffee Cake: a tube pan or a bundt pan. Considering this is such a dense cake, I would strongly recommend the use of a (10 inch non-stick) tube pan to ensure evenness in baking. By adding a glaze to this coffee cake (and/or some additional chopped nuts or edible flowers on top) it will be so 'dressed up' you might not even miss the 'bundt' cake look.


Regardless of which pan option you decide to use, make certain to use some non-stick spray to ensure easy removal. There are essentially five layers to this cake: three of batter and two of filling. Beginning and ending with placing one-third of the cake batter in the pan. In a preheated oven, the baking time for this Cardamom Pecan Coffee Cake in a preheated 350 degree (F) oven will be anywhere between 70 and 90 minutes or until it the top is beautifully browned and a probe all the down to the bottom of the cake comes out clean. Depending on your oven (or pan), you might want to begin checking for doneness at 60 minutes. The aroma emanating from this cake as it bakes in the oven is downright intoxicating.


Consider the confectionary sugar glaze as a necessary option. Just remember, a smooth glaze requires the use of sifted confectionary sugar.


Once the cake is removed from the oven, allow it to sit in the pan for an additional twenty minutes before inverting onto a cake stand or platter. And then wait another twenty to thirty minute before pouring over the glaze.


The best description of the difficult to capture in words flavor of cardamom was shared in an article written by Serious Eats....."part nostril-widening menthol, part dew-drenched flower, part honeyed syrup. There is nothing subtle about cardamom, so when used in all but sparing amounts it will dominate whatever it's paired with. Used properly, it elevates sweet and savory dishes, adding layers of flavor that stay on the tongue..."  Used in both sweet and savory dishes, cardamom is one of those spices you want to have in your life. The original recipe called for only the use of 1 1/2 teaspoons of cardamom. But in reviewing other's adaptations to this recipe, many increased the amount to 1 tablespoon. And happily so did I. Between the cardamom in the batter and the cinnamon in the pecan filling, this cake was satisfyingly delicious!


I often will take photographs of the same landscape. No two photos are ever the same. The time of year and day along with my choice of aperture or millimeter settings significantly affect the final photo. Invariably after declaring a photo a 'favorite', another capture of the same view has me proclaiming it to be my new 'favorite'. Like my photos, I have now discovered a new 'favorite' coffee cake. And it may just one of those 'melt in your mouth' coffee cakes having the distinction of being the most favored of all. I won't say never (shudder the thought of permanently closing the door on anything), but it will definitely be long awhile before I look for or bake a different one.

This is not one of those coffee cakes that everyone will eat just because it's there. Rather it's one your family and friends will be hoping you make.

Recipe
Cardamom Pecan Coffee Cake (an adaptation of the Cardamom Coffee Cake recipe from The Moosewood Cookbook and the Food and Wine recipe for Cardamom-Spiced Coffee Cake)

Ingredients
Cake
2 cups (4 sticks) unsalted butter, room temperature
2 cups light brown sugar, firmly packed
4 large eggs, room temperature
2 teaspoons vanilla
16 ounces sour cream
4 cups all-purpose flour
2 teaspoons baking powder
2 1/2 teaspoons baking soda
1/2 teaspoon kosher salt
1 Tablespoon ground cardamom (Note: The original recipe called for 1 1/2 teaspoons of cardamom, but I loved the flavor imparted by the full tablespoon. Feel free to use an amount as little as 1 1/2 teaspoons or as much a 1 Tablespoon)

Pecan Filling
1 cup pecans, lightly toasted and chopped
2-3 Tablespoons unsalted butter, melted
1/2 cup light brown sugar, firmly packed
1/2 cup sugar
1 Tablespoon cinnamon

Glaze
1 cup confectionary sugar, sifted
4 Tablespoons whole milk
1/2 teaspoon vanilla

Directions
Cake
1. Preheat oven to 350 degrees (F). Prepare a 10" bundt pan with non-stick spray and set aside.
2. Put flour, baking powder, baking soda, cardamom and salt in a medium sized mixing bowl. Whisk until blended. Set aside.
3. In a standing mixer fitted with a paddle attachment, cream together butter and brown sugar until light and fluffy (approximately 3-4 minutes).
4. Add eggs, one a time, beating until incorporated.
5. Mix in vanilla.
6. Add flour mixture and sour cream alternately, beginning and ending with the flour to the batter. Do not over mix. Batter will be very thick.
Note: There will be 3 additions of flour and 2 addition of the sour cream.

Pecan Filling
1. In a small bowl, mix together the pecans, brown sugar, sugar, butter and salt until blended. Set aside.

Glaze
1. In a small bowl, whisk together the sifted confectionary sugar, milk and vanilla. Stir until smooth. Note: If glaze is too thin, add a little more confectionary sugar. Conversely if it is too thick, add a little more milk. Set aside.

Assembly
1. Spoon one-third of the batter into prepared pan. Smooth slightly.
2. Sprinkle one-half of the pecan filling over the batter.
3. Spoon another one-third of the batter over the pecan filling.
4. Sprinkle remaining one-half of the pecan filling over the batter.
5. Finish with remaining batter, smoothing out surface with an offset spatula.
6. Bake for 70-90 minutes or until brown on top and a tester comes out dry when inserted all the way through the cake.
7. Remove from oven and allow to cool for 20 minutes.
8. Invert pan onto cake plate or platter. Allow to set another 20-30 minutes before pouring on the glaze.
9. Drizzle glaze over the top and sides of the cake.
10. Cut into slices and serve. Cover cake with plastic wrap to keep fresh.

Notes: Cake can be made a day ahead. Will keep for 3-4 days if tightly wrapped. Feel free to double the amount of glaze, particularly if you like a heavily glazed cake.

One typical photo and one a slight departure, both taken on the streets of Tombstone, Arizona (2016)

Thursday, January 14, 2016

Swedish Cinnamon and Cardamom Buns


My first thought upon seeing these almost too beautiful to eat Swedish Cinnamon and Cardamom Buns posted by a fellow foodblogger was 'I need to make them'. This was immediately followed by 'these look a little beyond my pastry and bread making skill set'. Being someone who is currently having significant difficulty wrapping my head around motor planning through a burpee, I wondered if making these buns would be another one of those challenges getting the best of me. Having my self-esteem take two hits in one week would border on a form of self-abuse I was pretty certain wasn't exactly in my best interest. If there was at least one consolation, it would be no one would be able to publicly see me struggling with one of them.


In spite of reading the recipe and pouring over Johanna Kindvall's one-dimensional drawings on forming each of the individual Swedish Cinnamon and Cardamom Buns, I still couldn't wrap my head around how she got them to look so beautiful. Could a trip to bakeries in Sweden, a virtual trip via YouTube that is, take me from feeling clueless to being Swedish bun (Kardemummabullar) I CAN do this confident? YES! Not only did I finally have that 'ah-ha' moment, I became so entrenched in watching Swedish videos I think I may have qualified for Swedish citizenship.


If I said these Swedish Cinnamon and Cardamom Buns were similar to Cinnamon Rolls I may inadvertently be misleading you or risk offending someone somewhere. And if I said they were much easier to make than Cinnamon Rolls, yet equally as delicious, I wonder if you will believe me considering all of my initial trepidations. I suppose you will just have to make them to decide for yourself. Or miss out knowing how OMG, melt in your mouth, delectable they are.

Here are some of the reasons why they are easier to make than traditional American cinnamon rolls: (1) you don't need a standing mixer with a dough hook, the dough simply comes together with your hands; (2) you don't need to feel like you are getting an arm workout kneading the dough, as in less than 5 minutes the dough becomes smooth and has the perfect elasticity; and (3), you don't need to wait hours for the first dough rise, it doubles in size in approximately an hour if placed in a warm, draft-free space.


If there was ever a dough to cure anyone suffering from dough-phobia, this would be it. I knew from the taste and texture of the dough alone that these Swedish Cinnamon and Cardamom Buns would be incredible.


After dividing the 'after the first rise' dough in half, it is rolled out into a 12"x18" rectangle. Half of the butter-cinnamon-cardamom mixture is spread evenly over the dough (all the way to the edges) before folding the dough in half. Now this is where I could tell you to cut the dough into approximately 1 1/4- 1 1/2 inch strips, then cut each strip in half (without cutting into the fold), first twisting each side of the strip then braiding both sides of the strip together, wrapping into a bun and placing on a parchment paper lined baking sheet. But if you too are more of a visual learner, here is a link to one of the videos that made the bun formation process easy to understand (seen shortly after the video's 6 minute mark). One of the more humorous videos watched demonstrated another way of forming these buns (about 2 minutes into the video). The point of sharing both of these two techniques with you (don't forget to look at Johanna's drawings) is that there is almost no way you can mess them up.


Once the dough is formed into these gorgeous buns, they are covered and allowed to rise for additional 45-60 minutes (or until puffy).


All of the 'second rising' buns are brushed with beaten egg and sprinkled with Swedish pearl sugar (my favorite is made my Lars and can be found at some grocery store or speciality food stores as well as bought on Amazon.)


Be generous with your sprinkling of the Swedish Pearl Sugar.


In a preheated 425 degree (F) oven, the Swedish Cinnamon and Cardamom Buns bake for approximately 8-10 minutes. Note: My baking time was between 9:30 and 10 minutes. I put one baking sheet into the oven at a time rather than risk having both pans of buns come out looking and baking differently.


Immediately remove the baked buns from the baking sheet and transfer to a cooling rack. Keeping the buns on the hot baking pan may cause them to continue baking, which will cause them to lose their moistness. Don't resist the temptation to eat them while they are still warm.


Cardamom is a spice with a strong, unique taste. Serious Eats describes cardamom's difficult to describe complex flavor as 'part-nostril widening menthol, part dew-drenched flower, part-honeyed syrup'. If you are unfamiliar with its' taste, these buns would be a great place to first experience it, particularly due its' pairing with cinnamon. Yes it is on the expensive side. But spice stores and some grocery stores (like Whole Foods) allow to buy 'what you need' from their spice bins.

While they are equally delicious room temperature, I couldn't help but want to recreate the taste of warm baked dough. So I heated them up (on low power) in the microwave. They were perfect.

It just so happened that I made these Swedish Cinnamon and Cardamom Buns while the person who shall remain nameless was traveling for work. To add insult to injury I texted him a photo of these over the top deliciously beautiful buns as soon as they came out of the oven. It wasn't that I was being wicked, I just couldn't contain my enthusiasm for being able to make buns I thought were destined to send my self-confidence plummeting. Before you go and start thinking too ill of me, I froze half of them. So when he returns back home I will reheat them in the microwave and he can experience their hot out of the oven scrumptiousness. Having already reheated one of these frozen buns, I learned they freeze and reheat incredibly well.


If watching more than my fair share of videos on youtube gave me the confidence I needed to form these beautiful Swedish Cinnamon and Cardamom Buns, maybe I should consider watching some youtube how-to burpees videos. Especially if I want to stop looking and feeling so uncoordinated in public. Although watching extremely fit people do burpees effortlessly may do even more irreparable harm to my self-esteem. Think if I bring in a platter of these gorgeous eye-candy Swedish Cinnamon and Cardamom Buns to my next circuit training class no one will see (or remember) the ungraceful burpee attempts being made by this aging ex-cheerleader? Possibly.
Recipe
Swedish Cinnamon and Cardamom Buns (inspired by Johanna Kindvall's Kardemummabullar (Cardamom Buns) as shared on her blog Pantry Confidential)

Ingredients
Dough
7 Tablespoons (99 grams) unsalted butter
1 1/2 cups whole milk
2 teaspoons active dry yeast
4 1/2 cups (638 grams) all-purpose-flour
1/4 cup (50 grams) granulated sugar
1 1/2 teaspoons cinnamon
1/4 teaspoon kosher salt

Filling
7 Tablespoons (99 grams) unsalted butter, room temperature
1/2 cup (99 grams) granulated sugar
4 teaspoons ground cinnamon
2 teaspoons ground cardamom

Topping
1 large egg, beaten
Pearl sugar (recommend Lars Pearl Sugar)

Directions
1. Melt butter in a saucepan. Stir in milk, heating until warm to the touch (110 degrees F).
2. In a smal bowl, dissolve yeast in 2 to 3 Tablespoons of warm butter/milk mixture. Stir and let mixture sit until bubbles form on the top of the yeast. Note: Keep reserved milk/butter mixture.
3. In a large bowl, mix together the flour, sugar, cinnamon, and kosher salt. Add the yeast mixture along with remaining butter/milk mixture. Work together with your hands until you can form the dough into a ball.
4. Transfer the dough to a flat surface and knead until it is smooth and elastic (approximately 3-5 minutes). Notes: (1) The dough should feel moist, however, if it sticks to your fingers add a small amount of flour. (2) The dough is fully kneaded when you slice into with a sharp knife and see small air  bubbles throughout.
5. Return the dough to the bowl, cover with a clean towel, and place in a warm, draft free place to rise until doubled in size (approximately 1 hour).
6. Before the dough has finished rising, make filling. Cream together the room temperature butter, sugar, and spices until the mixture is an evenly mixed and spreadable paste. Set aside.
7. After the dough has finished rising, cut the dough in half. Roll one half out on a flat, lightly floured surface into a 12 inch by 18 inch rectangle. Place the rectangle on the surface so that the long side is closest to you.
8. Carefully spread half of the filling on half of the dough, bringing the filling to edges of the dough. Fold the dough in half (should have a 6 inch by 18 inch rectangle). Slice into 12-14 equally sized pieces. Cut, twist, and shape into buns, placing them on a parchment paper lined baking sheet. Repeat with second half of the dough. Note: Either look at Johanna Kindvall's post or watch the youtube videos linked above.
9. Cover the buns with a clean flour sack or tea towel and let rise for 45-60 minutes, or until puffy.
10. Preheat oven to 425 degrees (F).
11. Brush the buns with an egg wash and sprinkle generously with pearl sugar. Bake for 8-10 minutes, rotating pans from front to back halfway through the baking.
12. Transfer baked buns to a cooling rack. Serve warm or cool completely. Buns can be stored in an airtight container in the freezer and reheated in the microwave.

Friday, November 6, 2015

Overnight Almond, Apple, and Cranberry Oatmeal


There was a time when my daily breakfast consisted only of a super-sized diet soda. I had been one of a handful of people left in the universe who didn't get their morning caffeine fix from coffee (yikes, this is crazy I know). While I have not yet given up my addiction to diet soda, a portal to the coffee world has recently opened for me. That is, if an espresso latte ramped up with a sweet nutty coconut almond milk base, a touch of half and half, and some cinnamon made at my local coffeehouse qualifies as 'coffee' to those of you hardcore 'only take it black' coffee drinkers. Whether it does or not, it has become newest obsession.

A couple months back I made a concerted effort to eat more oatmeal for breakfast. After almost three weeks of going on the 'be a little more health conscious, eat more oatmeal' binge, I sort of got burned out. Eating a bowl of hot oatmeal five days a week may have been a bit too much even for my creature of habit food habits. Yet, coinciding with this self-imposed monotony, the season of fresh blueberries was coming to an end. The fruit I was using to add some sweetness to the oatmeal because I was trying to keep it on the healthier side. 


I had been selectively flipping back and forth between the Cooking Channel (my favorite) and the Food Network (used to be my favorite) last weekend when I heard The Pioneer Woman talk about her obsession with overnight oatmeal. A cold oatmeal studded with raisins and apples, marinated overnight in a mixture of milk, half-and-half, brown sugar and vanilla, and as if that wasn't enough, it had a brĂ»lĂ©ed finish. Probably not the most health conscious way to eat oatmeal, but seriously, I wondered if this might be a wicked way to have oatmeal return to my life. Although maybe this version might require me to exercise some moderation. Maybe.


Raisins were Ree Drummond's dried fruit of choice. Dried cranberries were mine. To counterbalance the guilt over the addition of brown sugar in this oatmeal, I decided to add almonds. Did you know compared to all other nuts, almonds are packed with the most nutrients and have the longest list of health benefits? You probably did, however, I have a reason for reminding you of that bit of food trivia. You will figure what that is shortly.


The Granny Smith apple was the perfect apple option. Cut into a small dice, it brings the right amount of tartness and crunch to this oatmeal.


After all of the ingredients are mixed together in a medium sized bowl, covered, and placed in the refrigerator, the only thing left to do was wait. I added in the almonds with all of the other ingredients. To ensure they stay as crunchy as possible, it would be better to add them to the Overnight Almond, Apple and Cranberry Oatmeal right before you are ready to serve it.


If you do not have a kitchen torch, you can always brĂ»lĂ©e the oatmeal in a broiler (it only takes minutes for the sugar to melt and caramelize in a broiler, but you will need to watch it carefully). If you make creme brĂ»lĂ©e or have made/wanted to make the s'mores fudge tart, your investment of a thirty dollar kitchen torch will more than itself pay off. 

Any trepidation I had over not liking the taste of cold oatmeal completely dissipated after the first bite. If I told you it reminded me somewhat of a caramel apple, you might think it too sweet for your palate or for breakfast. So I won't tell you that because I want you to make it as it is nothing like any bowl of oatmeal you have ever had. When you are eating this bowl of deliciousness, I want you to focus more on the fact you are eating oatmeal, apples, and almonds (does it get any healthier?) than on worrying there is also some brown sugar and half-and-half (everything in moderation, right?). And let's not forget, the dried cranberries fall somewhere on good for you scale.

I discovered Bon Appétit's great article on overnight oatmeal ("Make Overnight Oats That Actually Taste Good by Avoiding These Common Mistakes") two days after making this version of overnight oatmeal. There are some aspects of this recipe not consistent with their advice (e.g., the liquid to oatmeal ratio), however, in spite of this, the creaminess and texture of the oatmeal was perfect.

Not only is this Overnight Almond, Apple, and Cranberry Oatmeal ideal for breakfast, it would also be a great option for either lunch or dinner. I happen to be one of those who thinks breakfast, like caffeine, should be a twenty-four a day option. 

Recipe
Overnight Almond, Apple, and Cranberry Oatmeal (slight adaptations to Ree Drummond's Overnight Oatmeal recipe)
Serves 2 (generously)

Ingredients
1 generous cup old-fashioned oats (recommend Quaker Old-Fashioned Oats)
3/4 cup whole milk (could also use almond milk or coconut almond milk)
1/2 cup half-and-half
1/4 generous cup of dried cranberries (can also use raisins or dried blueberries)
1/4 generous cup of almonds
2 packed Tablespoons light brown sugar
1-2 teaspoons vanilla
Pinch of kosher salt
1 small or half of a large Granny Smith Apple, diced
2-3 Tablespoons granulated sugar

Directions
1. In a medium sized bowl, mix together the old-fashioned oats, milk, half-and-half, dried cranberries, brown sugar, vanilla, salt, and diced apple. Cover and refrigerate overnight. Note: Almonds can be added in after the mixture has refrigerated overnight to prevent them from softening.
2. Stir mixture. If too thick add additional milk or half-and-half (mine was just the right consistency and no additional liquid was added).
3. Divide mixture between two bowls.
4. Sprinkle each with 1 - 1 1/2 Tablespoons of granulated sugar. Using a kitchen torch, brown lightly.
5. Serve immediately.
Note: This recipe can easily be doubled or tripled.