Showing posts with label Dessert. Show all posts

Wednesday, January 31, 2018

Sea Salted Chocolate Peanut Butter Skillet Cookie a la Mode


This week's rare blue super moon seems to be causing me to so all sorts of strange things. Which might explain why I am having a rare week of self disclosure. In my last post I shared how complete strangers have come to influence my book and movie choices. Although I intentionally, I left out the role my friends play in these decisions to avoid crossing into too much information (TMI) territory. So here goes my next admission, one possibly showing a little less restraint. After almost a year of going to yoga three, four, sometimes five days a week I am still finding it challenging; I am pretty sure I am only marginally better than I was when I started; and, I continue to find yoga's underlying 'seek to be your best self, not seek to be THE best' philosophy to be incongruent with my competitive self. For all of the stretching, balancing, and 'how could that be humanly possible' poses my body has experienced over the last twelve months, one would think (or at least I think) I should have the strength and flexibility of someone at least half my age. Or at least have mastered the graceful and effortless flow of a handful of poses. But that hasn't happened....yet. I still hold out the semi-impossible expectation that one day it will. Yoga requires a relative high degree of concentration. But when I am dripping wet and on the verge of feeling pushed beyond my physical limits, I find my mind suddenly unable to translate yoga language (malansana, tadasana, trikonsana, supta baddha konasana, chataranga dandasana, and even shavasana) into English. You might wonder how I managed to earn a doctorate degree and not be able to have mastered the language of yoga no matter what. I am wondering the same thing! We are reminded in almost every yoga class to make it 'our practice'. In other words, there are no expectations. The only expectations and intentions are the ones you set for yourself. After spending nineteen years of my life going to school this philosophy continues to feel incongruent with the expectation messages permanently hardwired into my brain. More often than I should admit, I find myself assigning a letter grade during and/or after yoga. And it would be one of those grades I would have cringed at seeing if they ever appeared on a report card. So why would someone like me continue to religiously make yoga an almost daily practice? Well I suppose it's because (a) I am a glutton for punishment, (b) I believe the benefits of yoga, like the benefits of relationships, are endless with ongoing, continuous hard work, (c) I feel my running has benefitted, (d) I treasure the post-yoga coffee time with friends, and, last but not least, (e) I am unwilling to give up my love-hate-love relationship with it. What is it in your life challenging your body, mind, and spirit you don't want to walk away from either?


I believe if you make time for exercise in your life, you should reward yourself. Right? Yes, I know, the benefits of exercise are supposed to be THE reward. But don't we all deserve a little something more to refuel our energy levels? Like maybe something made with chocolate and peanut butter? Aren't they on the list of super foods?

This Sea Salted Chocolate Peanut Butter Skillet Cookie a la Mode might just be one of those perfect rewards.


After seeing a photo of a chocolate peanut butter skillet cookie on Instagram last week, I set off on yet another down the rabbit hole recipe search. This time there were only dozens, not hundreds of recipes out there. All with a variety of chocolate and peanut butter ingredient variations. Some were made with chocolate chips and peanut butter chips, some with cocoa and peanut butter, and some with chocolate chips and peanut butter. But there wasn't one saying 'pick me, I am the best'. The cocoa and peanut butter combination had the greatest appeal. However, most of the recipes I found didn't specify whether to use unsweetened or Dutch-processed cocoa. After doing a little more research on when to use unsweetened cocoa and when to use Dutch-processed cocoa, I decided probably either would work in this skillet cookie recipe. Instead of making two versions of this skillet cookie, I trusted my chocolate loving instincts and made it using unsweetened cocoa. While I can't tell you if it would be as good as or better using Dutch-processed cocoa, I don't need to know. Not after tasting this one. Swirling creamy peanut butter into the chocolate instead of mixing peanut butter chips chips into the batter made for a visually appealing skillet cookie. It definitely exceeded my eye catching expectations. The sprinkling of sea salt on top pushed this version into contention for the 'pick me I am the best' category.


More than likely you have all of the ingredients in your pantry and refrigerator for this skillet cookie.If you needed a reason to justify why a box of unsweetened cocoa, a pint of vanilla ice cream, and a cast iron skillet are absolute necessities, it would be this Sea Salted Chocolate Peanut Butter Skillet Cookie. Being able to make this warm chocolatey, peanut buttery skillet cookie whenever you wanted to wow your family and/or friends, have an impromptu gathering, were storm homebound, or simply had a craving for it might be some of them. Or simply having a bite might be reason enough.


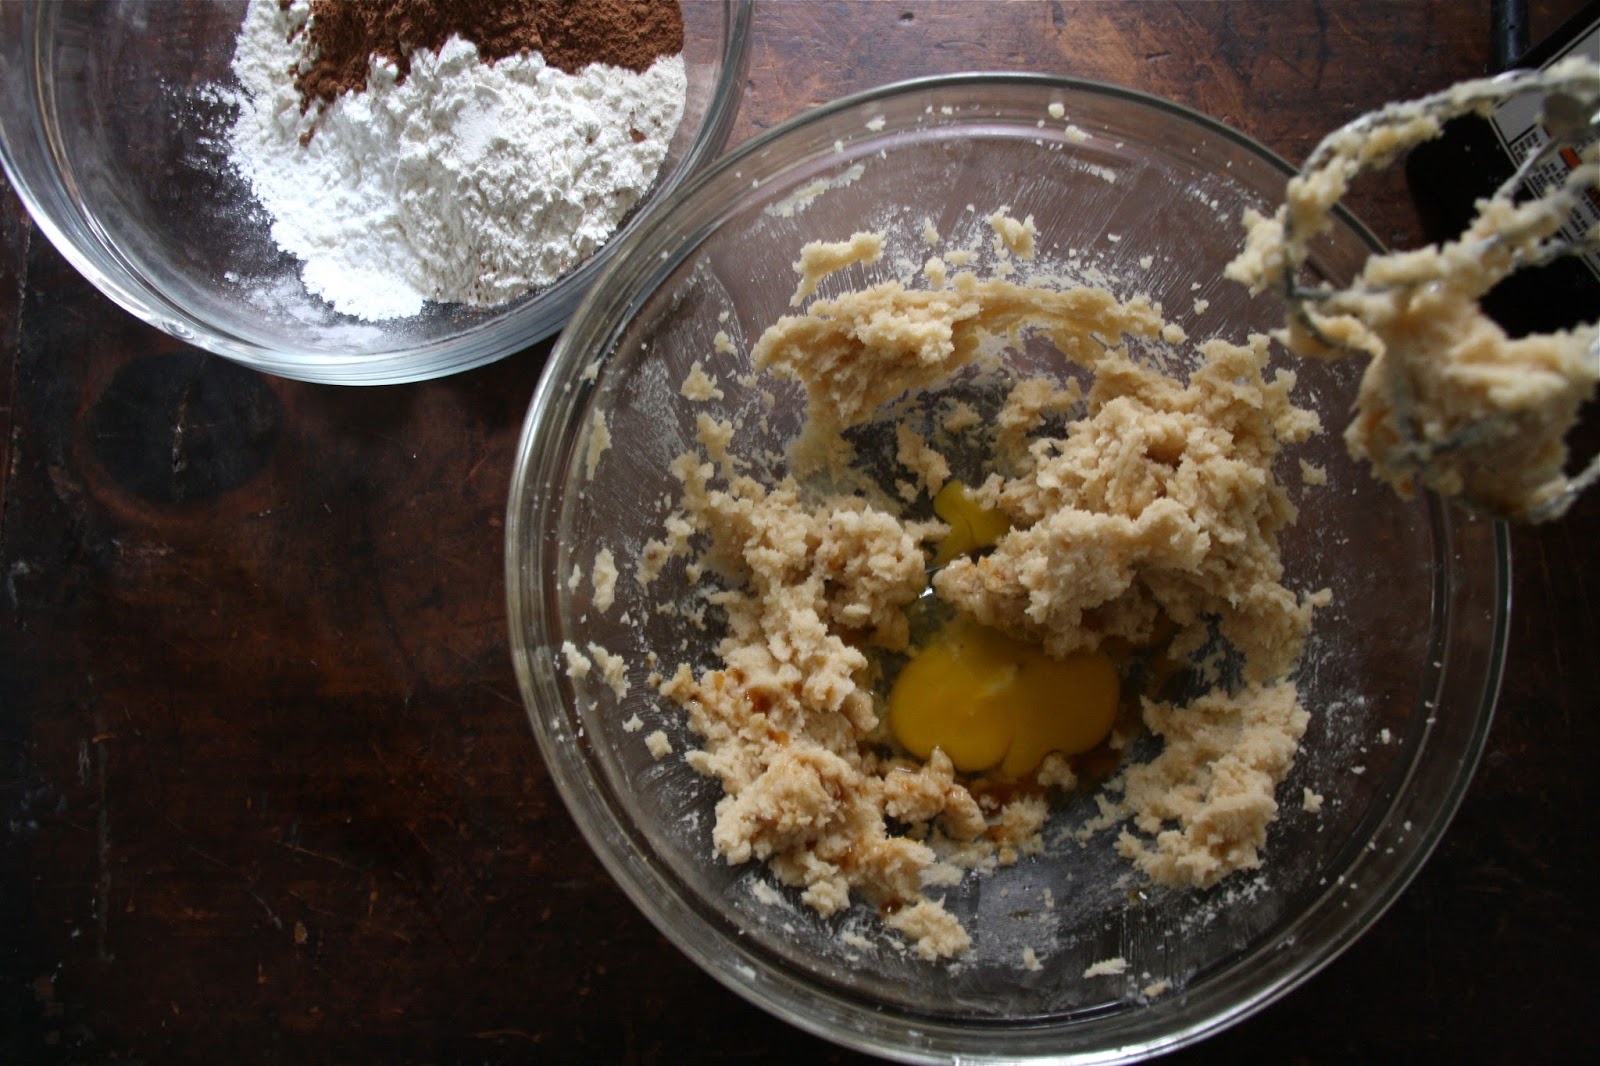
The butter, brown sugar and granulated sugar are beaten until light and fluffy. It generally takes three to five minutes of beating at medium-high speed to achieve the perfect state of fluffiness. After beating in the egg and vanilla, the dry ingredients are mixed in only until no streaks of flour remain. The batter will be very thick. 

After scraping the batter into a buttered 8" or 9" cast iron skillet, use an offset spatula or large tablespoon spoon to smooth the top. Then drop on small dollops of peanut butter. Use a butter knife to lightly swirl the peanut butter into the cookie batter. Be careful not to over swirl as you want streaks of peanut butter to remain visible. The finishing touch is a light sprinkle of sea salt. It's now ready to go into a preheated 350 degree (F) oven. Baking time ranges from 15-18 minutes.

The Sea Salted Chocolate Peanut Butter Skillet Cookie is done when the edges begin to firm up but the center remains soft. You definitely do not want to over bake this cookie or wait until a tester inserted in the center comes out clean. It will continue to bake in the skillet after being removed from the oven. Letting it rest for five minutes gets your cookie to the best of both cookie worlds eating experience place. Crunchy edges and a warm, slightly gooey center. 

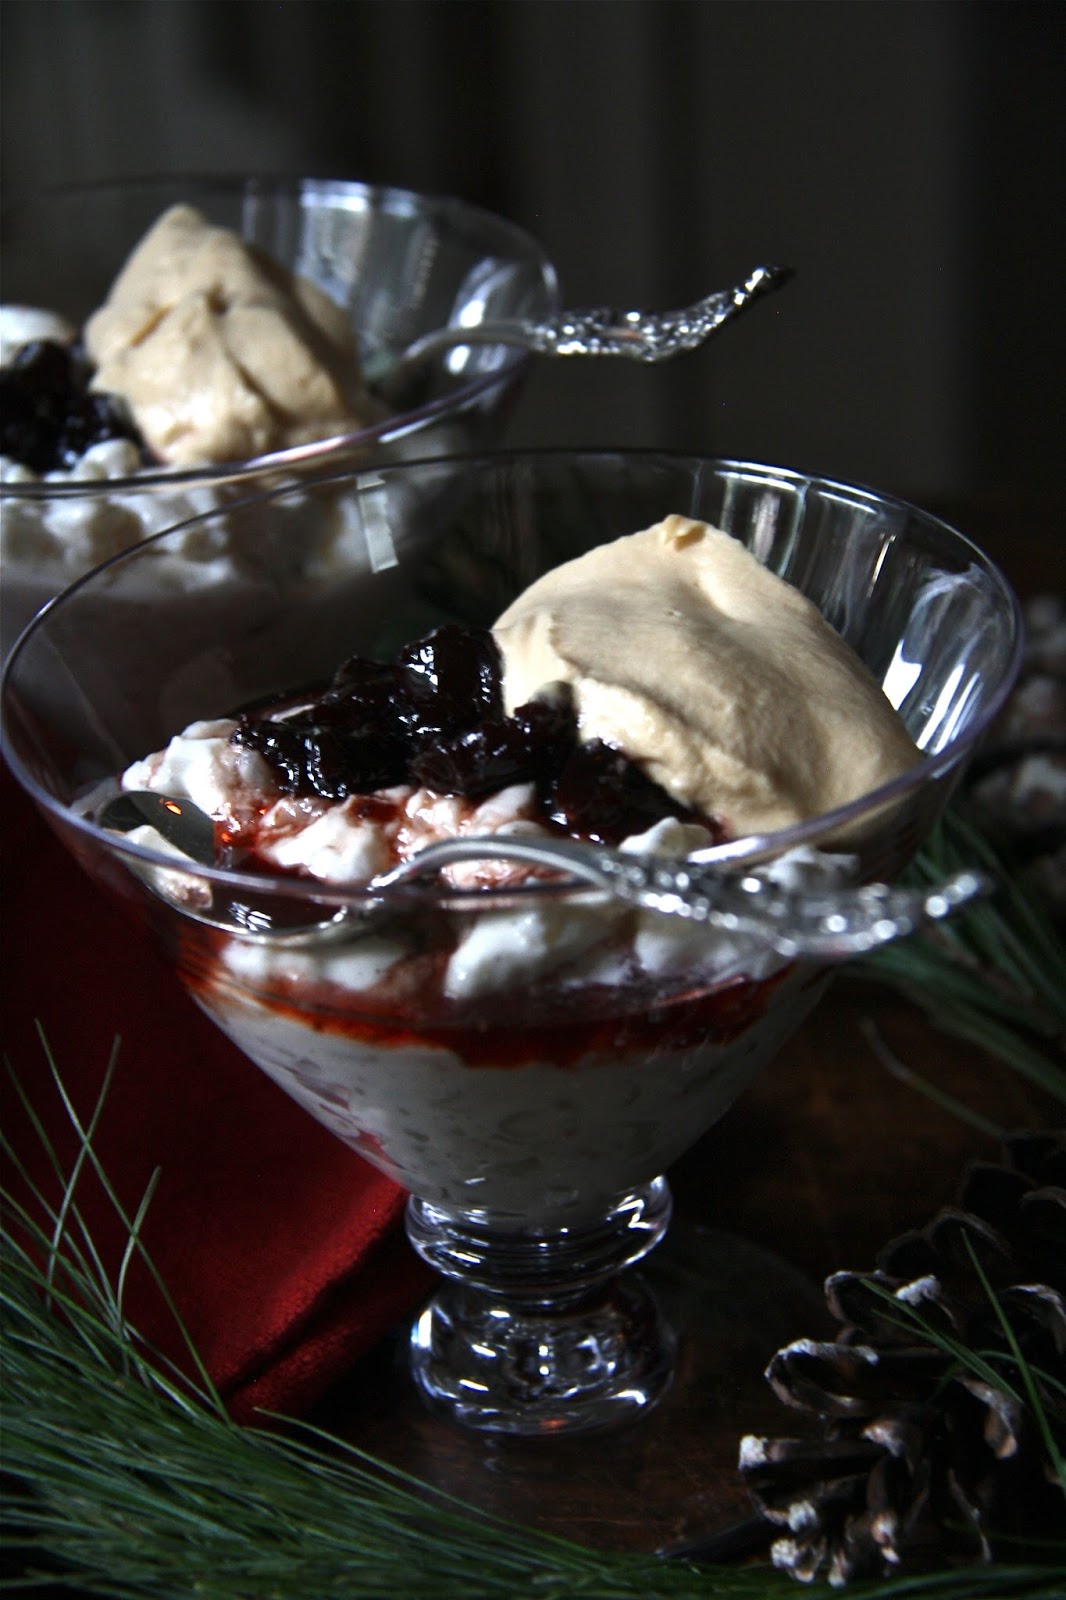
You could serve this blissfully delicious Sea Salted Chocolate Peanut Butter Skillet Cookie without scoops of vanilla ice cream, but why would you? Hold back on sprinkling miniature peanut butter cups if you really have to. But leaving out the vanilla ice cream would be akin to serving pancakes without butter, syrup, or jam. You could do it, but the eating experience would not be the same.


This is one of those desserts where you can pass out spoons, have everyone eat it directly out of the pan, and ultimately let there be a battle of the spoons for the final morsel. However, if you are worried about those who like to slowly savor their desserts not getting their fair share, you can spoon out the cookie into serving bowls and top with a scoop of vanilla ice cream. Either option works!


There are so many reasons why cast iron skillets have been around since the late 19th century. However, if I haven't yet convinced you this dessert alone is worth purchasing an 8" or 9" cast iron pan for, maybe this Dutch Baby with Creme Fraiche and Mixed Berries or this Caramel Apple Dutch Baby ala Mode or this Savory and Hearty Frittata or this Chocolate Chip Skillet Cookie would. 


You can more than satisfy the sweet tooth of up to six people with this Sea Salted Chocolate Peanut Butter Skillet Cookie a la Mode. Although you would make four of your chocolate and peanut butter loving friends even happier if you didn't invite two more people to the table. 

If you are looking for an easy to make, slightly decadent, insanely delicious, destined to satisfy any chocolate and peanut butter lover dessert, make this Sea Salted Chocolate Peanut Butter Skillet Cookie a la Mode. You might end up having a love-hate-love relationship with it but refuse to give it up. You can probably guess why.
Recipe
Sea Salted Chocolate Peanut Butter Skillet Cookie a la Mode (inspired by multiple sources)
Serves 4 to 6

Ingredients
8 Tablespoons (114 g) unsalted butter, room temperature
1/4 cup (50 g) light brown sugar, firmly packed
1/2 cup (100 g) granulated sugar
1 cup (128 g) all-purpose flour
1/3 cup (23 g) unsweetened cocoa (not Dutch-processed)
1 teaspoon cornstarch
1/2 teaspoon baking soda
1/4 teaspoon kosher salt
1 large egg, room temperature
3-4 Tablespoon creamy peanut butter
Sea Salt for finishing
Good quality vanilla ice for serving
Optional: Miniature peanut butter cups for garnish

Directions
1. Preheat oven to 350 degrees (F). Butter an 8 or 9 inch cast iron skillet and set aside.
2. In a medium sized bowl, combine the flour, cocoa, cornstarch, baking soda and salt. Whisk to combine. Set aside.
3. In a medium-large bowl, beat the butter, granulated sugar and brown sugar on medium speed using a hand mixer until light and fluffy (approximately 3-5 minutes).
4. Add egg and vanilla to the butter/sugar mixer. Beat to combine.
5. Add the dry ingredients to the batter. Beat until blended and no streaks of flour remain.
6. Spoon the batter into the prepared pan. Use an offset spatula to smooth and spread evenly.
7. Drop dollops of the creamy peanut butter on top of the batter. Use a butter knife to swirl it into the cookie batter. Lightly sprinkle the top of the cookie with sea salt
8. Bake for 15-18 minutes until the edges begin for firm up but is still soft in the center. Be careful to not over bake. 
9. Remove from oven and let the cookie rest for 5 minutes (the cookie will continue to bake during this time).
10. Top with scoops of vanilla ice cream. Sprinkle with miniature peanut butter cups, if using. Serve immediately Note: The Sea Salted Chocolate Peanut Butter Skillet Cookie is best served warm but is equally delicious served at room temperature.

Notes: (1) I used almost four tablespoons of creamy JIF when I made this skillet cookie. (2) If I was making this dessert on the east coast I would serve it with the vanilla ice cream made by Bliss. But since I am here in the midwest, I used Ben and Jerry's vanilla.


Little Compton, Rhode Island (November 2017)


Monday, January 15, 2018

Triple Chocolate Bundt Cake


"Those who never change their minds, never change anything." When I began this blog five years ago, I was using my cellphone camera to take the photos. It took me more than a year to make the switch to using my Canon as I had somehow convinced myself my photos were good enough. In retrospect, my powers of rationalization were operating at a delusional level. In spite of having a number of photography books, it wasn't until I took a photography class that I began to learn how to better optimize the functions on my camera. While I have yet to harness the power of the digital camera, I am in a better place than I had been but not to the place I envision. Somewhere along the way in this blog's evolution, I learned how to use Photoshop to edit my photos. As expected, the more I learned, the more I realized just how much I really don't know. I continue to wonder what my photos might look like if my knowledge level increased and if I took the plunge to purchase better editing software. Truth be told, it has been much easier to stay in the 'good enough' place than to go beyond my comfort zone. But I have come to realize the time has come for me to move beyond making the best of the 'good enough place' and head into uncharted territory. 

It's kind of a long story but I had lunch last week with a brother of a friend. Someone I had never met before. Over the course of an almost three hour lunch I learned about him, gained some knowledge about my camera (thank goodness he too uses a Canon), and listened as he talked about how his recent photo editing software purchase completely changed his photos (and here I naively thought his camera alone created the magic!). Although I didn't run right home and purchase this editing software, I left feeling as if all of the stars had aligned in order to gently 'push' me in that direction. It's inevitable there will be a new learning curve in my immediate future. Needless to say I am both excited and anxious. Not only to see how the quality of my photographs might change in the year ahead, but how much my perspective will change. I may or may not let you know when these 'shifts' happen. Well, that's not exactly true. More than likely I will share my trials and tribulations.


I have made this Triple Chocolate Bundt Cake twice in the last several days. The first time I accidentally tipped the cake platter. Before my very eyes I watched in what seemed like slow motion a beautiful, perfect cake slide onto the kitchen floor. Shortly after letting out a blood curdling scream and a few expletive deletives, I went into a temporary state of shock. After being in this more than ten second altered state, I picked up the unsalvageable splattered cake and set it back on the cake stand. Not because I was going to serve the cake or worried that the ten second rule police were going to descend into my house, but because I felt the need to mourn it. 


As distraught as I was over the loss of this Triple Chocolate Bundt Cake, I was determined to make it again. Keeping my fingers crossed the second time would be the charm.

The inspiration for this Triple Chocolate Bundt Cake came from the very talented blogger and photographer extrarodinaire Cenk Sonmezsoy. Someone who self describes himself as an obsessive home cook recently added new cookbook author to his resume. The only changes I made to his incredible bundt cake recipe was adding more chocolate in the form of miniature chocolate chips. Could this decadent, deeply chocolatey, rich, moist cake have been just as good in its' original Double Chocolate version? Probably yes. But considering there may be a chocolate shortage in the next 40 years, we might as well indulge our love of chocolate as often and as much as possible until then.


Bittersweet chocolate and Dutch-processed cocoa account for two of the chocolates used in this cake. Semi-sweet chocolate came in the form of the miniature chocolate chips, turning this bundt cake into a trifecta of chocolates!


After creaming the butter and sugar until the mixture is light and fluffy, the eggs are added in one at a time. The dry ingredients and chocolate/cream/espresso mixture are added in alternately beginning and ending with the flour. Note: Beat each egg for one minute and scrape down the sides of the bowl with a spatula to ensure the eggs are completely incorporated into the butter/sugar mixture.


The dry and wet ingredients can either be added to the butter/sugar mixture with the mixture on the lowest speed or folded in by hand using a spatula. I used the mixture for both additions of the chocolate mixture and for the first two additions. The last and final addition of the flour was folded in with a spatula. The miniature chocolate chips, if you are adding, are folded in last.


Successfully removing a bundt cake from the bundt pan begins with the pan's preparation. Although all of my bundt pans are considered non-stick, I always lightly spray them with a vegetable spray versus using a butter/flour application. If there was ever a bundt pan to turn an ordinary bundt cake into an extraordinary one or an extraordinary bundt cake into a spectacular one, it would be due in large part to this 10 cup capacity Heritage Bundt Pan from Nordicware. 

Smooth the top of the bundt cake with an offset spatula or spoon before putting in a preheated 325 degrees (F) or 160 degrees (C) oven.


The recommended baking time for this cake is 50 to 55 minutes, however, my baking time was closer to the 60 minute mark. Whether this was because I placed my my baking rack in the upper third versus in the center the oven, I can't fully explain why my baking time was longer. However, I would encourage you to begin checking your cake for doneness at the minute mark to ensure it isn't over or under baked.


Once the cake completely cools, you can make the chocolate ganache. In addition to adding some sea salt to the ganache, I also added two tablespoons of corn syrup. If the ganache is too thin to pour over the cooled cake, allow it to set for at least five minutes. The additional time will allow the ganache to thicken slightly but still remain pourable. 


There is enough ganache to pour over the entire cake, however, I decided to use about half if it. 


If you ice your cooled bundt cake on a platter instead of a cooling rack, place pieces of parchment paper under the cake to catch any of the icing drippings so none of it goes to waste. Additionally, the parchment paper will help prevent your platter from turning into a chocolate mess.


I poured the ganache on this cake twice to have as much build up of chocolate as possible. After the first pour, I let it set up for about five minutes before pouring on more. Note: Using a pitcher to pour the ganache on the bundt cake gives you the greatest amount of control over its' flow and direction.


Allow the ganache to complete set before serving. You won't have to wait more than thirty minutes. This Triple Chocolate Bundt Cake is as close to dessert perfection served as as a simple, unadorned slice. But should you want to send it over it's heart racing chocolate edge, serve a cake slice with some of the remaining ganache (slightly warmed and poured over), lightly whipped cream, and/or vanilla ice cream.


After just one bite of this swoonworthy Triple Chocolate Bundt Cake you will immediately begin t plan how to get every cake morsel off of your plate without completely abandoning your table manners. This cake is so moist, so decadent, so deeply chocolatey, one generous slice is more than enough. And I don't say that often.
Recipe
Triple Chocolate Bundt Cake (slight changes to the Double Chocolate Bundt Cake shared in Cenk Sonmezsoy's cookbook "The Artful Baker: Extraordinary Desserts From an Obsessive Home Baker")

Ingredients
Cake
14 Tablespoons (200 g) unsalted butter, room temperature
5 ounces (140 g) bittersweet (70% cacao) chocolate, coarsely chopped
1/2 cup (50 g) Dutch-processed cocoa powder
2 teaspoons (10 ml) vanilla
1/2 cup (120 ml) espresso or strong brewed coffee
1/2 cup (120 ml) heavy whipping cream
2 cups (280 g) all-purpose flour
1 1/2 teaspoons baking powder
1/2 teaspoon baking soda
1/2 teaspoon sea salt
1 3/4 cups (350 g) granulated sugar 
4 large eggs, room temperature
1/2 cup (96 g) miniature chocolate chips (optional)

Chocolate Ganache
5 ounces (140 g) dark (60% cacao to 70% cacao) chocolate, coarsely chopped
3/4 cup (180 ml) heavy whipping cream
2 Tablespoons caster or granulated sugar
1 teaspoon vanilla
2 Tablespoons corn syrup, optional

Optional for serving: Lightly whipped cream and/or vanilla ice cream

Directions
Cake
1. Preheat oven to 325 degrees (F) or 160 degrees (C). Prepare a 10 cup bundt pan. Set aside. Note: Butter and flour or lightly spray the pan.
2. In a medium sized bowl combine the bittersweet chocolate and cocoa powder.
3. Over medium-high heat, bring the espresso and whipping cream to a boil, stirring occasionally (about 3-4 minutes). Pour over the chocolate and cocoa powder. Whisk until the chocolate complete melts. Allow it to cool for 10 minutes. Stir in vanilla. Set aside. 
4. In a standing mixer fitted with a paddle attachment, beat the butter until creamy (approximately 2-3 minutes).
5. Add sugar and beat until light and fluffy (approximately 3-4 minutes).
6. Add eggs in one at a time, beating each egg for one minute before adding the second. Scrape down the bowl at least twice to ensure all of the ingredients are evenly blended.
7. Reduce speed to low, add in 1/3 of the flour mixture. Mix only until incorporated. Add 1/2 of the chocolate mixture, mixing only until incorporated. Add another 1/3 of the flour, mixing only until incorporated. Add remaining 1/2 of the chocolate mixture, mixing only until blended. Remove bowl from stand and add in remaining 1/3 of the flour mixture. Fold in using a spatula. When fully incorporated fold in the miniature chocolate chips if using. Note: Be sure to scrape down sides and bottom of the bowl to ensure all of the ingredients are incorporated.
8. Scrape cake mixture into prepared pan. Smooth top with an offset spatula or spoon.
9. Bake for 50-60 minutes or until a toothpick inserted into the cake comes out clean. Yes, this is a big baking time range. Just be careful to not under or over bake. 
10. Allow cake to rest for 10 minutes on a wire rack.
11. Invent cake pan onto a cake plate or platter. Allow to cool completely before pouring on the ganache.

Chocolate Ganache
1. Put chocolate in a small heat proof bowl.
2. In a small sauce pan, bring cream and sugar to almost a boil. 
3. Pour half of the hot cream mixture over the chocolate and stir until blended.
4. Add the remaining hot cream mixture and stir until chocolate completely melts. Stir in vanilla, sea salt, and corn syrup for approximately 4-5 minutes. Allow the ganache to sit for 5-8 minutes slightly thicken before pouring on cake.
5. Pour into a pitcher and pour over the cake. Note: Place strips of parchment paper around the bottom of the cake to catch the ganache drippings. 
6. Serve cake at room temperature and enjoy!

Notes: (1) The cake will be good for up to three days, if covered. To extend it's life, store covered in the refrigerator. (2) There is enough of the ganache to cover the entire cake, however, I used only half of the ganache to ice the cake. The remaining ganache was covered and chilled. You can slightly warm the chilled ganache to drizzle over cake when served or use to pour over ice cream. Whatever you do, don't throw it away. (3) The use of miniature semisweet chocolate chips in the cake batter and corn syrup in the ganache is completely optional. (4) I made the espresso using instant espresso mixed into hot boiling water.

 Anderson Warehouse Graffiti, Ephraim, WI  - Door County (December 2017)  - The original warehouse built in 1858 and destroyed by a fire in 1880 was rebuilt. The warehouse is on the National Register of Historic Places.


Wednesday, December 27, 2017

Almond Rice Pudding with Caramel Cream and Sour Cherry Jam


Whether your weather was warm and balmy or your wish of a white Christmas came true, I hope you all had a wonderfully memorable holiday with your family and friends. We certainly did. And all that time put into the decorating and spent getting ready for our Christmas dinner here were in the end all worth it. In spite of my predictable whining and worrying rituals (will it all get done? will it be almost perfect?), I absolutely love having and celebrating this holiday in our home. A generous and most perfect unexpected gift from my sister and brother-in-law brought tears to my eyes (seems getting me cry over a gift is one my family's goals). The meal was everything I hoped it would be. Although there is a recipe for a green bean casserole from a famous chef who shall remain nameless that will definitely not see the light of another holiday meal again (seriously I think the canned cream of mushroom soup and canned fried onion version, gasp, is actually better). The choice of our annual Christmas movie wasn't what you might call 'thought provoking or uplifting', however, "Get Out" really was one of my many favorite movies of the year. And it will definitely be one of those movies everyone will remember at all future Christmas gatherings. The only thing we seemed not to get around to was playing some games as a family. Considering the level of competitiveness in some members of the family (they shall remain nameless), maybe that was a good thing. And so in spite of a side dish that disappointed (me) and no game playing bragging rights to finish the day, it was a great, very blessed, memorable Christmas.


Our Christmas desserts included a tray of homemade holiday confections, a fresh fruit topped cheesecake and steamed pudding with hard sauce. Had I known how amazing this Almond Rice Pudding with Caramel Cream and Cherry Jam tasted, it too would have been one of the dessert options. But with the dessert menu already set and one dessert request (for Key Lime Pie) not granted, I thought it best to wait for another occasion to make it again.


I understand there are more than a handful of people out there who aren't big fans of Rice Pudding. Those who would normally opt out of having any even if they were starving. Of the top five working theories as to why this might be, I believe never having tasted a really delicious, creamy, decadent rice pudding is at the top of the list. Sure we all have had the less than so-so 'please don't make me eat another bite' rice puddings. You know the ones with weird textures, too much cinnamon, horribly bland or overly boozy. Some of the reasons why rice pudding can get a really rap. So I get why one might be so easily dismissive of even the thought of it. Which means it might take a bit of work, or more accurately a bit of deception, to turn someone's revulsion of rice pudding into a craving. And yes, for the record, I am all about having someone taste something first before I tell them what it is. As I know all too well that first tastes are highly influenced by past tastes and pre-conceived notions. 


But this a Rice Pudding recipe I didn't think I would share on the blog as I was midway into the process. All I can say is thank goodness I stayed the course and didn't give up. But more on that in just a bit.


The rice used in a rice pudding matters. With rice options of basmati, jasmine, Japanese short grain, long grain, arborio instant, and par-boiled, it's no wonder the taste and textures of rice puddings vary. What I learned in a limited rice pudding research endeavor was that with the exception of instant and par-boiled rice (designated as definitely not acceptable), there were pros and cons to all of the others. Yet some will argue that rice isn't the critical ingredient in the rice pudding, but the liquid used in the making of the pudding is. Whole milk seemed to be getting the most nods for creating a deliciously creamy pudding. The inspiration for this Almond Rice Pudding with Caramel Cream and Cherry Jam recipe came from a recent issue of Food and Wine Magazine. It recommended using arborio rice and whole milk. And I followed those recommendations. I opted to use vanilla bean paste instead of vanilla bean pods and replaced the homemade sweet cherry sauce with a sour cherry jam. While I can't honestly tell you their version is as good as or even better than the one I made, I would be willing to put their version against my modified one (yes, I am that confident of a win). 


The ratio of liquid to rice (6.25 cups to 1 cup). The liquid is comprised of 1.25 cups of water and 5 cups of whole milk. That is alot of liquid for one cup of arborio rice. That along with a cooking time of 35-40 minutes had me a bit concerned even before I started making it. But I forged ahead. However, when my cooking time was approaching the 40 minute mark and the texture of the rice pudding was not what I thought it should be, I thought this was endeavor was going to be a bust.  And even as my cooking time was approaching 55 minutes, I for a brief moment thought there was a typographical error in the recipe. Instead of cooking it until the rice absorbed all the liquid (which I don't think was completely possible in the cooking time recommended), it cooked the mixture until the rice was tender and it had the consistency of a thick pudding or porridge. I hoped or rather prayed the rice would absorb the liquid while it chilled in the refrigerator overnight. Spoiler alert: My hopes and prayers were answered.


The flavor of sweetness, creaminess and richness to this rice pudding comes from the vanilla bean paste, the sugar (only 6 Tablespoons) and one cup of freshly whipped cream. The addition of the whipped cream to the chilled rice pudding texture, in my opinion, is what makes it worthy of a comfort food distinction. And that's before it's topped with a caramel cream and sour cherry jam.


The addition of the caramel cream is what turns this comfort food dessert into a dinner party worthy comfort food dessert. I probably cooked my caramel mixture about a minute longer than I should have, but the slightly burnt caramel taste was an incredibly delicious compliment. However, since that may not exactly be everyone's favorite flavor of caramel (remember we might be trying to convert non-rice pudding lovers into rice pudding aficionados), cook your water/sugar mixture only until a golden (not deep deep) golden color appears. 


Once you make this caramel cream for this rice pudding, you are going to find more uses for it. It's insanely good.


If by now you are thinking, wow this rice pudding has a lot of whipped cream it. You would be right! But remember, there is no such thing as too much of a good thing.

I knew from the onset of making this recipe I would be using a sour cherry jam. The kind where the jar contains oodles and oodles of whole cherries swimming in a sweet syrupy jam. In other words, the kind you just want to eat off a spoon its that good. Use whatever brand you love (I used this one by Sarantis), but definitely use one having whole versus pieces of cherries. Or if you want to push this dessert even further over the extravagance edge, top it with Luxardo Maraschino Cherries. But you really, really, really need to like the people you are serving this rice pudding to as its' crazy expensive.


There is an explosion of flavors in every bite of this Almond Rice Pudding with Caramel Cream and Sour Cherry Jam. It is hands down comfort food at its' best. And if there was ever a rice pudding to change the opinion of those non-fans out there, this would be THE one. Seriously, it's that good. It's almost hard to resist anything topped with caramel cream and a thick, sweet sour cherry jam.

Recipe
Creamy Rice Pudding with Caramel Cream and Sour Cherry Jam (several adaptations to Food and Wine's Almond Rice Pudding with Sweet Cherry Sauce and Caramel Cream, December 2017)
Serves 8-10, depending on portion size

Ingredients
Rice Pudding
1 cup (194 g) arborio rice
1 1/4 cups water
5 cups whole milk
2 Tablespoons Vanilla Bean Paste (or 2 vanilla beans, split lengthwise, seeds scraped and pods reserved)
6 Tablespoons (86 g) granulated or caster sugar
1/4 teaspoon kosher salt
1 1/4 cups whole skin on natural almonds
1 cup heavy whipping cream
12-16 ounces of sour cherry jam in heavy syrup (Note: I used this one.)

Caramel Cream
1 cup granulated sugar
1/4 cup boiling water
1 1/4 cups heavy whipping cream
pinch of sea salt
1/2 teaspoon vanilla extract

Directions
Rice Pudding
1. Bring 1 1/4 cups of water to a boil in a medium, heavy bottomed saucepan. 
2. Add the rice and cook, stirring constantly for 3 minutes.
3. Stir in the milk and the vanilla bean paste (or vanilla bean seeds and pods) and bring to a boil.
4. Reduce heat to low, cover the pan and cook for 45-55 minutes (stirring frequently) until the mixture has the consistency of a very thick pudding or porridge and the rice is tender.  Note: Inspiration recipe indicated all of the liquid would be absorbed, however, that did not happen.)
5. Remove the pan from the heat and stir in the sugar and salt. Transfer to a heatproof bowl and allow to cool. Note: If using a vanilla bean, remove pod.
6. Cover with a piece of plastic wrap, placing the plastic wrap on top of the pudding so a crust does not form, and refrigerate overnight.
7. Before serving, whip 1 cup of heavy whipping cream until firm peaks form. Fold the whipped cream and almonds into the rice pudding.

Caramel Cream
1. In a medium, heavy bottomed saucepan, cook one cup of granulated sugar over moderate heat, stirring until the sugar liquifies and turns a golden caramel color (approximately 7-9 minutes)
2. While whisking, slowly and carefully pour the boiling water into the caramel. Whisk until blended. Note: Mixture will splash, so use a long handled whisk to prevent yourself from getting splashed with the hot mixture.
3. Remove from heat and stir in vanilla and sea salt.
4. Allow to cool for about 10 minutes.
5. In a medium bowl or standing mixer fitted with a whisk attachment, whip 1 1/4 cups of heavy whipping cream until soft peaks form.
6. Using a spatula, fold the caramel into the whipped cream until fully incorporated.

Serving
1. Spoon some of the rice pudding into a bowl, glass or cup.
2. Top with a generous tablespoon of the cherry jam.
3. Top with a generous tablespoon of the caramel cream. Note: You could form the caramel cream into quenelles rather than just dolloping it on top of the rice pudding. Directions on how to form them can be found here.

Notes: So my biggest takeaway from making this new recipe for the first time was to trust my instincts over the directions. Which means you too should trust your instincts. If the rice is tender and the mixture has a thick porridge like consistency at 40 minutes rather than 55 minutes, go with the 40 minutes. You will know in the morning after it is chilled overnight if your instincts were right.