Showing posts with label Side Dish. Show all posts

Wednesday, November 23, 2016

Roasted Butternut Squash Salad w/ Warm Cider Vinaigrette


Ready, set, it's almost time to get your stretchy pants on! In less than twenty-four hours the Thanksgivings festivities, food fest, annual Turkey Trot races, football binging, and family drama begins! As this is my most favorite holiday, I can hardly contain my excitement for the day. Ours will be a somewhat non-traditional day, one without turkey (be still my traditional heart), one without my niece at the dinner table (unfortunately collegiate swimmers going to school on the east coast don't get to come home for this holiday), one drama free (we didn't invite our individual politics to the table), one beginning with a hometown 5K run with some of my friends, and one where this Roasted Butternut Squash Salad with Warm Cider Vinaigrette will be served for the 'first' time on Thanksgiving.

If your Thanksgiving menu isn't yet carved in stone or if you have been asked to bring a dish to a gathering, consider making this Roasted Butternut Squash Salad with Warm Cider Vinaigrette. And if for some reason, you can't bring yourself to make yet another trip to the grocery store or couldn't possibly add one more 'new' dish to your Thanksgiving holiday meal, then plan to make this salad for your next dinner party while butternut squash is still in season. It took me six years to make this salad (this is what happens when one has too many cookbooks, cooking magazines, recipes clipped from newspapers, or recipes shared by friends). Hopefully it won't take you that long. I have already made it twice and will be making it for a third time for Thanksgiving (my contribution to this year's family dinner at my sister's house). 


The benefit of now making this salad a couple of times is figuring out the adjustments to the recipe albeit relatively minor ones. The first time I made it I tossed the arugula, roasted squash, cranberries, roasted walnuts and grated cheese with the dressing. While still delicious, it felt that the salad become a little 'overdressed' and didn't have as much as the visual 'wow' factor on the platter. The second time I tossed the arugula only using about a 1/4 cup of the dressing then arranged the squash, cranberries, walnuts and cheese on top. The remainder of the dressing was served on the side. I liked it even more the second time.

The second adjustment may or may not be an adjustment at all, more like a preference. And it involves the cranberries. More on that later.


Technically butternut squash is a fruit, although we treat it more like a vegetable. It's tan-yellow skin is easily peeled with a vegetable peeler. Normally it is sliced lengthwise (be sure to have a good sharp knife), but for this salad you can (if you want) cut half-inch slices starting at the smaller/top end of the butternut squash. When you get near the bottom of the squash, the place where all of the seeds are, it is much easier to cut in half. Scoop out the seeds and cut into one half inch slices. Keep cutting the slices of squash until you have beautiful deep orange little 1/2 inch diced bites. 

The diced butternut squash is tossed with extra-virgin olive oil, pure maple syrup (use the real stuff), kosher salt and pepper and baked for 22-24 minutes in a preheated 400 degree (F) oven. At least once during the baking the process use a spatula to turn over the squash. To test for doneness, insert a sharp knife into several pieces of the squash. If the knife goes through easily, your butternut squash is done. 

Okay here's the part where I talk about the cranberries. In the original recipe the cranberries were added to squash during the last 5 minutes of baking. I did this the first time I made this salad. Somehow I forgot to add them the second time and instead simply added them to the salad. Either way worked, but I think I liked them added to salad instead of being baked.


The dressing can be made a day ahead, brought to room temperature and slightly reheated or it can be made while the butternut squash is roasting. The apple cider, cider vinegar and shallots are cooked over medium-high heat until the mixture reduces to about a 1/4 cup. The dijon mustard, kosher salt, pepper, and extra-virgin olive oil are whisked in after you take the pan off the heat. 


Walnuts are always better toasted. In a 350 degree (F) oven they toast up beautifully in 8-10 minutes. If you don't have a thin slicing grater to create chards of the Parmigiano-Reggiano cheese, use a vegetable peeler. And if all else falls, use a boxed grater.  


Lightly dress your arugula with about a 1/4 cup of the dressing and taste. If it needs more, add more. Season with kosher salt and pepper. Serve the remaining dressing on the side.


Evenly scatter the roasted butternut squash, cranberries (baked or unbaked), toasted walnuts and grated cheese and serve. 


The Roasted Butternut Squash Salad w/ Warm Cider Vinaigrette is what I would call a 'platter' versus a 'bowl' salad. Whether you make it for Thanksgiving, for a dinner party, or even a weeknight meal, bring out one of your favorite platters so everyone can first eat with their eyes before they actually taste the sweetness of the butternut squash, the tartness of the dried cranberries, the nuttiness of the cheese and walnuts, and the peppery bitterness of the arugula all dressed in a warm cider vinaigrette. Pure beautiful deliciousness!


Wherever or however you are celebrating the Thanksgiving holiday this year, may your day be filled with joy, harmony, peace, contentment, abundance, and gratefulness. As you take time to be thankful for the family you love, for the friends you cherish, and for all of the blessings received and yet to come, take some time to spread the holiday spirit to others. Happy Thanksgiving wishes to all of you!

Recipe
Roasted Butternut Squash Salad w/ Warm Cider Vinaigrette (slight adaptations to Ina Garten's Roasted Butternut Squash Salad with Warm Cider Vinaigrette as shared in the Barefoot Contessa's Bake to Basics: Fabulous Flavor from Simple Ingredients cookbook)

Ingredients
1 1/2 to 2 pounds butternut squash, peeled and cut into 1/2 inch dice
1/2 cup plus 2 Tablespoons extra virgin olive oil, divided
2 teaspoons kosher salt and 1 teaspoon black pepper, divided
1 Tablespoon pure maple syrup
1/4 cup dried cranberries
3/4 cup fresh apple cider
2 Tablespoons cider vinegar
2 Tablespoons minced shallots
2 teaspoons Dijon mustard (recommend Maille)
4 - 5 ounces baby arugula, washed and dried
1/2 cup walnut halves, toasted
1/4 cup freshly grated Parmigiano-Reggiano

Directions
1. Preheat oven to 400 degrees (F).
2. Place diced butternut squash on a baking sheet. Add 2 Tablespoons extra-virgin olive oil, the maple syrup, 1 teaspoon kosher salt and 1/2 teaspoon black pepper and toss.
3. Roast squash for 22-24 minutes, turning once, until tender. Note: Add cranberries to the pan for the last five minutes of roasting or save cranberries to toss in salad.
4. While squash is roasting, combine apple cider, cider vinegar, and shallots in a small saucepan. Bring to a boil over medium-high heat. Cook for 8-10 minutes, or until cider is reduced to about 1/4 cup. Remove from heat.
5. Whisk in dijon mustard, 1 teaspoon kosher salt and 1/2 teaspoon black pepper. Whisk in 1/2 cup extra-virgin olive oil until dressing is emulsified.
6. Place arugula on a large platter. Spoon about 1/4 cup of the dressing over the arugula and toss. 
7. Top with the roasted squash mixture, walnuts, cranberries (if not already combined with the roasted squash) and grated Parmigiano-Reggiano. Sprinkle with salt and pepper. Serve extra dressing on the side.
8. Serve immediately.

Notes: (1) My butternut squash was cut into a 1/2 inch. Original recipe called for cutting into a 1/4 inch dice. If cut smaller, adjust roasting time. (2) Use a good quality fresh apple cider, the kind found in the refrigerator section of a grocery store or orchard. (3) Toss salad in the dressing right before serving. (4) The butternut squash can be peeled, diced, put in a ziplock bag and stored in the refrigerator several hours or the night before roasting.


The edge of Lake Michigan in South Haven before sunrise. (November 2016)

Wednesday, November 2, 2016

Thanksgiving Round Up: The Sides


If there was ever a holiday dominated by traditions, Thanksgiving might be the one having this distinction. At least in my world. This is not to say that every Thanksgiving is the same. It isn't. Oh, there are elements of continuity from year to year (with one unforgettable exception), but it has become a tradition to be sightly non-traditional. Although there is one sacred part of the meal: the turkey, stuffing, and gravy. Mess with that part of the dinner and, well, I will not take responsibility for what could happen next or how far I will spiral downward. Yet changes to the appetizers, sides, desserts, or even the table setting would not even phase me at all. My Thanksgiving flexibility is clearly compartmentalized. 

This year will be a very different Thanksgiving. With the person who shall remain nameless not returning home from an out of the country work assignment until after this holiday, I am left with deciding how, where, and with whom I will honor and celebrate it. At the moment, my fiercely independent side is having an ongoing conversation with my traditional side, with both sides being egged on by a few other personality characters (aren't we all more or less multidimensional?). Fortunately I have some time before having to make a decision. But for those of you fortunate enough to have a Thanksgiving plan already in place, maybe this is your year to change it up a bit. Particularly the meal part of the day. To encourage you to add something new to your holiday table, I will be re-sharing some of my favorite 'perfect' for Thanksgiving dinner recipes over the course of the next few weeks. First up. Well, the sides, of course.

Each of the following seven sides have appeared on 'my' Thanksgiving table more than once. It would be safe to say there is at least one (Wendy's Mashed Potatoes) where everyone's day would be ruined if it wasn't served. And not just because it's 'tradition'. All but one of them can be made the day before and are easily transportable. Each vary in their levels of richness. None of them are what you might consider 'low calorie', although the Roasted Brussels Sprouts Gratin might object. There are no obscure, hard to find, or must go to the ends of earth to find ingredients in any of the recipes. However, I won't guarantee they will be available if you wait until the night before Thanksgiving to do your grocery shopping. All seven of them push the limits on what most would consider 'best ever', 'the most insanely delicious side ever', 'worth fighting over the last spoonful' and/or 'worthy of going on a last meal list'. A click on the link below each of the photos will take you immediately to the recipe. As Ina Garten might say 'How easy is that?'. But don't feel you have to wait for Thanksgiving to make any of them. These sides would make any Sunday dinner, dinner party, and/or Christmas/Hanukkah meal memorable. 


Roasted Brussels Sprouts Gratin


Caramelized Onion and Mushroom Bread Pudding


Cheesy Hasselback Potato Gratin


Sweet Potato Casserole


Boursin Spinach Gratin

"Not what we say about our blessings, but how we use them, is the true measure of our thanksgiving." (W.T. Purkiser) 

Tuesday, August 9, 2016

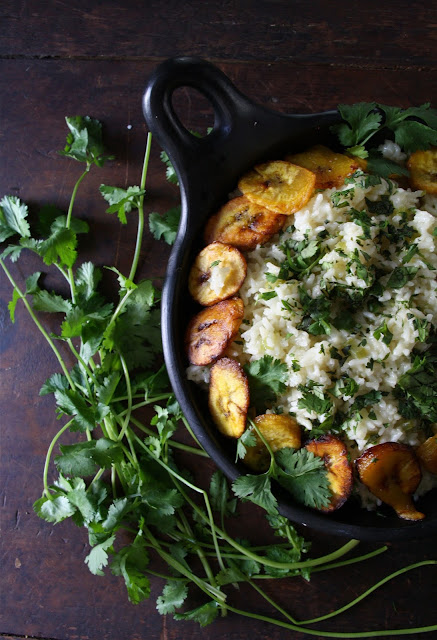
Mexican White Rice with Fried Plantains


After weeks of watching the Presidential conventions and sideshows, my patriotic spirit has been slightly dampened. While there certainly have been a few inspirational moments, nothing has been more disheartening than watching the darker sides of this year's political process play out. But then this past weekend I started to feel differently or rather start to feel more like myself again as my resiliency kicked in. Or I should say was rather kicked. The pride, hopes, and dreams I have for this country (and the world) returned. What caused this 180 degree shift in restoring my patriotism, my love of country? The 2016 Olympics. Quite possibly the most perfectly scripted, well-timed event to happen.  Am I not the only one who needed this year's summer Olympics to get a much needed patriotic adrenaline rush? Not only as a reprieve (or at best a diversion) from listening, watching or reading about the Presidential candidates and their campaigns, but to restore an optimistic, unifying spirit. Between the individual and team events along with the back stories on athletes themselves, the 2016 Olympics may seem to be a temporary distraction from everything else going on in the world. Except, their impact extends well into the future. From planting seeds of dreams for future generations both on and off the athletic playing fields to promoting peace and unity, the individual and collective impacts of the Olympics seem to have gone well beyond what the Ancient Greeks had conceived in 776 BC. And, I for one, could not be happier.


A few weeks ago I took a cooking class with a couple of running group friends. After having a margarita at A Todo Madre (an incredible Mexican Bistro in the western suburbs of Illinois) we walked across the street to Marcel's (an amazing locally owned culinary and food emporium) to learn all about the making of Summertime Street Tacos. Although the focus of the class was on tacos and not the Mexican Rice side dish, I first tasted and learned how to cook with plantains while in this intimate, hands-on class. Can you believe I had somehow managed to live a plantain free life? Who knew some of the takeaways from this class were opening my eyes to the deliciousness of a Mexican White Rice with Fried Plantains and discovering that White Rice with Fried Plantains is a perfect side dish for tacos!


In addition to cooking plantains for the first time, my eyes and palate were opened to the flavor (and heat) of Serrano chiles. Apparently my culinary life has been a little more sheltered than I have been willing to admit. This Mexican White Rice with Fried Plantains was the perfect way to expand my gastronomic horizons.

In addition to being insanely delicious, it is a relatively inexpensive dish to make. A little olive oil, celery, half of an onion (sweet yellow or white), garlic, half of a Serrano chili, a small bunch of cilantro, some long (or extra-long) grain rice, some kosher salt, chicken broth, two black (ripe) plantains and some vegetable oil make up the ingredients. 


I used a sweet yellow onion instead of the white onion we used in class. Feel free to use either one, although the white onion is the onion of choice in classic Mexican cooking. Both the onion and celery should be cut to fine dice. While the garlic and Serrano chile are finely minced. The heat in this rice dish comes from a half of Serrano chile, seeds and all. As someone who doesn't really do 'hot' well, this rice dish had just the right amount of heat. 


After the diced onions and celery are sautéed until the onions are slightly translucent, the garlic and chile are added and cooked for 30-45 seconds before the rice is added. Long grain rice is the rice most commonly used in Mexican cooking. Chefs like Rick Bayless and Zarela Martinez recommend using a medium-grained white rice for best results as the long grain rice found in the US is not comparable to the long grain rice found in Mexico. Having learned that after I made this rice dish and using extra-long instead of long grain rice, all I will say is that my choice of rice did not at all affect the incredible flavor of this dish. What it did affect was my rice cooking time.


Before the chicken stock is added to the saucepan, the rice is cooked along with the sautĂ©ed vegetables until it is slightly translucent (approximately 3-4 minutes). During this phase of cooking, you will be stirring the rice constantly. However, once you add the chicken stock and reduce the temperature to low, the covered pot remains undisturbed for at least 15 minutes or until all of the liquid has been absorbed by the rice. Side note: My cooking time was almost 25 minutes.  

According to Wikipedia 'Plantains contain more starch and less sugar than dessert bananas and are therefore usually cooked or otherwise processed before being eaten'. Sometimes referred to as the pasta and potatoes of the Caribbean, they have found their way into the produce section of many grocery stores. As the peel changes to black, the plantain becomes sweeter while still retaining the firmness necessary for frying.


The skin of a plantain is much thicker than that of a banana and requires a few knife cuts to remove it. By making several long cuts though the skin from one end of the plantain to the other, the skin removes easily. When frying the plantains in vegetable oil, keep these two things in mind: (1) make sure your vegetable oil is hot and (2) work in batches so you don't overcrowd the plantains. The cooking time for 1/4" slices is approximately 1-2 minutes. Transfer the cooked plantains to a dish lined with paper towels and season with kosher salt. Side note: You can make the plantains either before or while you are making the rice. They don't necessarily need to be hot when added to the rice.


The cooked rice is finished with chopped cilantro and the fried plantains served either in a bowl or platter. If you are not a big fan of cilantro, this Mexican White Rice with Fried Plantains might have you changing your mind.


In addition to being a perfect side dish to tacos, this Mexican White Rice with Fried Plantains would compliment a grilled chicken dish or any other Mexican entree. Although I could just eat this rice as a meal. Especially if margaritas were involved! Or maybe to pay homage to the Olympics in Brazil, I should serve this dish with some Caipirinhas (Brazil's national cocktail) using some of the Cachaca (clear sugarcane hard liquor) the person who shall remain nameless brought back from a work trip to Brazil last week. Served with or without alcohol or with or without tacos this Mexican White Rice with Fried Plantains could end up being one of your favorite side dishes. Or if you are anything like sheltered me, open your palate to the deliciousness of fried plantains.

Recipe
Mexican White Rice with Fried Plantains (ever so subtle changes to Robin Nathan's Mexican White Rice with Sweet Plantains recipe)

Ingredients
Rice
2 Tablespoons olive oil
1/2 large sweet yellow or white onion, finely diced
2 stalks celery, finely diced
4 cloves garlic, minced
1/2 Serrano chile (with seeds), finely minced
2 cups long grain or extra long grain white rice
4 cups chicken broth
Kosher salt to taste
1/4 cup chopped fresh cilantro

Plantains
2 ripe (black) plantains, peeled and cut into 1/4" slices
Vegetable oil for frying
Kosher salt

Directions
Rice
1. Heat oil in a heavy medium sized pan or stock pot. 
2. Add onion and celery, sautĂ©ing until onion is slightly translucent (approximately 2-3 minutes).
3. Add garlic and chiles, continue to cook for an additional 30-40 seconds, stirring constantly.
4. Add the rice and stir to coat with vegetables. Cook until rice becomes slightly opaque (approximately 3-4 minutes).
5. Add broth and a generous pinch of salt. Bring to a quick simmer, cover, reduce heat to low and cook undisturbed for 15-25 minutes (or until all of the liquid has been absorbed by the rice). Note: My cooking time for the rice was almost 25 minutes. This may have been due to the level of heat or size of pot. Would recommend checking for doneness at 15 minutes and then continue cooking until rice is done.
6. Fluff with a fork and transfer to serving bowl or platter.
7. Sprinkle with chopped cilantro

Plantains
1. In a large, preferable non-stick skillet, pour in vegetable oil to coat bottom of pan and to a height of approximately 1/4".
2. When oil is hot, add a third or half of the plantain slices (you do not want to overcrowd the pan). Cook for 1-2 minutes per side, flip when lightly browned. Repeat with remaining plantains.
3. Place cooked plantain slices on a plate lined with a paper towel. Season with kosher salt.
4. Arrange plantain slices around the edge of the bowl/platter of Mexican White Rice. 
5. Serve immediately.

Images from a walking tour of Philadelphia (Summer 2015).


Monday, June 20, 2016

Florentine-Style Peas


"Eat your peas!" For those of you whose aversion to peas was due in large part to being forced to eat those canned, soft, mushy peas, the ones eerily reminiscent of the jarred peas some of us were fed in our pea opinion-formative years, I can completely empathize. This emphatic plea heard at dinner tables around the country was usually accompanied by the words 'they are good for you'. Although no one happened to mention they were packed with Vitamin K, protein, full of fiber, had anti-inflammatory properties, and good for your heart. Many of us still shuddered at thought of having to eat 'those' peas. In spite of all of the health benefits of peas, more than likely my young, unworldly mind wouldn't have bought in to their whole health benefits thing anyway. Mostly because I couldn't get past how the canned version of peas tasted. Now, had I grown up in Italy my opinion and lust for peas would more than likely have been a completely different story.


There are eye-rolling peas (the canned version) and then there are eye-popping peas (Florentine-Style Peas). One look at a platter of these Florentine-Style Peas and your perception of peas begins to do a complete 180 degree flip. While you may feel compelled to passionately implore everyone sitting at your dinner table to 'eat these peas', just sit back and watch their faces when they taste them. It will be almost as good as seeing faces taking in the fireworks on the 4th of July. Better yet will be clearing the table of dishes free of even a single pea.


A side dish worthy of being placed in the center of the table, the combination of freshly shelled peas, the extra-virgin olive oil, pancetta, garlic, the sugar (the secret ingredient) and the delicious broth is what makes these peas extraordinarily delicious. In a single bite you will become deeply enamored with this savory dish. 

These Florentine-Style Peas would be a perfect side to a pasta dish, to a roast chicken, or to a grilled steak. In the spirit of 'less is more', don't serve these beautiful, flavorful peas if you are planning a meal with a hodge-podge of other sides. Because if there was ever a side dish worthy of taking center stage, it would be these Florentine-Style Peas. More than likely the words 'eat your peas' will never again need to be spoken at your dinner table.

Notes: The original recipe called for the use of freshly chopped flat leaf parsley. In spite of multiple visits to the grocery store, the parsley never made it into my cart. Thus it didn't make into these Florentine-Style Peas. Maybe the parsley further elevates the flavorfulness of this dish. I couldn't say. What I could say is that without the parsley it was insanely delicious. Dishes made with fresh seasonal ingredients always seem to taste better than ones with their frozen equivalents. While these Florentine-Style Peas can be made with high quality frozen peas, I would strongly encourage you to use freshly shelled peas the first time you make them. Sugar is the secret ingredient in these peas. I used caster sugar as it melts more quickly than granulated sugar. If you can't find caster sugar, used superfine sugar. And lastly, no matter what anyone tells you, there is no substitute for pancetta.

Recipe
Florentine-Style Peas (an ever so slight adaptation to Emiko Davies' Piselli all Fiorentina, Florentine-Style Peas as shared in her cookbook Florentine: The True Cuisine of Florence)

Ingredients
1/4 cup (4 Tablespoons) extra-virgin olive oil, divided
3 1/2 ounces thick slices of pancetta, cut into thin strips
2 garlic cloves, thinly sliced
3 1/3 cups (1 lb 2 oz) fresh, shelled peas (or good quality frozen peas)
1-2 teaspoons caster, superfine, or granulated sugar (Note: I used 2 teaspoons caster sugar)
Kosher salt and freshly ground black pepper
4 Tablespoons finely chopped flat-leaf parsley (optional)

Directions
1. In a large saucepan, gently heat 2 Tablespoons of extra-virgin olive oil.
2. Add pancetta and garlic in pan. Cook over a low-heat for about 1-2 minutes.
3. Add peas, parsley (if using), and enough cold water to just reach the level of the peas (Note: Add water 1/2 cup at a time, making sure you don't add too much).
4. Season with a pinch of kosher salt and bring to a simmer. Cook until peas are tender (but not mushy) and garlic is cooked (approximately 8-10 minutes).
5. Add sugar, stirring until dissolved. Remove from heat.
6. Transfer peas and the majority of the broth to a large, deep platter. Drizzle peas with remaining extra-virgin olive oil and freshly ground black pepper.
7. Serve warm or at room temperature. Note: Peas are equally delicious reheated the next day.


Sakonnet Vineyards, Little Compton, Rhode Island


Wednesday, June 15, 2016

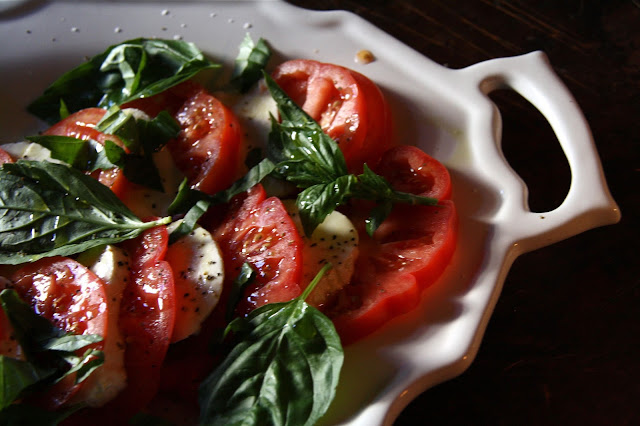
Caprese Salad


Summer's astronomical start doesn't officially arrive for another week, however, meteorologically it has already steamrolled in. If this midwestern 'heatmageddon' continues at its' current pace, it is going to be a very long, hot summer. Let the whining begin! Admittedly I am what you might call a heat wimptress. The little beads of sweat covering my nighttime face as I lay in bed in a room without a cross breeze in our un-air-conditioned house remains one of my still retrievable childhood memories. Somehow I managed to survive living in house where the fan was faced to the outside (supposedly to draw the heat out). Although the remains of my aversion to hot, humid weather is now reflected in my adult beet, or rather tomato red face. The visible battle scar from my days growing up in a 'hot' house.  

Summer's seasonal fruits, vegetables, and herbs are amongst my absolute favorites. One of the upsides of having to endure brutally hot and humid days is having access to the some of most incredibly flavorful bounty Mother Nature has to offer. High up on my list of summer food favorites are tomatoes.


If there was ever a dish requiring absolutely no culinary prowess, it would be a Caprese Salad. Essentially a four ingredient dish, if you don't count kosher salt and freshly ground pepper that is. However, if there was ever a salad requiring the best, freshest, ripest ingredients available, it would be, yes you guessed it, a Caprese Salad. SeriousEats wrote a great article on "How Not to F*ck Up a Caprese Salad". In case you don't want to or have the time to read the whole article, let me share with you the down and dirty short version of this great, wickedly entertaining, yet informative article. "Get the best damn tomatoes, mozzarella, and basil you can find, put 'em on a plate, sprinkle them with salt and pepper, drizzle them with the best damn olive oil and stop right there. Do not pass Go, do not collect $200, and step away from the balsamic vinegar." Yes, you read that correctly. No balsamic vinegar. Because this may cause your head to spin just a bit, I will let that thought sink in and come back to it later.


Depending on where you live, it may be one of those salads you can, or rather should be, making for only a couple months of the year. The Caprese Salads made in the summer or early fall tastes very different than the ones made in the winter or spring months. Unless, of course, you have a fondness for those mealy, tasteless, genetically engineered things sold in grocery stores or appearing on restaurant menus (falsely) labeled as tomatoes in the middle of the winter or in early spring. 

Whether you say to-may-to or to-ma-to, nothing comes close to the juicy, delicious, bursting with flavor taste of a freshly picked (from the farm or garden if you are lucky) ripe tomato. Or better yet, an heirloom tomato. Enduring the heat of the summer months just happens to be one the prices we need to pay in order to have access to ripe off the vine tomatoes. 

The tomatoes available at the Farmer's Market last weekend were absolutely, 'be still my heart' beautiful. For the Caprese Salad I planned to make for a dinner with friends, the combination of heirloom and some 'variety unknown' tomatoes would make it one of those best of both tomato worlds salads.


One of the larger Italian stores near my home sells some of the best homemade, fresh mozzarella. And at prices far less than some of the other grocery stores, especially the ones specializing in fresh, organic foods! If possible, look for the fresh mozzarella floating in its' brine solution versus the prepackaged wrapped 'fresh' mozzarella for a Caprese Salad to die for. The taste difference between the two types of fresh mozzarella is akin to the difference between a 30 degree and 90 degree day.


After the tomatoes and mozzarella, you need only two other 'freshest and bestest' you can find ingredients: basil and extra-virgin olive oil. Depending on how often you use basil, grow as much of it as you possibly can! One can never have too much basil growing in one's garden. 


To tear or to cut? That is the basil question. Some will say there is more flavor when you tear the basil (due to the release of its oil). Others will say a steel knife will cause some oxidation to the basil, thus affecting the coloring. But the cut-tear approach may be more about preference than exact science (especially if you use a plastic knife to cut the basil). So just do what feels right for you.


The Caprese Salad calls for thicker slices (about one-half inch) of tomatoes as well as the mozzarella. My mozzarella slices are generally cut a tad thinner than the tomato slices.


How many times have you ordered a Caprese Salad in a restaurant having at least, if not more, than a drizzle of balsamic vinegar on it? Hint: They probably are not making it with the best and/or freshest tomatoes and mozzarella available. Well, contrary to a widely held mis-conception in the United States. a genuine Italian Caprese Salad is not served with any vinegar. It is simply dressed with a high quality extra-virgin olive oil and the juices from the tomatoes. Anything more will mask the flavor of the tomatoes and mozzarella. If, for any reason you or your friends/family happen to like balsamic vinegar with your Caprese Salad, well, serve it on the side. But don't tell anyone I told you that. I do not want the Caprese Salad purists to come looking for me.


After mint mojitos and some appetizers, this Caprese Salad was the prelude to a meal of Lasagna Bolognese and Florentine Style Peas (both upcoming blog posts). And in keeping with an Italian themed meal, it ended with Honey and Pistachio Panna Cotta. If there was ever a dinner menu to both tantalize and satisfy one's visual and taste senses, this would be it. Whether or not I serve this meal again over the course next several months, I will definitely be making this Caprese Salad as often as possible. And always with the Balsamic vinegar, the one my sister brought me back from Italy, on the side.

Recipe
Caprese Salad
Serves 4 to 5

Ingredients
4-5 large ripe heirloom or vine ripened tomatoes, cut into half inch slices
3 six ounce balls of fresh mozzarella, cut into slightly less than half inch slices
10-12 basil leaves
Extra-virgin olive oil
Kosher salt and freshly ground black pepper
Optional to serve on the side: A good quality balsamic vinegar

Directions
1. Alternately layer tomatoes and mozzarella on large serving platter.
2. Sprinkle with kosher salt and pepper.
3. Generously drizzle extra-virgin olive oil over tomatoes and mozzarella.
4. Top with torn and/or cut slices of fresh basil.
5. Serve immediately.

Over the river and through the woods. Wilbour Woods, Little Compton, RI. Calm, cascading, and rippling water images.