Thursday, January 14, 2016

Swedish Cinnamon and Cardamom Buns


My first thought upon seeing these almost too beautiful to eat Swedish Cinnamon and Cardamom Buns posted by a fellow foodblogger was 'I need to make them'. This was immediately followed by 'these look a little beyond my pastry and bread making skill set'. Being someone who is currently having significant difficulty wrapping my head around motor planning through a burpee, I wondered if making these buns would be another one of those challenges getting the best of me. Having my self-esteem take two hits in one week would border on a form of self-abuse I was pretty certain wasn't exactly in my best interest. If there was at least one consolation, it would be no one would be able to publicly see me struggling with one of them.


In spite of reading the recipe and pouring over Johanna Kindvall's one-dimensional drawings on forming each of the individual Swedish Cinnamon and Cardamom Buns, I still couldn't wrap my head around how she got them to look so beautiful. Could a trip to bakeries in Sweden, a virtual trip via YouTube that is, take me from feeling clueless to being Swedish bun (Kardemummabullar) I CAN do this confident? YES! Not only did I finally have that 'ah-ha' moment, I became so entrenched in watching Swedish videos I think I may have qualified for Swedish citizenship.


If I said these Swedish Cinnamon and Cardamom Buns were similar to Cinnamon Rolls I may inadvertently be misleading you or risk offending someone somewhere. And if I said they were much easier to make than Cinnamon Rolls, yet equally as delicious, I wonder if you will believe me considering all of my initial trepidations. I suppose you will just have to make them to decide for yourself. Or miss out knowing how OMG, melt in your mouth, delectable they are.

Here are some of the reasons why they are easier to make than traditional American cinnamon rolls: (1) you don't need a standing mixer with a dough hook, the dough simply comes together with your hands; (2) you don't need to feel like you are getting an arm workout kneading the dough, as in less than 5 minutes the dough becomes smooth and has the perfect elasticity; and (3), you don't need to wait hours for the first dough rise, it doubles in size in approximately an hour if placed in a warm, draft-free space.


If there was ever a dough to cure anyone suffering from dough-phobia, this would be it. I knew from the taste and texture of the dough alone that these Swedish Cinnamon and Cardamom Buns would be incredible.


After dividing the 'after the first rise' dough in half, it is rolled out into a 12"x18" rectangle. Half of the butter-cinnamon-cardamom mixture is spread evenly over the dough (all the way to the edges) before folding the dough in half. Now this is where I could tell you to cut the dough into approximately 1 1/4- 1 1/2 inch strips, then cut each strip in half (without cutting into the fold), first twisting each side of the strip then braiding both sides of the strip together, wrapping into a bun and placing on a parchment paper lined baking sheet. But if you too are more of a visual learner, here is a link to one of the videos that made the bun formation process easy to understand (seen shortly after the video's 6 minute mark). One of the more humorous videos watched demonstrated another way of forming these buns (about 2 minutes into the video). The point of sharing both of these two techniques with you (don't forget to look at Johanna's drawings) is that there is almost no way you can mess them up.


Once the dough is formed into these gorgeous buns, they are covered and allowed to rise for additional 45-60 minutes (or until puffy).


All of the 'second rising' buns are brushed with beaten egg and sprinkled with Swedish pearl sugar (my favorite is made my Lars and can be found at some grocery store or speciality food stores as well as bought on Amazon.)


Be generous with your sprinkling of the Swedish Pearl Sugar.


In a preheated 425 degree (F) oven, the Swedish Cinnamon and Cardamom Buns bake for approximately 8-10 minutes. Note: My baking time was between 9:30 and 10 minutes. I put one baking sheet into the oven at a time rather than risk having both pans of buns come out looking and baking differently.


Immediately remove the baked buns from the baking sheet and transfer to a cooling rack. Keeping the buns on the hot baking pan may cause them to continue baking, which will cause them to lose their moistness. Don't resist the temptation to eat them while they are still warm.


Cardamom is a spice with a strong, unique taste. Serious Eats describes cardamom's difficult to describe complex flavor as 'part-nostril widening menthol, part dew-drenched flower, part-honeyed syrup'. If you are unfamiliar with its' taste, these buns would be a great place to first experience it, particularly due its' pairing with cinnamon. Yes it is on the expensive side. But spice stores and some grocery stores (like Whole Foods) allow to buy 'what you need' from their spice bins.

While they are equally delicious room temperature, I couldn't help but want to recreate the taste of warm baked dough. So I heated them up (on low power) in the microwave. They were perfect.

It just so happened that I made these Swedish Cinnamon and Cardamom Buns while the person who shall remain nameless was traveling for work. To add insult to injury I texted him a photo of these over the top deliciously beautiful buns as soon as they came out of the oven. It wasn't that I was being wicked, I just couldn't contain my enthusiasm for being able to make buns I thought were destined to send my self-confidence plummeting. Before you go and start thinking too ill of me, I froze half of them. So when he returns back home I will reheat them in the microwave and he can experience their hot out of the oven scrumptiousness. Having already reheated one of these frozen buns, I learned they freeze and reheat incredibly well.


If watching more than my fair share of videos on youtube gave me the confidence I needed to form these beautiful Swedish Cinnamon and Cardamom Buns, maybe I should consider watching some youtube how-to burpees videos. Especially if I want to stop looking and feeling so uncoordinated in public. Although watching extremely fit people do burpees effortlessly may do even more irreparable harm to my self-esteem. Think if I bring in a platter of these gorgeous eye-candy Swedish Cinnamon and Cardamom Buns to my next circuit training class no one will see (or remember) the ungraceful burpee attempts being made by this aging ex-cheerleader? Possibly.
Recipe
Swedish Cinnamon and Cardamom Buns (inspired by Johanna Kindvall's Kardemummabullar (Cardamom Buns) as shared on her blog Pantry Confidential)

Ingredients
Dough
7 Tablespoons (99 grams) unsalted butter
1 1/2 cups whole milk
2 teaspoons active dry yeast
4 1/2 cups (638 grams) all-purpose-flour
1/4 cup (50 grams) granulated sugar
1 1/2 teaspoons cinnamon
1/4 teaspoon kosher salt

Filling
7 Tablespoons (99 grams) unsalted butter, room temperature
1/2 cup (99 grams) granulated sugar
4 teaspoons ground cinnamon
2 teaspoons ground cardamom

Topping
1 large egg, beaten
Pearl sugar (recommend Lars Pearl Sugar)

Directions
1. Melt butter in a saucepan. Stir in milk, heating until warm to the touch (110 degrees F).
2. In a smal bowl, dissolve yeast in 2 to 3 Tablespoons of warm butter/milk mixture. Stir and let mixture sit until bubbles form on the top of the yeast. Note: Keep reserved milk/butter mixture.
3. In a large bowl, mix together the flour, sugar, cinnamon, and kosher salt. Add the yeast mixture along with remaining butter/milk mixture. Work together with your hands until you can form the dough into a ball.
4. Transfer the dough to a flat surface and knead until it is smooth and elastic (approximately 3-5 minutes). Notes: (1) The dough should feel moist, however, if it sticks to your fingers add a small amount of flour. (2) The dough is fully kneaded when you slice into with a sharp knife and see small air  bubbles throughout.
5. Return the dough to the bowl, cover with a clean towel, and place in a warm, draft free place to rise until doubled in size (approximately 1 hour).
6. Before the dough has finished rising, make filling. Cream together the room temperature butter, sugar, and spices until the mixture is an evenly mixed and spreadable paste. Set aside.
7. After the dough has finished rising, cut the dough in half. Roll one half out on a flat, lightly floured surface into a 12 inch by 18 inch rectangle. Place the rectangle on the surface so that the long side is closest to you.
8. Carefully spread half of the filling on half of the dough, bringing the filling to edges of the dough. Fold the dough in half (should have a 6 inch by 18 inch rectangle). Slice into 12-14 equally sized pieces. Cut, twist, and shape into buns, placing them on a parchment paper lined baking sheet. Repeat with second half of the dough. Note: Either look at Johanna Kindvall's post or watch the youtube videos linked above.
9. Cover the buns with a clean flour sack or tea towel and let rise for 45-60 minutes, or until puffy.
10. Preheat oven to 425 degrees (F).
11. Brush the buns with an egg wash and sprinkle generously with pearl sugar. Bake for 8-10 minutes, rotating pans from front to back halfway through the baking.
12. Transfer baked buns to a cooling rack. Serve warm or cool completely. Buns can be stored in an airtight container in the freezer and reheated in the microwave.

Tuesday, January 12, 2016

White Bean and Sausage Casserole


The likelihood of escaping those frigid winter temperatures arriving here in the midwest this week has about the same odds as winning a billion dollar lottery. It is after all winter. But, hey who needs pragmatism when you have the option of optimism! Spoiled by winter's relatively mild onset, this below degree weather has been a shock to the system. Hopefully this will be nothing more than a blip on the radar and we can return back to balmy 30 degree temperatures. More than likely, the thought of 30 degree weather now seems state of emergency, dangerously cold to my warm weather friends in Arizona and South Carolina, one of whom having spent her entire life in the midwest. But all good-intentioned teasing aside, it is genuinely amazing how quickly one's body acclimates to one's geographical location. Regardless of what the thermometer reads, warmth and cold are all relative, pragmatically speaking of course. Remind me I said this when my inner whimptress starts whining about running in the 'hot' summer weather or as soon as we again see 50 degree temperatures.

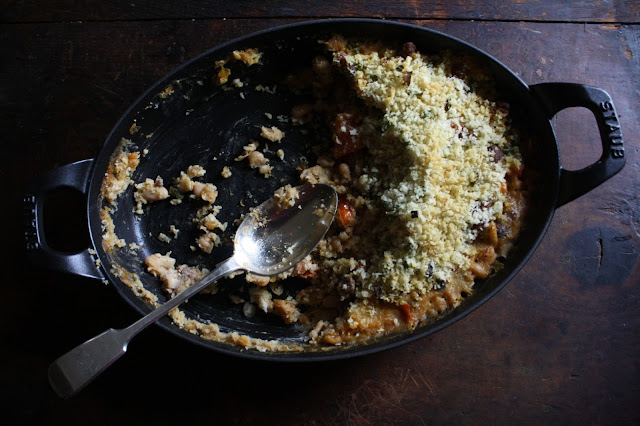
Cold weather always causes me to crave hot out of the oven or off the stove foods. When I came across a recipe for this White Bean and Sausage Casserole I couldn't help but think it was a simpler version of a French cassoulet, the hearty, deeply flavored, slow-cooked casserole made with beans and a wide assortment of meats. Like a cassoulet, this White Bean and Sausage Casserole is also a relatively inexpensive dish to make. Served with a fresh loaf of crusty bread, a salad, and of course some wine, there is an understated elegance to this simple, rustic meal. And it is a perfect cold weather dish.


Unlike a cassoulet, you don't have to soak the beans overnight. Canned white cannellini beans are the delicious time saver and hold up well in this casserole. Instead of pork or pork sausage, this casserole uses both mild/sweet and hot Italian sausage. More on the ratio of these two types of sausages to follow. In addition, to fresh tomatoes, parsley, and thyme, the base layer of the casserole includes white wine and roasted garlic.

Finding good fresh tomatoes can sometimes be dicey during the winter months. For this casserole the tomatoes need to be on the juicy side in order to give the casserole some much needed liquid. I thought these fresh off the vine tomatoes would be juicier than they were. After reviewing other cassoulet recipes, I will seriously consider using whole canned tomatoes the next time I make this White Bean and Sausage Casserole whether or not I can find really 'good' tomatoes.

If there is anything better than chopped garlic, it would be roasted chopped garlic. Roasted for 15-18 minutes in extra-virgin olive until tender, the flavor of the garlic becomes more deeply developed. As an added bonus the aroma from the six whole cloves of garlic roasting in extra-virgin olive oil is intoxicating.

While the garlic is roasting in the oven, a pound of mild/sweet and hot Italian sausage is cooked in a large skillet. Rather than use equal parts of each, I went with a 2/3 mild/sweet and 1/3 hot combination. It worked. 

The finished casserole was second-helping delicious in spite of having used 45 ounces instead of 38 ounces of cannellini beans. Those additional seven ounces absorbed more of the casserole's liquid 'gold' than I would have liked. Lesson learned.


The panko crust topping is made with extra-virgin olive oil, kosher salt, sliced green onion, and lemon zest. In retrospect, I am really glad I didn't second guess the use of lemon zest in the topping.


In a preheated 400 degree (F) oven the casserole (tightly covered is aluminum foil) is baked for 20 minutes. After removing the foil, it continues to bake for additional 10-15 minutes, giving time for the panko topping to brown. 


From beginning to end, this White Bean and Sausage Casserole comes together in about an hour. Making it the kind of dish you can be made on a weeknight or on the weekend.


This humble, yet luscious and hearty casserole is perfect cold weather comfort food. Having all of the deliciousness and beauty of a cassoulet, yet requiring very little time and effort, it is the kind of dish giving casseroles a good name. Although made with white wine, serve it with a great bottle (or two) or red wine. A Cabernet, Malbec, or Meritage would be great options. Considering this casserole is relatively inexpensive to make, go ahead and splurge a little on the wine. There are times when one needs to be pragmatic about how much to spend on a bottle of wine. This isn't one of them.

Recipe
White Bean and Sausage Casserole (adaptation of Yankee Magazine's recipe for White Bean and Sausage Casserole, January/February 2016)

Ingredients
Casserole
6 large garlic cloves
1 Tablespoons extra-virgin olive oil
1 pound Italian sausage (combination of mild/sweet and hot), casing removed and torn into pieces
38 ounces cannellini (white kidney) beans, drained, washed under cold water, drained again (from 2 19 ounce cans or 2 1/2 15 ounce cans (Note: Total weight of cannellini beans should not exceed 38 ounces)
1 pound ripe tomatoes, cored and cubed (or one pound of whole canned tomatoes)
1 1/2 teaspoons kosher salt
1/2 teaspoon black pepper
1  Tablespoon fresh thyme leaves, chopped
1/2 cup chopped fresh flat leaf parsley
1/3 cup white wine (I used a chardonnay)

Topping
2 cups panko breadcrumbs
1 teaspoon freshly grated lemon zest
2 Tablespoons green onions, thinly sliced (or 1 Tablespoon minced fresh chives)
3/4 teaspoon kosher salt
3-4 Tablespoons extra-virgin olive oil

Directions
1. Preheat oven to 325 degrees (F). 
2. Toss garlic cloves and 1 Tablespoon extra-virgin olive oil in a small ovenproof dish. Roast until garlic cloves are tender when pierced with a sharp knife (approximately 15-18 minutes). Remove from oven and allow to cool slightly. Chop garlic cloves and reserve oil.
3. Cook sausage over medium heat, until golden brown (approximately 10 minutes).
4. Stir in reserved olive oil, chopped garlic, parsley, thyme, beans, tomatoes, salt, and pepper. Cook over low heat for approximately 10 minutes.
5. Raise the heat to high, add the wine, then reduce to a simmer and cook for 3 minutes.
6. Transfer mixture to a casserole pan. Note: Casserole can be prepared up to the point, covered and refrigerated until ready to bake.
7. Mix together the panko breadcrumbs, lemon zest, green onions, kosher salt and extra-virgin olive oil. Note: Begin with 3 Tablespoons of olive oil, if panko crumbs do not seem adequately coated, slowly add the additional 1 Tablespoon.
8. Press topping into the casserole. 
9. Preheat oven to 400 degrees (F).
10. Tightly cover casserole with aluminum foil. Bake for 20 minutes. Remove foil and bake until topping is a golden brown and juices from the casserole are bubbling along the edges. Approximately 10-15 minutes. Remove from oven and serve.
Optional: Drizzle plated casserole with extra-virgin olive oil.

Friday, January 8, 2016

Chipotle and Rosemary Roasted Nuts


The wait is finally over. And the self-imposed weight of the world is finally off my shoulders. Drum roll please. Seems like a worthy introduction for the spiced nuts, aka Chipotle and Rosemary Roasted Nuts, recipe I had promised to share by week's end. And just in time for your weekend entertaining! Served warm from the oven (or at room temperature) and paired with your favorite cocktails, these addictive savory nuts are destined to be one of your most favorite go-to appetizer recipes.

These are the Chipotle and Rosemary Roasted Nuts I made to go along with the gravlax, cheese platter and pate for the overly ambitious, but incredibly delicious, Christmas Day dinner. With the unseasonably warmer start to winter here in the midwest, these nuts were one way to put the thriving rosemary bushes to good use.

As appetizers go, this one may skew a bit toward the healthy side. As almonds, walnuts, and cashews rank up there as being some of 'better for you' nuts. Which is one of the reasons why I made a slight alteration to Ina Garten's Chipotle and Rosemary Nuts recipe. I left the pecans out and slightly increased the proportions of cashews and almonds. Healthiness aside, these nuts are incredibly delicious. A case of something good for you actually really very good.


Having once made some spicy nuts that turned out to be a little too hot for an 85 degree, full sun, no breeze, weather golf outing day, I couldn't bring myself to using a full teaspoon of the ground chipotle powder. And instead went with 3/4 teaspoon. However, upon tasting the nuts, I realized 1teaspoon would not be too much, regardless of how hot or cold the weather might be.

The nuts are first mixed with the vegetable oil, pure maple syrup, light brown sugar, fresh squeezed orange juice. Once the nuts are fully coated, toss with 1 1/2 Tablespoons of chopped fresh rosemary, and 1 teaspoon of kosher salt. Spread the nuts evenly over the prepared large rimmed baking sheet. In a preheated 350 degree (F) oven, the nuts roast for approximately 25 minutes or until the nuts are glazed and golden brown. Note: Stir nuts at least twice using a large spatula during the baking process.

After removing the nuts from the oven, toss with another 1 1/2 Tablespoons of freshly minced rosemary and 1 1/2 teaspoons kosher salt. Transfer to a (clean) parchment paper lined baking sheet, stirring occasionally to minimize sticking. Allow to rest/cool approximately 10 minutes if serving the Chipotle and Rosemary Roasted Nuts warm. Having tasted them on the warmer side and on the room temperature side, I really, really loved them warm, yet still loved them room temperature. So did everyone else. Note: You can double this recipe if you are having a large gathering. Just make sure to use two  large rimmed baking sheets. 

These Chipotle and Rosemary Roasted Nuts take very little effort to make, yet they deliver big on taste and flavor. Having a cocktail party this weekend? Inviting friends over to watch a sporting event, award show, or movie? Putting together an impromptu gathering? Serve these nuts and don't be surprised if you find everyone hovering over them.

And take it from me, it feels really good to follow-through with a promise. This endorphin rush might be what I need to get me through a six mile run tomorrow morning. Enjoy your weekend!
Recipe
Chipotle and Rosemary Roasted Nuts (slight adaptation to Ina Garten's Chipotle and Rosemary Roasted Nuts recipe from her How Easy is That? cookbook)

Ingredients
1 Tablespoons vegetable oil, plus more for seasoning the baking pan
2 cups whole roasted unsalted cashews
1 1/2 cups walnut halves
1/2 cup whole almonds
5 Tablespoons pure maple syrup
1/8 cup light brown sugar, firmly packed
1 1/2 Tablespoons fresh squeezed orange juice
3/4 to 1 teaspoon ground chipotle powder (but would recommend going with 1 teaspoon)
3 Tablespoons fresh rosemary leaves, minced and divided
Kosher salt

Directions
1. Preheat oven to 350 degrees (F). Generously oil a large rimmed baking sheet (11"x17" or 12"x18") with vegetable oil. Set aside.
2. In a large bowl, combine cashews, walnut halves, almonds, 1 Tablespoon vegetable oil, the maple syrup, brown sugar, orange juice, and chipotle powder, mixing until nuts are evenly coated. Add 1 1/2 Tablespoons freshly minced rosemary and 1 teaspoon kosher salt and toss again. Transfer mixture to prepared baking sheet, spreading nuts out in one layer.
3. Roast nuts for approximately 25 minutes or until the nuts are glazed and golden brown. 
4. Remove nuts from oven and sprinkle with 1 1/2 Tablespoons freshly minced rosemary and 1 1/2 teaspoons kosher salt. Toss well.
5. Transfer to a parchment paper lined baking sheet and allow to cool slightly (approximately 10 minutes), stirring occasionally to prevent the nuts from sticking into clusters as they cool. 
6. Serve warm or cool completely. If not serving immediately, store in an airtight container at room temperature.

Monday, January 4, 2016

Swedish Meatballs with Lingonberries


"You are never too old to set another goal or dream a new dream." C. S. Lewis The arrival of a new year brings yet another opportunity to set new goals, dream new dreams. Although we don't really need to wait until January first for this to happen. In looking back at last year, I wasn't anywhere near committing to returning to running. Thinking about it yes. But thinking about something and doing something about it are two completely things. Truth be told, my list of things I think about doing but don't do anything about, is longer than it really should it be (you know that list, the one containing those things we aren't ready for or we have a plan for mind games we can be guilty of playing). Little did I know walking into my local running store last February would cause all of that thinking to shift into doing. The return to running brought more to my life in the last year than I had ever imagined. Even the unplanned stress fracture turned out to have at least one positive outcome (although at the time I saw the glass as half-empty). And more important than aiding Fleet Feet, Lululemon, and Athleta in meeting their fiscal goals for the year, has been being positively impacted by some new friends who have come into my life. It is often only in looking back that you realize how much more is gained when you start making your dreams your reality. Because if I had waited until I thought I was ready to run again, I would still be thinking about it instead of experiencing all of the (anticipated and unanticipated) benefits that come from running.

When I saw the recipe for Swedish Meatballs in the recent December/January issue of Food and Wine Magazine, I knew they would go on the 'make' rather go into that 'will think about, save for someday' list. For someone who loves Swedish Meatballs, it is hard even for me me to believe I have only made them a few times in my (long) life. Which translates into, I guess the recipe I was using wasn't one I was particularly enamored with.


Swedish meatballs (Köttbullar) have been considered both traditional old-world smorgasbord fare and a food served on festive occasions. Considered to be Sweden's national dish, they may have suffered an unfair identify crisis, due in large part to their 1960s cocktail party finger food reputation (but I am guessing those weren't being served with lingonberry jam). If you didn't grow up in a family celebrating all things Swedish, were too young to have experienced the 60s, don't buy frozen Kottbullars from IKEA, or had never driven hundreds of miles to eat at Al Johnson's Swedish Restaurant in Door Country, Wisconsin, you may not know what a deep love and strong craving for really good Swedish Meatballs feels like. But not to worry, all of that is about to change.

Early in Scandinavian history, beef was considered a luxury item, thus causing meatballs to be put into the category of a highly prized dish. Since its' first written cookbook appearance, numerous regional variations of Swedish meatball recipes are now reflective of ingredient availability. Although most are made with various ratios of meats (beef and pork), seasoned with spices (almost always allspice and sometimes nutmeg), and covered in a broth based cream gravy. When not served as an appetizer, Swedish meatballs are often served with buttered potatoes or egg noodles. And whether lingonberry jam is a required, obligatory accompaniment to them or not, it should be. 


So let's talk about the beef and pork ratio in these Swedish Meatballs. There seems to two common options. Either 1:1 or 2:1. Those that advocate for the 2:1 option assert the meatballs are springier and more flavorful if the amount of beef is double that of the pork. However, going with a 1:1 ground chuck to ground pork option resulted in incredibly flavorful and tender meatballs. So without doing side by side ratio taste test comparisons, I am in no position to advocate for one over the other. Although it's hard to believe these meatballs could have been better.

Some Swedish meatballs call for sautéing the onions before adding them to the meatball mixture. If you mince them finely, they will soften to the point where you notice their flavor but will not experience their crunch.


Early recipes for making Swedish Meatballs call for mixing them by hand (but then again they didn't have the options we have today). Using a standing mixer with a paddle attachment helped to create a cohesive meatball mixture and one not causing the meatballs to toughen when cooked. These savory meatballs were seasoned with allspice and freshly grated nutmeg, in addition to kosher salt and black pepper. The combination and amounts of spices were perfect and I wouldn't dare alter them.

As you know, I am a big fan of using an ice cream scoop every time I make cookies and/or meatballs. More than being slightly less messy, it helps to create perfect same size, same weight balls of delishness. The F&W recipe called for creating 1 1/2 ounce portions but 1 1/4 ounce size meatballs worked perfectly. In the future I might make 1 ounce meatballs if I was serving them as an appetizer at a larger gathering (making certain to adjustment cooking time).

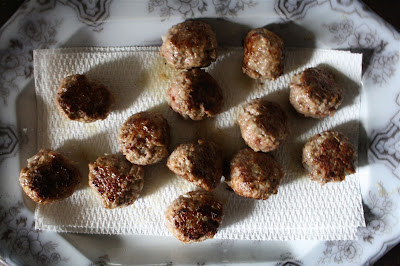
All of the ice cream scooped meatballs were eventually rolled by hand (because meatballs are supposed to be round, right?), they were sautĂ©ed in a combination of unsalted butter and extra virgin olive oil for a total of approximately four minutes. 


The meatballs were cooked in two batches and drained on paper towels while the sauce was prepared. After draining the 'fat' from the meatballs, a roux was created with unsalted butter, extra virgin olive oil, and flour until it became lightly browned. When whisking in the low sodium chicken broth and heavy cream, I would suggest you begin by adding the chicken broth first as the roux will seize slightly as soon as the liquid is added. Once the sauce begins to boil you return all of the partially cooked meatballs to the pan.


My cooking time for the meatballs after they were simmering in the sauce was closer to 15 instead of the 8-10 minutes suggested. A meat thermometer came in handy to test for their doneness (160 degrees F).


After removing only the cooked meatballs from the sauce, freshly chopped parsley and dill were added to the sauce before it was poured over the platter of Swedish Meatballs. This sauce was heavenly and from my palate's perspective didn't need to be seasoned with any additional kosher salt and black pepper.


The combination of flavors from the slightly tart, sweet jam with the warm savory meatballs was practically dizzying. When you now think of Swedish Meatballs, you also need to think of Lingonberries. They should be considered one of those inseparable food combinations. Because Swedish meatballs without lingonberries would be like having a vanilla ice cream sundae without the hot fudge, eating buttermilk pancakes without a large dollop of softened butter, or enjoying buffalo chicken wings without the blue cheese dip. And the good news? Nowadays lingonberry jam (the Felix brand) can easily be found at some grocery stores, at IKEA, at World Market, and of course, on Amazon. Of course, feel free to take a trip to Sweden to pick some lingonberries up.

It is quite possible some of you started the new year without any immediate plans to make Swedish Meatballs (with Lingonberry Jam) or getting your Swedish Meatball fix from either your favorite restaurant or at the dinner table of one of your Swedish friends. Heck, they may have not even been on your list of things you have been thinking of making. However, I hope this first blog posting of 2016 is the Swedish Meatball divine intervention you weren't expecting. Who knows what unintended benefits await you when you make them for family and/or friends!

Recipe
Swedish Meatballs with Lingonberries (ever so slight changes to Food and Wine's Swedish Meatballs with Cranberry Relish recipe, December 2015/January 2016 issue)

Ingredients
4 1/2 ounces whole wheat bread, coarsely torn (about 3 or 4 slices of a good quality whole wheat bread)
1/2 cup whole milk
12 ounces ground beef, preferably 85% lean (recommend using ground chuck)
12 ounces ground pork, preferably the shoulder if you can get it
1/2 cup minced yellow onion
1 large egg, lightly beaten
1/4 teaspoon ground allspice
1/4 teaspoon freshly grated nutmeg
1 1/2 teaspoons kosher salt, plus more for finishing
1/2 teaspoon black pepper, plus more for finishing
2 Tablespoons unsalted butter, divided
2 Tablespoons extra-virgin olive oil, divided
1 Tablespoon all-purpose flour
1 cup low-sodium chicken broth
1/4 cup heavy cream (at least a 17% fat content)
2 Tablespoons chopped fresh flat-leaf parsley
2 Tablespoons chopped fresh dill
Lingonberries (recommend Felix brand)

Directions
1. In a stand mixer fitted with a paddle attachment, soak the bread and milk until softened (approximately 5 minutes). Mix on low speed until blended and uniform, about 30 seconds.
2. Add ground beef, pork, minced onion and egg. Mix on low speed until incorporated into the bread mixture.
3. Sprinkle in salt, pepper, allspice, and nutmeg. Increase speed to medium and mix until incorporated, approximately 30 seconds.
4. Using an ice cream scoop, for 1 1/4 to 1 1/2 ounce portions of the meatball mixture. Set meatballs on a parchment paper lined baking sheet. When finished scooping all of the meatballs, roll into balls.
5. Line a platter with paper towels and set aside.
6. Heat a 12 inch skillet over medium-high heat. Add 1 Tablespoon of the unsalted butter and 1 Tablespoon of the extra-virgin olive oil. When butter has melted, add half of the meatballs and turn down heat to medium. Cook meatballs until browned on the bottom, approximately 2 minutes. Flip meatballs over and cook for an additional 2 minutes. Transfer meatballs to platter. Repeat with remaining meatballs.
7. Pour off the fat and return the skillet to medium heat. Add the 1 Tablespoon of the unsalted butter and 1 Tablespoon of the extra-virgin olive oil. When butter has melted, add flour, and cook stirring with a wood spoon until the mixture has turned a light brown (approximately 60-90 seconds). 
8. Slowly whisk in chicken stock and heavy cream. Stir until smooth. Bring to a boil.
9. Immediately add meatballs, reduce heat to medium and simmer shaking the pan occasionally until the meatballs cook through (160 degrees F) and the sauce thickens further, approximately 10-15 minutes. Note: To insure doneness, recommend using a meat thermometer.
10. Transfer meatballs to serving platter. Season with salt and pepper if necessary. Stir in chopped herbs (parsley and dill) into the sauce. Pour sauce over the meatballs and serve immediately with a side of lingonberries.
Notes: (1) Can be served as an appetizer or main course. If serving a main course, serve over buttered potatoes or egg noodles. (2) If serving as an appetizer, reduce size of meatballs to 1 ounce and make adjustments in cooking time as necessary.