Thursday, September 15, 2016

A Nice "Vegetarian" Lasagna


A couple of weeks ago, one of my friends said 'wouldn't it be fun to make homemade pasta together?'. I think I may have responded with a non-committal 'sure'. It had been so long since I had made homemade pasta, I vaguely remembered where I last saw my Atlas pasta maker. As it turned out it was gathering dust sitting on a shelf in the garage (I know, why would anyone store a pasta maker in the garage?). And then last week I read about a new cookbook, "Small Victories: Recipes, Advice & Hundreds of Ideas for Home-Cooking Triumphs", written by Julia Turshen. Intrigued by the comments made by some of her peers, I drove over to Barnes and Noble to check it out. After spending more than a half hour going through the book, I needed to buy it. Not only because it was one of the most inspiring cookbooks to come out since Tasting Rome and Florentine, but it was covered in my fingerprints and some of my drool (proverbially speaking of course). So many of her recipes leaped from the pages screaming 'make me first'. With the idea of making homemade pasta still resonating somewhere in my subconscious along with needing to find a great vegetarian 'pasta' recipe to make for an upcoming dinner party, her recipe for 'A Nice Lasagna' won out. And quite the winner it turned out to be. 


Any trepidation I had about trying my hand (again) at making homemade pasta dissipated as I read through the recipe. For some unexplainable reason it seemed much simpler than I had remembered. And as it turned out, it was. Okay, before you decide not to make this recipe (and God forbid stop reading this post) because (1) you don't have a pasta maker, (2) you have a pasta maker and have no idea where it is, (3) you tried making pasta before and well it wasn't worth all the effort, or (4) you have no interest in making homemade pasta, let me just say a couple of things about this recipe.


First, while the homemade pasta makes this dish feel as if it came out of a five star Italian restaurant, you can still make it using store bought fresh pasta (obstacle one removed). Second, the tomato sauce is unlike anything you have ever tasted. And lastly, it can be made early in the day or a day ahead, covered and refrigerated. Which means all you need to do is open the wine, make a salad, cut some bread, and put it in the oven to bake. After tasting this lasagna, it is quite possible you will never order lasagna in a restaurant again, either here in the states or in Italy. Yes, I am being completely serious.


So let's first talk about the tomato sauce. A sauce with only five ingredients: whole plum canned tomatoes, sliced garlic cloves, kosher salt, extra-virgin olive oil, and creme fraiche. Yes, creme fraiche. It adds a creaminess and richness to the sauce unlike any other 'tomato sauce' ingredient. And I would venture to bet you will never make a lasagna with ricotta cheese again. 


The original recipe called for four cloves of garlic. I used five because I love the flavor garlic imparts to a sauce. Five cloves was not at all overpowering. A great quality extra-virgin olive oil imparts incredible flavor to a tomato sauce. A bottle of the good stuff is well worth the money. 


In a large, heavy saucepan the garlic is first sautéed in the extra-virgin oil (this takes about a minute as long as you get your oil hot before adding the garlic). The whole canned plum tomatoes (that you first break up with your hands) and a teaspoon of salt go in next. After bringing the sauce to a boil, it needs to simmer for 30 to 45 minutes. In the spirit of 'more than be better', I simmered my sauce for 45 minutes before removing from heat and whisking in the creme fraiche. While the sauce cools to room temperature, you can begin making the homemade pasta.


The pasta is made with only three ingredients: all-purpose flour, three large (room temperature) eggs, and a teaspoon of kosher salt. 


A food processor does all of the work. This is a no-knead pasta dough! After the dough comes together, it is wrapped in cellophane and allowed to sit at room temperature for an hour before being put through the pasta maker. If you have never made homemade pasta before, consider giving it a try. 


There are only two cheeses in this lasagna: Parmigiano-Reggiano and fresh, whole milk mozzarella (versus the slightly rubbery mozzarella, sometimes called low-moisture mozzarella). Although grating fresh, whole-milk mozzarella is a little messier, it's softer, buttery texture gives a more delicate flavor to the finished dish. Like a high quality extra-virgin olive oil, great ingredients make great dishes. So splurge on and grate your own Parmigiano-Reggiano and fresh, whole milk mozzarella.


There is no need to cook the sheets of homemade pasta as the sauce does all of the work. Beginning with a layer of sauce on the bottom of 9"x12" pan comes a layer of pasta, a thin layer of sauce, a sprinkling of the grated cheeses, basil leaves (torn into pieces if large), and another thin layer of sauce. This assembly is repeated until all of the pasta is used. The final, top layers are sauce and the grated cheeses.


In a 400 degree preheated oven, the lasagna bakes for 35-40 minutes (my baking time was 40 minutes). Allowing the lasagna to rest for 15-30 minutes before cutting is critical and will ensure the cut squares of lasagna remain intact when plated. Note: I waited 30 minutes. To keep warm, you can tent a piece of aluminum foil over the resting lasagna before cutting, however, it retained its' heat without it. 


I had considered adding layers of roasted vegetables to the lasagna, but honestly it was as close to lasagna perfection without them. Before you decide whether to add them or not, first make this lasagna without them. The beauty of this deceptively light lasagna is in its' simplicity.


If anyone ever asked me to participate in a lasagna throw down, I would win it with this lasagna!  Of course, it would be a shared win with the majority of the credit going to Julia Turshen. Her recipe is not just a small victory, it is pure genius. Yes, it is really that good. This is the kind of 'forget your table manners and lick the plate clean' dish you will want to guiltlessly gorge yourself on.

Recipe
A Nice "Vegetarian" Lasagna (slight adaptations to Julia Turshen's A Nice Lasagna recipe shared in her recently published cookbook "Small Victories: Recipes, Advice & Hundreds of Ideas for Home-Cooking Triumphs")

Ingredients
Sauce
Two 28 ounce (794 g) cans whole peeled plum tomatoes (I used Delallo Organic Italian Whole Peeled Plum Tomatoes in heavy juice, but any good whole peeled Italian tomatoes should work.)
3 Tablespoons extra-virgin olive oil
4-5 cloves of garlic, thinly sliced
1 teaspoon kosher salt, plus more for taste, if needed
8 ounces creme fraiche (recommend Vermont Creamery's Creme Fraiche)

Pasta
2 1/4 cups (270 g) all-purpose flour, plus more as needed
3 large eggs, room temperature
1 teaspoon kosher salt

Assembly
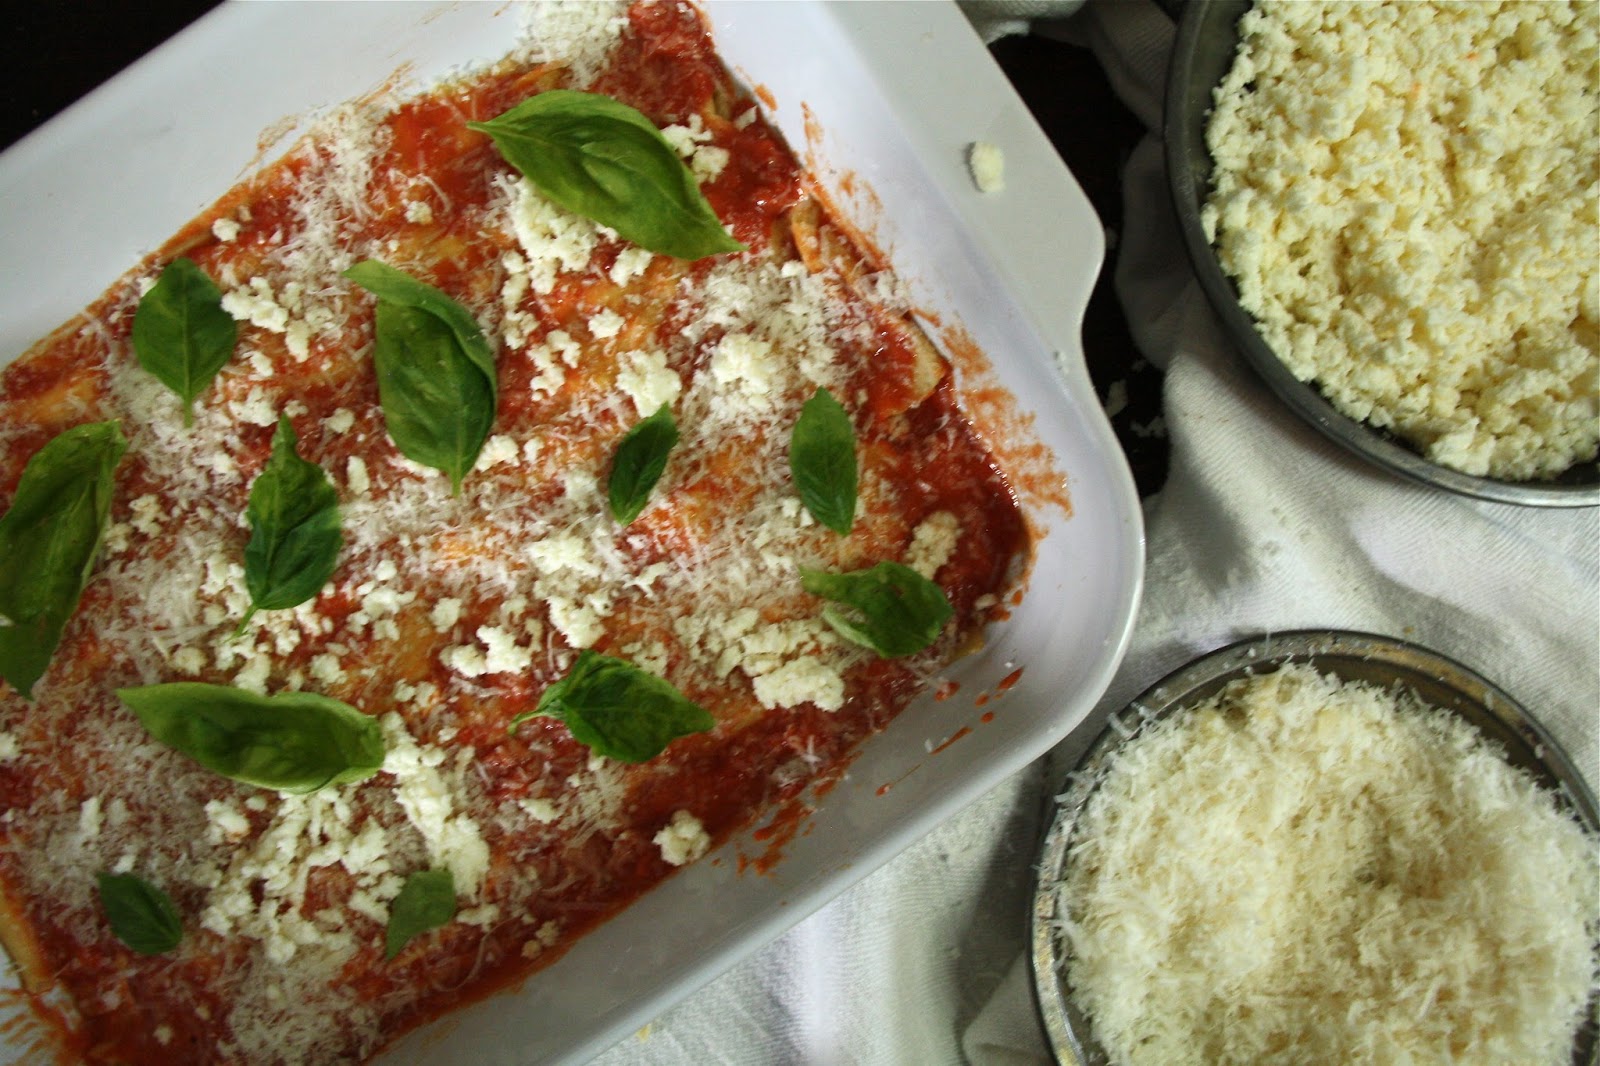
1 generous cup (120-140 g) finely grated Parmigiano-Reggiano cheese
12 ounces coarsely grated fresh, whole-milk mozzarella cheese
1 to 2 large handful fresh basil leaves, torn into small pieces if large (Note: Original recipe called for 2 large handfuls)

Directions
Sauce
1. In a medium to large sized bowl, crush the tomatoes with your hands until they are in bite sized pieces.
2. In a heavy bottomed, large saucepan, heat the extra-virgin olive oil over medium-high heat. Add sliced garlic and cook until it begins to sizzle (approximately 1 minutes). Add the hand crushed tomatoes and one teaspoon of kosher salt. 
3. Bring to a boil, then lower heat and simmer for 30-45 minutes, stirring every so often. Note: The sauce should be slightly reduced. 
4. Remove from the heat and whisk in the creme fraiche. Season with additional salt, if needed. Allow sauce to cool to room temperature.

Pasta
1. Combine the flour, eggs and salt in the bowl of a food processor. Run the machine until the dough forms around the blade and cleans the side of the bowl. Notes: The dough should not stick to your fingers when you touch it. If the dough is too dry, add water 1 teaspoon at a time. If it is too sticky, add a little flour 1 teaspoon at a time until the dough comes together. The size of your eggs (even large eggs have some variability) and the humidity in the air may affect your dough.
2. Remove dough from the food processor, form into a flat disk, lightly flour, and tightly wrap in plastic wrap. Let the dough rest at room temperature for an hour.
3. Line a baking sheet with parchment paper and have additional sheets of parchment paper cut.
4. Cut the rested dough into 6 pieces. Work with one piece at a time, keeping other pieces covered in plastic wrap.
5. Run the dough through the pasta machine beginning with the widest setting (this was a 1 on my Atlas) rolling it twice on this setting. Continue working the dough through the narrower settings until the pasta reaches a thickness of an envelope. It should be thin, but not transparent. Note: I ended on setting 5.
6. Lay the pasta sheets on the parchment paper lined baking pan. Cover with a piece of parchment paper. Note: I cut each sheet into three pieces before covering with the parchment paper. 
7. Repeat the process with the rest of the dough.
Assembly
1. Preheat oven to 400 degrees (F). 
2. Ladle a thin layer of the pasta sauce on the bottom of the pan. Spread to cover the surface of the baking dish.
3. Add a layer of pasta (first brushing off any excess flour) to form a single layer. Spoon sauce over the pasta, just enough to cover. Sprinkle grated cheeses and basil. 
4. Repeat process beginning with a thin layer of sauce until you have used up all of the pasta. Note: I ended up with six layers of pasta.
5. The final, top layer should be sauce and the cheeses.
6. Bake uncovered until it has browned beautifully and the edges are bubbling. Approximately 35-40 minutes.
7. Allow the lasagna to rest for 15 to 30 minutes before slicing and serving. The rest time allows the pasta to fully absorb the hot, bubbling sauce. Note: A wait time of 30 minutes resulted in perfectly cut slices.

Notes: (1) Make the sauce first as it needs to cool before assembling the lasagna. (2) If you don't make the homemade pasta, use fresh sheets of store-bought pasta. (3) I was conservative with the amount of fresh basil. Next time I would increase how much I used. The original recipe called for 2 handfuls, I probably used 1 handful. (4) Use the best ingredients available. (5) I increased the amount of cheeses slightly. Original recipe called for 1 cup (100 g) of grated parmesan and mozzarella cheeses. (6) Make this lasagna sooner rather than later.


Weekend Farmer's Market finds.


Monday, September 12, 2016

Autumn Apple Recipe Round-Up


Days getting shorter, air feeling crisper, wind breezes coming through the window, leaves beginning to change the color of the landscape, and apples hanging patiently on branches waiting to be picked. All signs of autumn's much anticipated arrival. And in less than two weeks, I will be spending the beginning of my favorite season in the mountains of Colorado. Be still my heart!! Containing my enthusiasm may prove to be an even greater challenge than figuring out how to travel with only one suitcase (says the Queen of Overpacking). Were it not for a few distractions going on in my life (an upcoming half-marathon), I might not get any sleep in the next two weeks.

It was on a trip to Colorado almost ten years ago where I first discovered and tasted Honey Crisp Apples. In one bite I was smitten. For awhile this sweet, crisp, firm hybrid apple was almost impossible to find at grocery stores. Fortunately, the number of orchards growing this apple have increased significantly over the years, now making them readily available. Honey Crisps are my go to apples to put on a cheese platter and just one of the many varieties of apples used in the cakes, crostatas, pies, crisps, tortas, and galettes coming out of my oven. There have been a number of apple recipes posted to the blog over the years. To celebrate the start of 'apple season' I am re-posting nine of my favorites. Each of the recipes recommend the best apple or apples to use as not all apples are created equal when baked! Note: There are other great apple recipes to be found in the recipe index on the blog as well (although, yikes, you might not be able to judge this by their photos) so look at this round-up as a starting point to inspire you. 

Happy apple baking season, happy autumn, happy September!


Brown Butter Caramelized Apple Crisp


Apple Cider Doughnut Cake


Torta di Mele (Apple Cake)


The French Laundry's Cranberry and Apple Kuchen with Hot Cream Sauce


Apple Galette


Baked Apples ala Mode


Baked Apples with Oat Crumble


Fresh Apple Cake


Rustic Apple Crostata

Tuesday, September 6, 2016

Peanut Butter and Chocolate Espresso Doughnuts


The earliest description of or reference to the doughnut first appeared in print in 1809. In his book "A History of New York, from the Beginning of the World to the End of the Dutch Dynasty", Washington Irving wrote "Sometimes the table was graced with immense apple-pies, or saucers full of preserved peaches and pears; but it was always sure to boast of an enormous dish of balls of sweetened dough, fried in hog's fat, and called dough-nuts, or oly koeks: a delicious kind of cake, at present scarce in this city, excepting in genuine Dutch families." While there hasn't been any debate regarding a doughnut's deliciousness over the past two centuries, apparently there has been some contention over whether or not it should be spelled doughnut or donut. The AP Stylebook (the journalists bible) and Grammarly (the site for grammar nuts) prefer the word 'doughnut', while the internet skews significantly toward the spelling 'donut'. Which means if you are doing an exhaustive search for 'doughnut' recipes on the internet, you may come up short if you don't also look for 'donut' recipes. Because we sometimes look for a scapegoat in times of conflicts, the finger has often been pointed at Dunkin' Donuts for popularizing the shortened spelling. Yet regardless of which spelling camp one falls in, time would be much better spent on making and eating these confections. Right?

So let's talk about why you should be making these Peanut Butter and Chocolate Espresso Doughnuts, why you need them in your life.


There may be no better doughnut flavor combination than a deep rich chocolate and creamy, salty peanut butter one. It's classic, it's timeless, and we have H.B. Reese, a farmer working for Hershey's to thank for giving us this winning combination. 


Do you think it's delusional to believe dipping a chocolate expresso baked doughnut into peanut butter icing is a way to ensure we get our daily intake of protein? Which means the icing actually makes them good for you, right? I suppose the answers depend on how gifted one is at rationalizing the irrational. 


Unlike the earliest doughnuts, these are baked and not fried. Which, if you think about it, makes them one of the healthier versions, right? (Again, you decide what you want your answer to be. There is no right or wrong here.) After combining the dry ingredients with wet ingredients, the batter is spooned or piped into a doughnut pan. Either method works. This recipe will make 18 mini-doughnuts. If for some reason you only want 9 of them (which I can't' for the life of me figure out why you would), you can halve the ingredients. 


The mini-sized doughnuts bake for 13-15 minutes in a preheated 325 degree (F) oven. After short three to four minute rest, the doughnuts are carefully turned out onto a cooling rack. 


Once you make this peanut butter icing, you will be making it all of the time. Just remember to sift your confectionary sugar before mixing all of the icing ingredients together. This doughnut deserves to be glazed with a smooth icing.


The doughnuts can be dipped once they have cooled to room temperature (approximately 20-30 minutes).


While the icing on the doughnuts is still wet, top with sprinkles. Chocolate sprinkles, colored sprinkles, chocolate and colored sprinkles, any kind of sprinkles. Just sprinkle them!


From beginning to end it takes a little more than hour to make these almost too pretty to eat Peanut Butter and Chocolate Espresso Doughnuts. I won't tell you how long it will take for all of them to be eaten. 


Regular sized doughnuts are 'too big' for me. The mini doughnuts are just the right size. Big enough for a couple of satisfying bites and small enough to eat two (without feeling too much guilt) if I wanted. Bring these Peanut Butter and Chocolate Espresso Doughnuts to your next meeting or put them on a platter and serve to family, friends or co-workers and watch them disappear! 

Recipe
Peanut Butter and Chocolate Espresso Doughnuts (slight adaptations to the Baked Espresso Glazed Doughnuts from Shutterbean and Joy the Baker's Mini Peanut Butter and Chocolate Baked Donuts)
(makes approximately 18 mini-doughnuts)

Ingredients
Doughnuts
1 cup all-purpose flour
1 cup cake flour
1 teaspoon baking soda
1/2 cup unsweetened cocoa
1 Tablespoons espresso powder
1/2 teaspoon kosher salt
1 cup low-fat buttermilk
1 1/2 cups light brown sugar, firmly packed
2 large eggs
1/2 cup vegetable oil
2 teaspoons vanilla
Substitution Note: Can use 2 cups of all-purpose instead of 1 cup of all-purpose flour and 1 cup of cake flour)

Peanut Butter Icing
1 1/2 cups confectionary sugar, sifted
1/4 to 1/2 cup smooth peanut butter (Recommend Jif Peanut Butter) 
2 teaspoons vanilla
4-6 Tablespoons whole milk
generous pinch of kosher salt

Chocolate and/or colored sprinkles for decorating

Directions
1. Preheat oven to 325 degrees (F). Spray a mini-doughnut pan with cooking spray and set aside.
2. In a medium sized bowl, sift together the flour(s), baking soda, espresso powder, unsweetened cocoa, and kosher salt. Set aside.
3. In another bowl, whisk together the buttermilk, egg, vegetable oil and vanilla until blended and smooth.
4. Add wet ingredients to dry ingredients, whisking until well blended and all ingredients are well incorporated.
5. Spoon doughnut batter into a pastry bag (or into a large resealable plastic bag) and squeeze batter into the prepared doughnut pan (about 2/3 full). Bake for 13-15 minutes or until doughnuts spring back when lightly pressed.
6. Allow doughnuts to cool in pan for at least 3 minutes, then turn carefully out onto a rack to cool. Allow the doughnuts to cool to room temperature before icing.
7. For the peanut butter icing: Combine all of the icing ingredients in a medium sized bowl. Whisk until smooth. Transfer frosting to a smaller bowl. Note: Begin mixing frosting with 4 Tablespoons of whole milk. Add additional milk, one tablespoon at a time, if frosting is too thick.
8. Dip the tops of the cooled doughnuts into the icing. Return to cooling rack  and top each of the cupcakes with chocolate sprinkles, colored sprinkles, or a combination of both.
9. Allow the icing to set. 

Notes: (1) Make sure to sift your confectionary to ensure the creamiest, smoothest icing possible. (2) I used 1/2 cup of creamy peanut butter, but will try reducing to 1/4 cup the next time to determine which I like better. (3) I love adding the espresso powder to these doughnuts as it deepens the flavor of the chocolate, but you can leave it out if you want to. (4) I absolutely love the NordicWare non-stick mini-doughnut pan but I still prepare the pan with cooking spray when making these doughnuts.

Fruits and vegetables aren't the only things found at the Farmer's Market.

Thursday, September 1, 2016

Cherry Tomato Jam for Cheese


With the arrival of September came the departure of the unwelcome oppressive humidity July and August brought this year. And in the last twenty four hours I have been transformed into one of those slightly annoying giddy school girls. Not because September is the official start of the Pumpkin Latte season or because it's my birthday month or because within the next couple of weeks the apple orchards will have an abundance of fruit to be harvested from its' trees or because the astronomical start to fall will soon arrive or because the cooler night air will remind me of what Wisconsin felt like during my childhood family vacations or because in a few short weeks I will be breathing in the Colorado mountain air and hiking on trails ablaze with the golden leaves of aspens set against an even deeper blue sky. Although each of those reasons on their own merit are enough to cause me to be heedlessly dizzy, their collective compounding effects have me feeling so deliriously punch-drunk I should probably not get behind the wheel of a car anytime soon. If there was ever a month I wish could be endlessly repeated, it would be September.


Besides champagne grapes, prune plums and apples, September is the month where farmer's markets and gardens are overflowing with all sorts of intensely flavorful vine ripened tomatoes. If there are any regrets during this month, it's that I didn't plant any tomatoes. There are a litany of reasons (or rather I should say excuses) why my kitchen will not reap the benefits of backyard home-grown tomatoes. Suffice to say tomato eating squirrels are one of my least favorite creatures on the planet and there seems to be a disproportionate number of them living in my neighborhood. Thankfully there are more than enough farms and gardens offering up their tomato bounties to those of us who need to overdose ourselves on those juicy, deeply flavorful summer tomatoes in order to get through the tomato famine months ahead. A tomato in September is not the same 'fruit' as the ones sold or served in January. They just aren't. At least for those of us who live in the midwest or northeast. And anyone who orders a Caprese Salad in a restaurant from late October to June, well I would seriously question whether their taste buds are in good working order.


The last time I made a Tomato Jam it was as the condiment for a Savory Bread Pudding. That one was made with heirloom tomatoes, a lemon, brown sugar, granulated sugar, and some water. While browsing through one of my cookbooks, I came across a recipe for a Cherry Tomato Jam for Cheese. This one being made with cherry (or grape) tomatoes, granulated sugar, lemon zest, freshly squeezed lemon juice, and finely chopped fresh rosemary. My culinary knowledge must be slipping as I had never thought to serve a Tomato Jam with cheese before. Clearly, as I have now discovered, I had been missing out.


If you have never made jam before, nothing is easier than making a Tomato Jam, especially this one. This particular Tomato Jam can be made with cherry tomatoes, grape tomatoes, or a combination of the both. You could even make it with baby heirloom tomatoes. 


The tomatoes are first roasted on a baking sheet in a preheated 350 degree (F) oven before they are cooked in heavy bottomed saucepan on the stove. While the inspiration recipe called for roasting them to remove their skins, I choose to keep the skins on to give a little more texture to the finished jam.


Initially the roasted tomatoes and granulated sugar are cooked in a heavy bottomed saucepan over medium heat (to allow the sugar to melt). Once the sugar melts the heat is increased to medium-high causing the mixture to come to a rapid boil. Stirring frequently, the tomato sugar mixture is boiled for 5 to 7 minutes or until it becomes thick and syrupy. My cooking time was closer to 7 minutes.


As soon as the tomato sugar mixture reaches the desired consistency it is removed from the heat. The lemon zest, fresh squeezed lemon juice and chopped rosemary are then stirred in. The original recipe called for 3 Tablespoons of lemon juice and 1/2 teaspoon of finely chopped fresh rosemary, both of which I used. While the lemon flavor from the zest and juice is not 'too' much, I would recommend you begin by adding 2 Tablespoons and tasting before adding the third tablespoon. Once the jam began to cool slightly, I decided there wasn't enough of a rosemary presence so I added a tad more (thus my recommendation below to use a generous 1/2 teaspoon). You won't be sorry about being generous with the rosemary as it is the perfect counterbalance to the sweetness of the tomatoes and tartness of the lemon flavor.


I decided to use two mini (5.2 ounce capacity) Weck canning jars instead of putting all of the Tomato Jam into a single jar. This gave me the option of giving one away as a gift (although after tasting it, I am selfishly holding onto to both jars).


The slightly cooled jars are stored in the refrigerator. 

There are any number of cheeses you could serve the Tomato Jam with. Some of the options include a creamy goat cheese, a double creme gouda, a fresh Robiola, and/or an aged Pecorino. 


I am not exaggerating when I say your next cocktail party, the one where you put together a small cheese platter as an appetizer (or for dessert), needs to have this Tomato Jam. Yes, I know Fig Jam is really popular these days (and yes, it really is good), but this savory/sweet tomato jam will set your cheese platter apart from all of the others your friends and family have been noshing on for years. However, while having a stellar cheese tray has a number of merits, the experience of eating this jam with cheese will be nothing short of a 'in the best of ways a' life-changing, rock your world one'. 

If by chance you have a garden full of cherry or grape tomatoes, well you are luckier than the rest of us who either have to rely on tomato handouts from our friends or have to schlep over to a farm stand or farmer's market (because sometimes the ones at grocery stores aren't as flavorful) to buy them.

Recipe
Cherry Tomato Jam for Cheese (a slightly revised version of the Cherry Tomato Jam for Cheese recipe as shared in the cookbook: The Cheesemonger's Kitchen: Celebrating Cheese in 90 recipes).

Ingredients
2 cups (340 g) cherry or grape tomatoes (or a mix of the two), cut in half
3/4 cup (150 g) granulated sugar
2 -3 Tablespoons freshly squeezed lemon juice
Zest of 1 lemon
generous 1/2 teaspoon finely chopped fresh rosemary
Serving: Along with thin cheese crackers serve with a creamy goat cheese, a double creme gouda, a fresh Robiola, and/or an aged Pecorino.

Directions
1. Preheat oven to 350 degrees (F). Line a rimmed baking sheet with aluminum foil.
2. Place the cut tomatoes halves on the prepared baking sheet. Bake for 15 minutes to loosen the skins.
3. Remove tomatoes from oven and place in a heavy bottomed saucepan. Add sugar.
4. Over medium heat gently melt sugar, then bring to a boil and cook (boiling rapidly) for 5 to 7 minutes, or until thick and syrupy. Notes: Stir frequently. My cooking time was 7 minutes.
5. Remove from heat and add lemon zest, freshly squeezed lemon juice and chopped rosemary.
6. Transfer tomato jam to clean, sterilized jars. Seal well. When cool, place jam in the refrigerator.
7. The tomato jam can be kept refrigerated for up to 2 weeks, if it lasts that long!


English Garden Views at the Chicago Botanic Garden