Friday, March 10, 2017

Irish Soda Bread with Raisins and Caraway


In the event I ever travel to Ireland (a place high on my bucket list), I fully expect to be detained, deported, or deterred from entering the country for posting this recipe for Irish Soda Bread with Raisins and Caraway. And, if by some chance, the authorities do not prevent me from leaving the airport, I anticipate a contingent from The Society for the Preservation of Irish Soda Bread will be there to greet me. Not to welcome me, but rather for the purpose of very politely informing me a true Irish Soda Bread is made with only four ingredients: flour, buttermilk, salt and baking soda. Calling my "Americanized" version "Irish" was a bit of stretch. And, of course, they would be right. In this paranoid fantasy moment I imagine I would have at least two options: graciously ask for their forgiveness or ever so kindly attempt to explain myself by sharing a bit of soda bread's history. Because leaving without having explored the lush landscapes, cliffs along the seashores, charming towns, and a couple of authentic Irish pubs, would not be an option.


While it's true the earliest reference to Irish Soda Bread appeared in the November 1836 edition of Farmer's Magazine (referencing a newspaper article for the bread in County Down) the origin of Soda Bread technically was not Ireland (the American Indians actually made the earliest version of soda bread using pearl ash to leaven the bread). The Irish Soda Bread tradition actually began shortly after baking soda was invented in the mid-1800's. It was quickly adopted by Irish women, as it allowed Irish flour to rise setting off the creation of closely guarded family Irish Soda Bread recipes. History aside, the wisest option would be to ask for forgiveness for taking liberties with a revered, traditional Irish Soda Bread recipe. All the while keeping my fingers crossed the old saying 'it's always best to beg for forgiveness than ask for permission' would actually work. My only default to earn their good graces would be to pray the fairies were with me.

One of the concerns about Irish Soda Bread is dryness and crumbly-ness. This one is neither. There are literally hundreds of Irish Soda Bread recipes to choose from. In addition to the four ingredient traditional Irish Soda Bread, variations include the use of both all-purpose and whole wheat/whole wheat pastry flour; raisins or currants soaked in Irish Whiskey; eggs or no eggs; melted instead of cold butter; and ,orange or lemon peel. Narrowing down my choices to three, I went back and forth between them before deciding on the recipe originally shared in Bon Appetit. Even after making a decision, I wasn't sure about the use of both caraway seeds and raisins. In the end, I decided not to eliminate either of them. It turned out to be a really good decision.


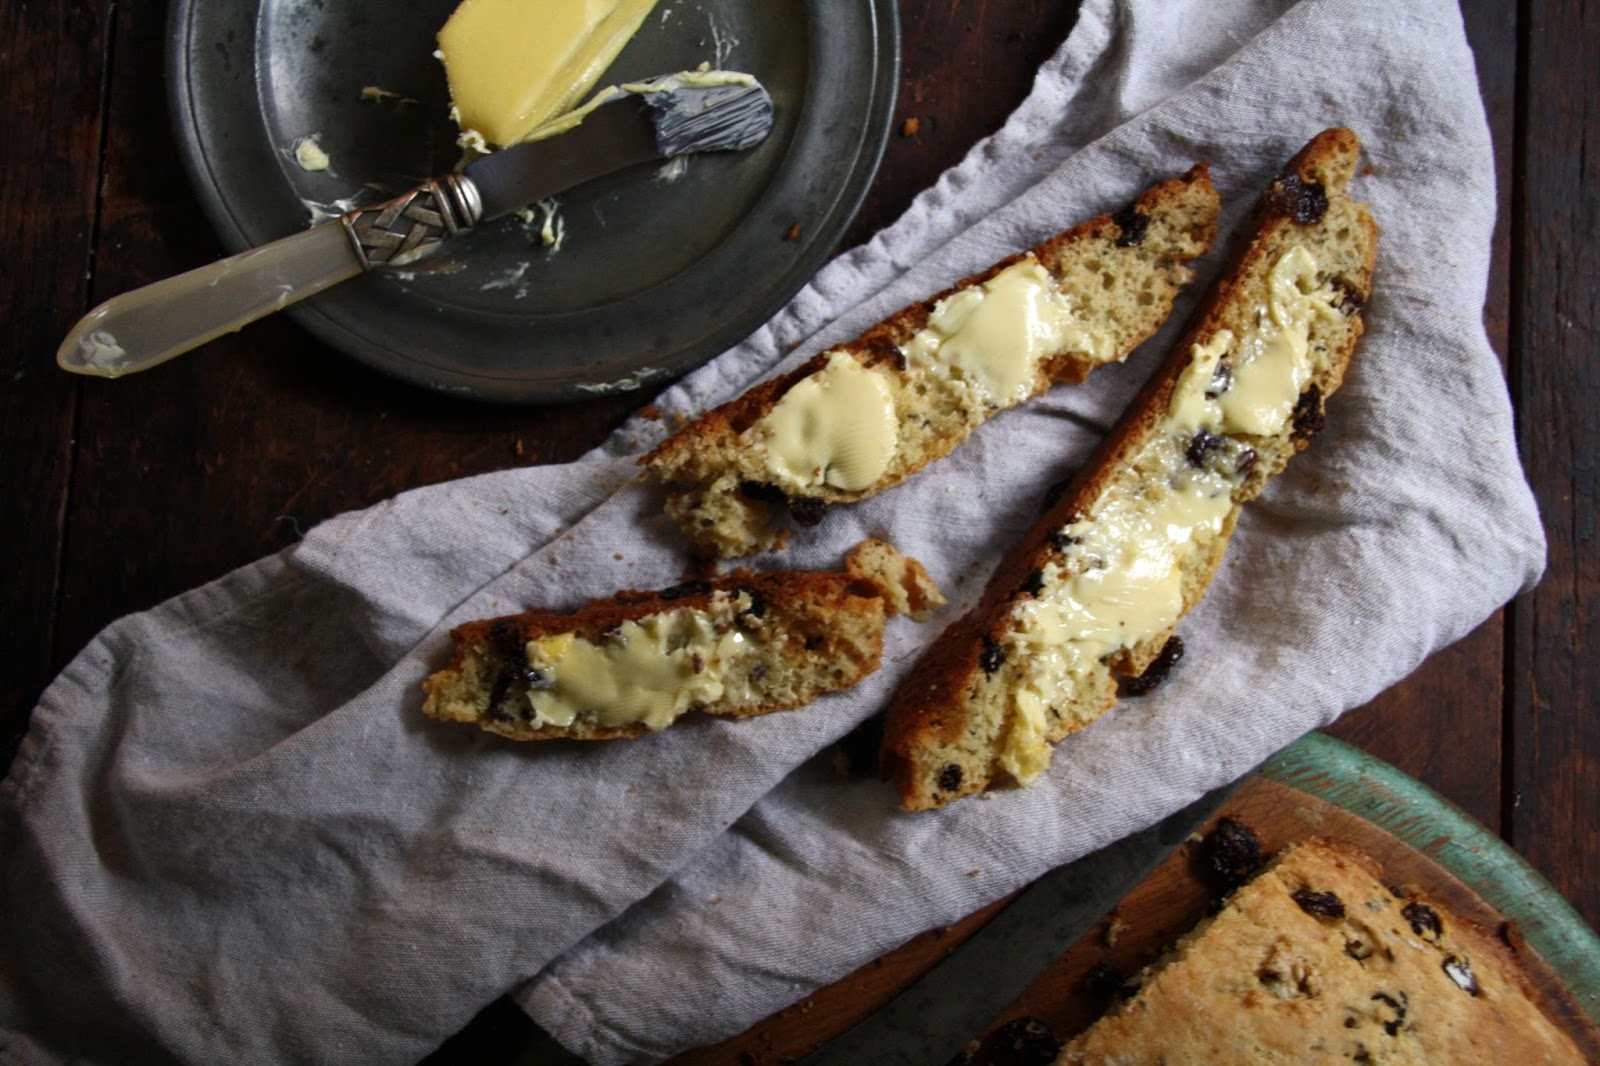
If there is one way to make this "Americanized" version of Irish Soda Bread with Raisins and Caraway a little more Irish, it would be to serve it with some softened Irish butter.

In a large bowl, whisk together the flour, sugar, baking soda, baking powder and salt. I used a fine sea salt instead of my usual Kosher salt. In lieu of using only all-purpose flour, you can use a combination of all-purpose flour and whole wheat pastry flour. See note below.


Instead of cutting the butter into small cubes, grating the butter makes it much easier to incorporate into the flour, sugar, baking soda, baking powder, and salt mixture.

Using your hands, blend the butter into dry ingredients until it looks like a coarse meal. Stir in the raisins and caraway seeds with a wooden spoons. You might think two and a half cups of dark raisins is too much. Trust me, it's not. The proportions in this Irish Soda Bread are pretty close to perfect.


Whisk together the buttermilk and egg. Pour into the dry ingredients. Begin to bring the dough together with a wooden spoon. Once the flour has been fully incorporated, knead very gently. Note: The dough will be very sticky. Flouring your hands before kneading makes it slightly less messy.

Transfer the dough to your prepared baking pan and shape into a mounded round loaf.


"You have to cut a cross in the dough to let the fairies out." There are actually two schools of thought on the cross cut into the dough. Some say it's to let the fairies escape, others say it brings blessings from above. You can choose to believe one or the other, or both, but I dare not upset the fairies. Altering the ingredients in an Irish Soda Bread recipe is one thing, not respecting the fairies is another. When making the cross on the top of the dough, cut deep into (apparently I did not cut deep enough as my finished bread had a barely discernible cross).


This recipe makes either one really large loaf or two perfectly size loaves. One of the benefits of dividing the dough into two loaves is that you will have one to give away.

If you have a cast iron pan, use it to get the crispiest edges to your soda bread. If you don't have them, use cake pans. Whichever pan you use, generously butter the pan and line the bottom withe parchment paper. Many Irish Soda Breads are baked at a high heat (i.e., 400 degrees (F) or higher. This Soda Bread is baked in 350 degree (F) oven, at temperature contributing to a moister bread. A single loaf will bake in approximately 70-80 minutes while two smaller loaves will bake in approximately 50-55 minutes.


To test for doneness, insert a tester into the center or side of bread. If the tester comes out clean, the bread is done. A less technical way of testing for doneness is to tap on the top of the bread. If it sounds hard but hollow, the bread is done. The baked bread remains in the baking pan for 10 minutes before it is removed and placed on a wire rack to cool. Cut into slices, serve with some room temperature (Irish) butter, then sit back and savor.

Although I was initially reluctant to use both raisins and caraway seeds, but I can't imagine making this soda bread using only or the other or omitting them completely. The sweetness of the moist bread with its' crunchy exterior combined with the sweet/savory contrast of the raisins and caraway seeds makes this Irish Soda Bread mouth-watering delicious. While it may not be a technically traditional Irish Soda Bread, it is one definitely worthy of being made well after St. Patrick's Day.
Recipe
Irish Soda Bread with Raisins and Caraway (slight adaptation to the Irish Soda Bread with Raisins and Caraway as shared by Bon Appetit, October 2002)
Updated March 2019

Ingredients
5 cups (640 grams) of all-purpose flour
1 cup (200 grams) granulated sugar
1 Tablespoon baking powder
1 slightly rounded teaspoon (8 grams) baking soda
1 1/2 teaspoons fine sea salt
8 Tablespoons (1 stick) cold European unsalted butter, grated (Recommend Kerrygold Butter)
2 1/2 - 3 cups dark raisins
2 1/2 to 3 Tablespoons caraway seeds
2 1/2 cups buttermilk
1 large egg
Best quality Irish butter for serving 

Directions
1. Preheat oven to 350 degrees (F). Generously butter one 11 or 12 inch cast iron pan or two 8"cast iron or cake pans. Line bottom of pan with parchment paper and lightly butter.
2. In a large bowl, whisk together the flour, sugar, baking powder, baking soda and sea salt.
3. Add grated butter. Using your fingertips, rub in butter until coarse crumbs form.
4. Stir in raisins and caraway seeds.
5. Whisk together buttermilk and egg in a medium bowl to blend. Add to dough. Using a wooden spoon, stir until well incorporated (dough will be sticky). Flour your hands and lightly knead the dough in the bowl for 3 to 5 minutes or until the dough comes together. 
6. Transfer dough to prepared pans. Smooth top, mounding slightly in the center. Using a sharp knife dipped in flour, cut a 1 inch deep cross into top center of the dough.
7. Bake until bread is cooked through and tester comes out clean when inserted into the center of the bread. For a single loaf, baking time will be approximately 70-80 minutes, for two loaves baking time will be 50-55 minutes.
8. Allow the bread to cool in the pan for 10 minutes before turning out onto a rack to cool completely.
9. Cut into slices and serve with room temperature (Irish) butter.
10. Wrap bread tightly with plastic wrap. Store at room temperature. The bread is best on the day it is baked and remains delicious, although slightly chewier, for two additional days.

Notes: (1) I measured the dry ingredients on a digital scale. If you decide to use both all-purpose flour and whole wheat pastry flour, measuring on a scale is critical as the wheat flour has a greater density, weighing less (120 grams per cup) than all-purpose flour. (2) Make sure to make a deep cross into your dough before putting in the oven. Not only will be this ensure the fairies are let out, your finished loaf will have a beautiful, rustic look to it. (3) I used Kerrygold Irish butter for the dough and for serving. (4) This makes one really large loaf of soda bread. Would recommend making two and giving one or both of them away to a friend!

Wednesday, March 8, 2017

Pear Cake with Caramel Sauce


Over the past couple of months I have incorporated a new Sunday night routine into my life. One gaining such sacred status I don't dare schedule or consider doing anything else. The routine begins with spending an hour in an 'extremely hot, sweat inducing, buckets of water dripping from your skin' room. The second hour is spent painfully stretching my body to its' limits. Much to my surprise the physical exhaustion coming from this self-inflicted torturous routine, aka my newest love-hate relationship, is actually a bit exhilarating. Because don't we all experience an endorphin rush high after surviving a 'push yourself to your limits' ordeal? I have come to discover there are endless benefits to these hot and restorative Sunday night yoga classes. But possibly none better than sharing the stamina-endurance experience with friends.


Sometimes we make this Sunday night routine a three hour experience. The third hour focuses only on rehydration. And water is always one of the options.


Not that I needed one, but I wanted a reason to make this Pear Cake with Caramel Sauce. So I surveyed the 'yoga posse' to learn whether or not they liked pears. Fortunately they all did. Our next third hour wouldn't only include hydration. There would also be cake. And not just any cake. But a cake pairing well with chilled prosecco.

Almost everything I bake is 'made from scratch'. However, when I came across the recipe for the Pear Cake with Caramel Sauce, I decided it might be okay, just this once, to channel my well-hidden inner Semi-Homemade with Sandra Lee self.


The ingredients for the cake include pureed (canned) pears, pear liquid, oil, egg whites, and, drum roll please.....a box of white cake mix. Slathered in a freshly whipped cream icing, lined with finely chopped toasted walnuts, topped with pear slices, and drizzled with homemade caramel sauce make this 'semi-homemade' cake look and taste more one made from scratch. And technically, two-thirds of it is.


Baked in a ten-inch bundt pan, the cake bakes for 40-45 minutes in a preheated 350 degree (F) oven. After cooling the cake in the pan for 15 minutes, it needs an additional 90 minutes to completely cool to room temperature. Note: Remember to invert the cake onto your cake stand or platter so the top of the cake is completely flat.


The most significant changes made to the stamina-endurance recipe were to the Whipped Cream Icing. In addition to increasing the ingredient amounts (because if there is going to be whipped cream icing, there needs to be lots of it), I added sour cream to stabilize it. Freshly whipped cream has a tendency to weep and lose its' fluffy cloud-like texture after a relatively short period of time. There are essentially two ways of stabilizing whipped cream: adding unflavored gelatin or sour cream. I used sour cream, however, if you want to try making the icing with gelatin, read the Cook's Illustrated article to learn how.

The finely chopped toasted walnuts pressed into the sides of the iced pear cake add both texture and flavor. If you aren't a big fan of walnuts, you can always toast and chop hazelnuts. The nuts are one of the finishing touches guaranteed to make you look like pastry chef when you bring the cake to the table.

I used canned pears in light syrup for the cake portion of the recipe, but went with pears in heavy syrup to top the cake. The canned pear halves are cut into slices and fanned out on the top of the cake. I had thought about using roasted pears instead of the canned pears (because honestly I was still a little anxious about making a semi-homemade cake), but time constraints made the decision for me. After tasting the cake topped with the canned pears, I am not sure if I will ever top it with roasted pears. Yes, who knew canned pears could be so loved by a self-admitted fussyterian.


The caramel sauce may be this cake's pièce de résistance. Not only is it drizzled over the top of the cake, each slice of cake is placed on plate drizzled with a bit more.

The cake can be made, iced, and topped pear slices several hours before serving. The caramel sauce can be made ahead as well and kept at room temperature. Before serving, simply warm the sauce over low heat before drizzling over the cake.


Served over a bed of warm caramel sauce this Pear Cake makes for an incredibly elegant presentation. This dense, moist cake, ever so lightly pear flavored, is dinner party, birthday party, special occasion party, or rehydration gathering worthy. Nothing about this cake looks or tastes like 'semi-homemade' (which may only be important to those of us who obsess about such things). If there was ever a cake to get both unanimous rave reviews and oohs-and-ahhs, this would be the one. If you don't have a 'special' occasion coming up, create one. Because you really need to make this Pear Cake with Caramel Sauce.

Recipe
Pear Cake with Caramel Sauce (several adaptations to Pillsbury's Delicate Pear Cake with Caramel Sauce recipe)

Ingredients
Cake
1 package (15.25 ounce) Moist Supreme White Cake Mix
1/3 cup vegetable or canola oil
1 can (15 ounce) pear halves in light syrup, drained reserving 1/3 cup of pear liquid
1/3 cup reserved pear liquid
3 egg whites (from large eggs)

Caramel Sauce
1 cup firmly packed light brown sugar
1/2 cup (1 stick) unsalted butter
1 cup heavy whipping cream (at least 17% fat)
generous pinch of sea salt
1 Tablespoon vanilla

Icing and Finishing
1 1/2 cups heavy whipping cream (at least 17% fat)
2 Tablespoons granulated or caster sugar
2 teaspoons vanilla
1/4 cup sour cream 
1 can (15 ounce) pear halves in heavy syrup, well drained (or can roast your own pears, see note below)
3/4 cup walnuts, toasted and finely chopped

Directions
Cake
1. Preheat oven to 350 degrees (F). Prepare a 10 inch tube pan with removable bottom.
2. Drain 1 can of pear halves, reserving 1/3 cup of the liquid.
3. Place drained pear halves in food processor. Process until smooth.
4. In the bowl of a standing mixer, combine cake mix, pureed pears, the reserved 1/3 cup pear liquid, oil, and egg whites. Beat at low speed until combined.
5. Beat at medium speed for 2 minutes.
6. Pour batter into the prepared pan.
7. Bake for 40-45 minutes or until a toothpick inserted in the center comes out clean. Cool cake in pan for 15 minutes. Invert cake onto serving plater. Allow cake to cool for at least 90 minutes before icing.

Caramel
1. In a medium saucepan, combine brown sugar, butter, whipping cream and sea salt. Bring to a boil. Continue boiling for an additional 5 minutes (stirring frequently) until the sauce has thickened and is golden in color. 
2. Remove from heat and add vanilla. Stir until incorporated.
3. Allow to cool to room temperature.

Icing
1. In the bowl of a standing mixer fitted with a whisk attachment, beat the whipping cream and sugar until stiff peaks form. Fold in vanilla and sour cream.

Assembly
1. Drain pears (discard liquid). Cut pear halves lengthwise (should yield about 32 slices).
2. Frost the cooled cake with the whipped icing. 
3. Arrange pear slices on top of cake, slightly overlapping.
4. Press nuts into the side of the cake.
5. Drizzle 3-5 Tablespoons of the caramel sauce over the top of the sliced pears.
6. To serve, spoon 2 Tablespoons of caramel sauce onto each individual dessert plate. Top with a slice of cake. Or serve sauce on the side.

Notes: (1) Instead of topping the cake with drained, canned pears, top with slices of roasted pears. Like these Honey and Butter Baked Pears. (2) The sour cream helps to stabilize the whipped cream. (3) Serve this cake with some chilled Prosecco for an added celebratory touch. (4) The completed cake can be prepared up to 4 hours in advance of serving, however, wait to drizzle the caramel sauce over the top until ready to serve. Keep any leftover cake in the refrigerator. (5) I used the Pillsbury White Supreme Cake Mix in the making of the cake.


Outside and inside views of vacant arsenal bunkers on the grounds of the Midewin National Tallgrass Prairie.


Thursday, March 2, 2017

Parmesan Roasted Cauliflower


Lately it seems there has been a proliferation recipes showcasing new ways to use cauliflower. From using it to make a pizza crust; to creating faux mashed potatoes, rice and/or risotto; to transforming into hamburger buns; and yes, to even using it to make chocolate pudding. Who knew cauliflower could be so versatile? Apparently quite a few people. I can't help but wonder what took so long for these unexpected, creative uses of cauliflower to begin making their way into the 'mainstream'. Or maybe all of these creative adaptations have been around for awhile but my cauliflower making lens has been a bit myopic. Although I have yet to venture down the sneaking in healthy cauliflower to replace 'bad' carbs road, I am a big fan of roasting this humble vegetable.


Last year I posted the recipe for insanely delicious Whole Roasted Cauliflower with Whipped Cheese. Although the preparation for dish is actually a three step process. Brine, boil, and then roast. Which may have made it one of those recipes some would put in the category of 'too many steps'. And I get that. Although in just one bite, even those who prefer preparation simplicity over complexity, would immediately consider shifting over to the multi-step end of the continuum.

So I have a surprise for you. This Parmesan Roasted Cauliflower is a one step, roast only process. And if there was ever a recipe to transform the way you feel about or make cauliflower, this would be it. You may never pair a grilled steak with a potato again. Seriously.


Roasting vegetables mellows and sweetens their flavor. The high, dry heat from the oven helps to caramelize the vegetable's natural sugars, resulting in an incredible depth of flavor not experienced if eating it raw, blanched, fried, or steamed.The roasting process not only removes bitterness of the raw vegetable but will completely alter your opinion of it. The vegetables benefitting the most from roasting are potatoes, onions, beets, carrots, squash, brussels sprouts, and, last but not least, cauliflower.


A large head of cauliflower, a large sweet onion, four or five cloves of unpeeled garlic, some sprigs of fresh thyme, good quality olive oil, salt, pepper and parmesan cheese are the only ingredients needed to make the Parmesan Roasted Cauliflower. 


When cutting the cauliflower into florets, try to retain their long stems. For really large florets, cut them half lengthwise. Be careful not to cut them into tiny pieces. Rather the rings, cut the onion into wedges. You should be able to get at least 6 wedges from each onion half. 


Vegetables need high heat to tenderize. Finding the 'sweet spot' roasting temperature depends on the vegetable. The original recipe called for roasting the cauliflower, onions, and garlic at 425 degrees (F). Feedback from others who had made it indicated that level of heat often lead to burning. The roasting temperature suggestions ranged from 375 degrees (F) to 400 degrees (F). Rather than choosing one temperature over the other, I used both. For the first 15 minutes, I roasted the vegetables at 375 degrees (F). For the remaining amount of roasting time, I increased the oven temperature to 400 degrees (F). The result was utter roasted perfection.

Once you have roasted the vegetables 35-40 minutes (tossing at least once), you sprinkle with the grated parmesan cheese. You will continue to roast for another 10-15 minutes, or until the cauliflower forets are tender.


When transferring the roasted vegetables to a serving platter, remove the skins from the cloves of garlic. You can cut the roasted garlic up into pieces (so everyone gets a little taste) or you can keep them whole (so only some get to experience that additional layer of flavor). You decide.


The Parmesan Roasted Cauliflower is at its' best served hot from the oven, although, I found I could not stop picking at it once it came to room temperature. I also wanted to lick my plate, but kept my manners in check.


Destined to be your all-time favorite roasted cauliflower dish as the pairing of the roasted vegetables with the parmesan cheese puts it in a side dish category of its' own. Satisfying, rich, deeply flavorful, elegant, and classic don't even begin to describe the Parmesan Roasted Cauliflower. Perfect as a weeknight or dinner party side dish. Definitely worthy of going on the last meal list.

Recipe
Parmesan Roasted Cauliflower (Slight adaptation to Bon Appetit's Parmesan Roasted Cauliflower recipe, February 2013)
Serves 6 to 8

Ingredients
1 large head cauliflower, cut into florets
1 large sweet onion, cut into wedges
4-5 springs fresh thyme
4 - 5 garlic cloves, unpeeled
3 Tablespoons good quality olive oil
Kosher salt and freshly ground pepper
1/2 cup (2 ounces) freshly grated Parmigiano-Reggiano cheese

Directions
1. Preheat oven to 375 degrees (F).
2. Toss cauliflower, onions, unpeeled garlic cloves and thyme in olive oil on a rimmed baking sheet. Season with kosher salt and black pepper.
3. Roast for 15 minutes. Toss and increase oven temperature to 400 degrees. Continue cooking for an additional 20-25 minutes.
4. Sprinkle with grated Parmigiano-Reggiano cheese and continue to roast for an additional 10-12 minutes (or until cauliflower is tender).
5. Remove skins from garlic cloves. 
6. Transfer to a platter. Serve immediately. Optional: Grate some additional Parmigiano-Reggiano cheese over top before serving.

Notes: (1) Serve the roasted garlic cloves whole or chop up. Recommend chopping up so everyone gets to experience their roasted deliciousness. (2) While not completely necessary, would recommend grating some additional parmesan cheese over the plated vegetables. (3) Highly recommend using a sweet onion, like a Vidalia or Maui for optimal flavor.


Views along Waikiki Beach, Oahu (February 2017)


Monday, February 27, 2017

White Chocolate Popcorn


New Orleans was the first far from home place we took our then 10 year old nephew and 8 year old niece. From the steamboat ride to the Audubon Zoo and trolley ride back to our hotel to walking into almost every bead shop on Royal and Bourbon Streets in the French Quarter to seeing their sweet little faces and exhausted bodies literally fall asleep in their plates remain vivid memories. It never fails. Each year as Mardi Gras approaches, I take a short trip down memory lane. Back then there weren't any smart phones with cameras and I didn't own a digital camera. Forget about being able to edit a photo as film had to be dropped off to be processed. It took days before your photos would be ready. Somewhere in my house and in theirs is a 'memory' book filled with captions containing some of the photos capturing our weekend adventures. And more than likely they each have their bags of beads somewhere in their drawers or closets. But for me, being able to see their young eyes take in the sights and sounds of New Orleans will remain the best, most treasured souvenir.

King Cakes, jambalaya, étouffée, po' boys, gumbo, muffulettas, or red beans and rice might be the more classic, traditional Mardi Gras foods, but one always needs something a little sweet to go with all of that savory. Like this White Chocolate Popcorn with M&Ms and Honey Roasted Peanuts. And it's easier and quicker to make than pralines!


Mardi Gras is just one of the reasons to make this White Chocolate Popcorn. Actually, you don't even need a reason. Sweet, salty snacks don't ever need an occasion to be made.

Many recipes for White Chocolate (coated) popcorn call for the use of Almond Bark. This one uses white chocolate melting wafers. Some call for the use of unbuttered popcorn. This one uses 'lightly buttered' microwave popcorn. Honestly, I don't think I would make this popcorn any other way. 


At first I wasn't certain if 10 ounces of melted white chocolate would be enough to adequate coat two (3 ounce) bags of microwave popcorn. But surprisingly it was. 

Before drizzling the melted chocolate over the popcorn, remove any of the unpopped kernals. 


Two cups of M&Ms and a generous one and a half cups of honey roasted peanuts seemed to be the right popcorn to candy/nut ratio. But feel free to increase or decrease to your preference.


After the popcorn was coated with the melted white chocolate, I mixed in the M&Ms and peanuts, thinking they might stick to some of the popped kernels. Some did, some didn't. Maybe the chocolate dried too quickly. Or maybe increasing the melted chocolate to 11 ounces and working a little faster would make a difference. Or maybe it wouldn't.

I must give you a warning about this White Chocolate Popcorn. It's a little addictive. So when you make you it, make sure you have friends and family over to share it with. If you are looking for a fun snack to serve at a party, while watching sports, or an informal gathering, this easy snack would definitely fall into the 'most memorable' category.

Recipe
White Chocolate Popcorn 

Ingredients
2 bags (3 ounce size) Light Butter Microwave Popcorn
2 cups M&Ms in your favorite colors
A generous 1 1/2 cups honey roasted peanuts
10-11 ounces white chocolate, melted

Directions
1. Make popcorn according to package directions. Spread popcorn out on a large baking sheet or pour into a large bowl. Remove any unpopped kernels.
2. Drizzle melted chocolate over popcorn. Stir popcorn until it is lightly coated.
3. Pour in M&Ms and honey roasted peanuts. Mix together.
4. Spread chocolate coated popcorn out on a large sheet of parchment paper to allow chocolate to set. 
5. Serve immediately or wrap in cellophane bags to keep fresh.

Notes: (1) I used Pop Secret Light Butter Microwave popcorn. (2) Ten ounces of melted white chocolate (I used Ghiradelli White Chocolate Melting Wafers) will give the popcorn a very light, not overly sweet, coat of chocolate. 


Food trucks on the North Shore on Oahu.