Thursday, August 1, 2019

Pasta in Roasted Eggplant Tomato Sauce w/ Basil and Fresh Mozzarella


"Life is short, use more glitter." At the beginning of almost every yoga class, we are reminded to connect to a mantra, an intention so to speak, to guide our practice. More often than not, the yoga instructor shares one having meaning to them. For more than a year now my mantra has been "You are good enough". But after hearing the one shared last Sunday, the one where the 'use more glitter' was merely a euphemism for show more kindness, be more empathic, be less hubris, be more accepting, be more thoughtful, and so on and so on, I smiled. Seems like I wasn't there just to experience the satisfaction of surviving an hour of yoga in the brutally hot sun or reveling in that post yoga session euphoria. Instead, unbeknownst to me, I was really there to make a change to my mantra. From one focused less on self-validation to one centered more on self-awareness. While I may still need to remind myself from time to time that I am indeed 'good enough', everyone around me will be better served if I repeatedly say, as well as act on, the words "Life is short, use more glitter.". Trust me when I say redundancy has its' benefits.


Speaking of, there is no such thing as too much of a good thing, this Pasta in Roasted Eggplant Tomato Sauce w/ Basil and Fresh Mozzarella is one of the most crave-worthy, hearty pasta dishes I have had in awhile. From the perfectly roasted eggplant to the velvety tomato sauce to the fresh basil and mozzarella to the trecce pasta, every bite of this dish is deeply satisfying. If you love roasted eggplant, but don't necessarily want to spend hours making eggplant parmesan, you definitely want this pasta dish in your life. Pair it with a really, really good bottle of wine (because life is too short not to indulge yourself) and a simple salad and you have the makings of a memorable meal. Easy enough to make for a weeknight dinner, yet elegant and impressive enough to serve for a dinner party, this might be your new, favorite go-to pasta dish. Seriously, it's so freaking delicious.


A few weeks back I picked up a bag of some trecce pasta from Eataly. Now in retrospect, I should have bought two, maybe three bags of this pasta. It is my new favorite pasta! These short rolls of pasta look like braids of hair. And in Italian, trecce literally means braid. Made with semolina wheat flour, trecce pasta is an Italian creation. Having a slightly rough texture, it's surface is perfect for capturing and holding sauces once cooked. How have I lived without ever having this pasta before? See notes below for alternative pasta options for this dish.


Rather than look for one large eggplant weighing approximately one and a half pounds, I would highly recommend you look for the smaller, baby eggplants. I used five baby (Italian) eggplants (totaling one and a half pounds in weight) for this dish. Smaller eggplants are generally more flavorful and have a more tender flesh/skin than larger eggplants. When choosing eggplants at the market, look for ones having a smooth, shiny skin. While they are available year round, their peak season is from July through October.


Choosing the smaller, baby eggplants has yet another advantage in this pasta dish. Cutting the eggplant into one inch chunks ensures each piece has a bit of the skin on it. When roasted, the little bites of roasted eggplant are able to hold their shape rather than fall apart.


Tossed with a half cup of olive oil, a teaspoon of kosher salt, and some black pepper, the eggplant roasts in a preheated 450 degree (F) oven for 30-35 minutes. Midway through the roasting process, toss the eggplant on the baking sheet. Your eggplant is done when its' browned and tender. Three quarters of the roasted eggplant will be mixed in with the tomato sauce. While the remaining one quarter is reserved along with some additional fresh basil, grated Pecorino Romano Cheese, and olive oil to adorn the top of the pasta.


When making the Pasta in Roasted Eggplant Tomato Sauce w/ Basil and Fresh Mozzarella begin by making the tomato sauce. It can even be made earlier in the day or even the day before (and then reheated). This is a very simple, yet rich, velvety sauce. Garlic, olive oil, peeled whole canned tomatoes, some water, salt, pepper, fresh basil, and a tablespoon of unsalted butter are its' only ingredients. After simmering for approximately 45-60 minutes, the sauce thickens to the most perfect consistency. 

When the eggplant is well past the halfway roasting point, start making the pasta. Like most pastas, this one should be cooked to slightly al dente as it will continue to cook when mixed in with the tomato sauce, roasted eggplant, and fresh mozzarella. 


Freshly grated Pecorino Romano Cheese, a little more fresh basil, and a generous drizzle of olive oil are the finishing touches to this hearty pasta dish. Even though there is eight ounces of fresh mozzarella in the pasta dish, I threw on about a half dozen balls of Ciliegine, bite sized pieces of fresh mozzarella, as an additional garnish. Are you drooling yet?


In the spirit of 'life is short', eat more pasta. In spite of there not being any 'meat' in the Pasta in Roasted Eggplant Tomato Sauce w/ Basil and Fresh Mozzarella, it is a very hearty, rich, soul satisfying, impressive dish. We can thank the roasted eggplant for making this insanely delicious, vegetarian pasta dish one even 'meat' lovers will be taken in by. 

To keep things simple, serve Kahlua Affogato Sundaes for dessert. They would be the most perfect finishing touch to what will end up being an epic meal. Splurge a little by topping the sundaes with some Luxardo cherries. 

So pick up some baby eggplant, fresh basil, and fresh mozzarella this weekend. Look for some trecce pasta (or find something similar) and invite some friends and/or family over for dinner. Open up some of that great wine you have waiting for the right occasion to serve and get ready to have the most delicious evening.
Recipe
Pasta in Roasted Eggplant Tomato Sauce w/ Basil and Fresh Mozzarella
Serves 6-8

Ingredients
1 1/2 pounds of eggplant, cut into one inch cubes (See notes)
1/2 cup and 4 Tablespoons olive oil, divided
5-7 cloves of garlic, minced
1/4 teaspoon Aleppo Pepper or 1/8 teaspoon red pepper flakes
28 ounce can of whole peeled Italian tomatoes, crushed
1 cup water
1 Tablespoon unsalted butter
1/2 cup plus 1 Tablespoon fresh basil, cut into chiffonade
8 ounces fresh mozzarella, cut into 1/2 inch cubes
Kosher salt and black pepper
Freshly grated Pecorino Romano

1 pound bag of Trecce pasta (or other 
1/2 cup reserved pasta water

Additional olive oil for finishing
Optional: 7-8 balls of Ciliegine

Directions
1. In a large, heavy bottomed saucepan, heat 2 Tablespoons of olive oil over medium heat. Add the garlic and Aleppo pepper. Cook until garlic is golden and tender (approximately 3-4 minutes).
2. In a medium sized bowl, pour in the contents of the whole peeled Italian tomatoes. Squeeze the tomatoes with your hands until you break them apart into chunks. Pour one cup of water into the empty can and add to the tomatoes.
3. Pour the tomato/water mixture into the olive oil.  Reduce heat to low and simmer sauce for 45-60 minutes or until the sauce has thickened. Stir in one tablespoon of chopped basil, one tablespoon of unsalted butter, and season with kosher salt and pepper. Remove from the heat and set aside.
4. Preheat oven to 450 degrees (F).
5. Toss the eggplant with one half cup of olive oil, one teaspoon of kosher salt, and some black pepper in a medium sized bowl. Spread out onto a large, rimmed baking sheet. Roast until browned and tender (approximately 30-35 minutes). Midway through the roasting process, turn eggplant over with a spatula. Remove from oven when done.
6. Midway through the eggplant roasting process, make the pasta. Cook until al dente. Reserve 1/2 cup of the pasta water before draining the pasta in a colander.
7. Return drained pasta to the pan. Pour over the homemade tomato sauce, 3/4 of the roasted eggplant, 1/4 cup of chopped basil, the fresh mozzarella, and 2 Tablespoons of olive oil. Cook on low heat, just until the cheese begins to melt adding 1/4 cup of the reserved pasta water to loosen the sauce (approximately 1-2 minutes). If the pasta mixture is too thick, use remaining reserved pasta water to loosen it slightly. Immediately transfer to a large serving platter. (Note: I used only 1/4 cup of the reserved pasta water.)
8. Top the pasta with the remaining eggplant and 1/4 cup of fresh basil. Grate Pecorino-Romano over the top and drizzle some additional olive oil. Optional: Top with a half dozen fresh mini-mozzarella balls. 
9. Serve with a plate of some additional grated cheese and enjoy!

Notes: (1) The trecce pasta was made by an Italian company, Fratelli Minaglia, and bought at Eataly. If you can't find trecce pasta in any of the food stores you frequent, look for another short-shaped, ridged Italian pasta like fusilli, gamelli, rigatoni, or cavatappi. (2) This is already a rich, hearty dish, but you take to an even more impressive level by finishing with some burrata. Just saying. (3) The tomato sauce can be made early in the day or the day before. Reheat before mixing in the pasta.

Friday, July 26, 2019

Bread and Butter Pickles, Second Edition


If you haven't already noticed, a pattern is developing or rather I should say emerging here. Second and third iterations of previously shared recipes are interspersed with first-time ones. There is only one rule I follow when deciding whether or not to revisit pasts recipes. They must look and taste better than the original ones. More often than not, old recipes are not just tweaked, updated, or subtly nuanced. They are significantly different from their first generation cousins in technique, ingredient ratios, ingredient amounts, taste, texture, and/or presentation. Do I hold any recipes sacred? Yes. there are many I think are as close to perfect as possible. Ones I want to preserve in perpetuity, stake my cooking and baking reputation on, and put on my final meal on earth list. But there are also some much loved recipes, which if never changed, will continue to be making regular appearances at my table. They might not be throw down worthy, but they are definitely better than good. However, then there are those good enough, definitely worth making recipes, who are just holding their breath wondering if they will be replaced with a holy grail version. The good news is there aren't many in that category. The recipe for Bread and Butter Pickles shared six years ago happens to be one falling into that final category.


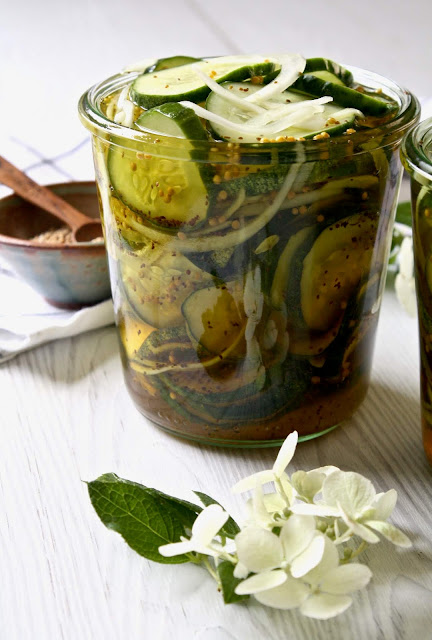
The Bread and Butter Pickles (Second Edition) recipe would definitely give last year's Sweet and Spicy Refrigerator Pickles recipe a run for its' money. But because these are two completely different refrigerator pickles, there is room in my life, in your life for both pickle recipes. And honestly, I wouldn't want to have to choose between them or give up one for the other. 


With pickling cucumbers now coming into season, I find it almost impossible to leave the Farmer's Market without buying some. The ones I bought this week were so beautiful. 

Like with most refrigerator pickle recipes there is generally a 24 hour wait time before they are ready to eat. Not only does overnight refrigeration gives the flavor a chance to deepen, but the pickles themselves have enough time to crisp up. A crunchy bread and butter pickles is a really good pickle. And this Bread and Butter pickle has a great crunch!


Cut your pickling cucumbers too thin and they will be close to impossible to develop that crunchy pickle texture we all love. Cutting them to a thickness of almost a 1/4" is what you should aim for as your they will shrink as they loose some of their moisture during the salting process.


To help remove some of the moisture from the pickling cucumber slices, they are tossed with some kosher salt, covered, and refrigerated for about 90 minutes. After they are drained and rinsed in a colander, they are mixed with the thinly sliced (sweet) onions.


Unlike the pickling cucumbers, you want your (sweet) onions very thinly sliced. Using a mandolin makes slicing tear-free easy. 

The brine for the pickles is made with white vinegar, apple cider vinegar, granulated sugar, light brown sugar, whole mustard seeds, celery seeds, turmeric, and a pinch of sea salt. All of the brine ingredients are mixed together in a pot and cooked until the sugars have completely melted. The brine should be really hot (not warm) when poured over the cucumber and onion slices.


All you have left to do is let the jars of bread and butter pickles cool slightly (about an hour) before covering tightly and chilling overnight in the refrigerator. That's when the magic happens!

If you have never had a homemade (refrigerator) Bread and Butter Pickle before, you are in for a treat. These have just the right amount of sweetness and a perfect crunch. Serve them as a side dish, as a condiment, on a charcuterie board, or use them in any recipe calling for bread and butter pickles. Or you can eat them out of the jar!

Summer wouldn't be summer around here without homemade pickles. Once you taste them, you may never want to eat another store-bought jar of bread and pickles again. And I definitely won't be looking to update, change, or alter this Bread and Butter Pickle (Second Edition) recipe any time soon. Or if ever. Yes, these are that good. Cucumber pickle season won't be here long. So get out there and make some pickles!

Recipe
Bread and Butter Pickles, Second Edition

Ingredients
1 1/2 pounds pickling cucumbers, cut into just shy of 1/4" inch slices
1 1/2 Tablespoons kosher salt
1 cup thinly sliced sweet onions (such as Vidalia onions)
1 cup white vinegar
1/2 cup apple cider vinegar
1 cup (200 g) granulated sugar
1/4 cup (50 g) light brown sugar, firmly packed
1 1/2 teaspoons whole mustard seeds
1/2 teaspoon celery seeds
1/8 teaspoon turmeric
Pinch of sea salt

Directions
1. Place the cucumber pickle slices in a large, shallow bowl. Sprinkle with the kosher salt. Cover and place in the refrigerator for 90 minutes.
2. Remove from the refrigerator and pour into a colander. Rinse and drain.
3. In a large, clean bowl, mix together the rinsed cucumber pickle slices and the onions. Transfer cucumber/onion mixture to a large or two medium sized jars. Set aside.
4. In a medium sized saucepan, combine the white vinegar, cider vinegar, granulated sugar, brown sugar, mustard seeds, celery seeds, turmeric, and sea salt. Bring mixture to a boil over medium heat. Whisk until the sugars have melted.
5. Pour the hot brine into a measuring cup. Then pour into the jars. Filling all the way to the top.
6. Let the jars sit at room temperature for about an hour.
7. Seal tightly with a lid and place in the refrigerator overnight (or up to 24 hours).
8. Open your Bread and Butter Pickle jar and enjoy. Pickles will remain fresh and crunchy stored properly in a sealed jar in the refrigerator.

Notes: (1) Look for medium sized (about 6 inch long) cucumber pickles. (2) A half of a large Vidalia onion had a one cup yield of thinly sliced onions. (3) I used these Weck jars. If you have vintage canning jars with lids that seal tightly use them.

Wednesday, July 24, 2019

Spice Cake with Maple Cream Cheese Icing


Apparently I really like Spice Cake. Love may be the more accurate explanation as to why I am now posting a third spice cake recipe! Could it be the third time is the charm? Now joining the Applesauce Spice Cake with Brown Sugar Icing and the Applesauce Spice Cake with Cinnamon Cream Cheese Icing is this Spice Cake with Maple Cream Cheese Icing. While each of the three versions of a spice cake share some common elements, they are discernibly different from one another in taste, texture, and appearance. Quite honestly, I am going to say my most favorite, quite possibly the best one of the three is this one. Saying this is akin to a mother admitting in public she has one favorite child rather than saying all of her children are her favorites. I am not a good spice cake mother. Hands down this cake is of those blue ribbon worthy, worth spoiling your dinner or your diet for, dreamiest, most destined to make anyone a spice cake lover of all spice cakes. Although there is room in the world (or on a blog) for more than one kind of spice cake, this Spice Cake with Maple Cream Cheese Icing should be the one taking up most of the oxygen. 


Why make a Spice Cake in the middle of summer? Well, why not? Think of it as a year round cake, not a seasonal or autumnal one. 


What makes this Spice Cake so 'shout it from the rooftop' fabulous? Several things actually. While all three recipes use applesauce, this one uses extra-virgin olive, honey, and whole milk instead of unsalted butter in the batter. The spiciness in the cake comes from not three but four spices (cinnamon, ginger, nutmeg, allspice) and the zest of an orange. And what taste game changers all of these ingredients are. Rather than using all-purpose flour, this spice cake is made with spelt flour, organic whole-grain spelt flour to be exact. Sometimes referred to as an ancient grain, spelt flour has more nutritional value than all-purpose flour and yields a lighter, softer texture in baked goods. Even before you taste the spice cake, your fork will detect something is different, better about it. Fork yeah!


The first piece of spice cake I ever tasted was served in the shape of a square. Which meant it was baked in either a square or rectangular pan. But I have resisted making spice cakes in square or rectangular pans, particularly 9"x 13" (or 9" x 12") or sheet pans. Mostly because I don't consider those pans to create cakes with high sexiness or swoonworthy factors. This observation (and strongly held conviction) comes from years of seeing too many cakes served right out of these pans instead being transferred to platters. Call me a bit of a cake fussyterian (and I won't be offended) but eating a cake out of a pan is kind of like serving vegetables out of the pot they were cooked in. You might do it at home with your family when food presentation takes a back seat to getting food on the table, when you are home alone and ravenous, or when bringing food in a cast iron pan to the table creates a rustic chic kind of ambiance. But you might think twice about bringing the vegetable pot to the table for intimate gatherings, dinner parties, or holiday meals. If you don't believe me, try serving something in a pot/pan or in a pretty bowl. Then do a taste test with your family and friends. I am fairly certain what they see with their eyes will influence their flavor and taste experience. 


One of the many things I love about this Spice Cake is how it's made. Two bowls, a whisk, and a spatula are all you need to make the cake batter. No standing mixers with specific attachments, no handheld mixers. Just good old-fashioned arm strength. 


You won't need to pull out your mixer until you make the Maple Cream Cheese Icing. Sifting the confectionary sugar along with having room temperature butter and cream cheese are key to creating the creamiest, dreamiest icing. The recipe below reflects a double batch of icing. You might have a little icing left over, but in order to get the most perfect cake to icing ratio you want to top the spice cake with a generous amount of this maple cream cheese icing.


Whatever you do, don't let the ingredient list or the finished look of this Spice Cake deter you from making it. Spelt flour is readily available in most grocery stores (see notes below). And you don't need a pastry bag and tips to ice the cake. Simply make beautiful icing swirls using an offset spatula. Just promise me you will remove it from the baking pan when you serve it.


This is a great cake when serving a crowd. You can make the cake early in the day or the day before (cover with plastic wrap and store in the refrigerator if made the day before) and ice it a couple of hours before you serve it. Because the icing is made with cream cheese and butter, I would recommend storing the finished cake in the refrigerator. Personally I like the taste of a chilled cake, but if you don't, take it out of the refrigerator about 30 minutes before its' served.

If there was ever a cake tasting better on the second day versus the first day, this Spice Cake with Maple Cream Cheese Icing would qualify. By the second day the flavors have a chance to fully develop and deepen. (Note: So making the cake only the day before you plan to serve it is a really good idea.)


I would be remiss if I didn't give you other options for finishing this cake. Even though I am partial to this Maple Cream Cheese Icing, one of my fellow foodblogging friends suggested serving it the way her grandmother did. With some freshly whipped cream and sliced peaches. For the simplest of presentations dust it with confectionary sugar. An even richer presentation would be to serve it warm (lightly reheated in the microwave) with a luscious caramel sauce. Or serve it on a bed of lightly melted vanilla ice cream (a semi-homemade creme anglaise). Whatever you decide, I only hope you make THIS spice cake. Aka the one yet to be designated as the best spice cake on the planet. And yes, just in case you were wondering. The third time was definitely the charm!
Recipe
Spice Cake with Maple Cream Cheese Icing (inspired by the Cinnamon Spice Cake recipe from "Simple Cake" by Odette Williams)

Ingredients
Spice Cake
2 1/4 cups (270 g) organic whole-grain spelt flour
1 1/2 teaspoons baking powder
1/2 teaspoon baking soda
1/2 teaspoon kosher salt
1 teaspoon ground cinnamon
1/2 teaspoon ground ginger
1/2 teaspoon ground allspice
1/4 teaspoon ground nutmeg
 3 large eggs, room temperature
1/2 cup mild flavored extra-virgin olive oil
1 teaspoon good quality vanilla
1 cup (240g) unsweetened applesauce
1/4 cup (85) mild flavored honey
1/2 cup whole milk
Zest from one orange
1 cup (190 g) lightly packed light brown sugar

Maple Cream Cheese Icing
4 cups (460 g) confectionary sugar, sifted
1 cup (2 sticks, 230 g) unsalted butter, room temperature
16 ounces cream cheese, at room temperature
2 teaspoons good quality vanilla
2 Tablespoons Grade A maple syrup
1/2 teaspoon kosher salt

Directions
Spice Cake
1. Preheat oven to 350 degrees (F). Line a 9" x 12" or 9" x 13" cake pan with parchment paper. Lightly butter the sides of the pan and bottom of the parchment paper. Set aside.
2. In a large bowl, sift together the spelt flour, baking powder, baking soda, kosher salt, cinnamon, ginger, nutmeg, and allspice. Set aside.
3. In another large bowl or measuring cup, whisk together the eggs, olive oil, vanilla, applesauce, honey, milk, light brown sugar, and orange zest until smooth.
4. Pour the wet ingredients into the dry ingredients. Whisk until the batter is smooth.
5. Pour the batter into the prepared cake pan. Bake for 25-30 minutes or until a toothpick inserted in the center of the cake comes out clean or the cake bounces bake when light pressed.
6. Allow cake to cool in the pan for 10 minutes. Then transfer to a cooling rack. Let cake cool completely before transferring to a platter and icing.

Maple Cream Cheese Icing
1. In a large bowl, beat the confectionary sugar, butter, cream cheese, vanilla, maple syrup, and kosher salt using handheld beaters until the icing is smooth and creamy.
2. Transfer icing to pastry bags fitted with selected pastry tips. Note: If using pastry tips, spread a thin layer of the icing the cake before piping on the additional icing.
3. Alternately, spread the icing on the cake using an offset spatula. Note: There will be some extra icing. Reserve for another use.
4. Serve immediately or store the cake in the refrigerator until ready to serve.

Notes: (1) I used an Organic Spelt Flour made by Arrowhead Mills. I found it at Whole Foods. (2) The cake can also be made in a 10" round cake pan. Baking time will be 40-45 minutes. (3) The cake itself can be made the day before. Store covered in the refrigerator overnight. Ice the cake either immediately or several hours before serving. Keep any leftover cake lightly covered in the refrigerator.

Friday, July 19, 2019

Grilled Peach, Burrata, and Arugula Salad with Balsamic Drizzle


For as long as I have lived near Chicago, I have yet to completely explore all it has to offer. Or easily navigate it without the use of a mapping application or the over-reliance on friends (even if I do sometimes second guess them). However, my familiarity with the streets is enough to make me annoyingly aware when a taxi driver takes the most circuitous route to my destination. I often feel like a tourist in my own 'hometown'. Still in awe of its' beauty as my love for it is deepened. On a good day the drive into the city is less than thirty minutes. In the height of rush hour, during construction season, or on a summer weekend, driving into the city in an hour would be miraculous. And while taking the train into the city is much quicker, it can be its' own kind of adventure for me. While less grandeur in scale, it always feels like I am in NYC's Grand Central Station whenever I am in Ogilvie Center. Being a little directionally challenged, I should probably carry a compass with me. Oh, there is probably an app for that too.

After the morning long run, a friend and I took the train into the city on Saturday afternoon. Our first stop was Eataly, a place she had never been before. While there, we had a glass of prosecco and some freshly shucked oysters, tasted more wine and spirits, had a great lunch, shared a dish of hazelnut and salted caramel gelato, shopped, and tasted a grilled peach and fresh mozzarella salad. One tiny bite of that summer rendition of a caprese salad and my mind began racing. I instantly knew I would be revising the recipe for the Grilled Peach and Burrata Salad shared on the blog almost four years ago. 


Initially I had planned to make the Grilled Peach and Burrata Salad with some fresh mozzarella. But when the cheese guy at the Farmer's Market had some freshly made burrata. And well, my plan changed instantly. 


Last summer the Peach, Tomato, Burrata Caprese Salad with Basil Drizzle was on regular repeat around here. Friends who either tasted or made it, raved about it. The combination of tomatoes and peaches was surprisingly delicious. This summer, this Grilled Peach, Burrata, and Arugula Salad with Balsamic Drizzle, may be the hit of the summer. And honestly, this updated version is so much better than the original. 


Peaches are just beginning to come into season here in the midwest. The ones I picked up at the Farmer's Market were salad ready. They were the slightly firm ripe, not that mushy ripe kind. If your peaches are too ripe, they will fall apart when you grill them. 


After cutting each peach half, cut each half into four pieces. If you have medium or even larger sized peaches, your pieces will be the perfect size and will hold up well on your grill pan. If you peaches are small, you might want to cut them in quarters or each half into three pieces.


Using a grill pan on your stove top makes grilling easier and less messy. Even with using this non-stick grill pan, I still used a cooking oil spray on the pan before placing the peach slices on the preheated pan. There were two lessons relearned in grilling the peaches. The first was to get the pan hot before grilling. The second, maybe the most important, was to work in batches. In other words, not put all of the peach slices on the grill pan all at once as the cooking time (about 2-3 minutes per side) is relatively short. You wouldn't want to risk burning them. 


The assembly of the Grilled Peach, Burrata, and Arugula Salad with Balsamic Drizzle is simple. The bottom layer is comprised of a couple of large handfuls of baby arugula, lightly drizzled with olive oil and sprinkled with some kosher salt. The grilled peaches and pieces of burrata are then arranged on the arugula base. After drizzling the salad with the balsamic crema (or balsamic glaze), it's sprinkled the basil chiffonade. How easy is that?

Balsamic crema (or balsamic glaze) is an aged (the longer the better) sweet, dense, almost syrupy vinegar. It's refined sweetness and mellow acidity make it the perfect finishing touch on this salad. If you have never had it before, it has a much deeper flavor profile than balsamic vinegar. You could eat it off a spoon. I bought my bottle of an imported aged balsamic crema at Eataly, but more than likely you can find a good one at a grocery or cooking store. 


If ever a salad benefitted from a do-over, this Grilled Peach, Burrata, and Arugula Salad with Balsamic Drizzle would be the one. And yet, even after making some changes to it, I may not have taken this salad  update far enough. Another one of my friends shared eating a similar version of this salad, although hers was also topped with thin slices of prosciutto. What a brilliant idea! How did I not think of that? Thank goodness for the kindness and generosity of friends!  So, if you are looking to take this salad up another notch, add some thin slices of prosciutto on top.

If you have never had a grilled peach before, you are in for the best treat of your life. And if you have never had a salad composed of grilled peaches, burrata, baby arugula, basil chiffonade, and balsamic drizzle your taste buds will be spinning. Given the choice between a traditional caprese salad and this one, I am placing my bets on your choosing this one. Serve it as a hearty appetizer or a side salad, but definitely put this salad on repeat rotation this summer while peaches are in season. Your friends and family will be blown away!

Every now and then updated, revised, better interpretations of a recipe emerge. The inspiration for them may come randomly. As if the universe is looking for a way to whisper in your ear. And last Saturday I heard it whispering to me.

Recipe
Grilled Peach, Burrata, and Arugula Salad with Balsamic Drizzle

Ingredients
Baby Arugula
Fresh medium sized peaches, ripe but not blemished or mushy (See notes)
Burrata cheese (or fresh mozzarella), cut into pieces
Basil, cut to a chiffonade
Extra-virgin olive oil
Balsamic Crema (or aged Balsamic Glaze)
Kosher salt

Optional: Thin slices of prosciutto

Directions
1. Cut peaches into 8 pieces, leaving the skin on.
2. Place grill pan over the burners set medium-high heat. Spray with olive oil or vegetable oil cooking spray.
3. Place the peaches on the hot grill. Grill each side for 2-3 minutes or until you have a nice char. Work in batches (i.e., 10 slices at a time) to prevent burning. Remove peaches from the grill pan and place on a platter. Set aside.
4. Layer bottom of a large platter with arugula. Lightly drizzle and toss with olive oil. Lightly sprinkle with salt.
5. Arrange grilled peach slices on top of the arugula, followed by pieces of burrata.
6. Scatter the basil chiffonade over the top.
7. Drizzle with the balsamic drizzle.
8. Swoon and serve.

Notes: (1) Use a high quality thick, sweet, syrupy balsamic crema or balsamic glaze. I used one imported from Italy found at Eataly (Antica Acetaia Dodi). (2) For a more substantial salad, roll each slice of prosciutto into a mound and then arrange them on the platter after you have drizzled with the balsamic crema. (3) The size of the salad will depend on how many you are serving. Use one medium sized peach per person. An 8 ounce ball of Burrata will be enough for 4 - 5 people.

Along the river on a summer day in Chicago (July 2019)


Saturday afternoon at Eataly in Chicago. (July 2019)

Monday, July 15, 2019

Triple Berry Crisp a la Mode


There is a forty year (and one month) difference between my niece and myself. She will be running her first half-marathon this fall, and I will be running my redemptive half-marathon in late September. I won't tell you the difference between her running pace and mine. But, be rest assured, there is a difference. So as I was taking a ten day running hiatus to nurse an injury, she kept improving her running pace. As if the age difference between us wasn't already enough. We recently looked up her mother's (my sister's) prior half-marathon and marathon running times. I had forgotten how fast my sister used to run (she has since given up running for cycling). With all of us having the competitive DNA gene (mine is in remission) I can't help but wonder if my niece has two half-marathon goals. One of them being able to best her mother. If not in her first half-marathon, but in her second. For me, I not only want to be able to run this half-marathon faster and stronger than I ran it two years ago, I want to be running it without the over reliance of anti-inflammatories. With a little bit of luck from the running and weather gods, I hope we will both achieve our goals. And I promise to do my best to curb my envy when my niece tells me her finish time. As I remind myself there is forty year (and one month) age difference between us.


While the summer running season in the Chicago area is wicked hot and humid, the seasonal fruits and vegetables are at the height of their flavorfulness, color, and ripeness. For me, it's the season of tomato and berry overindulgence. Eaten raw or roasted, I cannot get enough of either of them.  This may be the only time of the year when, if given the choice between a ripe tomato and anything chocolate, I would choose the tomato. Seriously. If only there was a way to preserve whole vine ripened summer tomatoes. I have already begun stockpiling bags of blueberries in the freezer so I can resurrect a little bit of summer in the middle of the cold, bitter winter season. Already having more than a half dozen recipes for great desserts calling for blueberries, my friends and family will be glad so many secret blueberry stashes have been squirreled away.


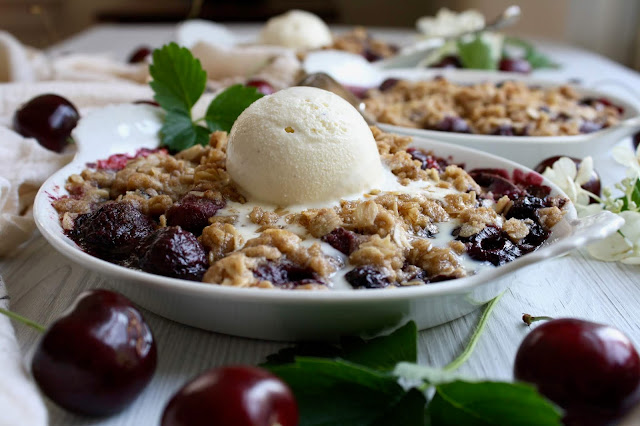
Blueberries are just one of the berries used in this incredibly delicious Triple Berry Crisp. An abundance of cherries and some strawberries round out this summer seasonal fruit trifecta. 

Topped with a rich vanilla ice cream, the Triple Berry Crisp is taken to an even higher level of comfort food scrumptiousness. Are you drooling yet?


There is a relatively higher ratio of cherries to blueberries and strawberries in this crisp. Considering someone here wasn't as diligent checking to ensure all of the cherry pits were removed, make sure you give this job to someone who will be painstakingly careful. The flavor of the fruit filling is deepened with the use of a fragrant, nutty browned butter. To make browned butter (beurre noisette), begin by melting the butter over medium heat. Occasionally swirl the pan so the butter melts evenly. The butter will begin to change from a melted foamy state, to a lemony-yellow color, to golden tan, and finally to a toasty brown. The tiny bits of milk solids sitting on the bottom of the pan are loaded with flavor. But not everyone is a fan of their slightly burnt taste (I am a huge fan). So when pouring the browned butter into a bowl feel free to use a strainer (or not).


It may seem like you have made too much of the topping. But trust me, you haven't. The generous crisp topping balances perfectly with the sweet, luscious,  thickened, warm fruit filling.

Instead of making this crisp in a single baking dish, I decided to make it in the beautiful au gratin dishes I recently found. Baking time for the Triple Berry Crisp, whether made in a single dish or five or six smaller dishes, will still be approximately 45 minutes. It takes that long for the flavor of the fruit to deepen and for the color of the crisp to turn to a golden brown.


The crisp topping is crunchy and buttery with a hint of cinnamon. The use of brown sugar gives it a warm, just the right amount of sweetness.


You can serve and/or eat the Triple Berry Crisp without some vanilla ice cream.  But why would you want to? Unless of course you are eating some of the leftovers for breakfast and you have a no ice cream for breakfast rule.


This is yet another one of those desserts worth turning on the oven for, even when temperatures are soaring above 90 degrees and the humidity levels are stifling. It also happens to be one that manages to ramp up the flavors of summer's best berries to off the chart levels.

The Triple Berry Crisp works well as either an informal gathering or formal dinner party dessert. The intoxicating aroma of the crisp baking in the oven will have everyone drooling even before you bring it to the table. Fresh summer cherries and berries won't be around forever. So don't wait too long before making this luscious, soul soothing Triple Berry Crisp.

Recipe
Triple Berry Crisp a la Mode
Serves 5 when using au gratin dishes and 6 to 8 when using medium sized ramekins. 
Serves 8-10 if served in a large baking dish.

Ingredients
Crisp Topping
1 1/2 cups (140 g) old-fashioned oatmeal (not quick oats)
1 cup (130 g) all-purpose flour
1/2 cup (100 g) light brown sugar
1 1/2 teaspoons cinnamon
1/2 teaspoon kosher salt
12 Tablespoons (1 1/2 sticks) unsalted butter, room temperature, cut into 12 pieces

Berry Mixture
6 Tablespoons unsalted butter, melted to the brown butter stage
18 ounces (620 g) cherries, pitted
12 ounces (310 g) blueberries
8 ounces (226 g) strawberries, hulls removed and cut into halves and/or quarters depending on size
2 Tablespoons cornstarch
1/3 cup (67 g) light brown sugar
Optional: 1 Tablespoon freshly squeezed lemon juice

Good quality vanilla ice cream

Directions
Crisp Topping
1. Preheat oven to 350 degrees (F).
2. In a medium sized bowl, add the flour, oatmeal, brown sugar, cinnamon, and salt. Stir to combine.
3. Add in the butter. Use your hands or a fork to combine all of the ingredients. Your mixture should look moist and there should be some clumps. Set aside.

Berry Mixture 
1. In a heavy bottomed skillet, melt the butter over medium-low heat. Cook until the butter begins to brown and has a nutty aroma (approximately 3 to 4 minutes). Remove from heat.
2. In a large bowl, combine the cherries, blueberries, strawberries, brown sugar, and cornstarch.
3. Pour the browned butter over the fruit.
4. Using a spatula, stir to combine. All of the fruit should be coated.
5. Spoon the berry mixture evenly into au gratin dishes and/or medium sized ramekins. Note: Alternately spoon into a 9" x 12" baking dish or 10" round baking dish.
6. Sprinkle on the crisp topping.
7. Bake for 45 minutes or until the top is a beautiful golden brown and the berry mixture is bubbling along the sides of the dish.
8. Let sit for 5 to 10 minutes before serving. 
9. Top with a generous scoop of vanilla ice cream and serve the crisp warm. Then sit back and enjoy.

Notes: (1) If you don't have a scale, there are 3 generous cups of cherries; 2 cups blueberries; 1 1/2 cup strawberries in the crisp. (2) Instead of using au gratin dishes or ramekins, use a baking dish (round, rectangular, or oval) or for a more rustic look use a 10 inch cast iron pan. (3) There was enough of the berry filling and crisp topping to fill five of the au gratin dishes I used. (4) If you don't have any strawberries, make this a cherry and blueberry crisp. Increase the amount of blueberries to 3 to 3 1/2 cups.