Wednesday, March 4, 2015

Sea Salted Dark Chocolate and Sunflower Seed Bars


"To think too long about doing a thing often becomes its' undoing." At one time or another, most of us are guilty of putting off a decision choosing instead to stay in that 'thinking about it' place. The longer we stay in that 'thinking' place, the harder it can be to get to the 'doing' place. Over the past several years I have had more than my share of false return to running starts. Each time kicking myself for ever needing to have to 'restart' something that had given me a great deal of pleasure (and a little bit of pain). Not wanting to keep looking in the mirror seeing someone who was 'all thinking, all talk and no action', I decided it was time to focus less on the obstacles and excuses and get my aging, much slower body back to running. This time it would be with the understanding this was NOT going to be another 'restart', but rather it was to be a 'return'. You might not think there is much difference between those two concepts, but there is. One allows for an 'out' while the other signifies a 'commitment'. Had I not made this 'commitment' to myself, I am pretty sure I wouldn't have finished a 'brutal' training run this past weekend (three miles felt like 26.2 miles uphill), let alone survive the run recovery. Whining aside, I had forgotten how good exhaustion and exhilaration feels (as crazy as that sounds). This past weekend's run brought it all back and then some. And it didn't seem to matter that I ran so much slower than I used to.


My post running cravings used to be gummi worms, gummi fish, gummi bears, anything gummi-like. Seems they still are. Following the Saturday group run I had some errands to do. First stop was picking up a few things from the grocery store. And yes, gummi worms were on the list. While standing in line I saw a package of sea salted chocolate covered sunflower seeds. For a moment I thought maybe chocolate and seeds would be a more healthy reward (haven't we all been lulled into believing how some chocolates may actually be good for you?). And then I looked at the price and had a temporary, unusual moment of sticker shock along with a very audible 'yikes'. The chocolates didn't make it into my bag, however, I left thinking 'why didn't I ever think of making the ultimate nutty, healthier version of the Nestle Crunch Bar before?'.


For awhile now I have been melting my chocolate in the microwave versus over simmering water on the stove. However, I have not been tempering the chocolate to ensure it retains that finished glossy shine one seeks to have when the making of or dipping chocolates. David Lebovitz has explained how to temper chocolate using a thermometer while the The Kitchn has described how a home cook can achieve perfectly tempered chocolate without one. You won't go wrong either way, but I went with process not requiring a thermometer. This also meant returning back to melting the chocolate over simmering water.

It was luck on the first try as the one pound of dark chocolate to one cup of roasted sunflower seeds turned out to be the perfect ratio in creating these bars. An additional two tablespoons of the sunflower seeds along with some sea salt were sprinkled over the top were the finishing touch. There is just something about the combination of chocolate, particularly dark or semi-sweet chocolate, and sea salt that works to enhance the overall flavor (of the chocolate).

Before the chocolate and sunflower seed mixture was fully set in the pan, I cut it into bars. To speed up the 'setting up' process I put the pan of pre-cut bars into the refrigerator for about ten minutes. The chilling process made it rather easy to break up the chocolate into bars. Note: If you want a more random look, you could easily forego the pre-cutting process and break it all up after it has chilled.

Seriously these Sea Salted Dark Chocolate and Sunflower Seed Bars were incredibly delicious and 's-crunch-ous'! Who knew that simply standing in line at the grocery store would lead to their creation! I suppose I could and I will rationalize this 'new' discovery was made possible as a result of my return to running. Isn't funny how when you return to the things that made you happy, made you feel good, gave you that skip in your step, and even at times caused you a little bit of angst, you begin to see the world and everything in it just a little bit differently. Think the word for this collection of feelings is bliss.

Recipe
Sea Salted Dark Chocolate and Sunflower Seed Bars

Ingredients
1 pound dark or semi-sweet chocolate, chopped and divided
1 cup dry roasted sunflower seeds, plus an additional 2 Tablespoons for sprinkling on top
Sea salt for finishing

Directions
1. Line a 10"x14" baking pan with parchment paper. Set aside.
2. Melt 13 ounces of the chocolate over simmering water.
3. Stir in remaining 3 ounces of the chocolate until mixture is smooth.
4. Gently stir in the dry roasted sunflower seeds.
5. Pour mixture into prepared pan. Smooth top with an offset spatula. Sprinkle lightly with sea salt and two tablespoons of sunflower seeds.
6. Allow the chocolate to set for approximately 8-10 minutes or until semi-firm but not completely hardened. Using a long, thin knife, cut into bars or squares. Note: Number of bars or squares will depend on size. My yield was 24 bars. 
7. Chill entire pan of chocolate in the refrigerator for 10 minutes. 
8. Remove pan from the refrigerate and carefully break into bars. Arrange on platter or package in cellophane bags.


Trying to find nature's beauty on another sunny winter day at the Morton Arboretum.

Monday, March 2, 2015

Cheddar Cheese Jalapeño Beer Bread


A souvenir is supposed to be a something small, relatively inexpensive article. These mementos, remembrances, or keepsakes are intended to serve as a reminder of an occasion, event, or place visited. Somewhere along the way the concepts of small and relatively inexpensive got lost on me (as in like the sterling silver purchased on a recent trip to New Orleans). However, on my recent trip to Wisconsin I seemed to have found my way back to what a souvenir was intended to be (this probably had more to do with the fact that most stores and galleries were closed for the winter or had limited weekend hours versus me showing souvenir restraint). But to go on a trip and bring back nothing, how crazy is that? For me that would border on being seriously delusional. So in the spirit of maintaining my own sanity, I managed to pick up a few things. Only this time my souvenirs turned out to not be the keeping kind, but instead the perishable kind.

In addition to the warm, freshly made cheese curds (I didn't know how good these are), I came back with some aged cheddar cheese, cherries, and beer. Why, of all things, beer? Well it seems there are some beers you can only buy in Wisconsin (what's up with that?). Since I sort of have a thing for bringing back regional items not found anywhere and everywhere, I couldn't resist buying a couple of six packs. Either I sensed the end of the world was coming (too many post-apoliptic books and television shows) or I had been invaded by a body snatcher as showing moderation and buying relatively inexpensive souvenirs would not be how most of my friends would describe me. Am now hoping whatever alien has found its' way into my pysche hangs around for awhile. Hopefully much longer than the life of the cheese, cherries and beer.


As someone who is a big fan of Rebecca Rather, a chef and cookbook author, born and raised in Texas, I found myself leaning toward making an ever so slight variation to her beer bread recipe. Beer bread may have an ancient history, but there are parts of the country claiming to have significantly contributed to its' sweet and savory evolution. Texas happens to be one of those places. The idea of adding both aged cheddar cheese and jalapeño pepper to a basic beer bread recipe sounded like a pretty good one. And now having consumed more than my fair share of it, I will go on record and say it was a great idea. Wish I had thought of it!

If you like savory breads, this Cheddar Cheese Jalapeño Beer Bread is for you. Of the many words I would use to describe this bread, addictive would be one of them. And not because there is beer in it, but it is really, really hard to have only one slice.


This is a no yeast needed, no kneading involved, and no long sit and let rise waiting time kind of bread. And it all comes together with a wooden spoon and a large mixing bowl. Quick and easy.


When their seeds are removed, Jalapeño peppers are rather mild as well as add great flavor to pretty much everything they are added to. This Cheddar Cheese Jalapeño Beer Bread is no exception. The amount of minced Jalapeño peppers added to this bread is mostly influenced by personal preference. For this bread I used somewhere between six and seven tablespoons or about 1 1/2 Jalapeño peppers.


I had another recipe in mind when I bought the aged cheddar cheese. But it seemed a shame not to use some of it for this one. And six ounces of shredded cheddar cheese wasn't going to take too much of a dent out of my souvenir stash (okay so I bought alot of cheese).


I could not bring myself to use a bottle of the 'you can only get in Wisconsin' beer for this bread. Maybe next time I told myself, maybe. Besides I had other uses in mind for the beer I traveled hundreds of miles for. In choosing a beer for this recipe, be certain to choose one you enjoy drinking because the beer flavor will come through in the bread. This is not one of those recipes where you have to travel to ends of the earth or hundreds of miles to buy one of it's ingredients. Unless you live in remote part of the country, you can probably find most of them within minutes of your home.


Once the beer is added and slowly stirred into the dry ingredients, cheese and jalapeños mixture, the batter becomes very thick. Stir only until the flour is fully incorporated.

Before scraping the batter into the loaf pan, three tablespoons of the melted butter are poured into it. The remaining four tablespoons of the melted butter are poured over the top of the bread batter. Do not smooth out the top of the batter. You want the bumpiest finish possible. To avoid having any butter spill over into the oven and creating a smokey mess during the baking process, place the loaf pan on a baking sheet. In a preheated 350 degree (F) oven the baking time for this bread ranges from 50 to 60 minutes or until the top crust is both bumpy and a golden brown. My baking time ended up being 55 minutes. The hardest part of making this bread was waiting the 10 minutes before removing from the loaf pan and slicing.

The chilled bottles of the 'souvenir' beer went perfectly with the Cheddar Cheese Jalapeño Beer Bread making me glad I had saved them for 'drinking' use. I would not go so far as to say you will feel 'drunk in love' when you taste this bread. I will only say that your level of intoxication from the aroma of the bread baking in the oven and in eating it might have something to do with your tolerance levels. Regardless of whether they are low or high, this bread will leave you feeling pretty gosh darn good.

Recipe
Cheddar Cheese Jalapeño Beer Bread (inspired by Rebecca Rather's recipe in The Pastry Queen cookbook)

Ingredients
3 cups all-purpose flour
1 Tablespoon baking powder
1 teaspoon kosher salt
1/4 cup granulated sugar
6 ounces cheddar cheese, grated (recommend a two-year aged cheddar)
6-7 Tablespoons minced Jalapeño peppers (about 1 1/2 Jalapeños)
12 ounces good quality beer (the Founders All Day IPA or Blue Moon Belgium White)
7 tablespoons unsalted butter, melted and divided

Directions 
1. Preheat oven to 350 degrees (F). Line a 9"x5" baking pan with parchment paper. Set aside.
2. In a large bowl, mix together the flour, salt, baking powder, and sugar. 
3. Mix in the grated cheddar cheese and minced Jalapeño peppers.
4. Pour in beer and stir until combined with a wooden spoon. Do not beat or over mix. 
5. Pour 3 tablespoons of melted butter in bottom of prepared baking pan.
6. Spoon the batter into the pan.
7. Pour the remaining 4 tablespoons butter evenly over top of the batter.
8. Place baking pan on a baking sheet, place in oven and bake for 50-60 minutes (until top of the crust is bumpy and golden brown). Note: My baking time was 55 minutes.
9. Allow to rest in pan 10 minutes before removing.
10. Slice using a serrated knife. 
11. Serve with butter and/or honey.

Note: The Cheddar Cheese Jalapeño Beer Bread is great served all on its' own with beer, but it is also the perfect accompaniment to pulled pork, chili, and grilled steak or chicken.

Icicles on the rocks along the shore of Lake Michigan.

Thursday, February 26, 2015

Porchetta-Style Roast Pork


"For the first time I know what it is to eat. I have gained four pounds. I get frantically hungry, and the food I eat gives me lingering pleasure. I never ate before in this deep carnal way...I want to bite into life and to be torn by it." (Anaïs Nin, author) What would life be like if every meal (or at least one meal a day) we ate was one that made both our heads and hearts race? Ones leaving us momentarily speechless so we could just take in the moment. Or making us forget all of those fast-food, frozen entree, junk food, mystery meat, or spaghetti-dinner meals we had ever eaten. Could such a life even be possible? The answer to those questions depends on whether or not you really, truly believe anything is possible. (I believe.) Great food doesn't always have to be labor or time intensive, but great food almost always needs great ingredients (unless you believe you can make a silk purse out of a sow's ear). And with fresh ingredients so readily accessible nowadays, the making of great food is always possible.


Okay, a Pollyanna as I can be sometimes be, let me show a moment of practicality. We may not always have time in our busy lives to turn every meal into a memorable moment. I do get that. Getting up early or working late doesn't always leave us with enough energy to even want to make a mess in the kitchen. The hecticness or stresses of the day can temporarily zap our culinary creativity causing us to even forget how to make creamy scrambled eggs. But most of us have a little more discretionary time on the weekends (that is, if we don't overextend ourselves) to create those 'don't want to leave the table' kind of memorable meals for family and friends. If you are looking for that best use of one's time in the making of one of those meals, make this Porchetta-Style Roast Pork. 


In Italy, porchetta traditionally refers to spit-roasting a deboned and stuffed baby pig seasoned with fennel, garlic, rosemary, and lemon. But the last time I checked no one surprised me by having a wood-burning oven installed in the backyard. However, this rich, moist, flavorful Porchetta-Style Roast Pork has all of the intense flavors without as much work. After one bite of the warm pork along with a bite of the garlic and spice rubbed crust, my friend's husband described the experience as an 'oral orgasm'. I found this to be one of the most simultaneously hilarious and disturbing food reviews I had ever heard. Although truth be told, this also ranks up there as one of the best compliments ever received. For those of you who, like me, have had only gray, on the dry side pork roasts or those over cooked, tough pork chops, maybe its' time to give your taste buds and mouth an incredibly pleasurable experience.


The Porchetta-Style Roast Pork is easy to make, however, it is a two-day process as the pork needs to marinate overnight (24 hours) before it goes into the oven. The grocery store just happened to have pork shoulder on sale this past week (although its' relatively inexpensive when not on sale). The Bon Appetit recipe called for a boneless pork shoulder, however, the bone-in pork shoulders were the ones on sale. Not a problem as I adjusted (increase) the roasting time (which had the added benefit of increasing the amount of aroma time). The marinade or rub for the pork is made with toasted fennel seeds, black peppercorns, Aleppo pepper (or dried crushed red pepper), kosher salt and garlic. The combination of these spices not only creates incredible flavor to the meat and transforms the top of the roast into something most at the table will want to fight over. Be careful to who you give a knife to at the table.


Fennel is one of those highly aromatic, ancient Mediterranean spices. Toasting the fennel seeds makes their flavor stronger and spicier. In a small skillet over medium heat, two tablespoons of fennel are stirred constantly until slightly darker in color and their aroma is released (approximately 4-5 minutes). Once cooled, they are combined with the black peppercorns, (coarse) kosher salt and Aleppo pepper in a food mill or food processor and processed to a medium-fine consistency (but not ground to a fine powder).


After rubbing the pork with the minced garlic, the spice mixture is rubbed into it. After loosely covering the pork with wax paper, refrigerate overnight (24 hours). 

The marinated roast is removed from the refrigerator for about an hour before going into a preheated 450 degree (F) oven. Brush the baking sheet with extra-virgin olive oil and evenly drizzle an additional two tablespoons over the roast. After the pork roasts at 450 degrees (F) for thirty minutes, reduce the oven temperature to 300 degrees. The roast will continue to cook for 3 - 3 1/2 hours (time for 5-6 deboned pork shoulder) or 4 - 4 1/2 hours (time for a bone-in 7 - 8 pound pork shoulder) until it reaches an internal temperature of 190 degrees at the thickest part of the roast. At 190 degrees the pork becomes perfectly sliceable, almost pull apart tender. Allow the roast to rest for 15-30 minutes before slicing and serving. See notes below regarding internal temperature of the porchetta.

I don't remember when I learned not all carrots were orange, but they could be yellow or red and equally as sweet when roasted at a high temperature. The roasted orange, yellow, and red carrots complimented the Porchetta-Style Roast Pork perfectly. So would some homemade applesauce or mashed potatoes. Put out some great bottles of white wine and be prepared for everyone to linger around the table for longer than usual. If you have never been a big fan of pork roasts, you definitely will after making this one as the long, slow cooking process makes for an incredibly moist pork roast. Perfect to serve for company or even more perfect to make while you are binge watching your favorite shows (the third season of House of Cards starts this weekend).  

Note: Any leftover pork would make for great pulled-pork sandwiches. Shred the meat before refrigerating.

Recipe
Porchetta-Style Roast Pork (inspired by the recipe shared in the Bon Appetit, June 2010 issue)

Ingredients

2 Tablespoons fennel seeds
1 Tablespoon kosher salt
2 teaspoons black peppercorns
1 teaspoon Aleppo pepper (or dried crushed red pepper)
5 1/2 - 6 pound boneless pork shoulder (Boston Butt) or a 7 1/2 - 8 pound pork shoulder bone-in (roasting time will be longer)
6-7 large garlic cloves, minced
2 Tablespoons extra-virgin olive oil, plus additional for brushing the pan

Directions

1. Place fennel seeds in a small skillet. Over medium-high heat stir frequently until slightly darker in color and fragrant (4-5 minutes). Transfer to a spice mill or small food processor.
2. Add kosher salt, peppercorns, and Aleppo pepper. Grind to a medium-fine consistency (not powder).
3. Place pork in a baking pan/dish. Rub minced garlic all over pork. Then coat with spice mixture.
4. Loosely cover rubbed pork with wax paper and refrigerate overnight (approximately 24 hours).
5. Preheat oven to 450 degrees (F). Remove refrigerated roast and allow to sit out at room temperature for an hour before placing in the oven.
6. Brush a large rimmed baking sheet with extra-virgin olive oil. Place roast, fat side up and rub intact, in the center of the sheet. Drizzle evenly with 2 Tablespoons of extra-virgin olive oil.
7. Roast pork for 30 minutes. Reduce temperature to 300 degrees (F) and continue to roast until very tender and thermometer reaches 180 degrees (F) (approximately 3 - 3 1/2 hours). Note: If roasting a 7 1/2 pound bone-in pork shoulder baking time could range from 4 - 4/12 hours.
8. Transfer roasted pork to cutting board. Allow to rest 15-30 minutes before slicing.
9. Serve with roasted carrots, applesauce, and/or mashed potatoes.

Notes: (1) The Bon Appetit recipe called for requiring the roast to have an internal temperature of 190 degrees, however, after making this porcetta twice, the roast is sliceable, juicy and perfect with an internal temperature of 180 degrees. (2) To make a gravy, pour and scrape all of the pan juices/bits into a small saucepan. Add 1/2 cup white wine. Mix 2 Tablespoons of all-purpose flour with 1/2 cup of whole milk until smooth. Cook juices/wine over medium heat. Slowly add flour/milk mixture. Stir constantly until mixture is smooth. Add additional wine as necessary to reach preferred consistency. Season only with pepper.

A Winter day in Northern Wisconsin.

Monday, February 23, 2015

World Peace Cookies


"You can't connect the dots looking forward, you can only connect them looking backwards. So you have to trust that the dots will somehow connect in your future. You have to trust in something: your gut, destiny, life, karma, whatever. Because believing that the dots will connect down the road will give you the confidence to follow your heart, even when it leads you off the well worn path." (Steve Jobs). For the past couple of weeks I had been obsessively checking the weather forecast for northern Wisconsin watching to see if a blizzard would be passing through during my planned getaway. Driving in treacherous snowy weather is not high on my list of favorite things to do (one knuckle clenching driving experience on Independence Pass on the way to Aspen one year was enough for me). As my trip approached, I breathed a sigh of relief knowing snow was not in forecast. However, the predictions for the air temperature in the days before I was leaving were a little off or rather I should say they were significantly off. Like more than twenty degrees off. Toe and hand warmers, my long North Face coat, scarves, boots, a hat, gloves, and multiple layers of clothing made taking photos in 25 and 35 degree below zero temperatures tolerable, but just barely. Not that anyone would have heard me (I don't think I saw any other insane humans out taking photos or on hikes on those record cold days), but I thought it best to wait until I got in the car to scream, as if that would help to relieve the pain of my exposed frozen fingers. It didn't. And other than wimping out to get sunrise photos (my threshold for pain wasn't high enough), I was determined to not let the dangerous cold completely thwart my little photography expedition. It didn't. Already I envision a return trip back to capture all of the images, paths, and roads seen but not taken. Only this next trip won't happen until temperatures become winter weather balmy-like (in other words, thirty degrees above zero or higher). Even I have my glutton for punishment limits.

At the end of each day spent outdoors I craved something warm to drink or eat. Note to self: On your next trip bring mulled wine or some chocolate chip cookie dough. But satisfying my need for something warm to drink or something warm and chocolatey to eat wouldn't be met until I returned home. For awhile now I had been wanting to make Pierre Herme's and Dorie Greenspan's World Peace cookies as the idea of a cookie described as a cross between a shortbread and salted chocolate chip cookie sounded like the best of all cookie combinations. In my world, these World Peace cookies were destined to be made with white chocolate chips instead of bittersweet chocolate chips as a way of paying homage to and reliving all of my wild adventures over the past couple of days in the snow and ice. Admittedly I am not a big fan of delayed gratification, however, these cookies were definitely worth the wait.


Both standard and metric measures for the ingredients are listed in the recipe below. After reading some  of the reviews on these cookies (dough was too crumbly and not coming together), I went with the metric measurement approach. Whether you measure or weigh your ingredients may not really matter. What matters most is beating the butter and sugars until light, fluffy and creamy. While I used the white chocolate chips, I imagine they would be equally delicious with bittersweet, peanut butter or mint chocolate chips.


This is a crumbly dough, but surprisingly it comes together when it is formed into two 1 1/2 inch in diameter logs. The logs of dough are chilled in the refrigerator for at least three hours but can be chilled for several days. But seriously, who could wait that long? Only someone with a high tolerance for personal deprivation. Note: Use a thin, sharp knife when cutting the cookies. Running the knife under hot water and drying it helps to keep each cookie round intact. However, if bits of the cookie break off (and they will) simply press them back into the cookie.


Like most shortbread cookies, these cookies are baked at a low oven temperature (325 degrees), but for a much shorter baking time. The half inch slices of the chilled cookie dough are baked for only 12-13 minutes. Yes, they will not look done when you remove them from the oven. But when they come to room temperature they will be, they become perfect. Even more perfect when accompanied by a glass of ice cold milk.

Because I cut these cookies thick (much closer to a 1/2 inch), I ended up with 24 cookies (versus the 36 indicated in the original recipe). Next time I will cut them slightly thinner, maybe somewhere between 1/4 and 1/3 of an inch.


It didn't take me nearly as many years to make these cookies as it did for me to return to a place in Wisconsin I had not been for decades, but had only experienced in summer and fall. While each season has its' own unique beauty, winter there created some of the most wondrous landscapes. The extreme cold weather made it hard at times for me to focus (aka brain freeze), I actually at the end of each day my eyes were more exhausted than my body as there was so much to take in. As brutally cold and tough to endure as the weather was (have I whined enough about the cold yet?), some of my heart stopping, gasping out loud moments came when I found some incredible icicles along the rocks in a cove on Lake Michigan; seeing more than a hundred geese take flight in a snow covered corn field (if only my hands had been warm enough for me to change the lens on my camera); and, watching sunsets over a bay covered with waves of frozen ice and snow. My other heart stopping moments are stories for another time. I can't help but wonder what a spring landscape there looks like. Suppose I will have to wait to find out. I hear destiny calling. And I should be completely warmed up by then.

Recipe
World Peace Cookies (inspired by Pierre Herme and Dorie Greenspan's World Peace Cookies recipe)

Ingredients
1 1/4 cups (175 grams) all-purpose flour
1/3 cup (30 grams) unsweetened cocoa
1/2 teaspoon baking soda
11 Tablespoons (150 grams) unsalted butter, room temperature
1/4 cup (50 grams) granulated sugar
2/3 cup (120 grams) light brown sugar
1/2 teaspoon fleur del sel or 1/4 teaspoon fine sea salt
1 teaspoon vanilla
5 ounces (150 grams) white chocolate chips (or bitter sweet chocolate chips, peanut butter chips, or chopped bitter or semisweet chocolate)

Directions
1. Sift flour, cocoa and baking soda together. Set aside.
2. Using a standing mixer with a paddle attachment, beat butter on medium speed until soft and creamy.
3. Add granulated sugar, brown sugar, vanilla and salt. Beat for two additional minutes. Turn off mixer.
4. Pour in dry ingredients. Cover top of bowl with a kitchen towel (to prevent flying flour), pulsing mixer at low speed about 5 times (a second or two each time). If there is still flour on the surface of the dough, pulse a couple more times. Remove towel and continue mixing on low seep for approximately 30 seconds or until all of the flour disappears into the dough (try to work the dough as little as possible for a better finished cookie texture). 
5. Add chocolate pieces and still until mixed in.
6. Turn the dough out onto a work surface (it will be very crumbly, but do not worry). Divide in half, shape each half into a log approximately 1 1/2 inches in diameter. Wrap in plastic wrap and refrigerate for at least 3 hours (dough can be refrigerated for up to 3 days or frozen for up to 2 months).
7. Preheat oven to 325 degrees. Line two baking sheets with parchment paper.
8. Using a sharp knife, slice logs into generous 1/4 inch or 1/2 inch rounds. If the rounds crack, just squeeze the bits back into each cookie). Place rounds on baking sheet. Note: To assist in the cutting process, run knife under hot water, dry and then cut.
9. Baking only one cookie sheet at a time, bake for approximately 12 minutes. Note: The cookies will not look done, nor will they be firm, but that is the way they should be. 
10. Transfer cookies to a cooling rack. Eat at room temperature.
11. Store cookies in a covered container.

Views of a harbor overlooking a bay and an old cherry truck sitting in an even older barn.


Seeing horses in a pasture made the drive back home on a snowy day a little less stressful.

Tuesday, February 17, 2015

Chicken Marbella Dark


This past weekend I bought a new pair of running shoes at one of the local running stores. I live in what I have called a 'running town'. In addition to there being two running stores, there are numerous running clubs, running camps for kids, more than a half dozen races hosted by local organizations, and a high school having a significant number of state championship teams. Even though it wasn't that long ago that I would have considered myself a 'runner', someone who ran four to five times a week, 5ks, 10ks and 5 milers, several half-marathons and two marathons, it feels like those running days were a lifetime ago. So during the long, thorough process of being fitted for a new pair of shoes, the young 'runner' who was helping me make a good shoe 'fit' purchase decision (steering me away from choosing a shoe based solely on color and towards one to help me compensate for my pronation issues) asked me what my running goals were. Not someone to be cagey or evasive (traits I see as being disingenuous), I shared my desire to run a few races in the year ahead. And then before I knew it I was signed up to train for a 5k (sometimes you have to go back and start at the beginning) when my only goal that day was to buy a new pair of running shoes! I guess somedays you need someone else to push you when you haven't been able to push yourself off of that 'thinking about it' place. Needless to say, I came out of the store with more than a pair of shoes. And I have an eighteen year old cross country runner heading off to college in the fall to study engineering at a Big Ten school to thank for pushing me.


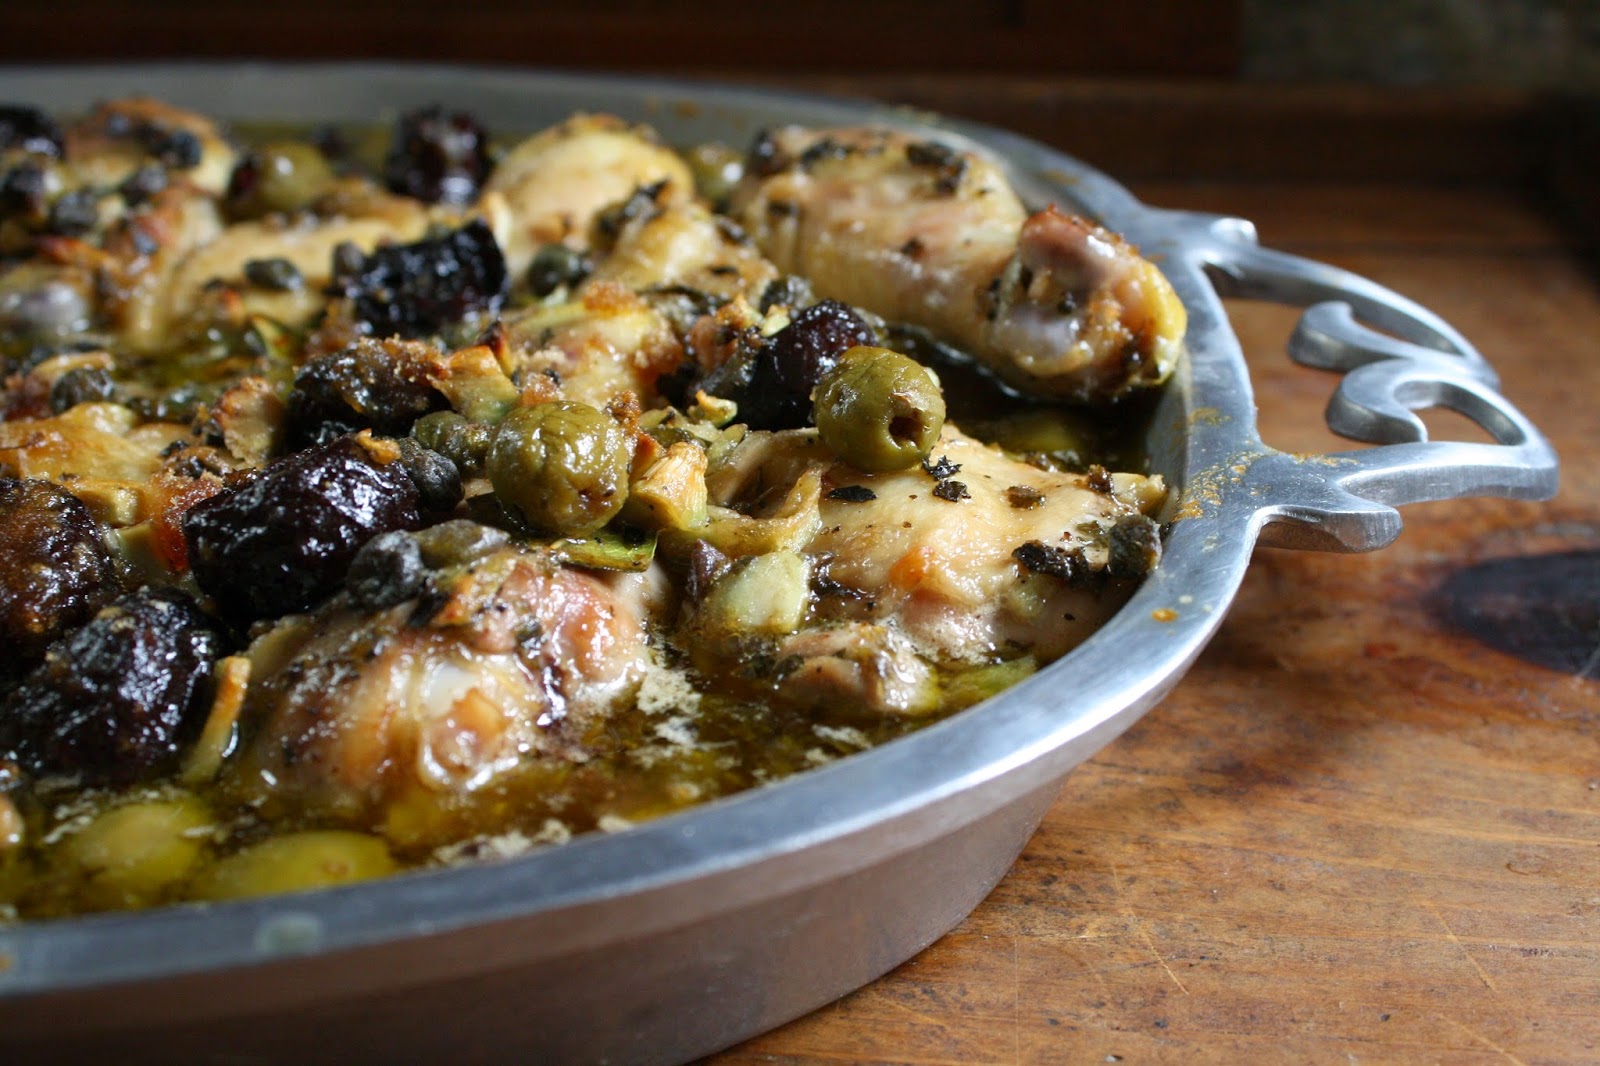
An even longer time period has passed since I made the Silver Palate's Chicken Marbella. So long ago I couldn't even remember what it tasted like or what I served it with. For whatever reason or reasons I never incorporated it into my repertoire of go to chicken dishes. But that too is now about to change. Maybe it was making this dish with only chicken thighs and chicken legs instead of pieces of cut-up chicken; maybe it was using Mexican instead of Mediterranean oregano; maybe it was using a Chardonnay I would actually drink; or maybe it was the combination of flavors of the Chicken Marbella Dark and Roasted Artichoke Orzo that made me look at this dish very differently. I would be remiss if I did not also mention the intoxicating aroma of this dish as it baked in the oven. Whatever it was that pushed me back into making the Chicken Marbella (the dark version), I was just glad I was open to being influenced into revisiting the recipe.


Chicken Marbella Dark is the kind of dish you want to serve for Sunday supper, for a dinner with friends, at a graduation party, at an Academy Awards gathering, or to make just because you absolutely love chicken. This is one of those dishes where 90 percent of the prep work is done the day before, making the day of entertaining so much less hectic. And in the words of the cooking goddess Ina Garten 'how easy is that?'.


One of the keys to this dish is giving it time to marinate in the olive oil, red wine vinegar, bay leaves, chopped garlic, the mexican oregano, salt/pepper, Spanish olives, capers and prunes (yes, prunes) overnight. Don't listen to anyone who tells you marinating for several hours is good enough. Unless of course you are someone who settles for good enough. Trust me when I say this marinade elevates chicken thighs and chicken legs to new heights of deliciousness. That is, if you allow it to marinate in the refrigerator overnight. 


About an hour before you are ready to bake the chicken, remove from the refrigerator, transfer to a baking dish large and deep enough to accommodate all of the pieces of chicken and the additional ingredients of light brown sugar and white wine. The pan I used worked, but next time I should give the pieces of chicken just a little more breathing room so each piece can fully brown. After laying out the individual pieces of chicken in your pan, pour the marinade over it. Top with one cup of light brown sugar and one cup of white wine. I used a chardonnay but any white blend would work. Choose a wine you would enjoy drinking and not the white wine someone brought you as a gift that you couldn't figure out to do with. 


The Chicken Marbella Dark bakes in a preheated 350 degree (F) oven for 50 to 60 minutes. The chicken is ready to remove from the oven when it has browned; when the juices run clear after being pierced with a sharp knife; and when the temperature of the chicken ranges between 165-170 degrees. The doneness of chicken has more to do with temperature than color. And remember, the temperature of chicken will increase from 5 to 10 degrees if allowed to rest (loosely covered) for five to ten minutes.


The baked chicken is transferred to a serving platter and topped with freshly chopped parsley. The remaining juices enhanced with the white wine can be poured into a gravy boat and served alongside the chicken. The Chicken Marbella Dark can be served warm or at room temperature, making it perfect for buffet style entertaining.

The Roasted Artichoke Orzo I made to accompany the chicken could not have been a more perfect and easy to make compliment. This was nothing more than drizzling some olive oil, salt and pepper over a drained, cut up into quarters can of artichokes and roasting for 30 to 35 minutes at 350 degrees (F) along with cooking two cups of orzo. Added to the roasted artichokes and cooked orzo were a couple of tablespoons of extra-virgin olive oil, a teaspoon of lemon zest, two tablespoons of chopped parsley, and some salt and pepper to taste. It is that easy. Note: The artichokes can be roasted earlier in the day, making this dish easy for last minute assembly. 

The changes made to some of the ingredients along with the use of dark meat only created a dish very different than the one I remembered (which was probably why I didn't keep making it). Mostly savory with a little bit of sweetness from the dried prunes and brown sugar, I can honestly say this now may be one of my favorite chicken dishes. So if by chance you had made and tasted Chicken Marbella before but weren't overly wowed by it, maybe I can push you into reconsidering making it again by borrowing from Nike. Just do it.

Recipe
Chicken Marbella Dark (inspired by the Chicken Marbella recipe from The Silver Palate Cookbook written by Julee Rosso and Sheila Lukins)

Ingredients
2 1/2 pounds chicken thighs, with skins
2 12 pounds chicken legs
1 large head of garlic, peeled and coarsely chopped
1 teaspoon kosher salt
1/2 teaspoon black pepper
1/4 cup dried mexican oregano 
1/2 cup red wine vinegar
1/2 cup extra virgin olive oil
1 cup whole pitted prunes
1/2 cup pitted Spanish green olives
1/2 cup larger sized capers, with a Tablespoon of juice
6 bay leaves
1 cup light brown sugar
1 cup white wine (recommend a Chardonnay or white blend)
1/4 cup fresh parsley, chopped

Directions
1. In a large bowl, combine the garlic, salt, pepper, oregano, red wine vinegar, olive oil, prunes, olives, capers and bay leaves. 
2. Add chicken thighs and chicken legs to the marinade. Mix to coat all pieces of chicken. Cover and refrigerate overnight. Note: Stir several times to ensure all pieces of the chicken are marinated evenly.
3. Preheat oven to 350 degrees (F). Remove chicken from refrigerator at least 30 minutes before baking.
4. Arrange chicken in a single layer in a large shallow baking dish. Spoon marinade over the chicken.
5. Evenly sprinkle the brown sugar over the chicken.
6. Pour white wine around the sides of the baking dish.
7. Bake chicken for 50 to 60 minutes, or until juices run clear.
8. Transfer baked chicken to a serving platter. Using a slotted spoon, arrange the prunes, olives and capers over the chicken. Spoon some of the remaining pan juices over the chicken. Note: Transfer remaining pan juices to a gravy boat and serve along side of the chicken.
9. Top with chopped parsley.
10. Serve immediately or at room temperature.
Note: Serve with a side of roasted artichoke orzo; basmati rice; or couscous.