Showing posts with label Cookies. Show all posts

Monday, November 4, 2024

Molasses Crinkle Cookies w/ Brown Butter Icing


I can't remember a fall season more beautiful than the one we are currently having. Crisp weather, spectacular landscapes, seasonal vegetables, crackling fires, the Thanksgiving holiday, and the aroma of richly spiced cookies baking in the oven are just some of things giving fall the edge as being the best season of all. While baking fruit crisps, pies, and loaves of pumpkin bread are autumnal traditions, we would be remiss if cookies weren't part of the seasonal confections. If there were a cookie to best capture flavors associated with the fall, it would absolutely be these intensely scrumptious Molasses Crinkle Cookies with Brown Butter Icing. 

What is not to love about a gorgeous, glistening cookie, packed with the flavors of warm spices and topped with a luscious brown butter icing? Crispy on the outside and chewy on the inside, these Molasses Crinkle Cookies with Brown Butter Icing are destined to become a family favorite. Their crave worthiness will extend well past the fall season as you are likely to continue baking them for the Christmas holiday season and throughout the winter. What better way to take the chill off of a cold day than with a hot cup of coffee and a richly spiced cookie!


While most molasses crinkle cookies are simply rolled in either granulated sugar or confectionary sugar, these cookies get two finishing touches. First rolled in granulated sugar and baked in the oven, and then heavily drizzled with a luscious brown butter icing. The icing kicks the simple molasses crinkle cookie up at least two notches, maybe three. The textures and flavors of the cookie and the icing, along with the signature cracks, are what makes them extraordinary. It's definitely a cookie you have to make for your family and friends!


In spite of not being made with butter, these cookies are packed with flavor. With the exception of dark or robust molasses, you may already have all of the ingredients. While the recipe calls for 2 1/4 cups of sugar, only 1 3/4 cups of the sugar go into the batter. The remaining 1/2 cup of sugar is used to coat the balls of dough. Yes, there is one tablespoon of baking soda used in this recipe. That is not a mistake. 


The batter comes together easily in a standing mixer fitted with a paddle attachment. To make evenly sized cookies, I highly recommend using an ice cream scoop (one about 1 3/4 inches in diameter). If you don't have one that size, break up the dough into 22 even sized pieces and then roll them into balls. They should be about the size of ping-pong balls. 


In a preheated 350 degree (F) oven, the cookies bake for 12-14 minutes. For a crispier cookie, your baking time will closer to the 14 minute mark. Once baked, allow the cookies to cool on the baking sheet for at least 10 minutes before transferring to a cooling rack. Bake only 9 cookies at a time on your baking sheet as they will spread. 

I have dipped my ginger cookies in melted white chocolate, but in all honestly, I think the flavor of a brown butter icing is an even better finishing touch. The creaminess, spiciness and nuttiness of the icing helps to create the most divinely delicious, mouthwatering molasses cookie.


The key to making the absolutely best brown butter icing is to brown your butter in a small saucepan over medium heat. Cooking time will range from 2 to 3 minutes. The cooked butter should be golden brown and there should be little bits of toasted butter swirling on the bottom of the pan. Once browned, the butter should be removed from the heat and allowed to cool for 5-6 minutes before the remaining icing ingredients are added. The thickness of your icing will depend on how much whole milk you add. Begin with two tablespoons and increase in teaspoonfuls until you get your desired consistency (I used a tad more than 3 Tablespoons of milk). Use a fork or whisk to drizzle the icing over the cooled cookies. Allow the icing to completely set before you stack them or package them up. 

These Molasses Crinkle Cookies w/ Brown Butter Icing were hands down winners! They are gorgeous, heavenly, luscious cookies! If you love the flavors of molasses, ginger, cinnamon, and cloves in a cookie, these are must make. With no rolling or chilling required, they are one of the easiest cookies to make. From start to finish you can make these cookies in less than an hour. If there was one cookie you wanted to serve on Thanksgiving or give to your friends after they run a morning Turkey Trot, these should be the ones!  

Recipe
Molasses Crinkle Cookies w/ Brown Butter Icing
Makes 22 large sized (3") cookies

Ingredients
Cookies
1 cup canola oil
2 1/4 cups (450g) granulated sugar, divided
1/3 cup dark or robust molasses
1 large egg, room temperature
3 cups (390g) all-purpose flour
1 Tablespoon baking soda
1 Tablespoon ginger
1 1/2 teaspoons Saigon cinnamon
3/8 teaspoon ground cloves
1/2 teaspoon Kosher salt

Brown Butter Icing
1/2 cup (113g) unsalted butter
1 1/2 cups (180g) confectionary sugar
1/2 teaspoon vanilla bean paste
1/8 teaspoon Saigon cinnamon
2 to 3 Tablespoons whole milk

Directions
Cookies
1. Preheat oven to 350 degrees (F). Line two baking sheets with parchment paper and set aside.
2. In the bowl of a standing mixer fitted with a paddle attachment, cream the oil and 1 3/4 cups sugar together until well blended.
3. Add in the molasses and egg. Mix to completely blend.
4. Mix together the dry ingredients. Add in the molasses batter. Mix well.
5. Use a medium sized ice cream scoop (about 1 3/4" in diameter), to form the balls of dough. Roll the balls in the remaining 1/2 cup of sugar.
6. Place 9 balls of dough on a prepared baking sheet. Bake for 12-14 minutes or until golden brown. Remove from the oven and allow to cool on the baking sheet for 10 minutes. Remove and transfer to a cooling rack. Continue baking until all of the balls of dough are baked. Note: For a crispier cookie, your baking time will be closer to the 14 minute mark. For a chewier cookie, check for doneness at 12 minutes.

Brown Butter Icing
1. In a small saucepan, melt the butter over medium heat. Cook for approximately 2-3 minutes or until the butter is golden brown and smells nutty. Remove from the heat and allow to cool for 5-6 minutes.
2. In a medium sized bowl, combine the confectionary sugar, vanilla bean paste, cinnamon and 2 Tablespoons of whole milk. Add in the slightly cooled browned butter. Whisk to desired consistency. Note: You may need to add at least another tablespoon of milk.
3. Use a fork or whisk to drizzle the icing over the cooled cookies.
4. Allow the icing to set before serving, packaging or storing.
5. Cookies will remain fresh for up to 5-6 days.

Notes: (1) You can ice these cookies in melted white chocolate, but I urge you to first try them with the brown butter icing. 


Morton Arboretum, Lisle, IL (November 2024)

Thursday, October 3, 2024

Iced Oatmeal Cranberry Toffee Cookies


Have you ever traveled somewhere and wished you never had to leave? To a place so beautiful you could hardly resist the urge to weep. More than likely you too have been to places where you felt a strong, unexplained connection. A return trip to the Grand Tetons in Wyoming this past September validated everything I felt on my first trip there in May. I am beyond smitten with the photogenic vistas, the aura, the wildlife, and even the food. Particularly the droolworthy Homemade Brioche French Toast on a bed of whipped mascarpone and topped with an Apricot and Orange Compote from Persephone Bakery in downtown Jackson. I am still dreaming about that breakfast. If I had room in my suitcase I would have filled it with their jams, honey, breads, and baked goods. Especially their cookies. 

As soon as I returned home, I did a search for recipes from Persephone Bakery (they really need to publish a cookbook). While I only found a very small handful of them, I did find an unverified recipe for one of their oatmeal cookies. As someone who happens to love oatmeal cookies, this recipe intrigued me. Made with brown sugar, dried cranberries and toffee bits (but no chocolate and no icing), a hint of cinnamon, and a fair amount of butter, I thought this was my kind of cookie. By now, you have already guessed it was.


In spite of the fact that there are already seven oatmeal cookie recipes on the blog, I knew there was room in my oatmeal cookie loving life for another one. One bite of these slightly sweet, a little bit salty, dense, deeply flavorful Iced Oatmeal Cranberry Toffee Cookies and I knew I wouldn't be the only one who discovered their oatmeal cookie eating life would never again be the same. These cookies are phenomenally delicious. They are the kind of cookie you will make to impress your family and friends, to enter into an oatmeal cookie throw down contest, and/or to just simply help you live your best oatmeal cookie life.

With the exception of toffee bits and dried cranberries, all of the cookie's ingredients are pantry staples. However, after you make these cookies, you will probably always have a couple of bags of toffee bits and dried cranberries in your pantry. After looking at the recipe found online, I made a few, simple changes. I increased the amount to dried cranberries to 1 1/4 cups, increased the amount of vanilla to 2 teaspoons, increased the flour from 1 1/3 cups to 2 1/8 cups, doubled the amount of butter, and added icing as a finishing touch. Without any direction as to how big or small to make these cookies, I decided using my large ice cream (2 1/4" in diameter) scoop to form the balls of dough would make them bakery sized. Additionally I decided to give the balls of dough a brief period of chilling (60-90 minutes) in the refrigerator before baking. Because chilling helps to ensure a really thick, chewy cookie. All of these decisions turned out to be good ones.


If you don't have a large ice cream scoop, you could use generously fill a quarter cup measuring cup to form the balls of dough. You want to end up with 16-17 balls of dough.

In a preheated 350 degree(F)F oven, the baking time for the cookies will range from 20-22 minutes or until they are golden brown along the edges. The cookies may seem a bit soft in the center, but they will firm up as they cool on the baking sheet. When placing the chilled balls of dough on a parchment paper lined baking sheet, press them down slightly (just enough to flatted the dome on the balls) before baking.


Once the cookies have cooled, use a spoon or fork to drizzle the icing. There are only three ingredients in the icing: confectionary sugar, whole milk, and vanilla. You can use regular vanilla extract or vanilla bean paste. I used the paste because I wanted flecks of vanilla in my icing. There won't be a difference in flavor between the extract or the paste, but there will be a visual difference. For a 'bakery' finish look to your cookies, I highly recommend using the vanilla bean paste.

The kind of oatmeal cookies that I love have a bit of a crispy edge but they absolutely must be thick and chewy. And these Iced Oatmeal Cranberry Toffee Cookies deliver on both flavor and texture. More importantly, they are unlike any of the other seven oatmeal cookie recipes on the blog. While they may fall into the 'dessert' category, you could make a case for them falling into the breakfast category. After all, they are made with oatmeal!

If you are looking the perfect autumnal cookie, you have now found it. These Iced Oatmeal Cranberry Toffee Cookies are destined to be your new fall favorites! Although after tasting them, they might also turn into you new winter favorites!

Recipe
Iced Oatmeal Cranberry Toffee Cookies
Makes 16-17 large cookies - 4" in diameter cookies
Updated October 4, 2024

Ingredients
Cookies
3/4 pound (339g) unsalted butter, room temperature (e.g., 3 sticks of unsalted butter)
3/4 cup (150g) light brown sugar (firmly packed if using a measuring cup)
1 large egg, lightly beaten
2 teaspoons vanilla
2 1/8 cups (277g) all-purpose flour
1 teaspoon baking soda
1 teaspoon Kosher salt
1/2 heaping teaspoon cinnamon
2 1/4 cups (215g) old-fashioned rolled oats
1 1/4 cups (188g) dried sweetened cranberries
1 1/2 cups (225g) english toffee pieces (see notes)

Icing
1 cup (130g) confectionary sugar
2 Tablespoons whole milk (slightly more if consistency is too thick)
1/4 teaspoon vanilla bean paste or vanilla extract

Directions
Cookies
1. In the bowl of a standing mixer fitted with a paddle attachment, cream the butter (approximately 1 minute).
2. Add in the brown sugar and beat until smooth (approximately 2-3 minutes).
3. In a small bowl, combine the lightly beaten egg with the vanilla. With the mixer on low, pour the mixture in a steady stream into the butter/sugar mixture. Beat until blended.
4. In a medium sized bowl, whisk together the flour, baking soda, Kosher salt, and cinnamon. Add in to the mixture. Mix until blended but do not over mix.
5. Add in the oats, dried cranberries, and toffee chips. Mix until blended.
6. Using a large ice cream scoop (2 1/4" in diameter) form 16-17 balls. Place on a small baking sheet. Cover and chill in the refrigerator for 60-90 minutes. Note: The balls of dough should weigh 3 ounces or 86g)
7. Preheat oven to 350 degrees (F). Line two baking sheets with parchment paper.
8. Remove 6 dough balls and place (well spaced apart) on one of the baking sheets. Gently press down the top of each cookie (to remove the round dome). Bake the first batch of cookies for 20-22 minutes or until golden brown along the edges. Note: Check cookies at the 18 minute mark. If some of the cookies remain domed, press down lightly with a spatula. You want your cookies to have an even thickness.
9. Remove from the oven and let cookies cool on the baking sheet. Note: For perfectly rounded cookies use a bowl or pastry ring to swirl the cookies to round the edges. Do this immediately when the cookies come out of the oven.
10. Repeat with remaining dough balls.
11. Allow all of the cookies to come to room temperature before icing.

Icing
1. In a medium sized bowl, whisk together the confectionary sugar, milk, and vanilla. Whisk until smooth.
2. Use a spoon or fork to drizzle the icing over the room temperature cookies. Let the icing set.
3. Enjoy the cookies immediately or store in either cellophane (not plastic) bags or a baking tin. Keep at room temperature. Cookies will be good for up to 4 days.

Notes: (1) I buy my sweetened dried cranberries from Trader Joe's. (2) I used the Heath English Toffee Bits (i.e., Bits O' Brickle). The 8 ounce (226g) bag gives you only slightly more than you need in this recipe. Do not buy the toffee bits coated in chocolate.


Mormon Row, Grand Tetons, Jackson, Wyoming (September2024)


Monday, August 5, 2024

Levain Style Chocolate Chip and Walnut Cookies


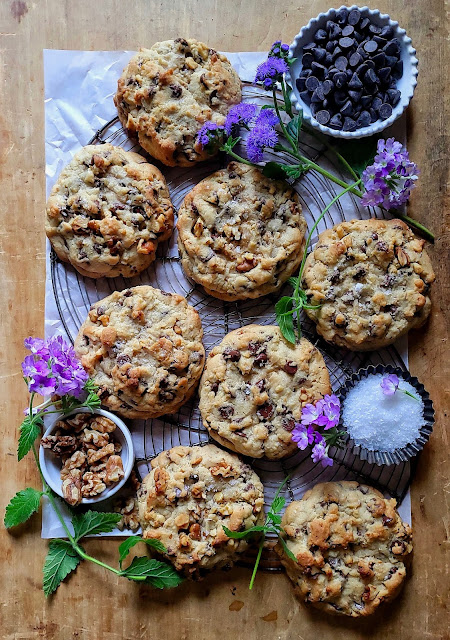
Two weeks ago I had my very first bake sale! The motivation for having the bake sale was to raise money for PAWS, my nephew's marathon charity. Our bake sale was hugely successful thanks in large part to the generosity of the runners in the marathon training running group. Next to spending an entire day baking and packaging everything up, deciding on what cookies and confections to make was my second biggest challenge. Our predictions on which items would sell out first completely missed the mark. In a last minute decision I decided to make two batches of the Levain Style Lemon Cookies. Turns out, those were the cookies that sold out first! I shouldn't have been surprised because there is something very appealing about a perfectly golden brown, humungous cookie. Which is why I decided I needed to create my version of Levain's Chocolate Chip and Walnut Cookies. 

In spite of having numerous recipes for chocolate chip cookies on the blog, only one other contains coarsely chopped, toasted walnuts. Additionally, the size, texture, taste, and look of these cookies are nothing like anything I have ever shared with you before. Had I brought these cookies to the bake sale, they might have given the Lemon Cookies a run for their money.


If chocolate chip cookie are one of your favorites, you absolutely want to have this almost too pretty to eat version in your repertoire. 


This version of a chocolate chip calls for using chocolate chips and not chopped chocolate. Buy either good quality semisweet or dark chocolate chips. Chips made by Guittard or Gharadelli are my favorites. 

The cookie recipe calls for two kinds of flour: all-purpose flour and cake flour. Cake flour when combined with all-purpose flour helps to create a more tender crumb, a melt in your mouth texture, and a thick without being cakey cookie. Unlike some other more traditional chocolate chip cookies, the dough is made with only one large egg and one large egg yolk. Save the extra egg white for your morning scrambled eggs. 

I used only light brown sugar, but you easily replace a couple of tablespoons of the light brown sugar with the dark brown sugar. Even a little bit of dark brown sugar will give your cookies a hint of molasses flavor.


Instead of dividing the dough into 8 equal portions, I divided it into 9 equal portions instead. The size of each baked cookie was still substantial enough. I would be reluctant to make these cookies any smaller as they would lose their 'Levain-style' look and eating experience.

The dough should be chilled for at least 60 to 90 minutes, however, it can also be chilled overnight. 


Baking the cookies at the slightly higher temperature of 375 degrees (F) helps to shock and prevent them from spreading too too much. You want the finished cookie to be hefty in appearance. 

The biggest challenge in making the cookies is determining their doneness. Particularly being careful in not under baking or over baking them. They should be golden brown along the edges and allowed to rest on the hot baking sheet for at least 10 minutes when they come out of the oven. If this is the first time making them, I recommend bake just one cookie to start. This will help you gauge the right amount of time they need to spend in the oven.


A light sprinkling of flaky sea salt on the balls of dough before they go into the oven is optional, but it helps to further ramp up the cookie's overall flavor.


Levain style cookies are my newest, latest obsession. And these Levain Style Chocolate Chip and Walnut Cookies are my newest chocolate chip cookie obsession. No, I am not abandoning my favorite Jacques Torres Style Chocolate Chip Cookie recipe. But if I wanted to sell, bring, or serve some 'eye-popping' chocolate chip cookies, I would make these Levain Style Chocolate Chip and Walnut Cookies. They are as irresistible and impressive as they are delicious. To use an Olympic analogy, they are gold medal worthy cookies.


Recipe
Levain Style Chocolate Chip and Walnut Cookies
Makes 9 humungous, gorgeous cookies

Ingredients
1 cup (226g) unsalted butter, room temperature
3/4 cup (150g) granulated sugar
2/3 cup (134g) light brown sugar
1 large egg
1 large egg yolk
1 Tablespoon good quality vanilla
2 1/4 cups (293g) all-purpose, unbleached flour
1 cup (118g) cake flour
1 teaspoon baking powder
3/4 teaspoon baking soda
3/4 teaspoon Kosher salt
12 ounces (340g) semisweet chocolate chips (e.g., Guittard or Gharadelli)
1 1/4 cups (125g) walnut halves, toasted and coarsely chopped
Flaky Sea Salt

Directions
1. In the bowl of a standing mixer fitted with a paddle attachment, beat butter for approximately 1 minute.
2. Add in the granulated sugar and brown sugar. Beat until light and fluffy (approximately 4 minutes).
3. Add in the egg, egg yolk, and vanilla extract. Beat until well blended.
4.In a medium sized bowl, whisk together the all-purpose flour, cake flour, baking powder, baking soda and Kosher salt. Add in the dry ingredients to the mixing bowl. Beat on low-medium speed until the dry ingredients are almost all incorporated.
5. Add in the chocolate chips and walnuts. Mix until completely blended (and no white streaks of flour remain).
6. Roll in 9 balls, slightly more than 5 ounces (164-168g) each. Break each ball in half and press sides into each other to create a round ball with a top of the craggle-y edges.
7. Place balls of dough onto a platter or baking sheet. Cover and chill for 60-90 minutes or overnight.
8. Preheat oven to 375 degrees (F).
9. Line two baking sheets with parchment paper. Note: You will bake only one sheet at a time (unless you have a double oven).
10. Place 4 or 5 balls of dough on a baking sheet, spacing more than 2 inches apart. Lightly sprinkle with flaky sea salt. Note: Do not bake up more than 5 balls of dough on a single baking sheet.
11. Turn a baking sheet upside down. Place the baking sheet with the balls of dough on top of it. Insert both of them onto the middle rack of the oven and bake for 18-20 minutes or until the cookies are golden brown. Note: Rotate the baking sheet midway through the baking process and check for doneness at the 16 minute mark.
12. Remove from the oven and let the cookies remain on the hot cookie sheet for at least 8 minutes before transferring to a cooling rack.
13. Bake the remaining cookie sheet.
14. Let the cookies cool before eating. Note: If you are gifting them or selling a bake sale, package the completely cooled cookies in a cellophane bag and tie rightly with ribbon or string. Do not wrap in 'plastic' bags as the cookies will lose their crispness.
15. Store the baked cookies at room temperature. Ideally, store them individually wrapped in a cellophane bag or waxed bag. To recreate the just out of the oven taste, reheat the cookies in the microwave at high for 8-10 seconds.

Notes: (1) There is another version of a Levain Style Chocolate Chip Cookie. There are differences between that recipe and this one. Both are good, but I am partial to this one now. (2) To make a milk chocolate chip cookie version, eliminate the semisweet chocolate chips and walnuts. Replace with 16 ounces (453g) milk chocolate chips. I highly recommend using Guittard Milk Chocolate Chips. (3) Cookies that were chilled overnight baked up slightly faster than the ones chilled only for 60-90 minutes. (4) To toast your walnut halves, put them on a baking sheet and bake in.preheated 350 degree oven for 8-10 minutes. Transfer the toasted walnuts to a cutting board to cool before chopping.

Tuesday, June 11, 2024

Levain Style Lemon Cookies


Every now and then I surprise myself. While I am almost always happy with how a new recipe turns out, there have only been a few times when I wanted to stand in the middle of street with a megaphone and announce to the neighborhood that I have just created the absolutely best thing in the universe. This would be one of those rare 'forget having any sense of humility' moments. Rather it would be one of those unabashedly, shamelessly hubris moments. The creation of these Levain Style Lemon Cookies has unleashed a monster in me. Because this is absolutely, unequivocally the BEST, GREATEST, MOST INSANELY DELECTABLE, CRAVEWORTHY, GORGEOUS lemon cookie on the planet. Possibly the universe. There I said it. I have never been so bold in my entire life. But this cookie, well this freaking amazing cookie has brought out the best of the worst in me.


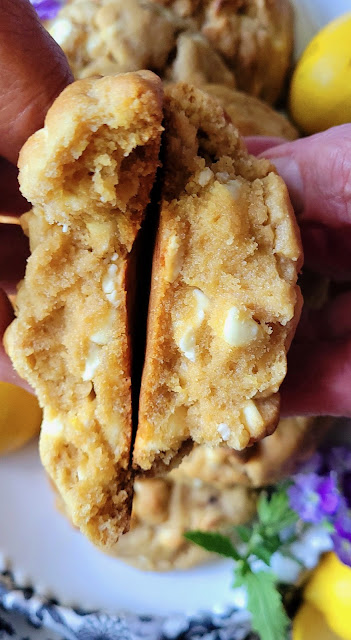
I could take complete responsibility for the creation of this cookie had I not been gently pushed (in the best of ways) by my dear friend Linda. It was she who asked me months ago if I could re-create the Levain Lemon Cookie as she absolutely loves all things lemon flavored. In spite of having created several Levain style cookies for the blog, I wasn't exactly sure I could replicate this one without creating a 'break the bank' confection. Lemon flavored chips were the sticking or rather should I say sticker shock point. Once I learned others had used white chocolate chips as an alternative, I knew my next biggest challenge would be to create a cookie having the 'right' amount of lemon flavor. Not one overpowering or cloyingly sweet with the flavor of lemon, but one having a more subtle, but still discerning lemon flavor to be detected in each mouthwatering bite.  


There were a myriad of options to consider for infusing lemon flavor into the cookie dough. Freshly squeezed lemon juice, lemon zest, lemon extract, lemon paste and/or any combination of the aforementioned. My gut was telling me to use only lemon zest and lemon paste. Some will say there isn't any difference between lemon extract and lemon paste, but I happen to be one that disagrees. The thicker lemon paste delivers a much better, less acidic lemon flavor. And while lemon juice can add some bitterness. lemon zest infuses concentrated amounts of sweet, citrus flavor. But figuring out the quantities of each was going to take a bit of thinking.
 

Having made Levain style cookies before I knew I would be using a combination of all-purpose and cake flours, granulated sugar, light brown sugar, baking powder, baking soda, Kosher salt, eggs (one large egg, one large egg yolk), unsalted butter, and alot of chips. Compared to my other Levain style cookies, this recipe uses different amounts of sugars, baking powder, baking soda, Kosher salt and chips. Some less, some more. I knew I would get a sense of whether or not I made the right decisions when I mixed and then tasted the batter. If there was thing I learned very long time ago is that 'the batter never lies'. If the consistency doesn't look or feel right, the cookie won't turn out right. If the batter doesn't taste right, the cookie won't have an optimal flavor. In other words, a bad batter isn't salvageable. 


To chill or not to chill the dough was yet another decision I needed to make. I decided to let the balls of dough chill for slightly over an hour. Just enough time for the to dough rest and hold its' shape when it went into a hot preheated oven. I knew i didn't want the tops of my cookies to be smooth, so I used the roll into a ball, break in half, bring the halves together method so I would have cookies with that beautiful bakery style craggle-y top. 


This recipe makes 8 ginormous cookies. In order to get them to bake evenly, the balls of dough must be weighed. Each ball of dough weighs a little more than 6 ounces. Because they are so huge, it's important to bake only four cookies at a time. When baking, I decided to use the two tray method. One tray turned upside down and the tray with the cookie balls set on top (so two tray bottoms are touching one another). I am not certain I can explain the science behind why this works with large over-sized cookies, but it does.


Baking time for the Levain Style Lemon Cookies ranged from 17-18 minutes in a preheated 375 degree (F) oven or just until the cookies were a beautiful golden brown. Key to their doneness was to allow the cookies to rest on the hot cookie sheet for at least 8-10 minutes before transferring them to a cooling rack. The heat from the pan helps to continue to bake the cookies without drying them out or burning their bottoms. Additionally that rest time makes it easier to transfer them to a cooling rack.


The texture and flavor and these cookies are perfect. You can definitely smell and taste the flavor of the lemon. We absolutely loved the level of lemon flavoring in theses cookies. It was detectable, yet subtle in the best of ways. 

If the Pancake Princess ever did a Levain Style Lemon Cookie bake-off I want to enter this recipe. If I ever wanted to brighten the day of friend who loved lemon flavored cookies, I would bake up and deliver a batch of these cookies. Or if I ever wanted to enter (and win) a cookie contest, I would make these cookies. Which speaks volumes since I absolutely love my chocolate chip cookies

In all seriousness, I take a big risk when I shamelessly gush about how fabulous these cookies are. In part because not everyone follows 'the' recipe, measures the ingredients, or bakes in an elevation similar to the one in the midwest. Yet, in spite all of these factors, I will end by saying this may be BEST, MOST SCRUMPTIOUS, TO DIE FOR, SHOW STOPPING, DIVINE cookie I have ever made in my entire life. There I said it!

Recipe
Levain Style Lemon Cookies
Makes 8 humungous cookies

Ingredients
1 cup (226g) unsalted butter, room temperature
3/4 cup (150g) granulated sugar
2/3 cup (134g) light brown sugar
1 large egg
1 large egg yolk
Zest from one large lemon
1 1/2 teaspoons Lemon Paste (See Notes)
2 1/4 cups (293g) all-purpose, unbleached flour
1 cup (118g) cake flour
1 teaspoon baking powder
3/4 teaspoon baking soda
3/4 teaspoon Kosher salt
16 ounces (453g) white chocolate chips

Directions
1. In the bowl of a standing mixer fitted with a paddle attachment, beat butter for approximately 1 minute.
2. Add in the granulated sugar and brown sugar. Beat until light and fluffy (approximately 4 minutes).
3. Add in the egg, egg yolk, lemon zest, and lemon extract. Beat until well blended.
4.In a medium sized bowl, whisk together the all-purpose flour, cake flour, baking powder, baking soda and Kosher salt. Add in the dry ingredients to the mixing bowl. Beat on low-medium speed until the dry ingredients are almost all incorporated.
5. Add in the white chocolate chips. Mix until completely blended (and no white streaks of flour remain).
6. Roll in 8 balls, slightly more than 6 ounces (171g) each. Break each ball in half and press sides into each other to create a round ball with a top of the craggle-y edges.
7. Place balls of dough onto a platter or baking sheet. Cover and chill for 60-90 minutes.
8. Preheat oven to 375 degrees (F).
9. Line two baking sheets with parchment paper. Note: You will bake only one sheet at a time (unless you have a double oven).
10. Place 4 balls of dough on a baking sheet.
11. Turn a baking sheet upside down. Place the baking sheet with the balls of dough on top of it. Insert onto the middle rack of the oven and bake for 17-18 minutes or until the cookies are golden brown. Note: Rotate the baking sheet midway through the baking process and check for doneness at the 16 minute mark.
12. Remove from the oven and let the cookies remain on the hot cookie sheet for at least 8 minutes before transferring to a cooling rack.
13. Bake the remaining cookie sheet.
14. Let the cookies cool before devouring.
15. Store the baked cookies at room temperature. Ideally store them individually in a cellophane bag or waxed bag. To recreate the just out of the oven taste, reheat in the microwave at high for 8-10 seconds.

Notes: (1) I used the lemon paste from Neilson-Massey. (2) If you would like a slightly stronger lemon flavor either increase the lemon paste to 2 teaspoons or add some additional lemon zest. (3) I used the Ghiradelli white chocolate chips.


Wildlife in Yellowstone, May 2024

Monday, February 19, 2024

Sugar Cookie Bars


After sharing recipes for more than ten years, I still get excited to share new ones. Especially ones having great visual appeal and a fabulous flavor profile. Because they are so easy to make, Sugar Cookie Bars are one of those confections you can (almost) make on a whim. If you need to bring a dessert for a potluck, to a book club, or to a gathering, these buttery, chewy, craveworthy Sugar Cookie Bars are destined to be a big hit with both kids and grown-ups. And who doesn't want to be the one bringing the dessert where the platter is the first one leaving only few crumbs behind!


If you have butter, eggs, cream cheese, and milk in your refrigerator, you have some of the makings of Sugar Cookie Bars. If you have all-purpose flour, sugar, Kosher salt, baking powder, cornstarch, vanilla, almond extract, and sprinkles in your pantry, you have everything you need to make them! 


I recently talked about the role cornstarch plays in cookies. Just a small amount of cornstarch adds softness and tenderness to the texture of the bars as well. You could leave it out if you want a slightly crispier bar, but the combination of soft, chewy bars topped with a luscious, creamy buttercream icing is irresistible. 

Unlike sugar cookies, the dough for these Sugar Cookie Bars does not need to be chilled. The key to creating a perfect dough is having your butter, cream cheese, and eggs at room temperature. From start to finish, these Sugar Cookie Bars take a fraction of the amount of time you would invest in making rolled sugar cookies. For the best baking results, use a 9"x 9" metal baking pan lined with parchment paper and preheat your oven. Baking time for the bars ranges from 25-30 minutes or until the top is golden. 


While the cookies are baking, you can whip up the dreamy buttercream icing. You control the thickness, the spreadability of the icing with the amount of whole milk you use. Begin with using two tablespoons. Assess the texture before adding more (in one Tablespoon increments). Personally, I love the ethereal look of white icing. Especially one topped with sprinkles. However, if you like a hint of color in yours, add some food coloring. But choose a pastel colored one to create bars with the most visual appeal.


Wait until the bars have cooled completely before icing them. If you ice them while the bars are still warm, the icing will melt. If you don't have or want to use sprinkles, use an offset spatula or large tablespoon to create pretty swirls. 


Have you ever noticed that by simply putting sprinkles on almost anything you can turn something ordinary into something extraordinary? From cake pops, to cakes, to all kinds of iced confections, sprinkles add elements of pure joy, delight, and happiness. They are the ultimate finishing touch. With the power to make everyone in the room feel giddy, it should go without saying that all Sugar Cookie Bars absolutely must be topped with sprinkles. 


As much as I love chocolate desserts, these buttery, scrumptious Sugar Cookie Bars slathered with buttercream icing are a refreshing way to satisfy a sweet tooth craving. And because they are so easy to make, you don't need to wait until the weekend to make them!

Recipe
Sugar Cookie Bars
Makes 16 Bars

Ingredients
1/2 cup (113g) unsalted butter, room temperature
1 cup (200g) granulated sugar
3 ounces (86g) cream cheese, softened
1 large egg, room temperature
1 1/2 teaspoons vanilla
1/4 teaspoon almond extract
2 cups (260g) all-purpose flour
1 teaspoon baking powder
1/2 teaspoon Kosher salt
1/2 teaspoon cornstarch (see notes)

1/2 cup (113g) unsalted butter, room temperature
2 1/4 cups (270g) confectionary sugar, sifted
1/8 teaspoon Kosher salt
2 teaspoons vanilla
3 Tablespoons whole milk

Options: Sprinkles, Food Coloring

Directions
Sugar Cookie Bars
1. Preheat the oven to 350 degrees (F). Line a 9" x 9" metal baking pan with parchment paper. Set aside.
2. Whisk together the flour, baking powder, Kosher salt, and cornstarch. Set aside.
3. In the bowl of a standing mixer fitted with a paddle attachment, beat the butter for approximately one minute. Scrape down the sides of the bowl.
4. Add in the granulated sugar and beat until light and fluffy (approximately 3-4 minutes). 
5. Beat in the cream cheese.
6. Beat in the egg until incorporated.
7. Beat in the vanilla and almond extracts.
8. Add the dry ingredients in two additions. Beat just until incorporated.
9. Transfer dough the prepared pan. Use an offset spatula to smooth the top of the dough. Note: Make sure to evenly spread out the dough.
10. Bake the sugar cookie bars for 25-30 minutes or until golden along the edges and top. Remove from the oven and the place pan on a cooling rack. Let pan cool for approximately 10 minutes before removing the sugar cookie bars from the pan. Place the still warm bars (still with the parchment paper) on a cooling rack. Let cool completely.

Icing
1. In a medium sized bowl, beat the butter until creamy using a hand mixer.
2. Add in the confectionary sugar, vanilla, Kosher salt, and whole milk. Beat until smooth and creamy.
3. If using food coloring, highly recommend using a pastel fool coloring gel or paste. Begin by adding a few drops. Beat in. Continue adding the food coloring until you get your desired color.
4. Spread the icing on the cooled sugar cookie bars. Use an offset spatula or spoon to create a beautiful swirled top.
5. Top with sprinkles!
6. Cut into 16 bars.
7. Serve and enjoy.
8. Store the bars in the refrigerator (well wrapped). Serve chilled or at room temperature.

Notes: (1) The use of cornstarch gives the sugar cookie bars a more tender texture. If you want a slightly crispier bar, omit it.