Thursday, February 24, 2022

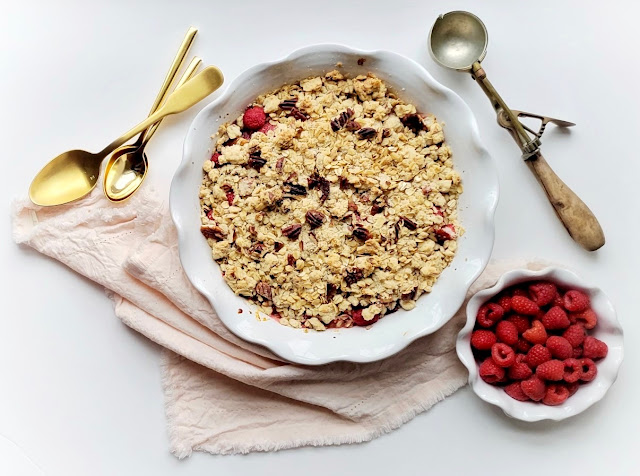
Rhubarb and Raspberry Crisp


Spring is a little more than four weeks away, however, from my perspective it can't get here soon enough. Between the snow, ice, dreary gray skies, bitter cold, and more snow, I have experienced all of the winter I need to this year. Although when you live in the midwest you begrudgingly understand winter often likes to linger or reappear well beyond it's meteorological end date. Which means there is always the possibility April will have snow showers. More than the return of milder temperatures and a green landscape, I look forward to seeing stalks of fresh rhubarb at the grocery store. Last summer one of my running friends gave me enough rhubarb to feed an army. And for once I did the responsible thing and froze more than half of it. Which meant this year I wasn't going to have to wait months to satisfy my rhubarb cravings. Being able to savor the taste of spring in the winter not only took a bit of the chill out of the air but it made the snow and cold slightly more tolerable. 


For those you who don't happen to have a stash of rhubarb in your freezer, you might be wondering (or maybe cursing) why in the heck am I sharing this recipe with you know now. Well, hear me out before you stop reading. Besides being barely able to contain my excitement at the surprising deliciousness of the rhubarb and raspberry combination along with the off chance that some of you have rhubarb in your freezer too, I wanted you to have this recipe now so you could make it the first day rhubarb arrives in the markets or is ready for harvest in your garden. Because after you make it the first time, it's likely to be something you put on repeat well beyond rhubarb season. Which is my way of saying, freezing bags of rhubarb this year will be one of those decisions you will never regret. 

Sweet, ripe raspberries temper the tartness of rhubarb in such a divinely, delightful way, I think it rivals the classic strawberry-rhubarb combination. If, by some chance, you have lived a rhubarb-free life, this Rhubarb and Raspberry Crisp should be how you experience it for the first time. Or, if you grew up eating so much rhubarb you now refuse to eat it, this crisp is the one to make you VERY glad you gave it another chance.


If there was ever a crisp worthy of being both a casual weeknight/weekend dinner or a dinner party dessert, this Rhubarb and Raspberry Crisp would be a serious contender. Especially when served with some really creamy vanilla ice cream.


There are essentially two parts to the crisp: the topping and the filling. Both come together easily and quickly. Some crisp toppings are made with room temperature butter cut into the flour, oats, sugar and salt. But this one is made with melted butter. Which means it can be made on a whim. And without having to remember to take the butter out of the refrigerator the night before or early in the day. In addition to the more customary crisp ingredients, there are coarsely chopped pecans. The nuts not only add both crunch and sweet, buttery flavor to the topping, they take it from a good to great level!


I used frozen rhubarb when making this crisp (and it worked great), but will shift to using fresh rhubarb when it starts showing up in the market. The recommended amount of sugar to use in the filling is a half-cup (plus one tablespoon). The sugar adds sweetness and helps to counteracts the tart/sour flavor of the rhubarb. If your rhubarb is more green than red you may need to increase the amount of sugar to 2/3 cup to help temper the green rhubarb's slightly sharper flavor. Conversely, if you are cutting up mostly red rhubarb stalks, you might want to reduce the sugar to a generous 1/3 cup. The amount of sugar to add to a rhubarb mixture isn't an exact science. It's more trial and error and more personal preference. 


The three tablespoons of cornstarch will help to thicken the juices released from the fruit. To help evenly distribute the cornstarch, I recommend mixing it first with the sugar and Kosher salt, before adding it to the fruit mixture.


I used a deep 9" pie dish to make for a pretty presentation. Although the crisp could have easily been made in a 9" cast iron pan for a more refined rustic one. The crisp is baked in a preheated 375 degree (F) oven for 50-60 minutes (or until the filling is bubbling and has thickened). From start to finish, it takes less than ninety minutes to be ready to devour!


Allowing the crisp to rest 10-15 minutes before serving will also help tighten up the filling a bit more. Serve the Rhubarb and Raspberry Crisp either warm (my favorite way to eat it) or at room temperature. Either way everyone is bound to be scraping their bowls to get every last morsel. If there are any leftovers, indulge your sweet tooth, reheat it in the microwave and have a bowl for breakfast!


If there was ever an easy to assemble, simple dessert to lessen the winter doldrums, this Rhubarb and Raspberry Crisp would be it. Bursting with sweet, tart, flavor notes and having a buttery, crunchy texture, this crisp is destined to make your taste buds deliriously happy, be a crowd pleaser and become one of your most favorite recurrent rhubarb recipes! 


Recipe
Rhubarb and Raspberry Crisp
Serves at least 8

Ingredients
Topping
1 cup (130g) all-purpose flour
1 cup (100g) old-fashioned oats 
1/3 cup (65g) granulated sugar
1/2 teaspoon Kosher salt
8 Tablespoons (113g) unsalted butter, melted
1/2 cup (62g) pecan halves, coarsely chopped and divided

Rhubarb and Raspberry Filling
1-2 Tablespoons of room temperature butter (to coat the baking dish)
4 cups (500g) rhubarb, cut into 1" pieces
3 cups (360g) fresh raspberries
1/2 cup (100g) granulated sugar, plus a Tablespoon to sprinkle on before adding the topping
3 slightly rounded Tablespoons cornstarch
1/2 teaspoon Kosher salt
2 Tablespoons freshly squeezed lemon juice (from a half of lemon)

Vanilla Ice Cream, for serving

Directions
Topping
1. In a medium sized bowl, combine the flour, oats, sugar, salt, half of the pecans. Stir until blended. 
2. Mix in the melted butter and create a mixture having a consistency of coarse crumbs. Squeeze the mixture with your fingertips to create a tighter dough.
3. Place in the refrigerator while you make the filling.

Filling and Assembly
1. Preheat the oven to 375 degrees (F). Lightly butter a 9" baking dish or cast iron pan.
2. Mix the cornstarch, sugar, and salt together in a small bowl. Set aside.
3. In a medium-large bowl, toss the rhubarb, raspberries, and lemon juice together. 
4. Mix in the sugar mixture and toss to combine. Transfer the filling to the prepared baking dish. Sprinkle on tablespoon of sugar over the top.
5. Top with the crisp topping and the remaining pecans. Put the baking dish on a baking pan and place in the preheated oven.
6. Bake for 50-60 minutes or until the filling is thick and bubbly and the crisp top is golden. Remove from the oven and let rest for at least 10-15 minutes before serving. Note: Check for doneness at the 45 minute mark.
7. Serve either warm or at room temperature. Top each serving with a generous scoop of vanilla ice cream.

Saturday, February 19, 2022

Mississippi Pot Roast


It was only a matter of time before I brought my 'used only a handful of times' slow-cooker up from the basement where it had been waiting patiently for me discover a recipe where it could work its' magic. Whatever aversions you may have toward or whatever you think about slow cookers, they have a way of transforming a chunk of beef into the most heavenly melt-in-your tenderness it would be a travesty not to own one. Yes, I know Instant Pots have been all the rage for awhile now, but having endured the test of time, slow-cookers deliver a kind of deliciousness not easily replicated. Not to mention having the ability to add in all of the ingredients into the pot, place the lid on, set the heat level and timer, and then walk away for hours while you do whatever it is that makes you happy is akin to having an in-home personal chef. Sure there was a time way back when, when my culinary-fussy self would have easily dismissed a recipe made in a slow-cooker. But with time, along with finally making a recipe for pot roast that had gone viral years back, has a way of softening one's rigidly held beliefs. 


Some years back a woman by the name of Robin Chapman from North Mississippi got more than her fair share of ten minutes of fame for her Mississippi Pot Roast recipe. Her adaptation of her grandmother's slow cooker pot roast recipe called for adding ranch dressing mix, au jus mix, and pepperoncinis. From Robin's appearances on major network morning shows to magazines extolling the virtues of her recipe, Mississippi Pot Roast became quite THE thing. Yet, in spite of sometimes suffering from FOMO, I didn't succumb to all the hype because at the time cooking with a slow cooker wasn't really MY thing. Besides, I was an Ina Garten-wannabe at the time firmly believing great food was made with recipes having an ingredient list almost as long as your arm (although that still hasn't completely changed). Which meant that a recipe made with only five ingredients was highly suspect.


Call it being unfashionably late to the party or call it finally letting go of previously held preconceived notions, but I finally stopped dragging my feet and made a slightly adapted version of the original Mississippi Pot Roast. And let's just say the old adage 'better late than never' have never been more true. In other words, I am publicly admitting that my preconceived notions were wrong. Wrong about the wonders of a slow cooker and it's ability to create craveable foods, wrong about the level of deliciousness created from five ingredient recipes, and wrong about a recipe about pot roast that was just different. So what prompted this change of heart? Let's just suffice to say the pandemic has taken a toll on and upended many of my beliefs.


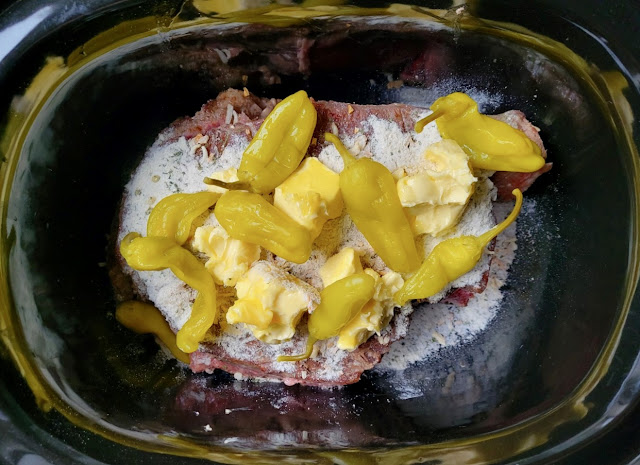
Like with most recipes, the original recipe for the Mississippi Pot Roast has undergone some subtle changes over time. So hey, maybe it's a good thing I waited so long? With boneless chuck pot roast on sale, I knew the universe was trying (yet again) to send me a message. This time I listened. But instead of using us jus gravy mix (as was recommended in the original recipe), I used a packet of onion soup mix (not claiming this to be my idea). Spoiler #1: That was a really good decision. To sear the chuck roast or not to sear, that was one of the slightly debated issues surrounding this recipe. Being a huge fan of searing methods, I went with and would go so far as to say you absolutely must sear the chuck roast first. Spoiler #2, that was a great decision. Once the chuck roast is seared, simply put everything on top of the roast in the slow-cooker, set the timer on low for 8 hours (it may take slightly longer if you have a larger or thick cut of roast), and walk away.  How simple is that?


The only decision you have left to make is will you serve it over a bed of homemade mashed potatoes or will you turn it into Mississippi Pot Roast French Dip Sandwiches (maybe topped with some provolone cheese)? Either way you can't go wrong. The only way you could go wrong is not making this highly flavorful, juicy, melt-in-your-mouth, one pot wonder Mississippi Pot Roast in the first place. A simple recipe that truly takes pot roast to whole new level of deliciousness. Not only has the slow cooker now become my new best friend, I have now officially become the newest member of the Mississippi Pot Roast fan club. Hope you will join me!

Recipe
Mississippi Pot Roast
Serves 6-8

Ingredients
3 1/2 to 4 1/2 pound boneless beef chuck pot roast
Kosher salt and black pepper
2 Tablespoons canola or vegetable oil
1 packet (1 ounce/28g) Ranch Seasoning Salad Dressing
1 packet (1 ounce/28g) Onion Soup & Dip Mix
8 Tablespoons unsalted butter, cut into 6 pieces (see notes)
8-10 pepperoncini peppers


Directions
1. Season both side of the pot roast with Kosher salt and pepper.
2. Heat oil in a cast iron skillet. Sear both sides of the pot roast (approximately 2 minutes per side).
3. Transfer the seared pot roast to a slow cooker.
4. Top the pot roast with the ranch dressing, onion soup mix, butter, and pepperoncini peppers.
5. Cook on low heat for 8 to 9 hours (depending on size of the roast).
6. When knife tender, shred the pot roast up into large pieces using two forks.
7. Spoon the mashed potatoes onto a large platter. Use thongs to top the mashed potatoes with the pot roast. Ladle some of the remaining juices over the meat.
8. Serve immediately.

Notes: (1) I used an unsalted European style butter. (2) Instead of serving the Mississippi Pot Roast over mashed potatoes, serve them on hoagie rolls, turning them into Mississippi Pot Roast French Dip sandwiches topped with provolone cheese!! (3) If you don't have time to make Wendy's Mashed Potatoes, buy some good quality store bought mashed potatoes (found in the refrigerator section of most grocery stores).

Wednesday, February 16, 2022

Reverse Sear Roasted Ribeyes w/ Dijon Aoili


In a little less than two weeks several items on my endless bucket list will get checked off. Ever since first seeing jaw dropping photos of the Upper and Lower Canyons in Page, Arizona I have dreamt about seeing them in person. More importantly, I have been longing to try my hand at photographing them. Already I am anticipating Enimen's lyrics "You only get one shot, do not miss your chance to blow. This opportunity comes once in a lifetime." will be swirling in my head as I try to simultaneously take in the canyon's surreal beauty, conquer my camera setting fears, breathe, and channel my inner Ansel Adams. After coming down from that high, we will head to another place on my bucket list: Zion National Park. In spite of having less than 48 hours to explore and hike there, I will have to do my best to capture as much of its' breathtaking landscapes as possible. If my first time in the majestic Zion will be anything like my first time at Rocky Mountain National Park, then more than likely at some point I will become emotionally overwhelmed. In other words, I will probably weep (with joy) while in this 'kingdom of Heaven'. Nature's beauty has a way of getting to me.
 

Next to spending time in nature, I get an equal amount of pleasure making a great meal. And these Reverse Sear Roasted Ribeyes with Dijon Aoili made for an absolutely phenomenal dinner this past weekend. In spite of having a gas grill, going out on the deck in the winter weather can often make grilling challenging. When that happens, I will often sear steaks in a cast iron skillet and finish them with a quick roast in the oven. Having recently learned about about the reverse searing method, I thought may I needed to learn firsthand if it was as foolproof of a method for cooking steaks as some claim.


Most of us have been taught to believe that searing a steak first helps to ensure all of its' juices are locked in. Turns out that isn't actually true. Instead the benefit of searing is that it adds flavor. So much for having that 'truth' upended!

For the best results when using a reverse sear method, steaks need to be thick (as close to the 1 1/2 inch or 2 inch mark as possible) and the oven temperature needs to be low (250 degrees F to 275 degrees F). Letting the steaks rest uncovered on a cooling rack in the refrigerator for several hours (or preferably overnight) will help to dry the surface of the steak, resulting in an even more beautiful browned finish.


Another key to the reverse sear process is generously seasoning both sides of the steak with Kosher salt and pepper as they rest in the refrigerator. Cooking time for the steaks ranges from 20-25 minutes for medium-rare to 25-20 minutes for medium doneness. If you happen to live in a household where not everyone is a fan of medium-rare (seriously, right?), the reverse sear method allows you to remove one of the steaks from the oven for a few minutes more while the other roasts a bit longer. 

After heating some vegetable oil in a cast iron pan, the roasted steaks are seared for approximately one minute on each side. Before removing the steaks from the pan, add in room temperature butter, thinly sliced garlic, and some fresh rosemary pan. Spooned the butter/herbs over the seared steaks (additional cooking time is about a minute) before removing the beautifully seared steaks to a cutting board. Allow the steaks to rest for about five minutes before cutting into thick slices. Note: Technically in the reverse sear method you don't need a rest period. But some old habits die hard.


Changing up the cooking method gave me the opportunity to shift the way 'some' around here like to eat their steaks. Yes, some commit the sacrilegious sin of dipping a perfectly cooked steak in ketchup. Serving the Reverse Sear Roasted Ribeyes with a Dijon Aoili (along with hiding the bottle of ketchup) turned out to have an even outcome better than I expected. Seems the creamy, slightly tart dijon aoili had just the right flavor profile for the ketchup lover at the table. Mission accomplished!

If there is a downside to the reverse sear method is that it takes longer to cook a steak than it would to grill it or sear first/roast second. But that is a very small price to pay for such a satisfying steak eating experience. Once you taste it, you too might be converted to using the reverse sear method to cook steaks. 

It took me years to realize the benefits of serving thick slices of a cooked ribeye on a platter. Everyone takes what they want and no longer is there any waste. Gone now are the days of serving 'whole' ribeyes on a platter. Another added benefit of serving a platter of sliced roasted and seared meat is being able to pour the melted butter and quickly sautĂ©ed garlic slivers over it. 

So the next time you want to make a simple, yet impressive dinner for family and/or friends, make Reverse Sear Roasted Ribeyes with Dijon Aoili. Serve them with some fresh bread, a beautiful salad, maybe a roasted vegetable or two, and an exceptional bottle of wine. I hope you decide you may never cook steak any other way. Or at least have another equally loved option. And, if by chance, you can turn steak eating ketchup lovers in steak eating aoili lovers, may you feel as jubilant as I did.  I could have cried I was so happy!


Recipe
Reverse Sear Roasted Ribeyes w/ Dijon Aoili
Serves 2-3

Ingredients
Aoili
5 Tablespoons (75ml) extra-virgin olive oil
1/4 teaspoon Kosher or flaky sea salt
2 large egg yolks
1 teaspoon good quality dijon mustard
1 large garlic clove, grated
2-3 teaspoons of freshly squeezed lemon juice (about a half of a small-medium lemon)

Ribeyes
2 ribeye steaks, approximately 1 1/4 pounds each and cut to about a 1 1/2" inch thickness
Kosher salt and black pepper
2 Tablespoons canola or vegetable oil
4 Tablespoons unsalted, room temperature butter
2-3 garlic cloves, thinly sliced
2-3 sprigs of fresh rosemary, plus more for garnish

Directions
Aoili
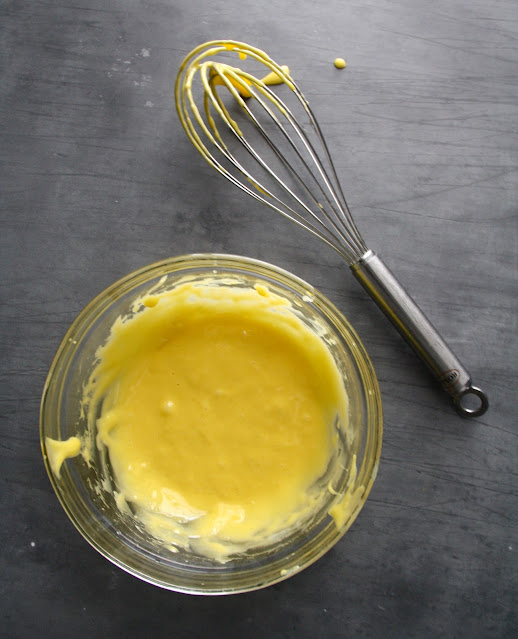
1. In a medium sized bowl, whisk together the salt, egg yolks, mustard, garlic, and lemon juice. Slowly add in the olive oil, whisking until the mixture is thick and luscious. Season for taste. Note: Make the aoili shortly before serving. Cover and keep at room temperature. If made ahead, bring to room temperature and whisk until smooth.

Ribeyes
1. Generously season both sides of the ribeyes with Kosher salt and black pepper. Place on rack on a baking sheet and chill in the refrigerator for several hours or the night before.
2. Preheat the oven to 275 degrees (F). Place the pan with the ribeyes in the oven. For medium-rare, roast for 20-25 minutes. For medium rare, roast for 25-30 minutes. Remove from the oven when they reach desired doneness.
3. Heat a cast iron skillet with oil When the oil is hot, sear the steaks for approximately one minute on each side. Working quickly add the butter, garlic and rosemary to the pan. Spoon the melted butter and herb mixture over the steaks. Remove from the pan and place steaks on a cutting board (reserve pan drippings).
4. Let the ribeyes rest for approximately 5 minutes. Cut into thick slices, season with some Kosher salt & pepper, and arrange on a serving platter. Pour the reserved drippings over the meat. Garnish with some fresh rosemary. Serve with the Dijon Aoili.

Friday, February 11, 2022

Super Bowl Appetizers and Snacks

Whether you are a fan of football or not, who doesn't love a reason to have friends gather? And Super Bowl weekend isn't just about football, it's about food. Lots and lots of food. Guacamole, queso, charcuterie boards, and spinach dip are some of the more usual game day fare found at Super Bowl gatherings. So if you are looking to mix it up a bit, the following eight appetizers just might make their way on your table this year! 


French Onion Dip - Always a hit! And so much better than anything store bought. Serve with your favorite, sturdy potato chips! Make the night before to let the flavors deepen.

Texas Caviar - A hearty, healthy-ish crowd pleaser. Make this one the early in the day or night before as to maximize the flavor wow factor! 


Everything Chicken Puffs - What is not to love about a chicken and cream cheese mixture rolled up in a crescent roll and served warm? These will disappear quickly.

Baked Soft Pretzels - Does anything go better with beer than pretzels? Warm, buttery, pillowy, and salty, these are certain to make everyone happy.


Cranberry Meatballs with Creamy Ranch Dip - Make a double batch of these! This retro recipe is taken to a new level with the Creamy Ranch Dip. 


Cinnamon Spiced Nuts - Put out a big bowl of my new favorite addictive nuts! Or if you are going to Super Bowl gathering, put them in a beautiful bowl, wrap them with cellophone, and tie with a bow. You will the most beloved guest ever.


Steak and Arugula Flatbread with Marinated Onions - this hearty appetizer is likely to appeal to almost every steak lover. 


Bacon Wrapped Dates with Red Pepper Sauce - these sweet and savory bites are even more delicious when dipped in the red pepper sauce. These are definite contenders for scoring big with your friends.

Thursday, February 10, 2022

Whiskey Sour


For as many times as I have traveled to Colorado over the past almost twenty years, I had never been there during the winter. But that all changed this past weekend. Days before leaving about eight inches of fresh snow fell in Boulder giving way to an absolutely beautiful winter landscape, yet some dicey snow packed trails. With the exception of a day with some strong winds, it was a perfect blue sky, sunny winter weather weekend. Lost luggage, tweaking my knee in a freak accident, and not coming home with my usual number of photos were some of the more forgettable experiences. However, staying in my favorite place, waking up to spectacular sunrises, discovering new hiking trails, eating at new places, and finding a great running store more than made up for them. Just being able to spend a few days in one of my happy places is always enough to sustain me until my next trip to the mountains. Already I am planning my return.

Ever since discovering the deliciousness of bourbon, I have been on a mission to try as many classic bourbon based cocktails as possible. From Paper Planes, to the Boulevardier, to the Old-Fashioned, my interest in and love for bourbon cocktails has only deepened. So it only made sense that I added the iconic Whiskey Sour to my repertoire. Going back to the 1870s, the Whiskey Sour is a sweet, tart, spicy, warm cocktail. From its' tart lemon flavor, to its' sweetness from simple syrup and St. Germain (elderflower liqueur), to the warmth and spiciness of the bourbon, to the creamy, foamy texture of the egg white, I have to wonder why it took so long for this classic cocktail to come into my life. But as they say, better late than never.


The very earliest recipes for Whiskey Sours did not include egg whites. Nor were they made with elderflower liqueur. However, these two ingredients help to create an even more luscious, memorable version of the Whiskey Sour.


To help create the finished foamy, frothy texture, many recommend using the dry shake method. Instead of mixing the ingredients and ice in a cocktail shaker, the ingredients are first mixed in a cocktail shaker without ice. After giving the ingredients a vigorous shake for 20-30 seconds, you can add in the ice and shake again or simply pour the cocktail over a glass filled with ice. If, by chance, your cocktail isn't foamy enough to your liking, you can always use a frother. 

When it comes to garnishing the Whiskey Sour nothing compares to or elevates a cocktail more than Luxardo Cherries. If, for some reason you can't find them at your local spirits, food specialty, or grocery store, use maraschino cherries instead.

The Whiskey Sour is of those year round kind of cocktails as it is as refreshing in the summer as it is warming in the winter. While it is typically served in an old-fashion glass, I strong recommend you serve it in a coupe glass as it makes for a great swoonworthy presentation. 


So the next time you are having friends over for cocktails, dinner, and/or movie night consider starting out serving them Whiskey Sours. Even non-bourbon lovers may find themselves swooning over this classic, impressive cocktail. 

Recipe
Whiskey Sour
Make 2 cocktails

Ingredients
4 ounces Bourbon
3/4 ounce simple syrup (preferably homemade)
1 1/2 ounces fresh squeezed lemon juice
1 ounce St. Germain or Elderflower liqueur
2 teaspoons to 1 Tablespoon egg white (the more egg white used, the frothier finish)
Ice cubes
4 Luxardo cherries

Directions
1. Add in the Bourbon, simple syrup, lemon juice, St. Germaine, and lastly the egg white to a cocktail shaker. Shake for 20-30 seconds. Note: This is the dry shake method as it's shaken without ice.
2. Add ice cubes to either coupe or old-fashioned glasses. Pour the cocktail mixture over the ice cubes into each glass.
3. Garnish with Luxardo cherries.

Notes: (1) Use a good drinking Bourbon. I happen to like Russell's and Buffalo Trace. (2) While slightly unconventional, I highly recommend serving the Whiskey Sours in coupe glasses. (3) You can use a frother to further whip up the egg whites after you pour the cocktail in your glass. (4) To make your own simple syrup combine one cup of water and one cup of granulated sugar in a saucepan. Bring to a boil, whisking occasionally. When the sugar has completely dissolved remove from the stovetop and let cool completely. Store the simple syrup in a bottle or jar in the refrigerator. It will be good for slightly more than a month. (5) If you are interested in learning more about the history of bourbon, you might want to watch this documentary Neat: The Story of Bourbon

Boulder, Colorado (February 2022)

Wednesday, January 26, 2022

Cinnamon Spiced Nuts


Winterpalooza finally made an unwelcome appearance this week. Dangerously cold arctic weather combined with snow and ice have me longing for the return of above freezing temperatures. While a fresh blanket of snow set against a blue sky makes for a beautiful landscape, it makes going out for a run a little treacherous. Right about now a forty degree temperature day would feel downright balmy to me, but would probably send shivers down the spines of my friends living in warm weather parts of the country. On bitter cold days my body craves comfort, hot, or spiced foods. And my idea of a snack to warm me up on a wintry day would be these Cinnamon Spiced Nuts. Although to be honest, these slightly addictive nuts would just as likely be easily inhaled on a warm day too. 

What makes these Cinnamon Spiced Nuts so craveworthy are their crunch and sweet-ever so slightly spicy flavor. Cinnamon, ginger, and coriander are the ultimate winning trifecta combination. Ginger and coriander create an intriguing citrusy and a warm flavor with a hint of sweetness. With cinnamon serving to ramp up the heat of the ginger, together these three spices transform nuts into something feeling seriously sinful. Don't be at all surprised when someone says they remind them of the 'pricey' nuts served in paper cones or bags at Christkindlmarkts, county fairs, or Farmer's Markets. 


These sweet, spicy nuts were made with raw/unroasted cashews and pecans, but any combination of your favorite nuts would work too. Almonds and walnuts would be great options. For the Cinnamon Spiced Nuts to have the best texture use a combination of two, three or four different kinds of nuts. I used half cashew and half pecans in this batch, but there are no rules for nut ratios. Let your personal preferences decide your nut choices.


An egg white and a tablespoon of water whisked to a frothy, soft peak consistency is what's responsible for binding the spices to the nuts as well as creating their crispiness.

Roasted on a large baking sheet lined with parchment paper in a preheated 300 degree (F) oven for 40-45 minutes, the aroma of the nuts is a sign of what is to come. Once slightly cooled, the nuts are broken apart and transferred to a serving bowl. If stored in a tightly sealed container, the Cinnamon Spiced Nuts will be good for at least a week. Chances are pretty good they won't last that long.


These Cinnamon Spiced Nuts are the kind that will cause your friends and/or family to either hover over the bowl or make frequent return trips back to it. They would make for the most perfect bites at a cocktail party, as an appetizer, or as a hostess gift. Because they take just slightly more than an hour to make, they can easily be made for a casual, impromptu gathering. These nuts are destined to be one of your go-to favorites!

Recipe
Cinnamon Spiced Nuts
Perfect for a gathering up to 8

Ingredients
1 large egg white
1 Tablespoon water
1 pound (452g) of nuts (mixture of raw/unsalted cashews, pecans, almonds, and/or walnuts) - See Notes
2 teaspoons cinnamon
1 teaspoon toasted ground coriander
1 teaspoon ground ginger
1 teaspoon flaky sea salt or Kosher salt
1/2 cup (100g) granulated sugar

Directions
1. Preheat the oven to 300 degrees (F). Line a large rimmed baking pan with parchment paper. Set aside.
2. In a medium sized bowl, whisk together the sugar, cinnamon, coriander, ginger, and salt. Set aside.
3. In a medium-large sized bowl, whisk the egg whites until frothy. Add in the water and whisk again until very soft peaks form.
4. Add in the nuts, stirring to coat.
5. Sprinkle the sugar/spice mixture over the nuts. Stir to coat.
6. Spread the nuts evenly on the prepared baking pan. Bake for 40-45 minutes, rotating the pan midway through the baking process, until the nuts are dry and crisp. Remove from the oven. Let nuts cool on the baking sheet for at least 20 minutes.
7. Break the nuts into pieces. 
8. Transfer the nuts to a serving bowl. Serve them slightly warm or room temperature. Then watch these addictive nuts disappear. 

Notes: (1) I used a half pound each of the raw/unsalted cashews and pecans. Use any combination of your favorite nuts. (2) The recipe was inspired by the 2005 Cook's Illustrated Cinnamon-Spiced Nuts recipe. In this version, I omitted the step of draining the nuts after they were mixed with egg white/water mixture; used flaky sea salt instead of table salt; and, baked the nuts at 300 degrees (F) rather than 275 degrees (F).