Tuesday, May 30, 2017

Mixed Greens Pasta Salad


Memorial Day is the unofficial start to the summer. Depending on where you live or how old you are, there are any number of tell tale signs of its glorious onset. Beaches and public pools officially open whether we are bathing suit ready or not; the population of beach towns swells with the arrival of the summer people; the aroma of food being cooked on outdoor grills permeates the air; piled high on tables at the farmer's markets are a wide array of fresh fruits and vegetables; pitchers of fruit filled sangria have a greater presence at gatherings; and, rule followers can freely wear white without fear of the ghosts of former etiquette matrons haunting them. Around here it also means the gardner (aka the person who shall remain nameless) has finished planting all of this season's annuals and herbs into the urns and hanging baskets; the mileage on my bicycle's odometer starts to see dramatic increases; the frequency of my whining escalates in anticipation of my long runs being on the hottest days; some of my favorite recipes (e.g., chocolate covered caramels) go on hiatus until cooler, less humid temperatures return while others return with a vengeance (e.g., blueberry crisp); and, I start to crave salads. And if this year's Memorial Day weekend weather is an omen of some sort, we should be having a wondrous summer here in the midwest. 


As soon as I came across the recipe for the Mixed Greens Salad in the June (2017) issue of Food and Wine I knew I would be making it. Sooner rather than later. Salads with pasta in them, especially ones with cone shaped fluted petal-like frilly edged pastas, are even harder to resist. With fresh asparagus still available at the farmer's market all of the salad making stars were aligned.


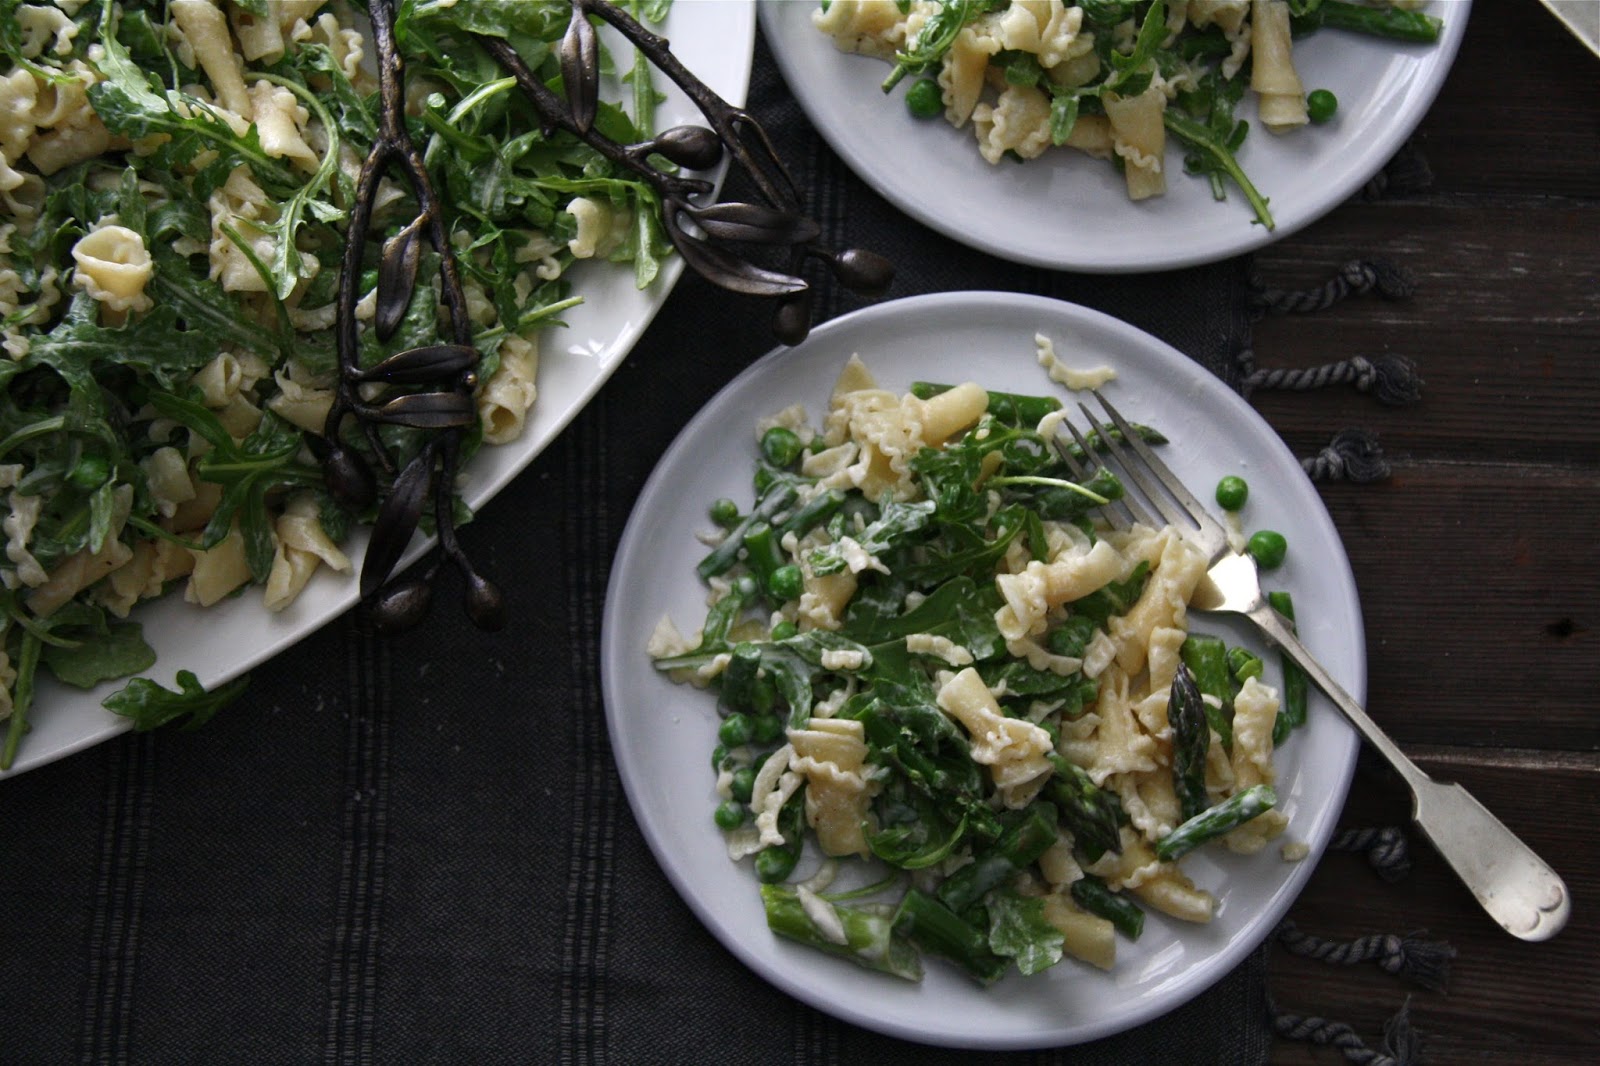
If there is one salad you want to be the stand-out at your next summer barbecue or gathering, this Mixed Greens Pasta Salad is a serious contender. Crisp vegetables and al dente campanelle (or gigli) pasta tossed with a creamy, light, tangy, mildly garlicy dressing are the epitome of what a flavorful, satisfying, crave worthy summer salad should be. It's a salad substantial enough to stand up as a main course as well as being the perfect accompaniment to grilled chicken, steak, fish, and even pizza.


At least in terms of its' size, this Mixed Greens Pasta Salad might be the kind of salad worthy of living up to Elaine's definition of a 'big salad' (click here for a Seinfeld episode clip). Because the recipe makes a really, really BIG salad. Enough to serve at least 10-12 people (as a side) or 6-8 (as a main course).


As far as salads go, this one comes together easily. And in spite the simplicity of the ingredients, it delivers as one seemingly much more complex.


Two cups of peas and a pound of trimmed asparagus cut into 1" or so pieces are blanched in boiling water until tender crisp. Two minutes is all it takes to get them salad ready.

Plunging the quick boiled vegetables into a bowl of ice water will ensure they retain their color vibrancy and crisp-tender texture.


The dressing is made with buttermilk, mayonnaise, champagne vinegar, minced garlic, and some kosher salt and pepper to taste. It can be made as you are assembling the salad or in advance (covered and refrigerated).


For the volume of pasta (original F&W recipe recommended using one pound of cooked pasta) and vegetables, the amount of dressing seemed to be slightly disproportional. While I am not at all suggesting this salad be drenched in dressing, having all of the vegetables lightly coated in it would make for an even more satisfying salad eating experience. So next time, I will make the the entire pound of pasta but initially use only 3/4 of it. If by chance, this reduction is 'too much' and the salad seems cloyingly overdressed, I will add a little bit more of the cooked pasta to get it to the still light, but having a slightly more discernible dressing presence.


The first step in assembling the salad is mixing half of the salad dressing (about 3/4 cup) with the drained, still warm al dente campanelle (or gigli) pasta. Once mixed together, the pasta needs to rest (cool) for about 30 minutes before the asparagus, peas, and remaining dressing are added in. The arugula is folded in to the salad at the end or right before serving. 


Once this 'big' Mixed Greens Pasta Salad is all mixed together, transfer to really big platter and serve. 


I couldn't stop eating this salad. Or rather, I didn't want to. The sweetness of the peas, the slight peppery taste of the arugula, the crunch of the asparagus, the texture of the pasta, and the just right amount of garlic in the dressing put it in the addictive salad category.


Aesthetically this is truly one of the most beautiful salads to ever grace a table. Part of its' visual allure is due to use of campanelle (or gigli) pasta. So whatever you do, I 'pretty please' beg you not to make a pasta substitution for this salad. It would be like wearing white before Memorial Day. You could do it, but it just wouldn't look right. I know what you may be thinking. Some rules are made to be broken or even a bit outdated. However, when it comes to this Mixed Greens Pasta Salad, there really should be a pasta rule. One with penalties for breaking.

If you are looking to change up your salad offerings for your summer gatherings or secretly seek to be the center of attention at the next barbecue, make this 'crazy good' Mixed Greens Pasta Salad. I almost guarantee it will get rave reviews. Don't be surprised if any of your family or friends claiming to have an aversion to peas take a second helping. Odds are it will be destined to make repeat appearances throughout the summer. 

Recipe
Mixed Greens Pasta Salad (Inspired by the Mixed Greens Salad recipe in Food & Wine, June 2017)
Serves 10-12 as a side dish, Serves 6-8 as a main dish

Ingredients
Dressing
1 cup buttermilk
1/2 cup mayonnaise
3 Tablespoons Champagne vinegar
1 large garlic clove, minced or grated
Kosher salt and black pepper to taste

Salad
1 pound fresh asparagus, trimmed and cut into 1" pieces
2 cups peas, fresh or frozen (Note: A 10 ounce bag of organic peas yielded two cups.)
3/4 - 1 pound campanelle or gigli pasta, cooked al dente 
4-6 ounces arugula, thick stems discarded and leaves coarsely chopped. See Note.
Kosher salt and black pepper

Directions
Dressing
1. In a medium sized bowl, whisk together the buttermilk, mayonnaise, vinegar, and garlic. Season with salt and pepper. Cover and store in the refrigerator until ready to use.
Note: Dressing can be made several hours or a day ahead.

Salad and Assembly
1. Set up an ice bath in large bowl.
2. Bring a saucepan of water to boiling. Add the peas and asparagus. Cook until crisp tender (approximately 2 minutes). Drain and transfer to ice bath to cool completely. Drain well.
3. Refill saucepan with water and return to a boil. Season water generously with sat. Add pasta and cook until al dente. Drain well and transfer to a large bowl.
4. Toss half (approximately 3/4 cup) of the dressing with the warm pasta. Let cool for 30 minutes.
5. Stir in asparagus, peas and remaining dressing. Season with salt and pepper.
6. Fold in arugula and serve.

Notes: (1) This was a very lightly coated salad. Would recommend using only 3/4 pound of the pasta to ensure all of the pasta and vegetables are evenly coated. (2) While the F&W recipe called for using regular sized arugula, I used an arugula slightly larger than baby, one without heavy stems. Instead of using 1/2 pound of arugula, used only 4 ounces and felt it was more than enough. However, after mixing your salad, add more to your liking. (3) If fresh peas are not available, use large sized frozen organic peas. They worked well. (4) The salad is best enjoyed immediately after fully assembled although it was still genuinely delicious after being chilled in the refrigerator overnight in spite of not having the freshly made creamy dressing finish (but this may have been due to the use of the full pound of pasta).


Memorial Day Weekend in Wilder Park 2017 (Elmhurst, IL)


Monday, May 15, 2017

Pistachio and Rose Water Meringues


There were a million things I should have been doing this weekend. Packing for my upcoming trip; planning my menu for next week's dinner party; finish reading a book I started eons ago so I can start reading the others piling up; purging my closets of clothes highly unlikely to be ever worn again; making order out of the disorder in one of the storage rooms in the basement; doing some research for recipes on my list to try. In other words, anything other than trying out a new recipe. Without too much hesitation, I decided the best use of my time would be to finally get around making Ottolenghi's Pistachio and Rose Water Meringues. (Spoiler Alert: It was or at least I thought so!) The first time I saw a photo of these beautiful, love at first bite, giant, chalkwhite, glossy confections, I was awestruck. However, the discovery made after tasting them was even better. They were unlike any other meringue I had ever tasted. It was their textural contrast, the crunchy exterior and pillowy interior, that redefined what I thought a meringue really was or could ever be. I was in meringue nirvana.

I couldn't have been happier with my decision to spend time in the kitchen. Because giddy may be the best word to describe how I felt when the Pistachio and Rose Water Meringues came out of the oven.


Two kitchen tools are essential to creating a thick, shiny and billowing meringue and ultimately these crispy on the outside, pillowy on the inside meringues. Those tools would be: a standing mixer with a whisk attachment and a metric measuring scale. They make what almost seems impossible, possible. You might be able to get away without having a metric scale (although precision in this recipe is rather important), but not without a standing mixer. If by chance you don't have one or other, this confection should more than justify the purchase of one or both of them. Or maybe I should be a little more emphatic and say they most definitely will.

The techniques for making these meringues is different from most other meringue recipes I have come across or tried. But then again no other meringue has looked or tasted like these. To start, the sugar is heated in a 400 degree (F) oven for approximately 8 minutes before slowly added to the slightly beaten, frothy egg whites. While heating the sugar may seem a little unusual, the heat helps to stabilize the egg whites. 

The meringue recipe called for use of superfine sugar. Also known as caster sugar or Baker's Sugar. If you cannot find any of these sugars, you can make your own superfine sugar by processing granulated sugar in a food processor until it has the texture of fine sand (it worked perfectly). Weighing your sugar on a digital scale before putting it in the food processor helps to ensure your sugar measurement remains accurate. If you don't have a scale and are using the measuring cup method, add a couple of extra tablespoons of sugar before processing to account for the reduction in volume.

In his cookbook, Ottolenghi: The Cookbooka Lebanese brand rose water (e.g., Cortas) was recommended. However, I used Nielsen Massey's Rose Water Extract instead. Regardless of which rose water brand used, know that it has a sweet distinctive, but not at all overpowering flavor. One which not everyone may be a fan of. For this reason, I recommend you add only one teaspoon of the rosewater when adding the sugar to the egg whites. Taste your meringue before deciding whether to add the second or even a third teaspoon of the rose water. Alternately, forget using the rose water altogether and use two teaspoons of vanilla. (Hint: If you use a clear vanilla extract, your meringues will be as white as a billowy cloud in the sky.)


As soon as you take the sugar out of the oven, turn the temperature down to 225 degrees (F). To aid in reducing the oven's temperature from 400 degrees (F) to 225 degrees (F), I left my oven door slightly ajar for a couple of minutes. Not sure if this really works to helping bring the oven temperature down, but at least I felt better.

Ottolenghi's recipe called for whisking the egg whites, sugar and rose water on high speed for 10 minutes, or until the meringue is cold. Somewhere around the 6 minute mark I tested the meringue. While it wasn't 'warm', it wasn't quite cold. But it was thick and had the right kind of glossy sheen. Torn between following the meringue master and trusting my instincts, I ended up whisking the meringue for almost 8 minutes before turned almost 'too thick' and lost its' beautiful glossy sheen. Beating the mixture for 8 or 10 minutes is not as important as having your meringue hold it shape when lifted from the bowl and retain a homogenously silky texture. 


The meringues are shaped using two large spoons (think slightly larger than a tablespoon). One spoon to scoop up a large dollop of meringue (think medium sized apple) and another spoon to scoop onto the prepared baking pan. Instead of first placing the meringues in a plate of finely chopped pistachios, I placed them directly on the pan and then sprinkled pistachios over them. Next time, I will be a little more generous with the pistachios.

I used two 12"x18" baking pans lined with parchment paper. Because the meringues almost double in size during the baking process, I recommend putting only six (6) mounds of the meringue on each. 


The meringues bake for approximately two (2) hours. During the baking process rotate your trays, back to front and top to bottom, every thirty minutes to ensure they bake evenly.

To test the meringues for doneness, lift from the pan, gently prod to make sure the outside is completely firm and the center is still a little soft. You might be wondering 'how do I test the center without breaking open one of the beautiful meringues?'. Without the benefit of having x-ray vision, you have to trust the two hour baking time and the constant 225 degrees (F) oven temperature will work its' magic. But if for any reason you have trust issues, go ahead and break one open (but you really shouldn't have to). When the meringues are done, the inside will have a marshmallowy-like texture.


Considering this was the first time I made the Pistachio and Rose Water Meringues, I could not have been more thrilled with how they tasted and looked (not yet to the level of Ottolenghi perfection but each one was uniquely beautiful). I cannot wait until you experience their amazing contrast of textures. Crunchy on the outside and marshmallowy on the inside. 

There are an almost infinite number of variations to these meringues. Instead of using rose water and pistachios, use vanilla and pistachios or vanilla and almonds or hazelnuts. Or use vanilla only and swirl some cooled melted dark chocolate into the meringue mixture and lightly dust with cocoa powder before baking them. Or maybe add some espresso powder (about 1/2 teaspoon) along with the cooled melted dark chocolate into the meringue mixture before baking them. The possibilities are almost endless.


If you are looking for a new, eye-widening, incredibly scrumptious confection to serve to your family and friends, make these Pistachio and Rose Water Meringues. Nothing may be more impressive or show stopping than a cake stand piled high with these blissfully divine meringues. Nothing. 

Recipe
Pistachio and Rose Water Meringues (inspired by the Pistachio and Rose Water Meringues from Ottolenghi: The Cookbook, written by Yotam Ottolenghi and Sami Tamimi)
Makes 12-14 large meringues

Ingredients
3 cups (600 g caster, superfine, or Baker's sugar)
10 1/2 ounces (300 g) free-range egg whites, from about 9 to 10 large eggs
1 -2 teaspoons rose water (or 2 teaspoons vanilla, see Notes below)
1/2 cup (60 g) raw pistachio nuts, finely chopped

Directions
1. Preheat oven to 400 degrees (F). Spread pistachios on a flat plate and set aside.
2. Separate egg whites. (Reserve egg yolks for another use.) Place in a standing mixer fitted with a whisk attachment.
3. Line a large baking sheet with parchment paper, ensuring the paper comes up the edges of the pan. Spread sugar evenly on baking sheet. Bake for about 8 minutes or until sugar is hot, over 212 degrees (F). The sugar may begin to dissolve at the edges.
4. While the sugar is in the oven, whisk the egg whites on high speed until the whites begin to froth up (about 1-2 minutes). 
5. After removing the sugar from the oven, reduce the oven temperature down to 225 degrees (F).
6. Carefully and slowly pour the hot sugar into the whisked whites. Add the rose water. Whisk mixture on high speed for up to 10 minutes or until the meringue is cold and looks homogenously silky. At this point, they should keep their shape when you lift a bit from the bowl. Note: Taste the meringue. If you want a more distinctive rose flavor, add a bit more and fold in. 
7. Line two baking sheets with parchment paper. Put a small dab of the meringue on the underneath corners of the parchment paper so it sticks firmly to the pan.
8. Have two large spoons (oversized tablespoons) ready. Use one of them to scoop up a big dollop of meringue (the size of a medium-sized apple). Then use the other spoon to scrape it off and place on the baking sheet. Generously sprinkle the top of each meringue with the finely ground pistachios. Repeat to  make more meringues, spacing them well apart on the pan as they will almost double in size in the oven. Note: Alternately place the meringue on the plate of chopped pistachios. Roll the meringue so it is covered with nuts on one side. Gently place the meringue on the prepared baking sheet. 
9. Place in oven and bake for approximately 2 hours. To check for doneness, lift them from the pan and gently prod to make sure the outside is completely firm and the center is still a little soft. Remove from the oven and leave to cool on baking sheet.
10. The meringues will keep in a dry place, at room temperature, for quite a few days. 

Notes: (1) If using a 12"x18" sized baking tray to bake the meringues, you will need two of them. Put no more than 6 meringues on each tray as they almost double in size during baking. (2) If your oven isn't wide enough to put trays on a single rack, rotate the trays every 30 minutes to ensure even baking. (3) When whisking the egg/sugar mixture, check the consistency and temperature of the mixture starting at 6 minutes. It is important for the meringue to remain shiny and hold its shape when scooped with a spoon. (4) Instead of rose water, consider using vanilla extract. If using the rose water, recommend begin using only 1 teaspoon when whisking the egg/sugar mixture. Taste before adding the additional teaspoon. While I loved the taste of the meringues made with 2 teaspoons of the rose water, some found the flavor too overwhelming. (5) A standing mixer with a whisk attachment is a must for making these meringues. (6) Strongly recommend using a metric scale to measure the ingredients. (7) The recipe makes 12-14 humungous meringues. If you only want or need 6-7 of them, cut the ingredients in half.

Thursday, May 11, 2017

Amatriciana Estiva (Summer Amatriciana)


Time flies much too fast. In less than two weeks Laura, my favorite niece, will be graduating from college. And we will all be making the trek out east to witness and celebrate her milestone moment. There are still days when I look at her and clearly see her three year old, five year, and eighteen year old faces, to name just a few. I feel fortunate to have been able to watch her grow into a beautiful, kind, smart, funny, accomplished young woman. And to this day, I remain more than grateful to God she didn't break her three year old neck landing hard as she flew off a swing while under my watch. Laura has so many admirable, enviable qualities I don't know where to begin listing them all. The one making the earliest appearance in her life was her fiercely determined spirit. As a preschooler she had very strong feelings about how to comb (or not comb) her hair or what she wanted to wear (or rather not wear). Thankfully she possesses a strong forgiving spirit. Or we may not have as close as a relationship we share today. To say that I am proud of the person Laura has become would be an understatement. If the world gave her back only some of what she has given it already, she will have a blessed, happy, successful life. But, of course, as her aunt, I want the world to give her more. 


Her graduation weekend will include meals filled great food and amazing wine. It is fitting we are having a celebratory dinner at the Italian restaurant in Boston my sister has raved about as Laura spent a study abroad semester in Florence. As much as I am looking forward to what will undoubtedly be an amazing dinner, I am also looking forward to making her this Amatriciana Estiva when she comes back home for a couple of weeks. 


Amatriciana, one of the better known sauces in Rome, means "in the style of Amatrice" (a town in the province of Rieti located in central Italy). This traditional, classic tomato sauce is prepared with guanciale (cured pork cheek), tomatoes, and grated pecorino romano cheese. Garlic, onions, and olive oil have worked their way into variations of Amatriciana, however, onion is the least favored ingredient. This version, shared in the cookbook 'Tasting Rome: Fresh Flavors & Forgotten Recipes from an Ancient City" adheres very closely to the early 19th and 20th century recipes as there is an almost negligible amount of extra-virgin olive oil and only clove of garlic.


Simple, fresh ingredients are the hallmarks of the Amatriciana. Fresh cherry tomatoes, garlic, basil, pecorino romano cheese, and guanicale. Considered by some to be a delicacy, guanciale is an unsmoked Italian bacon made from the pig's cheek. Nothing else adds the same kind of luxurious flavor to a sauce. In other words, there are no substitutions for it in an Amatriciana sauce.


The original recipe called for the use of bomboletti pasta. Translated it means short ribbed pasta. If by some chance you don't find a pound bag of pasta labeled as bomboletti, look for a mezzi rigatoni. Mezzi rigatoni comes in varying sizes. For this recipe you want to find one, preferably imported, about an inch long and about a half inch wide. I used this one, a Mezzi Rigatoni 18 made by Divella. 


Cut into matchstick pieces, the guanciale is cooked in one teaspoon, yes only one teaspoon, of extra-virgin olive oil until it is a beautiful golden brown and crispy. Using a heavy bottomed cast iron pan the guanciale took almost ten (10) minutes to be cooked to perfection. After removing and placing the pieces of guanciale on a plate lined with a paper towel, the rendered fat is poured into a heat proof glass measuring cup. Making it easier to return only half of it back into the pan before adding the garlic. As a self-professed garlic lover, I wanted to use more than one clove of garlic. But instead had a feeling this was a sauce calling for garlic restraint. For all of you garlic lover kindred spirits out there, one clove was all this sauce needed. Any more and it would have been an unfortunate distraction.

There are one and a half pounds of cherry tomatoes in this sauce. While cherry tomatoes are not yet in abundance at the farmer's markets, the cherry tomatoes on the vine found in many grocery stores worked well. I happened to find some San Marzano tomatoes at one of my local ethnic grocery stores. They are about the same size as a cherry tomato although they have an oblong shape. I decided to use a combination of the two tomatoes. While I can't compare sauces made with only one tomato variety or two, I can tell you I absolutely loved the depth of tomato flavor from the use of both the cherry and San Marzano tomatoes. So if you can find them near where you live, try this variation. 


In less than ten minutes over medium heat, the tomatoes fall apart, creating a thick, velvety sauce. Some fresh basil, sea salt, grated pecorino romano cheese, and the cooked guanciale all add to the complexity of this rather seemingly simple sauce. 

If you are planning on serving this dish immediately, start bringing a large pot of water to a rolling boil while you begin making the sauce. By time the sauce is almost finished, you should be ready to put the pasta in the water. Cook only until very al dente. Not al dente, very al dente. Note: The pasta will continue to cook in the sauce. After adding the very al dente pasta to the tomato sauce, add about one cup of the pasta water or enough to barely cover the top of the pasta. Some of the water will evaporate as well as be absorbed by the pasta. If one cup of pasta water is not enough, you can always add more. If you add too much at the start, you risk having a runny sauce or very overcooked pasta.


The one half cup of freshly, finely grated Pecorino Romano cheese used in this dish is divided equally. Half is mixed into the sauce itself, the other half is used to finish off the plated pasta. I don't know about you, but measuring grated cheese in a measuring cup had been a challenge. A half cup of grated Pecorino Romano cheese weighs two (2) ounces. To overcome this challenge as well as to avoid turning beautiful finely grated cheese into an ugly clump, I use a scale. It's one of those kitchen tools I can't live without. After using a scale for awhile you begin to get a sense of what a half-cup of grated Pecorino Romano looks like (and it doesn't look like it would fit into into a half measuring cup). If you don't have one, consider getting one. They are worth their weight in gold.

Before plating the pasta on a platter, I had added all of the cooked guanciale. The original recipe called for adding only half to the sauce and using the other half to sprinkle over the top of the dish. I suppose one reason was to make sure everyone gets a few pieces on their plate. Glossing over that little detail, I added all of the cooked guanciale to the sauce. Having tasted the Amatriciana Estiva, I would do the same thing again.


Have a bowl of some additional freshly grated cheese available on the table for those who love their pasta heavily draped. Whatever you do, don't buy the pre-grated, pre-packaged pecorino romano cheese. It doesn't taste the same as freshly grated. Really, seriously, it doesn't. 

I could, but probably shouldn't, eat this Amatriciana Estiva weekly for the rest of my life. I don't even know where to begin in describing this Amatriciana Estiva. If I used even half of the adjectives that came to mind when I took my first bite, I wouldn't come close to doing justice to this deceivingly simple, intensely flavorful and deeply satisfying dish. I could not think of a more fitting pasta dish to serve at a celebratory dinner.

With summer cherry tomato season just around the corner, I am predicting Amatriciana Estiva will be making regular appearances on the dinner table here. 

Recipe
Amatriciana Estiva (Summer Amatriciana) - an ever so slight adaptation to Katie Perla's and Kristina Gill's Amatriciana Estiva recipe shared in their 'Tasting Rome: Fresh Flavors & Forgotten Recipes from an Ancient City" cookbook

Ingredients
1 teaspoon good quality extra-virgin olive oil
3 to 3 1/2 ounces Guanciale, cut into matchsticks
1 large garlic clove, smashed
1 pound cherry tomatoes and 1/2 pound of San Marzano tomatoes (or 1 1/2 pounds cherry tomatoes), cut in half
6-8 fresh basil leaves, torn into pieces
1/2 cup (2 ounces) Pecorino Romano, finely grated, divided
Sea Salt
1 pound bomboletti style pasta (short, ridged, tubular shaped)
Additional grated Pecorino Romano for serving

Directions
1. Begin to bring a large pot of water to a rolling boil while you make the sauce.
2. Heat olive oil in a heavy bottomed pan over low heat. When oil begins to shimmer, add the guanciale. Cook, stirring, until golden brown and crisp (approximately 10 minutes).
3. Using a slotted spoon, transfer guanciale to a plate lined with a paper towel. Set aside.
4. Pour rendered fat into a measuring. Return half of the rendered fat back to the pan. 
5. Over medium-low heat, add garlic. Cook until it turns golden (approximately 4-6 minutes).
6. Add tomatoes. Increase heat to medium and cook until the tomatoes lose their shape (approximately 10 minutes). Stir in basil.
7. When water reaches a rolling boil, add at least 1 tablespoon of sea salt. When salt had dissolved, add the pasta. Cook until very al dente
8. Remove pasta from the pot using a skimmer (reserve pasta water) and add to sauce. Stir to coat.
9. Add enough pasta water (approximately 1 cup) to barely cover the pasta. Add more water as needed.
10. When pasta is al dente, remove pan from the heat.
11. Add 1/4 cup of the grated Pecorino Romano. Stir until cheese has melted. Add all of the cooked guanciale (or alternately add only half of the guanciale, reserving it for sprinkling over the top of the plated pasta).
12. Season to taste with sea salt.
13. Transfer to a serving platter. Top with remaining 1/4 cup grated Pecorino Romano cheese and, if not already mixed in, the remaining guanciale. Serve immediately. 
14. Optional: Serve with some additional grated cheese.

Notes: (1) This dish is best served warm, but even at room temperature it remained delicious. (2) The first time you make this, use only one clove of garlic. I would bet you won't be tempted to increase the amount the garlic the next time you make it. (3) Use the ripest cherry tomatoes you can find.


Cantigny Park, Wheaton, Illinois (May 2017)


Friday, May 5, 2017

Cinco de Mayo Round-Up

Happy Cinco de Mayo! However you decide to celebrate, I hope it includes some great food and beverages. And it goes without saying, a really good tequila! One of the great things about the foods typically enjoyed on Cinco de Mayo is they are all great year round. I mean, can you imagine if we waited to eat guacamole and drink margaritas once a year? The mere thought of this is almost unfathomable. So here are some recipes to include in your fiesta as well as in any of your upcoming gatherings.


Amy's Shortbread Cookies - Cinco de Mayo Style