Monday, February 29, 2016

Creamy Cornbread Casserole


By next year at this time most of us will still be able to remember who won the Oscar for best actress and best actor. However, the names of the Oscar winning best supporting actress and/or best supporting actor may be permanently stuck to the tips of some of our tongues. Similarly we have great powers of recall when it comes to remembering the main course of a meal, but a sketchier, more selective memory for the sides served. When someone asks us to describe a holiday, birthday, or other celebratory meal, we often lead with the main course. Most restaurants list the available sides in some obscure place on the menu, often in a smaller font. Just as a movie becomes more compelling with a great support cast, a meal feels complete with sides, particularly the 'we want second helpings' kind.

This Creamy Cornbread Casserole, part cornbread and part custard in texture, it is everything a corn pudding was meant to be. As the perfect accompaniment to grilled or roasted poultry, grilled steaks, and even a bowl of hearty chili, it is a side dish having a 'must have a second helping' quality.


For those of you having an aversion to making any casserole with canned corn, you may be tempted to say 'thanks but no thanks'. While I can appreciate the strong desire to cook only with fresh ingredients (I too have my 'fresh is best' moments), this Creamy Cornbread Casserole may cause your canned food paradigm to shift. 

Added to the can of creamed corn and whole kernel corn (undrained), are two eggs, sour cream, melted butter, heavy cream, and freshly grated cheddar cheese. 

For this casserole I used Kerrygold's 12 month aged cheddar (white) as it brought just the right amount of cheesiness. If for some reason you can't find it, buy a really good one year old white cheddar. You don't need to buy a 2 or 3 year old aged cheddar for this casserole, but you do need to buy some really good parmigiano-reggiano to give it a slight nuttiness. More on that in a bit.


Making up the dry ingredient portion of the casserole is all-purpose flour, kosher salt, sugar, baking powder, and cornmeal. I used Bob's Red Mill medium grind stone ground cornmeal.

The assembly of the casserole is as simple as blending the wet and dry ingredients together.


The entire mixture is poured into a butter casserole pan, topped with an additional 1/4 cup of grated cheddar and 1/4 cup of freshly grated parmigiano-reggiano cheese. Considering all of the controversy surrounding pre-grated, pre-packaged parmesan cheeses going on, why risk sprinkling wood chips onto this casserole? Besides, there is a world of flavor difference between freshly grated parmigiano-reggiano cheese and any bag or boxed pre-grated cheese.


The Cream Cornbread Casserole bakes in a preheated 350 degree (F) oven for 35-40 minutes or until the top is golden brown. The center of the casserole will have some movement or wiggle in the center, however, after resting for 15-20 minutes before serving, it all comes together perfectly. 


Having made other corn pudding recipes in the past, I have to say I think the recipe for this Creamy Cornbread Casserole is now my favorite. If there were ever a side dish worthy of having a starring role on your dinner table, this would be it. Unlike some of the other side dishes you have brought to your dinner table, this will definitely be one of those falling into the unforgettable ones category.

Recipe
Creamy Cornbread Casserole (slight adaptation to Colorado Chef John Broening's Creamy Cornbread Casserole recipe)

Ingredients
1/2 cup all-purpose flour
3/4 cup medium grind, stone ground corn meal (Recommend Bob's Red Mill Stone Ground Cornmeal)
4 Tablespoons granulated sugar
2 teaspoons baking powder
1/2 teaspoon salt
8 Tablespoons unsalted butter, melted, cooled slightly
1 can (15.25 ounces) whole kernel sweet corn with liquid (do not drain)
1 can (14.75 ounces) creamed corn
3/4 cup sour cream
1/2 cup heavy cream
2 large eggs
1 1/2 generous cups (7 ounces) shredded aged cheddar cheese, divided (Recommend Kerrygold's 12 month old Aged Cheddar Cheese)
1/4 cup finely grated Parmigiano-Reggiano cheese

Directions
1. Preheat oven to 350 degrees (F). Butter a 11"x7" casserole dish and set aside.
2. In a large bowl, combine butter, whole kernel sweet corn with liquid, creamed corn, sour cream, heavy cream, eggs and 1 1/4 cups grated cheese until blended. Set aside.
3. In a medium sized bowl, combine all-purpose flour, cornmeal, sugar, baking powder and salt. Whisk until blended.
4. Add dry ingredients to wet ingredients and mix to blend.
5. Pour mixture into prepared casserole dish.
6. Sprinkle remaining 1/4 plus grated cheddar cheese. Top with finely grated Parmigiano-Reggiano cheese.
7. Bake 35-40 minutes or until top is golden. Note: There will still be some slight movement in the center of the casserole. 
8. Remove from oven. Allow to sit at least 15-20 minutes before serving. Serve warm or at room temperature.

Friday, February 26, 2016

Whole Roasted Cauliflower with Whipped Cheese


If you asked me if I wanted to spend a Saturday night going out to eat a restaurant or spend most of the day preparing a four-course dinner for family and/or friends, more often than not I would choose the later. Even though deciding what to make is equally as difficult as choosing off the menu from one of my favorite restaurants. I have more creature of habit tendencies when dining out than I do when planning a dinner party. So invariably I spend almost about as much time planning what to make as I do actually making it (this is a slight, but only a slight exaggeration). Depending on who is coming to dinner, I may or may not take the risk of making something for the 'first' time (after all these years my culinary ego still has its' fragile moments). In spite of or maybe because of a lifelong competitive relationship with my younger sister, I almost always make something new. And this past Saturday night the Whole Roasted Cauliflower with Whipped Cheese would make its' debut on my dinner table.


Since the New Orleans Domenica chef Alon Shaya shared this recipe in Bon Appetit a couple of years ago, it consistently received rave reviews by everyone who made it and/or blogged about it. Quite possibly responsible for putting cauliflower back in the limelight as 'the' vegetable du jour as well as one being the key ingredient in everything from pizza crust to risotto.


Everything on this past Saturday night's dinner menu were things I had never served to my sister and brother-in-law before. However, with the exception of the Whole Roasted Cauliflower with Whipped Cheese, everything else was tried and true (at least once or twice before). 


When choosing a cauliflower, choose the whitest one you can find as well as one with most green leaves. Even though you will be ultimately be removing the green leaves, they are indicators your head of cauliflower has been better protected and thus, fresher. This at its' peak winter vegetable has been around since 600 BC (talk about having longevity), but remains available year round. 


You don't want to necessarily choose the largest head of cauliflower. If it is 'too' big, it will not fully submerge when it first simmered in a large, deep pot filled with dry white wine, extra-virgin olive oil, fresh lemon juice, kosher salt, unsalted butter, Aleppo pepper, sugar, bay leaves, and water. Without the basket insert, my All-Clad pasta pot was the perfectly sized pot.

After the dry white wine, extra-virgin olive oil, fresh lemon juice, kosher salt, unsalted butter, Aleppo pepper, sugar, bay leaves, and water comes to a boil, the head of cauliflower (trimmed of its' green leaves) goes in (top side down or stem side up) and the heat is reduced to a simmer. Turning the cauliflower at least twice, it becomes knife tender in 15-20 minutes. If anything, err on the side of slightly versus overly tender. Using either slotted spoons or a large mesh spider the cauliflower is removed from the pot and placed on a large, rimmed baking sheet to drain. Note: If not roasting immediately, the simmered cauliflower can be kept at room temperature for a couple of hours.


In a preheated 475 degree (F) oven, the cauliflower is then roasted for 30-40 minutes or until browned all over. Note: Rotate the baking sheet halfway through the roasting process. After transferring the roasted cauliflower to a serving dish, drizzle lightly with extra-virgin olive oil and sprinkle with sea salt.

This may be the most dramatic, visually striking, jaw-dropping head of cauliflower presentation to ever grace your dinner table. And the sheer beauty of this roasted cauliflower is merely a prelude to what your palate will be experiencing. Prepare to have your senses go into sensory overload, in the best of ways of course.

On its' own this Whole Roasted Cauliflower is incredibly delicious. Served with the Whipped Cheeses it is elevated to a new level of deliciousness insanity. The combination of flavors of the roasted cauliflower and slightly tangy whipped cheese may be unlike anything you have ever experienced. Goat cheese, feta cheese (buy fresh if you can), cream cheese, whipping cream, extra-virgin olive oil, and some sea salt are simply blended together in a food processor. Note: You can make the Whipped Cheese early in the day or the day before, keeping covered and chilled in the refrigerator.


If food can be art, then this Whole Roasted Cauliflower with Whipped Cheese should be put in a place of honor in the National Gallery. It is almost too beautiful to eat, but eat it you must.

Anyone who claims not to be a fan of cauliflower (and we all know those individuals known to be quickly dismissive about things they don't like) will be converted after one taste. The meat and potato lovers in your family will be transformed into meat and cauliflower lovers. 


As it turned out the Whole Roasted Cauliflower was a perfect compliment to the Porchetta-Style Pork Roast. Roasted asparagus and a salad of fresh green peas, apples, Maytag Blue Cheese, and mixed greens tossed in a lemon vinaigrette, and the Swedish Gooey Chocolate Cake with freshly whipped cream helped to create a memorable meal. One having me wondering if I should rethink my view of not making the same company dinner again and again. 

There are innumerable benefits to spending time sharing a great meal with the people in your life you really like, you love, or you enjoy. Having your sister and brother-in-law bring a bottle of Von Strasser Reserve (2006) for dinner might not be at the top of that list, but its' definitely one of those benefits making a home cooked meal feel like dinner in a five star restaurant. Except nothing is more intimate than having dinner at your own dining room table or having dessert by a warm, roaring fire on chilly winter night. 

Recipe
Whole Roasted Cauliflower with Whipped Cheese (an ever so slight adaptation to Domenica chef Alon Shaya's Whole Roasted Cauliflower with Whipped Goat Cheese recipe, as shared in Bon Appetit May 2013)

Ingredients

Whipped Cheese
4 ounces fresh goat cheese
3 ounces fresh feta
3 ounces of cream cheese, softened
1/3 cup heavy cream 
2 Tablespoons extra-virgin olive oil 
Sea salt

Roasted Cauliflower
1 head of white cauliflower, leaves removed
2 1/2 cups dry white wine (recommend a Pinot Grigio)
1/3 cup extra-virgin olive oil
1/4 cup kosher salt
3 Tablespoons fresh lemon juice
1 Tablespoon Aleppo pepper (or crushed red pepper flakes)
1 Tablespoon granulated sugar
2 bay leaves
8 cups water

Extra virgin olive oil for serving
Coarse sea salt

Directions
Whipped Cheese
1. Blend goat cheese, feta cheese, cream cheese, heavy cream, and two Tablespoons of extra-virgin olive oil in a food processor until smooth.
2. Season with sea salt.
3. Transfer mixture to a serving bowl. Cover and refrigerate until ready to serve.
Note: Whipped Cheese can be made one day ahead. Cover and chill in the refrigerator.

Roasted Cauliflower
1. Preheat oven to 475 degrees (F).
2. In a deep pot, bring wine, olive oil, kosher salt, lemon juice, butter, Aleppo pepper, sugar, bay leaves, and 8 cups of water to a boil.
3. Add trimmed cauliflower, reduce heat, and simmer, turning occasionally, until a knife easily inserts into the center (approximately 15-20 minutes). Note: Begin by placing the cauliflower stem side up.
4. Using a large mesh spider, transfer cauliflower to a rimmed baking sheet. Allow to drain. Note: If not roasting the cauliflower immediately, keep at room temperature.
5. Place cauliflower in oven, rotating the baking sheet halfway through, until brown all over. Approximately 30-40 minutes.
5. Transfer cauliflower to serving dish. Drizzle with extra-virgin olive oil and lightly sprinkle with sea salt. Serve with the Whipped Cheese.

Wednesday, February 24, 2016

Red Velvet Cake


Some days you just need a piece of cake to do more than simply satisfy a craving. Your body and soul absolutely must have a piece of cake for everything to feel right with the world. But not just any cake will do. Call me a cake snob, but for this kind of craving it has to be a homemade one, preferably one heavily lathered in icing.

And almost nothing satisfies or is more celebratory than a Red Velvet Cake with Cream Cheese Frosting.


Early on the Red Velvet Cake was known as the Waldorf-Astoria cake as it is alleged the original recipe was developed and served at the Waldorf-Astoria hotel. However, without causing any battle lines to be drawn between the North and the South, the Red Velvet Cake has also been strongly tied southern regional cooking origins. To add confusion over this cake's history, some claim the cake's recipe was developed by the wife of a wealthy department store owner. Regardless of who or where it was developed, it's popularity has increased significantly in recent years.

The original version of the cake was made with a French-style butter icing (ermine) versus a cream cheese frosting. The availability of red food coloring in the early part of the 21st century became the replacement for boiled beet and/or raspberry juices used in some of the early published recipes for this cake. In searching out recipes for this cake, I discovered there were multiple variations and conflicting ingredient recommendations. Ultimately I went with the one published in The Best of America's Test Kitchen (2008) cookbook because, well, just because.


Creating a cake light in texture, having a more tender crumb, remaining incredibly moist, and having no loss of flavor coming from the reduction of its' fat is due in large part to the use of buttermilk (versus milk and sour cream). And this Red Velvet Cake recipe calls for the use of buttermilk as the liquid ingredient.

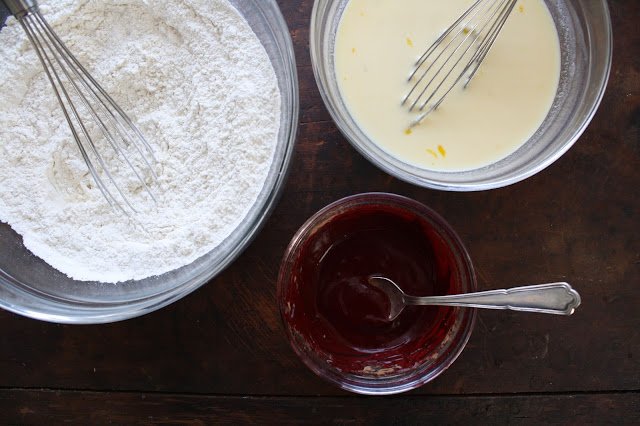
After the dry ingredients and wet ingredients are mixed separately in medium sized bowls, the red food coloring and natural cocoa are mixed to a paste consistency. Natural cocoa versus Dutch-processed cocoa is what further helps to give this cake its' beautiful depth of color.


After creaming unsalted butter and granulated sugar, the wet and dry ingredients are added alternately, beginning and ending with the flour mixture. Note: Dry ingredients divided into thirds, wet ingredients divided in half. When the first half of the buttermilk mixture is added to the batter it will look as if it has curdled. Not to worry. The texture of the batter completely changes by the time the last of the flour mixture is beaten in. To finish the batter, the cocoa paste is blended in thoroughly. Before pouring the batter into the prepared baking pans, use a spatula to give the batter a final stir to ensure there are no 'light' batter streaks.

In a preheated 350 degree (F) oven, two nine inch cake pans bake for 25-30 minutes or until a cake tester inserted in the center of the cake comes out clean (my baking time was 30 minutes). Measuring the weight of the batter in each of the cake pans and rotating the pans halfway through the baking process helps to ensure you have two perfectly sized, evenly baked layers. After cooling for 10-15 minutes, the cake layers are removed from the pans and placed on a cooling rack for approximately one hour. The cake needs to be room temperature (or slightly chilled) before it is iced.


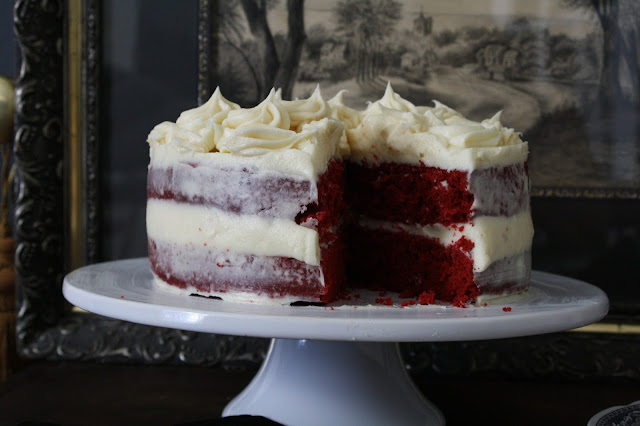
For the smoothest icing possible, always sift your confectionary sugar. How much icing you put on this cake or what kind of finished look you are going for is all a matter of personal preference. The amount of icing in the recipe below is enough to make a cake with naked sides, a generous center filling, and a thick pastry bag decorated top. If you want a cake with fully frosted sides, increase the proportions of the butter, cream cheese, vanilla, and confectionary sugar.

It almost seems a shame to slice off the beautiful domed top of the baked cake layers, the kind of dome causing oohs and aahs when the cake comes out the oven. But if you really looking for OOHS and AAHS when you put this cake out on the table and ultimately slice into it, you really do need to even out the layers.  Note: Those highly valued crumbs can be your reward for baking the cake or can be further crumbled and used to decorate the sides of the frosted cake.

Always put a thin layer of icing on the top layer of the cake if you are planning on finishing the top with a pastry bag piped design.


The finished look of your cake can be as simple or as fancy as you want.


The cake is easier to slice if you allow it to chill for at least an hour before serving.


We couldn't wait. This isn't a cake that qualifies as 'chocolate' although you will definitely taste the chocolate when you take a bite. And the cream cheese frosting ensures the tang created by the use of buttermilk and vinegar in the cake does not get lost. A slice of Red Velvet Cake is pure deliciousness, more than enough to satisfy that your 'I need to have, I must have a piece cake' craving.


This Red Velvet Cake is nothing short of amazing to both look at and enjoy. On your best days or on your worst days or a gray day, one piece of this iconic cake will have you feeling blissfully happy.

Recipe
Red Velvet Cake (mostly inspired by America's Test Kitchen's Red Velvet Cake recipe shared in The Best of America's Test Kitchen (2008) cookbook, icing recipe comes from a compilation of sources)

Ingredients
Cake
12 T unsalted butter, room temperature
2 1/4 cups (11 1/4 ounces) all-purpose flour
1 1/2 teaspoons baking soda
pinch of sea salt
1 cup buttermilk
1 Tablespoon white vinegar
1 teaspoon vanilla
2 large eggs, room temperature
2 Tablespoons natural cocoa powder (do not use Dutch Process cocoa)
1 ounce bottle (2 Tablespoons) red food coloring
1 1/2 cups granulated sugar

Icing
20 ounces cream cheese, room temperature
2 1/2 sticks (20 T) unsalted butter, room temperature
4 cups confectionary sugar, sifted
1 1/2 teaspoons vanilla
generous pinch of sea salt

Directions
Cake
1. Preheat oven to 350 degrees (F). Grease and flour two 9 inch cake pans, line with parchment paper, and set aside.
2. In a medium sized bowl, whisk to combine the flour, baking soda, and pinch of sea salt. Set aside.
3. In another medium sized bowl, whisk together the buttermilk, white vinegar, vanilla, and eggs. Set aside.
4. In a small bowl mix the cocoa and red food coloring together until a paste is formed. Set aside.
5. In a standing mixer fitted with a paddle attachment, beat the butter and granulated sugar at high speed until light and fluffy (approximately 3 minutes).
6. Add 1/3 of the flour mixture and beat on medium-low speed until just incorporated (30 seconds); Add half of the buttermilk mixture on low speed until combined (30 seconds); Repeat, ending with the flour mixture. Note: Scrape down the sides of the bowl during each addition.
7. On medium speed add cocoa mixture until completely incorporated (30-40 seconds). Using a rubber spatula, give the batter a final stir to ensure there are no streaks of white batter.
8. Divide the batter equally between the prepared cake pans, smoothing the top with an offset spatula. Note: Use of a measuring scale helps to ensure the evenness of the layer.
9. Bake for25-30 minutes, rotating the pans halfway through the baking process, until a tester inserted in the center comes out clean.
10. Allow the cakes for cool for 10-15 minutes, then turn out on a wire rack to cool completely (approximately 1 hour).

Icing
1. In a standing mixer fitted with a paddle attachment, beat the room temperature butter and cream cheese until well blended. 
2. Add sifted confectionary sugar and continue to beat until icing is light and fluffy. Scrape down the sides of the bowl as needed.
3. Beat in vanilla.
4. Refrigerate until ready to use. 
Note: There is enough icing to completely cover the cake with naked sides and piped decorated top. Increase the amount of icing if the desired finished cake is evenly iced on sides and top of cake.

Assembly
1. Place one cake layer, bottom side up, on platter or cake stand. Generously spread icing using a spatula to spread evenly over the cake layer.
2. Using a serrated knife, cut the dome off of the second layer (reserve crumbs). Place second layer of cake, top-cut side down, on layer of icing.
3. Spread remaining frosting over sides and top of the cake.
4. Serve immediately and/or chill in the refrigerator to serve later. Store cake in the refrigerator.

Notes: Cake can be made in 3 eight inch cake or 3 six inch cake pans. Adjust baking times accordingly.

Friday, February 19, 2016

Caramelized Shallots, Blue Cheese, & Prosciutto Spoons


I read somewhere it had only been the 18th time that Punxsutawney Phil had not seen his shadow since the Groundhog Day tradition began way back in the late 1800s. And according to folklore, this signaled the arrival of an early spring. But he wasn't the only groundhog failing to see their shadow on Groundhog Day this year.  If more than one groundhog did not see his shadow, then it's probably safe to say the early spring forecast will actually come to fruition. Right? Because who cares he has only been right somewhere between 36 and 39 percent of the time (depending on the time periods of records you look at). Certainly these are not the kind of percentages to cause anyone to gamble away their life savings. Yet, in spite the groundhog's poor powers of prognostication, I really believe this year he would get it right. However, a few bitter cold and snowy February days had me wondering if I shouldn't have been so quick to so vehemently take an early spring forecast position. But then, this past week as I was driving through an arboretum, I came upon a tree filled with not one, but dozens of robins. Upon seeing this almost surreal sight, I thought the return of all of these robins was more than an omen, but definitive proof spring really would return early this year. Well, as it turns out the whole return of the robins as a predictor of spring's arrival is nothing more than an old wives' tale. If you can't believe groundhogs and robins, who can you believe?


During a trip to New York several years ago I picked up a baker's dozen of Chinese Spoons I found at Fishs Eddy, a store filled with an incredibly eclectic collection of dinnerware, glassware, linens, and assortment of interesting serving pieces and knick-knacks. If you are ever in NYC and looking for a fun adventure, you absolutely must make a trip to this store. Okay, back to the Chinese Spoons. There must have been a reason why I bought them, although to be honest I don't remember what it was. If I had to guess, there was probably a recipe needing Chinese Spoons I thought I needed to make. Those spoons, the ones I absolutely had to have and then ultimately carefully pack for the return plane trip home had never been used. Until now that is. All because one of my best friends posted on her FB page an array of appetizers she served at a recent progressive dinner. The Caramelized Blue Cheese and Prosciutto Spoons caught my attention, setting me off on a search for the recipe. Fortunately I knew exactly where those Chinese Spoons were. And finally, these spoons in waiting would be put to good use.


These Caramelized Shallots, Blue Cheese, & Prosciutto Spoons are a perfect bite. Sweet, savory, and salty. How was it I never had them before? 


In searching out recipes for these spoons, some called for the use of shallots while others called for the use of (red or yellow) onions. Milder in flavor than red onions, but with a hint of garlic flavor, shallots it had to be. Note: Some recipes called for the use of either raspberry or red wine vinegar, so the choice is yours. I used red wine vinegar.

The thinly sliced shallots are first sautéed in unsalted butter (along with a generous pinch of kosher salt) until they become lightly golden and translucent. A tablespoon of sugar added to the shallots contributes to their caramelization as well as further highlights their sweet notes. Two tablespoons of red wine vinegar brings both balance and a slight tartness to the caramelized shallots. As tempted as you may be to eat this insane deliciousness right out of the pan, you really need to fill about a dozen Chinese spoons with a generous teaspoon of them.


The savory second layer on these spoons is a small slice of your favorite blue cheese. Mine happens to be Maytag Blue


A thin slice of prosciutto, cut into strips, becomes the final and salty layer on these spoons. 


If there is a downside to these Caramelized Shallots, Blue Cheese, & Prosciutto Spoons it is you need to assemble and serve them while the shallots are still warm. However, having the blue cheese and prosciutto cut and ready makes the process go quickly. If serving these for a cocktail party, the shallots can be caramelized early in the day and reheated (on low) in the microwave when you are ready to assemble them. Note: While the combination of the warm onions and chilled blue cheese and prosciutto send your taste sensation into a deeper state of euphoria, they retain their deliciousness even when the caramelized shallots begin to return to room temperature.


If there really such a thing as a perfect teasing bite, they would be these Caramelized Shallots, Blue Cheese, & Prosciutto Spoons. And while relatively inexpensive, the purchase of the Chinese spoons in NYC all those years ago, turned out to be a wise, maybe even fortuitous acquisition.  So now that I am feeling a little vindicated and even a little prophetic, I am predicting spring will be arriving early this year. I am betting on it.

Recipe
Caramelized Shallots, Blue Cheese, & Prosciutto Spoons (slight adaptation to the Blue Cheese and Prosciutto Spoons recipe shared on the French Cooking for Dummies food blog)
Makes approximately 10-12 spoons

Ingredients
4 - 5 large shallots or 6 - 7 medium sized shallots, peeled, and cut into thin slices (no larger than 1/4 inch)
1 1/2 Tablespoons unsalted butter
pinch of Kosher salt
1 Tablespoon granulated sugar
2 Tablespoons of red wine vinegar (or raspberry vinegar)
3 slices of prosciutto, sliced into long strips
2 ounces blue cheese (recommend Maytag Blue Cheese), cut into small sliced pieces

Directions
1. In a medium-large frying pan, melt butter over low heat. Add sliced shallots, stirring to coat the shallots in butter. Cover pan and cook until shallots become translucent (removing lid to stir several times as well as to ensure shallots are not burning). Approximately 8-10 minutes.
2. Stir sugar into the shallots and continue cooking for several minutes until the shallots begin to caramelize further. 
3. Increase heat to medium, add red wine vinegar cooking until vinegar evaporates. Immediately remove from heat.
4. Spoon a generous teaspoon of the caramelized shallots into each of the spoons. First top with a piece/slice of blue cheese and finish with a strip of the prosciutto. Serve immediately.
Notes: (1) Caramelized shallots can be made earlier in the day and reheated on low in the microwave before assembling. (2) Have the blue cheese and prosciutto cut up prior to filling spoons with the caramelized shallots. (3) While intended to be served warm, room temperature spoons were also delicious.


A tree filled with feasting robins, an omen spring will be arriving early here in the midwest.