Wednesday, December 27, 2017

Almond Rice Pudding with Caramel Cream and Sour Cherry Jam


Whether your weather was warm and balmy or your wish of a white Christmas came true, I hope you all had a wonderfully memorable holiday with your family and friends. We certainly did. And all that time put into the decorating and spent getting ready for our Christmas dinner here were in the end all worth it. In spite of my predictable whining and worrying rituals (will it all get done? will it be almost perfect?), I absolutely love having and celebrating this holiday in our home. A generous and most perfect unexpected gift from my sister and brother-in-law brought tears to my eyes (seems getting me cry over a gift is one my family's goals). The meal was everything I hoped it would be. Although there is a recipe for a green bean casserole from a famous chef who shall remain nameless that will definitely not see the light of another holiday meal again (seriously I think the canned cream of mushroom soup and canned fried onion version, gasp, is actually better). The choice of our annual Christmas movie wasn't what you might call 'thought provoking or uplifting', however, "Get Out" really was one of my many favorite movies of the year. And it will definitely be one of those movies everyone will remember at all future Christmas gatherings. The only thing we seemed not to get around to was playing some games as a family. Considering the level of competitiveness in some members of the family (they shall remain nameless), maybe that was a good thing. And so in spite of a side dish that disappointed (me) and no game playing bragging rights to finish the day, it was a great, very blessed, memorable Christmas.


Our Christmas desserts included a tray of homemade holiday confections, a fresh fruit topped cheesecake and steamed pudding with hard sauce. Had I known how amazing this Almond Rice Pudding with Caramel Cream and Cherry Jam tasted, it too would have been one of the dessert options. But with the dessert menu already set and one dessert request (for Key Lime Pie) not granted, I thought it best to wait for another occasion to make it again.


I understand there are more than a handful of people out there who aren't big fans of Rice Pudding. Those who would normally opt out of having any even if they were starving. Of the top five working theories as to why this might be, I believe never having tasted a really delicious, creamy, decadent rice pudding is at the top of the list. Sure we all have had the less than so-so 'please don't make me eat another bite' rice puddings. You know the ones with weird textures, too much cinnamon, horribly bland or overly boozy. Some of the reasons why rice pudding can get a really rap. So I get why one might be so easily dismissive of even the thought of it. Which means it might take a bit of work, or more accurately a bit of deception, to turn someone's revulsion of rice pudding into a craving. And yes, for the record, I am all about having someone taste something first before I tell them what it is. As I know all too well that first tastes are highly influenced by past tastes and pre-conceived notions. 


But this a Rice Pudding recipe I didn't think I would share on the blog as I was midway into the process. All I can say is thank goodness I stayed the course and didn't give up. But more on that in just a bit.


The rice used in a rice pudding matters. With rice options of basmati, jasmine, Japanese short grain, long grain, arborio instant, and par-boiled, it's no wonder the taste and textures of rice puddings vary. What I learned in a limited rice pudding research endeavor was that with the exception of instant and par-boiled rice (designated as definitely not acceptable), there were pros and cons to all of the others. Yet some will argue that rice isn't the critical ingredient in the rice pudding, but the liquid used in the making of the pudding is. Whole milk seemed to be getting the most nods for creating a deliciously creamy pudding. The inspiration for this Almond Rice Pudding with Caramel Cream and Cherry Jam recipe came from a recent issue of Food and Wine Magazine. It recommended using arborio rice and whole milk. And I followed those recommendations. I opted to use vanilla bean paste instead of vanilla bean pods and replaced the homemade sweet cherry sauce with a sour cherry jam. While I can't honestly tell you their version is as good as or even better than the one I made, I would be willing to put their version against my modified one (yes, I am that confident of a win). 


The ratio of liquid to rice (6.25 cups to 1 cup). The liquid is comprised of 1.25 cups of water and 5 cups of whole milk. That is alot of liquid for one cup of arborio rice. That along with a cooking time of 35-40 minutes had me a bit concerned even before I started making it. But I forged ahead. However, when my cooking time was approaching the 40 minute mark and the texture of the rice pudding was not what I thought it should be, I thought this was endeavor was going to be a bust.  And even as my cooking time was approaching 55 minutes, I for a brief moment thought there was a typographical error in the recipe. Instead of cooking it until the rice absorbed all the liquid (which I don't think was completely possible in the cooking time recommended), it cooked the mixture until the rice was tender and it had the consistency of a thick pudding or porridge. I hoped or rather prayed the rice would absorb the liquid while it chilled in the refrigerator overnight. Spoiler alert: My hopes and prayers were answered.


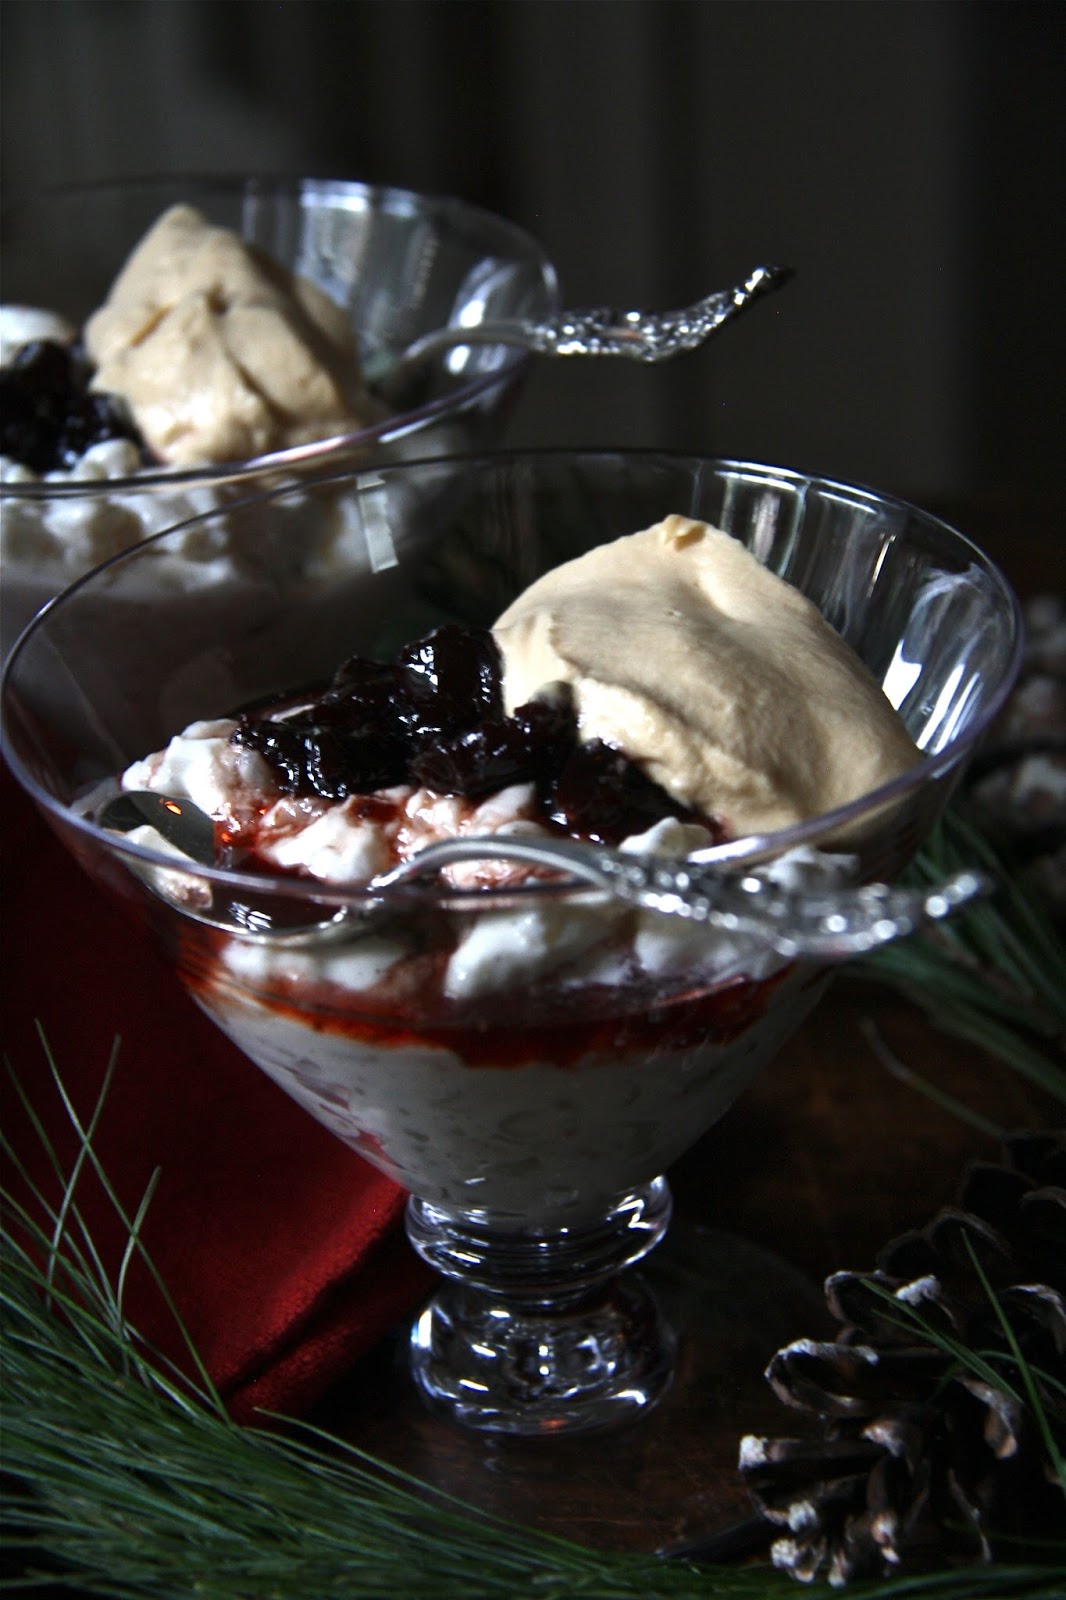
The flavor of sweetness, creaminess and richness to this rice pudding comes from the vanilla bean paste, the sugar (only 6 Tablespoons) and one cup of freshly whipped cream. The addition of the whipped cream to the chilled rice pudding texture, in my opinion, is what makes it worthy of a comfort food distinction. And that's before it's topped with a caramel cream and sour cherry jam.


The addition of the caramel cream is what turns this comfort food dessert into a dinner party worthy comfort food dessert. I probably cooked my caramel mixture about a minute longer than I should have, but the slightly burnt caramel taste was an incredibly delicious compliment. However, since that may not exactly be everyone's favorite flavor of caramel (remember we might be trying to convert non-rice pudding lovers into rice pudding aficionados), cook your water/sugar mixture only until a golden (not deep deep) golden color appears. 


Once you make this caramel cream for this rice pudding, you are going to find more uses for it. It's insanely good.


If by now you are thinking, wow this rice pudding has a lot of whipped cream it. You would be right! But remember, there is no such thing as too much of a good thing.

I knew from the onset of making this recipe I would be using a sour cherry jam. The kind where the jar contains oodles and oodles of whole cherries swimming in a sweet syrupy jam. In other words, the kind you just want to eat off a spoon its that good. Use whatever brand you love (I used this one by Sarantis), but definitely use one having whole versus pieces of cherries. Or if you want to push this dessert even further over the extravagance edge, top it with Luxardo Maraschino Cherries. But you really, really, really need to like the people you are serving this rice pudding to as its' crazy expensive.


There is an explosion of flavors in every bite of this Almond Rice Pudding with Caramel Cream and Sour Cherry Jam. It is hands down comfort food at its' best. And if there was ever a rice pudding to change the opinion of those non-fans out there, this would be THE one. Seriously, it's that good. It's almost hard to resist anything topped with caramel cream and a thick, sweet sour cherry jam.

Recipe
Creamy Rice Pudding with Caramel Cream and Sour Cherry Jam (several adaptations to Food and Wine's Almond Rice Pudding with Sweet Cherry Sauce and Caramel Cream, December 2017)
Serves 8-10, depending on portion size

Ingredients
Rice Pudding
1 cup (194 g) arborio rice
1 1/4 cups water
5 cups whole milk
2 Tablespoons Vanilla Bean Paste (or 2 vanilla beans, split lengthwise, seeds scraped and pods reserved)
6 Tablespoons (86 g) granulated or caster sugar
1/4 teaspoon kosher salt
1 1/4 cups whole skin on natural almonds
1 cup heavy whipping cream
12-16 ounces of sour cherry jam in heavy syrup (Note: I used this one.)

Caramel Cream
1 cup granulated sugar
1/4 cup boiling water
1 1/4 cups heavy whipping cream
pinch of sea salt
1/2 teaspoon vanilla extract

Directions
Rice Pudding
1. Bring 1 1/4 cups of water to a boil in a medium, heavy bottomed saucepan. 
2. Add the rice and cook, stirring constantly for 3 minutes.
3. Stir in the milk and the vanilla bean paste (or vanilla bean seeds and pods) and bring to a boil.
4. Reduce heat to low, cover the pan and cook for 45-55 minutes (stirring frequently) until the mixture has the consistency of a very thick pudding or porridge and the rice is tender.  Note: Inspiration recipe indicated all of the liquid would be absorbed, however, that did not happen.)
5. Remove the pan from the heat and stir in the sugar and salt. Transfer to a heatproof bowl and allow to cool. Note: If using a vanilla bean, remove pod.
6. Cover with a piece of plastic wrap, placing the plastic wrap on top of the pudding so a crust does not form, and refrigerate overnight.
7. Before serving, whip 1 cup of heavy whipping cream until firm peaks form. Fold the whipped cream and almonds into the rice pudding.

Caramel Cream
1. In a medium, heavy bottomed saucepan, cook one cup of granulated sugar over moderate heat, stirring until the sugar liquifies and turns a golden caramel color (approximately 7-9 minutes)
2. While whisking, slowly and carefully pour the boiling water into the caramel. Whisk until blended. Note: Mixture will splash, so use a long handled whisk to prevent yourself from getting splashed with the hot mixture.
3. Remove from heat and stir in vanilla and sea salt.
4. Allow to cool for about 10 minutes.
5. In a medium bowl or standing mixer fitted with a whisk attachment, whip 1 1/4 cups of heavy whipping cream until soft peaks form.
6. Using a spatula, fold the caramel into the whipped cream until fully incorporated.

Serving
1. Spoon some of the rice pudding into a bowl, glass or cup.
2. Top with a generous tablespoon of the cherry jam.
3. Top with a generous tablespoon of the caramel cream. Note: You could form the caramel cream into quenelles rather than just dolloping it on top of the rice pudding. Directions on how to form them can be found here.

Notes: So my biggest takeaway from making this new recipe for the first time was to trust my instincts over the directions. Which means you too should trust your instincts. If the rice is tender and the mixture has a thick porridge like consistency at 40 minutes rather than 55 minutes, go with the 40 minutes. You will know in the morning after it is chilled overnight if your instincts were right.


Thursday, December 21, 2017

Holiday Cookie Round-Up

The holidays around here mean the refrigerator is stocked with an (over) abundance of butter and the pantry contains a larger than usual amount of chocolate. With eight of the ten of this year's favorite holiday cookies being dipped in chocolate, there is probably little doubt as to what my vision of 'sugar plums' are made of. Christmas is the season to make our most favorite cookies. As well as the ones we make so infrequently, they have become the ones most anticipated. This year I discovered some new incredibly delicious. They will undoubtedly and definitely make repeat appearances at all future holidays. And that's a promise! Although these cookies are so over the moon wicked good, more than likely none of them will be put on hiatus for twelve long months.

Making Christmas cookies is one of the ways I gift myself during the holidays. Creating little bites of made with love, beautiful deliciousness to give to family and friends makes my heart incredibly happy. With the exception of the Linzer cookies and the Viennese Finger Biscuits, all of the others travel well if carefully packaged. Additionally, they remain flavorful, even if the post office takes three to four days to ship 'two day guaranteed' delivery packages. 

The spirit of Christmas takes many forms. Sometimes it manifests itself in anonymously extending 'pay it forward' kindnesses to strangers as well as friends. Or often it is displayed through volunteerism. But then other times it takes the form of homemade gifts of love for the people in our lives who unselfishly extended kindness, offered encouragement, made the time for shared memorable moments, showed heartwarming thoughtfulness, and/or never let anything affect a friendship. 'How' we show love, gratitude, or appreciation during the holidays isn't what matters most. Keeping the spirit of gratefulness and thankfulness alive is. Although a box of homemade cookies can often bring joy to both the giver and receiver. And just in case you want to share even more love and gratefulness, here's the link to last year's Holiday Candies and Confections Round-Up. Happy holidays to you! And may the gift of giving be one of the best you receive this holiday season!


Monday, December 18, 2017

Peppermint Chocolate Dipped Oreos


With the exception of an attempt at a run, the entire weekend here was spent baking cookies and making holiday confections to send to friends far and near.  As one of my friends said, it wouldn't be the holidays for me if I didn't embark on an overly ambitious baking journey. This year's holiday boxes were filled with some familiar and soon to be new favorites: Fluffy Vanilla Marshmallows, Gingerbread Cookies with Rum Glaze, Orangettes, White Chocolate Dipped Pistachio Shortbread Cookies (aka Amy's Shortbread), and Sea Salted Chocolate Dipped Caramels. And then because I still had some baking energy, some of the holiday cookie boxes included these Peppermint Chocolate Dipped Oreos. I had vacillated between making this Peppermint Bark and these cookies as my window for finishing everything up for packaging and readying to ship first thing Monday morning was coming to an end. The cookies won the day, but the bark didn't lose the holiday season. 


The chocolate tempering gods were with me this weekend as everything dipped in chocolate had the perfect finished sheen to them. And I managed not to send the 'elf' over the edge with the multiple 'please get this, please go pick up that' requests. Oh, the things that make me happy these days.


If you love chocolate, peppermint and Oreos (especially the double-stuff ones), you are going to fall deeply, madly in love with these Peppermint Chocolate Dipped Oreos. They may be the best semi-homemade cookies ever!


There can be such a thing as too much peppermint in the chocolate. A little bit of pure peppermint extract goes a long way. For two and half pounds of a combination of dark and milk chocolates, I used only a scant 1/4 teaspoon of peppermint extract. 


There are a number of options for topping the peppermint chocolate dipped Oreos (double stuff ones of course). Crushed peppermints, crushed candy canes or peppermint chips. You can find peppermint chips at most grocery stores this time of the year or if you have a local chocolate store near you, they often sell them in bags at the holidays (for everyone wanting to make their own peppermint bark). 


After dipping the Oreos in the melted chocolate, I usually top each of them with another small spoonful of the chocolate before sprinkling them with some peppermint chips. For the record, there is no such thing as too much peppermint chocolate on these cookies.


Because the chocolate sets relatively quickly on these cookies (especially in cooler weather), working in batches of about 10 cookies at a time ensures they will each get their peppermint chip finishing touch.


These Peppermint Chocolate Dipped Oreos are definitely so much better than the prepackaged ones you can buy in stores. Not only do they have a bit more chocolate on them, they contain the secret 'made with love' ingredient. They may be one of the easiest, quickest, simplest holiday cookie to make, however, they will definitely be one of the hardest cookies to resist. And if you are deciding whether to make Peppermint Bark or these Peppermint Chocolate Dipped Oreos, just make them both. There is no such thing as too much chocolate peppermint at the holidays.

Recipe
Peppermint Chocolate Dipped Oreos

Ingredients
2 packages (15.35 ounce size) Double Stuff Oreos
2 1/2 pounds dark chocolate or a combination of dark and milk chocolate, chopped and divided (if using a combination of dark and milk, recommend 3/4 dark and 1/4 milk)
Scant 1/4 teaspoon pure peppermint extract (I use this one).
1/4 cup crushed peppermints, candy canes, or peppermint chips (Note: Some local candy stores will sell you peppermint chips.)

Directions
1.  Line two 15 x 18 cookie sheets with parchment paper and set aside.
2.  Chop chocolate. Place all but 1/2 cup of the chocolate in a bowl over simmering water until melted.
3.  Remove bowl from heat source. Add in the reserved 1/2 cup of the chocolate and the peppermint extract. Mix until melted.
4. Placing a fork under the bottom of the Oreo, dip into the melted chocolate.  Lightly tap the fork holding the cookie on the side of the bowl to release some of the chocolate.  Place cookie on a parchment paper lined cookie sheet.
4.  After all of the cookies have been dipped once, top each cookie with some additional chocolate using a teaspoon (10 cookies at a time).
5.  After each set of ten cookies is topped with additional chocolate, lightly sprinkle with some crushed peppermints.
6.  Let cookies set completely.  
7.  Remove cookies from parchment paper. Serve on a platter or package in a box, tin or cellophane bags.

Tuesday, December 12, 2017

Cranberry, Oat and White Chocolate Biscuits


A couple of weeks ago I inadvertently deleted more than 2,000 (yes, 2,000) photos from my phone. They were lost to cyberspace as I had not taken the time to back them up or save them to another device. While probably not lost, simply unretrievable to me. It was one of those potentially meltdown moments except I was too stunned to weep. I stayed grounded by repeating to myself over and over 'they were only pictures, this is not the end of the world, get a grip on yourself others have lost more'. Photos for me not only capture a scene, they are also visual, tangible reminders of the emotions felt at a moment in time. The elation or tug at your heart feeling over seeing a familiar view from a new perspective; or seeing how light transforms from something seemingly benign into something spectacular; or seeing something wondrous for the first, second, even third time. Sharing photos taken can be a way of sharing a part of one's self with others or making a connection. They can be simple tokens of affection, particularly when they serve as reminders of shared experiences, interests, or passions. Pictures really are worth thousands of words.


As it turned out there were some silver linings in all of this. With the loss of thousands of photos came the return of available memory on my phone. Finally I could download the apps everyone else in the world seemed to have and rely on. And if I wanted, I could now create my own personal avatar. But could my bitmoji really reflect me? The me I think I look like versus the me everyone else sees. Maybe I should just stay with attaching nature, landscape and food photos to my texts and emails. At least for the moment. 


Baking and cooking is yet another one of the ways I share a part of myself with others. The holidays create a perfect opportunity for me to share some love and gratitude with others. Even more exhausting than shopping for ingredients, spending hours in the kitchen, or creating beautifully presented boxes of goodies is laboring over the 'what to make and what will arrive in the mail as delicious as the day it was baked' decisions. 


Although there are some of the same usual suspects in these goodie boxes, I like to add new, different confections. So this year, in addition to the sea salted chocolate covered caramels, fluffy vanilla marshmallows, orangettes (candied orange peels), and white chocolate dipped shortbread cookies, the soft gingerbread cookies with rum glaze and these Cranberry, Oat and White Chocolate Biscuits will be making first time appearances. 


There are so many things I love about these Cranberry, Oat and White Chocolate Biscuits I don't even know where to start. They are simultaneous luxurious and simple. The roasted almonds, dried cranberries, orange zest, and white chocolate are all readily available, simple ingredients, yet when combined in this biscuit (cookie) they seem exotic and extraordinary. The blend of flavors and textures creates hearty and satisfying bites of deliciousness. The crunch of the biscuit, the just the right amount of sweetness, and the creaminess of the white chocolate lathered on top are the components of a cookie destined to be a timeless, year-round classic.

The inspiration for these cookies comes from my newest, most favorite cookbook "Sweet" by Yotam Ottolenghi and Helen Goh. Increasing the amount of white chocolate and using orange flavored dried cranberries (versus unflavored dried cranberries) were the two most (in)significant changes I made to them. Finishing them with some sparkling sugar and topping them with a piece of dried fruit was nothing more than adding some whimsy and festiveness to them. Note: I followed the European version of the recipe which meant I weighed all of my ingredients and used caster instead of granulated sugar).


The texture of the dough is more shortbread like than cookie-dough like. Once the dough begins to come together it is scraped out onto a floured surface and kneaded into a ball before being rolled out. 


Using a 2 3/4" inch round, sharp cookie cutter, the dough was rolled out to almost a 1/4" thickness. In a 375 degree (F) preheated oven, the cookies bake for approximately 18 minutes or until lightly golden. Once cooled to room temperature they are ready to be dipped or lathered in melted white chocolate.


If there was ever the perfect cookie to eat with your morning cup of coffee (or tea), to enjoy as a mid-snack or to satisfy a before night-time sweet tooth, they would be these Cranberry, Oat and White Chocolate Biscuits. 


Whether you adorn them with sparkling sugar and a piece of dried fruit or not is definitely an option. Finished simply with melted white chocolate will give them a more classic than whimsical finish. 

I simple adore these Cranberry, Oat and White Chocolate Biscuits. I can hardly wait to include them in this year's cookie gift boxes. I only wish I could be there when my friends take their first bite of this 'new to them' confection. Maybe they will send me a photo.

Recipe 
Cranberry, Oat and White Chocolate Biscuits (an ever so slight adaption to the Cranberry, Oat and White Chocolate Biscuit recipe shared by Yotam Ottolenghi and Helen Goh in their cookbook 'Sweet')
Yield: 27-30 cookies using a 2 1/2 to 2 3/4 inch round cookie cutter

Ingredients
1 cup (150 g) whole unsalted raw, skin on almonds
1 cup plus 2 Tablespoons (150g) all-purpose flour, plus more for dusting
1/2 cup (75g) whole wheat flour
1 1/2 cups (150g) old fashioned rolled oats
1/4 teaspoon kosher salt
1 cup (225g) unsalted butter, room temperature
1/2 cup (100g) caster sugar
1 Tablespoon finely grated orange zest (from one large orange)
3/4 cup (125g) dried cranberries, chopped in half
1 Tablespoon plus 2 teaspoons (25ml) freshly squeezed orange juice
10-11 ounces (300g) white chocolate
Optional: Sparkling sugar

Directions
1. Preheat oven to 350 degrees (F) or 180 degrees (C).
2. Spread almonds out on a baking tray and roast for 10 minutes. Allow to cool and then coarsely chop in a food processor.
3. In a medium sized bowl, combine all-purpose flour, whole wheat flour, oats, salt, and chopped almonds. Set aside.
4. In a small bowl combine the chopped cranberries with the orange juice. Mix together. Set aside.
5. In a standing mixer fitted with a paddle attachment, beat the butter, orange zest and caster sugar on medium speed until combined and light (approximately 2 minutes).
6. Add the dry ingredients to the butter/sugar mixture and mix on low speed until dough just comes together. 
7. Add cranberries and orange juice, mixing just until incorporated.
8. On a lightly floured surface, scrape dough out of the bowl and knead into a ball. If dough is too sticky add a little more flour.
9. Increase oven temperature to 375 degrees (F) or 190 degrees (C). 
10. Cut dough ball in half. On a lightly floured surface, roll out dough. Using a 2 3/4 inch (7cm) cookie cutter, cut dough into rounds and place on a parchment paper lined baking sheet. Note: Dough should be rolled out to a slightly less than a 1/4 inch (.5cm) thickness.
11. Bake for 18 minutes (rotating tray midway through) or until lightly browned all over. Remove from oven and allow cookies to cool completely.
12.  Roll out second half of dough, cut into rounds, and bake. Allow to cool to room temperature.
13. Place white chocolate in a bowl over simmering water ensuring the bottom of the bowl does not touch the water. 
14. Dip the tops of the cookies into the melted white chocolate or alternately spread a tablespoon of the melted chocolate over the tops of the cookies using the back of a small spoon or offset spatula. Place coated cookies on a sheet of parchment or on a cooking rack. Allow to cool completely before serving or storing. 
15: Optional: Lightly sprinkle sparkling sugar over the tops of cookies before the chocolate has set. And/or top each cookie with a dried cranberry.

Notes: (1) To further increase the orange flavor in the cookies use orange flavored dried cranberries (Trader Joe's was my source). (2) Cookies will keep for up to a week if stored in an airtight container. (3) Could substitute granulated sugar for the caster sugar if caster sugar is not available to you. (4) Don't skip the roasting the almonds in the oven step. The flavor the roasting imparts to them adds to the depth of flavor of the biscuit. (5) Your baking time may need to be adjusted if you choose to make these biscuits smaller or larger. However, the 2 3/4 " size made them just about perfect.


Images from the Plimouth Plantation (November 2017)


Wednesday, November 29, 2017

Gingerbread Cookies with Rum Butter Glaze


This year we spent the Thanksgiving holiday out east. During the non-stop, whirlwind four days we managed to spend an afternoon at the Mystic Seaport Museum (Mystic Seaport, CT); take the ferry to Nantucket for the day; spend Thanksgiving morning at Plimouth Plantation; take a side trip to the Plymouth Rock; have personal tours of two historic homesteads (Nathanael Greene c. 1774 and the Denison Homestead c. 1717); stop and meander around the John Bradford Homestead (c. 1714); have a great dinner with friends; take some other friends to breakfast; and, have Thanksgiving dessert with the extended family of close friends. Needless to say it was one of two of the most memorable Thanksgiving holidays ever. If this holiday wasn't already my most favorite, this trip would have made it so. I feel an indescribable, somewhat unexplainable aura when I am on the east coast. It's more intense in some places (like Nantucket, MA and Little Compton, RI) and slightly less in others (like Mystic, CT). Whether it is the breathtaking, captivating beauty, the sense of history seen in the landscapes and architecture, or some other yet to be discovered reason, the east coast ranks high on my list of 'happy places'. And after four incredible days of traveling around the east coast and staying in my 'home away from home', the 'happy' in Happy Thanksgiving took on a new, even deeper meaning this year.

One of the things I discovered when planning this trip was that most of the historic homes and homesteads close at the end of October for a variety of reasons. But as luck and persistence would have it, staff from two of the homes on my 'wanted to see' list made it possible for us to have private tours. There is nothing quite like walking through homes built in the early 1700s, especially ones filled with period artifacts and furnishings, and imagining what life and baking must have been like three centuries ago. 


Gingerbread dates back to 2400 BC, but by the Middle Ages Europeans had created their own versions of the gingerbread we often associate with the holidays today. Not surprisingly, gingerbread was one of the confections brought to the New World by English colonists. In the first American cookbook, American Cookery, author Amelia Simmons shared recipes for three types of gingerbread, including the more popular softer variety baked in loaves. Mary Ball Washington, mother of George Washington, is said to have served gingerbread to the Marquis de Lafayette during one of his visits to the Washington's Fredericksburg, Virginia home. Although some of the proportions may have changed, the basic ingredients for gingerbread cookies we are familiar with have not changed significantly since Colonial times. Now, like back then, these cookies are made with molasses, butter, ginger, cinnamon, cloves, flour, sugar, baking soda, and eggs.

The Gingerbread Cookie recipe shared by Yotam Ottolenghi and Helen Goh in their recent cookbook 'Sweet' not surprisingly contains some additional as well altered ingredients. Aimed at enhancing both the cookie's taste and texture, the Ottolenghi-Goh version of gingerbread contains Dutch-processed cocoa powder, finely ground black pepper, dark brown (versus granulated) sugar, and black strap molasses. Together these ingredients coalesce to create a depth of flavor I had not known existed in a gingerbread cookie. Yet the transformation of this gingerbread cookie did not stop there. The addition of a warm rum butter glaze was not only gastronomical genius, it was the proverbial 'icing on the cake' or rather cookie finishing touch. The result is a cookie layered in flavors and almost too beautiful to eat. But to not eat them would be utterly sinful. 


The dough for the cookies loosely comes together after the dry ingredients are blended into the molasses, butter, dark brown sugar, and egg mixture. With just a little bit of kneading on a lightly floured surface, the consistency of the dough changes to one amendable to rolling. On days when the temperature is warmer, the soft dough may need to be chilled. However, on a cool, crisp November day, the dough rolled out beautifully without the need for any chilling time. 

Because weight is an absolute and measure is not, I weighed out the flour, butter, dark brown sugar, and blackstrap molasses. Forgive me but I have a strong need to temporarily digress to try (again) to convince you to use a scale when baking. A cup of flour is not always a cup of flour, but 120 grams of flour is always 120 grams. Slight variations in ingredient quantities can often alter the textures of both the dough and the final baked confection. It took me awhile to make this paradigm shift, particularly because I grew up in a cup and ounces, not a grams world. But after seeing the difference weighing ingredients makes, I have been converted to the way baking is done in pretty much the rest of world. Okay, the 'everyone should own and bake using a scale' public service announcement is over. For now, anyway.


On a lightly floured surface, the dough is rolled out to a 6mm (or 1/4") thickness. I used a 3 1/4" cookie cutter when I made this batch of cookies as it best matched the diameter of the Nordicware cookie stamps I used. Alternately you could roll out the dough using an embossed or engraved rolling pin and then cut the cookies into your desired shapes.


If I learned one thing when making these cookies, it was have all of your ingredients for the rum butter glaze measured out before you put your first batch of gingerbread cookies in the oven as the glaze needs to be applied while the cookies are still warm. Ottolenghi and Goh suggest the use of freshly squeezed lemon juice, if you want a booze-free version of the cookies. However, after tasting the glaze's boozy version, I could never be a teetotaler. 

My rum butter glaze was on the thick side, so I ended up adding a little more warm water to get it to the 'consistency of a runny honey'. It will thicken as it sets, so be prepared to add a little more warm water, particularly when you are glazing the second batch of cookies. 


The cookies bake for approximately 9 to 10 minutes in a preheated 375 degree F (190 C) oven with the baking sheet turned midway through the baking process. To test for doneness, the cookies only need to firm to the touch as they will continue to firm up as they cool. Be careful not to over bake. My baking time was approximately 9 1/2 minutes. The aromatic fragrance of the spices in the gingerbread cookies will have you spellbound.


These cookies have a deep, rich spicy intensity to them. The slightly crisp exterior and dense cake-like interior is pure gingerbread texture heaven. After tasting them, the gingerbread cookie bar has been raised so high I am pretty certain no other gingerbread cookie recipe could even come close. If you love the taste of gingerbread, you will be swooning over the decadence and lusciousness of these cookies. 


If there was at least one new cookie you wanted to added to your Christmas cookie platters or gift boxes this year, let it be these Gingerbread Cookies with Rum Butter Glaze. But don't make them too far in advance, unless you feel the urge to have them now, as they are best eaten within 5 days (if stored in a sealed container). Which means I am going to have to time the mailing of my holiday cookie packages out a little more carefully this year as I could not imagine a box of Christmas cookies without some Gingerbread Cookies with Rum Butter Glaze in them. I can't even imagine Christmas without them. 

And oh, don't forget to put a scale on your list to St. Nicholas this year.

Recipe
Gingerbread Cookies with Rum Butter Glaze (from the cookbook "Sweet" written by Yotam Ottolenghi and Helen Goh)
Makes 16 to 17 - 3 1/4" cookies

Ingredients
Cookie
6 Tablespoons (85 g) unsalted butter, room temperature
1/2 cup (95g) firmly packed dark brown sugar
100 g blackstrap molasses (or black treacle)
1 large egg yolk
2 cups less 1 Tablespoon (235 g) all purpose flour, plus more for dusting and stamping
1/2 teaspoon baking soda
1 teaspoon ground ginger
1/2 teaspoon ground cinnamon
1/8 teaspoon ground cloves
1 Tablespoon Dutch-processed cocoa powder
1/4 teaspoon kosher salt
1/4 teaspoon finely ground black pepper

Glaze
3/4 cup (80 g) confectionary sugar
1/8 teaspoon ground cinnamon
1 Tablespoon unsalted butter, melted 
1 Tablespoon dark rum (or fresh squeezed lemon juice)
1 teaspoon warm water, plus more as needed to achieve a honey like consistency to the glaze

Directions
Cookie
1. Preheat oven to 375 degrees F (190 degrees C). Line two baking sheets with parchment paper and set aside.
2. Sift together the flour, spices, cocoa powder, baking soda, salt and pepper. Set aside.
3. In the bowl of a standing mixer fitted with a paddle attachment, beat the butter, molasses, and dark brown sugar together until smooth. Approximately 2-3 minutes.
4. Add in egg yolk and beat until fully combined.
5. Add the sifted dry ingredients to the butter/molasses/sugar/egg mixture. Once it comes together (it will not be a smooth batter at this point), scrape dough onto a floured work surface and knead gently until it comes together. 
6. Roll out the dough so it has about a 1/4" (6mm) thickness. Note: If the dough is too soft for rolling, chill for approximately 20-30 minutes.
7. Cut cookies into desired shapes. If you using a cookie stamp, dip the stamp in a small bowl of flour, shake off any excess and then press firmly into the dough to create a deep imprint. How far you will need to press to get an imprint will depend on design on your stamp. Note: The cookies will rise as they bake and so any soft imprints will disappear. Transfer the cookies to the parchment paper lined baking sheets. Space about 3/4" to 1" apart. 
8. Bake 9-10 minutes, rotating the trays halfway through, until firm to the touch. Note: They will continue to firm up as the cool so be careful not to over bake them.
9. Remove from oven. Allow to sit for 5 minutes, then apply the glaze to the still warm cookies. Transfer to a wire rack to cool and set completely.
10. Serve immediately or store in a sealed container. Cookies are best eaten within 5 days.

Glaze
1. Sift the confectionary sugar and cinnamon in a small bowl.
2. Add the melted butter, rum, and water. Whisk until smooth. Add more warm water if necessary. The consistency of the glaze should be that of runny honey.

Notes: (1) Depending on the cookie stamp used, you could top the center of each cookie with some finely chopped crystallized ginger. (2) The original recipe called for stamping the cookies before cutting them out with a cookie cutter. I cut them out first, then stamped them. Use whichever method you are have had the most experience with. (3) I used the Nordicware All-Season cookie stamps. Other cookie stamp options can be found online. 


John Bradford House, Kingston, MA, - c 1714  (November, 2017)


Nathanael Greene Homestead, Coventry, RI - c. 1774 (November 2017)


Denison Homestead, Mystic, CT -  c 1717 (November 2017)