Monday, June 29, 2015

Banana Cupcakes with Peanut Butter Frosting


A couple of weeks ago my sister had a going away dinner for her son, my nephew (aka the recent college graduate) who was moving to Pennsylvania to begin his new job. Dessert was going to be Banana Cupcakes with Peanut Butter Frosting. As is often the case when my sister makes a dessert, I sometimes think 'hmmm, where does she find these interesting amalgamation of flavors?' (the answer is Epicurious). Sure I knew the Banana and Peanut Butter combination in the form of a sandwich had been made famous by and attributed to Elvis, but in a cupcake? At some point I probably need to stop second guessing my younger sister and put an end, or at least allow for a temporary reprieve, to some of the sibling rivalries that have permeated our relationship over the years. Who knew this long over due epiphany would come from a bite of the Banana Cupcakes with Peanut Butter Frosting.


I should have taken more than a bite of these cupcakes. Fortunately I had some bananas ripening at home. Delayed gratification is better than no gratification at all. 

If I were to do one thing differently the next time I make the Banana Cupcakes with Peanut Butter Frosting it would be to use a cupcake pan and paper liners. As much as I love the look of these stand alone paper cupcake cups, the baking time is slightly longer and they make it a little harder to eat the cupcake. These are the kind of cupcakes you want to be able to tear into quickly and easily.


The riper the bananas the deeper, the better the flavor. 


Depending on the size of your bananas, you will need either 2 (really large) or 3 (medium) in order to get one cup of mashed bananas.  


Like most cake recipes, wet and dry ingredients are alternately added to the butter/sugar base. 


I have watched more than enough episodes of 'Cupcake Wars' to know using an ice cream scoop creates uniform sized (aka perfect) cupcakes. Kitchen tools generally fall into three categories: 'don't waste your money', 'nice to have' and 'must have'. In addition to being one of those definite 'must haves', the ice cream scoop makes the portioning of cupcake batter seem effortless.


Quite possibly the best description I could give for the peanut butter frosting is 'wicked'. While not a word one would normally put in the list of culinary adjectives, there are no other words better at giving you a sense of how ambrosial, heavenly, divine, scrumptious, this frosting is. 


How else would one expect cream cheese, butter, creamy peanut butter, confectionary sugar and a pinch of sea salt to taste? 


Using a pastry bag with your favorite tip or simply an offset spatula, the consistency of this frosting could not be more perfect for spreading.


The original recipe for these cupcakes suggested they be topped with chopped lightly salted roasted peanuts,  however, after frosting the cupcakes they seemed to scream 'sprinkle me'!  If you are looking to pay homage to Elvis, top with some crispy, fried bacon. 

Recipe
Banana Cupcakes with Peanut Butter Frosting (An oh so slight adaptation to the Matt Lewis/Renato Poliafito recipe created for Bon Appetit)

Ingredients
Cupcakes
1 1/4 cups all-purpose flour
1 1/2 teaspoons baking powder
1/2 teaspoon baking soda
1/4 teaspoon kosher salt
2 very large ripe bananas or 3 medium (1 cup), peeled and mashed
1/2 cup sour cream
1 1/2 teaspoons vanilla
3/4 cup granulated sugar
1/2 cup (8 Tablespoons) unsalted butter, room temperature
1 large egg, room temperature
1 large egg yolk, from a room temperature egg

Frosting
1 1/2 cups confectionary sugar, sifted
8 ounces cream cheese, room temperature
1/2 cup (8 Tablespoons) unsalted butter, room temperature
1/2 cup smooth, creamy peanut butter, recommend JIF (do not use old-fashioned or freshly ground)
pinch of sea salt
Optional: Chocolate sprinkles, crispy fried bacon, chopped lightly salted roasted peanuts, etc.

Directions
Cupcakes
1. Preheat oven to 350 degrees (F). Position rack in center of oven. Line a muffin pan with paper liners.
2. In a medium sized bowl, whisk together the all-purpose flour, baking powder, baking soda and salt. Set aside.
3. Mash bananas with a fork until smooth in another bowl. Mix in sour cream and vanilla. Set aside.
4. Using either a standing mixer with a paddle attachment or hand held mixer, beat sugar and butter until light and fluffy (approximately 3 minutes).
5. Add egg and egg yolk and beat until well blended.
6. Beginning with flour mixture, add in 3 additions, alternating with two additions of the banana mixture, beating until blended after each addition.
7. Divide batter equally among the prepared muffin cups using a 1/4 cup ice cream scoop.
8. Bake cupcakes for 20-26 minutes, until lightly browned on top and a cake tester inserted into the center of each comes out clean. Transfer cupcakes to cooling rack and allow to cool completely before frosting. Note: If using standard paper liners, you should have a yield of 12 cupcakes.

Frosting
1. In a medium sized bowl, beat cream cheese, butter and peanut butter until smooth and creamy.
2. Add in sifted confectionary sugar, beat until well blended.
3. Using a pastry bag, pipe frosting onto cupcakes. Or spread frosting using an offset spatula.
4. Serve plain or decorate with chocolate sprinkles or chopped lightly salted roasted peanuts.


Fullersburg Woods (Illinois) shortly after the sunrise.


Thursday, June 25, 2015

Grilled Naan w/ Pancetta, Arugula and Parmesan aka Nancy's Naan


Who does not love pizza? No one. Okay I will reluctantly concede there might be a couple of outliers out there somewhere. Not there aren't multiple places to get some really good pizza, but who does not love a homemade pizza dough but doesn't always have or want to take the time to make it? Me and I would guess there are more than a handful of you out there who feel the same. So what does one do when they have a craving for a 'pizza' but for a myriad of reasons life gets in their dough making way and/or the only dough available at the grocery store is the frozen kind? Well, there is an easy answer to that question. Pick up some pillowy, oven baked, charred Naan (Indian Flatbread). Substituting Naan for pizza dough isn't really a new idea, although it's not one always immediately coming to mind when one has an insatiable craving for pizza (at least in my world). So I was thinking, hasn't the time finally come for (all of) us to think of pizza dough and Naan as being synonymous and interchangeable with one another? An absolute, definite, unwaivering yes! Of course, there are probably those (you know them) who enjoy arguing about anything and everything.


Who does not love a simple recipe, especially one that is likely to receive accolades and/or cause hovering over the dish behavior? Without going too far out on a limb, I am pretty confident 99% of us do. When one of my closest friends (who now lives much too far away from me) shared a recipe from one of her friends (who she met at a nail salon and also happened to have once called the midwest her home), I instantly put it on the 'to definitely make sooner rather than later' list. Although I knew I wanted to change out the salami for crispy, baked pancetta. Not because I don't belong to the salami fan club (unless of course, it's Volpi salami and it is cut almost paper thin), but because I am a card carrying member of the Italian bacon fan club. Even though I made two relatively minor ingredient changes (adding shaved Parmegiano-Reggiano was the other), the Grilled Naan w/ Pancetta, Arugula and Parmesan will be affectionately known as Nancy's Naan. As it only took one bite for me to thank my lucky stars she crossed paths with my friend.


There are probably a million versions of Naan pizza out there, however, this Grilled Naan w/ Pancetta, Arugula and Parmesan should be on everyone's top ten or rather I should say top two list.


All of the ingredients are readily accessible in most grocery stores. The 365 Tandoori Naan from Whole Foods topped the Taster's Choice list several years ago. I bought the 'original' Naan as I wanted the Naan to compliment rather than distract from the flavors of garlic and herbs coming from the Boursin cheese.


When buying pancetta, ask to have it sliced on the thin (but not transparent) side. The baking time for the pancetta will vary based on its' thickness (it could range from 9 to 14 minutes). Before placing in the oven, I sprinkled the pancetta with black pepper and placed it on a parchment paper lined baking sheet. In a preheated 400 degree oven, a baking time of 12 minutes was enough to bring the pancetta to the state of crispiness I wanted. Note: After removing the pancetta from the oven, transfer to a plate lined with paper towels. 


My new Lodge double-sided grill pan has been getting a workout in the last couple of weeks. While the grill of all grills sits out on the deck, the weeks of wet weather here has made this stove top grill pan indispensable. The Naan stays on the grill or grill pan for as long as it takes for grill marks to appear. 


The 'cheese' topping options include either an herbed Boursin cheese or a garlic-herb goat cheese brought to room temperature (the one made by Montchevre would work well) or any other cheese with a garlic/herb flavor that can easily be spread over and slightly melt into the warm, grilled Naan. Generously sprinkle the top of the cheese with the crumbled crispy pancetta.


Lightly dressing the arugula with extra-virgin olive oil and lemon juice not only adds another layer of flavor, it perfectly compliments the peppery taste of the arugula. Generally the ratio of extra-virgin olive oil to fresh squeezed lemon juice is 3 to 1 (Tablespoons). Because I wanted to slightly temper the peppery taste of the baby arugula, I increased the amount of lemon juice to 1 1/2 Tablespoons (2:1 ratio). If a 3:1 ratio of oil to lemon juice gives you the flavor you are looking for, stop there. 

The final layer includes a few sprinkles of sea salt (don't go overboard as the pancetta already adds saltiness) and fresh shavings of Parmigano-Reggiano. Cut into random or uniform slices, arrange on a platter, and serve immediately. The Grilled Naan w/ Pancetta, Arugula and Parmesan is addictive and incredibly mouthwatering served warm, however, it is one of those appetizers (or lunch entrees) equally delicious at room temperature.


Have you been looking for the perfect (as in fast, easy, delicious and beautiful) appetizer for planned or impromptu gatherings, maybe even something new to serve for 4th of July? Your search is over. 

Recipe
Grilled Naan w/ Pancetta, Arugula and Parmesan aka Nancy's Naan (inspired by one of Nancy Linn Goodman's recipes)

Ingredients
4 pieces (12 ounces) Naan (recommend Whole Foods 365 Tandoori Original Naan)
6-8 ounces Boursin Cheese, Montchevre's Garlic-Herb Flavored Goat cheese (softened) or other garlic-herb flavored soft/spreadable cheese
4-6 ounces pancetta, thinly sliced, baked crisp, crumbled into irregular pieces (Note: Original recipe called for bite size pieces of salami)
4 cups of baby arugula
3 Tablespoons extra-virgin olive oil
1 - 1 1/2 Tablespoons freshly squeezed lemon juice
sea salt
black pepper
Parmigano-Reggiano, shaved

Directions
1. Preheat oven to 400 degrees. Line a baking sheet with parchment paper. Arrange slices of pancetta sprinkled with pepper in a single layer. Bake until pancetta is crisp (8-14 minutes). Remove from oven, transfer pancetta to a plate lined with a paper towel. Set aside.
2. Mix together extra-virgin olive oil and fresh squeezed lemon juice. Set aside.
3. Grill Naan on an outdoor grill or on an indoor grill pan. Heat until grill marks appear on both sides.
4. Top warm Naan with a generous amount of Boursin cheese, spreading evenly.
5. Crumble crispy pancetta and sprinkle over top of cheese.
6. Drizzle dressing over arugula, tossing until coated. Add dressing coated arugula on top of pancetta layer.
7. Very lightly sprinkle with sea salt and finish with shavings of Parmigano-Reggiano.
8. Cut into slices/pieces. Transfer to a platter and serve.


Sydney & Walda Bestoff Sculpture Garden at the New Orleans Museum of Art (NOMA)


Tuesday, June 23, 2015

Peach Ice Cream


There are some things I don't think I will ever tire or get enough of. Reading great books, seeing the beauty of blooming blue hydrangeas, finding a great shoe sale, watching movies on the big screen, the feeling of butterflies in your stomach, and taking in a beautiful sunset are just some of them. Homemade ice cream has now been added to this ever expanding list of the things causing my heart to race. In the last three weeks, I have been guilty of making more ice cream than I should really be admitting to. So as not to overdose from too much of a good thing, I have taken a (temporary) break from strawberry ice cream and shifted to making peach ice cream this week. Besides, the containers of fresh peaches at this past weekend's farmers market were much to hard to resist.

First brought to the Americas in the 16th century by Spanish explorers, peaches immediately became a prized and expensive indulgence. Although much has changed in the last five centuries, the taste of a perfectly ripe, sweet, juicy, peach still feels like it is an indulgence.


The one significant difference between the peach and strawberry ice cream recipes is the use of both brown sugar and confectionary sugar. Allowing the finely chopped peaches to macerate in light brown sugar deepens the flavor of the ice cream. Two cups of finely chopped peaches added great 'peachy' flavor. For some this would be more than enough. In my world, the peachier the better. Which translates to increasing the amount of chopped peaches to somewhere between 2 1/4 and 2 1/2 cups the next time I make a batch. In a surprising show of restraint, there won't be any more peach ice cream made here until 4th of July weekend.

Some days I prefer eating ice cream plain, needing only a bowl and a spoon. Other days I like it sandwiched between cookies, homemade ones of course. Ginger cookies would pair perfectly with this homemade peach ice cream. If you are looking to fancy it up a bit, drizzle with fresh raspberry sauce and wallah, you have Peach Melba! Not looking to go to any fuss, simply sprinkle with fresh blueberries or blackberries. With all of these options, you might decide a peach ice cream binge isn't necessarily a bad thing.


I am predicting, with a high degree of certainty, a peach ice cream streak could or rather will probably last all summer long, going on the short list of things worthy of obsessing over.

Recipe
Peach Ice Cream

Ingredients
1 cup (240 ml) heavy whipping cream (at least 18% fat)
1 (14 ounce) can of sweetened condensed milk
Approximately 4-5 large peaches, peeled and cut into chunks
1/4 cup (25 g) light brown sugar, firmly packed
1/4 cup (25 g) confectionary sugar, sifted
1/4 teaspoon sea salt
Optional garnishes: Fresh raspberry sauce, homemade ginger cookies, fresh fruit, waffle cones.

Directions
1. Place chunks of peaches into the food processor. Pulse until small bits of peaches remain. Measure 2 to 2 1/2 cups of finely chopped peaches and place in a bowl. Add 1/4 cup of light brown sugar, mixing until sugar dissolves. Set aside.
2. In a standing mixer with a whisk attachment, beat heavy cream until soft peaks form.
3. Gently fold in sweetened condensed milk, sea salt and peach mixture. 
4. Fold in sifted confectionary sugar.
5. Pour mixture into an ice cream container and freeze at least overnight or preferably overnight. 
6. Scoop mixture into serving dishes, waffle cones or sandwich between cookies and serve.
Note: I used the ice cream storage container from Williams-Sonoma. It is the perfect shape and size.


Summer Solstice Sunset

Sunday, June 21, 2015

Avocado Sandwich with Lemon Ricotta


While walking through Anthropologie several weeks ago Gabrielle Hamilton's newest book, Prune, was lying open on one of the tables. Pausing momentarily to take in the photo, it was nothing less than a serendipitous reminder I had received this beautifully photographed cookbook as a gift from one of my friends a few months earlier. Having read Hamilton's first book, Blood, Bones and Butter: The Inadvertent Education of a Reluctant Chef, several years ago, I was not all surprised the format of this cookbook would be unlike all of the others out there. The pseudo-handwritten script along with the appearances of stains on the pages make it feel as you have been given access to a chef's private journal, one filled with highly coveted 'secrets'; the mouth-watering full page photographs validate great food was meant to be simple rather than ingredient du jour pretentious; and lastly, the absence of an index cleverly causes you to become completely immersed in the cookbook, dog earring the pages 'speaking' to you. It is the kind of cookbook you can give to both a novice and accomplished cook as each will find it to be inspiring, informative, and influential. If by chance it is not one in your collection, it should be.


Just looking at the photo of Gabrielle Hamilton's Avocado Sandwich with Lemon Ricotta made me hunger for the taste of it. For someone with more carnivore than vegetarian tendencies, I could not wait to make this sandwich. Hamilton's book is a reminder why simple food made with fresh ingredients should be presented artfully. In doing so, tomatoes, avocados, onions, bread, ricotta, sesame seeds and poppy seeds are transformed into something you might want to put in the category of 'last meal' worthy. Seriously, this open faced sandwich is that good. 


As I headed to the farmer's market this weekend, I was on a mission to find baby heirloom tomatoes and baby sweet red onions. With that mission accomplished, I picked up a beautiful loaf of country bread from Whole Foods before heading home to make another batch of homemade ricotta. The anticipation of taking a bite of this sandwich was akin to the excitement of heading to an antique show. In my world, hunting for antiques ranks up there with a hike in the mountains, a walk along the ocean's beach, or eating a warm, just out of the oven, sea salted chocolate chip cookie. Pretty exciting stuff, don't you think?

Once you have tasted homemade ricotta, it is really hard to go back to store bought. And once you have made it, you realize it isn't as intimidating as it appears. Whole milk (organic is best), heavy whipping cream, sea salt, fresh squeezed lemon juice, a reliable thermometer, a heavy bottomed pan, cheesecloth and a strainer are all you need. In less than two hours you will have the creamiest ricotta to every pass your lips. I used 'my' now go to ricotta recipe posted to the blog last year. The yield is about a pound of ricotta or enough for at least 5-6 open faced sandwiches.


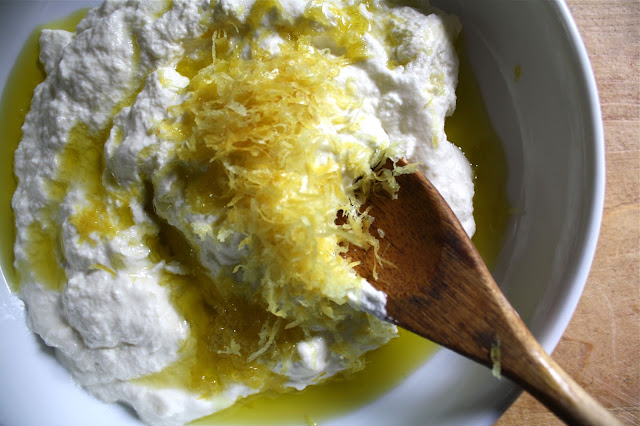
For this sandwich, the flavor of the ricotta is further enhanced with lemon zest, extra-virgin olive oil and a tad more sea salt. The ricotta is definitely something you can make the day before, and if you do, would recommend you let it sit out at least a half-hour (to take the chill off) before assembling the sandwich.

Lightly grilling the bread was my contribution to this sandwich recipe. Whoppie do! With a serrated knife, cut your bread loaf at a diagonal in 1/2 inch slices before placing on your stove top grill pan or outdoor grill.


Buy a soft ripe avocado and cut into slices.

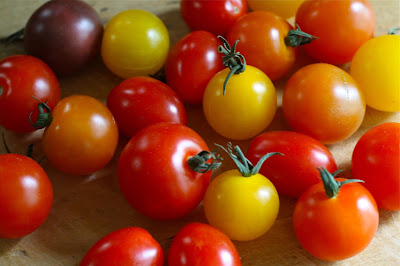
You can use grape tomatoes, multi-colored cherry tomatoes or baby heirloom tomatoes for this sandwich. The more colorful the tomatoes, the more beautiful the presentation.

The first time I made this sandwich I used a shallot because I could not find baby red onions. Let's just say I will either hold out to find baby red onions or use only the smaller rings from a red onion when making this sandwich. I love shallots, but this sandwich requires the flavor of the red onions.


Sometimes when you see a recipe calling for sesame seeds and poppy seeds, you might think they are optional. And then there are times when you see the toasting of the seeds (like the toasting of nuts before baking) as unnecessary. I am not sure I can find the right words to describe why there is nothing optional about these toasted seeds on this sandwich. I will leave it at 'just toast and use them'.


Gabrielle Hamilton's recipe called for the use of preserved lemons. I left them out (gasp). Not because I didn't think she knew best, but because I didn't have them. Maybe once I make some I will see them as necessary, however, the lemon zest added to the ricotta brought a great, just-right lemon flavor to this sandwich. The finishing touch is a light drizzle of extra-virgin olive oil and a sprinkling of sea salt.


This Avocado Sandwich with Lemon Ricotta makes the words 'eat your vegetables' sound enticing rather than reminiscent of those threatening words some of us heard during our childhood. Even the most carnivorous of your friends will find this to be a very satisfying sandwich. Your vegetarian friends will be delirious.

Served as a luncheon entree, appetizer, or finger food on weeknight/weekend cocktail party, it's versatility almost overshadows its' deliciousness and beauty. White wine or a sangria would pair perfectly with it. If there was ever a sandwich celebrating all of the bounty summer brings, this would be the one. Happy first day of summer!
Recipe
Avocado Sandwich with Lemon Ricotta (recipe inspired by one created by Gabrielle Hamilton and shared in her cookbook Prune)

Ingredients
Ricotta
3 cups whole organic milk
1 cup heavy whipping cream
3 1/2 Tablespoons fresh lemon juice
1/2 teaspoon sea salt (recommend Maldon)
Note: This yields approximately one pound of fresh ricotta. If you are reluctant to make your own, buy one pound of the best, freshest store bought ricotta you can find.

Sandwich
1 pound of freshly made ricotta
zest of 1 lemon
2 Tablespoons extra virgin olive oil
pinch of sea salt
5-6 diagonally cut, 1/2 inch slices of country bread (sourdough, peasant bread, etc)
2 large ripe avocados, at room temperature, cut into even slices
Small red onions (red pearl onions, baby red onions), thinly sliced into rounds
1 pint of baby heirloom tomatoes and/or grape tomatoes, cut in slices or cut in half horizontally Note: Choose multi-colored tomatoes if possible.
4 teaspoons of toasted sesame seeds
1/2 teaspoon toasted poppy seeds
Sea salt
Extra-virgin olive oil for drizzling
Optional: skin of a preserved lemon, flesh and pith removed, finely diced

Directions
Ricotta
1. Line a colander with cheesecloth and place over a deep measuring cup or bowl.
2. Place cream, milk and salt in a heavy medium sized saucepan. Heat to a temperature of 190 degrees (mixture will come to a soft boil).
3. Turn off heat and add 3 1/2 Tablespoons of fresh lemon juice. Stir gently with a wooden spoon for 15 seconds. Allow to sit undisturbed for 10 minutes.
4. Pour mixture into colander and allow to drain for at least one hour but no more than two hours. Note: The longer the ricotta rests the firmer it will become.
5. Gently squeeze drained ricotta and transfer to a serving dish.

Sandiwch
1. Mix ricotta with lemon zest, extra-virgin olive oil and pinch of sea salt. Set aside.
2. Grill both sides of the sliced bread.
3. Spread ricotta generously over bread.
4. Arrange sliced avocado on top of ricotta.
5. Artfully arrange tomatoes on top of avocados, nesting them on and in between slices of avocado.
6. Carefully arrange thin slices of onion over the tomatoes.
7. Sprinkle toasted sesame seeds and poppy seeds.
8. Transfer open faced sandwiches to a platter or plates. Drizzle lightly with extra-virgin olive oil. Sprinkle sea salt over the top.
Notes: Can cut sandwiches into wedges before placing on platter. Served as an appetizer or lunch entree.


Ocean views of South Shore Beach in Little Compton, Rhode Island