Showing posts with label Appetizer. Show all posts

Saturday, September 3, 2022

Whipped Ricotta, Basil Pesto & Tomato Jam Crostini

For the past few weeks I have been deliberating on whether or not there should be a post for this Whipped Ricotta, Basil Pesto & Tomato Jam Crostini. Not because I think it's seriously one of the best, easiest, most impressive, beyond delicious, slightly addictive, gorgeous appetizers ever to come out of my kitchen, but because I fear the lack of specificity in the 'recipe' will have you wondering if I was day drinking when I composed this post. For the record, I wasn't. And as far as calling this a 'recipe', well I may be using a rather broad sweep definition of the concept. While there is some degree of specificity here, there are also some suggested 'guidelines'. It may be first time I tell you to use 'approximately two to three tablespoons', or it may be the start of a trend. Sometimes recipes are more 'art' than 'science'. And this would be one of them.

If you are still with me (fingers crossed you are), I could go on endlessly singing the praises of this Whipped Ricotta, Basil Pesto & Tomato Jam Crostini. In all honesty, it's one of those appetizers likely to have your friends and family calling you (or at least thinking) the real hostess with the mostest. It's an appetizer that checks off all right boxes. Not only is it intensively flavorful, it's food at it's most beautiful.


This is one of those appetizers best served in 'individual' portions rather than a dish where everyone dives in. Small wine glasses (like the ones shown here) or small canning jars (ones with a wide mouth) make for the perfect vessel as you want everyone to see the layers of the whipped ricotta, basil pesto and tomato jam. When assembling the appetizer you are going to go slightly heavier on the whipped ricotta, easier on the basil pesto (so as not to overpower a bite with basil pesto), and moderately heavy on the tomato jam. Think 'the three bears' when you are putting it all together.

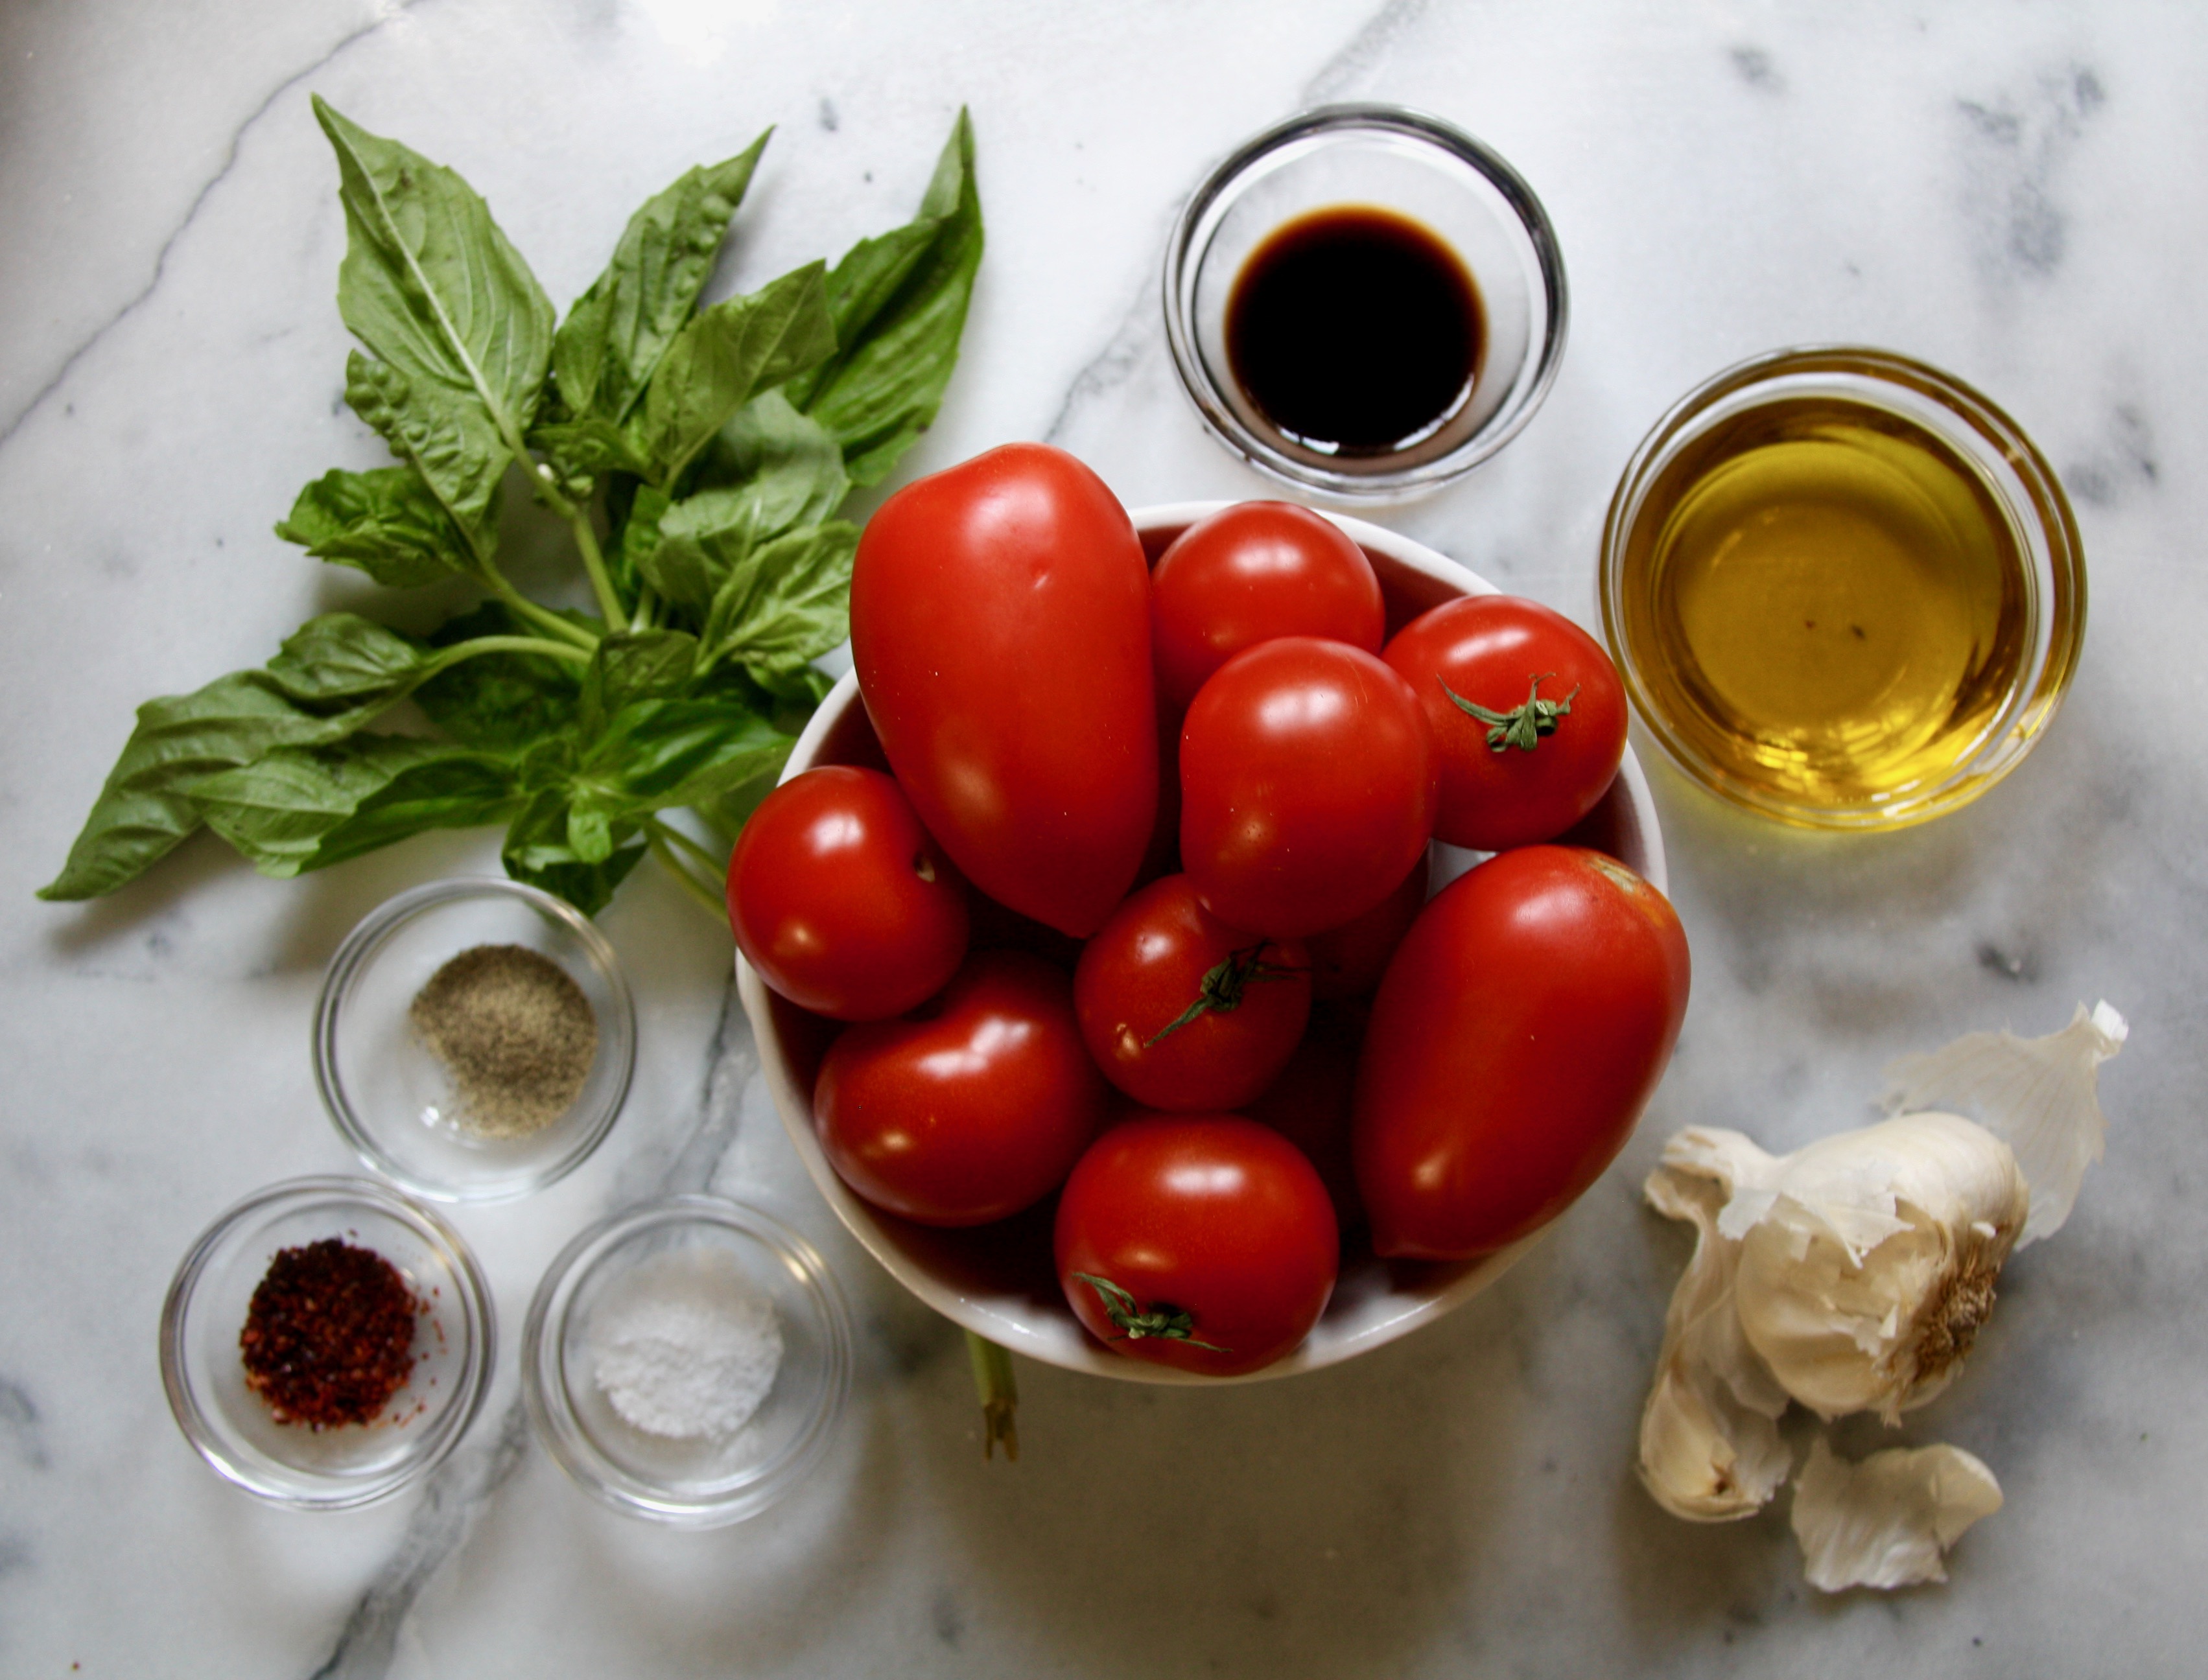
In full disclosure I used one of my favorite jarred Italian imported basil pestos here. Find one that you love and use it. You do not need to make your own pesto. Nor do you need to make a homemade ricotta (although you can if you want). A good quality whole-milk ricotta whipped with some extra-virgin olive oil and a pinch of Kosher salt will make an incredibly luscious creamy whipped ricotta. Pick up a baguette from the Farmer's Market or the grocery to make the crostini. However, you need to make the tomato jam. It's easy, it really is. And we are in the midst of cherry tomato season so you should find them in abundance at the grocery store, at Farmer's Markets, or in the tomato gardens of your friends willing to share their bounty with you.


If you are looking for the perfect, restaurant worthy, impressive, big flavored appetizer to serve, this Whipped Ricotta, Basil Pesto & Tomato Jam Crostini is the one!

Recipe
Whipped Ricotta, Basil Pesto & Tomato Jam Crostini
Serves 2-8

Ingredients
16 ounce baguette, cut into 1/4"slices on the diagonal
Extra-virgin oil for brushing the baguette slices

Cherry Tomato Jam (my favorite recipe)
6.35 oz (180g) jar of imported Italian Basil Pesto, like this one, (or homemade basil pesto)
16 ounces (453g) whole milk ricotta
2 Tablespoons extra-virgin olive oil
Pinch of Kosher salt

Directions
1. Make the Cherry Tomato Jam the night before to give the flavors a chance to further deepen.
2. To make the crostini, preheat the oven to 400 degrees (F). Place the 1/4" cut slices of the baguette on a heavy bottomed rimmed baking pan. Brush both of the slices with olive oil. Bake for 9-11 minutes, turning the slices over at the halfway point. The crostini is done when the edges of the bread are golden in color. Remove the pan from the oven and transfer the crostini to a cooling rack.
3. In a medium sized bowl (or in a food processor) add in the whole milk ricotta, 2 Tablespoons of extra-virgin olive oil, and pinch of Kosher salt. Whip (or process) until smooth and creamy.
4. In your stemless wine glasses (or canning jars), dollop about 3 tablespoons of the whipped ricotta on the bottom and smooth slightly with a spoon. Then spread a generous tablespoon of the basil pesto over the top of the whipped ricotta. Finish with 2-3 rounded tablespoons of the tomato jam.
5. Place the glasses on small appetizer plates, surround with 3-4 pieces of the crostini and serve. Note: You can assemble the glasses containing the whipped ricotta, basil pesto and tomato jam early in the day or several hours ahead. Cover each tightly with plastic wrap and keep chilled in the refrigerator.

Important Notes: (1) Well covered and chilled, the whipped ricotta will be good for 4-5 days (you may need to give it a good whisk if it's been in the refrigerator for more than two days). Which means you can make as many of these appetizers as you need for a gathering. If you need just two, make two. If you need four, make four. You should have enough of the individual ingredients to make up to 8 appetizers. (2) I generally buy my imported basil pesto from my local Italian grocery store, but there are many good options at food speciality and grocery stores. 


Sprague Lake, Rocky Mountain National Park (August 2022)

Monday, July 4, 2022

Beef and Caramelized Onion Quesadillas


In a little over a month we are headed back out West. Along with a million of our closest friends we will be hiking in the Badlands and Rocky Mountain National Park (RMNP). The trip to the Badlands will a first for all of us, however, I will be the only one having the most familiarity with RMNP. While I wouldn't exactly consider myself on expert on Colorado's most famous national park, I have probably been there at least a dozen times in the last two decades. Although I have never been there in the summer (I'm not a big fan of crowds). Being the 'planner' for one leg of the trip is a kind of double-edged sword. On one hand, my Type A personality couldn't be happier being the one planning the itinerary and making the hiking/sightseeing recommendations in one of my happy places. Yet, on the other hand, the pressure to make the experience the 'best-ever' for everyone will weigh heavily on me. Because at the end of day, I just want them to be as taken in by and smitten with the sheer beauty of RMNP as much as I am. Wish me luck on accomplishing that goal!


Speaking of recommendations. I have one for you. Make these to-die-for Beef and Caramelized Onion Quesadillas. Because as far as quesadillas go, these are divine. 


Century old humble food, quesadillas are one of those foods almost everyone loves. Whether served as an appetizer or as the main course, they can be incredibly satisfying. Yet, no matter how many times you have eaten them, they can still have some element of surprise. 


Ground beef mixed with a homemade smoky, sweet BBQ spice mixture, sweet, golden caramelized onions, and lots of thickly grated cheese layered between two flour tortillas are what elevates these quesadillas to a sinfully delicious level. If your were looking to make and serve a slightly decadent quesadilla, your search is over. As these craveworthy Beef and Caramelized Onion Quesadillas bring new meaning to the concept of simple food.


These savory Beef and Caramelized Onion Quesadillas can be served as either a hearty appetizer, for lunch, or for dinner. Jazz them up by serving them with some chunky salsa, sliced avocado or guacamole, sliced green onions, sour cream or crema, sliced jalapeños, and/or hot sauce. 

You can make the BBQ spice mixture in advance. The recipe below gives you enough to make these quesadillas twice. While I prefer to make my caramelized onions on the day I am using them, you can make them a day ahead. Just store them covered in the refrigerator and reheat them slightly (to get them to room temperature-ish) in the microwave before you begin assembling the quesadillas. Note: It takes about 4-5 minutes to make each quesadilla. Keep the quesadillas warm in oven on a baking sheet until you finish making all of them.


I am going to make one more recommendation (because that's what I love to do). If you are looking for a somewhat effortless, easy, and impressive Tex-Mex dish to make for your summer meals and gatherings, put these Beef and Caramelized Onion Quesadillas on the top of your list. I won't at all be surprised if you are still making them when the fall comes around. 

Recipe
Beef and Caramelized Onion Quesadillas
Serves 5-7 for dinner, serves 8-10 for hearty appetizers

Ingredients
BBQ Spice Mix
2 Tablespoons dark brown sugar
1 1/2 Tablespoons Kosher salt
1 Tablespoon paprika
1 Tablespoon Chipotle chili powder or chili powder
1 Tablespoon onion powder
1 Tablespoon garlic powder
2 teaspoons black pepper

Caramelized Onions
2 pounds (920g) sweet yellow onions (about 4 large), peeled and cut into 1/4 slices
2 Tablespoons unsalted butter
2 Tablespoons extra-virgin olive oil
Kosher salt

Beef Quesadillas
1 (455g) to 1/4 pounds (570g) 85/15 ground beef
1/4 cup BBQ Spice Mix
2-3 Tablespoons water
10-12 (10 inch) soft flour tortillas (from a 16 ounce bag)
4 cups thickly shredded Mexican Cheese Blend or a Cheddar/Monterey Jack Blend  OR 2 cups shredded mozzarella and 2 cups of a shredded Mexican Cheese Blend (see notes)
Extra-virgin olive oil

Topping Options
Jar of your favorite salsa (I like this one)
Sour cream or Crema
2 Avocados sliced or guacamole
2-3 Sliced green onions
2-3 Thinly sliced jalapeños 

Directions
BBQ Spice Mix
1. In a medium sized bowl, mix together all of the spice ingredients.
2. Store in an airtight jar. Note: Spice Mixture will be good for up to a year.

Caramelized Onions
1. In a large (14") nonstick skillet, heat the butter and olive oil over medium heat.
2. When butter has melted, add the onions and lightly sprinkle with Kosher salt. Cook for approximately 10 minutes, stirring frequently, until the onions have softened and are beginning to become translucent.
3. Reduce the heat to medium-low and continue cooking for another 35-55 minutes, stirring every 10-15 minutes, until the onions are golden and have caramelized. 
4. Remove from the heat. Transfer to a bowl. Let come to room temperature.
5. Onions can be made in advance. Cover and store in the refrigerator. Bring to room temperature before using. Note: Caramelized onions will be good for at least a week stored in the refrigerator.

Beef Quesadillas
1. Preheat oven to 200 degrees (F)
2. Place the beef in a large nonstick skillet. Cook over medium-high heat, breaking up the pieces with a metal spatula or wooden spoon, until browned.
3. Add the quarter cup of the BBQ spice rub and 2-3 Tablespoons of water. Stir to combine. Cook until the water has been absorbed and all of the beef is well coated (approximately 2 minutes).
4. Remove from the heat. For easy assembly divide the beef into 8 (or up to 10) mounds. 
5. Heat 1 teaspoon of olive oil in a medium sized cast iron pan or skillet. When the oil has warmed, place a tortilla in the pan. Immediately top with about a 1/4 cup of the beef, 1/2 cup of the cheese(s), and about 2 generous Tablespoons of the caramelized onions. Top with another tortilla, press down lightly. Cook until the bottom tortilla is golden brown. Flip the quesadilla and continue cooking another 2 minutes or until the bottom tortilla is golden brown and the cheese(s) has melted. Remove from the pan and place the quesadilla on a baking sheet. Put in the oven to keep warm while you finish making the remaining quesadillas.
6. Repeat with the remaining ingredients adding 1 teaspoon of olive oil each time you make a quesadilla.
7. Cut the quesadillas in quarters (do not cut smaller than quarters). Arrange on a platter and serve with a variety of topping options.
8. If you have any leftovers, reheat in a skillet as reheating in a microwave will cause the tortillas to get soft.

Notes: (1) The inspiration for the Beef and Caramelized Onion Quesadillas came from Holly Erickson and Natalie Mortimer's cookbook "The Modern Proper: Simple Dinners for Every Day". (2) I used Tillamook's Farmstyle Thick Cut Mexican Cheese, thick cut style, as it contains cheddar, monterey jack, queso quesadilla, and asadero cheeses. If you can't find this cheese, look for another high quality Mexican Cheese blend or a sharp cheddar and monterey jack cheese blend. Do not use finely shredded cheeses.


Lake Powell, Page, Arizona (March 2022)

Thursday, June 30, 2022

Corn Dip


All it took was a three day trip to Nashville to convert me into a country music fan. Almost immediately I was lulled in by the story telling music that spoke to my soul. Seven months later I went to my first outdoor country music concert. Not just any concert, mind you, but a five plus hour concert featuring some of my favorite artists. Hearing Old Dominion, Carly Pearce, Dan and Shay, and Kenny Chesney perform their music live has now made listening to their songs on my headphones or while driving in the car a kind of religious experience. As their words now resonate even deeper into my newly discovered country music loving soul. If I were forty years younger it's quite possible I might find myself on the verge of becoming a country music concert groupie. I suppose I will have to find other ways of putting my growing cowboy boot and cowboy hat collections to good use!
   

And all it will take is one bite of this slightly addictive, luscious, creamy with a bit of a kick, Corn Dip for you to fall deeply, madly in love with this ultimate summer gathering appetizer. If it were possible for a dip to speak to your soul, this would be the one.  Next to the BLT Dip, this may be the most crowd pleasing, standing ovation worthy dip on the blog. I dare you not to love it.


If you are a fan of elote (grilled corn slathering in a spicy, creamy sauce and topped with cojita cheese) you may find yourself being equally smitten with this craveworthy Corn Dip. However, unlike elote and some elote dips, this one is served chilled. Although it uses canned versus grilled (or sautéed) corn, no flavor is sacrificed and it's even easier to make.

Simply served with some scoop style corn chips or Frito Scoops, this will be the Corn Dip everyone will gravitate towards and hover over. 


There are several keys to making this chunky dip great. First, you need drain the canned corn (even if it's vacuum sealed), the chopped jalapeños, and chopped green chiles. If you don't, that liquid will create a runny, rather than hefty like texture. Second, you definitely need to use a full-fat sour cream, not a low-fat sour cream. Third, absolutely use a good quality mayonnaise such as Hellman's or Best Foods mayonnaise as it sets up perfectly chilled. And, last but not least, use a thicker cut shredded cheese mixture. Using a three or four cheese blend (preferably a Mexican blend) kicks up the flavor of this Corn Dip up a few more notches (see notes below). 


Not counting the time it takes to dice the red pepper and thinly slice the green onions, the dip comes together in less than five minutes. Allowing the Corn Dip to chill in the refrigerator for at least four hours or overnight will allow all of the flavors to develop. 


Because the corn dip is served chilled rather than baked in the oven, it's a refreshing appetizer on a hot summer day. 


There may be no better way to welcome in the Fourth of July weekend that putting out a bowl of the Corn Dip with piles of tortilla chips or Fritos Scoops. Just like your favorite (country music) songs, more than likely you will put it on repeat and won't tire of enjoying it all summer long.


If you are invited to a potluck this weekend or this summer bring this almost effortless to make Corn Dip! Don't be surprised if it upstages all of the other appetizers! The recipe makes enough to serve 8-10 people. 


We may have all had versions of either an elote or corn dip before. Some we may have loved, some we may have found a tad disappointing. However, I am guessing you haven't had one as insanely scrumptious and chunky as this one before. The combination of chopped (mild) green chiles and fire-roasted (hot) jalapeños gives this highly flavorful Corn Dip some great heat that is ever so slightly tempered by the sour cream and mayonnaise. 

If, by some chance, you have never had Corn Dip, it's never too late to join the party and become a fan!

And here's to wishing everyone a safe, happy holiday weekend!

 
Recipe
Corn Dip
Serves 8-10 as an appetizer

Ingredients
3 - 11 ounce cans (936g) whole kernel sweet corn, drained (see notes)
2 - 4 ounce cans (226g) chopped green chiles (mild), drained
4 ounce (113g) can fire-roasted (hot) chopped jalapeños, drained
2-3 green onions (green and white parts), thinly sliced
1 large red sweet pepper, seeds removed, cut into a small dice
1 cup (230 g) good quality mayonnaise (see notes)
1 cup (240g) sour cream (do not use low-fat sour cream)
1 teaspoon Kosher salt
1/2 teaspoon black pepper
1/2 teaspoon garlic powder 
16 ounces (454g) thick cut shredded Mexican Cheese or Sharp Cheddar Cheese (see notes)

Scoop style corn chips or Fritos Scoops

Optional: Thinly sliced jalapeño for garnish and/or sprigs of cilantro for garnishing

Directions
1. In a large bowl, mix together the corn, green chiles, jalapeños, green onions, red pepper, mayonnaise, sour cream, Kosher salt, black pepper, and garlic powder. Stir until blended.
2. Add in the cheese and stir until combined.
3. Transfer to your serving bowl. Cover and refrigerate at least 4 hours or overnight.
4. Serve with scoop style corn chips or Fritos Scoops.
5. Leftovers (if there are any), covered and chilled in the refrigerator, will be good for 3-4 days.

Notes: (1) I used Del Monte Summer Crisp Whole Kernel Sweet Corn. Even though it was vacuum packed, I still let it drain in a colander before mixing with all of the other ingredients. (2) Highly recommend using Hellman's or Best Mayonnaise. (3) I used Tillamook's Farmstyle Thick Cut Mexican Cheese, thick cut style, as it contained cheddar, monterey jack, queso quesadilla, and asadero cheeses. If you can't find this, look for another high quality Mexican Cheese blend, a sharp cheddar and monterey jack cheese blend, or use all sharp cheddar cheese. Do not use a finely shredded cheese.


Buckingham Fountain, Chicago, IL (June 2022)


Monday, June 20, 2022

BLT DIP


There are some days when I walk into the grocery store and leave without one of the things on my 'mental' grocery list. But there are many days when I can remember exactly what a recipe, one either handwritten or copied decades ago, looks like. But then it's always a matter of going through my recipe collection chaos to search for it. We were having friends over for dinner this past weekend and I wanted to resurrect one of my 'vintage' appetizer recipes. Fortunately for me, it didn't take too long to find the recipe card. One surprisingly in my early legible handwriting. As I looked at the recipe, I thought that after all these years it needed a bit of going from good to great makeover. Although it's a simple recipe, so the changes needed to be simple as well.


Seems everything retro is making a comeback. For my part in this growing trend, I am bringing back this BLT (sans the lettuce) Dip (yes, I am retro influencer now). Calling this a BLT dip when there is no lettuce in it doesn't make a whole sense, right? However, I suppose the name was intended to evoke all of the flavors of the BLT sandwich (and it does). And I would be the first to say a recipe called BT Dip doesn't sound quite as enticing. 


Way back when, when I was making this BLT dip on a semi-regular basis, I served it with cocktail rye breads. On Saturday night, I decided to serve it with some homemade ciabatta crostini. After posting a photo of the BLT dip on a platter surrounded by the crostini, one of my friends suggested serving the dip with Frito Scoops. Let's suffice to say that was a brilliant idea! If you have never had BLT dip before, you are going to want to enjoy it on Frito Scoops, cocktail rye bread, and ciabatta crostini so you can decide for yourself what your favorite pairing(s) are. If you come to my house, this luscious, cool, creamy dip will be served with scoops and cocktail rye bread.


My original recipe called for chopping up one large tomato. In this updated version I used cherry tomatoes instead as they have an even better tomato flavor and make for 'meatier' pieces when chopped. Using chopped cherry tomatoes versus a chopped large tomato also helps to ensure the dip doesn't become 'watery'.  In addition to changing the kind of tomato used, I added a thinly sliced green onion (green and white parts), some Kosher salt, and black pepper. The pound of bacon cooked to a slightly crisp level remained unchanged. 


The BLT Dip benefits from several hours of chilling time to allow the flavors to fully develop. However, an overnight chilling time makes for an even more addictively scrumptious dip.

If there was one appetizer you should put on your summer list of must-makes, this BLT Dip should absolutely be on it. It checks ALL the boxes. It's easy to make; it's addictively delicious; and, the list of ingredients won't break the bank and are readily accessible. If you aren't already your friend's favorite host/hostess, this BLT Dip will put you in serious contention for that place of honor.


One last promise. If you make this BLT Dip you will be happy I am a 'saver', 'keeper of things', and 'still have the better part of my memory still in tact'. Happy first week of summer!

Recipe
BLT DIP
Serves 8
Updated July 2022

Ingredients
1 pound (454g) bacon, cooked slightly crispy and coarsely chopped
1 cup (240g) sour cream
1 cup (230g) good quality mayonnaise (see notes)
11 ounces (320g) cherry tomatoes, cut up into pieces (about 28 small cherry tomatoes or 12-14 larger cherry tomatoes)
1-2 green onions, sliced thin, green and white parts
1/2 teaspoon Kosher salt
1/4 teaspoon black pepper

Fritos Scoops, Cocktail rye bread, or a Baguette, sliced on the diagonal and either grilled or toasted
Optional: Additional cherry tomatoes for dipping

Directions
1. In a medium sized bowl, mix together the mayonnaise and sour cream.
2. Add in the chopped bacon, tomatoes, sliced green onion, Kosher salt and black pepper. Mix until well blended.
3. Cover and chill several hours or (preferably) overnight.
4. Serve with Fritos Scoops, cocktail rye bread, and/or homemade crostini.

Note: (1) Any leftovers would be perfect as topping for baked potatoes. (2) Highly recommend using Hellman's or Best Foods Mayonnaise to ensure a luscious, thick dip. Other brands of mayonnaise may not have the same consistency resulting in a dip having a thinner consistency.


Morton Arboretum, Daniel Popper Sculptures (June 2022)


Monday, June 13, 2022

Radishes with Butter


Last year when I shared the Basil Butter with Radishes and/or Grilled Bread appetizer recipe with you. And now this year I am sharing the recipe, if that's what it could even be called, for these Radishes with Butter. In case some of you are wondering 'how many fresh radish appetizer 'recipes' does one need?'. Well that's a really great question. The answer is two. You absolutely need two. There would have to be a really good reason for me to throw a third one out there at any point in the future!


While radishes are generally available year round, they are one of the earliest root vegetables to appear at late spring Farmer's Markets. There are more than thirty varieties of radishes, however, the most common ones are the French Breakfast (oblong in shape) and Red (round in shape) aka Cherry Belle and Early Scarlet Globe. However, never pass up a chance to buy some White Icicles (pure white oblong in shape), Watermelon (light green on the outside, hot pink center), or Rainbow (oval in shape in shades of pink, purple white) radishes when putting together an irresistibly beautiful radish platter.


Usually eaten raw, radishes are spicy, crunchy, zesty, and slightly peppery. Their level of spiciness depends on the variety of radish. When slathered with some creamy butter and sprinkled with flaky sea salt, the radish's peppery flavor is toned down considerably. What you end up with a simple, chic, maybe even elegant, kind of indulgent appetizer. It's a perfect little bite.


Preparing the radishes for your platter begins with rinsing them thoroughly. More often than not when you get them home from the Farmer's Market, they will still have some dirt clinging to them. To cut the leaves and stems off or to leave them on (if not wholly but partially) is a decision you want to make. With at least partially keeping the leaves and stems on you end up with a kind of lollipop. Which not only makes picking them off the platter so much easier, you will have created a platter epitomizing the concept of 'eat beautifully'. When cutting the radishes, either cut them in half (or if large in quarters) almost all the way to their stem, being careful to not separate them. And now you are ready to artfully arrange them on a platter or cutting board. This actually may be the easiest recipe on the blog.


Room temperature unsalted butter is seasoned with some flaky sea salt and blended to a creamy, spreadable consistency. Can you use salted butter? You could. But whether you use an unsalted or salted butter, use a European or European style butter as it's much richer and generally creamier than most American made butters (with very few exceptions). Last, but not least, is the salt. Flaky sea salt. It's absolutely the only and best choice here. 


Elegant and effortless may be one of the ways I might describe a beautiful platter of fresh radishes served with a creamy butter and flaky sea salt. They are the kind of nibbles meant to be served at casual gatherings or relaxing weekend dinners with friends. From the market to your table, a platter of Radishes with Butter doesn't get any easier. Eat beautifully this summer my friends.

Recipe
Radishes with Butter
Serves 4-6

Ingredients
1/2 cup (113g) unsalted butter, room temperature
1/4 teaspoon flaky sea salt
Two bunches of radishes, rinsed, cut lengthwise (or in quarters depending on radish size) with greens fully or partially intact, and chilled
Flaky sea salt (highly recommend Maldon flaky sea salt)
Optional: Radish Micro-greens as an edible garnish

Directions
1. In a small bowl, mix together the unsalted butter and 1/4 teaspoon of flaky sea salt until smooth and creamy. Transfer to your serving dish.
2. Begin by placing the butter and dish of flaky sea salt on your platter. Then arrange the cut radishes as beautifully as possible. 
3. If using, sprinkle some radish micro-greens over the top.
4. Serve immediately.

Notes: (1) I used Red and Breakfast radishes for this platter. (2) You can make the butter early in the day or several hours ahead. Leave at room temperature. The butter needs to be at a spreadable, dipable consistency when serving. (3) It's best to serve this appetizer immediately after assembling as the greens may begin to wilt slightly if left out at room temperature for awhile.


Morton Arboretum, Lisle, Illinois (June 2022)


Wednesday, June 1, 2022

Bruschetta (Three Ways)


How was it that only just last week I noticed there was a huge, glaring, gaping hole in the recipes posted to the blog? I was actually shocked to discover I have never shared a recipe for bruschetta. The classic Italian appetizer that has been around for centuries. In my defense, had I filled that hole at some time during the last nine years, this may be a somewhat anti-climatic post for what is 'drum roll worthy' Bruschetta. One seriously eligible for best ever status as well as one so versatile that can be made three ways. On the upside of committing such an egregious error of omission, I am here to promise the blog will never have a 2.0 version of a classic bruschetta recipe. One everyone should have in their repertoire. In other words, this is the only forever version bruschetta recipe you and I will ever need. Or rather I should say ever want. 


Because of its' simplicity, a great recipe for bruschetta heavily relies on the quality of ingredients. From vine-ripened tomatoes to a flavorful extra virgin olive oil to a great balsamic vinegar to fresh herbs, the flavors of the herb butter (used for making the crostini) and the bruschetta topping depend highly on great, fresh ingredients. Which explains in part, why some of the bruschetta you order at a restaurant doesn't always have a wow factor. But this bruschetta has all of the incredibleness, amazingness, and impressiveness a great bruschetta should have! Quite possibly you may never order bruschetta in a restaurant again. Unless of course that restaurant happens to be somewhere in Italy.


Beyond it's depth of flavor, this bruschetta is incredibly versatile. You can serve it plain, drizzled with a luscious, thick balsamic glaze or both drizzled and topped with some creamy burrata. Yes, it has three different serving options! My personal preference is having bruschetta topped with a drizzle of balsamic glaze and a healthy spoonful of burrata. 


Traditionally the bread is rubbed with cloves of garlic, then brushed with some olive oil before getting a sprinkling of salt and pepper. For this bruschetta, the generous 1/4 inch thick slices of ciabatta are spread with a herbed compound butter. Butter, olive oil, Italian parsley, thyme, garlic, Kosher salt, black pepper and white pepper combine to create the perfect elixir to add flavor to the toasted or grilled ciabatta. After all of the herbed butter ingredients are mixed together, it's slightly chilled. When ready to serve the bruschetta, the herbed butter is generously spread on the slices of ciabatta. Whether toasted in the oven or grilled, it makes for the most perfect 'ciabatta crisps'. Further enhancing the 'wow' factor of this bruschetta. The recipe below gives you more herbed compound butter than you need, but it will last for weeks in the refrigerator. Use it to make garlic bread, more bruschetta, or use to enhance the flavor of grilled vegetables. 

The closest bread to Pagnotta, the bread used in Italy to make bruschetta, is ciabatta. It's crusty and sturdy enough to hold the weight of the bruschetta topping(s). Demi-baguette ciabatta loaves cut on the diagonal to a generous 1/4" thickness) make for the perfect bruschetta 'crisps'! Trader Joe's is my go-to place for these loaves, but you might also find them at other grocery stores.


I generously slathered slices of ciabatta and toasted them in a preheated 400 degree (F) oven for 9-11 minutes. 


The bruschetta topping is a kind of antipasto. This topping is made with ripe tomatoes, chopped garlic, Kosher salt, black pepper, white pepper, Aleppo pepper (or red chile flakes), balsamic vinegar, extra virgin olive oil, and fresh basil. I used both Roma and Campari tomatoes. But you could easily use only Roma tomatoes, cherry tomatoes, grape tomatoes or even heirloom tomatoes. Whichever tomatoes you choose, make certain they are ripe.


The tomatoes are first cut into a quarter or half inch dice then placed in a colander to drain. Give the tomatoes at least 20 minutes to drain. If you don't drain them or give them enough time to drain your topping will be too juicy. 


Once drained, the rest of the ingredients are added in (see the sequence in the recipe below). It's best to make the bruschetta topping right before you are ready to assemble the bruschetta. Any leftovers you have can be refrigerated and tossed with pasta or used to top some grilled fish.


You can serve a platter of plain bruschetta and have a bottle of balsamic glaze as well as a bowl filled with a ball of burrata available on the side. Or you can drizzle them with the balsamic glaze and have the burrata on the side. Or you can make a bruschetta platter, allowing everyone to create their own bruschetta. Do what works for you!

When I tell you the platter of bruschetta was inhaled, I am not exaggerating. Nothing makes me happier than to see food disappear! Cleaned plates and empty platters are all the signs of a great meal, a great dish. And, in this case, everyone was telling me this was a great bruschetta! I couldn't agree more. Some things are worth the wait. And this versatile bruschetta recipe is one of them. With fresh tomatoes coming into the market, now is the time to invite over some friends, open up a good bottle of wine, and serve a platter of bruschetta. 

Recipe
Bruschetta (Three Ways)
Serves 4-8

Ingredients
Herbed Butter
2 1/2 Tablespoons extra virgin olive oil
1 cup (113g) unsalted butter, room temperature
1 Tablespoon chopped fresh parsley
1 1/2 teaspoons fresh thyme leaves
1 heaping teaspoon minced fresh garlic
3/4 teaspoon Kosher salt
1/8 teaspoon black pepper
1/8 teaspoon white pepper

Bruschetta
1 1/2 pounds (720g) Roma tomatoes (or a combination of Roma and Campari tomatoes), cut into 1/4" and/or 1/2" pieces
1 heaping teaspoon minced garlic
1/4 cup high quality extra virgin olive oil
3/4 teaspoon Kosher salt
1/4 teaspoon black pepper
2 teaspoons high quality balsamic vinegar
1/2 teaspoon Aleppo pepper or red chile flakes
1/2 cup (1 ounce/29g) fresh basil, cut into a chiffonade

2 small (6 ounce/176g) Ciabetta demi-baguettes, sliced on the diagonal to a generous 1/4" thickness
Balsamic Glaze
8 ounce (226g) burrata ball (one large or two small)

Directions
Herbed Butter
1. In a medium sized bowl, beat the butter and olive oil together until smooth and creamy.
2. Stir in the parsley, thyme, garlic, Kosher salt, black pepper, and white pepper until well blended.
3. Cover and chill for at least an hour. Note: The herbed butter can be made a day ahead. Remove from the refrigerator at least an hour before assembling so the herbed butter compound has a spreadable consistency.
4. When ready to serve, preheat the oven to 400 degrees (F). 
5. Spread each slice of ciabatta with the herbed butter compound. Place on a heavy bottomed, rimmed baking sheet. Bake for 9-11 minutes or until the ciabatta is golden and crisp. Note: You could also toast the ciabatta on a grill.
6. Transfer the ciabatta to a cooling rack. Then start preparing the bruschetta topping.

Bruschetta
1. Place the chopped tomatoes in a colander. Let the tomatoes drain for at least 30 minutes before mixing in the other ingredients.
2. Put the diced, drained tomatoes into a medium sized bowl. First stir in the olive oil. Followed by the Kosher salt and pepper. Then mix in the garlic.
3. Mix in the balsamic vinegar, then add in the Aleppo pepper. Last, but not least, gently stir in the basil. Be careful to not over stir the mixture.
4. Heap the bruschetta topping on top of each slice of toasted or grilled ciabatta. Drizzle with a balsamic glaze. Top with a spoonful of burrata (or serve burrata on the side and let your guests do the honor).

Notes:(1) The bruschetta topping is best the day it's made. But leftovers can be used to toss with pasta or used as topping for grilled fish. (2) I like the demi-baguette Ciabatta loaves from Trader Joe's.


Sturgeon Bay, Wisconsin (May 2022)