Wednesday, June 17, 2015

Blueberry Pancakes


"Have blueberries whenever you are low-destiny will change and you will be high." (Adam Voichester) Being slightly gullible, maybe the solution to getting me out of this unseasonably rainy weather and running injury funk was as simple as eating blueberries. Whether or not they actually do possess some life-changing mystical qualities, they might certainly be a better option than some of the alternatives currently under consideration. With blueberries having the highest antioxidant levels in the entire fruit/vegetable universe, eating the world's healthiest fruit would at least have nutritional value benefits. I guess that would be some consolation if the whole life-changing and experiencing a buzz thing doesn't really happen.


I really do love blueberries. And I really do love pancakes, although not just any pancakes. Take it from someone who has taken bites of more than their fair share of bad ones. For several years now I have been making pancakes using the amazing recipe my sister had discovered in a newspaper. However, I hadn't been adding blueberries to them, preferring instead to be a pancake purist. 


If you like the taste of fresh blueberries eaten by the handful or picked fresh off of a blueberry bush, you will gasp at the deliciousness of the oozing with sweetness cooked blueberries in these pancakes. The delirium experienced from eating the blueberries in these pancakes had me realizing that may not have been one of my better decisions. Not exactly the life-changing experience I was hoping for, but going forward my plain pancake days have now come to an end.

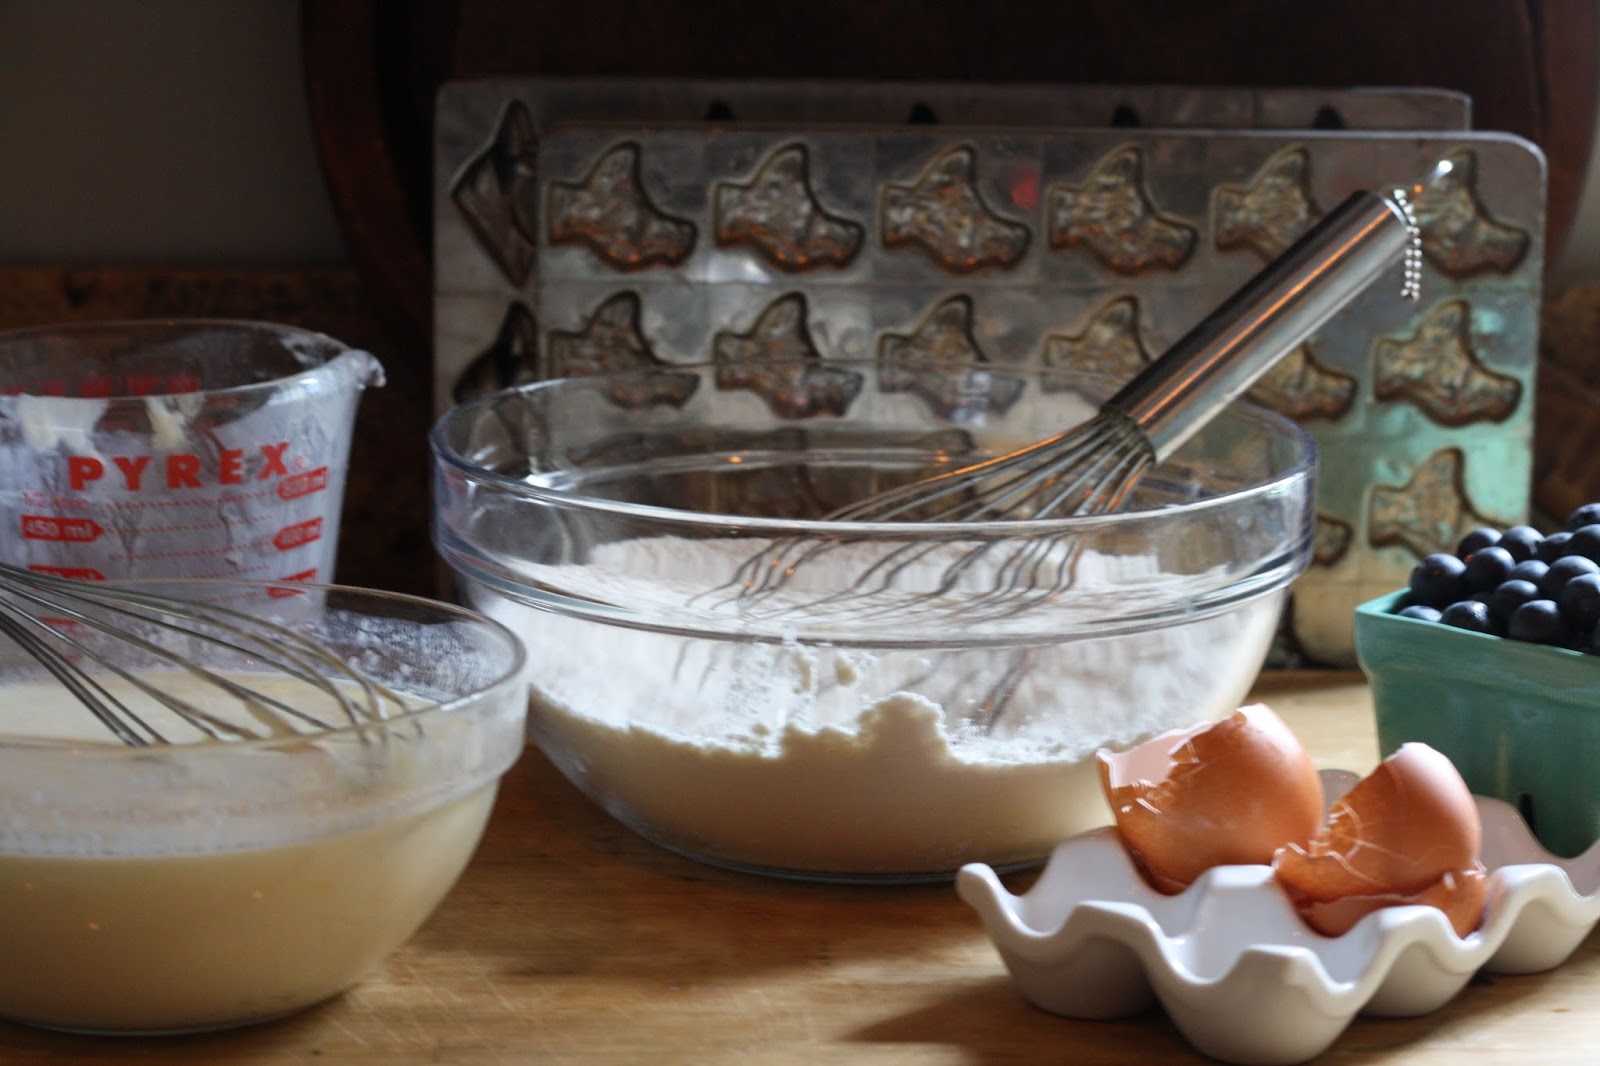
Eggs, all-purpose flour, sugar, unsalted butter, baking soda, baking powder, kosher salt, buttermilk, and now yes, blueberries are all you need to make these fluffy, slightly addictive pancakes. No sifting and no mixers required make it the kind of recipe you can make anywhere. 


These are one of those perfect make on vacation pancakes. With the dry ingredients pre-assembled in a ziplock bag, you can pick up the remaining ingredients from any grocery store and/or roadside stand. Not going on vacation? Serving these pancakes to your family and friends will have them feeling as if they were on vacation! 

The wet ingredients (buttermilk, eggs, melted butter) and gently mixed into the dry ingredients (flour, sugar, baking soda, baking powder and kosher salt) and allowed to rest 10 minutes. The batter should be thick and lumpy. Stirring the batter until smooth will adversely affect the fluffiness of the pancakes. When in doubt, under stir and not over stir.


After the batter rests, the generous two cups of blueberries and again gently mixed into the batter. The batter will deflate slightly. Adding the blueberries after the resting stage ensures your batter does not turn 'blue' or have streaks of 'blue' running through it. Note: Any unused batter can be covered and stored in the refrigerator overnight. The batter will begin to break down if left in the refrigerator longer than overnight.


Cook the pancakes on a non-stick griddle rubbed very lightly with oil. I have used both the All-Clad and (a seasoned) Lodge Cast Iron griddles with great success. Not cooking them in a pan of 'oil or butter' gives you the semi-guilt free option of lathering the pancakes with butter and/or maple syrup. The cooked pancakes can be kept warm in a preheated 200 degree oven. 


For those of you who have followed this blog from the beginning, you will recognize this is the same as my first posted recipe. Sometimes recipes are so good they need to resurrected, brought to everyone's attention a second time. This is one of them. And yes, I am one of those who believe redundancy can be a good thing. For those of you new to the blog, this is your lucky day! Maybe even one of those life-changing kind of days. 

Recipe 
Blueberry Pancakes (original recipe discovered by my sister)

Ingredients
2 cups all-purpose flour
2 tablespoons granulated sugar
2 teaspoons baking powder
1 teaspoon baking soda
1 teaspoon salt (Kosher salt is always my preference)
2 large eggs
2 cups buttermilk
1/2 stick or 4 tablespoons of melted unsalted butter
2 generous cups of fresh blueberries
Serve with room temperature salted butter, maple syrup, and blueberries

Directions
1. Combine the flour, sugar, baking powder, baking soda and salt in a large bowl.
2. In a separate bowl lightly beat eggs then stir in buttermilk and butter.
3. Add the liquid ingredients to the dry ingredients stirring gently with a wooden spoon just to blend.  Note: The batter will be slightly lumpy and quite thick. 
4. Let the batter rest 10 minutes. 
5. Gently add blueberries.
5. Heat a very lightly oiled non-stick frying pan or griddle. Using either large ice cream scoop or a 1/4 cup measure pour to pour batter.
6. Cook 2-3 minutes before flipping.  The bottom should be lightly browned or golden when you flip.
7. Once gently flipped, cook until the other side is lightly browned or golden (Another 2-3 minutes).
8. Transfer to a plate or platter to serve.  To keep keep pancakes warm, transfer pancakes to a baking sheet and place in a 200 degree (F) oven.


One of my favorite places in Tucson, the historic San Xavier del Bac Mission. 


Sunday, June 14, 2015

Strawberry Ice Cream


"I scream, you scream, we all scream for ice cream." All of the opened square pint containers of neapolitan ice cream sitting in the freezer of my childhood home looked exactly the same. The blocks of chocolate and vanilla were carefully sliced away leaving strawberry to become freezer burned inedible or the only ice cream choice for my father. One couldn't help but feel a little sorry for both the strawberry ice cream and my father. Fortunately my aversion to strawberry ice cream ended sometime after adolescence (that period in one's life where with 'high degrees of certainty' you think you know best). However, after working at a Baskin-Robbins during college, I went through a stage where vanilla was the only flavor of ice cream I could eat. Too many tastes of Pralines and Cream and Jamoca Almond Fudge. Like adolescence, I am thankful that period of my life came to end as well.


In coming across a recipe for a no-churn strawberry ice cream I wondered where it would land on the 'not so great to great' ice cream continuum. Would it skew closer to the taste of that strawberry ice cream in those square pints of neapolitan (low end), to that of the artisan ice cream made by Rococo in Kennebunkport (extreme high end) or somewhere in between. My hope was its' flavor, taste, and texture would have it fall somewhere between the middle and higher end of the my 'years of eating and scooping ice cream' continuum.


If having now made this strawberry ice cream twice in the last two weeks is any indication, suffice to say I wish strawberry season here in the midwest extended from June to May.

This ice cream's creaminess factor depends on whether the strawberries are processed to a smooth puree or are puree-like with discernible bits of strawberries remaining. The presence of strawberries scattered throughout the ice cream make it appear as one more closely resembling an artisan ice cream, one lovingly churned by hand, and one screaming 'homemade'.


Without having to make the investment of an ice cream maker, you can make this strawberry ice cream pretty much anywhere, anytime. The only caveat is that you will need access to a food processor and a whisk. Standing mixers with whisk attachments rank up there with love, health and happiness, but whisking cream by hand has the added benefits of sculpting your arms and burning calories. Forgive my redundancy if I have shared this before, but choose a whipping cream having at least a 17% fat content. In addition to the cream whipping up to fluffier, softer peaks, cream with a higher fat content creates a creamier, richer ice cream.

The sweetened condensed milk, pureed strawberries, and sea salt are very gently folded into the whipped cream until no white streaks remain. And lastly the sifted confectionary sugar is mixed in.


The entire mixture is poured into a freezer safe container, one having a very tight lid. Note: The ice cream storage container from Williams-Sonoma was the perfect size.

The strawberry ice cream takes at least 8 hours to set up in the freezer, but I would suggest you allow it to remain in the freezer overnight. 


Is there any non-alcoholic option more refreshing on a hot day than a scoop of ice cream? Well, maybe a couple of scoops. 


For those of you who like a little something more with your ice cream, chocolate sprinkles, berry compote, chocolate sauce, hot fudge sauce, or more fresh berries are just some of the options. Sandwiching the strawberry ice cream between two cookies eliminates the need for bowls and spoons. 

This might be one of the simplest dessert recipes you will make all summer. Beyond being one of the most delicious, it is like to make you think twice before heading out to an ice cream stand. Who would have ever thought making homemade ice cream was this easy? The expensive ice cream maker I just had to have, the one taken out of the box maybe once or twice over the past ten years, might possibly never see the light of the day, at least for the rest of the summer. And as far as where this ice cream falls on the ice cream continuum, well, it is much closer to the high end than to the center.  

Recipe
Strawberry Ice Cream (an ever so slight change to Mimi Thorisson's Strawberry Ice Cream recipe)

Ingredients
14 ounce can (350 ml) sweetened condensed milk
1 cup (240 ml) heavy cream (at least 17% fat)
2 1/4 cups (450 g) strawberries, hulled and cut into quarters
1/2 cup (50 g) confectionary sugar, sifted
1/4 teaspoon sea salt

Directions
1. Place cut strawberries in a food processor. Blend until very small pieces remain (do not puree). Note: If you prefer your ice cream on the creamier side, process strawberries until smooth.
2. In a standing mixer with a whisk attachment, beat heavy cream until soft peaks form.
3. Gently fold in sweetened condensed milk, strawberries and salt.
4. Add confectionary sugar and fold until blended.
5. Pour mixture into an ice cream container (or other freezer friendly container with a tight lid). Freeze at least 8 hours or overnight. Note: The ice cream storage container from Williams-Sonoma was the perfect size.
6. Scoop mixture into bowls, waffle cones, or between cookies and serve.
Optional: Serve with additional fresh strawberries, chocolate sauce, hot fudge sauce, or berry compote.


Freshly picked strawberries at the Farmer's Market.

Wednesday, June 10, 2015

Goat Cheese Cheesecake with Berry Compote


This past weekend, I finally came to the realization it would take decades if I made at least one 'new' recipe every day, 365 days a year, from the collection of cookbooks and cooking magazines amassed over the years. In spite of this moment of clarity, throwing away (almost all of) the cooking magazines was more painful than having a root canal. Having purged more than twenty-five years of saved magazines several years ago, one might think this time around it would be easier. It wasn't. Each time I opened a magazine, my eyes got distracted by a recipe I would put in that ambiguous 'your life would not be complete if you did not eat this' category. Had anyone uttered the words 'take a deep breath or let it go' to me, I would have made one of those 'if looks could kill' faces before turning into a three-year old having a full-blown 'you don't understand' tantrum. But at the end of the day more magazines went into the recycling bin than were 'saved' and the world did not come to an end. 


Before tossing out a five year old Southern Living magazine, I tore out a recipe for Goat Cheese Cheesecakes with Summer Berries. With the hot, humid weather finally arriving this week here, it was the no-bake filling that caught my attention. And instead of making the cheesecake in jars, I decided to make it as a tart, saving the 'jar' idea for another time. 


I have been a little skeptical of 'no-bake' cheesecakes as the ones I have tasted generally didn't have a creamy, satisfying cheesecake texture. Many of the 'no-bake' recipes out there call for the use of beaten egg whites. This one doesn't have any eggs in it. Instead, unflavored gelatin and whipped heavy cream combine to give this cheesecake all of the richness and creaminess one craves and expects in this confection. With the goat cheese and lemon zest adding the perfect amount of tartness to the cheesecake, the berry compote topping elevates it to that dubious 'you have not lived until you have eaten it' place. 


Blueberries and blackberries come together to create a delicious compote. In addition to it being the finishing touch to the cheesecake, it would also make for a great topping over vanilla ice cream or even on pancakes or waffles.


The recipe for the graham cracker crust makes a little more than you need for a 10 inch tart. You can save the leftover crumb mixture for another use or make a 12 inch tart (there will be enough of the cream cheese mixture and compote if you make a larger sized tart). Bake the graham cracker crust in a preheated 350 degree (F) oven for 12-15 minutes and allow to come to room temperature before spooning in the cheesecake filling.


The cream should be whipped to soft peaks before it's gently folded into the goat/cream cheese mixture. When buying a heavy cream, look for one with a fat content of at least 17%. 


After spooning the cheesecake filling into the cooled graham cracker shell, use an offset spatula to smooth the top. At this point, the cheesecake should be covered and placed in the refrigerator for at least 6 hours or overnight.


Just before serving, unmold the cheesecake, place on a platter, and spoon the compote over the top. Sprinkle a handful of fresh berries over the top of the compote. Again, you will have more compote than you need. The remaining compote can either be saved for another use or poured into a bowl to serve along side the cheesecake.


If there was ever a reason to plant edible flowers, finishing cakes and tarts with their blossoms is one of them. 


After taking one bite of the Goat Cheese Cheesecake with Berry Compote I felt some sense of vindication for having saved all of those magazines over the years. Had I not gone on a much needed purging expedition, this hidden treasure of a recipe would have probably remained in the stacks of 'haven't seen the light of day in years' magazines. No, I am not going to dwell on wondering what else I may have thrown away (although admittedly that fleeting thought went through my head). I am quite certain there are thousands, hundreds of thousands actually, of recipes sitting in the collection of more than 300 cookbooks (and stack of magazines I saved) just waiting to be 'unearthed'. 

Recipe
Goat Cheese Cheesecake with Berry Compote (slight adaptation of a June 2010 recipe in Southern Living)

Ingredients
Crust
2 cups crushed graham crackers
1 stick (4 ounces) unsalted butter, melted
1/4 cup granulated sugar
generous pinch of sea salt
Compote
3 cups blueberries, divided
3/4 cup blackberries
1/4 cup water
1 Tablespoon lemon zest
2 Tablespoons fresh squeeze lemon juice
2 teaspoons honey
pinch of sea salt
1 teaspoon corn starch
Cheesecake
1 envelope (.25 ounces) unflavored gelation (i.e., Knox)
1/3 cup whole milk
4 ounces cream cheese, softened
4 ounces goat cheese, softened
1/3 cup granulated sugar
2 teaspoons lemon zest
generous pinch of sea salt
1 1/4 cups heavy cream (with at least 17% fat)

Directions
Crust
1. Preheat oven to 350 degrees.
2. In a medium sized bowl, mix together crushed graham crackers, melted butter, sugar and sea salt until well blended. Remove 1/2 cup of mixture and set aside for another use. Note: If making a 12 inch tart, use all of the graham cracker crumb mixture.
3. Press crumb mixture firmly into 10 inch removable bottom tart pan. Place tart pan on baking sheet.
4. Bake crust for 12-15 minutes or until lightly browned. Remove from oven. Allow to cool to room temperature. Set aside.
Compote
1. In a heavy bottomed medium saucepan, combine 2 1/2 cups blueberries, sugar, lemon zest, lemon juice, honey, and water. Stirring often, simmer over medium heat until berries begin to burst. 
2. Stir in cornstarch and simmer until sauce becomes thickened.
3. Remove from heat and stir in remaining 1/2 cup blueberries and blackberries. Allow to cool.
4. Transfer compote mixture to a bowl, cover and refrigerate until ready to use.
Cheesecake
1. In a small saucepan, sprinkle gelatin over milk and let stand one minute.
2. Cook milk mixture over medium-low heat, whisking constantly, until gelatin is dissolved (approximately 2-4 minutes). Remove from heat and set aside.
3. In a stand mixer, cream together goat cheese and cream cheese until smooth. Beat in sugar, lemon zest and salt.
4. Slowly add milk/gelatin mixture, beating until combined. 
5. In a standing mixer fitted with a whisk attachment, beat cream at high speed until soft peaks form. Gently fold whipped cream into cheese mixture. 
6. Spread cheesecake mixture onto baked crust. Smooth top. Cover and refrigerate for 6 hours or overnight.
7. When ready to serve, spoon berry compote over top of the cheesecake. Sprinkle top with a few additional fresh berries.
Optional: Decorate cheesecake with fresh, edible flowers.


Sunday, June 7, 2015

Quinoa Tabbouleh with Grilled Asparagus and Feta


My home confinement due to a stress fracture on my right foot has been 'challenging' for me. I have managed to ride my bike without falling (but not without incident) while wearing a rather cumbersome boot, but unfortunately not being able to drive has significantly altered my daily life, at least for the next four to six weeks (which on any given day seems like a lifetime). On Saturday my childhood best friend came to the rescue. Not only offering to drive us to my favorite farmer's market, but to bring me to a forest preserve so I could take some landscape photos. For several hours on a glorious June day I felt as if I had won the lottery. Oh, the euphoria of having the freedom to do some of the simple things I  have grown to love. There is much to be said for 'living in the moment'. Life actually felt 'normal' again. Maybe more important than having a much needed break from obsessing about my running injury was being able to spend some quality time with a friend.


In anticipation of having access to 'fresh from the farm' vegetables, I had written out a list of the ingredients I needed for the Quinoa Tabbouleh with Grilled Asparagus and Feta. My childhood best friend solidified her sainthood destiny by taking me the grocery store to get everything else I needed. From the heirloom cherry tomatoes, to the English cucumbers, to the asparagus, to the herbs, the farmer's market did not disappoint. My head was spinning at the sight of some of the most beautiful fresh vegetables I had ever seen (okay, maybe a slight exaggeration, but you stay confined to your house for a week and let me know if any of your perceptions shift). Feeling energized and inspired I also bought some insanely gorgeous fresh-picked strawberries to use in a homemade strawberry ice cream recipe I had recently found (well maybe discretionary time on your hands isn't a completely bad thing). 


Tabbouleh is a classic, traditional Middle Eastern salad, generally made with bulgur, vegetables, and herbs. Whether or not everything out there on the web has any truth to it (really?), there are a few sites claiming the origins of this dish can be traced back to a rivalry between Caesar and Cleopatra. Allegedly they each requested a refreshing salad be created using fresh seasonal ingredients. Upon learning of the well-received, refreshing dish created for Cleopatra, one aptly named in her honor, Caesar demanded its' name be changed (one would think Caesar had more compelling things to do). In accordance with this 'legend', Caesar demanded the salad came be known as 'Tabouli'. Other than Cassius or Brutus how many others would dare risk crossing his will?


Unless you were born in, lived in, visited, or had relatives from Peru, Bolivia or anywhere in South America, you most likely grew up never having heard of quinoa (keen-wah) before. The popularity of quinoa has grown significantly here in the US within the last ten years. However, whatever amount of attention quinoa may now be getting, it is nothing in comparison to the popularity it had in 3000BC in the Andes mountain regions of South America. While it has yet to be as sacred or as mainstay as it was for the Inca Empire in 1200 AD, it has now become a presence on restaurant menus (and not only those claiming to be 'health food' ones). Additionally it is now readily available in most grocery stores.  Interestingly enough, this grain belongs not to the true grass family, but to the same family containing spinach, Swiss chard and beets. For that reason quinoa has often been referred to as a 'pseudocereal'. Way back in 1955 a researcher named Philip White published an article "Edible Seed Products of the Andes Mountains" stating 'While no single food can supply all the essential life sustaining nutrients, quinoa comes as close as any other in the plant or animal kingdom'. This now rediscovered obscure article has become one of the most referenced in articles, websites, and even food blogs.

Being this was the first time I was making quinoa I thought it would be wise to learn more about its' cooking method from others. After doing a bit of 'research', I went with a 2-1 water to quinoa ratio (along with a teaspoon of kosher salt). Two cups of water was brought to a boil, after adding the quinoa and kosher salt, the heat was reduced to a simmer and the pot covered. After 15 minutes of cooking time, I removed the pot from the heat and let sit for 5 minutes before draining. For this salad, 1/4 cup of freshly squeezed olive oil, 1/4 cup extra-virgin olive oil and 1 1/2 teaspoons of kosher salt were mixed into the drained quinoa. With the quinoa perfectly made, it had time to cool and come close to room temperature while I began chopping the vegetables and mincing the herbs.

My first reaction each time a recipe calls for freshly chopped mint, I sort of make a face. This would be a very different face to the one I make after I actually taste the completed dish (with the mint in it). So if you have mint avoidance tendencies, get past them. The mint enhances without at all overpowering the dish. And it would not be the same without out it. This salad will have you making a happy face.


Whether you blanch or grill the asparagus for this salad, I 'pretty please' suggest you do not leave it out. While not one of the vegetables in a traditional Tabbouleh, it adds great flavor and texture.

This is one of those can be made in advance salads. Just remember, the feta cheese is added right before serving.


Mix half of the feta into to the tabbouleh and sprinkle the remaining cheese over the top.


Again, feta may not be another of the 'traditional' tabbouleh ingredients but it is one complimentary to the flavors of the quinoa, vegetables and herbs. While I prefer sheep's milk feta, do a taste test of both a cow's milk and sheep's milk feta to decide which one you like best. Fresh feta can be found in most deli counters giving you the chance to taste before buying.


Perfect as a side salad to accompany chicken, grilled steak, and/or fish. Served with some large-sized grilled shrimp it transforms into a very satisfying meal. 

If by any chance you have never had Tabbouleh or quinoa before, let this be Quinoa Tabbouleh with Grilled Asparagus and Feta be your first. And it could end up being your only one as I think the ingredient choices and quantities are 'just right'. In the event your plans for the week ahead don't include going to a farmer's market, change them. Honestly, this salad made with the fresh seasonal ingredients is one worthy of making time for. Be ready for your family and friends to worship you in a manner befitting an Egyptian Queen.

Recipe
Quinoa Tabbouleh with Grilled Asparagus and Feta (recipe inspired by Ina Garten's Quinoa Tabbouleh with Feta in the Make It Ahead: A Barefoot Contessa Cookbook)

Ingredients
1 cup quinoa
2 cups water
2 1/2 teaspoons kosher salt, divided
1 teaspoons black pepper
1/4 cup fresh squeezed lemon juice (from one large or two medium lemons)
1/4 cup extra-virgin olive oil
1 cup thinly sliced scallions, green and white parts (approximately 5 scallions)
1/2 cup chopped fresh mint leaves
1 cup chopped fresh flat leaf parsley
1 large English cucumber, unpeeled and medium diced 
2 cups heirloom cherry tomatoes, halved through the stem (or regular cherry or grape tomatoes)
1 pound asparagus, grilled, cooled and cut into one inch pieces
4-6 ounces Greek (sheep's milk) feta, divided
Optional: 12-18 Large Grilled Shrimp

Directions
1. In a heavy bottomed medium saucepan, bring 2 cups of water to a boil.
2. Add the quinoa and 1 teaspoon of salt. Reduce heat to simmer, cover and cook for 15 minutes. Remove from heat and allow to rest for 5 minutes.
3. Drain, transfer to a bowl and immediately mix in the lemon juice, olive oil and 1 1/2 teaspoons of salt. Allow to come to room temperature.
4. In a large bowl, combine the scallions, mint, parsley, cucumber, asparagus, tomatoes, and 1 teaspoon of black pepper. Mix to combine.
5. Add the cooled quinoa mixture to the vegetable/herb mixture. Carefully fold in 1/2 of the feta, reserving the other half to sprinkle over the top of the salad. Note: If not serving immediately, cover and chill in the refrigerator, waiting to add feta until ready to serve.
6. Serve room temperature of chilled.
Note: To turn this salad into a main course, carefully arrange 12-18 grilled shrimp on top of the salad.


Herrick Lake Forest Preserve in Wheaton, IL