Wednesday, August 22, 2018

Black and Blue (berry) Clafoutis


There is a very long list of things I look forward to as summer starts to come an end and fall arrives. But my most anticipated BIG three are: (1) the release of movies most likely to be considered Oscar-worthy, (2) new book releases having compelling stories and/or written by some of my favorite authors, and (3) comfortably cool, low humidity days when the air-conditioning is turned off and the windows are finally opened again. Throw in fall apple picking season, the autumnal landscapes, crackling fires to take the chill off the day, and making homemade caramels again, and I get almost giddy just thinking about them. Much to my surprise, at least two of my favorite BIG three things, arrived early this year. While a shift in the weather wasn't one one of them, my Amazon book wishlist seems to grow almost daily and my consumption of movie theatre popcorn (a guilty pleasure) has increased significantly in the past couple of weeks. My preferences books and movies are somewhat similar in that they usually don't skew to the humor genre. I am more of a drama, fable, historical fiction, realistic fiction kind of girl. But after seeing the Rom-Com "Crazy Rich Asians" this past weekend, I may have to put humor back on the list. Have you seen that movie yet? OMG it is so-o-o-o-o crazy good, I almost want to see it again. You absolutely have to see it as there is more to this film than a love story. It might even be one of the contenders for the family Christmas movie this year. Fingers crossed it's out on DVD or available on demand when December rolls around.


As the glory days of summer come to an end, sadly so does the tomato, peach, and berry season. Which means I have to get my fix in for all of them before they have all but disappeared from the Farmer's Markets and grocery stores. At least overindulging in summer tomatoes, peaches and berries isn't such a bad thing. 

Four years ago I shared a recipe for a Cherry Clafoutis, a slight adaptation of a version shared by Williams-Sonoma. This time I am sharing a slightly altered version of Julia Child's recipe for this classic French custard-like textured dessert. Clafoutis, pronounced 'kla-FOO-tee' (or you can hear it spoken here), originates from the farming region of Limousin, France but didn't gained widespread popularity until the nineteenth century. The word clafoutis comes from the verb 'clafir' which means 'to fill'. Traditionally it is made with un-pitted cherries. Yes, unpitted. While not discounting the subtle almond flavor cherry pits give to the custard, today most Cherry Clafoutis are made with fresh pitted cherries. Seems risking someone choking on a cherry pit is considered slightly more important than a hint of almond flavor these days.


But Clafoutis purists might argue a clafoutis is not a clafoutis if it's made with anything other than cherries. Instead a clafoutis made with berries or any other fruit would be considered a flaugnarde. Although in her cookbook "Mastering the Art of French Cooking, Volume I", Julia Child refers to one made with blackberries or blueberries as "Clafouti aux Mures or Claufouti aux Myrtilles". Which means I feel safe calling this a Black and Blue (berry) Clafoutis.


With the creation of clafoutis being attributed to peasants and farmers, it is and is intended to be a simple dessert. How else would we consider a pancake batter poured over fruit and baked in an ovenproof dish anything else? Yet, as simple as it is to make, the mere presentation of a Clafoutis as a dessert makes it appear to be so much more.


The technique used here for assembling the clafoutis is different than one recommended by Julia Child. Instead of using a blender to whip up the custard's ingredients, I used a standing mixer with a whisk attachment. Additionally, I did not whip all of the custard ingredients at once. Using the technique from my Cherry Clafoutis recipe, I whipped the eggs and 1/3 cup of the sugar together for approximately four minutes (until they had almost tripled in volume) before adding in the flour, milk, cream, salt, and vanilla. With the exceptions of increasing the salt from 1/8 teaspoon to 1/4 teaspoon and using a milk/cream combination versus using milk only, I kept all of the other ingredient amounts the same as Julia's recipe. Well that's not completely true. I made one more ingredient exception. Instead of using 1 1/4 cups of all-purpose flour as she recommends for a clafoutis made with juicy, berry fruits, I used the 2/3 cup of flour amount from her Cherry Clafoutis recipe. After having made this Black and Blue (berry) Clafoutis I am not sure I would increase the amount of flour to the higher amount. Maybe I would use up to 3/4 cup of flour if the berries were overly ripe.


After buttering a heat proof dish (use an au gratin style or round pan), a quarter of the batter is poured into it. Instead of setting the pan over moderate heat on the stove top to allow the batter to develop a film, I placed the pan in a preheated 350 degree (F) oven for approximately 5 minutes. And then I sprinkled on the berries and the remaining 1/3 cup granulate sugar before pouring over the rest of the batter. 


The recommended baking time will range from 45 to 60 minutes, however, the size and depth of the pan will affect it. With the pan I used, my baking time was closer to the 45 minute mark.

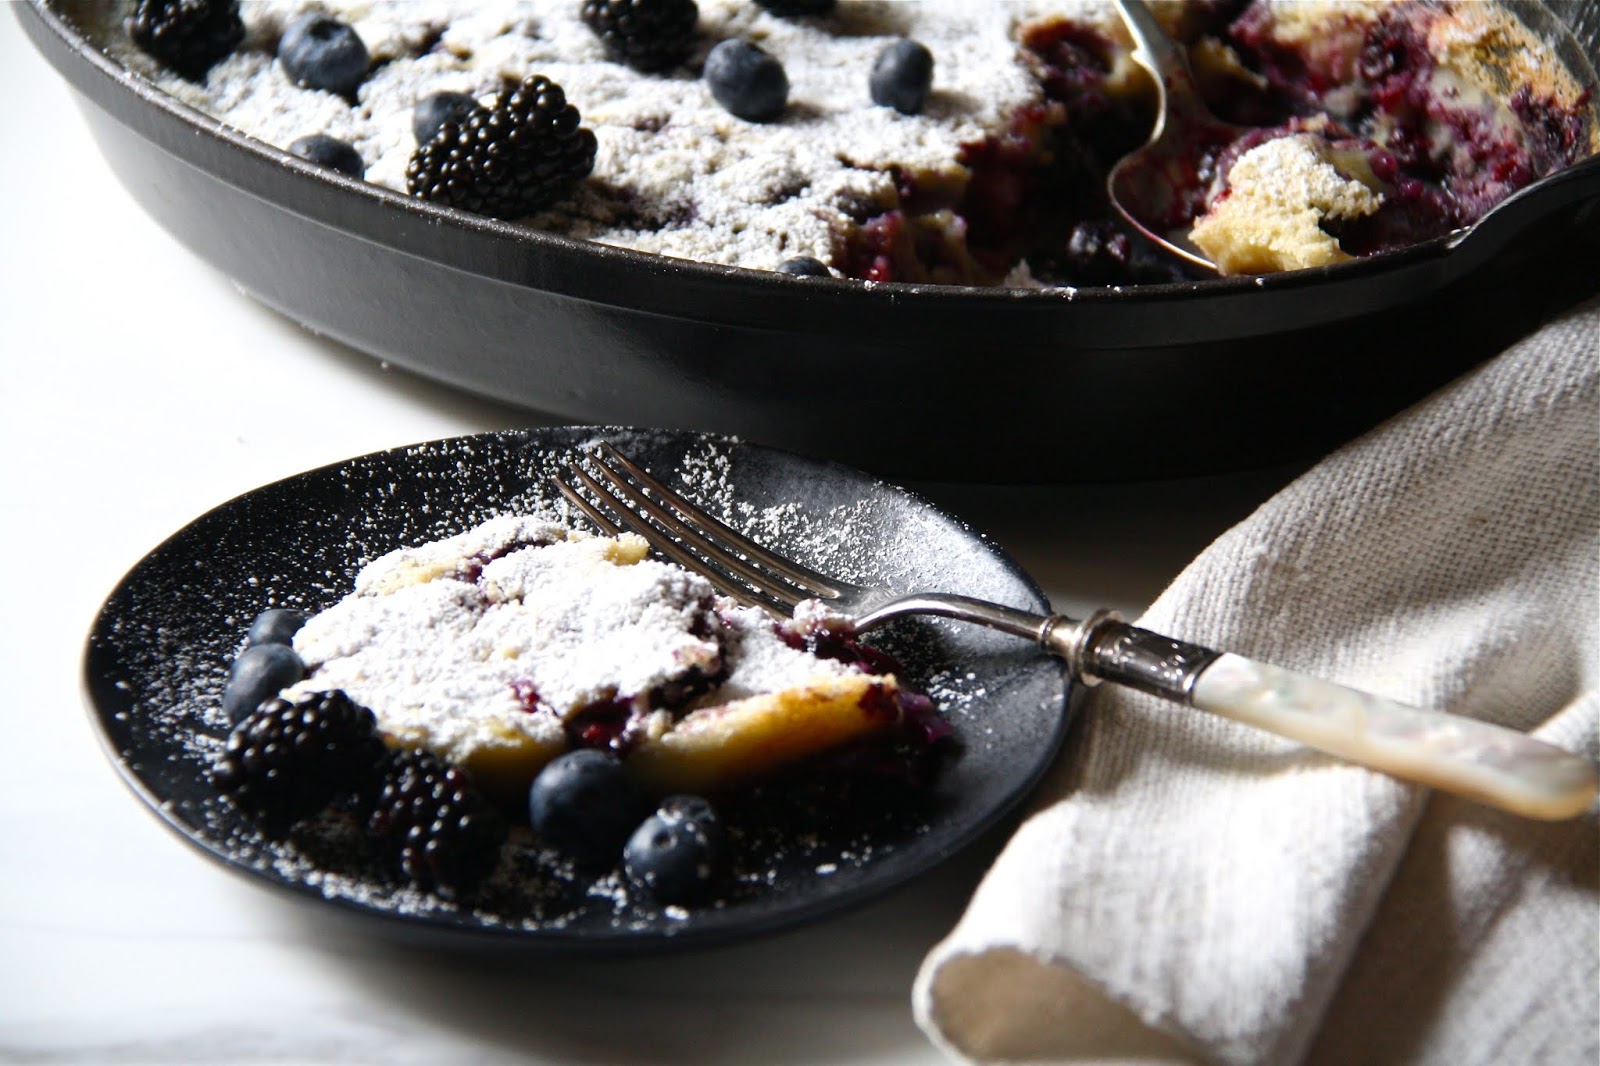
A clafoutis is intended to be served warm, not hot. Once removed from the oven, it can sit for 5-10 minutes before it is finished with a dusting of confectionary sugar.

But even after we finished our first helping of the Black and Blue (berry) Clafoutis, it was still delicious at room temperature several hours later. 


If you, anyone in your family, or any of your friends are big fans of custard-textured desserts, you need to make this Black and Blue (berry) Clafoutis.


I used a combination of fresh blueberries and blackberries, but it would be equally delicious using one or the other. Don't let the summer berry season come to an end without making this Black and Blue (berry) Clafoutis because it wasn't intended to be with frozen berries. Bon Appetit!

Recipe
Black and Blue (berry) Clafoutis (several alterations to Julia Child's Berry Clafoutis recipe as shard in her cookbook 'Mastering the Art of French Cooking, Volume I')

Ingredients
2/3 cup (134g) granulated sugar, divided
3 large eggs
3/4 cup whole milk
1/2 cup heavy whipping cream
1 Tablespoon vanilla
1/4 teaspoon sea salt or kosher salt
2/3 cup (87g) all-purpose flour
14 ounces fresh berries (mixture of blackberries and blueberries or use only blackberries or blueberries) Note: Do not use frozen berries.
Confectionary sugar for dusting

Directions
1. Preheat oven to 350 degrees (F). Butter a 10" baking pan or dish with deep sides and set aside.
2. In the bowl of a standing mixer fitted with a whisk attachment beat 1/3 cup of the granulated sugar and the eggs until light, fluffy, and has more than tripled in volume (approximately 4 minutes).
3. Add in the milk, vanilla, sea salt, and flour. Mix on medium speed to blend.
4. Pour 1/4 of the batter into the prepared baking pan. Place in oven and bake for 5 minutes or until a film forms on the batter.
5. Remove from oven. Sprinkle the berries evenly over the partially set batter. Then sprinkle the remaining 1/3 cup of sugar over the berries. Pour remaining batter over the berries. 
6. Return pan to oven and continue to bake for 45-60 minutes or until sides are lightly golden and clafoutis is set in the middle. Note: Size of the baking pan will either increase or decrease baking time.
7. Allow to sit for 5-10 minutes before sprinkling with confectionary sugar. Serve immediately. Note: The clafoutis is best served warm but it is delicious at room temperature.

Notes: (1) Instead of using both whole milk and whipping cream, can use whole milk only. If using whole milk only use 1 1/4 cups. (2) Instead of blackberries and/or blueberries, could also use freshly pitted cherries. (3) Check for doneness at the 40 minute mark. Again, the size of the pan will affect baking time.

Sedona, Arizona (March 2016)


Sunday, August 19, 2018

Chocolate Dipped Nutter Butter Cookies


"Remember that growth can feel uncomfortable sometimes-embrace the journey." This quote or rather should I say 'words of wisdom' appeared in my Instagram feed this week. Amazing how the universe delivers timely messages. The idea that growth comes from getting comfortable with being uncomfortable isn't just brilliant or should become one's personal mantra, it's true. How many of us have walked away from a stressful conversation and expected the next one to be less awkward? Avoidance of any difficult conversation almost never leads to healthier interactions or relationships. Rather it can be damaging in both the short and long term. Conversely, how many of us have realized while engaging in one of those hard conversations we discover new perspectives or flaws in our own thinking? When this happens, we not only deepen our connections with others, we experience growth in our own emotional intelligence. The perfect win-win.

How many of us have not given it all we have in our workouts or runs and expected to perform as good as or better than our last personal best? Unless you are superhuman, reaching new performance goals requires a significant amount of grit and investment of time. Or doing what can sometimes make us feel uncomfortable. Having some focus and a fair amount of determination can enable us to get through those moments when we feel mentally and physically challenged. As I get older I seem to be more aware of those uncomfortable moments. For me, whether it's yoga or running, being part of a group has helped my mind and body deal with discomfort differently. More often than not, I am able to push myself further than if I was alone. But whether surrounded by friends or going solo, I hope someday to no longer let humidity undermine me.

In a relatively recent Forbes article (2016) "Why Feeling Uncomfortable is the Key to Success", the author shared that improvement in performance, creativity, and learning happens when you allow yourself to experience uncomfortableness. Routines in one's life might make you feel more comfortable and in control, but as it turns out they only dull one's sensitivities. In other words, only good things happen in the short and long term when we get outside of our comfort zones. A Fast Company article (2018) "5 Ways Unfamiliar Experiences Sharpen Your Emotional Intelligence" provided a short summary of some of the key benefits of uncomfortableness. While all five ways can have an impact, getting outside of one's comfort zone not only aids in imagining and weighing possibilities previously discounted (or not considered) is the one seemingly to have the greatest impact on emotional intelligence. At least that was my takeaway. Choosing to avoid uncomfortableness is like choosing a life free of growth.


For as much as I cook and bake, there are still recipes and techniques which put me outside of my culinary comfort zone. In spite of buying one of the most beautiful paella pans I have ever come across, I have yet to make it. The pan has been collecting dust for years. And for more than likely a not very good reason, I have (unfairly) elevated the making of paella to a high degree of difficulty. While I have made homemade bread, pasta, and ice cream in the past, these things too are ones I don't often tackle. Again, there isn't a good reason for avoiding them. Fear of failure is never reason enough to avoid what we find challenging. While I do venture outside of my culinary zone of comfort more than most, I also try to keep from routinely making the same things again and again by playing around with new recipes closer to my wheelhouse. Cookies are one of the things I get a great deal of pleasure in making. But not all cookie recipes are 'a piece of cake'. 

At first glance, the number of steps in the directions alone for Stella Parks recipe for Homemade Nutter Butter Cookies shared in her cookbook "Bravetart: Iconic American Desserts" look a little daunting. Even for me. Throw in the need for a uniquely shaped cookie cutter and it might be a recipe even the most fervent of peanut butter lovers might put on the 'maybe someday' rather than the 'definitely now' list. To get to 'now rather than later, someday, or never' I decided I didn't need to make cookies in the traditional peanut shape. Because no one ever said a Nutter Butter Cookie couldn't be a Nutter Butter Cookie if it didn't look like a peanut. Right? 

I am one of those who actually like making cookies requiring the dough to be rolled out and cut into shapes. Not because I am glutton for a cookie recipe with extra steps or have a significant amount of discretionary time in my life, but because any reason to help me justify the expense and time I put into collecting of antique cookie cutters is a worthy one. However, this recipe wasn't just a roll out and cut out one, it was a roll out, cut out, and score one. Ideally, the diagonal scores should create symmetrically perfect diamonds. But again, who says there can't be perfection in a bit of imperfection? I happen to be a big fan of 'imperfection is good thing' way of thinking.


There is nothing unusual in the ingredient list for these cookies. Some are simply a matter of personal preference. I happen to be a JIF peanut butter fan, so creamy JIF peanut butter it would be. My loyalty to a specific brand of all-purpose flour can be recipe or recipe creator dependent. For these Chocolate Dipped Nutter Butter Cookies I heeded the recommendation of Stella Parks and used Gold Medal all-purpose flour. But do I think they wouldn't be as good using another  all-purpose flour? Nope.


Like Amy's Shortbread Cookies, this is one of the easiest doughs to make and roll out. If rolling out dough makes you a bit uncomfortable, this is the cookie to help you work through it. I loved, loved working with this dough! In other words, these Chocolate Dipped Nutter Butter Cookies (with and without the dipping of chocolate) are going to be making regular appearances in the months ahead.


The cookies (aka wafers) bake in a preheated 350 degree (F) oven for approximately 14-15 minutes or until lightly browned and firm to touch. When cooled the wafers will have a crispy, crunchy versus soft consistency. Sort of like a shortbread texture. Note: Baking time might vary depending on the size of the cookie cutter used. The wafers/cookies need to cool completely before the luscious peanut butter cream is piped on to them.


Okay, let's talk about this peanut butter cream. It might seriously be the best nutter butter cookie filling ever! It's not too sweet, it's oh so creamy, and has the perfect peanut butter flavor to it. As delicious as the peanut butter wafers/cookies are on their own, you need to make these Chocolate Dipped Nutter Butter Cookies for the peanut butter cream. 


I didn't think there would be enough peanut butter cream to pipe onto the wafers/cookies, but there was. There was even a bit left over to savor all its' own. I piped about a tablespoon of peanut butter cream onto each cookie (my cookies were larger than the ones in the recipe). Using a pastry bag or ziplock bag versus spreading the cream with a spoon helps to create a more even, beautiful cream edge. If making smaller cookies, you will use less peanut butter cream.

Once you pipe the peanut butter cream on the wafers/cookies and sandwich them together, you are almost done. Putting them in the refrigerator for about 15 minutes helps set the cream. Once set, remove from the refrigerator, let come to room temperature and serve. Or.......


Melt some dark or milk chocolate and dip the top half of each cookie into it. 


I dipped the cookies after they were completely sandwiched together because I didn't want to smudge the chocolate had I dipped the top (unsandwiched) wafer first. Choose whichever dipping method works for you or pushes you outside of your comfort zone.


Everyone loved these Chocolate Dipped Nutter Butter Cookies! And at least one friend said the store bought version of Nutter Butter Cookies USED to be her favorites. Homemade versions of our childhood favorite cookies rarely live up to our memories or expectations. However, these exceeded them! So, if (cookie) familiarity is what makes you comfortable, I challenge you to move outside of your comfort zone and make these absolutely amazing, swoonworthy, seriously delicious, borderline addictive cookies! Make them with or without the chocolate. I will leave that decision up to you.

Recipe
Chocolate Dipped Nutter Butter Cookies (an ever so slight change to Stella Parks Homemade Nutter Butter Cookies from her cookbook "Bravetart: Iconic American Desserts")
Makes approximately 34-36 wafers or 17-18 sandwich cookies using a larger sized cookie cutter. Recipe will make 30-35 2 1/4" round sandwich cookies.

Ingredients
Wafers
2 cups (9 ounces, 256g) all-purpose flour, sifted
6 Tablespoons (3 ounces) unsalted butter, room temperature
1/3 cup (3 ounces, 86g) creamy peanut butter
1 cup (7 ounces, 200g) granulated sugar
1/4 teaspoon baking soda
1/4 teaspoon kosher salt
2 large egg whites, beaten with a fork until frothy

Peanut Butter Cream
6 Tablespoons (3 ounces) unsalted butter, room temperature
1/3 cup (3 ounces, 86g) creamy peanut butter
1 Tablespoon honey
1 teaspoon vanilla
1 cup (4 ounces 115g) confectionary sugar, sifted
Pinch of sea salt (or 1/4 teaspoon kosher salt)

Optional: 7-8 ounces milk or dark chocolate

Directions
Wafers
1. Preheat oven to 350 degrees (F). Line two baking sheets with parchment paper and set aside.
2. In the bowl of a standing mixer fitted with a paddle attachment, combine the peanut butter, sugar, baking soda and salt. Mix on low to moisten, then increase to medium-high and beat until light and fluffy (approximately 5 minutes.
3. Add egg white mixture into the batter in four additions, letting each incorporate before adding the next.
4. Scrape the bowl with a spatula.
5. With the mixer on low, add flour in slowly and beat until fully incorporated.
6. Remove batter from bowl, shape into a ball, and cut into two pieces.
7. On a lightly floured surface, roll the dough out to an 1/8" thickness.
8. Using a cookie cutter, cut and arrange on the prepared baking sheets. Note: Leave at least a half inch between cookie.
9. Using a flat edged pie scraper, gently score the wafers, creating a diamond pattern. Note: Press gently into the cookie until you see an indentation.
10. Bake for approximately 14-15 minutes or until the wafers are lightly browned and firm. Remove from oven and let sit on baking sheet for 5 minutes before transferring to a wire rack to cool completely.

Peanut Butter Cream
1. In the bowl of a standing mixer fitted with whisk attachment, combine peanut butter, honey, vanilla, and salt. Mix on low speed to moisten.
2. Slowly add the confectionary sugar. Once fully incorporated, increase speed to medium and beat until the cream is soft and light (approximately 5 minutes).

Assembly
1. Using a pastry bag or ziplock bag, pipe about 1 Tablespoon of the cream on one half of the wafers. 
2. Place another wafer on top to create a sandwich.
3. Transfer cookies to the refrigerator for up to 15 minutes to let filling set.
4. Melt chocolate over a double boiler and/or in the microwave. 
5. Dip the top side of half of each cookie and place on parchment paper to set. Let chocolate set completely before serving.
6. Cookies will keep up to 1 week at room temperature or up to a month in the refrigerator. Serve at room temperature.

Notes: (1) I weighed all of my dry ingredients. (2) I used Gold Medal all-purpose flour and JIF peanut butter. Use a commercially made versus homemade or natural peanut butter to make both the dough and cream easy to handle. (3) These Nutter Butters are delicious with and without the chocolate. Don't let the melting and dipping them into chocolate prevent you from making them. Once you taste these, you will never eat another packaged Nutter Butter Cookie again. (4) The original recipe called for the use of a 3" peanut shaped or bikini shaped cookie cutter. I used a larger sized cookie cutter which reduced the cookie yield.

Murals in Key West, Florida (July 2018)


Monday, August 13, 2018

Cherry Tomato Confit


On Sunday morning I went with a couple of my friends to an outdoor sculpt yoga class in a park. Now having had this experience, I am kicking myself for waiting so long this summer to join in with another hundred or so fellow yoga lovers to find zen under the canopy of a sunny, blue sky on a warm summer day. Already I am dreaming of making a trip out to Red Rocks in Colorado to take one of the summer series Saturday morning yoga classes held there. The views and elevation alone will more than likely take my breath away. With outdoor yoga classes essentially in my own backyard, why would anyone travel all the way to Colorado for one? If you have ever been to Colorado and/or to Red Rocks, you know the answer to that question. If you haven't been to one or the other, close your eyes for a moment and imagine the deepest blue sky. Now pair that image with doing something you love in an open air amphitheater surrounded by ochre sandstone mountains. Not there yet? Okay, now imagine pushing your body to its' physical limits in almost perfect weather conditions (aka sun and no humidity). Can you understand why I feel the urge to make this pilgrimage west just to take an hour yoga class? Would it help if I told you Colorado is my second happiest place on earth? 

But taking just one one outdoor yoga class next summer wouldn't be enough. I also plan to return to next year's outdoor summer yoga classes, the ones available within a twenty-minute drive from my house. Hopefully every one in the posse will be there with me. Like running, a great meal, or incredible bottle of win, going to yoga is always more fun when it's a experience shared with your friends. 


When you hear the word confit, one of the first words first coming to mind might be duck confit. And up until recently 'cherry tomato confit' was not in my culinary vocabulary. A word with French origins but with a Latin derivation (conficiere), confit means 'to preserve'. Used primarily as a method of preservation, the word confit could be applied to any kind of food cooked in oil or fat over a long period of time and at a low temperature. While our need to preserve foods has changed considerably over the last couple of centuries, our desire to optimize flavor might be a better characterization of food preparation in the 21st century. The flavorfulness of meats, garlic, fruits, and yes, even cherry tomatoes can be dramatically enhanced through the process of a long, slow, simmering or roasting process. With very little effort and a fair amount of time, you can create the most luxurious confits. And, with the abundance of those vine ripened cherry tomatoes now found in gardens and at Farmer's Markets, cherry tomatoes can be transformed into even sweeter, more delicate, and intensely flavorful bites of deliciousness using the methods of confit.


Ripe cherry tomatoes, garlic, fresh thyme, fresh rosemary, and some sea salt transform olive oil into liquid gold. And the olive oil, fresh herbs, sea salt and long, slow roasting process turn the cherry tomatoes into food for the gods. If you think these metaphors are simply exaggerations on my part, ones used only to encourage you to make this Cherry Tomato Confit, you would be partly mistaken. Yes, I want you to make it. But seriously I am not exaggerating. Not in the least bit.

Run, don't walk out to your garden to harvest your cherry tomatoes or to get to the next available Farmer's Market near your home to buy them. Heck drive 20 miles if you have to. There is less than two months of the summer tomato season left. Which means if you don't make this now (as in the next week) you won't be able to make it again and again in the coming weeks. And if you wait until the summer cherry tomato pickings are slim, you are going to be kicking yourself for the next eleven months for procrastinating.


It's been quite awhile since I put any of the recipes on the blog into the elusive 'last meal' category. This Cherry Tomato Confit has now been officially put on that list.

There are number of ways you can use this Cherry Tomato Confit. Here are some options: (1) Toss with pasta or spiralized zucchini, (2) Use in making Bruscetta, (3) Serve with loaf of a dense loaf of Italian or French bread, (4) Put on a cheese platter, (5) Serve as condiment with grilled meats, chicken or fish, and/or (6) Spread on top of crostini slathered in some burrata or herbed cheese. Or just eat them out of the pan or the jar. Note: The flavor of this Cherry Tomato Confit is amplified when it is warm out of the oven, warmed in the microwave or in a pan, or at room temperature.


More often than not, the time spent browsing through and/or reading cookbooks, cooking magazines, and foodblogs along with scrolling though Instagram for far too much time even I am willing to admit, has its' rewards. The recent discovery of Cherry Tomato Confit was like winning some kind of summer food lottery or finding the holy grail. This unearthing of this dish slightly lessened my guilt over my discretionary time priorities. The recipe shared below comes from a blend of multiple sources although I really have to give the inspiration credit to the Cherry Tomato Confit recipe from the foodblog ful-filled. And just as that one did for me, I hope my version of a Cherry Tomato Confit recipe inspires you.

Recipe
Cherry Tomato Confit (inspired from several sources)

Ingredients
2 pounds (900g) cherry tomatoes, washed, dried, and stems removed
1 cup extra-virgin olive oil
6 large cloves of garlic, peeled and left whole
6 sprigs of rosemary
8-10 sprigs of fresh thyme
Generous pinch of sea salt

Directions
1. Preheat oven to 250 degrees (F).
2. Place tomatoes and garlic cloves in a large (9"x12" or 9"x13") baking pan. 
3. Pour olive oil over and toss gently to coat.
4. Intersperse thyme and rosemary sprigs into the mixture, leaving some of them on top.
5. Bake for 2 hours at 250 degrees (F). Increase oven temperature to 275 degrees (F) and continue baking for 1 hour or until tomatoes look wilted but remain intact.
6. Remove from oven and remove herb sprigs.
7. Either let cool to room temperature before pouring the tomatoes, garlic and oil in tightly sealed jars and placing in the refrigerator for later use. Or use immediately. The Cherry Tomato Confit will last up 2 weeks in the refrigerator if kept property covered.

Notes: (1) Use a colorful combination of cherry tomatoes if you can find them or have them. Otherwise choose red cherry tomatoes. (2) Before using the refrigerated Cherry Tomato Confit, bring to room temperature. Alternately reheat to room temperature in the microwave on on the stove to reheat until warm. (4) To make the Pasta tossed with Cherry Tomato Confit, use 3/4 of the confit with one pound of pasta (or adjust accordingly to the amount of pasta used). In a large pan, add the cherry tomato confit to heat up. Add in the cooked pasta and cook until the sauce has coated the pasta and the entire mixture is warm-hot. Stir in 1/2 cup of grated parmigiano-reggiano cheese and keep on heat until the cheese is melted. Transfer to a large serving platter, top with additional grated and shaved cheese and fresh basil. Serve immediately.


Stormy day near the Broken Bridge, Florida Keys (July 2018)


Saturday, August 11, 2018

Sweet and Spicy Refrigerator Pickles


The first time I went to the Brimfield, a six day antiques extravaganza in Massachusetts held three times a year, I was deliriously happy and overwhelmed, but on a mission. Antiques set up in tents across acres of open fields and ranging in both quality and price can cause even the most seasoned antiques collector's head to spin. While it can be both a physically and mentally exhausting day (or days if your resolve and pocketbook can handle it), it can also be exhilarating. Especially when you find something or many somethings making your heart race. Like an antique carpet in mint condition, or vintage dresser still with its original large, unchipped glass knobs, or pewter plates in perfect condition. My next trip to Brimfield will be in September. With my niece moving into her very first apartment near Boston, this time the mission will be to try finding both functional and decorative items to create the most beautiful living space possible. I only hope she knows what asking me to help her decorate her apartment means! And if by chance as we walk through the fields, I can find a few things to add to any of my collections, things I can carry back with me on a plane, we should both leave there deliriously happy. And she and her roommate will have the start of a fabulous living space.


When I decided to make these Sweet and Spicy Refrigerator Pickles I thought some of antique canning jars lovingly collected over the years might like to get some use. They have been sitting on shelves in a closet in a basement for awhile now. Seeing the light of day only occasionally.


The pickling cucumbers at this week's Farmer's Market were absolutely gorgeous. After buying several pounds of them, I could hardly wait to get home to start making pickles. If you have never had or made homemade pickles before, these Sweet and Spicy Refrigerator Pickles are the least labor intensive and best ones to start and maybe end with. They are slightly sweet, have a little bit of the kind of heat that sneaks up on you after your second bite, and have the perfect crunch. Even those who claim not to be pickle fans will find themselves eating them.


Making pickles, especially refrigerator pickles, is actually easier than you might think. But it all starts with buying the best pickling cucumbers you can find. Look for ones ripe but still firm and as unblemished as possible. Carefully wash and dry them before you begin cutting them into generous 1/4" rounds. Be sure to throw away the ends.

After the pickling cucumbers, the brine and aromatics are the two other critical elements to determining the pickles flavor. The base for the brine used to create these Sweet and Spicy Refrigerator Pickles is made with apple cider vinegar, water, sugar, and kosher salt. As much as we all like to tinker with recipes, changes made to pickle recipes could put your pickle making efforts in the 'effed up' category. If you don't have kosher salt or apple cider vinegar before you start making these pickles, take a quick trip to the grocery store. I promise that trip will be worth your time and energy. 


Intensifying the brine's flavor are peppercorns and mustard seeds. I used black peppercorns but you can also use the multi-colored variety. Before adding the peppercorns and mustard seeds to the brine, rough them up a bit with a mortar and pestle to make it easier for their flavors to be released in the brine solution. If you don't have a mortar and pestle, put them in a ziplock bag and pound them with hammer or mallet to slightly crush them. You don't want them pulverized, so don't put them in the food processor. They just need to be roughed up a bit.


In addition to the brine ingredients, these Sweet and Spicy Refrigerator Pickles even more flavor from jalapeño peppers, sweet yellow onions, dried dill, and a couple of sprigs of fresh dill. Slices of onion are first layered on the bottom on your canning jars, followed by your pickling cucumber slices. After cutting and seeding the jalapeño peppers, insert them along the sides of the jar. Note: Cut each of your jalapeño peppers into six pieces. Try putting your pickle slices in horizontally, but be careful not to pack them too tightly as you want the brine to be able two swirl around them. As you can see, some of my pickle slices were standing up and that's all good. Before adding the brine to the jars, top each jar with a teaspoon of dried dill.


To make the brine, place the apple cider vinegar, sugar, water, salt and ever so slightly crushed spices in a heavy bottomed medium sized pan. Bring the mixture to a boil over medium-high heat, stirring to ensure all of the sugar melts. Once the brine has reached a boil and all of the sugar has melted, begin ladling or pouring it into your prepared jars. Work to ensure each jar has the same amount of peppercorns and mustard seeds. There should be enough of the brine to completely cover all of the pickling cucumbers yet leaving at least 1/2" of space at the top of the jar. 


Allow the jars to cool (uncovered) for thirty minutes before topping with a spring or two of fresh dill sprigs. Then seal the jars with the lid and place in the refrigerator. Note: I gently shook each jar of the pickles before placing the refrigerator to help distribute the spices.


In only 24 hours your Sweet and Spicy Refrigerator Pickles are ready to be devoured. Use them as a condiment on sandwiches or burgers, serve as a side dish to grilled chicken/steak, put in a bowl on cheese or charcuterie board, or just munch on them as a snack. There are endless ways to enjoy them! Note: Pickles will keep in the refrigerator at least two weeks in their covered jars. But I seriously doubt they will last that long.


I have made these Bread and Butter Pickles and these Zucchini Pickles, but these Sweet and Spicy Refrigerator Pickles are my new favorites. They pack the most delicious flavor, have a great crisp texture, require no special canning equipment, and are incredibly simple to make. In other words, they are AWESOME! 

These Sweet and Spicy Refrigerator Pickles received the seal of approval from not only the pickle discerning person who shall remain nameless, but a half dozen of my friends. Would you believe it if I told you everyone ate the entire small tasting bowl of pickles before cutting into birthday cupcakes? Well it's TRUE! If you are looking for the most scrumptious pickle recipe, you have found it. Today is your lucky day! And an even luckier one awaits you.

Recipe
Sweet and Spicy Refrigerator Pickles (inspired from multiple sources)
Makes 3 quarts

Ingredients
3 pounds pickling cucumbers, cut horizontally into generous 1/4" circles (ends removed)
1 medium sweet or yellow onion, cut into slices
4 Tablespoons whole mustard seeds
3 Tablespoons whole black or mixed variety peppercorns
2 large or 3 medium sized Jalapeño peppers, seed removed, and each cut into 6 slices
3 cups apple cider vinegar
1 1/2 cups water 
2 cups granulated sugar
3 Tablespoons kosher salt
3 teaspoons dried dill
Optional: fresh dill springs

Directions
1. Clean and dry three quart jars. Set aside.
2. Evenly divide the sliced onion between the three jars. 
3. Equally divide the sliced pickling cucumbers between the jars. Pack horizontally as much as possible.
4. Slip the slices of Jalapeño peppers alongside the pickling cucumbers.
5. Top each jar with one teaspoon dried dill.
6. Place the peppercorns and mustard seeds in a mortar. Use the pestle to slightly crush the spices. 
7. In a medium sized heavy bottomed saucepan, combine the apple cider vinegar, sugar, water, kosher salt, and crushed spices to make the brine. Bring mixture to a boil over medium-high heat, stirring to ensure the sugar dissolves. 
8. Pour the brine evenly over the three jars, trying to evenly distribute the spices. Note: To help with the even distribution of spices, remove the spices using a small strainer or slotted spoon, and evenly spoon over each jar.
9. Allow the jars to cool for 30 minutes. Once the jars have cooled slightly (they should not be hot), top with a couple of sprigs of fresh dill, cover with their lids, and place in the refrigerator for 24 hours.
10. Open the jars and enjoy!

Notes: (1) Use one quart jars when making these pickles. If you have six half-quart jars, distribute onions, pickling cucumbers, jalapeño peppers, dried dill, spices and brine evenly. (2) If you like a lot of heat in your pickles, don't remove all of the seeds from the jalapeño peppers. 


Midwest Farmer's Market Finds (August 2018)