Monday, November 20, 2023

Herbed Stuffing


With Thanksgiving just days away, many of us are already anticipating the first bite of our favorite holiday foods. Often it's a specific side dish or dessert. But sometimes it's the combination of flavors on our plates we look forward to eating. While I can't say with absolute certainty, I would however venture to say many of us can hardly wait to enjoy a heaping helping of stuffing. Whether it's adorned with a healthy spoonful of gravy or not, stuffing is almost always the real star on Thanksgiving tables across the country. 


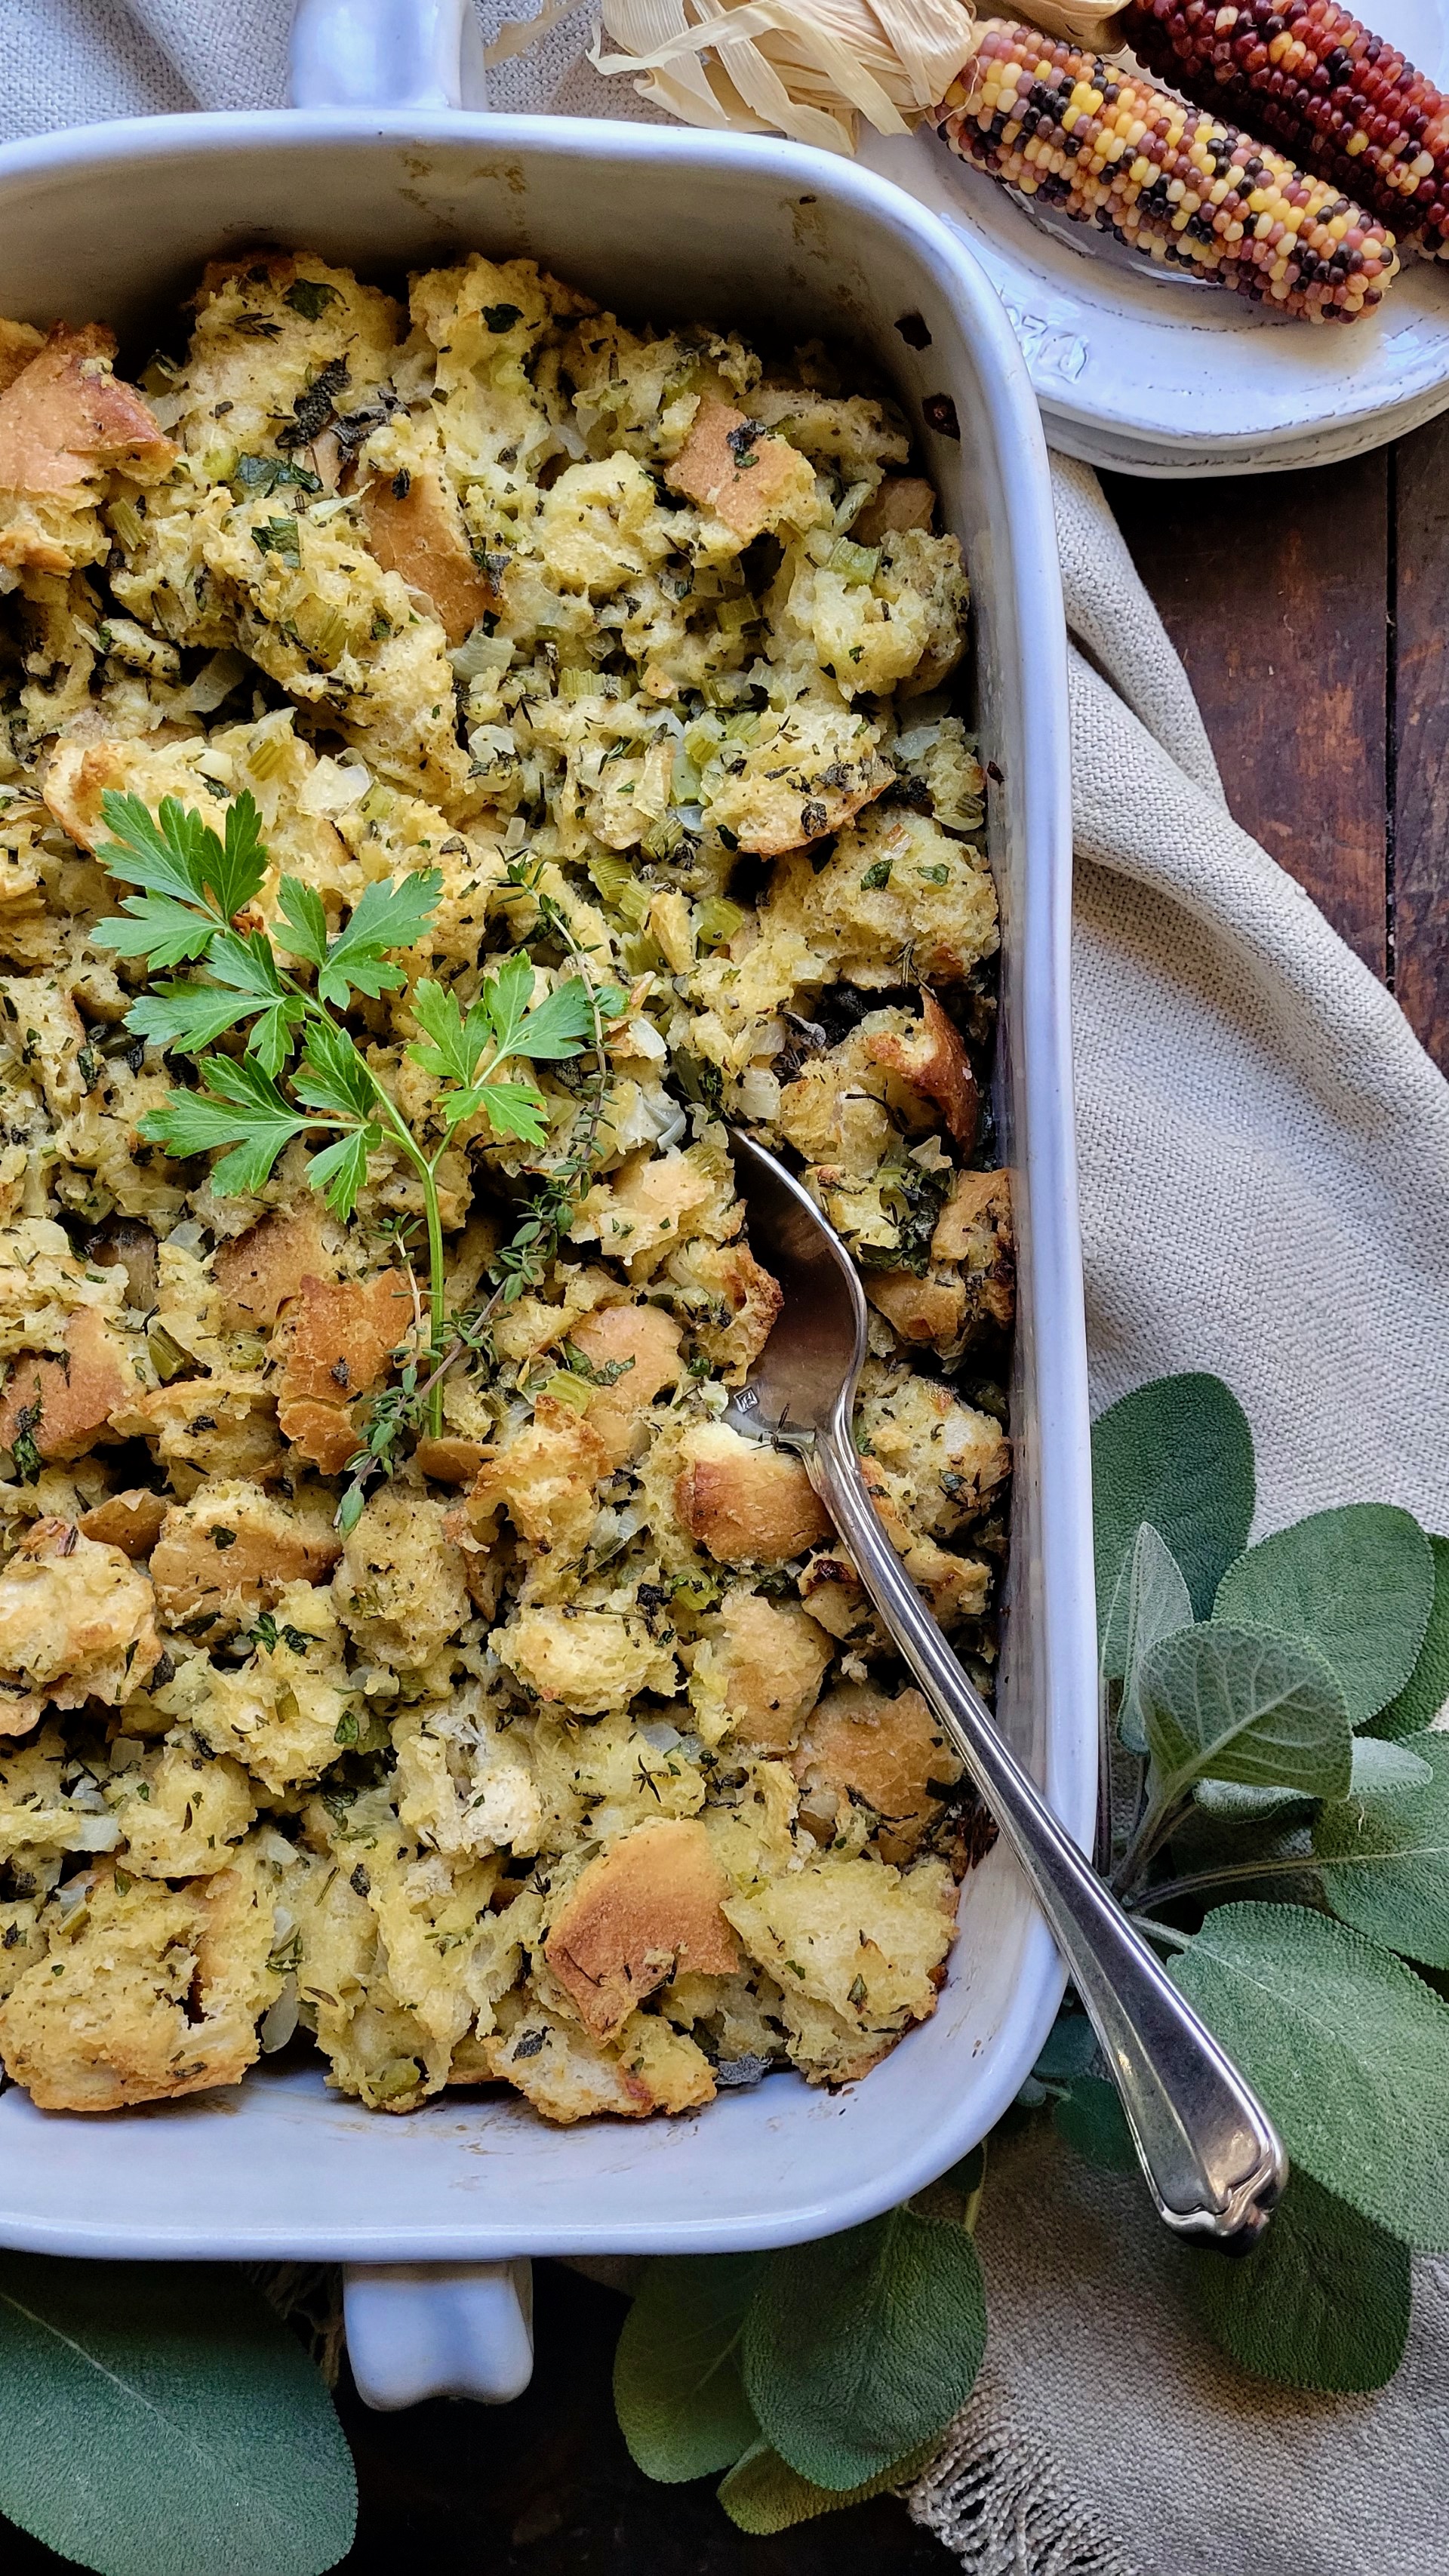
If you grew up devouring an herby, buttery bread stuffing on Thanksgiving Day and making sandwiches with it the day after, it's probably the one you love best. I have nothing against cornbread or meat stuffings. But in all seriousness, nothing compares to the depth of flavor only a bread stuffing made with fresh herbs can deliver. Especially one with a crispy, crunchy exterior and moist, custardy like interior. Which means to make a best of both worlds stuffing, it must be baked outside of the turkey.


To achieve that rustic, homemade look, a loaf of a Tuscan or Hearty White Country Bread must be torn up into one inch, craggy edged pieces. Not cut into cubes. The days of letting your torn up pieces of bread dry for days are over. Baking the bread pieces in a 250 degree (F) oven for about an hour will not only dry out the bread, but will turn it into crispy pieces of deliciousness.

For the most herbaceous stuffing, only fresh herbs will do. Dried herbs won't do this stuffing justice. In other words, there are no recommended substitutions for the fresh herbs. Parsley, sage, rosemary and thyme chopped up and mixed in with the bread, sautéed onions and celery, Kosher salt, pepper, chicken broth and eggs create a stuffing so insanely delicious you will find yourself wondering why you don't make stuffing year round. Or at least when you are serving a roasted (homemade or store bought) chicken or a grilled ribeye.

If you want to make your own chicken broth you can. But a really good quality chicken broth can be found on your grocery store shelves.


To achieve its' craveworthy crispy, crunchy and moist, almost custardy textures, the Herbed Stuffing is first baked covered for 40 minutes, then uncovered and baked for another 35-40 minutes. This two part baking process is key to making the most feast worthy stuffing.


If there was ever an Herbed Stuffing standing head and shoulders above all others, this would be the one. From taste to texture, it has all of the bells and whistles a classic, impressive bread stuffing should have. 


If there is one new dish you bring to or swap out at your Thanksgiving table this year, let it be this Herbed Stuffing. Because no matter what dessert you serve this year, I promise everyone will be talking about this stuffing. You just need to hope you have a bit leftover so you can enjoy it the day after along with a few slices of turkey, some gravy, a scoop of mashed potatoes, and/or maybe cranberry chutney (or sauce).

Happy Thanksgiving wishes and blessings to all of you!


Recipe
Herbed Stuffing
Serves 8

Ingredients
20-22 ounces good quality day old hearty white bread (unsliced) loaf (see notes), torn into 1 inch pieces
3/4 cup (170g) unsalted butter
2 1/2 cups (325g) chopped yellow onions (from one large onion)
1 1/2 cups (197g) chopped celery (from 4 large stalks)
1/2 cup chopped fresh flat leaf parsley
2 slightly heaping Tablespoons fresh sage, chopped
1 Tablespoon fresh rosemary, chopped
1 Tablespoon fresh thyme, chopped
2 teaspoons Kosher salt
1 teaspoon black pepper
2 3/4 cups chicken broth, divided
3 large eggs
Butter for preparing the pan

Directions
1. Spread the torn pieces of bread out on a large rimmed baking sheet. Bake at 250 degrees (F) for one approximately hour or until dried out and lightly golden on the edges. Let cool.
2. Increase the oven temperature to 350 degrees (F). Generously butter a 9" x 12" baking dish. Set aside.
3. In a large skillet melt the butter over medium heat. Add in the onions and celery. Cook until the vegetables are softened and lightly golden (approximately 10 minutes).
4. In a large bowl, combine the bread, sautéed onions and celery, parsley, sage, rosemary, thyme, Kosher salt, and black pepper. 
5. Heat 1 1/4 cups of the chicken broth until warm to the touch. Pour the warmed broth over the ingredients in the bowl. Mix well. Let cool slightly.
6. Whisk together the remaining (unheated) 1 1/2 cups chicken broth and eggs together. Pour over the mixture. Mix well. You can use your hands here!
7. Transfer the stuffing to the prepared dish. Cover with aluminum foil. Place dish on a baking sheet and place in the preheated oven. Bake for 40 minutes.
8. Remove the foil and continue baking for an additional 40-45 minutes or until the stuffing is set and the top is crispy and golden brown.
9. Serve and savor.
 
Notes: (1) Look for a larger sized Tuscan or Country Style White Loaf in your grocery store.  If you buy a 20-22 ounce loaf, you will not need all of it. If you can only find 16 ounce loaves of bread, you will need two but will have leftovers to use for making sandwiches or toast. (2) Stuffing can be made a day ahead. Take out of the refrigerator at least one hour prior to baking. Bake as directed. (3) If you like a sage-y stuffing, use up to 3 Tablespoons of freshly chopped sage. 

Thursday, November 16, 2023

Popovers with Strawberry Butter

For those of you who grew up savoring the classic popover at your Thanksgiving or Christmas dinner tables, consider yourself both blessed and lucky. My first bite of a popover didn't come until well into my adulthood. Way back when, Neiman-Marcus took the concept of the bread basket to the next level by serving a small basket of popovers at lunch. The light, airy, crunchy on the outside, yet slightly hollow and soft on the inside popover was one of the most heavenly bites I ever had. At the time, I was convinced those swoonworthy, lofty popovers had to be one of the most difficult things in the world to make. Yet, after doing a bit of research I discovered they were well within my reach. 


Making the most gorgeous, high topped, golden, scrumptious popovers requires only a little bit of patience and following a few rules. The patience portion is two fold. Allowing the mixed batter to rest for 15-30 minutes before baking and not opening the oven door at any time during the 30-32 minute baking process. 

There are a few other rules for making the most perfect popovers. They involve both the ingredients and baking process. One of the keys to the lightest, airiest popovers is room temperature eggs and milk. Taking your eggs out of the refrigerator the night before will ensure they are popover batter ready. Heating the milk over low heat in a pan until just barely warmed is one of the safest ways to get your milk to room temperature. Mixing your room temperature ingredients in a blender rather than whisking by hand helps to ensure you have a lump-free batter.


Another important key to a making a perfect popover is heating the popover pan in the preheated 450 degree (F) oven for five minutes before either brushing the wells with melted butter or spraying with canola oil. The butter and/or oil promotes browning. The moment the room temperature batter hits the hot metal, steam begins to form. As a result the hot pan creates the ideal environment to maximize the amount of steam. And it's that steam that helps push the batter upwards while also creating the soft texture and partially hollow interior.

Steam is your friend only during the baking popovers. As soon as the popovers come out of the oven, insert a sharp knife into the top of popover to let the steam out in order to prevent the popovers from collapsing. Releasing the steam will not only help the popovers keep their shape, it helps ensure you don't end up with a soggy popover.

Popovers are traditionally baked in a popover pan. Their straight sides and taller, skinnier cups are the shape producing the best desired, most dramatic effect. However, popovers can also be made in a muffin pan. While the popover pan might give the popover wow-factor a slight edge, ones made in muffin pans are just as delicious. Having said that, good popover pans are relatively inexpensive and worth splurging on. Especially if you plan on serving popovers year round and not only on special occasions.


Popovers are meant to be enjoyed immediately after they come out of the oven. If by chance you have any leftovers, store them in a sealed plastic bag. Reheat them in a preheated 350 degree (F) oven for 5-10 minutes to rewarm and slightly re-crisp them up.


Popovers can be simply enjoyed with a generous slathering of butter. Or you with a large dollop of some delicious homemade Strawberry Butter. How you choose to eat your popovers will depend in large part on whether they are being served for breakfast, lunch or dinner.


Popovers are classic for a reason as they make every meal feel a little extra special. Replacing your bread or muffin basket with a magical basket of hot, towering, airy, golden popovers is bound to be a jaw-dropping moment at your table. Does it get any better than that?

Recipe
Popovers with Strawberry Butter
Makes 12

Ingredients
Popovers
1 1/2 cups whole milk, room temperature or heated just gently warm to the touch 
4 large eggs, room temperature
2 heaping teaspoons (10g) confectionary sugar
1 teaspoon Kosher salt
3 Tablespoons unsalted butter, melted, cooled slightly
1 1/2 cups (192g) all-purpose flour (I use Unbleached Gold Medal Flour) - See Notes
Melted butter or canola spray for preparing the pan

Strawberry Butter
1/2 cup (113g) unsalted butter, room temperature
1 Tablespoon (15g) confectionary sugar
1/8 teaspoon Kosher salt
1/2 cup (165g) strawberry preserves or lingonberry preserves

Directions
Popovers
1. Preheat oven to 450 degrees (F).
2. In a blender, add in the room temperature/gently warmed milk, eggs, confectionary sugar, and Kosher salt. Blend until smooth.
3. Add in the melted butter, blending until incorporated.
4. Add in the flour and blend until the batter is smooth.
5. Let the batter rest for 15-30 minutes.
6. Put an empty (unprepared) popover pan on a baking sheet. Insert into the oven and let heat up for 5 minutes.
7. Remove pan and baking sheet. Working quickly either brush each well with melted butter or spray with canola oil. Note: I prefer using melted butter.
8. Immediately pour the batter into the hot popover pan until it is about 2/3's full. Note: If using a muffin pan, fill slightly past the halfway mark.
9. Bake popovers for 20 minutes at 450 degrees (F). Do Not Open the Oven. Reduce the temperature to 350 degrees (F) and bake for an additional 10-12 minutes or until the popovers have risen and are a deep golden brown. Note: You can check for doneness at the 30 minute mark but not a minute earlier. My oven required an additional couple of minutes.
10. Remove the pan from the oven. Insert a sharp knife into the top of each popover. Immediately remove from the pan.
11. Serve immediately with the strawberry butter.

Strawberry Butter
1. In a medium sized bowl, beat the butter until creamy (about 2 minutes).
2. Add in the confectionary sugar and Kosher salt.  Beat until incorporated.
3. Add in the strawberry preserves. Mix until blended.
4. Let the strawberry butter chill for at least 30 minute in the refrigerator. Note: You can make the strawberry butter several days ahead. Remove from the refrigerator when you begin baking the popovers to soften it up and make it easier for spreading.

Notes: (1) I used a 128g per cup measurement for the all-purpose flour for this recipe because I used Gold Medal Unbleached All-Purpose Flour. If you are using a different flour, use a weight measurement of 180g. (2) I used a popover pan but you can also use a muffin tin. Fill the well of the hot, prepared muffin tins a little more than half full. You should use up all of your batter, but if not, pour whatever is left evenly into each well. (3) If you have only one six well popover pan and you are serving 2-4 people, you can cut the recipe in half.

Tuesday, October 24, 2023

Gruyere, Onion & Prosciutto Crustless Quiche


Life has been a little hectic around here lately. The most beautiful, magical wedding was held this past weekend on an absolutely gorgeous fall day in Wisconsin. Everything about the wedding venue and day of my favorite niece in the world and her bride could not have been more perfect. Seeing how blissfully happy and in love they both were made my heart almost want to burst. So how I managed to get through my reading during the ceremony without weeping was nothing short of a miracle. Keeping the image of my favorite nephew in the world walking down the aisle as the best ever flower 'boy' was probably my saving grace. And at the end of the evening all I could think of was that I couldn't have imagined a more wondrous, love filled wedding day for the girl whom I have loved ever since the day she was born.


When I woke up the next morning I almost wished I was having this incredibly scrumptious Gruyere, Onion & Prosciutto Crustless Quiche for breakfast. While the Eggs Benedict I had a restaurant nearby was really, really very good, I was craving this creamy, custardy, cheesey dish. This savory quiche is unfussy as there is no fretting over the making of a crust. For those of you who are quiche-crust adversives, today is your lucky day. Because in just one bite of this quiche, you won't miss it. Actually you might be happy to have the quiche paired with a croissant instead!


What makes this Gruyere, Onion & Prosciutto Crustless Quiche so exceptionally delicious and craveworthy are the cheeses, the heavy cream, the prosciutto, sautéed yellow onions, and the fresh thyme. The sweet, slightly sweet gruyere cheese and the sharp, nutty Parmigianno-Reggiano give the quiche an even more complex flavor. Rather than bacon, this quiche uses chopped prosciutto cooked just until slightly crispy. The sweet, salty flavor profile of the prosciutto adds a layer of incomparable flavor. You may never ever want bacon in your quiche again.


Although there are several steps in the making of this quiche, none of them take very long. And the pan used to saute the onions can be the same pan used to crisp up the prosciutto. 

Generously buttering your quiche dish will make the cutting and serving process almost effortless. Baking the quiche at the lower 325 degrees (F) temperature helps to create its' creamy, custardy texture. Low and slow have its' benefits, especially when it comes to baking a quiche. Always place your quiche dish on a baking sheet before putting it in the oven to prevent the bottom of the quiche from either burning or cooking too fast.


The key to successfully cutting the quiche is to give it a brief period of rest after it comes out the oven. Not to worry, because the quiche will still be warm after a ten minute rest period.

While it's true real men eat quiche, this Gruyere, Onion & Prosciutto Crustless Quiche just happens to be one of those perfect girl breakfasts, lunches or dinners. When serving for breakfast or brunch, all you might need is some fresh fruit to go along with it. But if serving the quiche for lunch or dinner, a green salad lightly dressed with a champagne vinaigrette would compliment it perfectly.

The speed at which everyone inhales this quiche will bring pure joy to your heart. Because nothing makes a cook happier than when plates are cleaned! 

Recipe
Gruyere, Onion & Prosciutto Crustless Quiche
Serves 4-6

Ingredients
1 medium onion, halved and thinly sliced
1 Tablespoon unsalted butter
3 1/2 ounces (99g) prosciutto, minced
1 cup heavy cream
3 large eggs, room temperature
3/4 cup (75g) Gruyere cheese, coarsely grated
1/4 cup 925g) Parmigiano-Reggiano, finely grated
1/2 teaspoon Kosher salt
1/4 teaspoon white pepper
1 teaspoon fresh thyme, minced

Directions
1. Preheat oven to 325 degrees (F). Generously butter a 7" ceramic quiche dish (see notes) and set aside.
2. In a medium sized non-stick skillet, melt the one Tablespoon of unsalted butter. Add in the sliced onions and cook over medium heat until soft and golden (approximately 10-12 minutes). Stir onions often. Remove onions and temporarily place in a bowl.
3. Add in the minced prosciutto to the same skillet. Cook until slightly crispy (about 4 minutes). Remove from the pan and temporarily set aside.
4. In a medium-large bowl, whisk the eggs. Add in the heavy cream and whisk until well blended.
5. Add in Gruyere cheese, Parmigiano-Reggiano, Kosher salt, white pepper, minced thyme, cooked prosciutto, and all but 1 Tablespoon of the sautéed onions. Use a spatula to blend.
6. Pour the quiche mixture into the prepared pan. Drop strands of the reserved one Tablespoon of onions over the top.
7. Place the quiche dish on a baking pan. Place in the oven. Bake for 40-45 minutes (beginning checking at 35 minutes) until the quiche is set in the center.
8. Remove from the oven. Let the quiche rest for at least 10 minutes before cutting.
9. Serve warm or at room temperature.

Notes: (1) When measuring a quiche pan, measure the bottom of the pan. A 7" quiche dish may will measure 9"-10" across the top. I used an Emile Henry Quiche Dish. (2) I bought a package of chopped prosciutto at my favorite Italian deli. If they don't it your grocery store, just ask for thicker slices of prosciutto to be sliced at your deli and chop them yourself. (3) Trader Joe's is one of my favorite places to buy cheeses, especially the ones at the more expensive end of the continuum.

Thursday, October 12, 2023

Streusel Pumpkin Bread


Over the last few years the fall season has become synonymous with pumpkin spice season. For some it arrives too early, for others it doesn't last long enough. I am a member of the latter group. If there was ever a campaign to shift pumpkin spice from being a one season wonder to a year round one, I would gladly volunteer! To be able to satisfy a craving for a pumpkin confection in the middle of winter, on a chilly spring day, and yes, even during the summer months seems like something hardly anyone would object to and many would embrace. 


I have made a couple versions of pumpkin bread, but (you know what's coming next) I think I have now found the 'one' I can't live without and the one I would make for family and friends. The third time is the charm. Between the amounts of spice and pumpkin puree used along with the combination of sugars called for in the recipe, this is a densely crumbed, moist, tender, deeply spiced, and nothing short of being the most heavenly version of a pumpkin bread I have ever tasted. 

There are a myriad of both similarities and differences between the recipe for this Streusel Pumpkin Bread and the two others posted on the blog. But rather than go into detail about all of them, I would rather talk about what I love about this recipe. First, let me gush about the swoonworthy streusel topping. It's buttery, crunchy, and the closest thing to one found in fancy high-end bakeries. Second, the bread's almost melt in your mouth texture combined with its' the perfectly spiced, drop the mic flavor. And lastly, it's a reminder that simplicity almost always wins over complexity.


If you have mixing bowls, a whisk, a spatula, some measuring spoons, and a scale (and/or measuring cups), you have what you need to assemble the batter. If you have a metal 9" x 5" baking pan, some parchment paper, and a baking sheet, you have everything you need to create the perfect sized loaf of Streusel Pumpkin Bread.

Baking time for the Streusel Pumpkin Loaf ranges from 70-80 minutes (when baked in a preheated 350 degree F oven).  When testing for doneness, always insert your wooden skewer or toothpick in the center of the bread as that's the last place the bread sets up.


Pumpkin bread is meant to be cut into thick slices. This is not a 'please cut me a sliver' kind of bread. A thick slice of the bread will not only enable you to better experience the bread's tender, moist, plush crumb, but will allow you to be enchanted by its' perfectly spiced flavor. If I were you, I would stock up on cans of pumpkin puree now (they usually have a long expiration date) so you can make this Streusel Pumpkin Bread well past the fall season. Just imagine the intoxicating aroma created by this bread baking in the oven on a cold, windy, rainy, even snowy day. You too might be jump on the year-round pumpkin spice bandwagon too.

Recipe
Streusel Pumpkin Bread
Makes a 9" x 5" loaf - serves 10-12

Ingredients
Streusel
1/2 cup (65g) all-purpose flour
6 Tablespoons (80g) light brown sugar
1/2 teaspoon cinnamon
1/4 teaspoon Kosher salt
4 Tablespoons (57g) unsalted butter, melted

Pumpkin Bread
2 cups (260g) all-purpose flour
1 1/2 teaspoons baking powder
3/4 teaspoon baking soda
1 teaspoon Kosher salt
4 to 5 teaspoons cinnamon (strongly recommend you use 5 teaspoons)
1/2 teaspoon nutmeg
1/4 to 1/2 teaspoon teaspoon ginger (if you love the flavor of ginger, use 1/2 teaspoon)
1/4 teaspoon ground cloves
15 ounce can of pumpkin puree
3/4 cup canola or vegetable oil
1/2 cup (100g) granulated sugar
1/4 cup (50g) dark brown sugar
3/4 cup (150g) light brown sugar (see notes)
2 large eggs, room temperature

Optional: Confectionary sugar for dusting

Directions
Streusel
1. In a medium sized bowl, combine the flour, light brown sugar, cinnamon, Kosher salt, and melted butter. Mix until well blended.
2. Place in the refrigerator to chill while assembling the pumpkin bread.

Pumpkin Bread
1. Preheat oven to 350 degrees (F). Line the length of a 9" x 5" metal baking with parchment paper. Lightly butter the pan and paper. Set aside.
2. In a medium sized bowl, add in the flour, baking soda, baking powder, Kosher salt, cinnamon, nutmeg, ginger and cloves. Whisk until combined.
3. In a large bowl, whisk together the light brown sugar, dark brown sugar, oil, and pumpkin puree.
4. Whisk in eggs, one at a time.
5. Add in the dry ingredients. Use a spatula to combine. Be careful to not over mix.
6. Pour the batter into the prepared pan. Let rest for 10-15 minutes.
7. Break off pieces of the chilled streusel and sprinkle on top of the pumpkin bread.
8. Place the baking pan on a large baking sheet. Insert into the oven. Bake for 70-80 minutes (rotating the pan midway through the baking process) until a tester inserted into the center of the bread comes out clean. Note: If the streusel topping is getting too brown place a piece of aluminum foil over the top.
9. Allow the Streusel Pumpkin Bread to cool to room temperature before cutting into thick slices. Optional: Before cutting dust the top of the bread with confectionary sugar.

Notes: (1) The Streusel Pumpkin Bread will be good for at least days covered and stored at room temperature. To extend the life of the bread, cover and chill in the refrigerator. (2) Instead of using both dark brown and light brown sugars in the bread, you can use all light brown sugar. (3) Use only a metal baking pan. Do nut recommend baking this bread in a glass loaf pan. (4) Recipe strongly influenced by the Pancake Princess's Easy Streusel Pumpkin Bread.


Morton Arboretum, October 2023

Wednesday, October 11, 2023

Mushroom and Spinach Strata


Stratas are essentially breakfast casseroles. Being nothing more than a gussied up version of a savory bread pudding, they are hearty, easy to make, yet impressive, late morning breakfast, brunch, lunch and/or even late night dinner dishes. The foundational ingredients for all stratas are eggs, milk (and/or cream), toasted bread cubes, and cheese. When only fresh herbs and vegetables are added in, the result is a rich, deeply flavorful, vegetarian dish. This Mushroom and Spinach Strata (a vegetarian strata) is so satisfying, I promise that even your meat loving friends will be smitten with it.


There are an endless number of herb, vegetable, and cheese options and combinations when making stratas. Once you find the ones that appeal to your palate you will want to make stratas one of your go-to, signature dishes.


Stratas can be made either the night before or right before serving. Because I find them so easy to make, I tend to lean toward making them right before serving. From start to finish, it takes less than 40 minutes to make a strata. Note: If making the strata the night before I recommend baking the strata in a ceramic baking dish able to withstand a high level of heat. If serving immediately after making, I recommend using a cast iron pan.


Bread dried out in the oven is more absorbent than bread toasted in a toaster. It takes less than 5 minutes to dry out the bread cubes. A crusty baguette or sourdough are the ideal breads to use when making a strata. You might be inclined to want to use brioche bread, but it's richness will overpower the other flavors in the strata. So save the brioche for a french toast casserole.


Sautéed yellow onions, cremini mushrooms, baby spinach, garlic cloves, and fresh thyme get mixed into the egg, bread, milk and grated cheese mixture before being transferred to a buttered cast iron (or ceramic baking dish). The coarsely grated smoked Gouda cheese lends a hearty richness to the dish and pairs exceptionally well with the vegetables and herbs used here.


The total baking time for the Mushroom and Spinach Strata is somewhere between 16 and 18 minutes. For the first ten minutes, the baking dish must be covered so as to ensure the strata does not dry out. If you don't have a covered cast iron pan, use aluminum foil. For the last 6-8 minutes, the strata is baked without a cover.

There may be nothing more satisfying than having a warm meal or taking in the aroma of something savory baking in the oven on a chilly day. This Mushroom and Spinach Strata checks off all the boxes for me. It's gorgeous, mouthwateringly delicious, simple and relatively inexpensive to make, and a definite crowd pleaser. As an added benefit, your vegetarian friends will love you!

Paired with a lightly dressed salad and maybe even some wine, you have the makings of the loveliest of meals. Instead of ordering that late night pizza, make this elegant, almost effortless Mushroom and Spinach Strata instead. You can be enjoying a hot slice of strata before the pizza delivery vehicle even gets to your house.

Recipe
Mushroom and Spinach Strata
Serves 4-6

Ingredients
6 ounces (121g) crusty baguette or sourdough, cut into 1/2 inch cubes (about 1 9" long piece) - See Notes
1 1/2 Tablespoons butter
1 medium yellow or sweet yellow onion, halved and thinly sliced
6 ounces (171g) cremini mushrooms, stems removed, coarsely chopped
2 cloves garlic, minced
1 teaspoons fresh thyme, chopped
1 teaspoon Kosher salt
1/2 teaspoon black pepper
4 ounces (113g) fresh baby spinach
4 large eggs
1 cup whole milk
3 1/2 ounces (98g) smoked Gouda, coarsely grated

Optional: If serving for lunch or dinner, pair with a lightly dressed salad.

Directions
1. Preheat oven to 450 degrees (F).
2. Spread the bread cubes on a large, rimmed baking sheet. Toast in the oven until lightly golden and dry (approximately 4-6 minutes).
3. In a large bowl, whisk the eggs and milk. Add in the grated cheese and bread. Mix well. Let sit for at least 10 minutes, to ensure the bread becomes well hydrated.
4. In a large skillet, melt the butter over medium heat. Add the thinly sliced onions and cook until they are tender (about 3-4 minutes).
5. Add in the mushrooms, garlic, thyme, Kosher salt and pepper. Cook until the mushrooms have softened (about 3 minutes).
6. Add in the spinach and cook until wilted (about 1-2 minutes).
7. Add the mushroom, onion and spinach mixture to the bread mixture. Give a quick stir.
8. Pour into a buttered 9" to 10" cast iron skillet (one with a lid). Press down on the mixture to flatten it a bit. Note: If you don't have a covered cast iron pan with a lid, use aluminum foil.
9. Bake covered for 10 minutes.
10. Remove the lid and continue cooking for an additional 6-8 minutes or until the strata has set in the center.
11. Remove from the oven and let set about 5 minutes before serving. The strata is best served warm, but still delicious either at room temperature or reheated in the microwave.

Notes: (1) I generally buy my smoked gouda cheese from Trader Joe's. (2) The strata can be made in one pan, but I found using two separate pans created a much better strata. (3) You can make a strata the night before. Just take the dish out the refrigerator at least 30 minutes before inserting the chilled pan into the hot oven. And make certain your ceramic dish can withstand temperatures at least up to 450 degrees F.

Tuesday, September 26, 2023

Apple Galette with Salted Caramel Sauce


On what began as a glorious fall day we made the ninety minute drive out to our favorite apple orchard. It took us less than twenty minutes to pick a half bushel of Honey Crisp apples.  After another twenty minutes was spent taking photos in the orchard, we headed into the barn to buy a half dozen of the best ever warm apple cider donuts (the donuts themselves are worth the ninety minute drive). It was one of those perfect, laid back, pinch yourself kind of days. The kind we remember, the kind we hope will always be an annual tradition. 


On the ride home I mulled over how the Honey Crisp apples might be best put to use. Other than saving some for eating, making a batch of my favorite Homemade Applesauce and maybe even an Apple Crisp, I thought I would make this Apple Galette with Salted Caramel Sauce. Not only do I love the rustic look of a galette, I love how unfussy and almost impossible they are to mess up. Some people like making crimped edge pies, but I like making galettes. Otherwise known as free form French pies, galettes have a casual, yet elegant quality to them. 


When topped with some vanilla ice cream and homemade salted caramel sauce, you have one of the most inviting, crowd-pleasing, mouthwatering desserts. One that completely embraces all of the feels and flavors of fall.


I used Honey Crisp in this galette, but you could use other apples having both tart and sweet like qualities to them. If I didn't have a half bushel full of Honey Crisp apples, I might use Pink Lady or Granny Smith apples in this galette. 


The dough for the galette comes together easily in a food processor. Once assembled the dough requires a chilling time of only thirty minutes. It can be chilled longer (and even overnight), but will need to be removed from the refrigerator for 10-15 minutes before rolling out. 


The assembled galette bakes for 10 minutes in a preheated 425 degree (F) oven. After which the oven temperature is reduced to 375 degrees (F). The galette will continue to bake for an additional 30-35 minutes or until the crust is golden brown.


While the galette bakes, make the Salted Caramel Sauce. Unlike other caramel sauces, this one begins by toasting the granulated sugar until it's melted. Once the sugar has melted, the pan is removed from the heat and the room temperature butter is whisked in. Followed by stirring in the whipping cream, salt, and vanilla. To achieve a perfect sauce texture, the pan is returned to low heat and whisked until the desired consistency is reached (this should take only a few minutes). Immediately remove the pan from the heat and pour the sauce in a heatproof bowl or jar. Note: If you leave the sauce in the hot pan, it will continue to cook.

The galette can be served warm or at room temperature. Serving it with some vanilla ice cream is optional, but you absolutely must serve it with the heavenly salted caramel sauce. You can drizzle on some of the sauce over the top of the galette or you can let everyone drizzle on as much of the sauce as their caramel loving heart desires. Or drizzle some on and have the jar of sauce available on the side.


So whether you get your apples from an apple orchard, at the Farmer's Market, in your backyard, or from the grocery store, this is the season for turning apples into luscious desserts. Hopefully you are enticed to make this impressive Apple Galette with Salted Caramel Sauce for your family and/or friends. It's one destined to make your meal a memorable one.


Recipe
Apple Galette with Salted Caramel Sauce
Serves 8

Ingredients
Tart Dough
2 Tablespoons granulated sugar
1 teaspoon Kosher salt
2 cups (260g) all-purpose flour, plus additional for rolling out dough
12 Tablespoons (170g)chilled unsalted butter, cut into pieces 
1 large egg, lightly beaten

Apple Galette
1 1/2 pounds Honey Crisp or Granny Smith apples (3 to 4 medium sized apples), peeled, cored and cut into 1/4inch thick slices (or use any other baking apples of your choice)
1/4 cup (33g) all-purpose flour
1/4 cup (50g) sugar (plus additional for sprinkling on egg washed tart dough)
1/4 teaspoon Kosher salt
1 teaspoon cinnamon (recommend Saigon cinnamon)

1 large egg
1 teaspoon half-and-half, water or whipping cream
1 generous Tablespoon of sparkling sugar (or granulated sugar)

Salted Caramel Sauce
1 cup (200g) granulated sugar
6 Tablespoons (85g) unsalted butter
1/2 cup heavy cream
3/4 teaspoon flaky sea salt or Kosher salt
1 teaspoon vanilla

Optional: 
Good quality Vanilla Ice Cream OR
2 cups heavy whipping cream and 2 Tablespoons of pure maple syrup (for maple cream, beat to medium-soft peaks then fold in maple syrup)

Directions
Tart Dough
1. In a food processor, pulse together the sugar, salt and flour until combined.
2. Add butter and pulse until the mixture is crumbly.
3. Add egg and process until dough begins to come together and forms a loose ball.
4. Form dough into a disk, wrap in plastic wrap and chill until firm for at least 30 minutes or up to overnight. Note: Allow to sit out at room temperature for 5-10 minutes before rolling out to prevent cracking if refrigerated for more than an hour.

Apple Galette
1. Preheat oven to 425 degrees (F). 
2. On a lightly floured surface, roll out tart dough to a 14-16 inch, slightly less than a 1/4 inch thick, circle.
3. Transfer the dough to a parchment paper lined baking sheet.
4. Press a 9" pie pan lightly in the center of the dough to help guide where to place the apples.
5. Toss the sliced apples in the flour, sugar, Kosher salt and cinnamon.  Arrange the sliced apples within the 9' circle.
6. Lift edges of dough over apples, tucking and overlapping to create a rustic circle shape.
7. Brush edges of dough with egg wash, then sprinkle with sparkling sugar (or granulated sugar).
8. Place the baking sheet in center of oven. Bake at 425 degrees (F) for 10 minutes. Then immediately reduce the oven temperature to 375 degrees (F). Continue baking for an additional 30-35 minutes or until crust is a golden brown.
9. Let cool slightly before drizzling with the salted caramel sauce. Top or serve with scoops of vanilla ice cream.
10. Serve the galette warm or at room temperature.

Salted Caramel Sauce
1. In a heavy bottomed saucepan. Add in the sugar. Cook over medium-low heat, stirring often until the sugar melts and turns to a golden brown. Note: The sugar will clump up, but those clumps will dissolve as the sugar melts.
2. Remove the pan from the heat and add in the butter. Stir until it is completely melted. Note: The mixture will bubble up, so be careful.
3. Whisk in the heavy cream, salt and vanilla until completely blended.
4. Return the pan to a medium low heat. Continue cooking for another 3-4 minutes or until the desired sauce consistency is reached.
5. Immediately pour the salted caramel sauce into a heatproof jar or bowl to allow to cool slightly before serving. Store any leftover sauce in the refrigerator. Reheat before serving.

Notes: (1) Other than Honey Crisp apples, you could use Pink Lady or Granny Smith apples when making this galette. (2) To make the egg wash, whisk together an egg with a teaspoon of half and half, water or whipping cream until well blended.


Honey Crisp Apple Picking (September 2023)