Tuesday, September 26, 2023

Apple Galette with Salted Caramel Sauce


On what began as a glorious fall day we made the ninety minute drive out to our favorite apple orchard. It took us less than twenty minutes to pick a half bushel of Honey Crisp apples.  After another twenty minutes was spent taking photos in the orchard, we headed into the barn to buy a half dozen of the best ever warm apple cider donuts (the donuts themselves are worth the ninety minute drive). It was one of those perfect, laid back, pinch yourself kind of days. The kind we remember, the kind we hope will always be an annual tradition. 


On the ride home I mulled over how the Honey Crisp apples might be best put to use. Other than saving some for eating, making a batch of my favorite Homemade Applesauce and maybe even an Apple Crisp, I thought I would make this Apple Galette with Salted Caramel Sauce. Not only do I love the rustic look of a galette, I love how unfussy and almost impossible they are to mess up. Some people like making crimped edge pies, but I like making galettes. Otherwise known as free form French pies, galettes have a casual, yet elegant quality to them. 


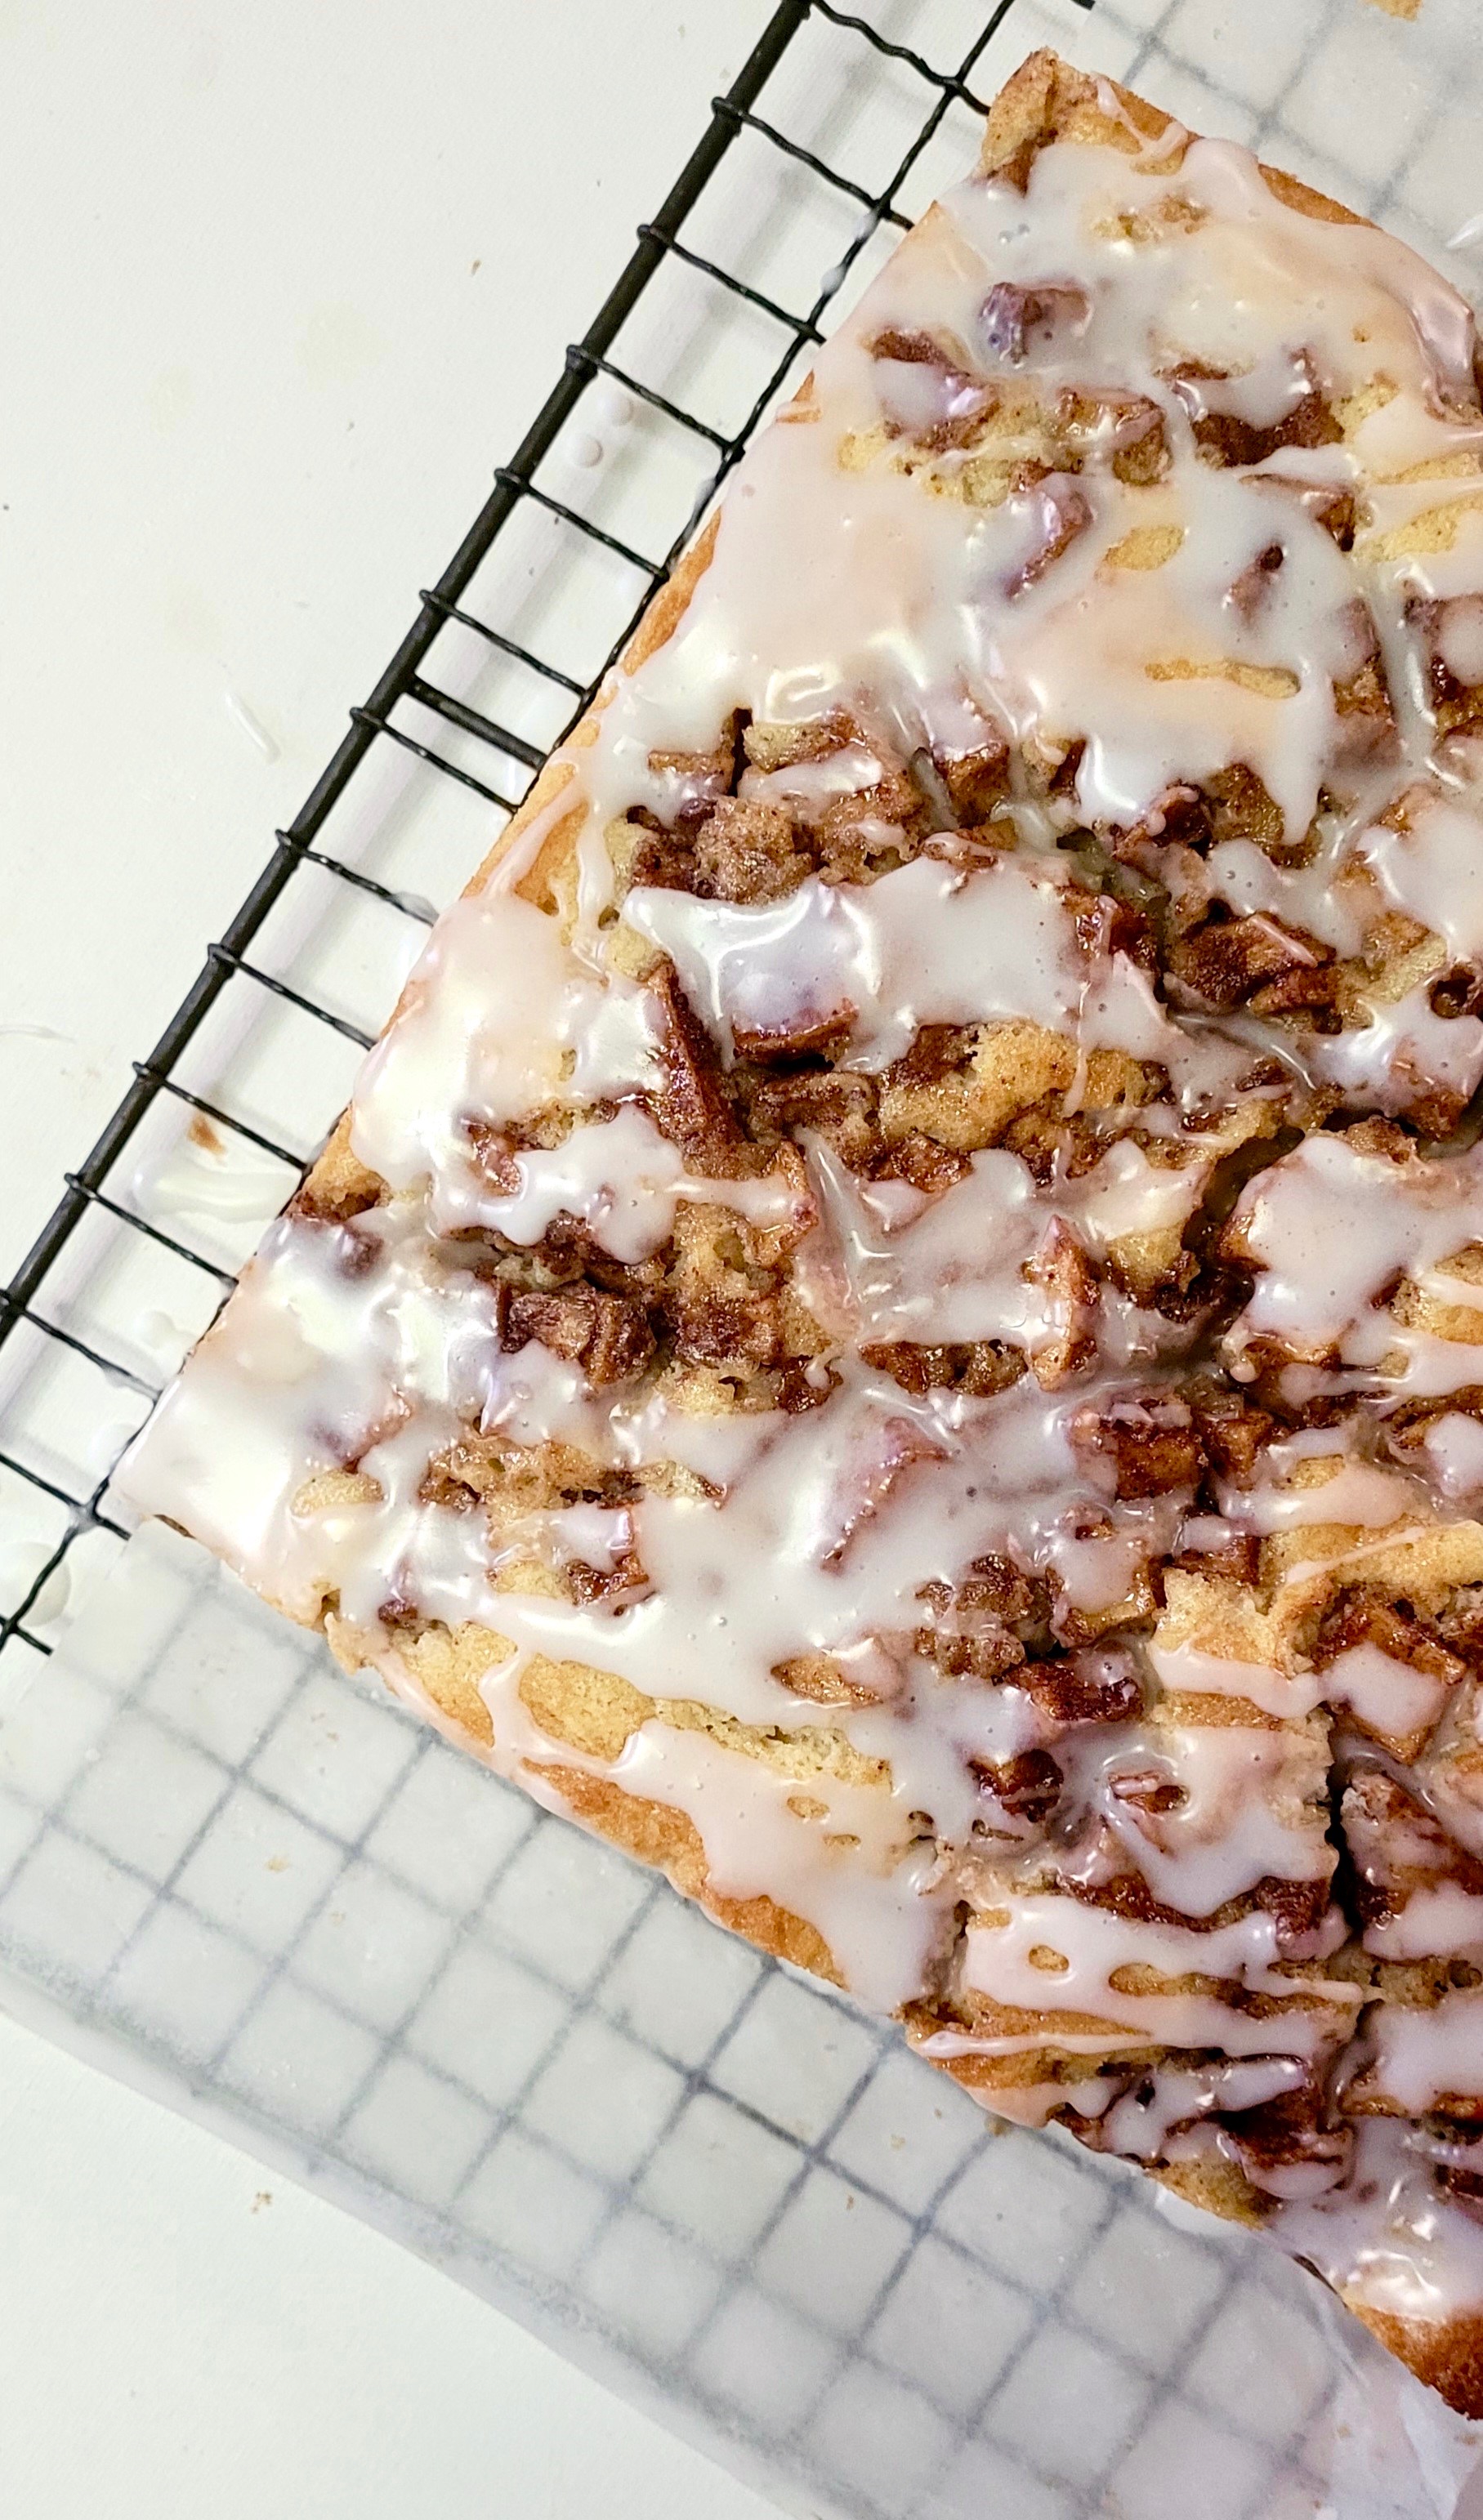
When topped with some vanilla ice cream and homemade salted caramel sauce, you have one of the most inviting, crowd-pleasing, mouthwatering desserts. One that completely embraces all of the feels and flavors of fall.


I used Honey Crisp in this galette, but you could use other apples having both tart and sweet like qualities to them. If I didn't have a half bushel full of Honey Crisp apples, I might use Pink Lady or Granny Smith apples in this galette. 


The dough for the galette comes together easily in a food processor. Once assembled the dough requires a chilling time of only thirty minutes. It can be chilled longer (and even overnight), but will need to be removed from the refrigerator for 10-15 minutes before rolling out. 


The assembled galette bakes for 10 minutes in a preheated 425 degree (F) oven. After which the oven temperature is reduced to 375 degrees (F). The galette will continue to bake for an additional 30-35 minutes or until the crust is golden brown.


While the galette bakes, make the Salted Caramel Sauce. Unlike other caramel sauces, this one begins by toasting the granulated sugar until it's melted. Once the sugar has melted, the pan is removed from the heat and the room temperature butter is whisked in. Followed by stirring in the whipping cream, salt, and vanilla. To achieve a perfect sauce texture, the pan is returned to low heat and whisked until the desired consistency is reached (this should take only a few minutes). Immediately remove the pan from the heat and pour the sauce in a heatproof bowl or jar. Note: If you leave the sauce in the hot pan, it will continue to cook.

The galette can be served warm or at room temperature. Serving it with some vanilla ice cream is optional, but you absolutely must serve it with the heavenly salted caramel sauce. You can drizzle on some of the sauce over the top of the galette or you can let everyone drizzle on as much of the sauce as their caramel loving heart desires. Or drizzle some on and have the jar of sauce available on the side.


So whether you get your apples from an apple orchard, at the Farmer's Market, in your backyard, or from the grocery store, this is the season for turning apples into luscious desserts. Hopefully you are enticed to make this impressive Apple Galette with Salted Caramel Sauce for your family and/or friends. It's one destined to make your meal a memorable one.


Recipe
Apple Galette with Salted Caramel Sauce
Serves 8

Ingredients
Tart Dough
2 Tablespoons granulated sugar
1 teaspoon Kosher salt
2 cups (260g) all-purpose flour, plus additional for rolling out dough
12 Tablespoons (170g)chilled unsalted butter, cut into pieces 
1 large egg, lightly beaten

Apple Galette
1 1/2 pounds Honey Crisp or Granny Smith apples (3 to 4 medium sized apples), peeled, cored and cut into 1/4inch thick slices (or use any other baking apples of your choice)
1/4 cup (33g) all-purpose flour
1/4 cup (50g) sugar (plus additional for sprinkling on egg washed tart dough)
1/4 teaspoon Kosher salt
1 teaspoon cinnamon (recommend Saigon cinnamon)

1 large egg
1 teaspoon half-and-half, water or whipping cream
1 generous Tablespoon of sparkling sugar (or granulated sugar)

Salted Caramel Sauce
1 cup (200g) granulated sugar
6 Tablespoons (85g) unsalted butter
1/2 cup heavy cream
3/4 teaspoon flaky sea salt or Kosher salt
1 teaspoon vanilla

Optional: 
Good quality Vanilla Ice Cream OR
2 cups heavy whipping cream and 2 Tablespoons of pure maple syrup (for maple cream, beat to medium-soft peaks then fold in maple syrup)

Directions
Tart Dough
1. In a food processor, pulse together the sugar, salt and flour until combined.
2. Add butter and pulse until the mixture is crumbly.
3. Add egg and process until dough begins to come together and forms a loose ball.
4. Form dough into a disk, wrap in plastic wrap and chill until firm for at least 30 minutes or up to overnight. Note: Allow to sit out at room temperature for 5-10 minutes before rolling out to prevent cracking if refrigerated for more than an hour.

Apple Galette
1. Preheat oven to 425 degrees (F). 
2. On a lightly floured surface, roll out tart dough to a 14-16 inch, slightly less than a 1/4 inch thick, circle.
3. Transfer the dough to a parchment paper lined baking sheet.
4. Press a 9" pie pan lightly in the center of the dough to help guide where to place the apples.
5. Toss the sliced apples in the flour, sugar, Kosher salt and cinnamon.  Arrange the sliced apples within the 9' circle.
6. Lift edges of dough over apples, tucking and overlapping to create a rustic circle shape.
7. Brush edges of dough with egg wash, then sprinkle with sparkling sugar (or granulated sugar).
8. Place the baking sheet in center of oven. Bake at 425 degrees (F) for 10 minutes. Then immediately reduce the oven temperature to 375 degrees (F). Continue baking for an additional 30-35 minutes or until crust is a golden brown.
9. Let cool slightly before drizzling with the salted caramel sauce. Top or serve with scoops of vanilla ice cream.
10. Serve the galette warm or at room temperature.

Salted Caramel Sauce
1. In a heavy bottomed saucepan. Add in the sugar. Cook over medium-low heat, stirring often until the sugar melts and turns to a golden brown. Note: The sugar will clump up, but those clumps will dissolve as the sugar melts.
2. Remove the pan from the heat and add in the butter. Stir until it is completely melted. Note: The mixture will bubble up, so be careful.
3. Whisk in the heavy cream, salt and vanilla until completely blended.
4. Return the pan to a medium low heat. Continue cooking for another 3-4 minutes or until the desired sauce consistency is reached.
5. Immediately pour the salted caramel sauce into a heatproof jar or bowl to allow to cool slightly before serving. Store any leftover sauce in the refrigerator. Reheat before serving.

Notes: (1) Other than Honey Crisp apples, you could use Pink Lady or Granny Smith apples when making this galette. (2) To make the egg wash, whisk together an egg with a teaspoon of half and half, water or whipping cream until well blended.


Honey Crisp Apple Picking (September 2023)

Thursday, September 14, 2023

Pumpkin Spice Snack Cake w/ Vanilla Bean Icing


Pumpkin spice season is here! While some of you might satisfy your cravings for pumpkin spice in liquid form, I much prefer to get my fix of those warm, comforting, fall flavored spices in doughnut, loaf, bars, muffins, cake, and sometimes pie form. It's about this time of the year when I buy more than my fair share of cans of pumpkin puree. Call it hoarding or call it a fear of shortages, the idea of the fall season without pumpkin spiced confections would be unfathomable. 

But there isn't a shortage of pumpkin recipes on the blog. There are twelve of them until this post. When you are someone who tries to follow and keep up with food trends, it's slightly alarming when you discover you don't have any recipes for a 'snack cake'! Snack or snacking cakes are typically single layer, almost effortless to make homemade cakes. Generally they aren't considered to be a celebration kind of cake, but rather the kind you make on a whim to satisfy your cravings for cake and icing. They are ones you don't have to wait for the weekend to make. If you want cake on a Tuesday, snacking cakes are for you! 

This moist, dense crumbed, comforting, satisfying, delicious Pumpkin Spice Snack Cake w/ Vanilla Bean Icing turned out to be everything a snack cake should be. 

By their very nature, snack cakes are made with simple, easily accessible ingredients. Because they are usually made with oil (canola or vegetable), you don't have to wait for your butter to come to room temperature. And other than a couple of bowls, a whisk and spatula, you don't need to pull out your standing or hand mixer to make them. Easy peasy!

The ingredient list calls for the use of both Pumpkin Pie Spice and Cinnamon. If you don't have pumpkin pie spice, not to worry. you can make your own! You can find the recipe for a homemade version of Pumpkin Pie Spice in the notes section below. 


Making a cake with oil ensures not only its' moistness, but its' ability to become even more flavorful days after the cake is baked. Which means the spices in this pumpkin spice snacking cake will intensify as the days go by (if it lasts that long!). 


Baking the cake in a nine inch springform pan makes it easy to unmold and transfer to a serving platter. If you don't have one, use a nine inch square pan (as the volumes between the two pans are similar). In a preheated 350 degree (F) oven, baking time for the cake will range somewhere between 48 and 53 minutes. But rather than going by time only, test for doneness by inserting a toothpick in the center of the cake. 


The cream cheese icing is the perfect compliment to the pumpkin spice cake. If you make the cake early in the day, take out the cream cheese and butter to give it time to soften up. Your icing will be creamier if those ingredients are nearing room temperature. I used vanilla bean paste to flavor the icing and because I wanted the flecks of vanilla to show. If you don't have it, use a good quality vanilla.

Technically I violated the 'rules' of snacking cakes by gussying it up by piping on, rather than slathering on the icing. While it's fun to do, you don't need to use a pastry tip and bag. You can create a beautifully icing swirled cake using an offset spatula, metal cake spatula, and/or even a large tablespoon. 


When I created this simple cake I wanted one fall flavored with lovely warm seasonal spices. More importantly I wanted a cake that felt like you were getting a big, warm comforting hug in each bite. As it turned out this Pumpkin Spice Snack Cake w/ Vanilla Bean Icing exceeded all of my hopes and expectations. I may never need to make a two layer pumpkin cake again! And I think I have now officially jumped on the snacking cake bandwagon!


This cake will definitely satisfy your craving for pumpkin spice. However, there it comes with two added bonuses. It will satisfy your sweet tooth and tantalize your sense of smell while it bakes in the oven. Which makes this Pumpkin Spice Snack Cake w/ Vanilla Bean Icing a winner in my world.

Recipe
Pumpkin Spice Snack Cake w/ Vanilla Bean Icing
Makes one 9" round cake

Ingredients
Cake
1 3/4 cups (228g) all-purpose unbleached flour
2 teaspoons Pumpkin Pie Spice (see notes)
1/2 teaspoon cinnamon
1 teaspoon baking soda
1/2 teaspoon baking powder
1/2 teaspoon Kosher salt
1 cup (200g) granulated sugar
1/2 cup (100g) light brown sugar
2 large eggs
1/2 cup vegetable or canola oil
1 1/2 cups (378g) pumpkin puree (see notes)
1 teaspoon vanilla

Icing
8 ounces (226g) cream cheese, room temperature
1/4 cup (56g) unsalted butter, room temperature
2 cups (250g) confectionary sugar, sifted
1 teaspoon vanilla bean paste or vanilla
1/8 teaspoon Kosher salt

Directions
Cake
1. Preheat the oven to 350 degrees (F). Line a 9" springform pan with parchment paper. Generously butter and set aside. Note: If you don't have a springform pan, use a 9" square pan.
2. In a medium sized bowl, add in the flour, pumpkin pie spice, cinnamon, baking soda, baking powder, and Kosher salt. Whisk to combine. Set side.
3. In a medium-large bowl, add in the sugar, light brown sugar, oil, eggs, vanilla, and pumpkin puree. Whisk until smooth and creamy.
4. Add the dry ingredients to the bowl with the wet ingredients. Whisk until well blended. Batter should be thick and clump free.
5. Add the batter to the prepared pan. Smooth the top with an offset spatula.
6. Place the baking pan on a baking sheet. Place in the oven. Bake for 48-54 minutes or until a toothpick inserted in the center comes out clean.
7. Remove from the oven and place pan on a cooling rack. Allow cake to come to room temperature before icing.
8. Remove the cake from the can pan and place on a cake plate or cake stand.

Icing
1. In small standing mixer fitted with a paddle attachment or using a hand mixer, beat the cream cheese and butter until smooth and well blended.
2. Add in the confectionary sugar and vanilla bean paste (or vanilla). Starting the mixer on low, beat the icing until smooth and creamy.
3. If your cake has domed up during baking (and it should), use a serrated knife to remove the dome so you have a flatter surface when icing the cake (those pieces are the baker's reward). Ice the cake using either a pastry bag fitted with a tip of your choice (I used Ateco tip #827) or spoon on with a metal spatula.
4. Place the cake in the refrigerator to let the icing set up for about an hour before cutting. Or don't wait that long and just cut yourself a piece!
5. Store any leftover cake covered in the refrigerator.

Notes: (1) If you don't have a jar of Pumpkin Pie Spice, you can make your own. To make a batch (it will be more than you need for this recipe), mix together 1 1/2 Tablespoons cinnamon, 1 teaspoon ginger, 1 teaspoon nutmeg, 3/4 teaspoon allspice and 3/4 teaspoon ground cloves. (2) You will use almost all of a 15 can of pumpkin puree. (3) The Ateco tip #827 is an open star tip.

Monday, September 4, 2023

Apple Fritter Cake


Apple season has officially arrived! Which means the consumption of fresh apples, apple desserts, apple cider donuts, apple appetizers, and apples in savory dishes over the course of the next couple of months will increase significantly!  Is anyone else as excited as I am for the return of apple-palooza? If you are, you are my kind of people! Last year we missed the Honeycrisp picking season at our favorite apple orchard (someone wasn't paying attention). That will NOT happen this year. Especially now that this scrumptious, moist crumbed Apple Fritter Cake is now in our lives.

As much as I love apple fritters, I don't love the mess created when deep frying them. I also don't love the fact that they are really best when eaten warm or at least a day within being made. So what does one do when they need to satisfy a craving for apple fritters? They make this heavenly, deeply flavorful Apple Fritter Cake! Yes, this cake is guaranteed to satisfy any lustful yearning one has for an apple fritter.


With apples available year round, the Apple Fritter Cake is not a seasonal one. However, it has all of the feels of autumn. From the cinnamon, to the nutmeg, to the Honeycrisp apples, there may be no better cake to welcome in the new season. 


To give the apples ample time to optimize their flavor, start by tossing the diced apples in a mixture of light brown sugar, dark brown sugar, cinnamon, Kosher salt, and flour. The batter for the cake comes together almost effortlessly. Especially when using a stand mixer fitted with a paddle attachment. 


This is what I will call a 'layered' cake. Half of the batter is spread on the bottom of an 8" square metal pan, then topped with half of the sugar and spice coated apples. Then you repeat the layers using the remaining batter and apples before baking in a preheated 350 degree (F) oven for 60-70 minutes. The intoxicating aroma created by this cake while it bakes may cause you to drool. 


Once the cake has cooled, it gets the classic apple fritter confectionary sugar glaze finishing touch.


The most challenging part of making this cake is waiting for the icing to set up before it's cut up into sixteen squares. 


If you are looking for a perfect, crowd pleasing, shareable cake to serve for either a weekend breakfast or brunch, this is the one! Unlike an apple fritter, this cake is as delicious on day one as it is on day three. It's a moist, dense, tender crumbed cake. One studded with an almost melt in your mouth spiced baked apples studded in the middle and on top!  With the confectionary sugar glaze bringing just the right amount of sweetness, there may be no better way to start off a fall weekend! Heck, there may be no better way to encourage you to go apple picking!


Recipe
Apple Fritter Cake
Makes 16 - 2" squares

Ingredients
Cake
3 cups (336g) peeled, cored and diced Honeycrisp apples (see notes)
1/4 cup (50g) light brown sugar
1/4 cup (50g) dark brown sugar
1 1/2 teaspoons cinnamon
1 Tablespoon all-purpose flour
pinch of Kosher salt

1 cup (226g) unsalted butter, room temperature
3/4 cup (150g) granulated sugar
3 large eggs
2 teaspoons vanilla
1 3/4 cup (228g) all-purpose unbleached flour
1 3/4 teaspoons baking powder
1 teaspoon Kosher salt
1/4 teaspoon nutmeg
1/2 cup whole milk

Icing
3/4 cup (85g) confectionary sugar, sifted
1 1/2-2 Tablespoons whole milk
pinch of Kosher salt

Directions
Cake
1. Preheat oven to 350 degrees (F). Line an 8" square metal baking pan with parchment paper. Butter the paper and set aside.
2. In a medium sized bowl, mix together the diced apples, light brown sugar, dark brown sugar, flour and salt. Stir until the apples are coated. Set aside.
3. In the bowl of a standing mixer fitted with a paddle attachment, cream the butter (about 2 minutes).
4. Add in the granulated sugar and beat until light and fluffy (about 3-4 minutes).
5. Beat in the eggs one at a time. Blend until incorporated.
6. In a medium sized bowl, whisk together the flour, baking powder, Kosher salt, and nutmeg. Then add into the mixing bowl. Mix on medium speed until the flour is blended in.
7. Mix the vanilla into the milk. With the mixer on low, slowly pour in the milk/vanilla. Mix until fully incorporated. You should have a thick, luscious matter.
8. Spread half of the batter in the prepared pan. Smooth with an offset spatula.
9. Evenly top the bottom layer with 1/2 of the apple mixture.
10. Spread the remaining batter over the first apple layer.
11. Evenly top the batter layer with the remaining 1/2 of the apple mixture.
12. Place the baking pan on a baking sheet. Insert into the oven. bake for 60-70 minutes or until done. Note: The cake should spring back when lightly pressed and the edges should be golden brown.
13. Remove from the oven and let cool completely.

Icing
1. In a small-medium sized bowl, whisk together the confectionary sugar and milk (begin with 1 1/2 Tablespoons) until the icing has a smooth, pourable consistency. If too thick add a little more milk. If the icing gets too thin, add a little more confectionary sugar.

Assembly
1. Remove the baked Apple Fritter Cake from the pan and place on a cutting board.
2. Drizzle the icing over the top of the cake. Let set before cutting.
3. Using a sharp or serrated knife, cut into 16 pieces. Transfer pieces to a serving platter or dish.
4. Serve and enjoy. Store any leftovers lightly covered and at room temperature.

Notes: (1) Dice the apples to somewhere between 1/4" and 1/2" size. Two large apples will yield more than enough for three cups of diced apples. (2) If you want more icing, go for it. Just increase the amount of ingredients proportionately. (3) I love baking this cake in an 8" square metal baking pan, but if you don't have one use a 9" round metal baking pan. I would still recommend you cut the cake in squares. Even though you won't get the same number of same sized squares. (4) To extend the life of the Apple Fritter Cake longer than 2 or 3 days, store covered in the refrigerator. Bring to room temperature before eating or eat chilled.