Wednesday, March 30, 2022

Orange Yogurt Cake with Coconut Cream Cheese Icing

As much as I love cookies, I secretly harbor an even greater fondness for cake. While I have a weakness for decadent layered cakes (especially chocolate ones) slathered in icing, my sweet tooth is easily satisfied with simple, one bowl cakes. The kinds you can make on a whim. Ones so versatile they are equally impressive as a snacking, afternoon tea, Sunday brunch/dinner, or holiday cake. Which explains in part why I am currently smitten with this luscious, moist Orange Yogurt Cake with Coconut Cream Cheese Icing. But the best part of this cake is that it hits all the right notes: simple, easy to make, pretty, delicious, flavorful, and, highly adaptable.


Adding to this cake's already long list of virtues is that it is a relatively inexpensive cake to make. However, it delivers like it came from a high end bakery in both flavor and appearance. 

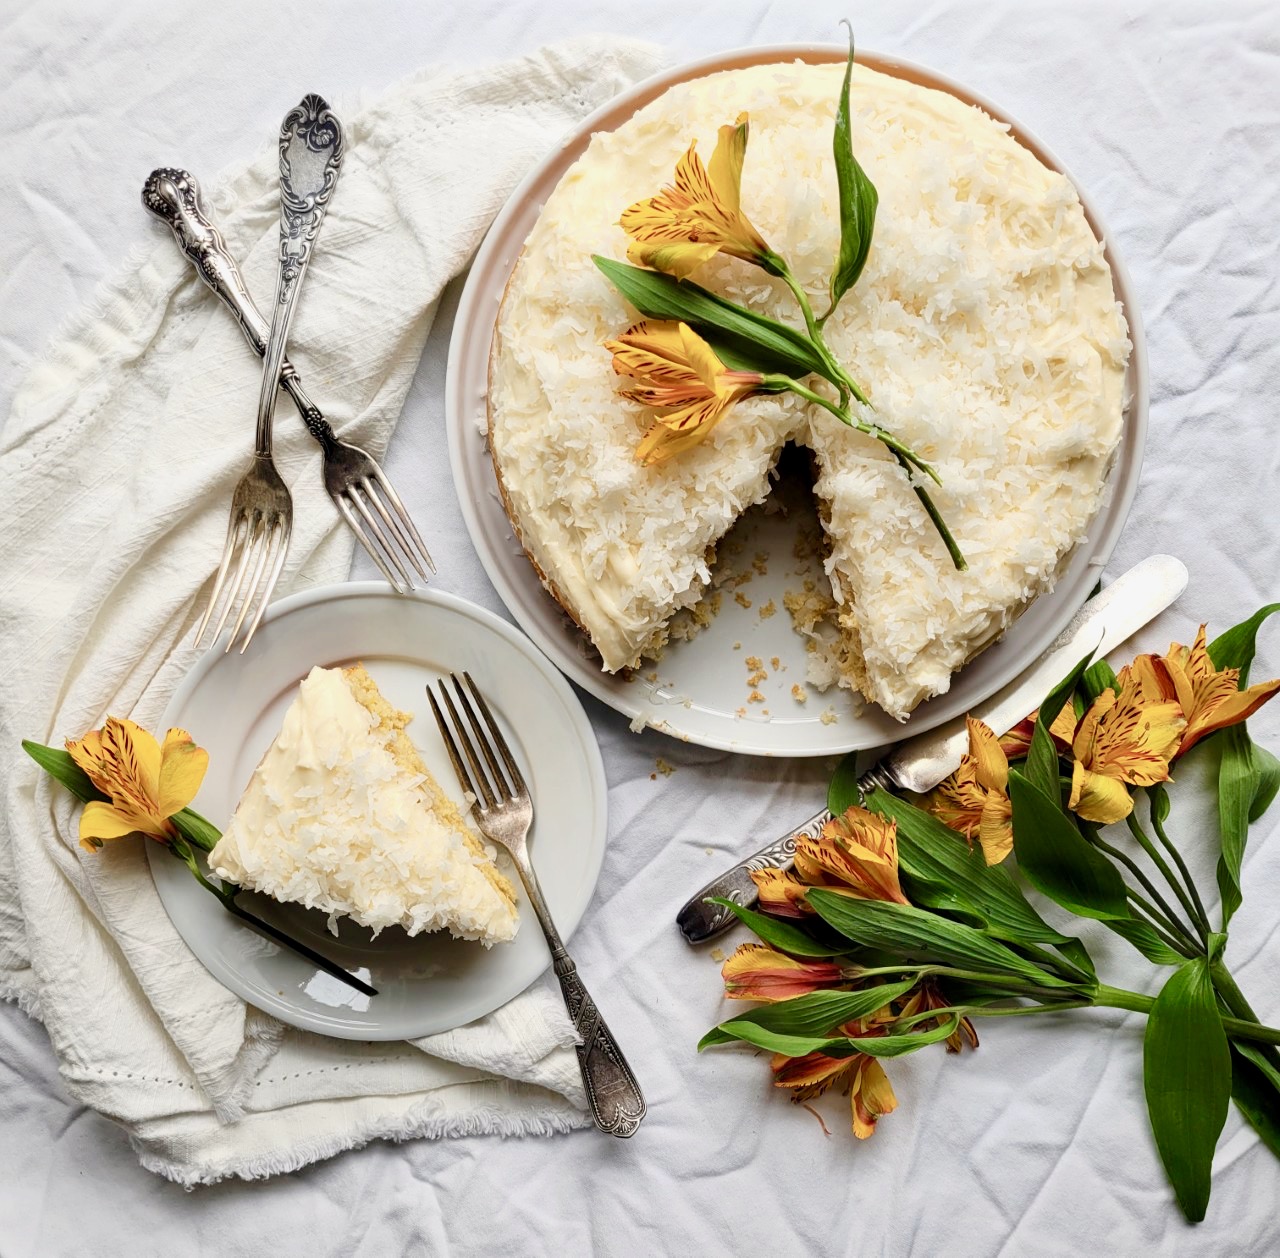
The inspiration for this Orange Yogurt Cake with Coconut Cream Cheese Icing came from a recipe in Julia Turshen's "Simply Julia: 110 Easy Recipes for Healthy Comfort Food" cookbook. While the changes made to the ingredients were minimal, there was a significant alteration made to the cake's appearance. Instead of making the cake in a loaf pan and serving it with some additional yogurt and orange slices, this cake was baked in a nine inch round cake pan and topped with a coconut cream cheese icing. Changes that took the cake from being simple to a little bit fancy.


The ingredients for this Orange Yogurt Cake are a little surprising (in a good way) as they are relatively inexpensive and easily accessible. Yet more reasons to put this cake in the 'winner' category. There are two secret ingredients: full fat plain Greek yogurt and extra-virgin olive oil. Both of which contribute to the cake's moistness and texture. And instead of using only all-purpose flour, this cake is made with both all-purpose and whole wheat flours. The whole wheat flour not only brings a little more nutritional value to the cake it plays a significant role in its' density. Equal parts all-purpose and whole-wheat flours create a cake with a perfect texture. 


For the most optimal results, I highly recommend you weigh your ingredients. But if you don't have a scale, it's important to measure using the right tools. Liquids should be measured in liquid measuring cups. Solids should be measured in measuring cups intended for use with dry ingredients. Because liquid and dry measuring cups do not hold the same volume, you risk having inconsistent results each time you make a recipe when you use liquid measures for dry ingredients and dry ingredients in liquid measure. Even worse, you are likely have a less than desirable outcome causing you wonder why your cake didn't look or taste anything like the one you saw or ate. 


When the dense crumb, moist, citrusy flavored cake is combined with the mouthwatering cream cheese icing this dreamy cake it seems to take on a kind of Creamsicle-like eating experience. The combination of flavors and textures in the cake and icing are nothing short of heavenly. 


For those of you who love coconut, this cake is pure bliss. But for those of you who aren't coconut fans, this Orange Yogurt Cake is just as delicious lathered with a simple cream cheese icing.


There is something rather appealing about a round versus a square cake. The cake batter just happens to fit perfectly in a nine-inch cake pan. 


Baked in a preheated 350 degree (F) oven, the baking time ranges somewhere between 25 and 35 minutes (my baking time was 30 minutes). You can test for doneness by either pressing lightly on the cake (it will be firm but bounce back) or a toothpick tests clean when inserted in the center of the cake.


If you were looking for a scrumptious, swoonworthy cake to serve for Easter Dinner or Mother's Day Brunch, look no further because you have now found it! Although you hardly need a reason to make a cake destined to wow both your taste buds and eyes. Because this is one of those cakes you should make simply to satisfy a sweet tooth or to bring a little bit of sunshine into the lives of your family/friends.

Recipe
Orange Yogurt Cake with Coconut Cream Cheese Icing
Makes one 9" cake - serves 8-10

Ingredients
Cake
2 large eggs, room temperature
1 cup (227) full fat Plain Greek Yogurt
1/2 cup (120ml) extra-virgin olive oil
Finely grated zest from one large navel orange
Juice from one large navel orange (2.5 ounces)
1 Tablespoon vanilla
2/3 cup (133g) granulated sugar
2 teaspoons baking powder
1/2 teaspoon Kosher salt
1 cup (130g) all-purpose flour
1 cup (130g) whole wheat flour

Icing
8 ounces (226g) cream cheese, room temperature
1/2 cup (113g) unsalted butter, room temperature
2 cups (240g) confectionary sugar, sifted
2 teaspoons vanilla
1/4 teaspoon Kosher salt
1 cup (95g) flaky sweetened coconut flakes

Directions
Cake
1. Preheat oven to 350 degrees (F). Spray a 9" cake pan with canola oil and line with a piece of parchment paper. Set aside.
2. In a large bowl, whisk together the two eggs until well blended.
3. Add in yogurt, olive oil, vanilla, sugar, salt, orange zest, orange juice and vanilla. Whisk until combined.
4. Stir together the all-purpose flour, whole wheat flour, and baking powder in a medium bowl together before adding it in to the orange, yogurt mixture. 
5. Gently whisk the flour mixture just until it's blended in (no streaks remain). Be careful to not overmix.
6. Pour into the prepared pan. Smooth the top with an offset spatula.
7. Place the cake pan on a large baking sheet and insert into the oven. Bake for 25-35 minutes or until the cake is done. Remove from oven and place the cake pan on a cooling rack. Let cake rest for at least 10 minutes before transferring to a platter. Let the cake come to room temperature before icing.

Icing
1. In a medium sized bowl, beat the cream cheese until smooth using a hand held mixer.
2. Add in the butter and beat until the mixture is smooth and creamy.
3. Mix in the vanilla and Kosher salt.
4. With the mixer on low, add in the sifted confectionary sugar. Beat until the mixture is smooth.
5. Spread the cream cheese icing on the top of the cake. Note: If not topping with the coconut, use a spoon or an offset spatula to swirl a design into the icing.
6. Sprinkle the coconut over the top.
7. Cut and serve. 
8. Store any leftover cake covered and chilled in the refrigerator.

Notes: (1) Slight adaptations made to Julia Turshen's Orange Yogurt Cake recipe from her cookbook "Simply Julia: 110 Easy Recipes for Healthy Comfort Food".

Tuesday, March 29, 2022

Pickled Red Onions - Version 2


On more than one occasion I have used this space to share my trials and tribulations of being a food blogger, runner, amateur photographer, etc. Why I intentionally spend time in an uncomfortable place to experience self-doubt and discomfort with the hope of experiencing growth might be indicative of my bipolar glutton for punishment and no risk/no reward personalities. Or, in other words, I find jumping into the learning curve equally exhausting and exhilarating. Sometimes I can be persuaded to jump in, while other times I need to at least think I am ready (although who really is ready to ever to choose temporary discomfort?). This past week I took the plunge into the world of Reels. All I can say it's akin to jumping into the deep end of a pool without wearing a life preserver or knowing how to swim. While it's only been a few short days of entering into this 'discomfort zone', already I can hardly wait for the feelings of angst and uncertainty to be replaced with some sense of accomplishment. Let's hope that is sooner rather than later! I am anticipating (actually hoping) that someday I will look back at my early Reels and realize all of my discomfort wasn't all for naught. Sort of the same 'yikes' feeling I get when I look back at some of my early blog posts. Like the one for Pickled Red Onions I posted eight years ago. 


Anyone who was drawn to that early post did so because they were either on the hunt for a Pickled Red Onions recipe or they were one of my loyal friends supporting my endeavor. While it's still a really good recipe, the photos themselves were not ones actually inspiring anyone to make Pickled Red Onions. But back then, I didn't know what I didn't know (now). Sometimes looking back in that proverbial rearview mirror can serve to reaffirm the time and energy spent being uncomfortable was well worth it. 


Now I know I am taking a bit of a leap here, but I really do hope both the photos and the super easy Pickled Red Onions - Version 2 recipe posted here will inspire you to make a batch of these incredibly versatile, tender-crunchy, tangy-sweet flavored, pretty in pink pickled red onions. They are game changers on burgers, fish tacos, carnitas, deviled eggs, pork sandwiches, charcuterie boards, a Ploughman's lunch platter, avocado toast, hot dogs, and salads to name a few. And, if you happen to be someone who enjoys eating pickles out of a jar, well you might just find yourself happy to nosh on a jar of pickled red onions. 

When it comes to choosing a vinegar when making pickled onions, half of the decision is made based on use (will you be refrigerating or canning) and the other half on flavor. If you looking to can pickled onions, you need to use a vinegar having at least a 5% acidity. Which is why many choose to use either white vinegar or apple cider vinegar when making pickled vegetables. But, if you are looking for a vinegar that not only enhances the gorgeous pink hue created when mixed with thinly sliced red onions, but has even more flavor than a white, red wine, or apple cider vinegar, then you definitely want use a seasoned rice vinegar. With an acid level ranging from 4.2% to 4.3%, you won't be able to 'can' your pickled red onions, but you can keep them refrigerated for up to three weeks. If they last that long.


Flaky sea salt, granulated sugar, sliced garlic cloves, and black peppercorns all get mixed together with the seasoned rice wine vinegar to create the pickling brine. The flaky sea salt not only gives the pickling brine flavor, it dissolves better in vinegar than Kosher salt. The granulated sugar adds some sweetness by balancing out the acidity and tanginess of the vinegar. Sliced garlic cloves, black peppercorns, and even a few sprigs of thyme add flavor and a bit of complexity to the pickled red onions. When all of these ingredients are mixed in with the red onions, magic happens.


When cutting the red onions, think thin. Not see-through thin, but closer to about an 1/8" in thickness thin. You want them to be able to quickly absorb the pickling mixture, yet still have a bit of a crunch factor while they marinate. Cutting red onions goes quickly using a mandolin, but a good sharp knife works just as well. 

In this recipe, there is no need to rinse or blanch the thinly sliced onions in warm or even hot water before mixing them into the pickling mixture as you will be refrigerating them, not canning them. Note: This way of making pickled red onions might be a slight departure from most other pickling recipes. 


For the most optimal flavor, allow these incredibly easy to make irresistible pickled red onions to chill in the refrigerator for at least four hours or overnight before you take your first bite. If there was ever a condiment that could single-handedly, significantly elevate the droolworthy flavor and texture of anything it was put on, without a doubt it would be Pickled Red Onions. Especially, these Pickled Red Onions.


If, by some remote chance pickled red onions have been outside of your condiment comfort zone or if you just have never had them before, I promise, that in one bite you will be wondering why and how you had lived without them. Yes, they are that extraordinary! Last, but not least, I genuinely hope I have inspired you to make these Pickled Red Onions (Version 2) this time around.

Recipe
Pickled Red Onions - Version 2

Ingredients
Two large red onions (about 1 1/4 pounds), thinly sliced (about 1/8" thickness)
1 1/2 cups (12 ounces/355 ml) seasoned rice wine vinegar (see notes)
4 teaspoons flaky sea salt
3 Tablespoons (48g) granulated sugar
1 teaspoon black peppercorns
2 large garlic cloves, cut into quarters
Optional: sprigs of fresh thyme

Directions
1. In a medium sized bowl, whisk together the seasoned rice vinegar, flaky sea salt, granulated sugar, and black peppercorns. 
2. Add in the sliced red onions and toss until the onions are well coated. Let sit for 3-5 minutes.
3. Add in the garlic cloves, then carefully pour the red onion mixture into a 32 ounce glass jar. Note: It's easier to transfer the mixture when you use thongs to place the sliced onions in the jar and then pour the brining liquid over the onions.
4. Top with a couple of sprigs of fresh thyme, if using.
5. Put the lid on the glass jar and place in the refrigerator for at least 4 hours or overnight before using them for the first time. The Pickled Red Onions will be good kept covered and chilled in the refrigerator for several weeks, if they last that long.

Notes: (1) I used a 12 ounce bottle of Marakan Seasoned Rice Vinegar in this recipe. (2) Mix and store Pickled Red Onions in glass bowls and glass jars. Do not use a metal bowl or metal storage container as the acidity of vinegar mixture will react with the metal. (3) I used 1 litre/33 ounce size wide mouth Weck jar. You can find them on Amazon, at Williams-Sonoma, at World Market or any good quality kitchenware store.


Zion National Park, Springdale, Utah  (March 2022)


Friday, March 18, 2022

Boursin Cheese Beef Wellington Bites


Last December a very good friend asked me if I would make some cookies and an appetizer for a large gathering she was having. There was just one catch. She asked me to make an appetizer I had never made before. At the time my first angst filled, plummeting self-confidence thought was 'omg, what if I muck it up and ruin her event'. This was immediately followed by another slightly more positive thought 'she has more faith and confidence in me than I have in myself''. All the while as my lips were saying 'yes', my head couldn't help but wonder 'what am getting myself into?'. The cookies would be a no-brainer, but the miniature Beef Wellington Balls (pieces of beef tenderloin and tiny spoonfuls of Boursin cheese wrapped and rolled in puff pastry), well they out to be one of those appetizers on the labor and time intensive side.  Even after making and delivering them, I irrationally worried they wouldn't turn out when she baked them in her oven. And yet, in spite of vowing to myself to never make those little balls again (even for very, very good friends), the savory gods stepped in and made certain the appetizers were devoured at the party. So as it turned out, not only did I worry for naught, I was inspired to create a much easier, maybe even more impressively elegant appetizer made with beef tenderloin, Boursin Cheese, fresh thyme, and puff pastry. Had I fallen victim to self-doubt and fear of failure, these scrumptious, gorgeous Boursin Cheese Beef Wellington Bites may have never been created. The moral of this story: Do what scares you because the fear of regret is always greater than the fear of failure.


Normally when you think of Beef Wellington you think of beef tenderloin and sautĂ©ed mushrooms wrapped in puff pastry. However, this version of Beef Wellington pairs beef tenderloin with a garlic and herb Boursin Cheese and some fresh thyme semi-encased in an egg washed square of buttery puff pastry. The combination of savory flavors is ethereal. They are nothing short of pure bliss. 


In all seriousness, these sinfully delicious Boursin Cheese Beef Wellington Bites are destined to guarantee you earning the highly coveted culinary designation of either 'hostess with the mostess' or 'host with the most'. A platter of these beauties served with a fabulous bottle of wine will definitely make for an epic gathering.

When you make anything with five or less ingredients, the quality of the ingredients really matters. So splurge on a good piece of beef tenderloin and buy some high quality puff pastry. While I have used Pepperidge Farm Puff Pastry before (and with good results), Dufour Puff Pastry yields great results. I generally prefer to buy Boursin Cheese at Trader Joe's as it's almost half the price you pay for it at most grocery stores. 


The thawed sheet of puff pastry is rolled out very slightly on a lightly floured surface before it's cut into 16 three inch squares (you will actually get 15 squares but have enough to piece together the 16th one). After spraying a mini-muffin pan with canola or avocado oil, the pastry squares are placed into the wells of the pan and just lightly pricked with a fork. Next goes in a teaspoonful of the Boursin Cheese, followed by a pinch of fresh thyme leaves. After placing a piece of the beef tenderloin on top, brush the egg wash on the edges of the puff pastry, then season the beef with some Kosher salt and black pepper. Place the muffin pan in the refrigerator for at least 30 minutes before placing it in a preheated 400 degree (F) oven. Note: The Boursin Cheese Beef Wellington Bites could be made earlier in the day, wrapped and chilled in the refrigerator until ready to bake.


Baking time ranges from 22-26 minutes or until the edges of the puff pastry have puffed up and are golden in color. 


Remove from the muffin tin, top with some additional fresh thyme, and arrange the Boursin Cheese Beef Wellington Bites on a platter. Serve with a small bowl of garlic aoili and bowl of cornichons. This is definitely one of those appetizers having a high 'wow' mouthwatering factor. They are pure perfection. Even better, they are neither labor nor time intensive to make.


I strongly encourage you to make these easy to make delectable, bite sized appetizers for your next gathering of really good friends. The kind of friends who believe in you even more than you believe in yourself, who inspire you to channel your inner domestic goddess, and who you just love to invite over. Open up a bottle of sparkling wine, a really good Pinot Noir, a great red blend, an impressive Cab, or mix up a batch of your favorite 'house' cocktails and you have the makings of a really great evening.
 

Recipe
Boursin Cheese Beef Wellington Bites
Makes 16 bites

Ingredients
14 ounces (396g) puff pastry, thawed (see notes)
5 ounces (150g) Boursin Cheese (Garlic and Herb), slightly softened
5-6 ounces (145-175g) beef tenderloin (filet mignon), cut into 3/4" pieces
Fresh thyme
Kosher salt and black pepper
1 large egg mixed with one teaspoon of water  to make an egg wash

Garlic Aoili (homemade or store-bought) - see notes
Optional for serving: cornichons

Directions
1. Generously spray a non-stick mini-muffin tin with canola or avocado oil. Set aside.
2. On a lightly floured surface, unfold the thawed (but chilled) puff pastry and roll out just to even the surface. Cut into 16 three inch squares. Note: If you are using a sheet of Dufour puff pastry, you will get 15 squares out of the sheet, but will have enough left over to piece together the sixteenth piece.
3. Place the squares into the wells of the prepared muffin pan. Use a fork to make one poke into the bottom of each piece of pastry.
4. Put a teaspoonful of the Boursin cheese into each one. If you have Boursin cheese left over, distribute evenly amongst them.
5. Sprinkle a few leaves of the fresh thyme on top of the Boursin Cheese.
6. Place a piece of the cubed beef tenderloin on top. Press down lightly. Season with Kosher salt and black pepper.
7. Brush the egg wash on the edges of the exposed puff pastry. Place the muffin tin in the refrigerator and chill for at least 30 minutes (or make early in the day, cover and chill until ready to bake).
8. Preheat oven to 400 degrees (F). Once the oven has preheated, put the muffin tin on a baking sheet and place in the oven. Bake for 24-27 minutes or until the pastry is puffed and golden.
9. Remove each bite with an offset spatula and place on a serving platter. Top each of the Boursin Cheese Beef Wellington Bites with a small sprig or a few leaves of fresh thyme. 
10. Serve with some garlic aoili and cornichons. 
11. Enjoy these bites immediately after they have been plated. They are great warm, but still really good when they come to room temperature.

Notes: (1) I used a package of Dufour Puff Pastry to make these bites. If you can't find it (I usually find it at Whole Foods), then use a package of the Pepperidge Farm Puff Pastry. (2) To make your own homemade aoili, mix together 1/2 cup of good quality mayonnaise with one clove of garlic finely minced. Chill at least one hour before serving to allow the flavors to blend. (3) In addition to buying the Garlic and Herb Boursin Cheese at Trader Joe's, I also buy cans of spray canola and avocado oil there as well.


Joshua Tree, Arizona, March 2022

Friday, March 11, 2022

Flourless Chocolate Crinkle Cookies


Sometimes the reality of going to a place on one's bucket list, doesn't always live up to either the hype or the expectations. But then sometimes, the experience more than exceeds them. Nothing, not even the thousands of images I had drooled over prior to going on this trip, prepared me for a recent bucket list trip. As just last week, I was in a state of head spinning, heart racing visual nirvana while taking in the sunrise beauty at Horseshoe Bend, exploring the Lower and Upper Antelope Canyons in Page, Arizona, and hiking in Zion National Park in Springdale, Utah. Places I had dreamt of going for years. The landscapes in northern Arizona and southwestern Utah were unlike anything I had ever seen before and they were beyond spectacular. And while all of the other worldly, mesmerizing images will be permanently etched in my memory, I would jump at the chance to go back there again. With everything that has gone on in the world and is going on now, being able to freely travel feels like such a privilege these days. One I don't think I will ever take for granted. In addition to the lifetime of memories, there many takeaways from this long awaited, breathtaking adventure. But there was that one resonated with me the most. Never give up on your dreams. 


After eating almost every meal at a restaurant for several days, it felt good to get back home to my kitchen, to get back to cooking and baking. There had a been a cookie recipe I had been wanting to make for months, but for some reason I kept putting it off. Had I known how decadently delicious these Flourless Chocolate Crinkle Cookies would be, I wouldn't have procrastinated for so long. Like the magnificent landscapes out west, these cookies will take your breath away. 

Months back I stopped at Stephanie Izard's Sugargoat Bakery in Chicago to buy some cupcakes and cookies. While they all had varying wow factor levels, there was a chocolate cookie I feel madly in love with. As luck would have it (or when you put something out in the universe and the universe is listening) one of my friends actually had it. And as luck would have it, she shared top chef winner, cookbook author, restaurant owner Stephanie Izard's recipe for Flourless Chocolate Crinkle Cookies with me. At the time I looked over the ingredients for the recipe, there were two things holding me back: going out to get a jar of her 'this little goat when to Belize hearty and bright spice mix' and trying to wrap my head around how a spice mixture made of savory garlic, onion, smoky paprika, and chilies could be responsible for creating a rich, intensely chocolatey, mouthwatering cookie. Let's just say getting the jar of spice was easier than reconciling my spice-challenged imagination.


Made with only seven ingredients, these Flourless Chocolate Crinkle Cookies are the kind causing a chocolate lover to become weak in the knees. They are dense yet moist, decadent, rich, and perfectly spiced. The recipe makes somewhere between 14-16 cookies and takes somewhere around 40 minutes to make from start to finish. And having a standing mixer with a whisk attachment will make whipping up the egg whites to firm (but not dry) peaks easier than whisking by hand. 

Allowing the batter to rest for 7-10 minutes is key to enabling the dough to become 'scoopable'. Using an ice cream scoop (about 1 1/4" in diameter) makes forming the balls of dough a breeze. But if you don't have a metal ice cream scoop use a tablespoon to form golf balled size balls of dough. Note: The dough likes to stick to the ice cream scoop. If you run the ice cream scoop under hot water and dry it, the heat from the metal scoop will make scooping a little easier. But I used my fingers to release the dough from the scoop and it worked just fine.


Baking time for the cookies ranges from 12-14 minutes. The cookies will still be slightly soft in the center when you take them out of the oven, but they will firm up as you let them cool on the baking sheet. Note: Do not transfer the baked cookies to a cooking rack. Let them come to room temperature on the baking sheet.

The recipe called for rolling the balls of dough in confectionary sugar before putting them into the oven. I decided to sift even more confectionary sugar over them when they finished baking. Which means they look a little less crinkly, but I think the extra confectionary sugar made them slightly more delicious.

Chocolate Whoppers, a recipe from Maida Heatter, has been a long time favorite semi-flourless chocolate cookies. But these (truly) Flourless Chocolate Crinkle Cookies are definitely giving my death by chocolate cookie loving self a run for their money. 

I often have friends asking me to make a gluten-free cookie. And until I made and devoured these Flourless Chocolate Crinkle Cookies I never thought a gluten-free cookie could be as good as (or better than) a cookie with gluten. These cookies prove me wrong! If you are looking for a great cookie to serve for Passover, you definitely want to make these Flourless Chocolate Crinkle Cookies!

Recipe
Flourless Chocolate Crinkle Cookies (inspired by Stephanie Izard's Flourless Chocolate Crinkle Cookies)
Makes 14-16 good sized cookies

Ingredients
1 1/2 cups (8 ounces/255g) semi-sweet chocolate chips, divided
4 large egg whites
1 teaspoon good quality vanilla
2 3/4 cups (330g) confectionary sugar, divided
1/2 cup (50g) Dutch Processed Cocoa Powder
2 teaspoons This Little Goat Went to Belize spice (See Notes)
1/2 teaspoon kosher salt

Directions
1. Preheat the oven to 350 degrees (F). Line two large, heavy bottomed baking sheet with parchment paper.
2. In a small-medium bowl, melt 1 cup (170g) of the semi-sweet chocolate chips in the microwave. Set aside to cool slightly.
3. In a medium sized bowl, whisk together 2 cups (240g) confectionary sugar, cocoa powder, Kosher salt, and the This Little Goat Went to Believe spice. Set aside.
4. In the bowl of a standing mixer fitted with a paddle attachment, whip the egg whites until firm peaks form. Beat in the vanilla until blended.
5. Reduce the mixer speed to low, and add in the dry ingredients until combined.
6. Mix in the melted chocolate chips. Blend until combined.
7. Add in the remaining half cup (85g) semi-sweet chocolate chips and mix using a spatula.
8. Allow the batter to rest for 7-10 minutes to allow it firm up slightly.
9. Use a 1 1/2 inch in diameter ice cream scoop or tablespoon to form golf ball sized balls of dough. Roll each ball of dough into the remaining 3/4 cup (90g) confectionary sugar. 
10. Place balls of dough on prepared baking sheets, spacing at least one and a half inches apart.
11. Bake cookies until they puff up and are crackly on top (about 12-14 minutes). Allow the still slightly soft in the center cookies to cool completely on the baking sheet. Note: Start checking for doneness at the 12 minute mark as some ovens can run hot.
12. If desired, sift more confectionary sugar over the baked cookies.

Notes: (1) You can buy the Little Goat Went to Belize spice at many Whole Food stores, some grocery stores, or on Amazon. (2) I used Nestle Dark Chocolate (53% Cacao) Chocolate Chips. (3) Cookies remain delicious for several days if kept in an air-tight container.


Lower and Upper Antelope Canyons, Page, Arizona, March 2022