Showing posts with label Bread. Show all posts

Tuesday, June 17, 2025

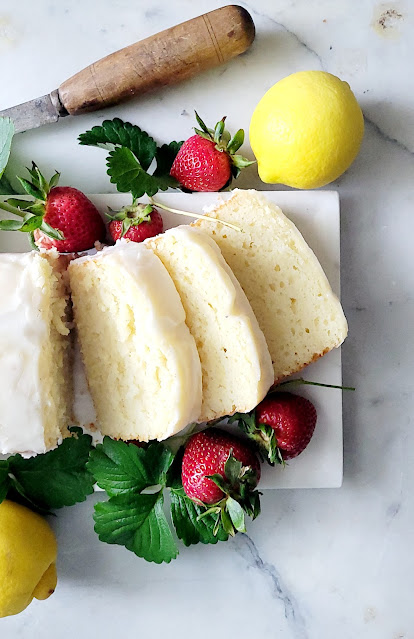
Lemon Yogurt Loaf w/ Lemon Icing


At an outdoor concert to celebrate a friend's birthday, we had an eclectic mix of nibbles. From a charcuterie board, to pistachio shortbread cookies, to a lemon yogurt loaf, we enjoyed one another's company and the music while feasting upon our concert picnic fare. While I had would have never thought pairing a lemon yogurt loaf with a charcuterie board would work, it was actually a brilliantly delicious pairing. So rather than pigeonhole a Lemon Yogurt Loaf into the categories of breakfast, a midday snack, a high-tea option, or an afternoon dessert, it now has almost an infinite number of serving possibilities. Evening concert fare being just one of them.


This Lemon Yogurt Loaf with Lemon Icing is proof that a seemingly plain, simple loaf cake can surprisingly be an impressive, craveable one. Especially if you are a lover of all things lemony. This loaf is lemony, dense, and moist. It's more spongy and moister than a poundcake, however, it still might give you pound cake vibes. Note: If you are looking to make a Lemon Pound Cake, I would highly recommend you using this Classic Pound Cake recipe.


For the most part you will probably have all of the ingredients on hand to make this loaf. With the possible exception of plain, whole milk yogurt. If you generally buy low-fat or fat-free yogurt, you will want to make a trip to the store to buy some plain whole milk yogurt when you make this. The whole milk yogurt adds moisture, richness and a subtle tanginess to the baked loaf. In addition, it helps to create a more tender crumb. A low-fat yogurt may have less calories, but it will also result in a less rich flavor and will affect the rise on the loaf. 


There may be nothing more refreshing on a hot day than something lemony. And this Lemon Yogurt Loaf with Lemon Icing just might be what satisfies your lemon flavor cravings. It can be served simply as a thick slice or you could gussy it up by serving it with either some lemon curd (because there is no such thing as too much lemon for a lemon lover) or you can turn it into a shortcake like presentation by topping a thick slice with some freshly whipped cream and fresh strawberries.

Recipe
Lemon Yogurt Loaf w/ Lemon Icing
Makes one 8" x 4" Loaf. Serves up to 10 people.

Ingredients
Loaf
1 1/2 cups (195g) all-purpose flour
2 teaspoons baking powder
1/2 teaspoon Kosher salt
1 cup (240g) plain, whole milk yogurt (e.g., Chobani)
3 large eggs
1 Tablespoon and 1 teaspoon of lemon paste (or lemon extract)
1 cup (200g) granulated sugar
Zest from 3 lemons
1/2 cup vegetable oil
1/3 cup freshly squeezed lemon juice

Icing
1 cup (120g) confectionary sugar
2-3 Tablespoons freshly squeezed lemon juice
1 teaspoon honey

Directions
Loaf
1. Preheat oven to 350 degrees (F). Line an 8"x4" metal baking pan with parchment paper. Butter any exposed parts of the pan. Set aside. Note: If you don't have an 8"x4" baking pan, you can use an 8 1/2" x 4 1/2" baking pan. 
2. In a medium sized bowl, mix together the sugar and lemon zest. Set aside.
3. In another medium sized bowl, whisk together the flour, baking powder and Kosher salt. Set aside.
4. In a large bowl, mix together the eggs, yogurt, lemon juice and lemon extract or paste until blended.
5. Add in the sugar and lemon zest mixture. Whisk until well blended.
6. Add in the dry ingredients. Whisk thoroughly and until the mixture slightly thickens.
7. Pour mixture into the prepared baking pan. Using a butter knife, draw a line down the center of the loaf (insert the knife at least 2 inches into the loaf). 
8. Place the loaf pan on a baking sheet and insert into the oven. Bake for 55 to 60 minutes or until a toothpick inserted into the center comes out clean. Remove from the oven and let cool.
9. Remove the cooled loaf from the pan when ready to pour on the icing.

Icing
1. In a small-medium sized bowl, whisk together the confectionary sugar, at least 2 Tablespoons of lemon juice and the honey until smooth and having a spreadable/pourable consistency. If the icing is too thick, add the additional 1 Tablespoon of lemon juice.
2. Pour the icing over the cooled loaf. Note: If the loaf is too warm, the icing will melt into it.
3. Allow the icing to set. Then place the loaf on a platter. Cut into thick slices and serve.
4. Optional serving ideas: Serve with a bowl of lemon curd or serve with freshly whipped cream and strawberries.

Notes: (1) You will need 4 lemons to make this loaf. (2) If you like a really thick icing on your loaf, double the icing ingredients. After pouring on half of the glaze, let it set up slightly before pouring on the remaining icing. If you pour it all on at once, it will drip down the sides of the cake and you won't get the thickness you desire. (3) Instead of finishing the loaf with the lemon icing, you can finish with a lemon glaze. To make the glaze you will need 1/3 cup (67g) of granulated sugar and 1/3 cup lemon juice. Cook the sugar and lemon juice in a small saucepan until the sugar dissolves and the mixture is clear. Allow the loaf to cool approximately 10 minutes before pouring the glaze over the top of the loaf. Allow it to soak in. If the glaze isn't absorbing well, use a skewer to make holes in the top of the cake. When cake has cooled, you can dust with confectionary sugar.


Little Compton, Rhode Island at Sunset (May 2025)

Monday, June 2, 2025

Streusel Topped Banana Bread


It has been slightly more than five months since I have posted a recipe. And quite honestly, I wasn't sure if I would ever share another recipe here again as so much has changed in my life. The most significant change has been the unexpected passing of my husband, my life partner, and my favorite taste tester. For those of you who have experienced grief, you know all too well how much physical, emotional and spiritual fatigue impacts every part of your being. Things that once brought you joy become ones that feel taxing to your energy levels. Needless to say, in dealing with all the life changes in this new normal, the idea of creating a new blog post had seemed overwhelming. And I couldn't seem to muster the energy needed. But over the weekend, I had an epiphany. While loss brings change, it also brings new perspectives. By looking at the blog differently than I had in the past, I think I discovered I may have the energy to return to one of the places that used to bring me joy. So just as I am not the same person I was five months ago, going forward saltedsugaredspiced.com will not be the same either. There will be less photos and less words (I can hear you applauding!) along with less posts, but there will still be great recipes. Sometimes I will share a brand-new recipe or sometimes it will be a recipe completely updated and reworked. This Streusel Topped Banana Bread is one of those updated, reworked recipes. 

Five years ago I shared a recipe for a Banana Bread with Streusel Topping. Ever since then, it has been my go-to banana bread recipe. It's the one I strongly encouraged everyone to make. But after making it with a friend last week, I decided the streusel topping didn't have the 'wow' factor I thought it should have. So, I decided to make a change to it. The kind of change that would completely transform the look, texture, and taste of the Banana Bread. I will cut to the chase and tell you that this streusel topping gives the banana bread that 'tastes like something you would spend oodles of money on at a high end bakery 'wow' factor'. The sweetness and crunch the streusel topping added to the banana bread completely transformed it. 

In addition to completely revamping the streusel topping, there were some subtle changes made to the banana bread portion of the recipe itself. Slightly rounding the baking powder and baking soda, adding a pinch of nutmeg (optional, but good), slightly reducing the amount of mashed ripe bananas, lightly beating the eggs before mixing in, and using an organic, stone milled all-purpose flour from Janie's Mill. Like all stone-milled flours, it's color is a light beige rather than a pure white. Which means your quick breads and/or cookies will have a slightly darker color. Personally, I think this flour is a game changer in this Banana Bread, but using a high quality unbleached flour (like King Arthur) will still give you an amazing, impressive loaf! I will try to temper being overly dramatic, but this Streusel Topped Banana Bread is an absolute blue-ribbon, throwdown winner! 


Recipe
Banana Bread w/ Streusel Topping 
Makes one 9" x 5" loaf. Enough to share, but recommend you making 2 loaves. One for you and one to share with others.

Ingredients
Streusel Topping
1 1/4 cups (162g) all-purpose flour (i.e. King Arthur All-Purpose Unbleached Flour)
1/2 cup (100g) light brown sugar
1/4 cup (50g) granulated sugar
1 1/2 teaspoons ground cinnamon

1/4 teaspoon kosher salt
1/2 cup (113g) unsalted butter, melted and cooled slightly
Optional: 2 Tablespoons of sparkling sugar to finish.

Banana Bread
1 1/2 cups (202 g) all-purpose flour (see notes)
1/4 teaspoon baking powder, very slightly rounded
3/4 teaspoon baking soda, very slightly rounded
1/2 teaspoon kosher salt
1 teaspoon ground cinnamon
Pinch of nutmeg (optional)
1 cup (205g) granulated sugar

4 medium sized very ripe bananas (365-375g), mashed (recommend weighing your bananas)
2 large eggs, room temperature, lightly blended
1 1/2 teaspoons good quality vanilla
1/3 cup (85g) sour cream (or creme fraiche or whole plain yogurt)
1/2 cup (113g) unsalted butter, melted and cooled slightly
Optional: 1 cup of miniature chocolate chips

Directions
Streusel Topping
1. In a medium sized bowl mix together the flour, brown sugar, granulated sugar, cinnamon, kosher salt, and melted unsalted butter. Mash with a fork until the mixture is well blended and crumbly. It's okay to use your fingers too. Set the bowl in the refrigerator while you assemble the banana bread.

Banana Bread
1. Preheat the oven to 350 degrees (F). Line a 9" x 5" metal baking pan with parchment paper. Set aside.
2. In a large bowl, whisk together the flour, sugar, baking powder, baking soda, kosher salt, cinnamon and nutmeg (if using).
3. In a medium sized bowl, whisk together the melted butter, eggs, sour cream, and vanilla until the mixture is smooth and creamy (approximately 1-2 minutes). Then stir in the mashed bananas, mixing until they are fully incorporated.
4. Add the banana mixture to the flour mixture. Use a wooden spoon or spatula to mix them together. Do not over mix, but do not leave any streaks of flour. (Note: If adding chocolate chips to the bread, stir them in now.)
5. Scrape the bread mixture into the prepared pan.
6. Sprinkle on the streusel topping. Use all of it! Don't let any of that goodness go to waste. Spinkling on the sparking sugar (optional). Let the bread rest for 10 minutes before putting into the oven.
7. Set the baking pan on a baking sheet and place in the oven. Bake for 75 to 80 minutes rotating the tray midway through the baking process. The banana bread is done when an inserted skewer comes out clean.
8. Remove the pan from the oven and let the bread rest for 10-15 minutes. Remove from pan and let cool on a wire rack.
9. When cooled, cut into thick 1" slices, pour yourself some coffee or make some tea and sit back and just breathe. Eat slowly to get the full calming effect this moist, delicious banana bread will have on your spirit.
10. Keep any leftover bread tightly covered. I sometimes like to store my banana bread in the refrigerator and reheat slices in the microwave so it tastes like it just came out of the oven. Or sometimes I even like to toast it.

Notes: (1) I used Janie's Mill All-Purpose Flour for the bread portion of the recipe, not the streusel portion. This flour is available online or at some stores. As an alternative use King Arthur Unbleached All-Purpose Flour. (2) This is a slightly adapted recipe of the Cinnamon Streusel Banana Bread from Now, Forager. (3) Definitely use a 9" x 5" metal baking pan. To determine the size of the pan, measure the bottom side of the pan rather than measuring the top of the pan. 

Tuesday, August 20, 2024

Apple Fritter Loaf


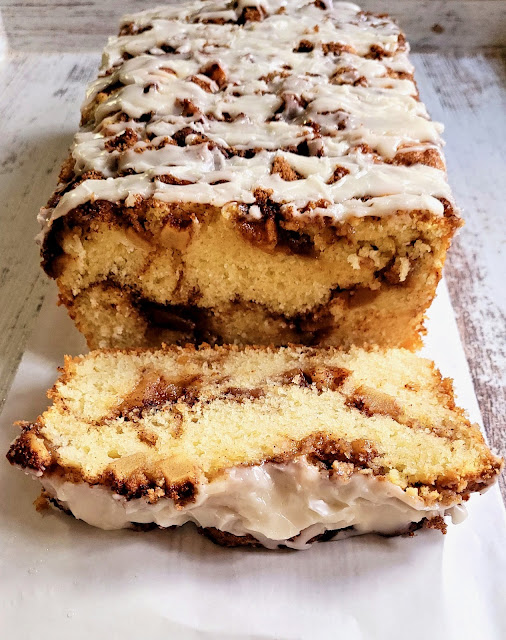
As the month of August ends, apple season begins. A much welcome sign foreshadowing the arrival of fall and the return of applesauce making and the apple baking season. In the next couple of weeks we will take a drive up to our favorite apple orchard to pick a couple of bushels of Honey Crisp Apples. In addition to making Homemade Applesauce, there will be a number of apple desserts and savory bites going into rotation. Joining the Apple CrispApple Fritter Skillet Cake, Apple Fritter Cake, Caramel Apple Dutch Babies, and Cinnamon and Apple Crumble family this year will be this scrumptious, spiced, moist Apple Fritter Loaf. Having all of the flavors of apple fritters but taking only half of the work makes this the easiest, most crowd pleasing way to satisfy an apple fritter craving. 

Other than warm cinnamon sugar coated Baked Apple Cider Doughnuts, there may be no other dessert better at capturing our cravings for the seasonal flavor of apples. When chunks of apples tossed in cinnamon and brown sugar are combined with layers of a sweet brown sugar-cinnamon mixture and a buttery, moist cake, the result is the most flavorful, gorgeous quick bread. Perfect for breakfast, brunch, or a mid-day snack, a thick slice of this Apple Fritter Loaf may be one of the most tempting, irresistible, droolworthy things you can make for your family and friends. 


Other than allowing time for your butter and eggs to come to room temperature (I take mine out the night before), this isn't one of those recipes requiring a significant amount of preparation time. The entire loaf comes together in less than thirty minutes (maybe even closer to twenty) and bakes for somewhere between 55 and 65 minutes. 

In addition to the Honey Crisp Apples, the cinnamon and dark brown sugar are what makes this Apple Fritter so incredibly flavorful. The dark brown sugar gives this loaf a depth of flavor (with nots of caramel and toffee) light brown sugar just can't.While many will say it's okay to swap out the dark brown sugar with light brown sugar, I am very reluctant to tell you it's okay in this particular recipe. 

The layers of apples and dark brown sugar mixtures is what gives the loaf its' gorgeous dark stripes. In order to achieve a loaf with discernible layers of lusciousness, each component of the loaf is divided in half. 


Baking time for the Apple Fritter Loaf is somewhere between 55 and 65 minutes. For that hour your kitchen will be swimming blissfully in the heavenly, intoxicating aromas of cinnamon, apples and dark brown sugar. 

The key to making the perfect loaf is to neither over nor under bake this loaf. Begin checking for doneness at 50 minutes by inserting a long toothpick or skewer into the center of the cake. If it comes out clean or with very few crumbs, your loaf is done. Allow the loaf to rest in the pan for thirty minutes before you drizzle on the icing.

The confectionary icing truly is the literal and proverbial icing on the loaf. The sweetness and creaminess of the icing compliments and contrasts perfectly with the dense, spiced loaf. 


Cut this Apple Fritter into thick, hefty (almost 3/4") slices for the absolutely best eating experience. This is not one of those cut into thin slice kind of loaf. 


Bringing on the smells and flavors of fall in late August is one of the best decisions you can make! Sure you can wait until September to make this Apple Fritter Loaf if you are one of those delayed gratification kind of people. But there is much to be said about living in the moment. And the moment of apple season has arrived.

Recipe
Apple Fritter Loaf
Makes one loaf

Ingredients
Apple Mixture
2 cups (1 pound/454g) Honey Crisp Apples, peeled, cored, and cut into a small 1/4'-1/3" dice (about 4 small or 2 large apples) - See notes
2 Tablespoons dark brown sugar
1 teaspoon cinnamon

Sugar Mixture
1/2 cup (100g) dark brown sugar
2 teaspoons cinnamon

Batter
1/2 cup (113g) unsalted butter, room temperature
2/3 cup (134g) granulated sugar
2 large eggs, room temperature
2 teaspoons vanilla
1 1/2 cups (210g) all-purpose flour
2 1/2 teaspoons baking powder
1/2 teaspoon Kosher salt
Pinch of nutmeg
1/3 cup whole milk
1/3 cup (80g) sour cream

Icing
3/4 cup (90g) confectionary sugar, sifted
1 Tablespoon + 1 teaspoon whole milk
1/4 teaspoon vanilla
Pinch of Kosher salt

Directions
1. Preheat oven to 350 degrees (F). Line a metal 8" x 4"pan with parchment paper. Butter paper and sides of pan not covered by the paper. Set aside.
2. In a medium sized bowl, mix together the apples, dark brown sugar and cinnamon. Set aside.
3. In a small bowl, mix together the dark brown sugar and cinnamon. Set aside.
4. In the bowl of a standing mixer fitted with a paddle attachment, beat butter for approximately one minute.
5. Add in the granulated sugar and beat until light and fluffy (approximately 3 minutes).
6. Beat in the eggs one at a time.
7. Beat in the vanilla.
8. In a medium sized bowl, whisk together the flour, baking powder, Kosher salt and nutmeg. Set aside.
9 .In a small-medium bowl, whisk together the milk and sour cream.
10. Add half of the flour mixture to the batter. Mix until blended.
11. Add half of milk-sour cream mixture to the batter. Mix until blended.
12. Repeat adding in the remaining flour and milk-sour cream mixture. Beat until well blended.
13. Pour half of the batter into the prepared pan.
14. Evenly top with half of the apple mixture. Note: Do not add the liquid released from the apples.
15. Evenly top with half of the sugar mixture.
16. Repeat with remaining batter, apples and sugar mixture.
17. Place the baking pan on a baking sheet. Insert into oven and bake for 55-65 minutes our until a skewer inserted into the loaf comes out clean. Note: My baking time was closer to 65 minutes and I rotated the pan midway through the baking process.
18. Remove from the oven. Let the Apple Fritter Loaf remain in the pan for 30 minutes.
19. Whisk together the icing ingredients (confectionary sugar, milk, vanilla and Kosher salt). Note: If your icing is too thick, add slightly more milk.
20. Remove the loaf from the pan. Drizzle the loaf with the icing.
21. Let the icing set and cake cool for another 30 minutes before slicing with a serrated knife.
22. Serve and enjoy. 
23. Store any leftover loaf in the pan and cover with plastic wrap. Store in the refrigerator or at room temperature. Note: The loaf was incredibly delicious on the day it was baked and equally, if not a tad more delicious the next day. So if you want to serve it for breakfast, you can make it the night before.

Notes: (1) Weight of the apples was before peeling and coring. (2) I love the flavor of baked Honey Crisp Apples. If you wanted a sweet, slightly tart Apple Fritter Loaf, use half Honey Crisp Apples and half Granny Smith Apples. But cut your Granny Smith apples into a slightly smaller dice.

Tuesday, June 4, 2024

Lemon Blueberry Muffin Bread


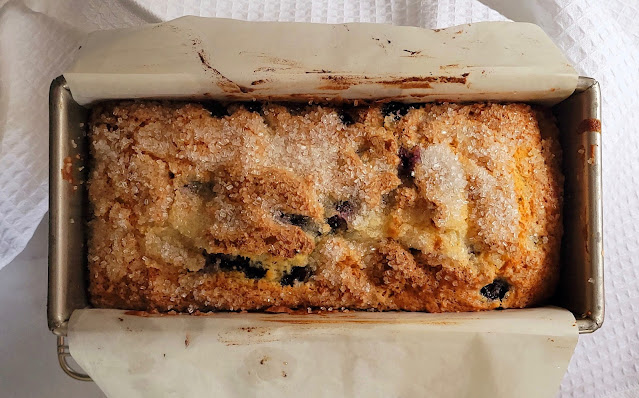
I am still dreaming about our recent trip to Yellowstone and the Tetons. From the surreal, jaw dropping landscapes to the abundance of wildlife, I was in a continual state of visual overload. Every day brought unforgettable images, experiences, and moments. More than anything, this trip affirmed that I am a mountain girl at heart. The mountains are my happy place. Already I wondering how long it will be before I return to those spectacular, beautiful, stunning, awe-inspiring vistas. As John Muir once said 'The mountains are calling and I must go." But certainly not before I tell you about this dreamy, crunchy, densely blueberry filled Lemon Blueberry Muffin Bread. This absolutely delicious bread just might have affirmed I am more of a bread girl than a muffin girl. What is not to love about a thick slice of sugar topped, lemony, fruit filled, moist, dense crumbed Lemon Blueberry Muffin Bread? It's one of those breads that will have you swooning before you take a second bite.


And simplicity strikes again. As this is a one bowl, one pan bread. The assembly is quick and the baking time just slightly over an hour. If made early in the morning, you will be enjoying it before noon. If made the night before, you will have ensured a perfect start to the day. With blueberry season only just beginning, you won't be able to resist making this Lemon Blueberry Muffin Bread on a regular basis. It might even be the best hostess gift you can bring when visiting a friend.

To achieve the perfect lemony flavor, all you need is the zest from one medium sized lemon. The amount of fruit you use will depend on how dense you want your bread. Don't use any less than 2 cups or any more than 2 1/4 quarter cups. Mixing the blueberries and flour into the batter at the same time, helps to coat the blueberries and prevent them from falling to the bottom of the bread. You could toss the blueberries with some of the flour before mixing everything together, but you don't have to.


For me, a thick batter is a sign of a great bread. And this batter is lusciously thick.


If there is one thing that matters when making this Lemon Blueberry Muffin Bread, it's the type and size of pan. Definitely use metal, not glass. And using an 9" x 4" (not a 9" x 5") baking pan will yield a bakery perfect kind of loaf. I have found the pullman loaf pans (like this one), make the best-ever quick bread. If you like making quick breads, this pan will be put to great use.

Begin preheating your oven right before you begin measuring and mixing the ingredients. By time you are ready to put the bread into the oven, your oven will be perfectly heated. Baking time ranges from 60 to70 minutes. Begin checking for doneness at the 60 minute mark as ovens can vary (especially it's been awhile since you had it calibrated). I always put my baking pan on a sheet pan. Not only in case there is any spillage, but it makes it easier to rotate the pan midway through the baking process.

This Lemon Blueberry Muffin Bread is as scrumptious on day one as it is on day four (if it lasts that long). Keeping the top of the bread uncovered (at room temperature) will help to keep its' sinfully good crunchy, sugary top. To extend the life of the bread, you can always store it in the refrigerator. Just reheat a thick slice in the microwave before enjoying.

If there was ever a bread you will dream about, it will be this Lemon Blueberry Muffin Bread. There may be no sweeter way to start your summer.

Recipe
Lemon Blueberry Muffin Bread
Serves 10-12

Ingredients
1/2 cup (113g) unsalted butter, melted
3/4 cup (150g) granulated sugar
Zest of one medium sized lemon
1 cup (225g) plain, unsweetened Greek yogurt
2 large eggs
2 teaspoons baking powder
1/2 teaspoon baking soda
1 teaspoon Kosher salt
2 cups (260g) all-purpose, unbleached flour
2 to 2 1/4 cups (285-320g) fresh blueberries (I used 2 1/4 cups)
3 Tablespoons sparkling sugar

Directions
1. Preheat oven to 375 degrees F. Line an 9" x 4" baking pan with parchment paper. Butter any exposed sides of the pan. Set aside. Note: Pan measurements taken from the bottom of the pan, not from across the top of the pan.
2. In a medium sized bowl, whisk together the melted butter, sugar and zest.
3. Add in the yogurt and eggs. Whisk until well blended.
4. Sprinkle the baking powder, baking soda and Kosher salt on top of the batter. Whisk in.
5. Add in the flour and blueberries together. Use a spatula to mix in. Batter will be very thick.
6. Spoon batter into the prepared pan.
7. Smooth the top of the batter with an offset spatula. Sprinkle with the sparkling sugar (use it all). Let batter rest for 10 minutes before putting into the preheated oven.
8. Place baking pan on a baking sheet. Place in oven and bake for 60-70 minutes. Begin checking for doneness at 60 minutes (a skewer inserted into the center of the bread should come out clean or with a couple of crumbs.
9. Remove from the oven and place baking pan on a cooling rack. Let bread come to room temperature before removing from the pan and cutting into thick slices.
10. Store bread (uncovered) at room temperature to ensure the top of the bread remains crunchy. Alternately store in the refrigerator. Bread will be good for 3-4 days at room temperature and up to a week if refrigerated.
11. When serving, cut into thick slices! Slathering on butter is optional!

Notes: (1) I used Fage Total (5%) Plain Yogurt. (2) King Arthur is my preferred flour.


Grand Teton National Park, May 2024

Thursday, November 16, 2023

Popovers with Strawberry Butter

For those of you who grew up savoring the classic popover at your Thanksgiving or Christmas dinner tables, consider yourself both blessed and lucky. My first bite of a popover didn't come until well into my adulthood. Way back when, Neiman-Marcus took the concept of the bread basket to the next level by serving a small basket of popovers at lunch. The light, airy, crunchy on the outside, yet slightly hollow and soft on the inside popover was one of the most heavenly bites I ever had. At the time, I was convinced those swoonworthy, lofty popovers had to be one of the most difficult things in the world to make. Yet, after doing a bit of research I discovered they were well within my reach. 


Making the most gorgeous, high topped, golden, scrumptious popovers requires only a little bit of patience and following a few rules. The patience portion is two fold. Allowing the mixed batter to rest for 15-30 minutes before baking and not opening the oven door at any time during the 30-32 minute baking process. 

There are a few other rules for making the most perfect popovers. They involve both the ingredients and baking process. One of the keys to the lightest, airiest popovers is room temperature eggs and milk. Taking your eggs out of the refrigerator the night before will ensure they are popover batter ready. Heating the milk over low heat in a pan until just barely warmed is one of the safest ways to get your milk to room temperature. Mixing your room temperature ingredients in a blender rather than whisking by hand helps to ensure you have a lump-free batter.


Another important key to a making a perfect popover is heating the popover pan in the preheated 450 degree (F) oven for five minutes before either brushing the wells with melted butter or spraying with canola oil. The butter and/or oil promotes browning. The moment the room temperature batter hits the hot metal, steam begins to form. As a result the hot pan creates the ideal environment to maximize the amount of steam. And it's that steam that helps push the batter upwards while also creating the soft texture and partially hollow interior.

Steam is your friend only during the baking popovers. As soon as the popovers come out of the oven, insert a sharp knife into the top of popover to let the steam out in order to prevent the popovers from collapsing. Releasing the steam will not only help the popovers keep their shape, it helps ensure you don't end up with a soggy popover.

Popovers are traditionally baked in a popover pan. Their straight sides and taller, skinnier cups are the shape producing the best desired, most dramatic effect. However, popovers can also be made in a muffin pan. While the popover pan might give the popover wow-factor a slight edge, ones made in muffin pans are just as delicious. Having said that, good popover pans are relatively inexpensive and worth splurging on. Especially if you plan on serving popovers year round and not only on special occasions.


Popovers are meant to be enjoyed immediately after they come out of the oven. If by chance you have any leftovers, store them in a sealed plastic bag. Reheat them in a preheated 350 degree (F) oven for 5-10 minutes to rewarm and slightly re-crisp them up.


Popovers can be simply enjoyed with a generous slathering of butter. Or you with a large dollop of some delicious homemade Strawberry Butter. How you choose to eat your popovers will depend in large part on whether they are being served for breakfast, lunch or dinner.


Popovers are classic for a reason as they make every meal feel a little extra special. Replacing your bread or muffin basket with a magical basket of hot, towering, airy, golden popovers is bound to be a jaw-dropping moment at your table. Does it get any better than that?

Recipe
Popovers with Strawberry Butter
Makes 12

Ingredients
Popovers
1 1/2 cups whole milk, room temperature or heated just gently warm to the touch 
4 large eggs, room temperature
2 heaping teaspoons (10g) confectionary sugar
1 teaspoon Kosher salt
3 Tablespoons unsalted butter, melted, cooled slightly
1 1/2 cups (192g) all-purpose flour (I use Unbleached Gold Medal Flour) - See Notes
Melted butter or canola spray for preparing the pan

Strawberry Butter
1/2 cup (113g) unsalted butter, room temperature
1 Tablespoon (15g) confectionary sugar
1/8 teaspoon Kosher salt
1/2 cup (165g) strawberry preserves or lingonberry preserves

Directions
Popovers
1. Preheat oven to 450 degrees (F).
2. In a blender, add in the room temperature/gently warmed milk, eggs, confectionary sugar, and Kosher salt. Blend until smooth.
3. Add in the melted butter, blending until incorporated.
4. Add in the flour and blend until the batter is smooth.
5. Let the batter rest for 15-30 minutes.
6. Put an empty (unprepared) popover pan on a baking sheet. Insert into the oven and let heat up for 5 minutes.
7. Remove pan and baking sheet. Working quickly either brush each well with melted butter or spray with canola oil. Note: I prefer using melted butter.
8. Immediately pour the batter into the hot popover pan until it is about 2/3's full. Note: If using a muffin pan, fill slightly past the halfway mark.
9. Bake popovers for 20 minutes at 450 degrees (F). Do Not Open the Oven. Reduce the temperature to 350 degrees (F) and bake for an additional 10-12 minutes or until the popovers have risen and are a deep golden brown. Note: You can check for doneness at the 30 minute mark but not a minute earlier. My oven required an additional couple of minutes.
10. Remove the pan from the oven. Insert a sharp knife into the top of each popover. Immediately remove from the pan.
11. Serve immediately with the strawberry butter.

Strawberry Butter
1. In a medium sized bowl, beat the butter until creamy (about 2 minutes).
2. Add in the confectionary sugar and Kosher salt.  Beat until incorporated.
3. Add in the strawberry preserves. Mix until blended.
4. Let the strawberry butter chill for at least 30 minute in the refrigerator. Note: You can make the strawberry butter several days ahead. Remove from the refrigerator when you begin baking the popovers to soften it up and make it easier for spreading.

Notes: (1) I used a 128g per cup measurement for the all-purpose flour for this recipe because I used Gold Medal Unbleached All-Purpose Flour. If you are using a different flour, use a weight measurement of 180g. (2) I used a popover pan but you can also use a muffin tin. Fill the well of the hot, prepared muffin tins a little more than half full. You should use up all of your batter, but if not, pour whatever is left evenly into each well. (3) If you have only one six well popover pan and you are serving 2-4 people, you can cut the recipe in half.

Thursday, October 12, 2023

Streusel Pumpkin Bread


Over the last few years the fall season has become synonymous with pumpkin spice season. For some it arrives too early, for others it doesn't last long enough. I am a member of the latter group. If there was ever a campaign to shift pumpkin spice from being a one season wonder to a year round one, I would gladly volunteer! To be able to satisfy a craving for a pumpkin confection in the middle of winter, on a chilly spring day, and yes, even during the summer months seems like something hardly anyone would object to and many would embrace. 


I have made a couple versions of pumpkin bread, but (you know what's coming next) I think I have now found the 'one' I can't live without and the one I would make for family and friends. The third time is the charm. Between the amounts of spice and pumpkin puree used along with the combination of sugars called for in the recipe, this is a densely crumbed, moist, tender, deeply spiced, and nothing short of being the most heavenly version of a pumpkin bread I have ever tasted. 

There are a myriad of both similarities and differences between the recipe for this Streusel Pumpkin Bread and the two others posted on the blog. But rather than go into detail about all of them, I would rather talk about what I love about this recipe. First, let me gush about the swoonworthy streusel topping. It's buttery, crunchy, and the closest thing to one found in fancy high-end bakeries. Second, the bread's almost melt in your mouth texture combined with its' the perfectly spiced, drop the mic flavor. And lastly, it's a reminder that simplicity almost always wins over complexity.


If you have mixing bowls, a whisk, a spatula, some measuring spoons, and a scale (and/or measuring cups), you have what you need to assemble the batter. If you have a metal 9" x 5" baking pan, some parchment paper, and a baking sheet, you have everything you need to create the perfect sized loaf of Streusel Pumpkin Bread.

Baking time for the Streusel Pumpkin Loaf ranges from 70-80 minutes (when baked in a preheated 350 degree F oven).  When testing for doneness, always insert your wooden skewer or toothpick in the center of the bread as that's the last place the bread sets up.


Pumpkin bread is meant to be cut into thick slices. This is not a 'please cut me a sliver' kind of bread. A thick slice of the bread will not only enable you to better experience the bread's tender, moist, plush crumb, but will allow you to be enchanted by its' perfectly spiced flavor. If I were you, I would stock up on cans of pumpkin puree now (they usually have a long expiration date) so you can make this Streusel Pumpkin Bread well past the fall season. Just imagine the intoxicating aroma created by this bread baking in the oven on a cold, windy, rainy, even snowy day. You too might be jump on the year-round pumpkin spice bandwagon too.

Recipe
Streusel Pumpkin Bread
Makes a 9" x 5" loaf - serves 10-12

Ingredients
Streusel
1/2 cup (65g) all-purpose flour
6 Tablespoons (80g) light brown sugar
1/2 teaspoon cinnamon
1/4 teaspoon Kosher salt
4 Tablespoons (57g) unsalted butter, melted

Pumpkin Bread
2 cups (260g) all-purpose flour
1 1/2 teaspoons baking powder
3/4 teaspoon baking soda
1 teaspoon Kosher salt
4 to 5 teaspoons cinnamon (strongly recommend you use 5 teaspoons)
1/2 teaspoon nutmeg
1/4 to 1/2 teaspoon teaspoon ginger (if you love the flavor of ginger, use 1/2 teaspoon)
1/4 teaspoon ground cloves
15 ounce can of pumpkin puree
3/4 cup canola or vegetable oil
1/2 cup (100g) granulated sugar
1/4 cup (50g) dark brown sugar
3/4 cup (150g) light brown sugar (see notes)
2 large eggs, room temperature

Optional: Confectionary sugar for dusting

Directions
Streusel
1. In a medium sized bowl, combine the flour, light brown sugar, cinnamon, Kosher salt, and melted butter. Mix until well blended.
2. Place in the refrigerator to chill while assembling the pumpkin bread.

Pumpkin Bread
1. Preheat oven to 350 degrees (F). Line the length of a 9" x 5" metal baking with parchment paper. Lightly butter the pan and paper. Set aside.
2. In a medium sized bowl, add in the flour, baking soda, baking powder, Kosher salt, cinnamon, nutmeg, ginger and cloves. Whisk until combined.
3. In a large bowl, whisk together the light brown sugar, dark brown sugar, oil, and pumpkin puree.
4. Whisk in eggs, one at a time.
5. Add in the dry ingredients. Use a spatula to combine. Be careful to not over mix.
6. Pour the batter into the prepared pan. Let rest for 10-15 minutes.
7. Break off pieces of the chilled streusel and sprinkle on top of the pumpkin bread.
8. Place the baking pan on a large baking sheet. Insert into the oven. Bake for 70-80 minutes (rotating the pan midway through the baking process) until a tester inserted into the center of the bread comes out clean. Note: If the streusel topping is getting too brown place a piece of aluminum foil over the top.
9. Allow the Streusel Pumpkin Bread to cool to room temperature before cutting into thick slices. Optional: Before cutting dust the top of the bread with confectionary sugar.

Notes: (1) The Streusel Pumpkin Bread will be good for at least days covered and stored at room temperature. To extend the life of the bread, cover and chill in the refrigerator. (2) Instead of using both dark brown and light brown sugars in the bread, you can use all light brown sugar. (3) Use only a metal baking pan. Do nut recommend baking this bread in a glass loaf pan. (4) Recipe strongly influenced by the Pancake Princess's Easy Streusel Pumpkin Bread.


Morton Arboretum, October 2023

Wednesday, August 3, 2022

Blueberry Banana Bread


You might be wondering (hopefully gleefully wondering) if I have decided in favor of continuing to breath life into this non-income producing, creative outlet endeavor. The short answer is yes. But having spent an inordinate amount of time and energy wrestling with this decision over the past several weeks, the short answer doesn't really fully explain what will be happening in this blog's next chapter. So here goes. The blog will evolve differently in the months ahead. There will be less new recipes appearing on a monthly basis, but they will be ones being what I will call 'cookbook worthy'. Meaning, if someday there is a cookbook in my future, these recipes will be some of the contenders. There will be updates to many of the recipes posted in the blog's early days. From reshooting the photos (desperately needed in too many cases), to revising the recipe ingredients (to include gram measurements), to bringing greater clarity to the directions, is how I will spending more of my time. When these revisions happen, they will appear on my Instagram feed and stories. So I hope you follow me (lynnkrizic) there too, if you aren't already. Rather than spending countless hours taking and editing photos for a blog post, I am going on the uphill learning curve climb and dipping further into the reel pond. As I believe this is where the foodie world has been headed for awhile now (yes, I am a tad late to the party). So each blog post, beginning with this one, will have no more than six photos. Infrequent will be the days when a post has ten to twelve photos. But you never know, there may be an exception every now and then. If it weren't for the feedback I had received from a small handful of loyal, publicly supportive, encouraging friends, I would be writing the eulogy for this blog. So if you have ever doubted that it only takes is a small group of people to make a difference, let me be the one to tell you to never have those doubts again.


There happens to be eight delicious versions of banana bread recipes on this blog. And when I press the publish button there will be nine! Yes, nine recipes for banana bread. I have sung the praises of all of them. But after tasting a bite of my friend Ann's Blueberry Banana Bread I knew it was one I needed in my repertoire. Let me go on record as saying this is the blue ribbon banana bread contender, the one I would put up in a banana bread throw down, the one I must begrudgingly admit wasn't my original creation but a slight adaptation, the one you need if you want to live your best banana bread life. If I haven't yet enticed you to make this moist, scrumptious, better than any fancy bakeshop Blueberry Banana Bread, let me keep trying.


If I hadn't first tasted this Blueberry Banana Bread, I may have never made it. Because for some reason I wouldn't have been able to wrap my head around the whole blueberry banana combination. Which explains in part why there has been an almost unforgivable void on the blog. But let me back up a bit. Before I tasted this seriously good, actually pretty darn great, blueberry banana bread, my friend Ann shared it was a long time favorite family recipe. When I hear the words 'favorite family recipe' my thoughts immediately go back to the well done roast with crisco laden gravy my husband at one time would have referred to as a 'family favorite'. In other words, I am guilty of being unfairly dismissive of any recipe framed by those words. And had I not been a little hungry, I may have taken a pass on a slice. Thank goodness hunger has a way of overruling irrational thinking. Because I knew in the first bite, I absolutely had to have her recipe. 

Fortunately for me, she shared it. But like most well-worn, old family favorite recipe cards, the directions left a little to the imagination. Having seen and tasted the blueberry banana bread she made, I could have easily figured out how the blueberries were added to the batter. But, of course, I felt I had permission to take a few liberties with the recipe. Instead of mashing 1/3 cup of fresh blueberries in with the bananas, I decided to add a whole cup, lightly tossed with flour, (plus a handful for the top) of fresh blueberries into the batter. When you taste a whole sweet blueberry in a bite of banana bread, you will understand why I did this. I had to make an educated guess as to what size (metal) pan to use. The first time I made it, I used an 8" x 4" pan (rather than a 9" x 5" pan) because I like a banana bread to have alot of height. The second time I used an 8 1/2" x 4 1/2" pan. The slightly larger pan worked perfectly. And lastly, I made two changes to the ingredients: increasing the amount of Kosher salt from 1/4 teaspoon to 1/2 teaspoon and adding in 1 teaspoon of baking powder. Yet, in spite of these slight changes to my friend's recipe, it was the ratios of all of the other ingredients that were responsible for creating such an incredibly moist, perfect crumb, scrumptious blueberry banana bread. Without her recipe, I may have never been able to make a five star worthy version of a banana bread.


Forget about taking out your KitchenAid to make this Blueberry Banana Bread. Use your hand mixer. For the best results, use a European-style unsalted butter. In this bread, it makes a difference. Use very ripe bananas to give your bread a deep, luscious banana flavor. If you don't happen to have any bananas, it might be a week before you can make this bread. Unless of course you can find some getting very close to the ripe point bananas at your grocery store. Then maybe you are only a couple of days away from making this Blueberry Banana Bread. (Hint: Convenience stores are famous for having ripe bananas for sale.)

This Blueberry Banana Bread doesn't really need to be slathered with cream cheese or butter and honey, but I won't stop you. Whether you eat it 'plain' or 'adorned', you are in for such the best treat!

Last but not least, I hope you continue to follow the blog and my Instagram account. Nothing is more validating or motivating to a blogger than when posts garner comments and/or likes. 

Recipe
Blueberry Banana Bread (some very slight changes to my friend Ann's Blueberry Banana Bread family recipe)

Ingredients
1/2 cup (113g) unsalted butter, room temperature (recommend European or European-style butter)
1 cup (200g) granulated sugar
1 teaspoon vanilla
2 large eggs, room temperature
2 cups all-purpose flour plus 1 Tablespoon for dusting the blueberries
1/2 teaspoon Kosher salt
1 teaspoon baking soda
1 teaspoon baking powder
1 Tablespoon whole milk
1 1/2 cups (about 350g) ripe bananas, mashed (3-4 medium sized or 3 large bananas should yield this amount)
1 cup (148g) fresh blueberries

Optional: 1/2 cup walnuts, toasted and chopped
Optional: Cream cheese, butter and/or honey for serving

Directions
1. In a medium sized bowl, whisk together the all-purpose flour, baking powder, baking soda, and Kosher salt. Set aside.
2. In a large bowl, add in the unsalted butter and sugar. Beat until light and fluffy (approximately 2 minutes) using a hand mixer.
3. Beat in the eggs one at a time. Beat until fully incorporated.
4. Add in the dry ingredients. Beat until incorporated (don't over beat).
5. Add in the Tablespoon of whole milk and mashed bananas. Beat until blended.
6. Toss the blueberries with a tablespoon of flour. Add to the batter. Fold in using a spatula. (Note: Coating the blueberries in flour helps to prevent them from sinking to the bottom.)
7. Butter or spray an 8 1/2" by 4 1/2" metal baking. Line with parchment paper. Pour the batter into the prepared pan. Smooth the top, then sprinkle on a handful of fresh blueberries. If using walnuts, fold them i with the blueberries.
Place the baking pan in the refrigerator to let the batter rest for 15 minutes. While the batter is resting, preheat the oven to 350 degrees (F).
8. Place the baking pan on a baking sheet before placing in the oven. Bake for 70-90 minutes or until the bread is done. At the halfway point, rotate your baking pan and lightly place a piece of aluminum foil over the top of the bread to prevent it from 'over' browning. Note: My baking time was closer to 80 minutes.)
9. Remove from the oven. Place baking pan on a cooling rack but keep the aluminum foil on top (it helps to keep the top of the bread from getting a hard top layer.) Allow the Blueberry Banana Bread to rest for at least 15 minutes before transferring the bread back to the cooling rack. Place the piece
10. You can wait to cut into thick (1" slices) when it comes to room temperature, or you can cut it when it's almost room temperature. However long you can wait.
11. I like to store any leftover blueberry banana bread in the refrigerator as it helps to keep it moist. You can always reheat a slice in the microwave or in the toaster if you would like to enjoy it warm.

Notes: (1) I increased the Kosher salt from 1/4 teaspoon to 1/2 teaspoon because I use unsalted, not salted butter, when baking. (2) I added 1 teaspoon of baking powder, in addition to the baking soda, to ensure there would be some rise to the bread. (3) Giving the bread some resting time in the refrigerator is a modification of a technique used when making quick breads. And technically, banana bread falls into the quick bread category.