Showing posts with label Breakfast. Show all posts

Thursday, January 14, 2016

Swedish Cinnamon and Cardamom Buns


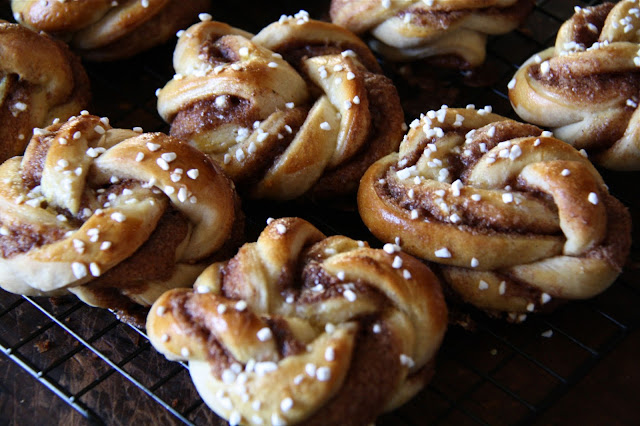
My first thought upon seeing these almost too beautiful to eat Swedish Cinnamon and Cardamom Buns posted by a fellow foodblogger was 'I need to make them'. This was immediately followed by 'these look a little beyond my pastry and bread making skill set'. Being someone who is currently having significant difficulty wrapping my head around motor planning through a burpee, I wondered if making these buns would be another one of those challenges getting the best of me. Having my self-esteem take two hits in one week would border on a form of self-abuse I was pretty certain wasn't exactly in my best interest. If there was at least one consolation, it would be no one would be able to publicly see me struggling with one of them.


In spite of reading the recipe and pouring over Johanna Kindvall's one-dimensional drawings on forming each of the individual Swedish Cinnamon and Cardamom Buns, I still couldn't wrap my head around how she got them to look so beautiful. Could a trip to bakeries in Sweden, a virtual trip via YouTube that is, take me from feeling clueless to being Swedish bun (Kardemummabullar) I CAN do this confident? YES! Not only did I finally have that 'ah-ha' moment, I became so entrenched in watching Swedish videos I think I may have qualified for Swedish citizenship.


If I said these Swedish Cinnamon and Cardamom Buns were similar to Cinnamon Rolls I may inadvertently be misleading you or risk offending someone somewhere. And if I said they were much easier to make than Cinnamon Rolls, yet equally as delicious, I wonder if you will believe me considering all of my initial trepidations. I suppose you will just have to make them to decide for yourself. Or miss out knowing how OMG, melt in your mouth, delectable they are.

Here are some of the reasons why they are easier to make than traditional American cinnamon rolls: (1) you don't need a standing mixer with a dough hook, the dough simply comes together with your hands; (2) you don't need to feel like you are getting an arm workout kneading the dough, as in less than 5 minutes the dough becomes smooth and has the perfect elasticity; and (3), you don't need to wait hours for the first dough rise, it doubles in size in approximately an hour if placed in a warm, draft-free space.


If there was ever a dough to cure anyone suffering from dough-phobia, this would be it. I knew from the taste and texture of the dough alone that these Swedish Cinnamon and Cardamom Buns would be incredible.


After dividing the 'after the first rise' dough in half, it is rolled out into a 12"x18" rectangle. Half of the butter-cinnamon-cardamom mixture is spread evenly over the dough (all the way to the edges) before folding the dough in half. Now this is where I could tell you to cut the dough into approximately 1 1/4- 1 1/2 inch strips, then cut each strip in half (without cutting into the fold), first twisting each side of the strip then braiding both sides of the strip together, wrapping into a bun and placing on a parchment paper lined baking sheet. But if you too are more of a visual learner, here is a link to one of the videos that made the bun formation process easy to understand (seen shortly after the video's 6 minute mark). One of the more humorous videos watched demonstrated another way of forming these buns (about 2 minutes into the video). The point of sharing both of these two techniques with you (don't forget to look at Johanna's drawings) is that there is almost no way you can mess them up.


Once the dough is formed into these gorgeous buns, they are covered and allowed to rise for additional 45-60 minutes (or until puffy).


All of the 'second rising' buns are brushed with beaten egg and sprinkled with Swedish pearl sugar (my favorite is made my Lars and can be found at some grocery store or speciality food stores as well as bought on Amazon.)


Be generous with your sprinkling of the Swedish Pearl Sugar.


In a preheated 425 degree (F) oven, the Swedish Cinnamon and Cardamom Buns bake for approximately 8-10 minutes. Note: My baking time was between 9:30 and 10 minutes. I put one baking sheet into the oven at a time rather than risk having both pans of buns come out looking and baking differently.


Immediately remove the baked buns from the baking sheet and transfer to a cooling rack. Keeping the buns on the hot baking pan may cause them to continue baking, which will cause them to lose their moistness. Don't resist the temptation to eat them while they are still warm.


Cardamom is a spice with a strong, unique taste. Serious Eats describes cardamom's difficult to describe complex flavor as 'part-nostril widening menthol, part dew-drenched flower, part-honeyed syrup'. If you are unfamiliar with its' taste, these buns would be a great place to first experience it, particularly due its' pairing with cinnamon. Yes it is on the expensive side. But spice stores and some grocery stores (like Whole Foods) allow to buy 'what you need' from their spice bins.

While they are equally delicious room temperature, I couldn't help but want to recreate the taste of warm baked dough. So I heated them up (on low power) in the microwave. They were perfect.

It just so happened that I made these Swedish Cinnamon and Cardamom Buns while the person who shall remain nameless was traveling for work. To add insult to injury I texted him a photo of these over the top deliciously beautiful buns as soon as they came out of the oven. It wasn't that I was being wicked, I just couldn't contain my enthusiasm for being able to make buns I thought were destined to send my self-confidence plummeting. Before you go and start thinking too ill of me, I froze half of them. So when he returns back home I will reheat them in the microwave and he can experience their hot out of the oven scrumptiousness. Having already reheated one of these frozen buns, I learned they freeze and reheat incredibly well.


If watching more than my fair share of videos on youtube gave me the confidence I needed to form these beautiful Swedish Cinnamon and Cardamom Buns, maybe I should consider watching some youtube how-to burpees videos. Especially if I want to stop looking and feeling so uncoordinated in public. Although watching extremely fit people do burpees effortlessly may do even more irreparable harm to my self-esteem. Think if I bring in a platter of these gorgeous eye-candy Swedish Cinnamon and Cardamom Buns to my next circuit training class no one will see (or remember) the ungraceful burpee attempts being made by this aging ex-cheerleader? Possibly.
Recipe
Swedish Cinnamon and Cardamom Buns (inspired by Johanna Kindvall's Kardemummabullar (Cardamom Buns) as shared on her blog Pantry Confidential)

Ingredients
Dough
7 Tablespoons (99 grams) unsalted butter
1 1/2 cups whole milk
2 teaspoons active dry yeast
4 1/2 cups (638 grams) all-purpose-flour
1/4 cup (50 grams) granulated sugar
1 1/2 teaspoons cinnamon
1/4 teaspoon kosher salt

Filling
7 Tablespoons (99 grams) unsalted butter, room temperature
1/2 cup (99 grams) granulated sugar
4 teaspoons ground cinnamon
2 teaspoons ground cardamom

Topping
1 large egg, beaten
Pearl sugar (recommend Lars Pearl Sugar)

Directions
1. Melt butter in a saucepan. Stir in milk, heating until warm to the touch (110 degrees F).
2. In a smal bowl, dissolve yeast in 2 to 3 Tablespoons of warm butter/milk mixture. Stir and let mixture sit until bubbles form on the top of the yeast. Note: Keep reserved milk/butter mixture.
3. In a large bowl, mix together the flour, sugar, cinnamon, and kosher salt. Add the yeast mixture along with remaining butter/milk mixture. Work together with your hands until you can form the dough into a ball.
4. Transfer the dough to a flat surface and knead until it is smooth and elastic (approximately 3-5 minutes). Notes: (1) The dough should feel moist, however, if it sticks to your fingers add a small amount of flour. (2) The dough is fully kneaded when you slice into with a sharp knife and see small air  bubbles throughout.
5. Return the dough to the bowl, cover with a clean towel, and place in a warm, draft free place to rise until doubled in size (approximately 1 hour).
6. Before the dough has finished rising, make filling. Cream together the room temperature butter, sugar, and spices until the mixture is an evenly mixed and spreadable paste. Set aside.
7. After the dough has finished rising, cut the dough in half. Roll one half out on a flat, lightly floured surface into a 12 inch by 18 inch rectangle. Place the rectangle on the surface so that the long side is closest to you.
8. Carefully spread half of the filling on half of the dough, bringing the filling to edges of the dough. Fold the dough in half (should have a 6 inch by 18 inch rectangle). Slice into 12-14 equally sized pieces. Cut, twist, and shape into buns, placing them on a parchment paper lined baking sheet. Repeat with second half of the dough. Note: Either look at Johanna Kindvall's post or watch the youtube videos linked above.
9. Cover the buns with a clean flour sack or tea towel and let rise for 45-60 minutes, or until puffy.
10. Preheat oven to 425 degrees (F).
11. Brush the buns with an egg wash and sprinkle generously with pearl sugar. Bake for 8-10 minutes, rotating pans from front to back halfway through the baking.
12. Transfer baked buns to a cooling rack. Serve warm or cool completely. Buns can be stored in an airtight container in the freezer and reheated in the microwave.

Friday, November 6, 2015

Overnight Almond, Apple, and Cranberry Oatmeal


There was a time when my daily breakfast consisted only of a super-sized diet soda. I had been one of a handful of people left in the universe who didn't get their morning caffeine fix from coffee (yikes, this is crazy I know). While I have not yet given up my addiction to diet soda, a portal to the coffee world has recently opened for me. That is, if an espresso latte ramped up with a sweet nutty coconut almond milk base, a touch of half and half, and some cinnamon made at my local coffeehouse qualifies as 'coffee' to those of you hardcore 'only take it black' coffee drinkers. Whether it does or not, it has become newest obsession.

A couple months back I made a concerted effort to eat more oatmeal for breakfast. After almost three weeks of going on the 'be a little more health conscious, eat more oatmeal' binge, I sort of got burned out. Eating a bowl of hot oatmeal five days a week may have been a bit too much even for my creature of habit food habits. Yet, coinciding with this self-imposed monotony, the season of fresh blueberries was coming to an end. The fruit I was using to add some sweetness to the oatmeal because I was trying to keep it on the healthier side. 


I had been selectively flipping back and forth between the Cooking Channel (my favorite) and the Food Network (used to be my favorite) last weekend when I heard The Pioneer Woman talk about her obsession with overnight oatmeal. A cold oatmeal studded with raisins and apples, marinated overnight in a mixture of milk, half-and-half, brown sugar and vanilla, and as if that wasn't enough, it had a brûléed finish. Probably not the most health conscious way to eat oatmeal, but seriously, I wondered if this might be a wicked way to have oatmeal return to my life. Although maybe this version might require me to exercise some moderation. Maybe.


Raisins were Ree Drummond's dried fruit of choice. Dried cranberries were mine. To counterbalance the guilt over the addition of brown sugar in this oatmeal, I decided to add almonds. Did you know compared to all other nuts, almonds are packed with the most nutrients and have the longest list of health benefits? You probably did, however, I have a reason for reminding you of that bit of food trivia. You will figure what that is shortly.


The Granny Smith apple was the perfect apple option. Cut into a small dice, it brings the right amount of tartness and crunch to this oatmeal.


After all of the ingredients are mixed together in a medium sized bowl, covered, and placed in the refrigerator, the only thing left to do was wait. I added in the almonds with all of the other ingredients. To ensure they stay as crunchy as possible, it would be better to add them to the Overnight Almond, Apple and Cranberry Oatmeal right before you are ready to serve it.


If you do not have a kitchen torch, you can always brûlée the oatmeal in a broiler (it only takes minutes for the sugar to melt and caramelize in a broiler, but you will need to watch it carefully). If you make creme brûlée or have made/wanted to make the s'mores fudge tart, your investment of a thirty dollar kitchen torch will more than itself pay off. 

Any trepidation I had over not liking the taste of cold oatmeal completely dissipated after the first bite. If I told you it reminded me somewhat of a caramel apple, you might think it too sweet for your palate or for breakfast. So I won't tell you that because I want you to make it as it is nothing like any bowl of oatmeal you have ever had. When you are eating this bowl of deliciousness, I want you to focus more on the fact you are eating oatmeal, apples, and almonds (does it get any healthier?) than on worrying there is also some brown sugar and half-and-half (everything in moderation, right?). And let's not forget, the dried cranberries fall somewhere on good for you scale.

I discovered Bon Appétit's great article on overnight oatmeal ("Make Overnight Oats That Actually Taste Good by Avoiding These Common Mistakes") two days after making this version of overnight oatmeal. There are some aspects of this recipe not consistent with their advice (e.g., the liquid to oatmeal ratio), however, in spite of this, the creaminess and texture of the oatmeal was perfect.

Not only is this Overnight Almond, Apple, and Cranberry Oatmeal ideal for breakfast, it would also be a great option for either lunch or dinner. I happen to be one of those who thinks breakfast, like caffeine, should be a twenty-four a day option. 

Recipe
Overnight Almond, Apple, and Cranberry Oatmeal (slight adaptations to Ree Drummond's Overnight Oatmeal recipe)
Serves 2 (generously)

Ingredients
1 generous cup old-fashioned oats (recommend Quaker Old-Fashioned Oats)
3/4 cup whole milk (could also use almond milk or coconut almond milk)
1/2 cup half-and-half
1/4 generous cup of dried cranberries (can also use raisins or dried blueberries)
1/4 generous cup of almonds
2 packed Tablespoons light brown sugar
1-2 teaspoons vanilla
Pinch of kosher salt
1 small or half of a large Granny Smith Apple, diced
2-3 Tablespoons granulated sugar

Directions
1. In a medium sized bowl, mix together the old-fashioned oats, milk, half-and-half, dried cranberries, brown sugar, vanilla, salt, and diced apple. Cover and refrigerate overnight. Note: Almonds can be added in after the mixture has refrigerated overnight to prevent them from softening.
2. Stir mixture. If too thick add additional milk or half-and-half (mine was just the right consistency and no additional liquid was added).
3. Divide mixture between two bowls.
4. Sprinkle each with 1 - 1 1/2 Tablespoons of granulated sugar. Using a kitchen torch, brown lightly.
5. Serve immediately.
Note: This recipe can easily be doubled or tripled.

Monday, September 28, 2015

Herb and Cheese Baked Eggs


"Everyone runs around trying to find a place where they still serve breakfast, because eating breakfast, even if it's 5 o'clock in the afternoon is a sign that the day has just begun and good things can still happen. Having lunch is like throwing in the towel." (Lenny Bruce is Dead, Jonathan Goldstein At some point in my life I went from skipping breakfast to wanting to 'breakfast' foods at any or all of the meals of the day. While I have scaled back significantly going to fast food restaurants, learning that McDonald's would be serving some of their breakfast foods 24 hours a day felt like a long awaited wish had finally been granted by the fast food fairy godmother. Could this mean the recently reported egg shortage news causing so many of us to go into a state of panic is coming to a sooner than later predicted end? I certainly hope so. Because I already envision myself making regular trips to the drive-through ordering my not-so-guilty pleasure Egg McMuffin to satisfy 'my too frequent to admit to' after 10:30 in the morning craving for it.


If there is one thing you can always find in my refrigerator, besides butter, it would be eggs. The large, brown, organic ones. Every time I watch one of Martha Stewart's baking shows, I enviously drool over the large bowl of fresh eggs sitting on her counter. If it were feasible to raise chickens where I now live and I wasn't such a 'picking up chickens wimptress', there would always be a large antique yellow ware bowl filled with fresh eggs gracing the counter of my kitchen. Not that anyone on the planet could compete with Martha Stewart, but this bowl of eggs would come as close to rivaling hers as possible. Maybe in my next life I will live in a chicken raising friendly place and have someone to pick up the chickens for me.  My dreams of having readily accessible fresh eggs don't include conquering my trepidation over handing either chickens, let alone a rooster. 


As much as I like eggs poached, fried sunny-side up, soft hardboiled, and soft scrambled, I also like their custard-like quality when mixed with cream and cheese. These Herb and Cheese Baked Eggs are kind of like a crustless quiche. They deliver all of the flavor of a quiche, without the work of having to make a crust. Served in individual ramekins makes them feel like you are receiving a personally made gift.


As with most quiche recipes there are no hard and fast rules in the making of these Herb and Cheese Baked Eggs. But unlike most quiche recipes it does not follow the 2 to 1 cream to egg ratio. Instead of a 1 1/2 cup of cream to 3 egg mixture, this one has a 1 1/2 cup of cream to 4 egg mixture. The fresh basil works as a great compliment to the three cheeses, sun dried tomatoes, dijon mustard, and bacon, however, fresh thyme, fresh oregano, or a mixture of any or all of these herbs would equally be delicious. 

There are three freshly grated cheeses in these baked eggs: Sharp Cheddar, Monterey Jack, and Parmigiano-Reggiano. For each half cup of cheese, the general rule of thumb is that you will need a 2 ounce block. These Herb and Cheese Baked Eggs contain a total of 6 ounces of cheese or 1 1/2 cups of grated cheese. If you don't have all three of these cheeses, choose a combination of two of them and increase the weight of the cheese blocks accordingly to ensure you have a total of 6 ounces of cheese before grating.


Whether you call them scallions or green onions, you are still talking about the same onion-y, mild in bite vegetable. Thinly sliced they add the right amount of onion mellowness to the baked eggs.


After mixing the eggs and light cream (half and half) until combined, all of the other ingredients, except the crispy, cooked bacon are blended together.


There are many reasons why we are all so obsessed with bacon. Sometimes referred to as the candy meat, bacon is rich, indulgent, and slightly decadent. From its' aroma to it's taste, bacon broke out of its' 'for breakfast only' niche awhile back now. However, any morning that begins with bacon is a great morning. You can make these Herb and Cheese Baked Eggs with Canadian Bacon, but I would encourage you to first make them with some crispy, fried applewood smoked bacon. If you have a craving for Canadian Bacon, go out and get an Egg McMuffin.


In lightly greased or sprayed ramekins, the egg-cheese mixture is equally divided. To ensure each ramekin has the same amount of bacon (God forbid one should get a bacon shorted ramekin), the bacon is added after the ramekins are filled the egg-cheese mixture. Pressing the bacon down slightly into the mixture, they are baked in a preheated 350 degree (F) oven for 30-35 minutes.


The Herb and Cheese Baked Eggs become golden, slightly firm and puffed when done. During the cooling process they will lose some of their height, but none of their flavor.

You can serve the Herb and Cheese Baked Eggs hot, warm, or even at room temperature. The ramekin filled Herb and Cheese Baked Eggs are the perfect portion for breakfast, lunch or even dinner (depending on your appetite at that time of the day). 


There are an almost infinite number of reasons why eggs should be one of those foods we always have in our refrigerator or on our counters, that is, if we are fortunate enough to have access to freshly gathered eggs. These Herb and Cheese Baked Eggs were just added to that list.

Recipe
Herb and Cheese Baked Eggs

Ingredients
4 slices (5 ounces) of thick cut applewood smoked bacon, cooked crisp and cut into pieces or 3 ounces of Canadian bacon cut into pieces
4 large eggs
1 1/2 cups half and half (light cream)
1 Tablespoon dijon mustard (recommend Maille)
1 clove of garlic, minced
1/2 cup sun dried tomatoes, chopped
2 ounces of sharp Cheddar cheese, grated (1/2 cup measured)
2 ounces Monterey Jack cheese, grated (1/2 cup measured)
2 ounces Parmigiano-Reggiano cheese, grated (1/2 cup measured)
1/2 teaspoon black pepper
1/2 teaspoon kosher salt or sea salt
1/2 teaspoon baking powder (optional)
2 green onions, sliced thinly (both green and white parts)
2 Tablespoons fresh basil, julienned 

Directions
1. Preheat oven to 350 degrees. Lightly butter or spray six 4.5 ounce ramekins. Set aside.
2. In a medium bowl, beat eggs and light cream until blended.
3. Add green onion, garlic, sun-dried tomatoes, mustard, cheeses, salt, pepper, baking powder, and basil. Mix until blended.
4. Spoon or pour mixture into prepared ramekins. 
5. Divide the chopped bacon (or Canadian bacon) evenly amongst the ramekins. Lightly press the bacon into the egg-cheese-herb mixture.
6. Bake for 30-35 minutes until golden or set.
7. Serve hot, warm, or at room temperature.


Just a few of the animals residing on a family farm in Little Compton, Rhode Island.


Wednesday, June 17, 2015

Blueberry Pancakes


"Have blueberries whenever you are low-destiny will change and you will be high." (Adam Voichester) Being slightly gullible, maybe the solution to getting me out of this unseasonably rainy weather and running injury funk was as simple as eating blueberries. Whether or not they actually do possess some life-changing mystical qualities, they might certainly be a better option than some of the alternatives currently under consideration. With blueberries having the highest antioxidant levels in the entire fruit/vegetable universe, eating the world's healthiest fruit would at least have nutritional value benefits. I guess that would be some consolation if the whole life-changing and experiencing a buzz thing doesn't really happen.


I really do love blueberries. And I really do love pancakes, although not just any pancakes. Take it from someone who has taken bites of more than their fair share of bad ones. For several years now I have been making pancakes using the amazing recipe my sister had discovered in a newspaper. However, I hadn't been adding blueberries to them, preferring instead to be a pancake purist. 


If you like the taste of fresh blueberries eaten by the handful or picked fresh off of a blueberry bush, you will gasp at the deliciousness of the oozing with sweetness cooked blueberries in these pancakes. The delirium experienced from eating the blueberries in these pancakes had me realizing that may not have been one of my better decisions. Not exactly the life-changing experience I was hoping for, but going forward my plain pancake days have now come to an end.

Eggs, all-purpose flour, sugar, unsalted butter, baking soda, baking powder, kosher salt, buttermilk, and now yes, blueberries are all you need to make these fluffy, slightly addictive pancakes. No sifting and no mixers required make it the kind of recipe you can make anywhere. 


These are one of those perfect make on vacation pancakes. With the dry ingredients pre-assembled in a ziplock bag, you can pick up the remaining ingredients from any grocery store and/or roadside stand. Not going on vacation? Serving these pancakes to your family and friends will have them feeling as if they were on vacation! 

The wet ingredients (buttermilk, eggs, melted butter) and gently mixed into the dry ingredients (flour, sugar, baking soda, baking powder and kosher salt) and allowed to rest 10 minutes. The batter should be thick and lumpy. Stirring the batter until smooth will adversely affect the fluffiness of the pancakes. When in doubt, under stir and not over stir.


After the batter rests, the generous two cups of blueberries and again gently mixed into the batter. The batter will deflate slightly. Adding the blueberries after the resting stage ensures your batter does not turn 'blue' or have streaks of 'blue' running through it. Note: Any unused batter can be covered and stored in the refrigerator overnight. The batter will begin to break down if left in the refrigerator longer than overnight.


Cook the pancakes on a non-stick griddle rubbed very lightly with oil. I have used both the All-Clad and (a seasoned) Lodge Cast Iron griddles with great success. Not cooking them in a pan of 'oil or butter' gives you the semi-guilt free option of lathering the pancakes with butter and/or maple syrup. The cooked pancakes can be kept warm in a preheated 200 degree oven. 


For those of you who have followed this blog from the beginning, you will recognize this is the same as my first posted recipe. Sometimes recipes are so good they need to resurrected, brought to everyone's attention a second time. This is one of them. And yes, I am one of those who believe redundancy can be a good thing. For those of you new to the blog, this is your lucky day! Maybe even one of those life-changing kind of days. 

Recipe 
Blueberry Pancakes (original recipe discovered by my sister)

Ingredients
2 cups all-purpose flour
2 tablespoons granulated sugar
2 teaspoons baking powder
1 teaspoon baking soda
1 teaspoon salt (Kosher salt is always my preference)
2 large eggs
2 cups buttermilk
1/2 stick or 4 tablespoons of melted unsalted butter
2 generous cups of fresh blueberries
Serve with room temperature salted butter, maple syrup, and blueberries

Directions
1. Combine the flour, sugar, baking powder, baking soda and salt in a large bowl.
2. In a separate bowl lightly beat eggs then stir in buttermilk and butter.
3. Add the liquid ingredients to the dry ingredients stirring gently with a wooden spoon just to blend.  Note: The batter will be slightly lumpy and quite thick. 
4. Let the batter rest 10 minutes. 
5. Gently add blueberries.
5. Heat a very lightly oiled non-stick frying pan or griddle. Using either large ice cream scoop or a 1/4 cup measure pour to pour batter.
6. Cook 2-3 minutes before flipping.  The bottom should be lightly browned or golden when you flip.
7. Once gently flipped, cook until the other side is lightly browned or golden (Another 2-3 minutes).
8. Transfer to a plate or platter to serve.  To keep keep pancakes warm, transfer pancakes to a baking sheet and place in a 200 degree (F) oven.


One of my favorite places in Tucson, the historic San Xavier del Bac Mission.