Showing posts with label Candy. Show all posts

Thursday, October 16, 2014

Chocolate Dipped Sea Salted Caramels


When I read in an email from my favorite local cooking store they were looking for volunteers for their baking or cooking demonstration days, I thought 'this could be a fun first'. Then I thought 'or maybe not'. Sharing my love of cooking and baking in the relative anonymity of a foodblog and sharing it in a large professional kitchen with a live audience; making a mess in my own kitchen and baking and making a mess in someone's kitchen (with an audience); and, baking in my oven versus in an unfamiliar oven for the first time were just some of the rambling variables spinning in my head as I debated over whether or not to volunteer. Having a tendency to just 'do' rather than spending time 'thinking through it', this whole decision making process took less than a couple of minutes (I think fast). As the days to my afternoon as a guest baker got closer, I thought 'what was I thinking?'.


My life is filled with sleepless nights. Add a little anxiousness into the mix and I am lucky to get the equivalent of a power nap in. On the morning of the demonstration the butterflies in my stomach (not a bad thing) turned into a stomach on a high speed roller coaster (not a good thing). Fortunately most of this subsided by the time I got to the store and started setting up. Even a batch of White Chocolate Pistachio Shortbread cookies (aka Amy's Cookies) over baked because the timer wasn't set and a small bowl of white chocolate burned in the microwave didn't unnerve me (another 'first' of the day, not being unnerved that is). All in all it was an exhilarating, exhausting, energizing experience, one I may not have had if I allowed myself to overanalyze and over think it.

All of the good exhaustion from baking and talking for three hours allowed me to get five solid hours of sleep and get my creative energies going. Making caramels is one of my 'fall as soon as the weather turns less humid, cooler' rituals.  For years I have been making the Sea Salted Caramels, always wrapping them in cellophone (the most tedious part of making them).  On their own, these caramels are insanely delicious. But if I 'wrapped' them in chocolate, they would be? Better than the all caramel Milky Way bar? A candy to die for? Almost too beautiful to eat? The answers are yes, yes, yes. Only it would be a crime if you didn't eat them.

Making caramels is easy as long as you have a reliable candy thermometer, a deep heavy saucepan, a long handled whisk or wooden spoon, and use a quality unsalted butter. When buying the butter for these caramels look for an unsalted made with at least 82% butterfat. In a New York Times article, Dorie Greenspan explains butterfat affect a 'butter's flavor, texture, and workability' and why every 'little bit counts'. American butters must contain at least 80% butterfat, however, European butters contain at least 82% butterfat. When making caramels, candies and sauces, the extra 2% of butterfat makes a significant difference.

In addition to the generous pinch of sea salt that goes into the caramels themselves, I like to lightly sprinkle the finished caramels with additional sea salt to further intensify the flavor of the caramel. Just like all butters are not created equal, neither are sea salts. My current favorites are the french Fleur de Sel and Maldon sea salt.

After the caramels were cut, I chilled them in the refrigerator for about 30 minutes before dipping them in the melted chocolate. This made the dipping process easier and it also 'set' the chocolate faster. If you want the sea salt on the chocolate instead of the caramel, you will need to add the sea salt onto each piece immediately after it is dipped. Otherwise if you wait until you dipped several, the chocolate will have already 'set' and the salt will not adhere.


In spite of the burning of the white chocolate in the microwave hiccup in my baking demonstration (the store's microwave was significantly more powerful than mine at home), I still prefer the melting in the microwave over the double-boiler/simmering water method. Considering the amount of caramels to be dipped, I divided the chocolate in half, melting one bowl at a time, in order to ensure my melted chocolate had the same consistency throughout the dipping process.

Why I did not start dipping these caramels years ago I can't understand. Fear of failure? Fear of the unknown? Fear of what? The worst thing that could have happened was that I would have ruined some chocolate and a batch of caramels. Not the end of the world things. 


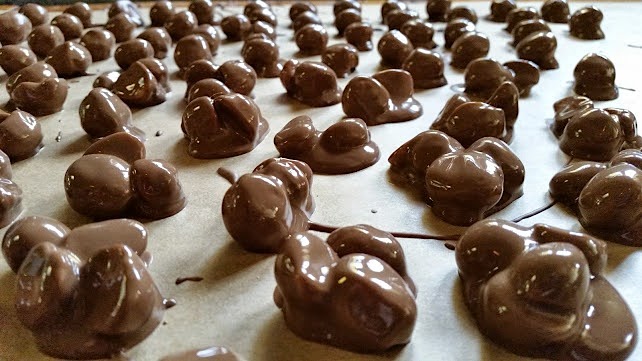
After all of the caramels were dipped, I used a fork to drizzle the remaining chocolate over the caramels, trying not to make too much of mess or let too much of my inner "Pig-Pen" come out.

There are some chocolate combinations that work better than others. (Disclaimer: This is totally based on my palate's biases and preferences.) Dark chocolate is my current preference for dipping cashews, milk chocolate for dipping macadamia nuts, dark chocolate for coating coconut balls, and milk chocolate for dipping caramels. A month from now this may all change and I might be dipping these caramels in dark chocolate. Unless of course, I decide to over think it.

"It's impossible," said pride. "It's risky," said experience. "It's pointless," said reason. "Give it a try," whispered the heart. If you have never made chocolate dipped caramels before, just try. And if for any reason your caramels aren't perfect the first time or the dipping isn't as perfect as you would like, keep trying. These chocolate dipped sea salted caramels will be worth your time, energy and effort.  Because is there anything better than caramel and chocolate?
Recipe
Chocolate Dipped Sea Salted Caramels

Ingredients
1 pound light brown sugar
1 pound unsalted butter (recommend unsalted Kerrygold, any European style butter, or any butter with at least an 82% butterfat content)
1 cup light corn syrup
1 can (14 ounce) sweetened condensed milk 
1 teaspoon vanilla
generous pinch of Kosher or sea salt (about a 1/4 teaspoon)
sea salt for finishing (recommend Maldon sea salt)
1 to 1 1/2 pounds of milk chocolate, chopped, melted (divided) Or a combination of milk and dark chocolate
Optional: 1 cup of roasted, chopped walnuts

Directions
1. Melt butter in a heavy medium sized saucepan over low to medium heat.
2. Add brown sugar and pinch of Kosher or sea salt whisking so no lumps remain.
3. Add corn syrup whisking until blended.
4. Add sweetened condensed milk whisking until blended.
5. On medium heat cook mixture until it reaches 248 degrees (F) on a candy thermometer. Immediately remove from heat when it reaches this temperature.
6. Add vanilla and stir with a wooden spoon. (Note: If you like your caramels with nuts in them, stir in after you have added the vanilla. Remember to toast and chop them before adding to the caramel mixture.)
7. Pour mixture into 9" x 12" inch pan lined with parchment paper.
8. Allow to set for 5 minutes and lightly sprinkle with sea salt 
9. Allow to cool. Optional: Continue cooling in refrigerator to firm up as it makes cutting them easier or let them cool for several hours or overnight.
10. Remove from the refrigerator. Using a long sharp knife, cut caramels into 1 inch squares. Return caramels to refrigerator for at least 30 minutes. Note: If caramels are too firm to cut after refrigeration, let them sit out for about an hour.
11. Melt milk chocolate (microwaving or over simmering water melting methods).
12. Dip each caramel in the melted chocolate, place on a large cutting board or baking sheet lined with parchment paper. 
13. With remaining chocolate, drizzle melted chocolate over caramels using a fork.
14. Allow to set. Place in small paper cups. Store in a covered container set in a cool place.


Early on in our life we often hear the words 'clean up your mess'. Little do we know or realize when asked to clean our rooms or the mess we made in the house these words would become applicable to cleaning up messes we make in our lives. We all make them, intentionally or unintentionally, as they are sometimes the way we learn about ourselves, our strengths, and our shortcomings. And sometimes we become temporarily paralyzed when trying to figure out to clean up a mess we have made. Ironically, this actually takes more energy than just doing something about it. The state of semi-paralysis has consequences, usually not good ones. Whenever I have ignored one of the 'messes' I have created or have been a party to, it often turns into something bigger, something harder to do, something harder to repair. Never a good life lesson, never a good way to feel good about yourself, and almost never good feelings left with anyone else either.

As I left my baking demonstration, my 'sous chef' said 'one of the best parts of the day is that you don't have to clean up'. While it was nice to not have to clean up the bowls, pans and utensils I used, I sort of missed having the 'closure' to this experience. For me, nothing is worse than not having closure (the proverbial hanging chads in one's life). This need for closure may drive some those around me a little crazy at times because I like to talk through things whenever there is a 'mess'. Because isn't that how we grow and how friendships and relationships grow? For me the answers are yes and yes. Things are always better when you talk though them, when there is closure, no matter if the closure is or isn't what you thought or wanted it to be.

Wednesday, October 8, 2014

Sea Salted Chocolate Dipped Macadamia Nuts


If the benefits of traveling (for pleasure) weren't so incredible, the process of unpacking and regrouping would be a fate worse than having a root canal (coming from someone who has had one). Being able to extend the zen-like benefits of a vacation stay upon returning back home is the only reward for enduring any or all of the travel hiccups that happen along the way. You know the ones, the flight delays, the sneezing passenger, the flight delays, the reclining their seat passenger sitting in front of you, and oh, did I say the flight delays? Being able to fly home first class on this recent trip (was the lucky recipient of someone's frequent flyer miles), seemed to make those hiccups almost disappear. Am still wondering how the guy sitting next to me managed to walk off the plane after having six, maybe seven gin and tonics. At least all of that alcohol stopped him from sneezing.

Some new cookbooks arrived (yippee) while I was away for a few days, giving me a plausible reason to delay unpacking my overpacked, overweight suitcase. Whether the books arrived or not, I am pretty certain I would find another reason to delay the inevitable unpacking.


Before I left for a trip to visit a very close friend in warm, sunny Arizona, I had made some Sea Salted Chocolate Dipped Macadamia Nuts. Normally dipping nuts in chocolate isn't such a big deal, possibly not even blog posting worthy. But double dipping macadamia nuts in chocolate and sprinkling them ever so lightly with sea salt just seemed to take them from being ordinary to being extraordinary chocolate dipped nuts. Thus making them blog worthy, not only for inspiration but for staying connected.


When dipping anything in chocolate, use real chocolate. When dipping macadamia nuts in chocolate, use real chocolate. There is a reason why I am being a little redundant (redundancy is usually, almost always a good thing) about real chocolate. There is what I call 'real' and 'fake' chocolates out there. There are many 'real' chocolate options: Ghirardelli (US), Callebaut (Belgium), Valrhona (France), Scharffenberger (US), and Guittard (US). And then sometimes even local chocolatiers will sell the 'real' chocolate they use. Then there are the 'fake' chocolate options, sometimes called 'candy' melts. Besides taste (and cost), there is also a difference between the two are in its' ingredients. 'Real' chocolate contains cocoa butter while the 'fake' chocolate contains vegetable fat. What I am trying to say here is that when buying chocolate to melt for dipping nuts or making candy, be a chocolate snob (the best and only kind of snob there is) and use the 'real' stuff.

Microwaving is probably the easiest way to melt chocolate (power level set on high and microwaving in 1 minute bursts, checking at each interval). The other option is melt in a bowl over a pan of simmering water, making sure the bowl doesn't touch the water. In both options, you need to have some patience. Wait until the chocolate has fully melted before stirring until smooth. 


Using a fork, single (whole) or small clusters of the macadamia nuts are dipped in the melted chocolate.


After the nuts have been dipped once, allow the chocolate to set before dipping a second time. You might think a single dipping is enough. But once you taste them double dipped, your definition of 'enough' will shift. Trust me, it will.


In order for the fine sea salt to adhere to the chocolate, work in batches. After double dipping 10 to 12 macadamia nuts or nut clusters, sprinkle on some fine sea salt, ever so lightly.

Waiting for the chocolate to set is the hardest part of making these Sea Salted Chocolate Dipped Macadamia Nuts. They could not be easier to make and could not be more decadent. Perfect for serving after dinner, perfect for giving as a gift, and perfect for rewarding yourself for any reason (like unpacking your bags). 
Recipe
Sea Salted Chocolate Dipped Macadamia Nuts

Ingredients
2 1/4 cups roasted and lightly salted macadamia nuts
1 1/4 pounds of milk chocolate discs, divided (used the milk chocolate discs from Graham's, a local chocolatier)
fine sea salt

Directions
1. Line a long baking sheet or cutting board with parchment paper. Set aside.
2. Melt 3/4 pound of milk chocolate discs (in microwave or over simmering water, either method works).
3. Dip macadamia nuts in melted chocolate and place on parchment paper. Note: Dip nuts individually or in small clusters (2-3 nuts).
4. Allow dipped nuts to dry.
5. Melt remaining 1/2 pound of milk chocolate discs (in microwave or over simmering water, either method works).
6. Dip dried macadamia nuts for a second time. 
7. Sprinkle ever so lightly with fine sea salt while nuts are still 'wet'. Note: After the second dipping of 10-12 macadamia nuts, sprinkle with sea salt. Repeat.

To work off some of the liquid calories consumed on this trip, we went on several early morning hikes. As warm as the southern Arizona sun was, the lack of humidity made hiking in 80 to 90 degree weather bearable. Stopping to take photos along the way (really so I could catch my breath), made it easier to hike in an elevation higher than the one I live in. There is something simultaneously energizing and calming about hiking in the outdoors, particularly when the views are so spectacular as well as so different than the ones I see everyday. How anyone could ever get 'enough' of taking in views of the mountains, of water, or of the desert, I could not even begin to imagine.

No matter how many times I walk or hike a trail one thing is for certain. It may retain its' familiarity but it never looks or feels the same. Sometimes the changes are as subtle as the depth of color of the sky. Sometimes they are significant as changes to the seasonal landscape. And depending on where my head is on any given day, things missed in both the landscape and in my life are often seen with such clarity I sometimes wonder out loud 'how could I have missed this?'. John Muir, the 'patron saint of the American wilderness' once said 'I only went out for a walk and finally concluded to stay out till sundown, for going out, I found, was really going in.' And I couldn't agree with him more.

Wednesday, December 4, 2013

Fruit and Nut Chocolate Bark with Sea Salt

Remember the adage 'Don't judge a book by its' cover'? Well over the years, it has become one of those maxims we modify and use to fit a myriad of contexts. So I feel compelled to say 'Don't judge a recipe by its' name'. Why? Because for some of you when you hear the words fruit and nut together it conjures up foods you are not particularly fond of. Things like fruit and nut eggs (those last to be eaten candy confections in an Easter basket) and fruitcake (a cake having an almost legendary bad rap). So I ask (kindly, of course) for you to momentarily suspend your preconceptions about the taste of any 'fruit and nut' foods ever eaten (or dismissed) and allow me to change how you think about those two words. Because I am going to put them in a very different context for you. The context of cashews, pistachios, dried cherries, chocolate and sea salt.


If chocolate has the same seductive qualities as the little black dress, then the Fruit and Nut Chocolate Bark with Sea Salt is akin to the wearing the low cut black dress and four inch heels. Other than having you take a taste of this bark, I know of no other way to explain to you how amazing it is or how you will be affected by it. Believe it or not, there is also an element of simplicity in this chocolate bark, in the making of the bark that is. However, there is nothing simple about being taken in by something so beautiful and so delicious.


What could be easier than melting chocolate and spreading it onto a parchment paper lined baking sheet and then sprinkling with nuts, dried fruit, and sea salt? If your answer was 'pretty much nothing', you would be right.


Making the chocolate bark means you have to temporarily ignore your phone, texts, emails, Facebook alerts, tweets, and all other forms of social media. Why? Because if the nuts, dried fruit, and sea salt are not sprinkled over the warm melted chocolate before the chocolate sets up, you will end up with a slab of chocolate.

There is no required order of sprinkling the nuts, however, I like to start first with the cashews and then the pistachios as it is important that these large nuts have the time to become embedded in the melted chocolate.


Once the nuts are spread, the dried cherries and sea salt are sprinkled as evenly as possible. The amounts of nuts and dried fruit you spread over the bark is all about personal preference, but I have shared with you the quantities I use when making it.


It takes several hours for the chocolate to set. Once set, you simply break into pieces. I like the look of random sized pieces, however, you can certainly use a knife to create more uniform ones. If some of the nuts fall off during the breaking process, just enjoy them or throw them on the platter of bark.


I like to package up the Fruit and Nut Chocolate Bark with Sea Salt in cellophane bags tied with a ribbon and give as gifts during the holiday season. If not giving it away but keeping to serve, I generally store the bark in a sealed tin (to keep it fresh) until I am ready to put it on a platter. This bark can be a dessert all unto itself (it is center stage worthy) or it can be added to a tray of other confections and baked goods. It will definitely be one of the more memorable confections you make, during the holidays or throughout the year.

Recipe
Fruit and Nut Chocolate Bark with Sea Salt

Ingredients
2 pounds of chocolate (recommend Ghiradelli Dark Melting Wafers) Note: Could use white chocolate instead of dark chocolate)
1/2 cup dried cherries (or other dried fruit of your choice. Options include dried apricots, dried blueberries, dried cranberries)
3/4 cup chopped pistachios
1 1/2  cups whole cashews
Maldon sea salt (less than 1/2 teaspoon)

Directions
1. Line an 11 x 15 baking pan with parchment paper. Set aside.
2. Melt chocolate in a bowl set over simmering water.
3. Carefully pour the melted chocolate onto the parchment paper. Using an offset spatula or spoon, spread the chocolate to the edges of the parchment paper.
4. Immediately sprinkle the cashews, pistachios and dried cherries over the chocolate. Lightly tap the baking sheet onto the counter to ensure all of the nuts and fruits adhere to the chocolate.
5. Lightly sprinkle sea salt over the top.
6. Allow the chocolate bark to set up. Break into pieces. 
7. Store in covered container or package in cellophane bags.


Second chances. How many times have we heard or even said the truism 'Just give it a second chance'? As parents you may have said this more than a few times, as a member of team you may have said this when discussing a strategy, or as a friend you may have said it to provide encouragement. Sometimes we think were giving something or someone a second chance, when really all we are doing is going through the motions without doing or seeing anything differently ourselves. When this happens we sometimes look for faults or differences rather than looking for strengths, celebrating the differences or even dealing with our own fears (of the unknown, of failure). A second chance isn't supposed to be doing the same thing again (or again and again), it supposed to be doing it differently.

Years ago when I was training for my first marathon I had days of really good runs and really bad runs. On those good run days, I felt like I could conquer the world and could hardly keep from smiling all day long. The bad runs were on those days when my head just wasn't in it, when I felt exhausted, when I felt outside of my comfort zone, or when I was running with a little bit of pain. On those days I never felt the addiction to or the exhilaration that comes with running. And if running with someone else who I wasn't keeping up with, I was quick to blame them for making me run too fast or on routes with inclines (those darn inclines).

On those bad days, it would have been easy to walk away and say 'I tried' without ever knowing what it would feel like to actually finish a marathon. Or I could have sabotaged myself by not running for a few days or keeping my runs short. I learned the hard way that in the end those strategies not only were keeping me from that marathon goal, but from experiencing the euphoria felt when I was 'in the zone' as well as from benefitting from the changes that come from the running. Over the course of that first marathon training, it took more than a few second chances for me to achieve my goal. It meant seeing myself and running differently, facing my fears, accepting my own vulnerabilities (running was something that put me way out of my comfort zone) and being courageous (yes second chances and courage go hand in hand). So whether it is giving yourself, someone else or even any confection containing fruits and nuts a second chance, just remember it is mostly up to (and about) you as to what the outcome may be.

As a post script, I did finish that first marathon and stayed with running regularly for several more years, even running a second marathon. But I have not run regularly in quite awhile and could just kick myself for letting go of something that had so many benefits. Fortunately though, I am back to giving it a second chance. The goal this time isn't a marathon, it is simply feeling that euphoria again.

Monday, November 25, 2013

Chocolate Covered Cashew Clusters

Almost anything dipped or covered in chocolate tastes better, right? High on the list of my favorite chocolate covered foods, other than Oreos, are cashews. As delicious as cashews are all on their own, when covered in chocolate they are transformed into a bite of pure decadence. Remember the somewhat memorable line from the Forrest Gump movie "Mama always said life was like a box of chocolates. You never know what you're gonna get? ". Well a box of chocolate covered cashew clusters is the perfect gift for those in your life that like a little bit (or even alot) of predictability (aka for whom change doesn't come easy) as well as for those who are a little more adventurous (aka willing to take some risks). In other words, you can't go, you won't go wrong making these chocolate covered bites of wonderfulness.

Making chocolate covered cashew clusters could not be easier. During the hectic holidays or one's hectic life, having a chocolate confection that is simple, relatively quick to make, and doesn't require much planning ahead can be a lifesaver. If you believe in keeping things simple, chocolate covered cashews could become one of your favorite things to make and give to family and friends.


Like with most things, the quality of the ingredients can sometimes mean the difference between 'not so good' and 'really great'. Whatever you do, don't use the chocolate wafers that come in every color under the rainbow (you know the ones I am talking about, they are the ones often called 'candy melts' or 'almond bark' as these are generally made with vegetable fats instead of cocoa butter). One of my favorite chocolate shops in Illinois is Grahams. Their milk chocolate confectioner's discs are perfect for making cashew clusters (available online for those you not living in the western suburbs of Chicago). (The dark chocolate confectioner's discs from Grahams's are equally perfect.) However, the Ghiradelli melting chocolate discs work really well too. If you have a chocolatier near where you live and they sell confectioner's chocolate, you have yet another option. In other words, I am trying to eliminate all of the obstacles for you!


Melting good chocolate, mixing in roasted, salted whole cashews and dropping by the tablespoonful on parchment paper is the extent of this 'recipe'. The size of the cashew clusters is about the only decision you need to make. Once the chocolate cashew clusters have set simply place them in small candy papers. If you are not serving them on the day you make them, just store in a covered container. These are so addictively good that you may have to hide them from your family if you were planning on serving them at a gathering.


Recipe
Chocolate Covered Cashew Clusters

Ingredients
1 pound of milk chocolate confectioner's discs (recommend Grahams Chocolates or Ghiradelli Melting Chocolate) or for those of you like dark chocolate I recommend using a semi-sweet chocolate or bittersweet chocolate (no more than 60% cocoa)
1 1/4 to 1 1/2 pounds of roasted and salted whole cashews (a generous 3 cups)

Directions
1. Melt chocolate discs in a glass bowl set over a pan of hot, simmering water.
2. When chocolate has melted, remove bowl from pan. Stir in cashews.
3. Drop tablespoons of the cashew/chocolate mixture on parchment paper. Allow chocolate to set.
4. Place cashew clusters in small paper cups. 
5. Store cashews in a covered container.


Just like any act of service, there are always small ways to show others you care. For me, cooking and/or baking for others has been my way of sharing a small part of myself, of showing gratefulness. The holidays always provide me with the opportunity to thank people that extended a kindness to me over the year even if I had already shown my appreciation and thankfulness to them.

For me the best kindnesses are the ones unexpected, the ones genuine, and the ones coming from the heart. It is often hard to repay these kindnesses, because more often than not, they are given without the expectation of anything in return. And it is the simplest of kindnesses that are the most endearing. A bag of my favorite brought when working a really long day, a note left on a windshield, freshly picked flowers waiting for me, and the 'just thinking of you' phone call are just some of the kindnesses permanently etched in my memory, in my heart.

Thursday, September 5, 2013

Sea Salted Caramels

Admittedly I love chocolate. Not all chocolate as I have grown to be a tiny bit little fussy as to what chocolate I will or will not eat. Nowadays I have a leaning toward dark chocolate as I have convinced myself it has medicinal qualities. Although I might not necessarily pass up a piece of any good quality milk chocolate. Yet in spite of my love for chocolate, caramels are the one confection that I have an even deeper affection for. Caramels without nuts, with nuts, dipped in dark chocolate, dipped in milk chocolate, with sea salt, or without sea salt. The choices of caramels are endlessly delicious. But if I had to choose just one to eat for the rest of my life (and I am not one who likes to choose only one), without giving it a second thought, I would choose a sea salted caramel. Yes, the deliciousness of a sea salted caramel is beyond amazing. I would call it scream worthy but if I use scream worthy too often when describing some foods, it will lose it's impact. But just know these really are scream worthy. It almost feels sinful to indulge oneself in this buttery, creamy, melt in your mouth confection. With almost being the operative word here as it would be a sin in of itself not to allow oneself to enjoy them, in moderation of course.

It was more than thirty years ago when I made my first batch of caramels. It was my first time using a candy thermometer and my first time making 'candy' (unless of course fudge counts as candy). The recipe was given to me by a woman who I worked with in the china department at Marshall Field's (I was a temporary Christmas employee working primarily to get the employee discount for my holiday shopping). Little did I know at the time that as a result of my time in the china department that I would develop both an obsession (oh I really mean appreciation) for caramels as well as for china. Up until that time I had never tasted a homemade caramel and would often pass over the chocolate covered caramels in the Fannie May Candy box in favor a dark chocolate covered vanilla cream. But after tasting a homemade caramel, the choices I made when receiving a box of chocolates changed. And a gift of a box of caramels has become more treasured than a box of chocolates.

While I no longer have the small piece of paper on which the recipe was beautifully written, the recipe itself lives on. In part thanks to one of my friends who re-shared my recipe with me as I had misplaced the even smaller piece of paper I had typed (yes, typed) the recipe on. In the last several years I have made one change to this recipe. After discovering how sea salt even further elevates the taste of caramel, the caramels I make these days are now finished with sea salt.

I don't know if it was the anticipation of fall, seeing caramel apples, or the humidity finally breaking, that made me want to make the sea salted caramels this week or not. I do know that this is one of those cooler, not overly humid weather making confections. Although I recall making them in the August heat for a county fair years back. It must have been my lucky day (or the reward for suffering through the making of these caramels on a wickedly hot day) as the caramels not only won the blue ribbon in the candy division, they won a grand prize ribbon as well. I am not sure what compelled me back then to enter a county fair (with women who take these contests rather seriously), but that bucket list experience has now been checked off.


Having a good heavy sauce pan is as important as having an accurate candy thermometer when making caramels. My personal pan preference is All-Clad, however, any heavy duty stainless pan should work.  If you have not yet bought a candy thermometer, consider getting a digital one as they take the guessing out of knowing when you have reached your desired temperature. The caramel making process all begins when one pound of unsalted butter is melted over low to medium heat.

Once the butter is melted, one pound of light brown sugar and a pinch of Kosher salt is added and mixed until the brown sugar has melted into the butter. Stir with a wooden spoon to ensure there are no lumps. Why wooden spoon? The mixture is going to gradually increase in temperature so it is best to begin and end with using a wooden spoon as a metal spoon will begin to take on the heat as the cooking process continues. Trust me, I have learned this from experience.

The corn syrup is added, followed by the sweetened condensed milk. Each time you add an ingredient, stir until well blended. Cooking over medium-low heat it will take anywhere from 20 to 25 minutes before the caramel reaches 248 degrees. You do not need to stir it constantly, but whatever you do, do not walk away from the cooking caramel. I generally stir the mixture every 2-3 minutes, making certain there is no burning at the bottom of the pan. Once the caramel reaches 248 degrees, remove from the burner and quickly stir in 1 teaspoon of vanilla.


Your parchment paper lined 9x12 inch pan should be ready and waiting as you want to immediately pour the hot caramel mixture into the prepared pan. Allow the poured caramel to set for several minutes before lightly sprinkling sea salt over the top. Some of the sea salt will melt into the caramel, so be careful to sprinkle very lightly here. You will be adding more sea salt once the caramels have cooled completely and you are ready to cut.


You can cut the caramels into any size. I like to cut mine into 1 inch squares as it makes for a perfect bite. Remember, a light sprinkling of sea salt is added to the cooled caramels right before you get ready to cut and wrap.


Wrapping the caramels in cellophane makes for a great presentation and also keeps them fresh. I usually cut squares from a roll of cellophane unless I had some store bought precut squares (which is not very often). Once all of the caramels are wrapped, you can package them on platters or in bags. Once the weather turns much cooler and there is no humidity, I will store the caramels in a tin in the house. Until that time, I will store them in a container in the refrigerator, bringing them to room temperature before serving. If you are looking for the perfect gift to bring to your friends, you have now found it.

Recipe
Sea Salted Caramels (adaptation of a recipe given to me more than 30 years ago)

Ingredients
1 pound light brown sugar
1 pound unsalted butter
1 cup corn syrup
1 can sweetened condensed milk
1 teaspoon vanilla
pinch of Kosher salt
sea salt for finishing (recommend Maldon sea salt)
Optional: 1 cup walnuts, toasted and chopped

Directions
1. Melt butter in a heavy medium sized saucepan over low to medium heat.
2. Add brown sugar and pinch of Kosher salt. Stir so that no lumps remain.
3. Add corn syrup and stir until blended.
4. Add sweetened condensed milk. Stir until blended.
5. On medium heat cook mixture until it reaches 248 degrees on a candy thermometer. Immediately remove from heat when it reaches this temperature.
6. Add vanilla and stir with a wooden spoon. Optional: If you like your caramels with nuts in them, you will quickly stir them in after you have added the vanilla. Remember to toast and chop them before adding to the caramel mixture.
7. Pour mixture into 9x12 inch pan lined with parchment paper.
8. Allow to set for 5 minutes and lightly sprinkle with sea salt (don't over do it here as you will be adding more later).
9. Allow to cool. Continue cooling in refrigerator.
10. Remove from the refrigerator and lightly sprinkle caramels with sea salt. Using a long sharp knife, cut caramels into 1 inch squares and wrap with cellophane.
11. During warmer weather store in refrigerator. Bring to room temperature before serving or eat chilled.
12. During cooler weather, place wrapped caramels in a tin or container.


When the fall came when I was in elementary school there were taffy apples for sale every Friday. I think they were called affy tapples and while not having much caramel on them, they transformed an apple and were a welcoming end of the week treat. At the time it was the only way I would eat an apple. Since experiencing the mass produced, pre-packaged taffy apples, I have found candy stores (the mom and pop ones) who make some rather amazing caramel apples. Probably my favorites are the caramel apples made by Dan's Homemade Candies in Joliet, Illinois. While its been more than 7 years since I had one of their apples, I haven't come across a hand dipped caramel apple I like better (and it is not for the like of trying). Recently a friend told me they shipped their apples, but there is something about going into a store and picking 'just the right one'.

Isn't it funny how we remember the foods from our childhood? Maybe these foods have left a permanent impact on our taste buds. And while history is the enemy of memory, I would venture to say that if I were to eat some of those exact same favorite childhood foods today I might wonder what it was that made me think they were the best things ever. And whether it's a memory of really good or really bad food, we also seem to have the uncanny ability to remember not only what we ate growing up, but also the foods of a holiday meal or those experienced at a meal with a friend. I may not remember what I had for lunch last week, but I can remember almost all of the meals that had some significance or affected me in some way. Because sometimes it wasn't the food that mattered at all. It was who the meal was shared with that made the food seem like the best one ever. Regardless if that food was an incredible confection or even just a late night McDonald's cheeseburger.