Showing posts with label Main Dish. Show all posts

Wednesday, August 3, 2016

Blueberry Dutch Baby


Breakfast seems to be one of these meals we are often in a hurry to eat. Usually this means when going out for breakfast we set relatively short time parameters around the time it takes to place the order to the time it is brought to the table. Invariably we often avoid ordering any menu item requiring a twenty minute wait time. For some reason twenty minutes in the morning is considered an endless eternity. We need to convince ourselves we are much too busy to wait that long. Although we think nothing of waiting in endless lines at the coffee shop, at the ice cream shop on a really hot summer's day, or at an amusement park. Essentially our perception of 'too long' is consistently inconsistent. Because if we really want something badly enough, we usually manage to deal with the wait time.


Dutch Babies are those 'do I really have to wait twenty minutes?' breakfast menu items causing us some angst. As soon as we place a breakfast order for anything other than a Dutch Baby, it seems the universe conspires against us. Within seconds of the server leaving our table, another server delivers a a tray of Dutch Babies to the table sitting next to us. The sight of them immediately makes our mouths water or drool or both. Suddenly our perspective shifts and we silently admit a twenty minute wait is really not that long at all. So instead of going out for breakfast and not ordering what you  crave, why not just stay in and make some Dutch Babies!

With the possible exception of wild blueberries, you more than likely generally have all of the ingredients for the making of this Blueberry Dutch Baby on hand. Less time consuming than making traditional pancakes and with a greater visual wow factor at the table, Dutch Babies are an impressive breakfast or brunch dish. By using different seasonal ingredients (blueberries, apples) or simply topping with a homemade lemon curd you may never grow tired of either making and devouring them. 

A prior dutch baby recipe post (Dutch Baby, At Last) used slightly different ingredients in the batter. I would be hard pressed to say which one of these Dutch Babies I liked better. Although in one bite of this Blueberry Dutch Baby and I was immediately smitten with the flavor the smaller, wild blueberries, lightly sprinkled with fresh squeezed lemon juice and finished with a generous dusting of confectionary sugar brought to it. Unfortunately fresh wild blueberries (a much smaller version of the blueberries most of us are familiar with) are not readily available here in the midwest. Driving to Maine or Canada is not a feasible option, so I instead used frozen wild blueberries (with success!). The recipe in Yankee Magazine called for using only one half cup of wild blueberries, but I can tell you now your Blueberry Dutch Baby really needs somewhere between three-quarters to a full cup of them.


The key to making the batter for a Dutch Baby is three-fold: use the best possible ingredients, use room temperature eggs, and whatever you do, do not over blend the batter. A lumpy Dutch Baby batter is a really good batter.


Cast iron pans and Dutch Babies are inseparable. Not only do they conduct heat evenly, they can stand up to relatively high oven temperatures (like the 425 degrees (F) oven temperature called for in this recipe). Cast iron pans at antique stores or flea markets may be a little more expensive than the newer ones made today although either of them will work (this comes from someone who has both). Never ever use a non-stick pan when making a Dutch Baby. Both your pan and your Dutch Baby will be ruined.


Getting the cast iron pan hot is important when making this puffy pancake. The best way to accomplish that goal is to first preheat the oven before placing the pan with the three tablespoons of butter in it. Not only will your butter melt (within about a minute) perfectly, your pan will be evenly heated. Once the butter is melted, the batter is poured into the pan first and then topped with the blueberries. In about 20-22 minutes you will the most beautiful, insanely delicious golden browned, puffy pancake. 

As soon as the Dutch Baby has finished baking, remove from the oven and immediately squeeze a half of small lemon over the top and dust generously with confectionary sugar. Serve immediately! Because part of the experience of a eating a Dutch Baby is taking it in with your eyes make certain everyone is at the table ready and waiting as the Dutch Baby will slightly deflate in a relatively short period of time. While it is as delicious fully puffed as it is deflated, seeing it puffed might make everyone at the table think twice before passing on ordering a Dutch Baby the next time they go out for breakfast at a restaurant. Life may be short, but who wants a life without a Dutch Baby, especially a Blueberry one.

Recipe
Blueberry Dutch Baby (slight adaptation to Yankee Magazine's Blueberry Dutch Baby recipe, July/August 2016)
Serves 2 generously and 4 slightly less generously

Ingredients
1/2 cup (65g) all-purpose flour
1/2 cup whole milk
2 large eggs, room temperature
2 Tablespoons sugar
1/8 teaspoon kosher salt
1/8 teaspoon freshly grated nutmeg or ground nutmeg
3/4 to 1 cup wild blueberries (fresh or frozen)
3 Tablespoon unsalted butter
Juice of 1/2 lemon
Confectionary sugar for finishing
Optional: Maple syrup

Directions
1. Preheat oven to 425 degrees (F) and position rack to lower position in oven.
2. Lightly beat the flour, milk, eggs, sugar, salt and nutmeg. Do not over beat as batter should be slightly lumpy.
3. Place butter in 9 inch cast iron pan. Place in oven. Allow butter to melt (about 1 minute).
4. Carefully remove pan from oven, immediately pour batter into the heated skillet and sprinkle with wild blueberries. 
5. Place pan in oven and bake until puffed and golden, approximately 20-22 minutes. Remove from oven.
6. Immediately sprinkle with fresh lemon juice and generously dust with confectionary sugar.
7. Serve immediately.

Notes: (1) I used one cup of wild blueberries here, but 3/4 cup could work as well. Anything less and well, it wouldn't be as delicious, (2) In the midwest, finding fresh wild blueberries (from Maine or Canada) is a challenge. Most grocery stores sell smaller wild blueberries in the freezer section, (3) Serving with maple syrup is optional, but not necessary. Personally I prefer a Dutch Baby without maple syrup, (4) This recipe definitely calls for the use of a cast iron pan. You can find vintage cast iron pans in antique stores and some flea markets or you can find new ones in a good culinary store. If buying new would recommend Lodge cast iron pans. Everyone should have at least one cast iron pan and (5) Feel free to make the base of this Blueberry Dutch Baby using the Dutch Baby, At Last recipe posted on the blog.


Views in Bar Harbor and on Mt. Desert Island (Maine)

Monday, June 27, 2016

Lasagna Bolognese


Let me begin with a kinda, sorta forewarning about one of the most blissfully delicious, soul satisfying, decadent lasagnas on the planet, one you will fall hopelessly, deeply in love with in the first bite. This Lasagna Bolognese is an ambitious labor of love. Suffice to say this is a dish you should make only for the family and friends in your life that you really, really, really, really like. More specifically, for those in your life who, while sitting at your dinner table, unabashedly express their euphoria moments after their taste buds go into overdrive. Definitely do not make this dish for the kind, for whatever reason or reasons, have the uncanny ability to refrain from sharing or showing the joy their taste buds are experiencing, begin critiquing the dish ('did you put too much garlic in?') or who get all effusive about a lasagna they had elsewhere. Because if there was ever a Lasagna Bolognese to share with your most favorite people in the universe, one where you (or they) wouldn't care if the world or life as you know it ended tomorrow, this would be the one. 


I know what you may be thinking "we all don't experience the tastes of things the same way so maybe not everyone will be doing backflips and handstands at the table". To a certain extent I might concede to the possibility there is some truth to that belief. Except for the well documented fact there are some foods and dishes so incredible in taste and texture they transcend all of our individual unique food experiences and preferences. Generically speaking, pizza, ice cream and bread, are amongst the foods with the most universal appeal. While lasagna may be one of those dishes where our love or ambivalence for them is due in large part to the kinds of lasagna we grew up eating, this Lasagna Bolognese is a game-changer. For those brave enough to willing admit their Lasagna rating bar was set against frozen lasagna dinners or ones made with commercially sold jarred sauces, they won't be able to keep their heads from spinning after tasting this Lasagna Bolognese. 


This Lasagna Bolognese is made with a veal and pork ragu simmered to perfection, a white bechamel sauce ever so lightly seasoned with salt and a hint of grated nutmeg, freshly grated Parmigiano-Reggiano cheese, and sheets of fresh lasagna noodles (no you don't have to make your own pasta if you don't want to as you can find some really high quality fresh pasta in the refrigerated section of many grocery stores). To make the process of making this Lasagna Bolognese seem less labor intensive you can make the Bolognese Ragu a day ahead (cover and chill in the refrigerator). Rather than trying to the 'hostess with mostest" after an exhaustive day of cooking, make and assemble the entire Lasagna Bolognese the day before (cover and chill in the refrigerator). Not only will enjoy your dinner gathering as much as everyone else, you also give the flavors of the ragu some time to further develop. In other words, if you pace yourself the feelings of love will overshadow the labor.


Finely diced carrots, celery and onion (along with thinly sliced garlic) starts out as an Italian Buttato and transforms into a Soffritto when sautéed in extra-virgin olive oil. This cousin to France's mirepoix become the flavor base for the ragu. Key to the soffrito is three-fold: finely diced uniform pieces of vegetables; using a large heavy bottomed pan; and, sautéeing just until they have softened and translucent but not browned.


The second layer of richness comes from the ground pork, ground veal, and pancetta. Before adding the meats to the pan, temporarily transfer the Soffritto to a bowl, to enable them to brown.


After the meats are browned and the Soffritto returned to the pan, add the tomato paste, milk, wine, and thyme bundle are stirred in and brought just to a boil, the heat is reduced to a simmer. The ragu should be allowed to simmer for 1 1/2 to 2 hours, however, the longer you simmer the deeper its' flavor. If your mixture seems to become 'too' thick, add in a little water (I added about a cup of water after about an hour). Season with salt and pepper, remove the thyme bundle, and allow to cool before assembling the lasagna.


The more classic Northern Italian lasagnas are made with a bechamel (besciamella in Italian) sauce, versus ricotta cheese found in other versions of the recipe. Considered to be one of the simplest of the Italian sauces and one of the five 'mother' sauces in French cooking, the bechamel sauce adds flavor and creaminess to this Lasagna Bolognese along with helping to keep the pasta from drying out. The key to making this sauce is making sure the butter/flour roux is a light golden brown before slowly adding in the milk. Patience is key here. In about 15-20 minutes you will have created a smooth, creamy, thickened (but spreadable) bechamel sauce.

Call me a cheese snob (I have been called worse), but nothing compares to the nutty, complex flavor of Parmigiano-Reggiano. Nothing. So don't even think of using any else.

Now here's the point in the recipe where I made a substitution. I (gasp) used 'fresh' but not 'homemade' pasta sheets. While the 'fresh' pasta found in the refrigerated section (not to be confused with those in the box 'no boil' pasta sheets), they are next best thing to homemade pasta. You can certainly make your pasta for this Lasagna Bolognese, but you can't those slippery curly edged lasagna noodles cooked in boiling water. Really you can't. 


To assemble this epic pasta dish, begin with a layer of the ragu, a sprinkling of the grated Parmigiano-Reggiano, a layer of pasta, a layer of bechemal, a layer of ragu, a sprinkling of the grated Parmigiano-Reggiano cheese....until all of the sauce and pasta are used up but ensuring the top layer is the pasta with the bechamel sauce over it. Before putting the Lasagna Bolognese in a preheated 375 degree (F) oven, generously finish with more grated Parmigiano-Reggiano cheese. Note: In a 9"x12" pan you will have 4 to 5 layers of pasta if using the fresh, refrigerated pasta sheets, but more layers if you use your own homemade pasta.  The Lasagna is baked for 30 to 45 minutes (longer if you had made it the night before) until the edges are browned and is cooked through. Allow it to set at least 15-20 minutes before cutting and serving. Then brace yourself for the most delicious meal of your life.


So how much do I love this Lasagna Bolognese? Almost as much as I love chocolate; puppies; the sound of a giggling baby; the deep rich colors of a beautiful sunset; the sound of the ocean; a bouquet of deep blue hydrangeas; the feel and smell of clean, hung out to dry in the fresh air sheets; a long, windows open drive out in the country; two-armed hugs; bringing a smile to the face of everyone sitting at my dining room table (handstands or backflips optional).......Your search for the most perfect, best, most mouthwatering lasagna is over. Buon appetito!

Recipe
Lasagna Bolognese (several adaptations to Mario Batali's Lasagna Bolognese recipe shared on The Food Network and in his cookbook Molto Italiano: 327 Simple Italian Recipes to Cook at Home)

NOTE: Recipe updated March 20, 2018

Ingredients
Bologonese Ragu (make about 6 cups)
1/4 cup extra-virgin olive oil
2 medium onions, finely chopped
4 ribs of celery, finely chopped
2 medium carrots, finely chopped
5-6 cloves of garlic, thinly sliced
1 to 1 1/4 pounds ground veal
1 to 1 1/4 pounds ground pork
4 ounces pancetta (either run through a meat grinder or finely diced)
9 ounces tomato paste
1 1/4 cups whole milk
1 1/4 cups dry white wine
1 bundle of fresh thyme leaves (about 4-5 stems)
2 teaspoons kosher salt (or more to taste)
1 teaspoon black pepper
Water, if needed, during the cooking process

Bechamel Sauce
5 Tablespoons unsalted butter
4 Tablespoons all-purpose flour
3 cups whole milk
2 teaspoons Kosher salt
1/2 teaspoon pepper
1/2 teaspoon freshly grated nutmeg

Lasagna Assembly
2 (12-14 ounce) packages of fresh lasagna noodles (Note: Briefly (45-60 seconds) cook each of the pasta sheets in hot simmering water)
8-10 ounces Parmigiano-Reggiano cheese, grated

Directions
Bologonese Ragu
1. In the bottom of a large heavy bottomed pan, heat the olive oil over medium heat until hot. Add the onions, celery, carrots, and garlic and cook until the vegetables are translucent but not browned (about 5-7 minutes). Transfer to a bowl and set aside to cool slightly. Note: I often like to process these sauteed vegetables in a food processor for about a minute, ensuring the mixture does not turn to paste.
2. Increase the heat to high and the pancetta. Cook the pancetta until beginning to turn brown (approximately 4-5 minutes). Then add the pork and veal to the pan (stirring frequently). Cook until the meats have browned.
3. Add the tomato paste to the pan. Cook for approximately 4-5 minutes or until the tomato paste takes on a deeper red color. Return vegetables along with the milk, wine, and thyme bundle. Season lightly with salt and pepper. Bring just a boil, then reduce heat to low and simmer for 1 1/2 to 2 hours. Note: You may need to add some water midway through to keep the sauce's consistency.
4. Taste for seasoning. Add additional salt and pepper if needed. Remove from heat and allow to cool before assembling the lasagna.

Bechamel Sauce
1. Melt the butter in a heavy bottomed, medium sized saucepan over medium heat.
2. Add the flour into the butter and whisk into the butter until smooth. Continue to cook the mixture (whisking constantly) until the butter/flour roux turns a light golden brown (about 5-6 minutes).
3. Begin by adding about 1/4 cup of the milk whisking constantly into the butter/flour roux is again smooth. Then add the remaining milk in three to four (or even five) equal portions, whisking until the sauce begins to thicken after each addition. 
4. Add the grated nutmeg, salt and pepper and allow the bechamel sauce to simmer (on low heat) for about 8-10 minutes. Taste and adjust for season. 
5. Allow to cool slightly before assembling the lasagna.
Note: If you add the milk too quickly your bechamel may not properly thicken.

Lasagna Assembly
1. Preheat oven to 375 degrees (F).
2. In a deep dish 9"x12" or 9"x13" baking pan, begin with a layer of the ragu, a sprinkling of the grated Parmigiano-Reggiano, a layer of pasta, a layer of bechamel, a layer of ragu, a sprinkling of the grated Parmigiano-Reggiano cheese....until all of the sauce and pasta are used up but ensuring the top layer is finished with bechamel sauce.
3. Finish with a generous sprinkling of grated Parmigiano-Reggiano cheese.
4. Bake 30-45 minutes or until the edges have browned and the lasagna is cooked through. Note: Cooking time will be longer if the lasagna was prepared and refrigerated the day before cooking.
5. Allow to rest 15-20 minutes before serving.

Notes: (1) Assembling the entire dish the day before serving is a life-saver. Individual servings reheat beautifully in the oven or microwave for several days after it has been baked (if it lasts that long). (2) The lasagna can also be frozen. Allow to cool slightly before wrapping and placing in the refrigerator. When slightly chilled place in the freezer (wrapped well). Remove the lasagna from the freezer and allow to thaw before baking in the oven. (3) Recently I started to make more of the bolognese, increasing the recipe by half, so there is extra sauce to serve when plating the lasagna.


Two early morning summer views of Lake Marmo at Morton Arboretum in Lisle, Illinois

Monday, May 2, 2016

Spaghetti Alla Gricia


It has been thirty days since I have had a diet soda. Or rather almost a month since I removed the diet soda IV from my arm. Considering this beverage has been my primary form of morning, noon, and night liquid intake for decades, it is nothing short of a miracle I have had enough willpower to end this addiction. Weaning myself from this diet soda addiction was not an option (been there, done that). Cold turkey was the only painful choice. Needing an alternative source of hydration, I had no other choice than to turn to water. Over the course of the past several weeks my consumption of water has surpassed the amount of water passing my lips in a very, very long time. If I told you I drank more water in the last 30 days than I had since I was 18 years old you might think this a bit of an exaggeration, rather than a claim much closer to the truth. Just remember truth is almost always stranger than fiction. Had I not decided to fingers crossed finally eliminate diet soda from my life I may have never discovered the deliciousness and thirst quenching qualities of water. Who knew water could be so satisfying? Well certainly I didn't. Not surprisingly I have begun to develop an affinity for some of the European waters, although I am not ready to declare a commitment to any of the English, Swedish, French, or Italian waters I have been trying just yet. No reason to hurry or even make this decision as there is a lot of water drinking catching up to do. Besides I was a 'will drink only one kind of diet soda snob' for decades, so this time around I will forego becoming one of those 'will drink only one kind of water snobs'.


Speaking of water, we have heard over and over again never to throw away the (salted) pasta water before finishing a pasta dish. This Spaghetti Alla Gricia proved this to be true and was a perfect example of the sauciness value pasta water has to finishing off a pasta dish.


As much as I had promised myself to stop buying new cookbooks (another addiction), I was weak in the knees when I came across two new recently published Italian cookbooks: Tasting Rome: Fresh Flavors and Forgotten Recipes from an Ancient City and Florentine: The True Cuisine of Florence. In the event that I never get to either of these two cities, I can vicariously experience them both through the recipes, stories, and photographs in these two books. More than simply great inspirational cookbooks, they are gastronomic guides and visual tours of Rome and Florence.


Without going into a long story as to why I decided to first make a pasta dish from Tasting Rome, I will share my 'think I have died and gone to heaven' experience making and eating Spaghetti Alla Gricia, a dish somewhat like a carbonara. Only this one is made with guanciale instead of pancetta or bacon, Pecorino Romano instead of Parmigiano-Reggiano, and white wine instead of eggs.


So what exactly is guanciale? Whole cured pork jowl and one of the key elements of the cucina romana. The rendered fat from guanciale adds both flavor and thickness to many of the classic pasta dishes like Carbonara and this Gricia. 


I thought if water from Italy could be imported to the states, then guanciale should too. And the good news: it is! You may have to seek out a grocery store with an extensive array of Italian foods, but it can be found. Note: Substituting guanciale with unsmoked pancetta or bacon will not yield the same or texture to a pasta dish as guanciale is quite a bit fattier.


Pecorino Romano is a hard, salty sheep's milk cheese, a staple in the diet in ancient Rome. Cheese labeled as 'Romano' is not the same as Pecorino Romano (so buyer beware). Freshly grated and pre-packaged grated cheeses are two different animals, ones performing and tasting differently. For the purest flavor and the best consistency in sauces (or any dish calling for grated cheese) always, always grate your own cheese.


Spaghetti Alla Gricia is the kind of dish you don't have to wait for the weekend to make. It all comes together in well under an hour, making it perfect for a mid-week dinner or a last minute dinner party. Paired with a simple salad and wine, it is a dish destined to make you feel as if you brought Rome home.


The rendered fat from the guanciale, white wine, and some of the reserved pasta water not only helps to create the sauce but it also continues to cook the al dente spaghetti. I was a little reluctant to cook the spaghetti to very al dente (approximately 6 minutes of cooking time) as I worried I would end up with an inedible dish. Turns out I worried needlessly as the spaghetti cooks to the perfect consistency after added to and cooked over medium-high heat with the 'sauce'.

The original recipe called for the use of only 1 cup of grated pecorino romano cheese. I ended up using almost 1 1/4 cups. While I loved the lightness, taste and texture of this dish using that amount of cheese, the next time I make Spaghetti Alla Gricia I will more than likely increase it to at least 1 3/4 cups to create an even creamier coating of cheese/sauce on the spaghetti. Depending on how that works I may end landing on an amount somewhere in the middle. If it is your first time making it, begin with 1 1/4 cups, taste it and then decide if you want to add more grated cheese before plating it.


If I tell you I inhaled a bowl of this Spaghetti Alla Gricia it might give you the wrong impression of my table manners. Well I actually took three very quick bites but then decided I should slow down, sit back, and savor the absolute deliciousness of this pasta dish. If it were possible for a dish to allow you to time travel to another time and place, this Spaghetti Alla Gricia would open that portal. And maybe someday when I finally travel to Italy, I can consume as much wine, pasta, and of course, water as possible. Until such time, I can at least begin working my way through these two cookbooks.

Recipe
Spaghetti Alla Gricia (slight adaption to the Spaghetti Alla Gricia recipe in Tasting Rome: Fresh Flavors and Forgotten Recipes from an Ancient City by Katie Parla and Kristina Gill)

Ingredients
1 pound spaghetti (recommend using a premium brand Italian pasta)
1 teaspoon extra-virgin olive oil
7 ounces Guanciale, cut into 1 1/2" x 1/2" inch strips
1/2 cup white wine (recommend a Pinot Grigio)
1 3/4 cups Pecorino Romano, freshly grated (plus more for serving) Notes: (1) A 6-7 ounce block of Pecorino Romano will yield the amount of grated cheese needed and (2) Original recipe called for 1 cup of grated cheese, so depending on taste, use anywhere from 1 to 1 3/4 cups of grated cheese.
Freshly ground black pepper

Directions
1. Bring a large pot of water to a rolling boil over high heat, salting the water. Add the pasta and cook until very al dente or partially raw (approximately 6 minutes). Drain reserving the cooking water. Note: The pasta will continue to cook when it is added to the liquid in the skillet.
2. Heat the olive oil in a large skillet over low-medium heat. When oil begins to shimmer add the guanciale, stirring until golden brown (approximately 8 minutes). 
3. Add white wine and cook until the alcohol dissipates (about 1 minute).
4. Add a small ladle of the pasta cooking water and bring to a simmer. 
5. Add pasta and another small ladle of the pasta cooking water. Cook over medium-high heat, stirring vigorously, until a thick sauce forms (add more water if necessary to achieve the desired consistency).
6. Remove the skillet from the heat, and add 1 1/2 cups of the grated Pecorino Romano. Mix thorough and season to taste with salt and pepper.
7. Transfer to a large platter or plate in individual pasta bowls. Sprinkle each portion with additional  1/4 cup grated Pecorino Romano and pepper to taste. Serve immediately with additional Pecorino Romano. 

Important Notes:
1. Keep pasta water heated as warm or cooled pasta water will create clumps in the cheese instead of creating a creamy sauce.
2. Do not use already grated Pecorino Romano cheese. Buy a block of cheese and freshly grate. There is a night and day difference between the two.
3. Can add a sunny side up fried egg to each individual portion for a more traditional carbonara.
4. Only use a white wine you would be willing to serve and drink. 
5. Freshly ground pepper is the only spice you need as the rendered fat from the guanciale, the Pecorino Romano, and the salted pasta water give the dish enough of a salty finish. 

Sheep on farms in Northern Wisconsin and in Little Compton, Rhode Island.

Tuesday, March 22, 2016

Yogurt Marinated Chicken Skewers with Tzatziki


"The beautiful Spring came, and when nature resumes her loveliness, the human soul is apt to revive also." Harriet Ann Jacobs. Of the four seasons, spring had long been my least favorite. Yet over the last several years, I have developed a deeper appreciation and fondness for nature's rebirth and renewal. Beyond having color restored to the landscape, spring's return symbolically reminds us we have another chance to renew those friendships we have allowed to go dormant, to resurrect those lists of resolutions we have made over the years, and to recommit to making time for what reenergizes us physically, emotionally, and spiritually. Spring truly is the season of perennial second chances.


While going through the stacks of food magazines I have acquired over the years, I recently spent time revisiting the dog-earred pages of recipes I never got around to making. Maybe it was a brief conversation about food with someone who had recently been to the Middle East or maybe I am always drawn to recipes made with interesting spices responsible for gravitating me toward one of the famed Istanbul chef Musa Dagdeviren recipes shared in a July (2009) edition of Bon Appetit. If I ever needed a legitimate reason to rationalize my magazine saving (aka hoarding) tendencies, especially in this day and age, Musa's recipe for Yogurt-Marinated Chicken Kebobs with Aleppo Pepper would qualify. 


It has been quite awhile since any of the recipes posted to the blog were worthy of being placed on my highly selective 'last meal' list. That hiatus ends today. One bite of this Yogurt Marinated Chicken Skewers with Tzatziki had me seriously wondering if I died and gone to (wishful thinking) heaven.


Seriously, this may be the best grilled chicken dish ever! As much as I have been reluctant to serve the same dish to family and friends over and over again, this Yogurt Marinated Chicken Skewers with Tzatziki just might be the exception. The grilled spiced marinated chicken served with a cool Tzatkiki sauce (along with warm, grilled Naan) will transport your palate to a culinary world you may have never experienced. And one you probably will never want to leave.

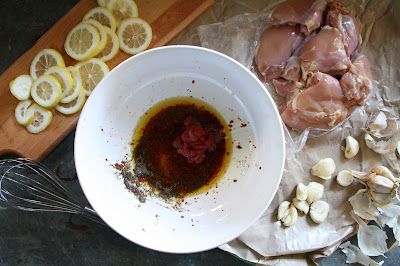
One of the many beauties of this recipe is that everything can be prepared the morning or day before you are ready to serve it. And actually, marinating the chicken longer than three hours in a mixture of (full-fat) yogurt, Aleppo pepper, garlic, lemon, salt, pepper, red wine vinegar, tomato paste and extra-virgin olive oil further deepens its flavor.

Miss Bossy Pants, my alter ego, says 'for optimal flavor and moistness use full-fat yogurt (Fage Total) in your marinade and only skinless, boneless chicken thighs'. Miss People Pleaser, another alter ego, completely agrees with Miss Bossy Pants' recommendations. There is more than enough marinade for at least 2 1/2 pounds, if not 2 3/4 pounds, of chicken instead of the original 2 1/4 pounds recommendation in Musa's original recipe as once the chicken is marinated it is discarded. Being someone who skews to 'the more garlic the better', I used 8 cloves of garlic. If you don't live at that end of the garlic continuum, use 6 (large) cloves.

While the chicken is marinating, you can make the Tzatziki. There are many versions of Tzatziki recipes out there, but not surprisingly, Ina's seems to be best.

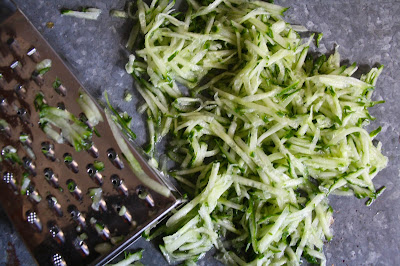
For the thickest, creamiest Tzatziki Sauce use an English (seedless) cucumber and yes, the full-fat yogurt (Fage Total). The cucumber can either be coarsely grated on a box grater or in a food processor (but why make more of a mess when you don't have to). Whichever option you choose, as much of the grated cucumber's moisture needs to be squeezed out (a paper towel or cheesecloth works) or the sauce will end up being too watery. And again, the longer it marinades the better the flavor.

Don't forget to soak the wooden skewers in water for at least 30 minutes before you skewer on pieces of chicken (I put 3 three pieces on each one) or they may catch fire on the grill.

The chicken skewers cook for 12-16 minutes on a medium-hot grill (turning frequently to ensure they cook evenly).


The flavors of the spices along with the char of the moist marinated grilled chicken thighs pair perfectly with the creamy, dilled Tzatziki Sauce. This is a chicken destined to awakened your senses in the best of ways. Served with a Curried Israeli Couscous Salad and/or roasted spiced carrots (recipe coming soon) along with plenty of grilled Naan, this Yogurt Marinated Chicken Skewers with Tzatziki is an absolutely perfect, beyond deliciousness, almost effortless, mouth-watering, last-meal worthy meal for entertaining family and friends. It doesn't get any easier or better than that. Happy Spring, happy renewal!
Recipe
Yogurt Marinated Chicken Skewers with Tzatziki (slight adaptions to the Yogurt-Marinated Chicken Kebabs with Aleppo Pepper recipe shared in Bon Appetit (July 2009) and to Ina Garten's Tzatziki recipe)

Ingredients
Chicken
1 1/2 Tablespoons Aleppo Pepper plus 1 Tablespoon warm water*
8 ounces whole-milk (full-fat) plain Greek yogurt (highly recommend Fage Total)
3 Tablespoons extra-virgin olive oil
2 Tablespoons red wine vinegar
2 Tablespoons tomato paste
2 teaspoons kosher salt
1 teaspoon black pepper
6-8 garlic cloves, peeled and smashed (I like garlic, so I went with 8 cloves)
1 lemon, thinly sliced into rounds 
2 1/4 to 2 3/4 pounds skinless, boneless chicken thighs (or a combination of chicken thighs and/or chicken breasts) cut into 1 1/4" strips (depending on how much chicken used, yield will be 10-12 skewers)

For serving: 
1 lemon cut into wedges
Naan or soft pita bread 

*Note: Instead of the Aleppo pepper you can use 2 teaspoons dried crushed red pepper plus 2 teaspoons Hungarian sweet paprika combined with 2 Tablespoons warm water.

Tzatziki
14 ounces whole-milk (full-fat) plain Greek yogurt (highly recommend Fage Total)
1 large English cucumber, unpeeled 
1/4 cup sour cream
2 Tablespoons fresh squeezed lemon juice
1 Tablespoon white balsamic vinegar or white wine vinegar
2 Tablespoons minced fresh dill
1 1/2 teaspoons minced garlic (from 3-4 garlic cloves)
2 teaspoons kosher salt
1/2 teaspoon black pepper

Directions
Chicken
1. In a large bowl, add Aleppo pepper and water. Stir and let stand until thick paste forms (approximately 5 minutes).
2. Add yogurt, olive oil, red wine vinegar, tomato paste, kosher salt, and black pepper. Stir to combine and whisk to blend.
3. Stir in garlic and lemon slices.
4. Mix in chicken. Cover and chill at least 3 hours (or up to overnight).
5. Prepare barbecue (medium-high heat).
6. Thread 3 pieces of chicken on skewers (if using wooden skewers soak in water at least 1 hour before assembly in order to prevent them from catching fire on the grill). Discard marinade.
7. Sprinkle skewers with kosher salt, pepper, and Hungarian paprika (or additional Aleppo pepper).
8. Grill chicken skewers until golden brown and cooked through, turning skewers occasionally (approximately 12-16 minutes). 
9. Transfer to a platter, surround with lemon wedges.
10. Serve with warmed naan (or pita bread) and tzatziki.

Tzatziki
1. Place yogurt, sour cream, lemon juice, vinegar, dill, garlic, salt and pepper in a medium bowl. Stir to combine.
2. On a box grater coarsely grate the cucumber. Put grated cucumber in a cheesecloth or paper towel to squeeze out as much liquid as possible. Add to yogurt mixture.
3. Cover and chill at least 2 hours (or overnight).

Spring images from Tohono Chul Park, a Botanical Garden in Tucson, Arizona.