Showing posts with label Side Dish. Show all posts

Tuesday, August 9, 2016

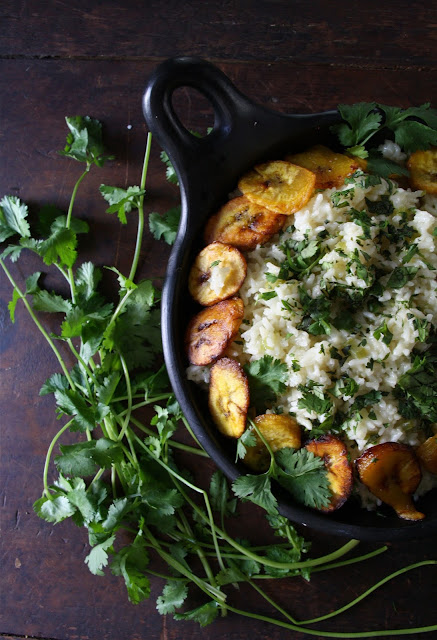
Mexican White Rice with Fried Plantains


After weeks of watching the Presidential conventions and sideshows, my patriotic spirit has been slightly dampened. While there certainly have been a few inspirational moments, nothing has been more disheartening than watching the darker sides of this year's political process play out. But then this past weekend I started to feel differently or rather start to feel more like myself again as my resiliency kicked in. Or I should say was rather kicked. The pride, hopes, and dreams I have for this country (and the world) returned. What caused this 180 degree shift in restoring my patriotism, my love of country? The 2016 Olympics. Quite possibly the most perfectly scripted, well-timed event to happen.  Am I not the only one who needed this year's summer Olympics to get a much needed patriotic adrenaline rush? Not only as a reprieve (or at best a diversion) from listening, watching or reading about the Presidential candidates and their campaigns, but to restore an optimistic, unifying spirit. Between the individual and team events along with the back stories on athletes themselves, the 2016 Olympics may seem to be a temporary distraction from everything else going on in the world. Except, their impact extends well into the future. From planting seeds of dreams for future generations both on and off the athletic playing fields to promoting peace and unity, the individual and collective impacts of the Olympics seem to have gone well beyond what the Ancient Greeks had conceived in 776 BC. And, I for one, could not be happier.


A few weeks ago I took a cooking class with a couple of running group friends. After having a margarita at A Todo Madre (an incredible Mexican Bistro in the western suburbs of Illinois) we walked across the street to Marcel's (an amazing locally owned culinary and food emporium) to learn all about the making of Summertime Street Tacos. Although the focus of the class was on tacos and not the Mexican Rice side dish, I first tasted and learned how to cook with plantains while in this intimate, hands-on class. Can you believe I had somehow managed to live a plantain free life? Who knew some of the takeaways from this class were opening my eyes to the deliciousness of a Mexican White Rice with Fried Plantains and discovering that White Rice with Fried Plantains is a perfect side dish for tacos!


In addition to cooking plantains for the first time, my eyes and palate were opened to the flavor (and heat) of Serrano chiles. Apparently my culinary life has been a little more sheltered than I have been willing to admit. This Mexican White Rice with Fried Plantains was the perfect way to expand my gastronomic horizons.

In addition to being insanely delicious, it is a relatively inexpensive dish to make. A little olive oil, celery, half of an onion (sweet yellow or white), garlic, half of a Serrano chili, a small bunch of cilantro, some long (or extra-long) grain rice, some kosher salt, chicken broth, two black (ripe) plantains and some vegetable oil make up the ingredients. 


I used a sweet yellow onion instead of the white onion we used in class. Feel free to use either one, although the white onion is the onion of choice in classic Mexican cooking. Both the onion and celery should be cut to fine dice. While the garlic and Serrano chile are finely minced. The heat in this rice dish comes from a half of Serrano chile, seeds and all. As someone who doesn't really do 'hot' well, this rice dish had just the right amount of heat. 


After the diced onions and celery are sautéed until the onions are slightly translucent, the garlic and chile are added and cooked for 30-45 seconds before the rice is added. Long grain rice is the rice most commonly used in Mexican cooking. Chefs like Rick Bayless and Zarela Martinez recommend using a medium-grained white rice for best results as the long grain rice found in the US is not comparable to the long grain rice found in Mexico. Having learned that after I made this rice dish and using extra-long instead of long grain rice, all I will say is that my choice of rice did not at all affect the incredible flavor of this dish. What it did affect was my rice cooking time.


Before the chicken stock is added to the saucepan, the rice is cooked along with the sautéed vegetables until it is slightly translucent (approximately 3-4 minutes). During this phase of cooking, you will be stirring the rice constantly. However, once you add the chicken stock and reduce the temperature to low, the covered pot remains undisturbed for at least 15 minutes or until all of the liquid has been absorbed by the rice. Side note: My cooking time was almost 25 minutes.  

According to Wikipedia 'Plantains contain more starch and less sugar than dessert bananas and are therefore usually cooked or otherwise processed before being eaten'. Sometimes referred to as the pasta and potatoes of the Caribbean, they have found their way into the produce section of many grocery stores. As the peel changes to black, the plantain becomes sweeter while still retaining the firmness necessary for frying.


The skin of a plantain is much thicker than that of a banana and requires a few knife cuts to remove it. By making several long cuts though the skin from one end of the plantain to the other, the skin removes easily. When frying the plantains in vegetable oil, keep these two things in mind: (1) make sure your vegetable oil is hot and (2) work in batches so you don't overcrowd the plantains. The cooking time for 1/4" slices is approximately 1-2 minutes. Transfer the cooked plantains to a dish lined with paper towels and season with kosher salt. Side note: You can make the plantains either before or while you are making the rice. They don't necessarily need to be hot when added to the rice.


The cooked rice is finished with chopped cilantro and the fried plantains served either in a bowl or platter. If you are not a big fan of cilantro, this Mexican White Rice with Fried Plantains might have you changing your mind.


In addition to being a perfect side dish to tacos, this Mexican White Rice with Fried Plantains would compliment a grilled chicken dish or any other Mexican entree. Although I could just eat this rice as a meal. Especially if margaritas were involved! Or maybe to pay homage to the Olympics in Brazil, I should serve this dish with some Caipirinhas (Brazil's national cocktail) using some of the Cachaca (clear sugarcane hard liquor) the person who shall remain nameless brought back from a work trip to Brazil last week. Served with or without alcohol or with or without tacos this Mexican White Rice with Fried Plantains could end up being one of your favorite side dishes. Or if you are anything like sheltered me, open your palate to the deliciousness of fried plantains.

Recipe
Mexican White Rice with Fried Plantains (ever so subtle changes to Robin Nathan's Mexican White Rice with Sweet Plantains recipe)

Ingredients
Rice
2 Tablespoons olive oil
1/2 large sweet yellow or white onion, finely diced
2 stalks celery, finely diced
4 cloves garlic, minced
1/2 Serrano chile (with seeds), finely minced
2 cups long grain or extra long grain white rice
4 cups chicken broth
Kosher salt to taste
1/4 cup chopped fresh cilantro

Plantains
2 ripe (black) plantains, peeled and cut into 1/4" slices
Vegetable oil for frying
Kosher salt

Directions
Rice
1. Heat oil in a heavy medium sized pan or stock pot. 
2. Add onion and celery, sautéing until onion is slightly translucent (approximately 2-3 minutes).
3. Add garlic and chiles, continue to cook for an additional 30-40 seconds, stirring constantly.
4. Add the rice and stir to coat with vegetables. Cook until rice becomes slightly opaque (approximately 3-4 minutes).
5. Add broth and a generous pinch of salt. Bring to a quick simmer, cover, reduce heat to low and cook undisturbed for 15-25 minutes (or until all of the liquid has been absorbed by the rice). Note: My cooking time for the rice was almost 25 minutes. This may have been due to the level of heat or size of pot. Would recommend checking for doneness at 15 minutes and then continue cooking until rice is done.
6. Fluff with a fork and transfer to serving bowl or platter.
7. Sprinkle with chopped cilantro

Plantains
1. In a large, preferable non-stick skillet, pour in vegetable oil to coat bottom of pan and to a height of approximately 1/4".
2. When oil is hot, add a third or half of the plantain slices (you do not want to overcrowd the pan). Cook for 1-2 minutes per side, flip when lightly browned. Repeat with remaining plantains.
3. Place cooked plantain slices on a plate lined with a paper towel. Season with kosher salt.
4. Arrange plantain slices around the edge of the bowl/platter of Mexican White Rice. 
5. Serve immediately.

Images from a walking tour of Philadelphia (Summer 2015).


Monday, June 20, 2016

Florentine-Style Peas


"Eat your peas!" For those of you whose aversion to peas was due in large part to being forced to eat those canned, soft, mushy peas, the ones eerily reminiscent of the jarred peas some of us were fed in our pea opinion-formative years, I can completely empathize. This emphatic plea heard at dinner tables around the country was usually accompanied by the words 'they are good for you'. Although no one happened to mention they were packed with Vitamin K, protein, full of fiber, had anti-inflammatory properties, and good for your heart. Many of us still shuddered at thought of having to eat 'those' peas. In spite of all of the health benefits of peas, more than likely my young, unworldly mind wouldn't have bought in to their whole health benefits thing anyway. Mostly because I couldn't get past how the canned version of peas tasted. Now, had I grown up in Italy my opinion and lust for peas would more than likely have been a completely different story.


There are eye-rolling peas (the canned version) and then there are eye-popping peas (Florentine-Style Peas). One look at a platter of these Florentine-Style Peas and your perception of peas begins to do a complete 180 degree flip. While you may feel compelled to passionately implore everyone sitting at your dinner table to 'eat these peas', just sit back and watch their faces when they taste them. It will be almost as good as seeing faces taking in the fireworks on the 4th of July. Better yet will be clearing the table of dishes free of even a single pea.


A side dish worthy of being placed in the center of the table, the combination of freshly shelled peas, the extra-virgin olive oil, pancetta, garlic, the sugar (the secret ingredient) and the delicious broth is what makes these peas extraordinarily delicious. In a single bite you will become deeply enamored with this savory dish. 

These Florentine-Style Peas would be a perfect side to a pasta dish, to a roast chicken, or to a grilled steak. In the spirit of 'less is more', don't serve these beautiful, flavorful peas if you are planning a meal with a hodge-podge of other sides. Because if there was ever a side dish worthy of taking center stage, it would be these Florentine-Style Peas. More than likely the words 'eat your peas' will never again need to be spoken at your dinner table.

Notes: The original recipe called for the use of freshly chopped flat leaf parsley. In spite of multiple visits to the grocery store, the parsley never made it into my cart. Thus it didn't make into these Florentine-Style Peas. Maybe the parsley further elevates the flavorfulness of this dish. I couldn't say. What I could say is that without the parsley it was insanely delicious. Dishes made with fresh seasonal ingredients always seem to taste better than ones with their frozen equivalents. While these Florentine-Style Peas can be made with high quality frozen peas, I would strongly encourage you to use freshly shelled peas the first time you make them. Sugar is the secret ingredient in these peas. I used caster sugar as it melts more quickly than granulated sugar. If you can't find caster sugar, used superfine sugar. And lastly, no matter what anyone tells you, there is no substitute for pancetta.

Recipe
Florentine-Style Peas (an ever so slight adaptation to Emiko Davies' Piselli all Fiorentina, Florentine-Style Peas as shared in her cookbook Florentine: The True Cuisine of Florence)

Ingredients
1/4 cup (4 Tablespoons) extra-virgin olive oil, divided
3 1/2 ounces thick slices of pancetta, cut into thin strips
2 garlic cloves, thinly sliced
3 1/3 cups (1 lb 2 oz) fresh, shelled peas (or good quality frozen peas)
1-2 teaspoons caster, superfine, or granulated sugar (Note: I used 2 teaspoons caster sugar)
Kosher salt and freshly ground black pepper
4 Tablespoons finely chopped flat-leaf parsley (optional)

Directions
1. In a large saucepan, gently heat 2 Tablespoons of extra-virgin olive oil.
2. Add pancetta and garlic in pan. Cook over a low-heat for about 1-2 minutes.
3. Add peas, parsley (if using), and enough cold water to just reach the level of the peas (Note: Add water 1/2 cup at a time, making sure you don't add too much).
4. Season with a pinch of kosher salt and bring to a simmer. Cook until peas are tender (but not mushy) and garlic is cooked (approximately 8-10 minutes).
5. Add sugar, stirring until dissolved. Remove from heat.
6. Transfer peas and the majority of the broth to a large, deep platter. Drizzle peas with remaining extra-virgin olive oil and freshly ground black pepper.
7. Serve warm or at room temperature. Note: Peas are equally delicious reheated the next day.


Sakonnet Vineyards, Little Compton, Rhode Island


Wednesday, June 15, 2016

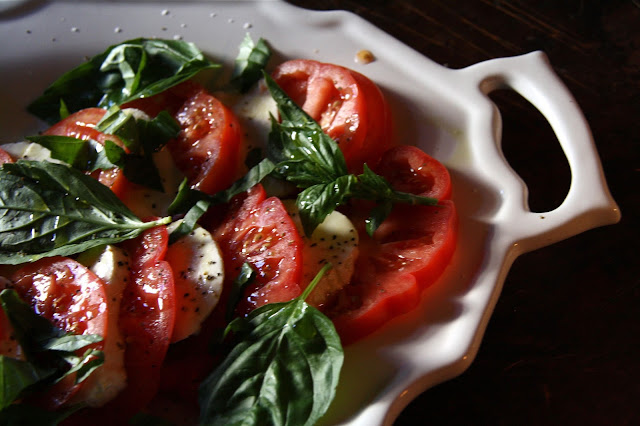
Caprese Salad


Summer's astronomical start doesn't officially arrive for another week, however, meteorologically it has already steamrolled in. If this midwestern 'heatmageddon' continues at its' current pace, it is going to be a very long, hot summer. Let the whining begin! Admittedly I am what you might call a heat wimptress. The little beads of sweat covering my nighttime face as I lay in bed in a room without a cross breeze in our un-air-conditioned house remains one of my still retrievable childhood memories. Somehow I managed to survive living in house where the fan was faced to the outside (supposedly to draw the heat out). Although the remains of my aversion to hot, humid weather is now reflected in my adult beet, or rather tomato red face. The visible battle scar from my days growing up in a 'hot' house.  

Summer's seasonal fruits, vegetables, and herbs are amongst my absolute favorites. One of the upsides of having to endure brutally hot and humid days is having access to the some of most incredibly flavorful bounty Mother Nature has to offer. High up on my list of summer food favorites are tomatoes.


If there was ever a dish requiring absolutely no culinary prowess, it would be a Caprese Salad. Essentially a four ingredient dish, if you don't count kosher salt and freshly ground pepper that is. However, if there was ever a salad requiring the best, freshest, ripest ingredients available, it would be, yes you guessed it, a Caprese Salad. SeriousEats wrote a great article on "How Not to F*ck Up a Caprese Salad". In case you don't want to or have the time to read the whole article, let me share with you the down and dirty short version of this great, wickedly entertaining, yet informative article. "Get the best damn tomatoes, mozzarella, and basil you can find, put 'em on a plate, sprinkle them with salt and pepper, drizzle them with the best damn olive oil and stop right there. Do not pass Go, do not collect $200, and step away from the balsamic vinegar." Yes, you read that correctly. No balsamic vinegar. Because this may cause your head to spin just a bit, I will let that thought sink in and come back to it later.


Depending on where you live, it may be one of those salads you can, or rather should be, making for only a couple months of the year. The Caprese Salads made in the summer or early fall tastes very different than the ones made in the winter or spring months. Unless, of course, you have a fondness for those mealy, tasteless, genetically engineered things sold in grocery stores or appearing on restaurant menus (falsely) labeled as tomatoes in the middle of the winter or in early spring. 

Whether you say to-may-to or to-ma-to, nothing comes close to the juicy, delicious, bursting with flavor taste of a freshly picked (from the farm or garden if you are lucky) ripe tomato. Or better yet, an heirloom tomato. Enduring the heat of the summer months just happens to be one the prices we need to pay in order to have access to ripe off the vine tomatoes. 

The tomatoes available at the Farmer's Market last weekend were absolutely, 'be still my heart' beautiful. For the Caprese Salad I planned to make for a dinner with friends, the combination of heirloom and some 'variety unknown' tomatoes would make it one of those best of both tomato worlds salads.


One of the larger Italian stores near my home sells some of the best homemade, fresh mozzarella. And at prices far less than some of the other grocery stores, especially the ones specializing in fresh, organic foods! If possible, look for the fresh mozzarella floating in its' brine solution versus the prepackaged wrapped 'fresh' mozzarella for a Caprese Salad to die for. The taste difference between the two types of fresh mozzarella is akin to the difference between a 30 degree and 90 degree day.


After the tomatoes and mozzarella, you need only two other 'freshest and bestest' you can find ingredients: basil and extra-virgin olive oil. Depending on how often you use basil, grow as much of it as you possibly can! One can never have too much basil growing in one's garden. 


To tear or to cut? That is the basil question. Some will say there is more flavor when you tear the basil (due to the release of its oil). Others will say a steel knife will cause some oxidation to the basil, thus affecting the coloring. But the cut-tear approach may be more about preference than exact science (especially if you use a plastic knife to cut the basil). So just do what feels right for you.


The Caprese Salad calls for thicker slices (about one-half inch) of tomatoes as well as the mozzarella. My mozzarella slices are generally cut a tad thinner than the tomato slices.


How many times have you ordered a Caprese Salad in a restaurant having at least, if not more, than a drizzle of balsamic vinegar on it? Hint: They probably are not making it with the best and/or freshest tomatoes and mozzarella available. Well, contrary to a widely held mis-conception in the United States. a genuine Italian Caprese Salad is not served with any vinegar. It is simply dressed with a high quality extra-virgin olive oil and the juices from the tomatoes. Anything more will mask the flavor of the tomatoes and mozzarella. If, for any reason you or your friends/family happen to like balsamic vinegar with your Caprese Salad, well, serve it on the side. But don't tell anyone I told you that. I do not want the Caprese Salad purists to come looking for me.


After mint mojitos and some appetizers, this Caprese Salad was the prelude to a meal of Lasagna Bolognese and Florentine Style Peas (both upcoming blog posts). And in keeping with an Italian themed meal, it ended with Honey and Pistachio Panna Cotta. If there was ever a dinner menu to both tantalize and satisfy one's visual and taste senses, this would be it. Whether or not I serve this meal again over the course next several months, I will definitely be making this Caprese Salad as often as possible. And always with the Balsamic vinegar, the one my sister brought me back from Italy, on the side.

Recipe
Caprese Salad
Serves 4 to 5

Ingredients
4-5 large ripe heirloom or vine ripened tomatoes, cut into half inch slices
3 six ounce balls of fresh mozzarella, cut into slightly less than half inch slices
10-12 basil leaves
Extra-virgin olive oil
Kosher salt and freshly ground black pepper
Optional to serve on the side: A good quality balsamic vinegar

Directions
1. Alternately layer tomatoes and mozzarella on large serving platter.
2. Sprinkle with kosher salt and pepper.
3. Generously drizzle extra-virgin olive oil over tomatoes and mozzarella.
4. Top with torn and/or cut slices of fresh basil.
5. Serve immediately.

Over the river and through the woods. Wilbour Woods, Little Compton, RI. Calm, cascading, and rippling water images.


Tuesday, April 12, 2016

Grilled Carrots with Dill Yogurt Sauce


The last time I was in Charleston, South Carolina it was a gray, rainy, chilly day. In the weeks prior to a return trip back, rain was again in the weather forecast. As I have learned or at least try to remind myself, weather can be rather unpredictable and not necessarily influenced by wishful thinking, fingers/toes crossed, or even a rain dance. But there are times when one has to put rationality aside. This was one of them. Yet, even as I got on the plane, rain remained in the forecast. I had been second guessing this group running trip ever since I had committed to it months ago. Maybe the rain forecast was as omen. Steady inclines/hills and heat/humidity are things frequently causing me to whine. Having to give up control of my time/space on a trip is enough to cause some minor hyperventilation. So, if you have asked me a year ago if I would travel more than 900 miles to run a 10K race (one having a significant incline) on a hot/humid day with 40,000+ runners and stay in house with 9 other people I had never traveled with before, more than likely I would have said without hesitation 'no thank you'. However, funny things happen when you give yourself permission to leave your comfort zone, when you stop looking for (bad) omens, and when you allow yourself to take a leap of faith. Literally and figuratively the sun comes out. After a night of tornado warnings and hurricane-like pounding rain, blue skies miraculously appeared shortly before the start of our 10K race. A validating omen on many different levels.


While my whining days over heat, humidity, and hills are (unfortunately) far from over, my perceptions of what traveling with an eclectic group of fellow runners could be like has been forever altered. From having 'family' meals together, to exploring parts of Charleston, to a night of karaoke, to a morning run along the ocean, to unexpected kindnesses, to great meals in some incredible restaurants, to being open to possibility, to waking every morning with the view of the ocean, everything about this trip was positively memorable. One changing me in some unexpected ways. So if you asked me again if I would make another group road trip again, I would only hope the next running venue would be a little cooler, a little flatter. Although I would probably still obsess about the weather.

When friends suggested we order a plate of radishes with soft creamy butter and sea salt as an appetizer at the The Publican restaurant in Chicago, I probably made one of those 'really, are you serious?' faces. Up until that point, I had probably consumed less than two radishes over the course of my lifetime. I can't remember the other appetizer we ordered that day, but I do remember the radishes. In just one bite of a radish half slathered in some soft, creamy butter and topped with a hint of sea salt I instantly knew my lifetime consumption of radishes was about to change. So when I saw a recipe for The Publican's Barbecued Carrots with Yogurt and Pecans, I knew my love for carrots was about to be deepened. And let's just say, if I had radishes and carrots served The Publican way growing up, chances are I might be a vegetarian or at least, have strong vegetarian tendencies.


Prior to making these Grilled Carrots with Dill Yogurt Sauce I thought nothing could top the flavor of oven roasted carrots. Apparently my vision for the possibilities of carrots was a bit narrow. Now having tasted carrots marinated in a myriad of spices, grilled until slightly charred, drizzled with yogurt dill sauce, topped with toasted pecans, and served with a drizzle of freshly squeezed lemon juice, it might be awhile before an oven roasted carrot passes my lips.


The Publican's recipe calls for one pound of small carrots. But since I couldn't find them I went with several bunches (somewhere between 1 1/2 and 2 pounds) of slightly larger carrots, but ones still having their beautiful green tops. Whether you find the smaller ones or the slightly larger (but not too large) ones or not may not really matter. However, look for the carrots that haven't had their tops cut off. After peeling and cutting them in half lengthwise, they are parboiled in boiling salted water for approximately 4 minutes (or until crisp tender). This size carrot took only 4 minutes to get to that point.


The parboiled carrots are then marinated in a spice and olive oil mixture for 1 to 3 hours. One look at this sweet and savory array (sweet smoked paprika, celery salt, onion powder, cumin, kosher salt, black pepper, granulated garlic, Aleppo pepper, and dark brown sugar), you might think 'I don't stock all of those spices in my cupboard. Or 'not sure I would like this combination of spices'. Next! But don't let preconceived notions keep you from these carrots and definitely don't throw in the towel just yet. As this is an obstacle you can easily overcome without spending a fortune on jars of spices you might not use regularly. Nowadays many grocery and spice stores allow you to buy many different spices in whatever quantity you need (Whole Foods was my source for some of them).

The fragrance of this spice mixture is intoxicating. It is a prelude of what is to come.


Is is easier to rub the olive oil spice mixture into the carrots if done on a large baking sheet (rather than a bowl). Additionally, you don't risk breaking any of them. The longer you allow the carrots to marinate the more they take on the flavor of the spices (my marinating time was 90 minutes).


While the carrots marinate you can make the Dill Yogurt Sauce. After mixing the full fat yogurt, buttermilk, freshly squeezed lemon juice, fresh dill, some sea salt and black pepper, cover and refrigerate. This is one of those sauces greatly benefitting from having some 'resting' time. There was more than enough of the spice mixture to coat almost 2 pounds of carrots, however, I increased the proportions of the ingredients in the sauce as I wanted to have some to serve on the side.


Having a gas grill means we can grill year round here in the midwest. But these grilled carrots can also be made on an indoor grill pan (if you don't have a gas grill). Placing the carrots cut side down, they grill until they begin to char and the sugars caramelize (about 3-4 minutes).


Transfer the grilled carrots to a large platter, drizzle with some of the Yogurt Dill Sauce, sprinkle with the toasted pecans, and finish with some freshly squeezed lemon juice. The sweet spicy taste of the grilled carrots are balanced with the cool, creamy Yogurt Dill Sauce and splash of lemon juice. Together with the crunch of the roasted pecans, this is an incredibly satisfying, almost over-the-top, unexpected delicious side or appetizer dish made with carrots.


If there was one recipe to take your summer barbecue from good to great, it would be these Grilled Carrots with Dill Yogurt Sauce. They would be a great prelude to a meal as well as pair well with grilled chicken, steak, or lamb. However, I could have made a meal out of these incredibly sweet and savory carrots. I really like carrots, but until now, never knew they could taste this good.

Because most of the preparation can be done ahead of time, they may one of the easiest appetizer or side dishes you make. Sit back and watch how their expectations around the taste of carrots is changed forever.  I wouldn't be surprised if your consumption of carrots increases significantly. Or if you give some thought to becoming a vegetarian (at least for a day).

Recipe
Grilled Carrots with Dill Yogurt Sauce (an ever so slight adaptation to The Publican restaurant's Barbecue Carrots with Yogurt and Pecans recipe)

Ingredients
Carrots
3 Tablespoons dark brown sugar
1 Tablespoon sweet smoked paprika
2 teaspoons ground cumin
1 teaspoon celery salt
1 teaspoon granulated garlic
1 teaspoon onion powder
1/4 teaspoon Aleppo pepper (or cayenne pepper)
1 Tablespoon kosher salt
1 teaspoon ground black pepper
1 1/2-2 pounds fresh carrots, peeled and halved lengthwise
3 Tablespoons extra-virgin olive oil
1/2 cup pecan halves, toasted, roughly chopped

Dill Yogurt Sauce
3/4 cup (7 ounce container) of full-fat yogurt (recommend Fage Total)
3 Tablespoons buttermilk
1 1/2 Tablespoons fresh dill, chopped
3 teaspoons fresh lemon juice
Pinch of sea salt and pinch of black pepper
1 whole lemon, cut into quarters for serving

Directions
Dill Yogurt Sauce
1. In a small bowl, mix together the yogurt, buttermilk, dill, and lemon juice. Season with sea salt and black pepper. Cover and refrigerate. (Note: Sauce can be made 1-2 days in advance.)

Carrots
1. Combine dark brown sugar, smoked paprika, cumin, celery salt. granulated garlic, onion powder, Aleppo pepper, kosher salt and black pepper together in a small bowl. Set aside.
2. Bring a medium-large of salted water saucepan to a boil. Add carrots and cook for approximately 4 minutes or until crisp tender. Drain and transfer carrots to a large sheet pan.
3. Add extra-virgin olive to the spice mixture and rub on carrots to coat. Allow carrots to marinate in spice-olive oil mixture for 1-3 hours.
4. Heat grill to medium-high heat (or can use a stove top grill pan). Grill carrots, cut side down until lightly charred and slightly caramelized (approximately 3 minutes). 
5. Transfer carrots to a platter. Drizzle with Dill Yogurt Sauce and roughly chopped pecans. Lightly squeeze a lemon half over the carrots. Serve immediately with additional Dill Yogurt Sauce and lemon quarters. 


Images from Charleston, South Carolina.