Friday, March 25, 2016

Chocolate Chip Skillet Cookie


After a week of a couple of 'all my fault' driving mishaps, I was in serious need of some therapy. The unanticipated expense of a new tire took retail therapy off the table. So the next best therapeutic option had to involve dark chocolate. What was it going to take to soothe my distressed soul? One of those sold only once a year dark chocolate coconut cream eggs I had been resisting for the past month or a warm, gooey Chocolate Chip Skillet Cookie, a la mode, of course. My first thought was 'why choose, why not have both?'. Uncharacteristically I decided my crisis intervention option meant choosing only one of them. I can only attribute this significant decision-making departure to being in a cross-training delirious-induced state. Who knew cross-training could have this added benefit?

The final decision all came down to: 'Store-bought or homemade?' Homemade won. It usually does.


A million years ago I tasted a Chocolate Chip Skillet Cookie that left a permanent impression on my warm, gooey chocolate chip cookie loving palate. I managed to get the recipe but it somehow vanished from my disorganized stack of handwritten recipes. Over the years I had tried a few other recipes, but none of them were 'anything to write home about'. Not willing to give up (perseverance is my middle name), I thought it was time to go on the hunt for another one.

While embarking on another Chocolate Chip Skillet Cookie research project, I discovered none of the dozens of recipes I came across had a common butter to flour to sugar ratio. Which meant I had to choose one that seemed closest to the recipe I sort of remembered. Ultimately I went with one fully assembled and baked in a cast iron skillet. Will share my takeaways on that baking process ahead. The initial (and permanent) change I made to this untested recipe was using a combination of both dark and light brown sugars. The post cookie making change will be to slightly reduce the amount of all-purpose flour (either using a scant 1 1/2 cups or reducing it all the way down to 1 1/4 cups) to create an even gooey-er cookie.


After making Tara's Chocolate Chip Cookies, I have been forever converted into a chopped chocolate versus chocolate chip cookie fan. And at the moment Trader Joe's Pound Plus Dark Chocolate is my favorite chocolate bar to chop up. I used somewhere between 7 and 8 ounces of chopped chocolate in this skillet cookie.

So let's talk about the cookie assembly process. The inspiration recipe called for melting the butter in the cast iron skillet followed by mixing in the granulated sugar, brown sugar, and vanilla and a brief (5 minute) cooling off period before the egg was added. I waited almost 10 minutes and worked furiously to prevent the incorporated the egg from scrambling. After a sigh of it all worked out relief, I added in the dry ingredients. The batter was very, very thick (and didn't resemble at all the recipe blogger's photo). Again, I worried mixing too much would toughen the cookie dough and/or would be too thick to fully incorporate the chopped chocolate. That shouldn't have been my worry. When adding the chocolate to the batter (which was still rather warm from being in the cast iron skillet), some of the chards of chocolate began to melt. While having some of the chocolate melt is not necessarily a bad thing, having it all melt would have defeated the chocolate chip look to the cookie.


So while I think I have now found (and tweaked) a Chocolate Chip Skillet Cookie as good as or maybe even better than the one I remember, I will make a change to the assembly process. Once the butter is melted, I will pour it into a medium sized bowl before mixing in the sugars and vanilla. Mixing the butter and sugars together in a bowl versus the pan should not only help to cool the mixture down faster but should eliminate any other issues caused by the residual heat of the pan. From there, I will mix in the egg, add the dry ingredients, stir in the chopped dark chocolate, and then transfer to the more than likely still warm cast iron pan. Before placing the pan in a preheated 350 degree oven, I will lightly sprinkle the top with sea salt.


The baking time on the skillet ranges from 20-25 minutes if baking in a 10 inch (if measured across the top) cast iron baking pan. If using an 8 inch cast iron baking pan the baking time could be slightly longer. Any pan bigger than 10 inches would make for a large, crispy, not likely to be gooey cookie. And the added deliciousness factor to this cookie is its' gooeyness.


I loved the idea of having Chocolate Chip Skillet Cookie right out of the pan served communally, with everyone being able to gather round and dig in. If your family and friends aren't into that kind of dessert eating fun, well then just let them scoop their warm, gooey cookie into a bowl. Regardless of how you decide to serve it, the vanilla ice cream is a must! But for what it's worth, I would be remiss if I didn't tell you there is something incredibly magical about eating and sharing a warm chocolate chip cookie topped with melting vanilla ice cream right out of the pan with friends.


Not because this Chocolate Chip Skillet Cookie had high therapeutic value or that it was really easy to make will I make it again (my version), but because it was really, really, really delicious. So delicious, that maybe I won't be too upset if the Easter Bunny doesn't drop off one of those dark chocolate coconut eggs this year. Just to be on the safe side, I better not drive that day.

Recipe
Chocolate Chip Skillet Cookie (slight adaptation to Tasty Kitchen's Dark Chocolate Chunk Skillet Cookie)

Ingredients
1/2 cup (1 stick) unsalted butter
1/2 cup granulated sugar
1/2 cup brown sugar (equal parts of dark and light brown sugars)
2 teaspoons vanilla
1 large egg, room temperature
A scant 1 1/2 cups all-purpose flour (or consider reducing flour to 1 1/4 cups for a more gooey cookie)
1/2 teaspoon baking soda
1/2 teaspoon kosher salt
7-8 ounces of dark or semi-sweet chocolate coarsely chopped (recommend Trader Joe's Pound Plus Dark Chocolate) Note: If you don't have a scale, use a generously filled cup of chopped chocolate.
Sea Salt
Vanilla Ice Cream (Ben and Jerry's Vanilla is my favorite) and for added decadence caramel sauce

Directions
1. Preheat oven to 350 degrees (F).
2. In a 10 inch cast iron skillet, melt the butter. Pour the butter into a medium sized bowl and mix in the granulated sugar, brown sugars, and vanilla until the sugars have completely melted. Allow to cool for at least 8-10 minutes.
3. Add the egg and mix until it is fully incorporated. Note: You could use either a whisk or hand held mixer.
4. Stir in dry ingredients until fully incorporated.
5. Add chopped chocolate.
6. Transfer batter to the cast iron skillet, pressing down lightly to ensure the batter covers the entire bottom of the pan and has the same relative thickness. Sprinkle lightly with sea salt.
7. Bake for 20-25 minutes or until the top of the cookie is golden on the edges and top but still soft in the center. 
8. Scoop and serve warm in bowls with slightly softened vanilla ice cream or top with several scoops of vanilla ice cream and hand out spoons.

Notes: (1) I used Lodge's 10 inch skillet (Top dimension: 10 inches, Bottom dimension: 8 inches) in the making of this Chocolate Chip Skillet Cookie and (2) the inspiration recipe is linked in this posting, just in case you want to try your hand at making and baking the cookie all in one pan.


Scenes from the Tucson landscape.


Tuesday, March 22, 2016

Yogurt Marinated Chicken Skewers with Tzatziki


"The beautiful Spring came, and when nature resumes her loveliness, the human soul is apt to revive also." Harriet Ann Jacobs. Of the four seasons, spring had long been my least favorite. Yet over the last several years, I have developed a deeper appreciation and fondness for nature's rebirth and renewal. Beyond having color restored to the landscape, spring's return symbolically reminds us we have another chance to renew those friendships we have allowed to go dormant, to resurrect those lists of resolutions we have made over the years, and to recommit to making time for what reenergizes us physically, emotionally, and spiritually. Spring truly is the season of perennial second chances.


While going through the stacks of food magazines I have acquired over the years, I recently spent time revisiting the dog-earred pages of recipes I never got around to making. Maybe it was a brief conversation about food with someone who had recently been to the Middle East or maybe I am always drawn to recipes made with interesting spices responsible for gravitating me toward one of the famed Istanbul chef Musa Dagdeviren recipes shared in a July (2009) edition of Bon Appetit. If I ever needed a legitimate reason to rationalize my magazine saving (aka hoarding) tendencies, especially in this day and age, Musa's recipe for Yogurt-Marinated Chicken Kebobs with Aleppo Pepper would qualify. 


It has been quite awhile since any of the recipes posted to the blog were worthy of being placed on my highly selective 'last meal' list. That hiatus ends today. One bite of this Yogurt Marinated Chicken Skewers with Tzatziki had me seriously wondering if I died and gone to (wishful thinking) heaven.


Seriously, this may be the best grilled chicken dish ever! As much as I have been reluctant to serve the same dish to family and friends over and over again, this Yogurt Marinated Chicken Skewers with Tzatziki just might be the exception. The grilled spiced marinated chicken served with a cool Tzatkiki sauce (along with warm, grilled Naan) will transport your palate to a culinary world you may have never experienced. And one you probably will never want to leave.

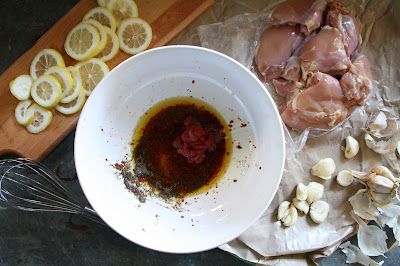
One of the many beauties of this recipe is that everything can be prepared the morning or day before you are ready to serve it. And actually, marinating the chicken longer than three hours in a mixture of (full-fat) yogurt, Aleppo pepper, garlic, lemon, salt, pepper, red wine vinegar, tomato paste and extra-virgin olive oil further deepens its flavor.

Miss Bossy Pants, my alter ego, says 'for optimal flavor and moistness use full-fat yogurt (Fage Total) in your marinade and only skinless, boneless chicken thighs'. Miss People Pleaser, another alter ego, completely agrees with Miss Bossy Pants' recommendations. There is more than enough marinade for at least 2 1/2 pounds, if not 2 3/4 pounds, of chicken instead of the original 2 1/4 pounds recommendation in Musa's original recipe as once the chicken is marinated it is discarded. Being someone who skews to 'the more garlic the better', I used 8 cloves of garlic. If you don't live at that end of the garlic continuum, use 6 (large) cloves.

While the chicken is marinating, you can make the Tzatziki. There are many versions of Tzatziki recipes out there, but not surprisingly, Ina's seems to be best.

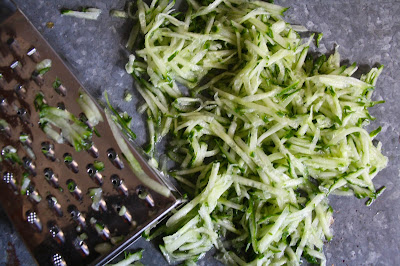
For the thickest, creamiest Tzatziki Sauce use an English (seedless) cucumber and yes, the full-fat yogurt (Fage Total). The cucumber can either be coarsely grated on a box grater or in a food processor (but why make more of a mess when you don't have to). Whichever option you choose, as much of the grated cucumber's moisture needs to be squeezed out (a paper towel or cheesecloth works) or the sauce will end up being too watery. And again, the longer it marinades the better the flavor.

Don't forget to soak the wooden skewers in water for at least 30 minutes before you skewer on pieces of chicken (I put 3 three pieces on each one) or they may catch fire on the grill.

The chicken skewers cook for 12-16 minutes on a medium-hot grill (turning frequently to ensure they cook evenly).


The flavors of the spices along with the char of the moist marinated grilled chicken thighs pair perfectly with the creamy, dilled Tzatziki Sauce. This is a chicken destined to awakened your senses in the best of ways. Served with a Curried Israeli Couscous Salad and/or roasted spiced carrots (recipe coming soon) along with plenty of grilled Naan, this Yogurt Marinated Chicken Skewers with Tzatziki is an absolutely perfect, beyond deliciousness, almost effortless, mouth-watering, last-meal worthy meal for entertaining family and friends. It doesn't get any easier or better than that. Happy Spring, happy renewal!
Recipe
Yogurt Marinated Chicken Skewers with Tzatziki (slight adaptions to the Yogurt-Marinated Chicken Kebabs with Aleppo Pepper recipe shared in Bon Appetit (July 2009) and to Ina Garten's Tzatziki recipe)

Ingredients
Chicken
1 1/2 Tablespoons Aleppo Pepper plus 1 Tablespoon warm water*
8 ounces whole-milk (full-fat) plain Greek yogurt (highly recommend Fage Total)
3 Tablespoons extra-virgin olive oil
2 Tablespoons red wine vinegar
2 Tablespoons tomato paste
2 teaspoons kosher salt
1 teaspoon black pepper
6-8 garlic cloves, peeled and smashed (I like garlic, so I went with 8 cloves)
1 lemon, thinly sliced into rounds 
2 1/4 to 2 3/4 pounds skinless, boneless chicken thighs (or a combination of chicken thighs and/or chicken breasts) cut into 1 1/4" strips (depending on how much chicken used, yield will be 10-12 skewers)

For serving: 
1 lemon cut into wedges
Naan or soft pita bread 

*Note: Instead of the Aleppo pepper you can use 2 teaspoons dried crushed red pepper plus 2 teaspoons Hungarian sweet paprika combined with 2 Tablespoons warm water.

Tzatziki
14 ounces whole-milk (full-fat) plain Greek yogurt (highly recommend Fage Total)
1 large English cucumber, unpeeled 
1/4 cup sour cream
2 Tablespoons fresh squeezed lemon juice
1 Tablespoon white balsamic vinegar or white wine vinegar
2 Tablespoons minced fresh dill
1 1/2 teaspoons minced garlic (from 3-4 garlic cloves)
2 teaspoons kosher salt
1/2 teaspoon black pepper

Directions
Chicken
1. In a large bowl, add Aleppo pepper and water. Stir and let stand until thick paste forms (approximately 5 minutes).
2. Add yogurt, olive oil, red wine vinegar, tomato paste, kosher salt, and black pepper. Stir to combine and whisk to blend.
3. Stir in garlic and lemon slices.
4. Mix in chicken. Cover and chill at least 3 hours (or up to overnight).
5. Prepare barbecue (medium-high heat).
6. Thread 3 pieces of chicken on skewers (if using wooden skewers soak in water at least 1 hour before assembly in order to prevent them from catching fire on the grill). Discard marinade.
7. Sprinkle skewers with kosher salt, pepper, and Hungarian paprika (or additional Aleppo pepper).
8. Grill chicken skewers until golden brown and cooked through, turning skewers occasionally (approximately 12-16 minutes). 
9. Transfer to a platter, surround with lemon wedges.
10. Serve with warmed naan (or pita bread) and tzatziki.

Tzatziki
1. Place yogurt, sour cream, lemon juice, vinegar, dill, garlic, salt and pepper in a medium bowl. Stir to combine.
2. On a box grater coarsely grate the cucumber. Put grated cucumber in a cheesecloth or paper towel to squeeze out as much liquid as possible. Add to yogurt mixture.
3. Cover and chill at least 2 hours (or overnight).

Spring images from Tohono Chul Park, a Botanical Garden in Tucson, Arizona.


Sunday, March 20, 2016

Baked Praline French Toast Casserole


"A mind that is stretched by a new experience can never go back to its' old dimension." Oliver Wendall Holmes, Jr. My bucket list remains in a constant state of revision with more things being added rather than being removed from it. Recently one of those significant 'must visit' places was finally checked off of my ever-changing, organic bucket list. Finally all my vicarious trips to the South Rim of the Grand Canyon came to their timely end. Needless to say they paled in comparison to staying in and witnessing the canyon's incredible beauty close-up and firsthand. With access to the rim's hiking trails just a short walk from our lodge, we spent from sun up to sun down walking the trails in the canyon. As the sun rose and set, we were mesmerized by canyon's vistas as they transformed into breathtaking works of nature's art. Neither my imagination nor the iconic images legendary photographer Ansel Adams shared with the world truly captured the majestic beauty and aura of what should be one of the seven wonders of the world.


On the drive from the Grand Canyon to the home of friends inTucson we stopped in Sedona. Although technically removed from the bucket list many years ago, the striking red stone formations and the intensely spiritual aura of Sedona puts it on my list of those 'worthy of multiple return visits' places. In other words, once is not enough. Signs of spring's return along with the panoramic views of the scenic red rocks had me wishing we had more time to spend in this magical paradise. With my head spinning and heart racing from the time spent in the Grand Canyon and Sedona, being on sensory overload never felt so good.

And after spending several days with close friends in Tucson (along with a road trip to Bisbee and Tombstone) on this relatively short-lived vacation, it was time to return to life in the midwest. Thankfully Mother Nature helped to ease this transition by gracing us with several days of spectacular cloud filled blue skies. Not that they compared to those Arizona skies, but something was better than nothing.


Not only does my bucket list contain places to go and experiences to have, there are, what else, foods to eat and dishes to make (for the first time as well as again and again). For awhile now I have been wanting the Baked Praline French Toast Casserole to make a repeat appearance at the breakfast table. The perfect opportunity (to be the perfect aunt) came when my niece stayed over for a couple of days during her spring break last week.


This is one of those casseroles you partially assemble the night before. Making it one of those perfect for entertaining kinds of dishes.


The inspiration recipe called for using a sixteen ounce loaf of french bread. However, you could also make it with challah or brioche. Having made this casserole using all of these breads before, trust me when I say you will not go wrong with whichever bread you choose.

One inch thick slices of bread are quickly dipped into an egg-milk mixture and arranged in overlapping slices in a buttered casserole dish. Any remaining liquid is poured evenly over the bread. The important take away here is that you want the bread fully coated before covering the dish and refrigerating overnight. Note: You can also first arrange the bread slices in the dish and then pour over the egg mixture, spooning it between each of the slices and ever so lightly pressing down on the bread so it briefly submerges into the liquid. Either option works.


The praline topping is assembled and put onto the casserole right before baking. However, you can make it the night before, covering the bowl with plastic and refrigerating. While this makes the final assembly much easier, remember to take the butter-brown sugar-pecan mixture out of the refrigerator at least 30 minutes before spooning over the casserole. Don't forget: Toast your pecans before chopping them.


The Baked Praline French Toast Casserole bakes in a preheated 350 degree oven for 40 minutes or until the bread has puffed and the top is a medium golden brown.

If there was ever a breakfast casserole to cause your heart to race and head to spin, this Baked Praline French Toast Casserole would be the ONE! When soaked overnight and baked the next day, the bread takes on a custard like (almost bread pudding like) texture while the crunchy praline topping sends your taste buds into a state of pure bliss. And who doesn't want to serve a wickedly delicious, indulgent, memorable, easy to make breakfast (or brunch) to their family and/or friends?

To add to the casserole's decadence, serve with pure maple syrup or honey. Once you taste this Baked Praline French Toast Casserole, you may never look at ordinary french toast the same again. Not even if its' topped with freshly whipped cream and strawberries. This casserole will forever (for the better) change your french toast taste buds. So if there was ever a breakfast/brunch dish to move to the top of your food bucket list or one to send your heart racing and head spinning, this would be the one.

Recipe
Baked Praline French Toast Casserole (slight adaption to Baked French Toast Casserole shared in Marcia Adams' Heirloom Recipes cookbook)
Serves 7 generously but up to 10 if serving in a buffet

Ingredients
Casserole
1 loaf (16 ounces) french bread, challah, or brioche (day old if possible)
8 large eggs
2 cups half and half
1 cup whole milk
2 Tablespoons granulated sugar
2 teaspoons vanilla
1/2 to 1 teaspoon cinnamon (I used 3/4 teaspoon of cinnamon)
1/4 teaspoon Kosher salt

Praline Topping
1 cup unsalted butter, room temperature
1 cup light brown sugar, firmly packed
1 1/4 cups toasted, then chopped pecan halves
2 Tablespoons light corn syrup
1 teaspoon cinnamon
Pinch of kosher salt

Optional but highly recommended: Maple syrup or honey for serving

Directions
1. Generously butter a 9"x13" (or equivalent) casserole dish. Set aside.
2. Slice bread into 1 inch thick slices. Set aside.
3. In a large bowl, combine the eggs, half-and-half, milk, sugar, vanilla, cinnamon, and kosher salt. Mix until well combined (no yellow egg streaks).
4. Dip each slice of bread into egg mixture and begin to line the prepared casserole dish in overlapping slices. Pour remaining egg mixture evenly over the bread slices. Cover dish tightly with plastic wrap and refrigerate overnight.
5. To make praline topping, mix the butter, brown sugar, chopped pecans, corn syrup and cinnamon in a medium bowl until well blended. Note: If making night before baking the casserole, cover and refrigerate overnight.
6. Preheat oven to 350 degrees (F).
7. Place casserole on large baking sheet.
8. Spread or drop spoonfuls of the praline topping evenly over the bread.
9. Bake for 40 minutes or until the casserole is puffed and medium golden brown. Remove from the oven and serve with maple syrup or honey.
Note: Serves 7 generously and 10 adequately.

Sunrise in the South Rim of the Grand Canyon at Maricopa Point.


 Nearing sunset at Yavapai Point on the South Rim of the Grand Canyon.


Desert View Watchtower, designed by American architect Mary Colter (1932), on the south rim of the Grand Canyon.

Monday, February 29, 2016

Creamy Cornbread Casserole


By next year at this time most of us will still be able to remember who won the Oscar for best actress and best actor. However, the names of the Oscar winning best supporting actress and/or best supporting actor may be permanently stuck to the tips of some of our tongues. Similarly we have great powers of recall when it comes to remembering the main course of a meal, but a sketchier, more selective memory for the sides served. When someone asks us to describe a holiday, birthday, or other celebratory meal, we often lead with the main course. Most restaurants list the available sides in some obscure place on the menu, often in a smaller font. Just as a movie becomes more compelling with a great support cast, a meal feels complete with sides, particularly the 'we want second helpings' kind.

This Creamy Cornbread Casserole, part cornbread and part custard in texture, it is everything a corn pudding was meant to be. As the perfect accompaniment to grilled or roasted poultry, grilled steaks, and even a bowl of hearty chili, it is a side dish having a 'must have a second helping' quality.


For those of you having an aversion to making any casserole with canned corn, you may be tempted to say 'thanks but no thanks'. While I can appreciate the strong desire to cook only with fresh ingredients (I too have my 'fresh is best' moments), this Creamy Cornbread Casserole may cause your canned food paradigm to shift. 

Added to the can of creamed corn and whole kernel corn (undrained), are two eggs, sour cream, melted butter, heavy cream, and freshly grated cheddar cheese. 

For this casserole I used Kerrygold's 12 month aged cheddar (white) as it brought just the right amount of cheesiness. If for some reason you can't find it, buy a really good one year old white cheddar. You don't need to buy a 2 or 3 year old aged cheddar for this casserole, but you do need to buy some really good parmigiano-reggiano to give it a slight nuttiness. More on that in a bit.


Making up the dry ingredient portion of the casserole is all-purpose flour, kosher salt, sugar, baking powder, and cornmeal. I used Bob's Red Mill medium grind stone ground cornmeal.

The assembly of the casserole is as simple as blending the wet and dry ingredients together.


The entire mixture is poured into a butter casserole pan, topped with an additional 1/4 cup of grated cheddar and 1/4 cup of freshly grated parmigiano-reggiano cheese. Considering all of the controversy surrounding pre-grated, pre-packaged parmesan cheeses going on, why risk sprinkling wood chips onto this casserole? Besides, there is a world of flavor difference between freshly grated parmigiano-reggiano cheese and any bag or boxed pre-grated cheese.


The Cream Cornbread Casserole bakes in a preheated 350 degree (F) oven for 35-40 minutes or until the top is golden brown. The center of the casserole will have some movement or wiggle in the center, however, after resting for 15-20 minutes before serving, it all comes together perfectly. 


Having made other corn pudding recipes in the past, I have to say I think the recipe for this Creamy Cornbread Casserole is now my favorite. If there were ever a side dish worthy of having a starring role on your dinner table, this would be it. Unlike some of the other side dishes you have brought to your dinner table, this will definitely be one of those falling into the unforgettable ones category.

Recipe
Creamy Cornbread Casserole (slight adaptation to Colorado Chef John Broening's Creamy Cornbread Casserole recipe)

Ingredients
1/2 cup all-purpose flour
3/4 cup medium grind, stone ground corn meal (Recommend Bob's Red Mill Stone Ground Cornmeal)
4 Tablespoons granulated sugar
2 teaspoons baking powder
1/2 teaspoon salt
8 Tablespoons unsalted butter, melted, cooled slightly
1 can (15.25 ounces) whole kernel sweet corn with liquid (do not drain)
1 can (14.75 ounces) creamed corn
3/4 cup sour cream
1/2 cup heavy cream
2 large eggs
1 1/2 generous cups (7 ounces) shredded aged cheddar cheese, divided (Recommend Kerrygold's 12 month old Aged Cheddar Cheese)
1/4 cup finely grated Parmigiano-Reggiano cheese

Directions
1. Preheat oven to 350 degrees (F). Butter a 11"x7" casserole dish and set aside.
2. In a large bowl, combine butter, whole kernel sweet corn with liquid, creamed corn, sour cream, heavy cream, eggs and 1 1/4 cups grated cheese until blended. Set aside.
3. In a medium sized bowl, combine all-purpose flour, cornmeal, sugar, baking powder and salt. Whisk until blended.
4. Add dry ingredients to wet ingredients and mix to blend.
5. Pour mixture into prepared casserole dish.
6. Sprinkle remaining 1/4 plus grated cheddar cheese. Top with finely grated Parmigiano-Reggiano cheese.
7. Bake 35-40 minutes or until top is golden. Note: There will still be some slight movement in the center of the casserole. 
8. Remove from oven. Allow to sit at least 15-20 minutes before serving. Serve warm or at room temperature.