Thursday, January 26, 2023

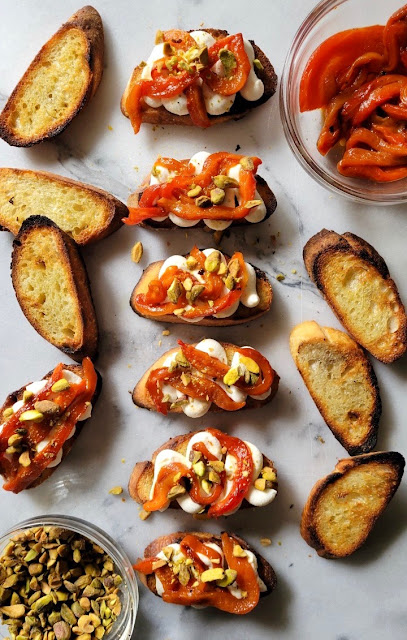
Honey Ricotta, Roasted Red Pepper & Pistachio Crostini


These Honey Ricotta, Roasted Red Pepper & Pistachio Crostini were inspired by an appetizer we had ordered and subsequently devoured while enjoying dinner out with friends. I took one bite of the crostini and immediately thought 'I need to figure out how to re-create this at home'. Which is exactly what happened several weeks later. I was having a small dinner party and wanted the appetizer course to be relatively easy, yet be one with  high 'wow in appearance and taste' factors. And apparently they did, as everyone raved about them! Needless to say the Honey Ricotta, Roasted Red Pepper & Pistachio Crostini helped to get night off a great start. 


If there was an ever an appetizer to go on repeat appearances around here, this one would be high on the list.


What makes this Honey Ricotta, Roasted Red Pepper & Pistachio Crostini so delicious are it's flavors and textures. With a bit of crunch coming from the crostini and chopped pistachios, to the creaminess of the honey infused ricotta, to the sweetness of the roasted red peppers, to the fruity, sweetness of the drizzle of honey, they are heaven in a bite.


The crostini can be made in the oven or on the grill. Lately I have been making them on the grill as it gives the crostini another dimension of flavor. Whole milk ricotta and honey get whipped together until smooth and creamy. Using a pastry bag (or a plastic bag with one corner cut off) makes for an even more luxurious beautiful bite. 

Roasted red peppers are easy to make on the grill. Char them until all sides are blackened. Place the charred peppers in a brown paper bag, seal, and let cool until you can handle them. Remove the charred skin, stem and seeds before cutting into 1/8" strips. Whatever you do, do not rinse the roasted red peppers as you will be removing some of their delicious flavor. These can be made early in the day and kept at room temperature or the day before (covered and chilled in the refrigerator). Another option would be to use jarred roasted red peppers. 


Chopped pistachios and pistachio dust get sprinkled on top of the strips of red pepper. A generous drizzle of good honey and some micro-greens are the finishing touch. 

All of the elements of the Honey Ricotta, Roasted Red Pepper & Pistachio Crostini can be made several hours ahead, but they should be assembled and arranged on a platter within 30 minutes of serving. However, wait to drizzle the honey until you are ready to serve them. 


These rustic, blissful Honey Ricotta, Roasted Red Pepper & Pistachio Crostini are on the heartier side. Which makes them a great stand alone appetizer. Although served with a bowl of Rosemary Roasted Cashews you have the makings of the most perfect (and easy) appetizer course. Or pair these two and serve them at a casual gathering of friends. 

Valentine's Day, Galentine's Day, the Grammys, and/or the Oscars coming in the weeks ahead give you all the more reason to make these swoonworthy Honey Ricotta, Roasted Red Pepper & Pistachio Crostini. 

Recipe
Honey Ricotta, Roasted Red Pepper & Pistachio Crostini
Makes 16-18

Ingredients
1 French Demi-Baguette (7oz/198g), cut into 1/4" slice on the diagonal, grilled or toasted in the oven (you should get 16 to 18 slices)
16 ounces (453g) whole milk ricotta
1 Tablespoon + 1 teaspoon good quality honey, plus more for drizzling
1/8 teaspoon Kosher Salt
1 - 2 red peppers, roasted, peeled, seeded, and cut into 1/8" slices (or can use jarred roasted red peppers)
Flaky sea salt (i.e., Maldon)
1/4 cup (35g) finely chopped pistachios (you want both small pieces and dust)
Micro-greens

Directions
1. Brush both side of the sliced baguette with olive oil. Place on a baking sheet and bake in a preheated 400 degree (F) for 10-12 minutes or until golden. Alternately make the crostini on the grill. Allow the crostini to cool.
2. In a medium sized bowl, whip the whole milk ricotta, honey, and Kosher salt until smooth and creamy. Place in a pastry bag or in a plastic bag (with one end cut). Pipe on top of the crostini.
3. Toss the slices of roasted red peppers with some flaky sea salt before arranging on top of the honey whipped ricotta.
4. Sprinkle some chopped pistachios and pistachio dust on top of the red peppers.
5. Drizzle with some honey. Top with some micro-greens. Serve immediately.

Notes: (1) You can make the Honey Whipped Ricotta early in the day or several hours ahead. Store covered in the refrigerator. (2) You can make the roasted red peppers early in the day. If grilling them to blacken their skins, place in a brown paper bag and seal. Let the red peppers cool. Remove from the bag, peel off the blackened skin, cut to remove stem and seeds. DO NOT RINSE the peppers. Cut the red peppers into thin strips. Place in a bowl. Lightly salt with flaky sea salt. Cover and let rest at room temperature if using several hours later. If roasted in the morning to be used for the evening, store covered in the refrigerator. (3) You can find micro-greens near the herb section at many grocery store. I generally buy mine at Whole Foods, but at the Farmer's Marker during the summer months.

Sunday, January 22, 2023

Hearty Homemade Chicken Soup


The skies have been overcast and gray for what seems like a lifetime. The only rays of sunshine have come in the forms of a bouquet of white tulips, spending time in the company of friends, and bowls of this Hearty Homemade Chicken Soup. All things giving me the added perseverance to keep going until the return of the sun and blue skies. Although once they return, I don't see any reason to stop buying one of my favorite flowers, to spending time with my favorite peeps, and from stop making this soul satisfying, divinely scrumptious, craveworthy, savory chicken soup. 


Who doesn't love a bowl of hot chicken soup on a chilly or cold day? It's tantamount to being considered comfort food on overload. Especially one flavored with fresh herbs as well as being heavily loaded with vegetables, tender pieces of shredded chicken, and tender wide enriched egg noodles. The flavors in this Hearty Homemade Chicken Soup are as far from the cans of chicken soup some of us grew up on or the gummy noodle versions served in various 'food establishments' as is the moon. It's the soup you didn't know you have been craving until you take your first spoonful.


What makes this soup so hearty is the almost higher ratio of chicken and vegetables to the broth. Giving it more of a hearty lunch or light supper consistency. Served with a torn up baguette or thick slices of sourdough bread (and don't forget the butter), the Hearty Homemade Chicken Soup makes for the kind of meal you want to serve to family and friends. Or want to bring to friends on the mend. 


The keys to a chicken soup having a great depth of flavor are ingredients and time. Shortchange either one of these and you will sacrifice the soup's flavor. There are no shortcuts to the making of an exceptional chicken soup. Onions, shallots, garlic, carrots, celery, fresh herbs (sage, thyme, rosemary), bay leaves, bone-in chicken pieces, organic or free-range chicken broth, the rind from a piece of Parmigiano-Reggianno, and extra-wide enriched egg noodles are the ingredients responsible for giving this soup its' incredible flavorsomeness and body. With a cooking time close to at least two hours, the vegetables and chicken turn tender while the herb bundle and cheese rind transform take responsibility for transforming it from an ordinary soup into something a bit extraordinary. 

As the soup simmers, the leaves from the herbs will break loose from their stems and permeate the broth. The cheese on the rind will melt into the broth. And the bone-in pieces of chicken will easily shred when removed from the broth. The bones in the chicken will give the broth an unparalleled flavor boost. As bones give soup more nourishment and body due in large part to the collagen contained within them. Whether you cut up a whole chicken or buy the chicken already cut up will not matter. At the end of the cooking process you will want at least 1 1/4 pounds of shredded chicken meat. If you have more than that, use it to make some chicken salad. Or if you want an even heartier soup use up to 1 1/2 pounds of chicken meat.


When buy enriched egg noodles, look for the widest noodles you can find. There are 12 ounces of noodles in most noodle packages but you only want to use 8 ounces (about 2-3 cups). The base recipe calls for the use of 10 cups of free-range (organic) chicken broth. If you want your soup brothier, add in up to 2 additional cups. We liked it heartier so I kept the amount of broth to 10 cups.


Fresh parsley and shavings of Parmigiano-Reggiano cheese are the soup's finishing touches. Leaving them out would be akin to leaving the jelly off of a peanut butter and jelly sandwich or leaving flaky sea salt off of a chocolate chip cookie. 


There are a plethora of chicken soup recipes out there all claiming to be the most delicious, the best, the most old-fashioned. However, if you want a robustly flavored chicken soup recipe worthy of passing down in your family or worthy of you earning the title of chicken soup goddess (or god) in your circle of friends, the recipe for this Hearty Homemade Chicken Soup is the only one you want. It's the throw down worthy version of chicken soups! And beyond how satisfying it is, it is destined to brighten up the cloudiest, grayest of days. 

Last, but not least, the notes following the directions are as important as the directions themselves. 

Recipe
Hearty Homemade Chicken Soup
Generously serves at least 8

Ingredients
2 Tablespoons olive oil
3 Tablespoons unsalted butter
1 large yellow or Spanish onion, coarsely chopped
2 large shallots, sliced (about 1/8" thickness)
4 cloves garlic, chopped
3 large ribs of celery, cut and sliced (about 1/4" thickness)
7 good sized carrots, peeled and sliced diagonally (about 3/8" thickness)
4 sprigs of fresh thyme
2 sprigs of fresh sage
2 sprigs of fresh rosemary
2 bay leaves
1 Tablespoon Kosher salt
1 teaspoon black pepper
Rind from a piece of Parmigiano-Reggiano
10 -12 cups free-range or organic chicken broth (See notes)
4 pound chicken, spatchcocked, then remove breasts (leaving in bone) and legs/thighs (leaving in bone) - Or 2 1/4 - 2 1/2 pounds bone-in breasts and bone-in thighs - You want a total yield of about 1 1/4 pounds of shredded meat -See Notes
8 ounces wide enriched egg noodles - See Notes
Fresh Parsley
Shavings of Parmigiano-Reggiano
Fresh bread

Directions
1. In a large cast iron Dutch Oven, heat the olive oil and butter. When the butter has melted add in the onions, shallots, garlic, celery and carrots. Mix well. Cook over medium heat for about 8-10 minutes or until the vegetables have slightly softened. They will continue to cook throughout the cooking process. Note: Putting a lid on the pot will help soften (steam) the vegetables.
2. Tie together the sprigs of thyme, sage, and rosemary with kitchen string to create an herb bundle.
3. Add the herb bundle and 10 cups of chicken broth to the pan. Increase the heat to high and bring the broth to a boil.
4. Reduce heat to medium-low and add in the bay leaves, Kosher salt, pepper, Parmigiano-Reggiano rind, and chicken. Cook for approximately 30 minutes. Reduce heat to low-simmer and continue cooking for another 60 minutes. Note: Put lid on top of the pot but don't completely seal, allowing some of the heat to escape.
5. Remove the chicken from the pot. Shred the chicken with a fork. You are looking for yield of approximately 1 1/4 pounds of shredded light and dark meat.
6. Return the shredded chicken back to the Dutch Oven. Continue to simmer for another 20-30 minutes.
7. Remove the rind, bay leaves, and the herb bundle. Increase the heat to medium-high and add in the egg noodles. Cook for approximately 8-10 minutes or until noodles are done. Taste for seasoning, adding more salt and/or pepper if needed.
8. Ladle generous portions of the Hearty Homemade Chicken Soup into bowls. Top each bowl with a generous helping of shaved Parmigiano-Reggiano and chopped parsley. Serve with some thick slices or chunks of fresh bread (e.g., sourdough loaf, baguette, etc.)
9. Store any leftovers in the refrigerator or put them in plastic containers and freeze to enjoy later.

Notes: (1) For the best flavor, use fresh chicken versus an already cooked rotisserie chicken. Buy a 4 pound cut up chicken or one whole you can cut yourself. You will only put the breasts/wings and legs/thighs into the pot. If you can't find a whole 4 pound chicken, then buy at least 2 1/4-2 1/2 pounds of bone-in breasts/wings and bone-in legs/thighs. Either option should get you approximately 1 1/4 pounds of shredded chicken. The amount you need for this hearty soup. (2) I used the extra wide enriched egg noodles from Gia Russa. Most egg noodles come in 12 ounce packages, however, you only need 8 ounces for this soup. If you want your soup heavy on the noodles add up to 10 ounces. You may need to add additional broth. (3) We like our soup very hearty, so I made it with 10 cups of the chicken broth. If you want it slightly more brothy add up to 2 additional cups. I used the Free Range Chicken Broth made by Pacifica Foods. (4) I used rainbow carrots to make this soup, but if you want your soup to be studded with  the bright orange color coming from 'regular' carrots, then use them.

Friday, January 13, 2023

Cheddar, Apple & Honey Crostini


I made these Cheddar, Apple & Honey Crostinis as the appetizer for our low-key, simple, at-home New Year's Eve dinner. I had more than an inkling they would be a hit as what's not to love about a creamy cheddar cheese, thinly sliced Honey Crisp Apples, a generous drizzle of honey, and fresh thyme sitting on top of an over roasted (or grilled) crostini. As hoped, or should I say predicted, they were immediately declared 'winners'. Which around here amounts to meaning 'put them on repeat'. Words that are music to my ears. Especially when something so good is so easy to make.


This small bite appetizer is one of those perfect for celebratory occasions, informal gatherings, casual dinners, fancy dinners, or whenever you get the taste for them foods. The Cheddar, Apple & Honey Crostini may have a kind of refined rustic look to them along, but don't let that fool you. Because they have such an unexpected explosion of flavors you might come to view them as a bit luxurious.


A five ingredient, easy to make, unfussy appetizer is exactly one we all need in our lives. 


It all begins with making the crostini. Quarter inch slices of a baguette are brushed on both sides with olive oil and baked a preheated 400 degree (F) oven for 9-11 minutes (or until golden). Alternately, you can grill the olive oil brushed baguette slices on a grill for an added, even better flavor dimension. 


If there is one drawback to this appetizer recipe, it's the Unexpected Cheddar Cheese Spread from Trader Joe's. For those of you who don't live near a Trader Joe's, my apologies as I have no recommended substitution to this slightly addictive, insanely good creamy cheese spread. But there happens to be a Trader Joe's near you, don't just buy one container, buy two. I promise you won't be sorry. 

The best apples to use for this appetizer are Honey Crisps. They have a sweet and subtly tart tangy flavor that pairs exceptionally well with the creamy cheddar cheese. When buying the apples, choose medium sized ones as you will get the perfect sized slices from them. You can cut the apples using a knife to cut the apple into thin slices or you can use a mandoline. I tend to like using a mandoline to ensure all of my slices are the same thickness.

When choosing the honey, look for a high quality raw honey sold in jars. If you can find a really good locally made honey or find one at a Farmer's Market (like one I bought in Boulder, Colorado) buy it. Even if it's price makes you gasp. Honey is one of those foods that lasts indefinitely if you keep it tightly sealed. Many of the honeys sold in plastic bottles often contain other ingredients, like corn syrup. So before you spend any money on honey, carefully look at the label. Because there is nothing more delectable than a really good pure honey. Especially when it's drizzled over apples and cheese.

And who knew fresh thyme was the perfect compliment to apples, honey and cheese? If you have never had this combination of flavors before, you are in for a treat!

This Cheddar, Apple & Honey Crostini could definitely get me on the simple food, small bites bandwagon in 2023. A meal made up of an appetizer and dessert sounds like something I could easily wrap my head around. Who needs dinner when you can enjoy a delicious, savory appetizer, made with fresh ingredients followed by a slightly decadent dessert! I am thinking the Cheddar, Apple & Honey Crostini would pair well with Honey Baked Pears with Cream, Double Chocolate Pudding, Chocolate Mousse, Creme BrĂ»lĂ©e, or Coconut Panna Cotta with Blueberry Sauce. Even a warm chocolate chip cookie with a scoop of ice cream would work well! 

Recipe
Cheddar, Apple & Honey Crostini
Makes 16 crostini 

Ingredients
1 French Demi Baguette (7 ounce/198g), cut into 1/4 inch slices, slightly on the diagonal
Extra-virgin olive oil
2 small or medium sized Honey Crisp Apples (unpeeled0, cut into thin slices
Good quality honey
4-5 sprigs of fresh thyme, leaves removed

Directions
1. Preheat oven to 400 degrees (F). Lightly brush both sides of the baguette slices with olive oil and place on a heavy bottomed rimmed baking sheet.
2. Bake the baguette slices for 9-11 minutes until golden, turning over once midway through the baking process. Remove from the oven and let cool slightly (approximately 6-8 minutes).
3. Spread about two teaspoons of the Unexpected Cheddar Cheese Spread on each crostini. Don't be skimpy with the cheese.
4. Top with 3-4 apple slices.
5. Transfer the crostini to your serving platter. 
6. Use a fork to drizzle honey over each crostini. Then sprinkle each with fresh thyme leaves. Serve immediately. Note: The honey will melt into the apples. Serve the crostini with a side bowl of honey for anyone who wants their crostini a little sweeter.

Notes: (1) Instead of making your crostini, make them on the grill. Brush both sides with olive olive and grill. Cooking time will range from 6-8 minutes depending on the heat of the grill. Be certain to flip your bread slices midway through the grilling process. (2) The Unexpected Cheddar Cheese Spread from Trader Joe's is insanely delicious. Buy at least two on your Trader Joe's run. (3) Use a high quality honey, preferably one from a reliable source. (4) If serving a larger crowd, buy a regular sized french baguette, pick up an extra Honey Crisp apple, and use a few more thyme sprigs. (5) Bjorn's Lavender Colorado Honey was what I used to make these crostini. I am absolutely in love with this honey.

Tuesday, January 10, 2023

Coconut Margarita (Two Versions)


I am calling this blog post the tale of two Coconut Margaritas. The original version and the revised version. But more on that a bit later. Let me first offer my apologies to those of you who set the intention of going dry month. I understand sharing a recipe for an alcohol based cocktail might be considered a bit of tease or an intent to undermine your Dry January good intentions. Trust me when I say it is neither of those. In actuality it's me being unable have the patience to wait until February or even the warmer months to share this refreshing, swanky cocktail with you. For those of you who decided a January Drizzle was more achievable or who long be somewhere warm and tropical, today is your lucky day! As this version of a margarita might just become your favorite.

As with most of the recipes on the blog this one too comes with a backstory. We celebrated Christmas with my sister, brother-in-law, nephew, niece and her partner a week early. A change in tradition that initially had me a bit weepy. With so much changing in the world in the past couple of years, this change hit me a bit hard. But after all of my angst, the 'early' Christmas dinner gave us all the chance to spend some quality time with another, enjoy a fabulous meal, savor a most delightful holiday cocktail, and exchange gifts. The first gift I opened was two limes. Imagine my curiousness. This was followed by a can of cream of coconut. My curiosity then turned to intrigue. By the time I opened the third gift, a good bottle of reposado tequila, I knew what the fourth one would be (you have probably already guessed it). The recipe card for the delicious Coconut Margarita my niece Laura served as our tasty holiday cocktail. Which is what I will call the original version.


The original version is made with two ounces of reposado tequila, one ounce of freshly squeezed lime juice, and one ounce of cream of coconut. All three ingredients are poured into a shaker to which 10-12 ice cubes are added. After vigorously shaking for 15-20 seconds, the Coconut Margarita is poured into a cocktail glass more than half filled with crushed ice. Simple, spirity deliciousness. It can be served completely ungarnished. It can have a toasted coconut rim. Or it can have a lime, pineapple, or edible flower garnish. Or for that full on tropical feel you can top it with a paper umbrella.


The second version is made with two ounces of reposado tequila, one ounce of freshly squeezed lime juice, two ounces of cream of coconut, and one ounce of Grand Marnier (or Cointreau). Grand Marnier is considered by some to be a classic margarita ingredient as it gives the margarita an added depth of flavor. An increase in the amount of the cream of coconut adds richness without too much sweetness. But more importantly, it slightly masks the flavors of the alcohol. Which also makes it a bit more lethal. Although I will say the second version is dangerously delicious.


Both versions are exceptionally mouth-warming. So how will you decide which one to make? The answer is simple. If you like Grand Marnier in your margaritas, make the second version. If you don't, make the original version. Or better yet, make both versions and decide which one is the most margarita palate pleasing.

But let me take a brief step back and talk a bit more about the ingredients. Why use reposado tequila instead of a blanco of anejo? Blanco tequilas are aged for the shortest period of time, while a reposado is generally aged (in oak barrels) for a much longer period of time. The result is a tequila having a more nuanced, better flavor. So given the choice between blanco and reposado tequilas choose the reposado. Anejo tequilas are aged from one to three years and considered to be more of a sipping tequila. Which gets us back to the reposado tequila being the best, smoothest, well-balanced tequila for this Coconut Margarita.

For the richest flavor and a more luscious texture use cream of coconut, not coconut milk. There is a world of difference between the two. So when you are at the grocery or liquor store, make certain you are buying cream of coconut. When you open the can of cream of coconut, it will contain both a liquid and solid. Pour and then scrape the cream of coconut into a bowl or jar and whisk together until thick and creamy. You can store any leftovers in the refrigerator. 

You can serve the Coconut Margarita in a margarita glass, but I much prefer serving it in a cocktail (aka old-fashioned) glass for a more refined presentation. 

If you are looking to add to your signature cocktail list, are looking to change up your margarita game, or are looking to transport yourself back to a tropical destination, I highly recommend this irresistibly delicious Coconut Margarita! Last, but not least, always drink responsibly. And always, always respect the personal choices of your friends. 

Recipe
Coconut Margarita (two versions)
Makes 1 irresistibly, delicious cocktail

Ingredients
2 ounces Reposado Tequila
1-2 ounces Coco Lopez Cream of Coconut (See Notes)
1 ounce freshly squeezed lime juice (from 1 large or 1 1/2 two medium sized limes)
1 ounce Grand Marnier or Cointreau (if making the second version. I highly, highly recommend using it)
Crushed Ice

Optional Garnishes: Wedge of a pineapple slice, slice/wedge of lime, edible flower, toasted coconut rimmed glass, etc.

Directions
1. Add the tequila, cream of coconut, lime juice, and Grand Marnier (if using) into a shaker. Add in 10-12 ice cubes.
2. Shake vigorously for 15-20 seconds.
3. Pour the strained margarita into cocktail/old-fashioned glass filled about 2/3's full of crushed ice.
4. Top with a garnish, if using. Alternately, dip cocktail glass in simple syrup and then into a plate of toasted coconut before pouring in the Coconut Margarita.
5. Enjoy immediately. Drink responsibly.

Notes: (1) After opening the 15 ounce can of the Coco Lopez Cream of Coconut, pour into a bowl or jar and whisk until smooth and creamy. Store leftovers in a covered jar in the refrigerator. (2) For a slightly sweeter margarita, use 2 ounces of Cream of Coconut. Highly recommend using 2 ounces! (3) My favorite version of the Coconut Margarita is made with 2 ounces of Reposado Tequila, 2 ounces of Cream of Coconut, 1 ounce freshly squeezed lime juice and 1 ounce Grand Marnier. (4) If your freezer doesn't make crushed ice, put some ice cubes in a plastic ziplock bag and use a can or rolling pin to crush the cubes. 

Saturday, January 7, 2023

Hot Chocolate


The blog is having it's tenth birthday! Double digits! A full decade! Half of a score! A milestone! It's crazy to think that I have been cooking and creating for the past ten years. Whenever I ask myself what is it that keeps me invested in this labor of love (non-income generating) side hustle, the answer is (public) validation and encouragement. While I spend more than my fair share of time self-reflecting, nothing is more energizing than getting feedback. Whether that be a comment on a Facebook or Instagram post, being tagged in a post of a recipe you made from the blog, hearing your stories about the accolades you have gotten for making these recipes, or for the messages about a recipe (especially the ones where you find a hiccup in my ingredient list), I continue to be beyond grateful for all forms of public support and encouragement. So thank you for helping to sustain not only my passion for sharing recipes and the things I have learned about food over the years, but for pushing me to be a better baker, cook, and blogger! And with this being the year of the rabbit, I am energized to keep this ten year old blog going!


What better way to kick off a new year or to celebrate a milestone than with a luscious, creamy, chocolatey, soul warming Hot Chocolate! The perfect beverage to have you feeling all warm and cozy on a chilly winter day. 


Made with whole milk, heavy whipping cream, milk chocolate, semi-sweet chocolate, instant espresso and a pinch of flaky sea salt, this Hot Chocolate is deserving of all the accolades I can possibly think of. Including, but not limited to, worthy of being referred to as droolworthy decadence. Channel an imagined ten year old self as an excuse for topping the Hot Chocolate with freshly whipped cream, a homemade marshmallow, and a dusting of cocoa powder for a pure bliss experience.  And think gloriously rich. 


Of course, you could drink the Hot Chocolate completely unadorned. 


Or maybe the only added bit of self-indulgence you need is a generous dollop of freshly whipped, lightly sweetened whipped cream. 


What makes this Hot Chocolate so darn delicious is the use of equal parts milk and semi-sweet chocolate. The milk chocolate gives it right amount of sweetness while the semi-sweet chocolate adds a hint of richness. The lusciousness of the Hot Chocolate comes from the use of both whole milk and heavy whipping cream. The 3 to 1 ratio of milk to cream adds a heavenly element to the Hot Chocolate. A pinch of flaky sea salt and an eighth of teaspoon of instant espresso powder are two other ingredients setting this Hot Chocolate apart from all others. Do I dare say this may be the BEST EVER Hot Chocolate? I think that may be the easiest dare challenge to accept!


Winter will be here for a while, so you have plenty of time and opportunity to savor some cups of Hot Chocolate. It pairs perfectly with a good book, a plate of cookies, a roaring fire, and/or the company of good friends. 

If you don't already, I would love for you to follow me on Instagram (lynnkrizic)! It's there where you will get previews of upcoming blog posts and access to reels, along with getting other insights into my sources of inspiration as well as my passions. 

Recipe
Hot Chocolate
2 Servings

Ingredients
1 1/2 cups whole milk
1/2 cup whipping cream 
2 ounces (57g) milk chocolate chips (or chopped milk chocolate)
2 ounces (57g) semi-sweet chocolate chips (or chopped semi-sweet chocolate)
1/8 teaspoon instant espresso (or 1/4 teaspoon vanilla)
Pinch of flaky sea salt

1/2 cup whipping cream 
1 Tablespoon confectionary sugar

Optional, but really good: Homemade Vanilla Marshmallows and/or dusting of cocoa powder

Directions
Whipped Cream
1. In a medium sized bowl whip the heavy cream and confectionary sugar until hefty (but not stiff) peaks form.
2. Place bowl in the refrigerator until ready to use.

Hot Chocolate
1. In a heavy bottomed saucepan, heat the milk and heavy cream until light bubbles begin to form and is well heated (do not let boil).
2. Remove from heat and add in the milk chocolate, semi-sweet chocolate, espresso powder and flaky sea salt. Let sit for four minutes without stirring. After four minutes use a whisk to blend the melted chocolate into the milk/cream until well blended. Return the pan to the heat and simmer for 1-2 minutes to bring the temperature up.
3. Equally divide the hot chocolate between two mugs.
4. Top with a generous dollop (or two) of freshly whipped cream.
5. If using, top with homemade (or store-bought marshmallows) and/or a dusting of cocoa powder.
6. Enjoy immediately.

Notes: (1) I used Guittard's Milk Chocolate and Semi-Sweet Chocolate Chips. Use your favorite milk and/or semi-sweet chocolate chips (or chocolate) for the hot chocolate if you can't find them. (2) If you don't have a scale, 2 ounces of chocolate chips or chopped chocolate is about. 1/3 of a cup. (3) I love the pillowy texture of these Homemade Vanilla Marshmallows but use your favorite marshmallows if you aren't making them yourself.


Door County, Wisconsin (September 2022)

Friday, December 23, 2022

Three Bean Chili


Within days of the Winter Solstice came a winter white landscape here in the midwest. However, it also came with finger biting, frigid, below zero, dangerously cold weather. The anticipation of the arrival of arctic winter temperatures unleashed my cravings for hearty, home cooked comfort food. And what better way to warm up the house and my belly than with chili. One having a long, slow cooking time allowing for the flavors to deepen while having the added benefit of creating an intoxicating aroma in the house. If there was ever a chili to remind us of the rewards of slowing down and taking a deep breath, it would be this Three Bean Chili. With a simmer time of six to seven hours the chili is transformed into a deliriously delicious, soul satisfying, perfect cold weather meal. 

Yes, I know there are four other chili recipes on the blog. But I am going to go out on a very short limb and declare this to be the BEST EVER chili. Quite possibly it may be the only chili I will make from this day forward. Because without exaggeration this chili is seriously damn delicious! Destined to win any throw down competition or neighborhood chili contest along with winning the hearts of and earning high praise from your family and friends. 


All of the other chili recipes on the blog are made with either beef or turkey. This one is made with beef and pork. The combination of these two meats gives the chili a richer depth of flavor and an even greater texture. Black beans, pinto beans, and kidney beans (rinsed and drained) are what some call the best bean trifecta. Mild chili powder, cumin, Aleppo pepper, Kosher salt, black pepper, and bay leaves make up the spices. Garlic, red pepper, green pepper, and yellow onion when lightly sautĂ©ed in olive oil retain their shape and flavor during the long, slow cooking process. Red enchilada sauce and diced tomatoes bring lots of flavor. For just the right amount of heat, Tapatio Hot Sauce is an ingredient must. A little bit of sugar helps to temper all of the ingredients. And, last but not least, some water (two cups to be exact) to help tenderize the meat and keep everything from drying out. This is one of those recipes where every ingredient matters. Leave something out and you won't have the BEST EVER chili. 


We all have our favorite chili garnishes. From shredded cheese, to green onion, to avocado, to sour cream, to pickled jalapeños, to avocado, to guacamole, to chopped cilantro, to cooked macaroni, to oyster crackers, to cornbread, to fritos chips, the list is almost endless. So when serving the Three Bean Chili put out bowls or platters of everyone's favorites! 


The chili can be assembled in less than thirty minutes. After bringing it to a boil, all that is left to do is occasionally give it a stir while it simmers over a very low flame. Stirring the chili will help ensure nothing sticks to the bottom of the pan. Place a lid on top of the pot to help retain the heat, but turn the lid slightly so that it doesn't completely seal the pan or create unnecessary condensation.


This Three Bean Chili has a very long cooking time. It will take anywhere from six to seven hours for the flavors to fully develop. Taste it at the six hour mark, but if you can, let it go for the full seven hours.


The Three Bean Chili is mouthwatering delicious on the day it is made. However, it is just as good, maybe even a tiny bit better, when leftovers (if there are any) are slowly reheated on the stove. 

Which makes this Three Bean Chili the perfect dish for a weekend gathering of family and/or friends. Whether it's just for fun, to watch a sporting event, or to celebrate an occasion or holiday, this Three Bean Chili is destined to be a huge hit! If I was a betting person (which I am not) I would venture to guess this will definitely become one of your signature, favorite go-to dishes! If, by chance, you are invited to a chili cook off competition at any point in the future, you might end up coming home with the trophy! And lastly, if you are just looking to take the chill off of a very cold day, well you absolutely want to or rather I should say you definitely must make this Three Bean Chili!

Recipe
Three Bean Chili
Serves at least 8

Ingredients
1 Tablespoon olive oil
1 large yellow onion, diced
1 red bell pepper, diced
1 green pepper, diced
4-5 garlic cloves, minced
1 1/4 pounds of ground beef (either an 80/20 or 90/10 blend)
1 pound ground pork
26 ounce (794g) can of diced tomatoes
15 ounce (425g) can of black beans, drained and rinsed
16 ounce (454g) can of pinto beans, drained and rinsed
16 ounce (454g) can of kidney beans, drained and rinsed
20 ounces of red enchilada sauce (see notes)
2 ounces (58g) mild chili powder (very close to 1/2 cup)
3 bay leaves
1 1/2 teaspoons Kosher salt
1 teaspoon black pepper
2 teaspoons cumin 
2 Tablespoons granulated sugar
2 teaspoons Tapatio hot sauce (can also use Cholula Hot Sauce)
1/2 teaspoon Aleppo pepper or cayenne pepper
2 cups water

Serving and garnishing options: Sour cream, green onions, sliced avocado, shredded cheddar cheese (or cheese of choice), pickled jalapeños, chopped cilantro, cooked macaroni, oyster crackers, fritos chips, guacamole, cornbread

Directions
1. In a large, deep sided pan, heat a tablespoon of olive oil. Add in the the diced peppers, diced onion, and minced garlic. Sauté just until they begin to slightly soften. Remove from the pan and transfer to a bowl temporarily.
2. Add the beef and pork to the same pan and cook until the meat is browned and cooked through (about 8-10 minutes.
3. Add the cooked vegetables, all of the spices, the sugar, the red enchilada sauce, the can of diced tomatoes, and the Tapatio hot sauce. Stir to combine. At this point you can transfer the entire mixture to a large cast iron dutch oven. 
4. Pour in 2 cups of water into the mixture. Stir well.
5. Bring the mixture to a boil over high heat, then immediately lower the heat to a simmer. Over the next 6-7 hours, stir the chili occasionally to ensure nothing sticks to the bottom of the pan. Before serving the chili taste for seasonings (Kosher salt and/or pepper). Note: I didn't add any more salt of pepper.
6. Serve with your favorite garnishes!

Notes: (1) Recipe inspired from multiple sources. (2) When buying red enchilada sauce you may need two jars to ensure you have 20 ounces (jars of store bought red enchilada sauce come in 10 ounce of 14 ounce sizes). (3) Regardless if you use 80/20 or 90/10 beef, don't drain any of the rendered fat (there will be very little anyway). (4) A two ounce jar of chili powder (found in the spice aisle) will give you enough for this recipe (you may end up with an extra Tablespoon). (5) I sautéed the vegetables and cooked the meats in a large skillet. When all of the ingredients were mixed in, I transferred to a large cast iron dutch oven.