Wednesday, October 8, 2014

Sea Salted Chocolate Dipped Macadamia Nuts


If the benefits of traveling (for pleasure) weren't so incredible, the process of unpacking and regrouping would be a fate worse than having a root canal (coming from someone who has had one). Being able to extend the zen-like benefits of a vacation stay upon returning back home is the only reward for enduring any or all of the travel hiccups that happen along the way. You know the ones, the flight delays, the sneezing passenger, the flight delays, the reclining their seat passenger sitting in front of you, and oh, did I say the flight delays? Being able to fly home first class on this recent trip (was the lucky recipient of someone's frequent flyer miles), seemed to make those hiccups almost disappear. Am still wondering how the guy sitting next to me managed to walk off the plane after having six, maybe seven gin and tonics. At least all of that alcohol stopped him from sneezing.

Some new cookbooks arrived (yippee) while I was away for a few days, giving me a plausible reason to delay unpacking my overpacked, overweight suitcase. Whether the books arrived or not, I am pretty certain I would find another reason to delay the inevitable unpacking.


Before I left for a trip to visit a very close friend in warm, sunny Arizona, I had made some Sea Salted Chocolate Dipped Macadamia Nuts. Normally dipping nuts in chocolate isn't such a big deal, possibly not even blog posting worthy. But double dipping macadamia nuts in chocolate and sprinkling them ever so lightly with sea salt just seemed to take them from being ordinary to being extraordinary chocolate dipped nuts. Thus making them blog worthy, not only for inspiration but for staying connected.


When dipping anything in chocolate, use real chocolate. When dipping macadamia nuts in chocolate, use real chocolate. There is a reason why I am being a little redundant (redundancy is usually, almost always a good thing) about real chocolate. There is what I call 'real' and 'fake' chocolates out there. There are many 'real' chocolate options: Ghirardelli (US), Callebaut (Belgium), Valrhona (France), Scharffenberger (US), and Guittard (US). And then sometimes even local chocolatiers will sell the 'real' chocolate they use. Then there are the 'fake' chocolate options, sometimes called 'candy' melts. Besides taste (and cost), there is also a difference between the two are in its' ingredients. 'Real' chocolate contains cocoa butter while the 'fake' chocolate contains vegetable fat. What I am trying to say here is that when buying chocolate to melt for dipping nuts or making candy, be a chocolate snob (the best and only kind of snob there is) and use the 'real' stuff.

Microwaving is probably the easiest way to melt chocolate (power level set on high and microwaving in 1 minute bursts, checking at each interval). The other option is melt in a bowl over a pan of simmering water, making sure the bowl doesn't touch the water. In both options, you need to have some patience. Wait until the chocolate has fully melted before stirring until smooth. 


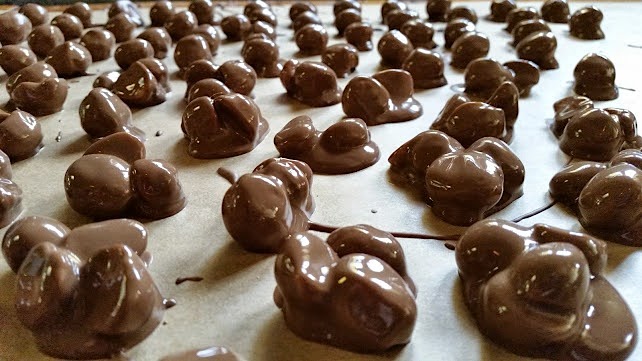
Using a fork, single (whole) or small clusters of the macadamia nuts are dipped in the melted chocolate.


After the nuts have been dipped once, allow the chocolate to set before dipping a second time. You might think a single dipping is enough. But once you taste them double dipped, your definition of 'enough' will shift. Trust me, it will.


In order for the fine sea salt to adhere to the chocolate, work in batches. After double dipping 10 to 12 macadamia nuts or nut clusters, sprinkle on some fine sea salt, ever so lightly.

Waiting for the chocolate to set is the hardest part of making these Sea Salted Chocolate Dipped Macadamia Nuts. They could not be easier to make and could not be more decadent. Perfect for serving after dinner, perfect for giving as a gift, and perfect for rewarding yourself for any reason (like unpacking your bags). 
Recipe
Sea Salted Chocolate Dipped Macadamia Nuts

Ingredients
2 1/4 cups roasted and lightly salted macadamia nuts
1 1/4 pounds of milk chocolate discs, divided (used the milk chocolate discs from Graham's, a local chocolatier)
fine sea salt

Directions
1. Line a long baking sheet or cutting board with parchment paper. Set aside.
2. Melt 3/4 pound of milk chocolate discs (in microwave or over simmering water, either method works).
3. Dip macadamia nuts in melted chocolate and place on parchment paper. Note: Dip nuts individually or in small clusters (2-3 nuts).
4. Allow dipped nuts to dry.
5. Melt remaining 1/2 pound of milk chocolate discs (in microwave or over simmering water, either method works).
6. Dip dried macadamia nuts for a second time. 
7. Sprinkle ever so lightly with fine sea salt while nuts are still 'wet'. Note: After the second dipping of 10-12 macadamia nuts, sprinkle with sea salt. Repeat.

To work off some of the liquid calories consumed on this trip, we went on several early morning hikes. As warm as the southern Arizona sun was, the lack of humidity made hiking in 80 to 90 degree weather bearable. Stopping to take photos along the way (really so I could catch my breath), made it easier to hike in an elevation higher than the one I live in. There is something simultaneously energizing and calming about hiking in the outdoors, particularly when the views are so spectacular as well as so different than the ones I see everyday. How anyone could ever get 'enough' of taking in views of the mountains, of water, or of the desert, I could not even begin to imagine.

No matter how many times I walk or hike a trail one thing is for certain. It may retain its' familiarity but it never looks or feels the same. Sometimes the changes are as subtle as the depth of color of the sky. Sometimes they are significant as changes to the seasonal landscape. And depending on where my head is on any given day, things missed in both the landscape and in my life are often seen with such clarity I sometimes wonder out loud 'how could I have missed this?'. John Muir, the 'patron saint of the American wilderness' once said 'I only went out for a walk and finally concluded to stay out till sundown, for going out, I found, was really going in.' And I couldn't agree with him more.

Wednesday, October 1, 2014

Liège Waffles


Sometimes when I am making and photographing food I become so giddy with excitement I will send off a text/photo message to some of my friends. Their almost instantaneous responses (barely any text back lag time in my circle of friends) make me smile or laugh out loud. This past weekend there was one texting interchange that touched my heart. After sending a photo of the Liège Waffles to one of my Swedish (born and raised in Minnesota) friends, she texted back and shared that the photo took her back to her Saturday morning childhood days when her mother and grandmother made these waffles. Being able to evoke a happy childhood memory for a friend only added to the giddiness I was feeling in making these Liège Waffles for the first time (giddiness and firsts seem to naturally go hand in hand).

Liège waffles (also known as gaufre de Liègewere (unfortunately) not a part of my childhood even though I have been told 10% of my heritage make-up is Scandinavian (only in my family do we put numbers to things like this.). For the record, Liège waffles are not considered to be Scandinavian in origin. Alleged to be native to Eastern Belgium in the 18th century, a Parisian pastry chef is the one given the credit for having the written recipe published in the 20h century. 

Liège waffles are not to be confused with the 'Belgian waffle'. This variation of a waffle is dense, sweet, chewy, having a brioche dough-like, and studded with caramelized bits of pearl sugar. Its' flavor and texture could not be more different than the 'Belgian waffle'. Putting butter and/or syrup on a Liège waffle would be a culinary faux pas.

If there was a ever recipe causing me think of the old adage 'not all good things come easy', this would be one of them. But I was determined to push through the process as giving up was not an option. Having absolutely no frame of reference for these waffles I kept wondering whether or not they would turn out (oh the trials and tribulations of trying new recipes). More than the time invested or the ingredients possibly being wasted, my confidence level for venturing into unknown territory was at risk (not the end of the world kind of risk, just the kind of risk that reinforces second guessing). Understanding the internal chaos I was experiencing while making these waffles might help to explain why the giddiness factor increased exponentially after taking the first bite of them.

I looked at more than a dozen recipes for Liège Waffles as well as read though the Liège Waffle Recipe blog (yes, I actually found one). The knowledge shared by those having done extensive research on this waffle helped to influence my decision as to which recipe I would make. Beyond looking at the similarities and differences in ingredients in the various recipes, it was equally important to have a sense of the technique used in the making of these waffles.

The result of all of my Liège Waffle research was a slightly tweaked recipe closely resembling the one shared by food blogger Sweet Amandine. Her claim that this was no ordinary waffle could not have been truer. I took her advice on weighing (almost all of) the ingredients, using instant dry yeast versus active dry yeast and incorporating only 1/2 cup (versus 3/4 cup) of the pearl sugar.


In the making of the brioche-like dough for the waffles I changed out the paddle attachment with the dough hook to 'knead' the dough. The volume of the dough wasn't enough for the dough hook to work well enough for me to experience having the dough pull away from the sides of the bowl. Next time I make them I will either double the recipe and use the dough hook or keep the mixer speed at low and continue to use the paddle attachment.

The first time I saw pearl sugar was in the kitchen cabinet of my born and raised in Minnesota Swedish friend (which explains in part why she was one of my friends I chose to send the waffle photo to). The second time was when my box of Lars Swedish Pearl Sugar arrived in the mail from Amazon (was easier to buy online than go on the hunt in grocery or specialty stores). The decision to use only 1/2 cup of the pearl sugar was made partly because I didn't want an overly sweet waffle (a lesson learned shared by other bloggers) and partly because the dough didn't seem it could take in any more. The pearl sugar is gently mixed in by hand so as to not toughen the dough. At this stage of making the waffles you want nothing to ruin them.


When I read the recipe yielded only six waffles I thought 'what, just six waffles'? These are rich waffles, eaten more like a doughnut than a 'plate of waffles'. So these six waffles would have been enough for four people (as decadent as they are, they can be a little addictive so it may be hard for some to stop at eating just one). If having friends or family over for breakfast or brunch, the Liège Waffles would be great a prelude to the meal (and for some they could be the meal itself).


When making the decision to buy an electric waffle maker years ago, I went back and forth between the larger and the smaller one made by All-Clad. While my baked waffles had a slightly different look than the ones I saw on other blogs, this smaller electric waffle maker worked perfectly. I even liked their finished look. However, if my Liège Waffle making momentum continues, I can already predict I will be wanting (the totally unnecessary, somewhat redundant) larger version of the All-Clad waffle maker.


Cooking time ranged from 4 to 4 1/2 minutes per waffle with the waffle maker set between the 2 and 3 heat settings. The cooked waffles were placed on a cooling rack (a suggestion found in one of the recipes reviewed) to add a slight exterior crispness to them.


The Liège Waffle is more of a 'length of time intensive' rather than a 'labor intensive' making process. But seriously, don't let this deter you from making them as it will be time well spent. Starting any day with a bite of a Liège Waffle is destined to make for a great day. And how often can we really actually affect our own destinies? Not often I know. But trust me, these waffles have the ability to align your 'lucky' stars.


The tender, rich, oozing with caramelized bites of sugar Liège Waffles really don't need to be topped with anything as they are deadly and intoxicating all on their own. However, the Scandinavian Ligonberry preserves and the (Eastern Belgium in origin, French in written documentation) Liège Waffle turned out to be a great taste combination. The tartness of the preserves paired with the rich, not too sweet taste of the waffle dough was 'wicked' (good). 

Eaten warm or at room temperature, for breakfast or as a snack, these yeast based, brioche-like dough waffles are nothing like waffles I grew up with. After making and eating and this variation of a waffle, I wished my childhood memories included the Saturday morning experience of taking in the heavenly smell and savoring the mouth watering taste of a Liège Waffle. Since there is no going back in time, the least I can do now is have them become part of the adult memories of my family and friends. 

"Food is a gift and should be treated reverentially--romanced and ritualized and seasoned with memory." - Chris Bohjalian

Recipe
Liège Waffles (slight adaptations made to the Liège Waffle recipe shared by food blogger Sweet Amandine)

Ingredients
2 cups (240 g) bread flour, divided (Recommend King Arthur Bread Flour) Note: Or can use half bread flour and half pastry flour.
1 teaspoon (3 g) instant dry yeast
1/4 cup whole milk, room temperature
2 Tablespoons and 2 teaspoons water, room temperature
1 large egg, lightly beaten, room temperature
1 Tablespoon and 1 teaspoon (20 g) light brown sugar
8 Tablespoons unsalted butter, at room temperature
1 Tablespoon honey
2 teaspoons vanilla
1/2 cup small sized pearl sugar (recommend Lars Swedish Pearl Sugar)
Non-stick spray
Optional but really good: Ligonberry Preserves/Jam

Directions
1. Whisk 2/3 cup (80 g) of the bread flour with instant dry yeast in bowl of a stand mixer. Set aside.
2. In a large mixing cup, mix together water, milk and egg. Add wet ingredients to flour/yeast mixture, stirring to moisten.
3. Sprinkle remaining 1 1/3 cup (160g) of bread flour on top (do not mix). Cover tightly with plastic wrap, place in warm location and let stand for 75-90 minutes or until the batter has broken the top layer of the flour (will see some bubbling through the flour).
4. Add brown sugar and salt to the dough using a paddle attachment (low speed).
5. Slowly add vanilla, honey and butter (2 Tablespoons at a time) until butter is fully incorporated.
6. Replace paddle attachment with dough hook. Mix for 4-5 minutes at medium-low speed (scrape down sides of bowl twice). Let dough rest for 1 minute. (Important note: Next time I will 'knead' the dough with the paddle vs dough hook attachment as the volume of dough was not enough for the dough hook to work well.)
7. Continue mixing until dough becomes stretchy and pulls away from side of bowl easily with a spatula. Note: This may take 2-3 minutes, another rest period, and another 2-3 minutes.
8. Tightly cover bowl with plastic wrap. Refrigerate overnight.
9. Remove from refrigerator. Mix in pearl sugar by hand. Note: try to work in all of the pearl sugar.
10. Divide dough into six equal chunks (108-110 grams), place on a parchment paper lined baking sheet, cover lightly with plastic wrap, and allow to rest for 90 minutes (or until slightly puffy).
11. Preheat electric waffle maker (recommend a heat setting between 2 and 3). Lightly spray waffle maker with non-stick spray.
12. Place one dough ball in center of waffle maker. Close and cook for approximately 4 minutes or until the waffles have browned and pearl sugar looks caramelized.
13. Place cooked waffles on a cooling rack to ensure a crisped exterior to the waffle. 
14. Continue cooking until all waffles have been made.
15. Serve warm or at room temperature with or without a side of ligonberry jam/preserves.
Note: Liège waffles make great ice cream sandwiches.


Giddily sharing with you a couple of the photos taken in the Boston Public Garden during my recent east coast adventure. My first visit to this magnificent garden could not have been on a more beautiful, blue sky September day.

Monday, September 29, 2014

Caramelized Leek, Ham and Cheddar Quiche


More decades than I care to admit to had passed before three former high school cheerleaders finally got together this past weekend (and yes, I was one of them). If there was a fly on the wall listening in on our sometimes overlapping, filled with laughter reminiscing and catching-up conversations during a five hour (only two bottles of wine) lunch, they would have never guessed any time had lapsed since we were all together. Time and distance seemed to have no affect on the bonds of friendship formed many, many, many years ago. And it also didn't take long for us to plot a wicked adventure. Yes, once a cheerleader always a cheerleader.

When having a lunch gathering with friends I have not seen in a very long time, I usually try to make something I have made at least once before. For some unknown reason my inner risk taker (a latent adult characteristic) pushed me into making something new for the main course, relying on tried and true recipes for the appetizer and dessert courses only. If the Caramelized Leek, Ham and Cheddar Quiche turned out to be a disaster, at least the first and last courses would salvage the meal. Fortunately (for me and them) there were no cooking disasters. Although I will tweek the quiche recipe even further now having made it. More about that later.


Finally listening to some of the (simplicity) wisdom Ina Garten has shared for years, this was one meal I didn't want to be a preparation slave to while everyone was here. Quite possibly greater motivations were not wanting to miss out on even a snippet of the stories and memories being shared! The quiche recipe made that possible.

Several sources claim the word quiche comes from the German word for 'cake' (Kuchen) even though many consider quiche to be French in origin. Regardless of its' origin, what is not to love about eggs (especially fresh eggs brought back from Rhode Island), heavy cream, and cheddar cheese filling a pastry shell? Caramelized leeks and diced smoked ham made for another layer of quiche love.

The filling possibilities for this quiche are endless, but if you have not yet made a quiche with caramelized leeks, you should. Two leeks thinly sliced and sautéed in one stick (1/2 cup) of unsalted butter on a low heat for about 30 to 40 minutes transforms their mild onion and garlic flavors into an addictive level of deliciousness.

This is a substantial quiche recipe. One calling for a dough recipe yielding enough dough for two pies and a large, deep quiche dish. I made the same pie dough recipe used for the Cinnamon Sugar Pie Crust Cookies and the Brûléed Pumpkin Pie with Caramel Swirl but added two tablespoons of sugar. My ten inch wide two inch deep quiche dish worked perfectly for the volume of filling ingredients.


Here is where the first of several changes I would make to the recipe happened. Instead of going with the crimping the edges of the crust with a fork, I would form the edges differently, more free form. With a total baking time of 1 hour and 45 minutes I thought the edges of the crust would develop a beautiful brown (they didn't). Next timed the edges of the curst will be brushed with an egg wash to get the finished crust color this quiche so deserved.


The original quiche recipe called for 24 ounces of extra-sharp cheddar cheese. Yes, a pound and a half of cheese! After making this quiche, the amount of cheese will be reduced to maybe 18-20 ounces in order for the baked filling to be silkier. However, using a combination of sharp and extra sharp cheddar cheeses instead of using extra sharp cheddar cheese only worked well.


One third of the cheese is layered in the pie shell, followed by a layering of the filling and finished with the remaining two-thirds of the shredded cheese. Once all of the filling is in the pie shell a well is made by pushing the cheese and filling to the sides before slowly pouring in the filling. The key word here is slowly. As I poured in egg/cream mixture, I discovered my 'well' wasn't wide or deep enough (another lesson for next time). To ensure the filling was evenly distributed throughout the pie shell, I used a fork to gently stir the entire mixture in the shell.


The quiche bakes in a 300 degree preheated oven for one hour and forty-five minutes. The long, slow baking time gave me time to take a shower, get dressed and relax just a bit before everyone arrived.


After resting for 10 to 15 minutes, the quiche is ready to cut and serve. The spinach salad with sliced strawberries, Point Reyes Blue Cheese, and pecan pralines all tossed with a homemade balsamic dressing complimented the quiche well. I would definitely pair with this salad with the Caramelized Leek, Ham and Cheddar Quiche again. 

Caramelized Leek, Ham and Cheddar Quiche (slight adaptation to the Vermont Cheddar Quiche recipe in the Pia and Simon Pearce 'A Way of Living' book)

Ingredients
1 pie dough recipe (one making enough for two pies) Note: I added two tablespoons of sugar to the pie dough recipe I have been using.)
18-24 ounces of a combination of sharp and extra-sharp cheese, grated, and divided into thirds (recommend Cabot cheese)
2 leeks, thinly sliced and caramelized in 1/2 cup of unsalted butter
4-6 ounces of a boneless, smoked ham steak, cut into 1/4 inch cubes (recommend Boar's Head)
8 large eggs
2 cups heavy cream
3/4 teaspoon Kosher salt
1/4 teaspoon black pepper

1 additional egg and 1 teaspoon of water for egg wash

Note: This quiche would work well with a variety of fillings. Choose 8 to 10 ounces of your favorite filling and/or filling combinations. Caramelized leeks with crab; spinach and ham; caramelized onions and shallots; bacon; sautéed asparagus; or any combination of lightly sautéed vegetables.

Directions
1. Make pie dough. Refrigerate over night. Roll out dough on a lightly floured surface. Line baking dish with dough and crimp edges (with hands or a fork). Refrigerate the dough-lined baking dish for at least one hour.
2. Preheat oven to 300 degrees.
3. Brush the edges of the chilled crust with an egg wash.
4. Fill pie shell with 1/3 of the grated cheese.
5. Layer caramelized leeks and ham, spreading evenly over the first cheese layer.
6. Layer the remaining 2/3 of the grated cheese over the filling and cheese layers.
7. In a large measuring cup, mix eggs, cream, salt and pepper together. Set aside.
8. Create a large well in the center of cheese/filling mixture. Carefully pour in egg/cream mixture. (Note: Stir gently with a fork to ensure egg/cream mixture is evenly distributed.)
9. Place baking dish on baking sheet and bake for 60 minutes. Rotate tray and continue baking for another 45-50 minutes or until done. Total baking time is approximately 1 hour and 45 minutes.
10. Allow quiche to rest for 10-15 minutes before serving.


You are never once a cheerleader. Once a cheerleader, always a cheerleader. Some of those high school cheerleader tendencies (for better or for worse) have remained not only as a part of my personality, but are recognizable traits in my fellow cheerleaders. For me, cheering on the team when they were losing caused me to believe in possibility. The singular trait of 'all things are possible' remains both a strength and albatross to this day. 

Cheering at wrestling meets (in the stifling hot, sweaty wrestling gym) and track meets may be the reason why I championed and advocated for the marginalized kids in the public schools for all of my years in the education arena. But before those of you who have a fondness for wrestlers get offended, let me explain. Through my high school cheerleader eyes, wrestlers seemed to endure great hardships getting ready for a match. Starving themselves for two days before a match in order to make their weight often meant isolating themselves from the lunch room at all costs. And in high school, no one wanted to miss lunch (and the cafeteria food wasn't the reason). Being assigned to cheer at a wrestling meet (in the stifling hot, sweaty gym) wasn't the same as cheering at a basketball game, but once there you couldn't help but want to cheer on and for those who imposed such hardships on themselves. And unlike football and basketball games, there were usually only a handful of fans at track meets. You had to admire (and want to cheer on) the track athletes who trained incredibly hard but never received all of the fanfare basketball and football players experienced.

Beyond spending time going down memory lane during our reunion lunch this past weekend, it was a reminder of how much our lives our shaped by our school, especially our high school experiences and those early friendships. Whether we maintain some of those early qualities (or vow to completely transform ourselves), what happens in those earlier years influences what happens in our later years. There are always a few regrets (the should have, the could have). For me the biggest regret is letting life get in the way of maintaining friendships that mattered. Keeping up with 'friends' on social media or via email isn't the same as spending time with them. The five hours we spent laughing and talking certainly doesn't make up for all of the 'lost' years, but hopefully it is the momentum we needed to reconnect with one another. Quite possibly (if they are all still game), the wicked adventure we planned will be the start of creating new memories.

Thursday, September 25, 2014

Pie Dough Cinnamon Cookies


Each time I open up the refrigerator I almost always see what I call a number of 'good intention' containers (aka leftovers). You know the ones. Morsels of food carefully wrapped as it would be nothing short of a sin to throw them away. Sometimes you intentionally don't finish your meal because your eyes were bigger than your stomach or because you wanted to savor its' deliciousness again. Other times you wrap them up because they taste even better the next day. Whatever the reason, some of these 'good intention' containers end up taking space in the refrigerator, waiting for the ultimate mortal sin of wasting and throwing away food to be committed (have you guessed my religious upbringing yet?).


I had dinner at Rino's Place in East Boston before my recent return flight back to the midwest. The amazing, wanted to (literally) lick my plate scallops served in a limoncello sauce appetizer adversely affected my ability to eat more than a few bites of the main course, the famed Lobster Ravioli. Not having a clue as to how I would manage to carry the uneaten, perfectly wrapped up Lobster Ravioli on the shuttle to the airport let alone on the plane, I took them with me anyway (not only would it have been another sin to leave them behind it would have been an insult to the chef who made the incredible dish). Dropping off the rental car, I finally came to the sad realization that the coconut frosted chocolate cupcake from Georgetown Cupcakes and the still warm Lobster Ravioli from Rino's were not going to make the trip back home. But if I couldn't be the one to enjoy the cupcake and lobster ravioli, someone else would have to (sin avoidance thinking). While checking in my rental car, the (young) car rental guy surprised me with an unexpected reduction to my bill. Unbeknownst to him, he would be the 'lucky' one to relieve me of the wasting food guilt I dreaded having. 


As I have shared previously, I am relatively new (and late) to the pie dough making world. For the Brûléed Pumpkin Pie with Caramel Swirl, the dough portion of recipe made enough for two pies. I couldn't bring myself to put the remaining dough into the abyss of the freezer and I wasn't ready to make pie two days in a row. So I decided to do what many other pie dough makers, who couldn't bear to see their homemade dough go to waste, have done for decades. I decided to make Pie Dough Cinnamon Cookies. 


In making these cookies, I finally understood why most bakers recommend allowing the pie dough to chill overnight. The dough's flakiness factor is significantly ramped up resulting in a baked pie dough cookie having buttery layers of cinnamon sugary, crispy goodness.


Antique cookie cutters are one of the things I collect. When browsing through antique stores or sifting through flea markets, I am continually on the hunt for them. The making of these 'vintage' cookies gave me yet another excuse to put them to use. Nowadays there are replicas being made of the antique graduated sets of tin cookie cutters that have taken me years to find. Fatdaddios is a company making some great nylon cutter sets in a variety of shapes.


Rolled out pie dough (to a 1/4 inch thickness) is brushed with an egg wash then generously sprinkled with a cinnamon sugar mixture. The 'sparkly' bakery look finish to the cookies came from using equal parts of white/clear coarse sanding and granulated sugars.


The recommended baking temperatures and times for pie dough cinnamon cookies shared by others ranged considerably. I settled on a baking temperature of 375 degrees and going with a 15 to 20 minute baking time (which turned out to be closer to 20 minutes) in order to get a lightly golden, crispy cookie. Note: The size of the cookie will impact your baking time, watch and adjust accordingly.


Never having made these cookies before I asked the 'tasters' in my life to guess what kind of cookie it was (love this game). In her first bite, my childhood best friend said without hesitation the cookie took her back to her childhood, reminding her of the one her mother made with leftover pie dough. Turns out, she was the only one at the table who guessed right. 

So whether or not these Pie Dough Cinnamon Cookies will evoke a childhood memory or fool everyone else tasting them, they really are a good cookie. A perfect cookie to go with a cup of tea or coffee, with ice cream or gelato, with a glass of milk, or with nothing at all. For me, pie dough will never again be one of those 'with good intentioned' things placed and left to sit indefinitely in the refrigerator before ultimately being thrown away. However, a batch of these Pie Dough Cinnamon Cookies can be baked without making a pie. Simple never tasted so good.

Recipe
Pie Dough Cinnamon Cookies 

Ingredients
Dough
12 ounces all purpose flour
8 ounces cold unsalted butter (recommend KerryGold), cut into pieces
4 ounces ice water
1 teaspoon apple cider vinegar
1/2 teaspoon Kosher salt

Sugar Mixture
1/4 cup granulated sugar
1/4 cup white sanding sugar (or any other color of sanding sugar for a different look to the finished cookie) Recommend India Tree Sanding Sugar
1 teaspoon Saigon cinnamon

Egg Wash
1 large egg, room temperature
1 teaspoon water

Directions
1. Place the flour and salt into the food processor to mix.
2. Add half of the butter and process slightly. Add remaining butter until mixture has a crumbly consistency.
3. Add cider vinegar to the ice cold water. Slowly pour the vinegar/water into the flour/butter mixture until the dough comes together (be careful to not over process). 
4. Press the dough together, divide in half (forming each one into a disk), wrap in plastic wrap and chill overnight. Overnight chilling is important.
5. Mix together the coarse sanding sugar, granulated sugar, and cinnamon and set aside.
6. Mix the egg and water until well blended and set aside.
6. Preheat oven to 375 degrees.
7. On a lightly floured surface, roll out dough to 1/4 inch thickness. Cut out dough with cookie cutter of choice (or use a knife to cut into triangles).
8. Place cookies on a parchment paper lined baking sheet. Brush each cookie egg wash and then sprinkle liberally with the sugar mixture.
9. Bake 15 to 20 minutes or until lightly golden. Remove baking sheet from oven. Allow cookies to set for five minutes before transferring to a cooling rack. Allow cookies to cool completely.
10. Store cooled cookies in a tightly sealed container or if making as a present, wrap in cellophane bags tied with ribbon.
Optional: Serve with some ice cream or gelato or dip in melted chocolate.


I grew up in a midwestern city designed like a grid. All of the horizontal and vertical intersecting streets were filled with houses, schools, a few parks, and some stores. The spaces between houses were called gangways and everyone got to their garages by driving down the alley. The only animals seen on a regular basis were dogs, cats, and squirrels (have I told you how much I don't like/hate squirrels?). I remember the family on our 'block' who tried to raise chickens for what seemed like a week. With neighbors living in such close proximity to one another, there wasn't much tolerance back then for the sound of a rooster.

Nowadays when I am driving down two-lane highways in towns with more open space or in rural areas, the mere sight of cows, sheep, goats, buffalo, or horses has me reaching for my camera to take some photos. I attribute this slight obsession with taking animal photos with a very limited exposure to animals seen in my childhood (the zoo doesn't count). But I am neither whining nor complaining about my childhood. As there is much to be said for being an adult having a childlike exuberance for all living things (except squirrels). I have been known to turn around on a highway, stop suddenly (not my wisest moments), or drive out of my way to take photos of animals and wildlife. When my nephew and I were driving across Montana this summer, I failed to let him know that the words 'oh, look' spoken as I was pointing at animals was really code for 'could you please pull over so I could take some photos?'. I ended up muttering 'there goes a good photo opportunity' more times than saying 'thank you for stopping the car'. But had we stopped as often as I thought there were picture postcard photo opportunities, the drive from Bozeman to Missoula would have been about as long as it would take to get there on a horse (only slightly exaggerating here).

Beyond experiencing the sheer excitement of just seeing a drove of cattle, a flock of sheep, a herd of buffalo or a string of horses, is getting as close as possible to seeing and capturing the genuine beauty in their faces and in their eyes. Oh, the things that make me happy.