Tuesday, February 17, 2015

Chicken Marbella Dark


This past weekend I bought a new pair of running shoes at one of the local running stores. I live in what I have called a 'running town'. In addition to there being two running stores, there are numerous running clubs, running camps for kids, more than a half dozen races hosted by local organizations, and a high school having a significant number of state championship teams. Even though it wasn't that long ago that I would have considered myself a 'runner', someone who ran four to five times a week, 5ks, 10ks and 5 milers, several half-marathons and two marathons, it feels like those running days were a lifetime ago. So during the long, thorough process of being fitted for a new pair of shoes, the young 'runner' who was helping me make a good shoe 'fit' purchase decision (steering me away from choosing a shoe based solely on color and towards one to help me compensate for my pronation issues) asked me what my running goals were. Not someone to be cagey or evasive (traits I see as being disingenuous), I shared my desire to run a few races in the year ahead. And then before I knew it I was signed up to train for a 5k (sometimes you have to go back and start at the beginning) when my only goal that day was to buy a new pair of running shoes! I guess somedays you need someone else to push you when you haven't been able to push yourself off of that 'thinking about it' place. Needless to say, I came out of the store with more than a pair of shoes. And I have an eighteen year old cross country runner heading off to college in the fall to study engineering at a Big Ten school to thank for pushing me.


An even longer time period has passed since I made the Silver Palate's Chicken Marbella. So long ago I couldn't even remember what it tasted like or what I served it with. For whatever reason or reasons I never incorporated it into my repertoire of go to chicken dishes. But that too is now about to change. Maybe it was making this dish with only chicken thighs and chicken legs instead of pieces of cut-up chicken; maybe it was using Mexican instead of Mediterranean oregano; maybe it was using a Chardonnay I would actually drink; or maybe it was the combination of flavors of the Chicken Marbella Dark and Roasted Artichoke Orzo that made me look at this dish very differently. I would be remiss if I did not also mention the intoxicating aroma of this dish as it baked in the oven. Whatever it was that pushed me back into making the Chicken Marbella (the dark version), I was just glad I was open to being influenced into revisiting the recipe.


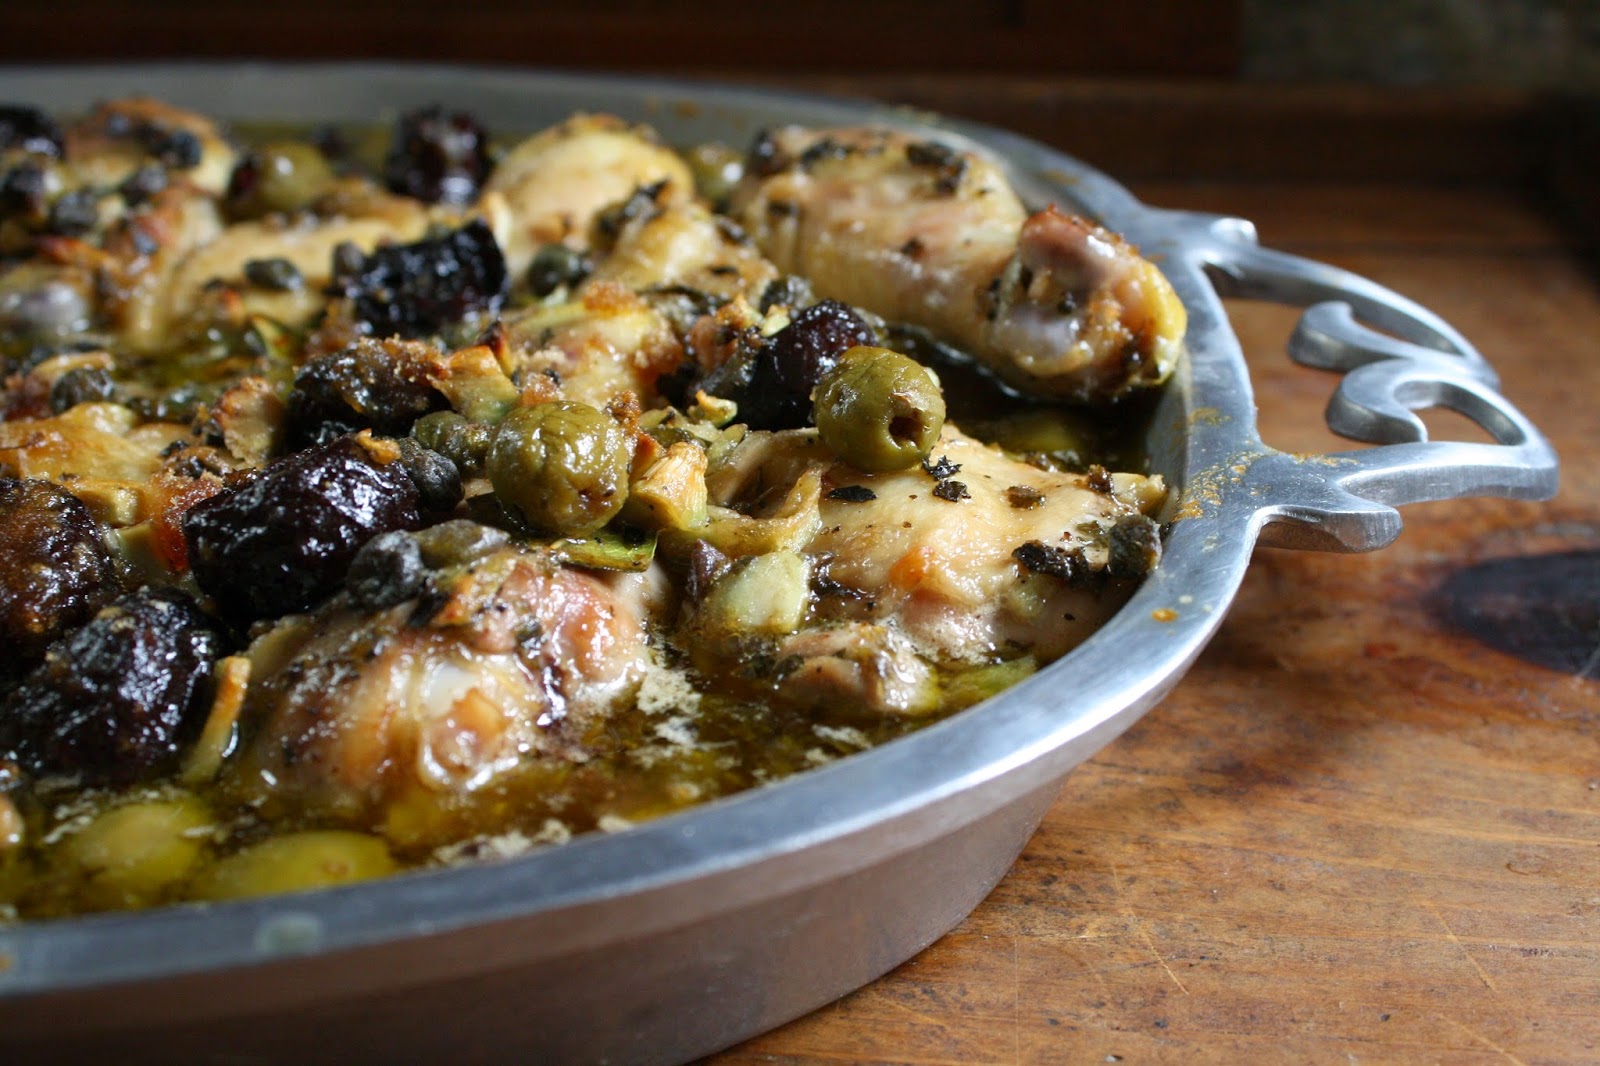
Chicken Marbella Dark is the kind of dish you want to serve for Sunday supper, for a dinner with friends, at a graduation party, at an Academy Awards gathering, or to make just because you absolutely love chicken. This is one of those dishes where 90 percent of the prep work is done the day before, making the day of entertaining so much less hectic. And in the words of the cooking goddess Ina Garten 'how easy is that?'.


One of the keys to this dish is giving it time to marinate in the olive oil, red wine vinegar, bay leaves, chopped garlic, the mexican oregano, salt/pepper, Spanish olives, capers and prunes (yes, prunes) overnight. Don't listen to anyone who tells you marinating for several hours is good enough. Unless of course you are someone who settles for good enough. Trust me when I say this marinade elevates chicken thighs and chicken legs to new heights of deliciousness. That is, if you allow it to marinate in the refrigerator overnight. 


About an hour before you are ready to bake the chicken, remove from the refrigerator, transfer to a baking dish large and deep enough to accommodate all of the pieces of chicken and the additional ingredients of light brown sugar and white wine. The pan I used worked, but next time I should give the pieces of chicken just a little more breathing room so each piece can fully brown. After laying out the individual pieces of chicken in your pan, pour the marinade over it. Top with one cup of light brown sugar and one cup of white wine. I used a chardonnay but any white blend would work. Choose a wine you would enjoy drinking and not the white wine someone brought you as a gift that you couldn't figure out to do with. 


The Chicken Marbella Dark bakes in a preheated 350 degree (F) oven for 50 to 60 minutes. The chicken is ready to remove from the oven when it has browned; when the juices run clear after being pierced with a sharp knife; and when the temperature of the chicken ranges between 165-170 degrees. The doneness of chicken has more to do with temperature than color. And remember, the temperature of chicken will increase from 5 to 10 degrees if allowed to rest (loosely covered) for five to ten minutes.


The baked chicken is transferred to a serving platter and topped with freshly chopped parsley. The remaining juices enhanced with the white wine can be poured into a gravy boat and served alongside the chicken. The Chicken Marbella Dark can be served warm or at room temperature, making it perfect for buffet style entertaining.

The Roasted Artichoke Orzo I made to accompany the chicken could not have been a more perfect and easy to make compliment. This was nothing more than drizzling some olive oil, salt and pepper over a drained, cut up into quarters can of artichokes and roasting for 30 to 35 minutes at 350 degrees (F) along with cooking two cups of orzo. Added to the roasted artichokes and cooked orzo were a couple of tablespoons of extra-virgin olive oil, a teaspoon of lemon zest, two tablespoons of chopped parsley, and some salt and pepper to taste. It is that easy. Note: The artichokes can be roasted earlier in the day, making this dish easy for last minute assembly. 

The changes made to some of the ingredients along with the use of dark meat only created a dish very different than the one I remembered (which was probably why I didn't keep making it). Mostly savory with a little bit of sweetness from the dried prunes and brown sugar, I can honestly say this now may be one of my favorite chicken dishes. So if by chance you had made and tasted Chicken Marbella before but weren't overly wowed by it, maybe I can push you into reconsidering making it again by borrowing from Nike. Just do it.

Recipe
Chicken Marbella Dark (inspired by the Chicken Marbella recipe from The Silver Palate Cookbook written by Julee Rosso and Sheila Lukins)

Ingredients
2 1/2 pounds chicken thighs, with skins
2 12 pounds chicken legs
1 large head of garlic, peeled and coarsely chopped
1 teaspoon kosher salt
1/2 teaspoon black pepper
1/4 cup dried mexican oregano 
1/2 cup red wine vinegar
1/2 cup extra virgin olive oil
1 cup whole pitted prunes
1/2 cup pitted Spanish green olives
1/2 cup larger sized capers, with a Tablespoon of juice
6 bay leaves
1 cup light brown sugar
1 cup white wine (recommend a Chardonnay or white blend)
1/4 cup fresh parsley, chopped

Directions
1. In a large bowl, combine the garlic, salt, pepper, oregano, red wine vinegar, olive oil, prunes, olives, capers and bay leaves. 
2. Add chicken thighs and chicken legs to the marinade. Mix to coat all pieces of chicken. Cover and refrigerate overnight. Note: Stir several times to ensure all pieces of the chicken are marinated evenly.
3. Preheat oven to 350 degrees (F). Remove chicken from refrigerator at least 30 minutes before baking.
4. Arrange chicken in a single layer in a large shallow baking dish. Spoon marinade over the chicken.
5. Evenly sprinkle the brown sugar over the chicken.
6. Pour white wine around the sides of the baking dish.
7. Bake chicken for 50 to 60 minutes, or until juices run clear.
8. Transfer baked chicken to a serving platter. Using a slotted spoon, arrange the prunes, olives and capers over the chicken. Spoon some of the remaining pan juices over the chicken. Note: Transfer remaining pan juices to a gravy boat and serve along side of the chicken.
9. Top with chopped parsley.
10. Serve immediately or at room temperature.
Note: Serve with a side of roasted artichoke orzo; basmati rice; or couscous.

Friday, February 13, 2015

Rosewater Glazed Madeleines


Maybe it was the photos of rock formations in Moab, Utah or the sun setting in Grand Junction, Colorado my sister sent or the incredible photos of western Washington State posted to Facebook by a rather gifted photographer I know only through Facebook that finally pushed me into making plans to see landscapes different than the one I am living in. My other excitement for the week was finally returning back to gym after a rather long hiatus. For awhile I had been working out five to six days a week and then I let the holidays alter my routine. I never cease to be amazed at how much better I feel after working out. Why I have not been able to internalize this feeling into a 'habit' speaks to so many things as well as why change can sometimes be hard. The motivation for the return to the gym was in part prompted by reading the quote 'Quit saying you don't have time. You have time for what you make time for in life.' If someone had not already taken credit for those two sentences, I would have put my name to them. It's always a red flag when someone you care about tells you they are 'too busy' just as it's a red flag when you tell yourself you are 'too busy'. In my world, busy is one of those four letter words, one that can be hurtful to hear as well as harmful (to oneself) to utter. And this week, the time had finally come (again) for me to make time to workout. Thank goodness the bottle of Motrin hadn't expired.


These Rosewater Glazed Madeleines were not going to be my next post, Chicken Marbella was. Best laid plans often go awry or so they say. But after making and tasting them, I couldn't wait until next week to share them with you. I could think of no better way to give you the sense of the transformational deliciousness of these small rich cakes, than to share the eloquence of the writing of Marcel Proust. In his book 'Remembrance of Things Past' he wrote '....when one day in winter, on my return home, my mother, seeing that I was cold, offered me some tea, a think I did not ordinarily take. I declined at first, and then, for no particular reason, changed my mind. She sent for one of those squat, plump little cakes called petites madeleines, which look as though they had been molded in the fluted valve of a scallop shell. And soon, mechanically, dispirited after a dreary day with the prospect of a depressing morrow, I raised my lips a spoonful of the tea in which I soaked a morsel of the cake. No sooner had the warm liquid mixed with the crumbs touched my palate than a shiver ran through me and I stopped, intent upon the extraordinary thing that was happening to me. An exquisite pleasure had invaded my senses, something isolated, detached, with no suggestion of its origin. And at once the vicissitudes of life had become indifferent to me, its disasters innocuous, its' brevity illusory, this new sensation having had the effect which loves has, of filling me with a precious essence; or rather this essence was not in me, it-was-me. I had ceased now to feel mediocre, contingent, mortal. When could it have come to me, this all-powerful joy? I sensed that is was connected with the taste of the tea and the cake, but that infinitely transcended those savors....' Do madeleines really have the power to evoke feelings of love and euphoria? I suppose you will have to taste one to find out.

Many years ago I had bought a madeleine pan, most likely with the intention of making madeleines. For some reason I cannot remember when I bought this pan, however, by looking at I could tell that it had never been used. Oh, those best laid plans. This past week one of David Lebovitz's madeleine recipes appeared in a social media posting. For some unexplainable reason, this long overdue inspiration and motivation was enough to send me on the hunt for that madeleine pan. Had the person who shall remain nameless not organized all of my bakeware while I was living out east, my search for the madeleine pan could have led me to either abandon my madeleine baking plans or sent me out to buy another one. The more likely outcome would have been the later. 


Before I started making these madeleines I thought it might be wise to see what other madeleine recipes attributed to David Lebovitz had been posted. Considering I had already waited quite some time before making them, adding another hour or two seemed an insignificant delay. After finding a few recipes, comparing their similarities and differences, some minor ingredient quantity adjustments to the recipe I had initially come across seemed to be make sense. Possibly the best takeaway to come from comparing recipes was in gaining a greater clarity of the process of making madeleines. And lastly, in a moment of creativity, I thought rather than a lemon glaze or dusting of confectionary sugar, the more perfect finishing touch to the madeleines would be a rosewater glaze.

The hump in the madeleine is a very good thing. Room temperature eggs, baking powder, the folding processes and batter resting times all contribute to creating a fuller, plump madeleine. And while the use of a pastry bag is not absolutely necessary, it makes life easier (as well as making for more uniform sized cakes). Be careful to not over or underfill your madeleine mold. Baked in the upper third of a preheated 400 degree (F) oven, the madeleines become golden brown in 8 to 10 minutes. Would recommend you check them at seven minutes and add time. A minute can mean the difference between perfect and over baked.

Traditionally madeleines are sprinkled with a dusting of confectionary sugar. They can be dipped in melted chocolate, in a lemon glaze, or in a rosewater glaze. Rosewater is nothing more than a flavored water infused with rose petals and a small amount of sugar. Marzipan is usually flavored with rosewater. Since it can be a little sweet, I used sparingly in the glaze (a scant 1/4 teaspoon to 1 cup of sifted confectionary sugar). It was just enough to add some sweetness and just a tiny bit of floralness to the madeleines.


The cooled to the touch madeleines are dipped (scallop side) into the glaze and placed on a cooling rack to set.


Once the glaze has set, the madeleines placed in cupcake papers can be arranged on a platter or packaged in a box for gifting.


This recipe yielded sixteen (16) madeleines. After baking the first batch of twelve, I let the pan cool slightly, wiped it clean with a paper towel, then rebrushed with melted butter/dusted lightly with flour. Both batches came out perfectly, so there really isn't any need to buy a second pan. 

Part cake, part cookie, madeleines are simply irresistible. Be prepared to be affected by them. And hey, Happy Valentine's Day. I hope you make time for not just yourself, but who matters to you. 

Recipe
Rosewater Glazed Madeleines (inspired by David Lebovitz's madeleine recipe in My Paris Kitchen)

Ingredients
2 large eggs, room temperature
1/2 cup granulated sugar
1 cup all purpose flour, plus additional flour for preparing pan
1 teaspoon baking powder (recommend Rumford)
1/2 teaspoon sea salt
1/2 teaspoon vanilla
10 Tablespoons unsalted butter, divided
1 Tablespoon honey

1 cup confectionary sugar, sifted
2 Tablespoons whole milk
scant 1/4 teaspoon rosewater
(optional: 1 drop of pink or red food coloring)

Directions
1. Place eggs in the bowl of standing mixer fitted with a whisk attachment. Whip on medium-high speed until frothy, add granulated sugar a little at a time until mixture has doubled in volume and has thickened (approximately 3-5 minutes). Remove bowl from mixer.
2. Sift together flour, baking powder and sea salt.
3. Fold in sifted ingredients and vanilla to egg/sugar mixture using a spatula. Cover bowl with plastic wrap or a towel, allow to rest for 30 to 60 minutes. (Note: My rest time was 60 minutes.)
4. Melt 8 Tablespoons of unsalted butter in a small pan over low heat. Add honey, continue stirring over the heat for an additional minute. Remove from heat and set aside for 30 to 60 minutes. Set aside.
5. Fold in melted, cooled butter/honey mixture a few spoonfuls at a time into the rested batter. Fold until all butter has been incorporated. Cover bowl with plastic wrap or a towel, allow to rest for 30 to 60 minutes. (Note: My rest time was 60 minutes.)
6. Preheat oven to 400 degrees. 
7. Melt 2 Tablespoons of unsalted butter. Brush the madeleine mold with the melted butter. Dust lightly with flour (shake out excess flour). 
8. Using a pastry bag, fill each mold indentation approximately 3/4 full with batter. Tap pan on counter before placing in the top third of the preheated oven.
9. Bake until golden brown and/or feel just set when you touch with your finger, approximately 8 to 10 minutes. (Note: My bake time was 8 minutes.)
10. Allow to cool for 30 seconds, then tip madeleines out onto a cooling rack. Allow to cool to touch before dipping in rosewater glaze.
11. For glaze, mix together the sifted confectionary sugar, milk and rosewater. Stir until smooth.
12. Dip top (scallop side) of the madeleines into the glaze, place dipped madeleine on cooling rack (scalloped side up). Allow to rest until icing has set.
13. Serve immediately. Note: Glazed madeleines are best left uncovered (or not tightly-wrapped). They are best eaten the day they are made, however, they can be kept in container for up to two days.
Additional note: Can dust cooled madeleines with confectionary sugar instead of dipping in glaze or can substitute 1 teaspoon of freshly squeezed lemon juice in place of the rosewater for a lemon glaze.


Monday, February 9, 2015

Linzer Sable Cookies


I could barely contain my excitement when I woke up Saturday morning to find the sun shining. After what seemed like an eternity of gray or short-lived sunny days, the sight of a bright sun could not have been a more welcoming, energizing sight. Quickly throwing on some clothes and rushing around to pack up my camera, I could not get in the car fast enough. Then came that temporarily, wasting valuable time, paralyzing feeling of indecisiveness as I began second-guessing my intended destination. After what seemed like an eternity (it was all of two minutes), I decided to change my plans and head back up to the Chicago Botanic Gardens. What I realized when I got there was that no matter how familiar this place has become to me in the last few months, there were new discoveries to be made. If there is such a thing as a place being familiarly unfamiliar, this would be one of those places. It is no wonder why "The real voyage of discovery consists not in seeking new landscapes, but in having new eyes."(Marcel Proust)  is one of my most favorite of all quotes.


Recently I came across Dorie Greenspan's Linzer Sable Cookie recipe and thought it would be perfect to share, perfect to make for Valentine's Day. However, in revisiting the list of cookies I have posted to this blog I realized I had already shared a recipe for Linzer cookies. This time last year I posted the White Chocolate Raspberry Linzer Cookies inspired by Model Bakery's Linzer cookie recipe. As it happens, these two Linzer cookies are both similar and different. 

In anticipation of making these Linzer Sable cookies, I stopped at Trader Joe's on the way back from a morning of taking photos to pick up some whole hazelnuts and some almond meal as I hadn't decided which nut I would use when making these cookies (this was turning into an epic day of indecisiveness).  I bought the almond meal not only because it is made from whole sweet almonds, but it would also save me the added step of grinding nuts. If you prefer the taste of hazelnuts in your cookies without having to grind them, Bob's Red Mill sells a Hazelnut Meal Flour made from ground hazelnuts that would work well in cookie. Complimenting the flavor of the nuts (whichever ones you choose) in the cookie are the spices of cinnamon and cloves. Combined with the raspberry preserves and a dusting of powdered sugar these cookies are bites of pure buttery, nutty, spicy and fruity deliciousness.


The rolling out process for these cookies is a little different. Usually you form a ball of dough into a disk, flatten it slightly, chill it, and then roll it out on a floured surface. With this cookie, you form a ball of dough, place it between two sheets of parchment or wax paper, flatten it slightly, roll it out and then chill it before cutting into your desired shapes. Because the parchment or wax paper slides around when you roll it out, I would suggest taping down the bottom piece of paper to the counter or whatever surface you are using to roll out the dough to a even 1/4 inch thickness. This was one of the early lessons learned in the making of this cookie.

The rolled out dough is placed on a baking sheet and placed in the refrigerator to chill for approximately two hours. Dorie Greenspan suggests you can also put the dough in the freezer for 45 minutes, but I prefer the slow to chill process so mine went into the refrigerator.


Traditional Linzer cookies are round with fluted or smooth edges. Heart shaped cookies, not just at Valentine's Day, but anytime of the year just look a little more irresistible. A raspberry jam or preserve is the classic filling for these cookies, however, you could also make them using mixed berry, blackberry, or apricot preserves. My personal favorite is raspberry, with or without the seeds.


The cookies baked for approximately 10 to 13 minutes in preheated 375 degree (F) oven until they are lightly golden on the bottom and slightly firm to the touch on top. Once cooled the bottoms are ready to be spread with the preserves and the tops lightly dusted with confectionary sugar. If you are making these cookies without a 'cut-out' the tops of the cookies can be dusted with confectionary sugar once they have been sandwiched together. Be sure to bake up the small cut-outs from the top of the cookie as they great for noshing on.


When assembling the cookie, the bottom/flat side of the solid cookie is spread with the preserves and topped with the bottom/flat side of the top cookie. This ensures the cookie can sandwich together perfectly.


The number of cookies will depend on the size of the cookie cutter used. Additionally, the quantity will be affected by the thickness of the rolled out dough. Mine were on the slightly thicker side (this was  mostly because I hadn't taped down the bottom piece of parchment paper when rolling out the dough). My yield for this recipe was 15 cookies due to the size of the heart cookie cutter used and the thickness of the dough. If using a small two inch round or smaller heart cookie cutter (and rolling out to a consistent 1/4 inch thickness) you should anticipate being able to make two dozen Linzer Sable (sandwich) cookies. Note: Graduated size heart cookie cutters are available from Williams-Sonoma (made by deBuyer) or through Amazon (made by Fat Daddio's).

If you are looking to make someone feel special on Valentine's Day or on any day, give them something homemade. Gifts from the heart are often those made with one's hands, written in one's own handwriting, or spoken from one's lips.

Recipe
Linzer Sable Cookies (inspired by Dorie Greenspan's Linzer Sable Cookie Recipe as shared in her book Baking: From My Home to Yours)

Ingredients
1 1/2 cups ground almond meal (or finely ground almonds, hazelnuts or walnuts)
1 1/2 cups all-purpose flour
1 1/2 teaspoons Saigon cinnamon
1/4 teaspoon kosher salt
scant 1/4 teaspoon ground cloves
1 large egg, room temperature
2 teaspoons water
1/2 cup (8 Tablespoons) unsalted butter, room temperature
1/2 cup granulated sugar
1/2 cup raspberry preserves (or your preserve of choice)
Confectionary sugar for dusting

Directions
1. Whisk together the almond meal, flour, cinnamon, cloves and salt in a medium sized bowl. Set aside.
2. Whisk together the egg and water. Set aside.
3. In a standing mixer fitted with a paddle attachment, cream together butter and granulated sugar until fluffy and smooth (approximately 3 minutes).
4. Add egg mixture and beat for 1 minute.
5. Reduce speed to low and mix in dry ingredients until incorporated. Be careful not to over mix.
6. Divide batter/dough in half. Working with one half at a time, form into a ball and place between two sheets of parchment paper or wax paper. Roll out until approximately 1/4 inch thick. Transfer to a baking sheet to keep flat. Repeat process with other batter/dough ball. Place cookie sheet in the refrigerator for at least 2 hours (or can place in freezer for 45 minutes). 
7. Preheat oven to 375 degrees (F). Prepare a baking pan lined with parchment paper.
8. Remove one rolled out dough and place on a cutting board. Remove one piece of the parchment paper/wax paper and cut into desired shapes. Place each cookie on prepared cookie sheet. Note: If you want the preserves or jam to show, cut half of the cookies with a smaller shape in the center.
9. Bake cookies for 10 to 13 minutes or until they are lightly golden and just firm to the touch. Transfer baked cookies to a cooling rack and cool to room temperature.
10. Repeat process with second rolled out disc of dough. 
11. Gather all unused dough scraps and reroll between two sheets of parchment paper or wax paper. Cut into desired shapes and bake.
12. Spread thin layer of preserves on the flat side of the 'solid' cookies. Note: Mound a little of the preserves in the center so they come up through the 'cut-out'.
13. Sprinkle confectionary sugar on the top side of the 'cut-out' cookies.
14. Sandwich the two halves together pressing lightly.
15. Depending on the size cookie cutter this recipe will make 15-24 linzer sandwich cookies.
Note: Instead of dusting these cookies with confectionary sugar and/or sandwiching them together with preserves, the cookies can be simply dipped in white or dark chocolate.

Thursday, February 5, 2015

Pecan Praline Monkey Bread


At some point in my life I must have decided it was sacrilegious to throw magazines away, specifically magazines having anything to do with food. Although I have also been known to hang on to those what I call 'inspiration' magazines for what most would consider longer than necessary. Earlier this week I decided the time had finally come for me to 'let some of them go'. I know of at least one person who secretly hopes I am getting closer to the place of  'let most of them go'. There really are days when I wish there were more minimalist tendencies in my DNA (admittedly I am not taking full responsibility for my 'saving' tendencies). Before parting with some of these magazines, I decided to quickly go through them to see if there was anything worth saving. Flipping though the pages of an old Southern Living magazine, I came across a recipe for a Praline Pull-Apart Bread, otherwise known as a Monkey Bread. This version was frozen yeasted bread rolls dipped in melted butter, rolled in a cinnamon sugar, sprinkled generously with chopped pecans, chilled overnight, slathered in a brown sugar whipped cream mixture and baked until golden brown. There was one less page in the magazine before it was tossed in the recycling bin.

Why did it take me so long to make this Pecan Praline Monkey Bread? Maybe it had something to do with my penchant for 'homemade from scratch' recipes and a blind eye to anything Sandra Lee-esq. But for those of you who read this blog regularly, you know I haven't actually been a 'homemade only' recipe purist as there have been at least two 'semi-homemade' recipes posted in the past year (Wendy's Mashed Potatoes and Four Bean Baked Beans). There always has to be room for exceptions. 

What makes this Pecan Praline Monkey Bread 'semi-homemade' is the use of frozen dinner rolls (I used the smaller ones made by Rhodes). The use of these rolls not only makes this one of those 'almost too easy not to make' breads, they enable you to assemble almost everything the night before, saving the baking for the morning. In a little more than an hour, you can be serving your friends and family warm cinnamon and praline flavored bites of deliciousness. No one will be the wiser that you didn't make the entire Monkey Bread from scratch. And don't be so quick to divulge you didn't slave for hours making it. 

For a deeper praline flavor and even darker finished color to the baked bread, use a combination of light and dark brown sugars. I used equal proportions of the two.

If I were to change one thing the next time I make this Pecan Praline Monkey Bread it would be to use either a 10 inch tube pan or a larger, wider bundt pan. The pan I used worked, but a larger pan would have worked better. Ideally you want to keep as much of the praline 'glaze' in the pan versus having any of it spill over out of the pan. The frozen bread dough not only rises while resting overnight in the refrigerator, it rises significantly during the baking process. There is no need to thaw the frozen dinner rolls in the preparation of this bread as they 'thaw' in the refrigerator after being dipped in melted butter and rolled in cinnamon sugar.


Once all of the dough balls have been placed in the pan and pecans sprinkled throughout, the pan is wrapped with plastic wrap and placed in the refrigerator for 8 to 18 hours. Note: Don't wait until all of dinner rolls are placed in the baking pan before adding the pecans. Sprinkle a half cup of the chopped pecans when half of the dinner rolls are in the pan and the other half cup over the top of the finished layer of dinner rolls.


The heavy cream is whipped until very soft peaks are formed. The brown sugars and vanilla are stirred into the whipped cream and,the entire mixture is spread and pressed lightly over the dough balls. In a preheated 325 degree (F) oven, the bread is placed on a baking sheet and baked for 60 to 70 minutes or until golden brown.

The baked Monkey bread should rest for approximately 10 minutes before it's unmolded onto a rimmed platter or rimmed cake stand. Pour any of the remaining praline glaze remaining in the baking pan over the bread before serving.


While this Pecan Praline Monkey Bread is best served warm, it is still good at room temperature. You can always reheat individual servings of the bread in the microwave (on half-power) to recapture the taste of its' warm, ooey gooey goodness. 

Now that the groundhog has seen his shadow it looks like some of us will not be getting any relief from the harsh, cold, snowy winter weather any time soon. This Pecan Praline Monkey Bread would be perfect for breakfast or brunch; after a morning of snow shoveling or cross-country skiing; a morning walk or hike; or, just because you crave the flavors of cinnamon and praline. Semi-homemade never tasted so good. I wonder what else I might find in those stacks of magazines.
Recipe
Pecan Praline Monkey Bread (inspired by Southern Living's Praline Pull-Apart Bread recipe, December 2009)

Ingredients
1 cup granulated sugar
4 teaspoons Saigon cinnamon, divided
2 pounds frozen bread rolls, do not thaw (recommend Rhodes White Dinner Rolls) Note: Used 24 of the small dinner rolls.
1/2 cup (1 stick) unsalted butter, melted and cooled slightly
1 generous cup pecan halves, chopped
3/4 cup whipping cream
3/4 cup brown sugar (recommend using equal parts of light and dark brown sugars)
1 teaspoon vanilla
Note: The Rhodes dinner rolls came in a three pound package, however, you only need two pounds of them for this recipe. I used the package containing 36 small white dinner rolls.

Directions
1. Spray a 10 inch tube or 10 inch bundt pan with oil. Set aside.
2. Combine granulated sugar and three teaspoons cinnamon in a medium sized bowl.
3. Dip each bread roll in melted sugar, dredge in sugar mixture, and place in prepared pan. (Note: When half of the rolls have been placed in the pan, sprinkle in half of the chopped pecans. Finish dredging remaining bread rolls and sprinkle remaining pecans over the top. Pour any remaining cinnamon sugar into the pan.)
4. Cover pan tightly with plastic wrap. Refrigerate 8 to 18 hours.
5. Preheat oven to 325 degrees (F).
6. Beat whipping cream until soft peaks form. Stir in brown sugar, remaining one teaspoon cinnamon and vanilla. Pour/spread mixture over the dough.
7. Place pan on a baking sheet. Bake for approximately 60 to 70 minutes or until golden brown.
8. Cool on wire rack for ten minutes. Invert on cake stand or platter. Drizzle with remaining glaze from the pan.


In the Sydney and Walda Bestoff Sculpture Garden at the New Orleans Museum of Art (NOMA), December 2014

Monday, February 2, 2015

Meatloaf


"I really don't know why it is that all of us are so committed to the sea, except I think it is because in addition to the fact that the sea changes and the light changes, and ships change, it is because we all came from the sea." (JFK's 1962 America's Cup Speech). Now that my photography class has ended I feel like taking a short trip somewhere. Any somewhere with beautiful landscapes I have yet to photograph will do. For once I am not particularly fussy although my preference would be to take a relatively short road trip to a place with water nearby. Whether it be an ocean, a lake, a river, or a stream, there is something both energizing and calming about being near, seeing, or listening to the sound of a body of water. Years ago while hiking in Rocky Mountain National Park (RMNP) I went on a trail ending with one of the clearest, calmest and refreshingly coolest lakes nestled in the mountains. Considering it wasn't necessarily the easiest of hikes (for me that is), the sight of the lake could not have been the more perfect reward. Whether I was suffering from elevation delirium or not, I just remember this lake being one of the most beautiful I had ever seen. I subsequently learned the lake was named after Enos Mills, a man referred to as the 'father of Rocky Mountain National Park'. So if you are ever up in RMNP, consider hiking the trail to Mills Lake. I promise you will find the views breathtaking. 

I learned the hard way the importance of bringing food and water on a hike. It only takes one experience underestimating just how thirsty and hungry you get acclimating to a higher elevation and expending a significant amount of energy to never go on a hike without water or food again. My ravenous cravings almost always lean toward comfort foods.


Speaking of comfort food, this is not your mother's meatloaf (apologies to those of you whose mother made a meatloaf so insanely delicious you thought twice about moving out). This is not the kind of meatloaf you need to smother in ketchup for flavor and moisture (no apologies to those of you who smother everything in ketchup). Rather, this is a meatloaf self-professed meatloaf connoisseurs would proclaim as throw down worthy. Comfort food never tasted this good.

Finely chopped onions, garlic, carrots and celery sautéed in butter make just about everything they go into taste better.


Bread and eggs are the binders in this meatloaf. Two slices of day old hearty white sandwich bread torn into pieces are soaked in whole milk. Rather than process the bread into crumbs in a food processor, I simply tore them into pieces. The bread soaks while you are sautéing the vegetables.


The original Gourmet recipe called for the use of ground beef chuck. Not that there is anything wrong with ground chuck, but this is the kind of meatloaf beckoning you to use ground sirloin. The addition of bacon and ground pork provide more than enough 'fat', so the meatloaf significantly benefits from the flavor ground sirloin brings to it.

The most unusual or atypical ingredient in this meatloaf are the dried prunes. No eye rolling or throwing shade allowed. Don't even think of omitting them. Don't even think of replacing them with any other dried fruit. I chopped both the prunes and bacon with a knife, however, you could chop them up in a food processor.

The spices in this meatloaf are kosher salt, black pepper and allspice. The one change I might consider making is reducing the salt from two teaspoons to one and a half teaspoons. Again I say 'might' because the meatloaf was not overly salty, but everyone views salty a little differently.


All of the ingredients are mixed together until well blended, shaped into a loaf, and placed on either a sheet pan or in a large oval cast iron pan. The length and width of your meatloaf will affect its' baking time. A longer, thinner loaf will cooker faster than the the thicker, wider loaf. Baked in a preheated 350 degree (F) oven, the meatloaf is done when it reaches an internal temperature of 155 degrees. My meatloaf was done in slightly less than an hour, however, baking times could range from 55 to 75 minutes.


The bacon on this meatloaf was cooked separately and not 'cooked' on top of the meatloaf in the oven. It is an optional garnish although it serves as a prelude to one of the flavors in the meatloaf. And remember, we just happen to be living in the 'everything is better with bacon' decade.

This meatloaf is delicious enjoyed warm out of the oven (with mashed potatoes of course) or cold (on a sandwich made with white bread and some mayonnaise). It is one of those meatloaves you might go so far as to declare as the 'best' you ever had. If you are going on a long, strenuous hike, your body will thank you for bringing a sandwich made with this meatloaf. And considering the groundhog saw his shadow, the next six weeks have comfort food written all over them. A blizzard might be the only thing preventing you from making this meatloaf, unless of course you had bought all of the ingredients in anticipation of being homebound for a couple of days.

Recipe
Meatloaf (inspired by Gourmet's February 2008 Meatloaf recipe)

Ingredients
1 cup torn bread pieces (from approximately 2 slices homestyle white sandwich bread)
1/3 cup whole milk
1 medium Spanish onion, finely chopped
3-4 garlic cloves, minced
1 medium sized celery stalk, finely chopped
2 medium carrots, finely chopped
2 Tablespoons unsalted butter
2 Tablespoons Worchestershire sauce
1 Tablespoon cider vinegar
1/4 teaspoon ground allspice
1 1/2 teaspoons black pepper
2 teaspoons of kosher salt (could reduce to 1 1/2 teaspoons)
1/4 pound of bacon, finely chopped
1/2 cup pitted prunes, chopped
1 1/2 pounds ground sirloin
1/2 pound ground pork (not lean)
2 large eggs
1/3 cup finely chopped fresh parsley 
Optional: 3-4 slices cooked bacon for garnish

Directions
1. Preheat oven to 350 degrees (F)
2. In a large bowl, combine bread crumbs and milk. Set aside.
3. In a large heavy skillet, sautĂ© onion, garlic, celery and carrots over medium heat, stirring occasionally (approximately 5 minutes). Reduce heat to low, cover, and cook until carrots are tender (an additional 3-5 minutes). Remove from heat. 
4. Stir in Worchestershire sauce, cider vinegar, allspice, pepper, and salt to cooked vegetables. Stir to combine. Add to the bread/milk mixture.
5. Add chopped bacon, chopped prunes, eggs, beef, pork and parsley. Mix together with hands until well combined.
6. Pack into a 10"x 5" slightly oval loaf in a shallow baking cast iron baking dish.
7. Bake for approximately 55-75 minutes or until internal temperature reaches 155 degrees (F). Note: Baking time will be affected by length/width of loaf. Shorter baking time for a longer/thinner loaf and a slightly longer time for a shorter/thicker loaf.
8. Let stand at least 10 minutes before serving. Garnish with cooked bacon slices.
Note: Serve warm with mashed potatoes or serve cold on white bread and a schmear of mayonnaise.


Backyard images from the winter blizzard.