Monday, May 25, 2015

Texas Caviar


Memorial Day weekend is the unofficial launch of the summer entertaining season, outdoor barbecues, picnics, and backyard gatherings. And according to 'old, almost antiquated' etiquette rules, it's the first weekend one can begin wearing white shoes without being targeted by the invisible fashion police for committing a fashion faux pas. But beyond planning one's social calendar or worrying about 'what not to wear', there is greater significance to this weekend; the opportunity to honor, remember, and celebrate all of those who sacrificed their lives to protect ours. Whether these heroes are known or unknown to us, our lives are more blessed because of them.


A couple of weeks ago I was at the wedding shower for the daughter of one of my very best friends. It was the first time I met the bride-to-be, however, having listened to the stories of her life over the course of the past twenty or so years it was as if I had known her since the day she was born. It was also the first time I tasted Texas Caviar. I couldn't help but wonder 'where has this been all my life?'. The dish was created sometime in the 1940s in, where else but Texas (the black-eyed capital of the country) by Helen Corbitt, head chef at Neiman Marcus for seventeen years. Served for the first time at a New Year's Eve gathering in Austin, the original recipe was made only with black-eyed peas, onion, garlic, salad oil, wine vinegar, salt and black pepper. There are many variations to the Texas Caviar recipe (sometimes called Cowboy Caviar) as the ingredients in today's bigger is better versions have expanded to include corn or hominy, red or green peppers, jalapeños, tomatoes, green chilies, and cilantro.


Up until recently I haven't been a big fan of cilantro (also known as coriander or Chinese parsley). Maybe my tastes are changing. If you happen to be someone who has avoided eating or making any dish with cilantro as one of the ingredients, this Texas Caviar could be what changes your mind about it. Seriously.

While made primarily with fresh vegetables and fresh herbs, the ingredients in this version of Texas Caviar also includes canned black-eyed peas, white hominy, and mild green chilies.


In addition to a half-cup of a chopped Spanish (or red) onion, this version also includes four thinly sliced green onions (using both the green and white parts).

Chopped garlic, cilantro, red pepper, and jalapeños add texture, color, and flavor. The seeds (or heat) of the jalapeños are removed before chopping.


Bringing everything together is an eight ounce bottle of Italian dressing and a half teaspoon of kosher salt. The flavors of the Texas Caviar are optimized if allowed to marinate for several hours or overnight in the refrigerator.


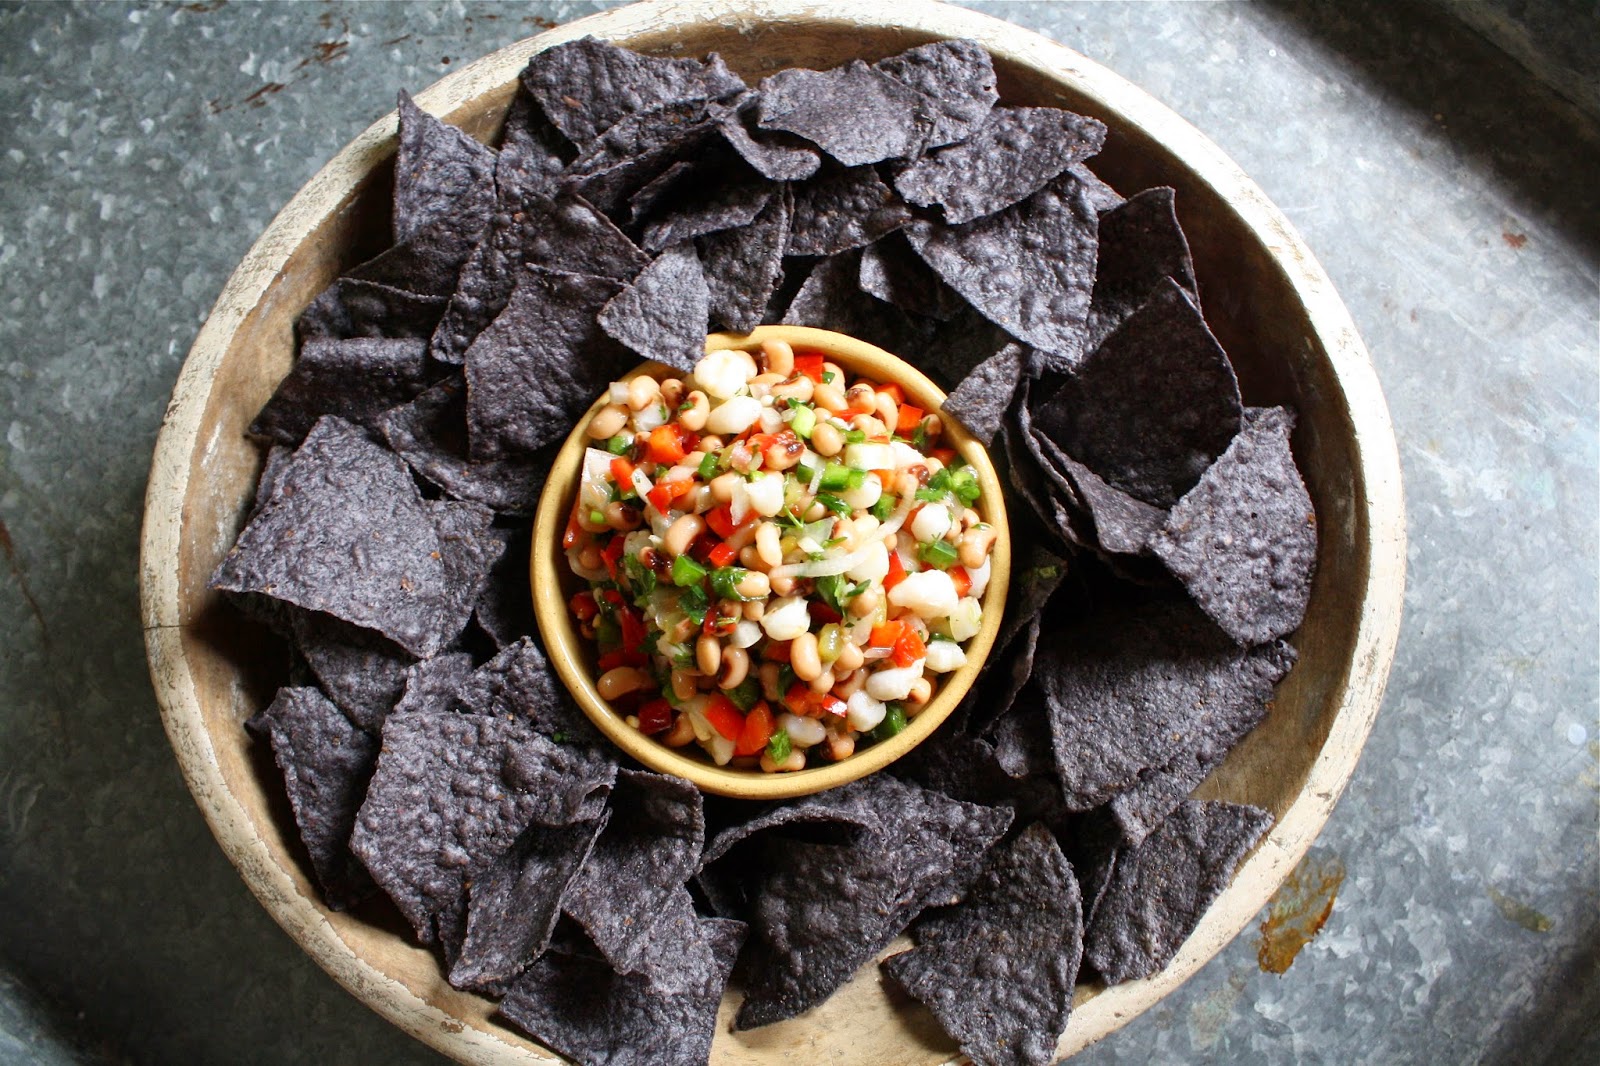
Often served with corn chips, this Texas Caviar is so good you can eat it with a spoon making it versatile enough to be either an appetizer or side dish. It is only fair I warn you this new favorite obsession of mine is slightly addictive. As an added bonus it's on the healthier side of the food continuum allowing you the guilt-free indulgement of your favorite alcoholic beverage.

Recipe 
Texas Caviar (inspired by a recipe from a Texas cafe located somewhere in Lubbock, Texas)

Ingredients
2 cans blackeyed peas, drained and rinsed (15.5 ounce size)
1 can white hominy, drained and rinsed (15.5 ounce size)
1 can green chilies, chopped and drained (4 ounce size)
1 red pepper, finely chopped
4 green onions (white and green parts), thinly sliced on the diagonal
1/2 cup finely chopped Spanish or red onion
3 cloves of garlic, finely minced
1/2 cup cilantro, chopped
8 ounce bottle of Italian dressing (recommend Wishbone Italian dressing)
2-3 jalapeños, stemmed, seeded and diced (Note: I used 2 jalapeños for this recipe)
1/2 teaspoon kosher salt
Blue Corn Chips or any kind of corn chips for dipping

Directions
1. Mix all ingredients together in a large bowl. Cover and chill overnight.
2. Serve with blue corn or any kind of corn chips for scooping.


Marsh leading into Nicolet Bay in Peninsula State Park (Wisconsin)


Blossoming cherry tree in a Wisconsin orchard.


A sculpture resting comfortably on the grounds of an art gallery.


Love the view of standing under a tree in the woods.

Monday, May 18, 2015

Crispy Oatmeal Scotchies


Exceptio probat regulam in casibus non exceptis ("The exception confirms the rule in cases not excepted"). In other words, an exception proves the rule. Thus, when you make an exception to a rule, a rule must exist. When Roman philosopher and politician Cicero first proposed this concept, he was neither defending nor explaining the reasons for his cookie preferences or rather I should say, exceptions to his preferences. After making the Crispy Oatmeal Scotchies, I can't help but borrow liberally from Cicero's legal principle. Thin, crispy cookies have not been my favorites. If given the choice between a thick, chewy versus a thin, crispy cookie, I would always go for the thicker, chewier one. Truth be told I have been a little dismissive of a thin, crispy cookie, especially one made without any chocolate. It now seems I have discovered an exception to my cookie eating preference rule. Yes, I am shamelessly admitting I had a limiting view of what made for a great cookie. One of the (few) benefits of getting older is the gift of wisdom. Maybe recklessly abandoning rules is another.


Better late than never. Seems we have Geoffery Chaucer to thank for first penning those words. Although over the course of the past eight centuries the original words of this proverb (Better than never is late) have been slightly altered. Prior to making and eating these Crispy Oatmeal Scotchies I might (operative word being 'might') not have acquiesced to the belief that large, flat, thin cookies could be considered 'beautiful'. This may have something to do with the thin, (a little too) crispy chocolate chip, made with margarine, cookies making regular appearances during my childhood. Unsalted butter, toasted oats, cake and all-purpose flour, three kinds of sugar, kosher salt, flaked sea salt and butterscotch chips have permanently changed that perception. Not only do I now see these Crispy Oatmeal Scotchies as 'beautiful', they skew toward the addictive end of the deliciousness continuum.


'There is no passion to be found in settling for a life that is less than the one you are capable of living." (Nelson Mandela). Had Mindy Segal not shared her recipe for these Oatmeal Scotchies, I may lived the rest of my life settling for only those cookies falling within my comfort zone. If I say these cookies are capable of making your heart race, would you think that a bit 'too much'? Let me know your answer after you taste them.


There are many reasons why these cookies are so wickedly delicious. The flavor resulting from oats toasted in the oven is one of them. After spending slightly less than five minutes in a preheated 350 degree (F) oven, the old-fashioned oats take on a subtle nutty like flavor. Two tablespoons of the oats are finely ground (I used a small food processor instead of a coffee grinder). Just as Mindy Segal promised, the ground oatmeal adds a delicate texture to the cookie.

For years I have often used a combination of light and dark brown sugars in cookie recipes calling only for light brown sugar. But this recipe goes one step further as it calls for equal portions of granulated (cane), light brown and dark brown sugars. Cookies always have an added depth of flavor when a combination of sugars are used. The Crispy Oatmeal Scotchies are no exception to that 'rule'.


When I read both teaspoon of kosher salt and a teaspoon of flaky sea salt were part of the dry ingredients, I couldn't help but initially wonder if that was 'too much'. Questioning the cookie goddess? Well let's just suffice to say my preliminary assumption was proven wrong. The combination of the use of these two salts was pure genius.

These thin, flat, crispy cookies did not happen by chance or because of the ingredients. Midway through the baking process the cookies are removed from the oven and given a sturdy tap to deflate them. The baking time for my cookies was slightly longer than the recipe called for, however, my balls of dough were a little larger than 1 1/2 tablespoons. Because of this I ended up giving the cookie tray another sturdy tap during the second half of the baking process. Finally, cooling the cookies on the baking sheet instead of transferring them to a cooling rack helps to ensure their crispiness. (Note: Make sure to store the baked cookies in an air-right container or they will become soft, particularly in more humid weather.)

Every now and then, if you are lucky you make a discovery that changes the way you think about or see the world. In this case, it was the world of cookies. If I had never made these Crispy Oatmeal Scotchies, I would have never experienced another kind of cookie bliss. There is much to be learned from reading Mindy Segal's Cookie Love cookbook. And who knows, you too might even be inspired to make an exception to your cookie 'rules'.

Recipe
Crispy Oatmeal Scotchies (recipe shared in Cookie Love by Mindy Segal)

Ingredients
1 cup plus 2 Tablespoons old-fashioned oats
1 cup (8 ounces) unsalted butter, room temperature
1/2 cup granulated cane sugar
1/2 cup light brown sugar, firmly packed
1/2 cup dark brown sugar, firmly packed
1 extra-large egg, room temperature
1 teaspoon vanilla
1/2 cup cake flour
1/2 cup all-purpose flour
1 1/2 teaspoons baking soda
1 teaspoon kosher salt
1 teaspoon sea salt flakes
1 generous cup butterscotch chips
Optional: Use toffee bits instead of butterscotch chips for a different flavor variation.

Directions
1. Preheat oven to 350 degrees (F). Line three large baking sheets with parchment paper. Set two aside.
2. Spread oats across one of the parchment paper lined baking sheets. Place in oven and toast until the oats smell like cooked oatmeal (approximately 5 minutes). Remove from oven and allow to cool to room temperature.
3. In a small food processor or coffee grinder, grind 2 Tablespoons of the oats into a fine powder. Set aside.
4. In a medium sized bowl, add cake flour, all-purpose flour, baking soda, kosher salt, flaked sea salt, toasted oats, ground toasted oats and butterscotch chips. Mix together and set aside.
5. Mix together egg and vanilla in a small bowl. Set aside.
6. In the bowl of a standing mixer fitted with a paddle attachment, mix butter for 5-10 seconds.
7. Add all three sugars and beat until butter mixture is pale in color and aerated (approximately 4 minutes). Note: Midway through the beating process, scrape down the sides of the bowl with a rubber spatula.
8. Scrape down the sides of the bowl with a rubber spatula to bring batter together.
9. On medium speed, add egg/vanilla mixture and mix until it resembles cottage cheese (approximately 5 seconds). Scrape down sides and bottom of bowl to bring batter together. Mix on medium speed for another 20 seconds until the mixture is nearly homogeneous.
10. Add all of dry ingredients. Mix on low until batter comes together but still looks shaggy (approximately 30 seconds). Do not over mix.
11. Remove bowl from stand mixer and bring dough together by hand using a rubber spatula or plastic  scraper.
12. Using a 3/4 ounce (1 1/2 tablespoon( ice scream scoop, portion dough into 8 mounds onto prepared cookie sheet. Note: Cookies spread considerably when baking so stagger the placement of your cookie mounds.
13. Bake cookies for 8 minutes. Quickly remove from oven, give pan a sturdy tap against the counter or oven to deflate the cookies. Rotate pan and return to oven until edges are a deep golden brown and the centers have fallen (approximately 4-6 minutes). Note: My cooking time was closer to 6 minutes. Midway through the second baking I removed the cookies and gave them another tap. 
14. Remove baked cookies and allow to cool on baking sheet.
15. Continue baking using remaining dough. Note: Cookies are best made the day the dough is made.
16. Store cookies in an airtight container to ensure they remain crispy.


Friday, May 15, 2015

Penne alla Vodka


It has been slightly less than two weeks since there has been a post to the blog although it feels more like nine months have passed. Little did I know a trip to Colorado to attend my nephew's college graduation in May would be akin to experiencing spring, summer-like and winter weather all over the course of just six days and all in just one state. Anticipating those surreal Colorado blue skies, I was also looking forward to going on a few hikes; taking as many spring landscape photos as possible; and, making the drive through Rocky Mountain National Park to the Continental Divide (a bucket list item for the person who shall remain nameless). Instead, we sat for two and half hours under rainy Colorado skies at the graduation ceremony (seems there are no plan B's in Colorado for outdoor graduation ceremonies at one of the best engineering schools in the country); rain and five inches of snow made for treacherous hiking (although my adventuresome family members braved the slippery, muddy conditions); winter-like landscapes dominated my photos; and, Trail Ridge Road going through Rocky Mountain National Park stopped short of the Continental Divide because of the May snow storm. Yet, in spite of some of the unanticipated weather, it was a fun-filled, memorable six days. And those glorious Colorado blue skies? They finally emerged on the last two days of the trip.

For the first four days we stayed in rented condo in Golden (my first VRBO experience), a perfect place for the family to gather for pre-graduation meals as well as to simply hang out. Although my sister and brother-in-law made dinner reservations at some great restaurants, I wanted at least one of our 'family' dinners to be as homemade as possible. To go with the Roasted Eggplant Parmesan (it traveled well) we stopped at the flagship Whole Foods in Boulder to pick up some roasted chickens, cheeses and an assortment of ingredients to make a 'beautiful' salad. And after discovering Piece, Love and Chocolate in Boulder, their Salted Caramel Cake would be our dessert, replacing the sea-salted chocolate chip cookies. The rented condo had almost everything needed to put this dinner together. The only thing missing was a large platter to serve the chicken on (okay so I am a little presentation obsessive). With an antique store only a few blocks away from the condo, I thought maybe I could find something.The large white oval platter in perfect condition with a price tag of only ten dollars seemed to be waiting for me. I thought about leaving the platter behind as I have more than my fair share of white platters, but after it was used for our pre-graduation dinner it took on sentimental value. Little did I know it would also be the perfect size for the Penne alla Vodka I made when I got back home. Serendipity.


After going through some of my new cooking magazines and recently purchased cookbooks, I came across a recipe Penne alla Vodka in the June/July issue (2015) of Fine Cooking that had me salivating. It immediately went to the top of the 'must make' list. What is not to love about pasta, basil and vodka?


Regardless of whether Penne alla Vodka was first made in Bologna or Naples (Italy) or was an American created recipe, it is a dish we should all be making. With the summer season approaching, it is the perfect dish to put basil's abundance to good use. Fine Cooking recommends using whole San Marzano tomatoes and its' juice. I would go even further and say it should be a required ingredient.


And the cheese recommendation? Parmigiano-Reggiano cheese. Is there any other kind?


The sauce begins with making a garlic infused oil. Five large cloves of smashed garlic are sautéed in a quarter cup of extra-virgin olive oil until the garlic is golden. The recipe called for removing all of the garlic once it had become golden, however, I left one of the cloves in. Next time I might leave one or two more in as I like the flavor of garlic to be more than just a little subtle (but I am a garlic lover). The whole tomatoes (crushed with your hands) and juice along with Aleppo pepper are added to flavored oil and cooked until the sauce begins to thicken (8-10 minutes). The vodka is added next and cooked for a couple of minutes in order for it mellow out in the sauce. The heavy cream and kosher salt is added in last and left to simmer while you make the pasta. Note: I wanted a slightly creamier sauce so I added the additional one tablespoon of heavy cream.


In a large pot of salted boiling water, the penne rigate is cooked until al dente (which is usually one minute less than package cooking directions). I used the ridged or rigate penne as it holds the sauce much better than the smoother penne. Once it reaches the al dente point, the pasta is drained and added to the simmering sauce. The entire mixture continues to cook on medium-low until the pasta begins to absorb some of the sauce.


After transferring the pasta and sauce to a platter, finish with coarsely grated Parmigiano-Reggiano cheese and julienned basil. The result is pure heaven on a plate. The only reason I can think of as to why I had never made Penne alla Vodka before was because I thought the sauce was 'difficult' to make. Either I was completely wrong (it wouldn't be the first time) or Fine Cooking's recipe was absolute perfection. I think I have now discovered my new pasta addiction. Think I need to head to the farmer's market this weekend and pick up a few more basil plants. As for the vodka, well the freezer is more than well stocked.

Recipe 
Penne alla Vodka (an ever so slight adaptation to Fine Cooking's (June/July 2015) penne alla vodka recipe)

Ingredients
12 ounces penne ziti rigate
28 ounce can whole peeled tomatoes in juice, recommend San Marzano
1/4 cup high quality extra-virgin olive oil
5 large cloves of garlic, peeled and smashed
1/4 teaspoon Aleppo pepper (or can use red pepper flakes)
1/3 cup vodka (recommend Grey Goose)
1/2 cup heavy cream
1 1/2 teaspoons kosher salt
1/2 cup coarsely grated Parmigiano-Reggiano cheese
2-3 Tablespoons fresh basil, julienned
Optional: Can serve goat cheese on the side if you also like a tart cheese flavor added to your tomato based cream sauces.

Directions
1. Pour tomatoes into a large bowl, breaking up with your hands. Set aside.
2. Heat oil and garlic in a 12 inch skillet over medium-low heat. Cook until garlic is golden, approximately 4 minutes. Discard all but one or two cloves of garlic.
3. Add tomatoes and juice along with Aleppo pepper to garlic oil. Raise heat to medium high, cook stirring occasionally until sauce thickens slightly (approximately 8-10 minutes).
4. Add vodka and cook for 2 minutes to infuse and mellow the alcohol.
5. Stir in cream and salt. Mix until well blended. Allow sauce to simmer on low while making the pasta. Note: For a creamier sauce add up to an additional 2 Tablespoons of heavy cream.
6. Bring a large pot of salted water to a boil. Cook pasta 1 minute less than package directions for al dente.
7. Drain al dente pasta and add to sauce. Mix until pasta is coated with sauce. Continue cooking sauce and pasta on medium-low until pasta has absorbed some of the sauce. Approximately 5 minutes.
8. Transfer to large platter.
9. Sprinkle grated Parmigiano-Reggiano cheese and julienned basil over top. Serve immediately.


Snow capped mountains in Rocky Mountain National Park.


A Longhorn steer grazing.


Cattle grazing near the Front Range on a low cloud hanging day.


Blue skies beginning to emerge after the snowfall.


Ominous clouds over the prairie.


Beautiful blue skies and the trail at Chautauqua in Boulder, Colorado.

Friday, May 1, 2015

Peach Pecan Squares with Cinnamon Whipped Cream


Happy May Day! Of the many varied traditions attributed to this day, my all-time favorite is the one where you (anonymously) leave a basket or bouquet of flowers at the doorstep of a friend. However, f you are not someone with sentimental, traditional tendencies, but rather an independent spirit who seeks to celebrate holidays non-traditionally maybe you should consider (anonymously) leaving a basket of baked goods. Homemade of course. And what better way to let someone know just how 'peachy keen' you think they might be than a basket filled with these Peach Pecan Squares. Because if you have never made them before they might not guess they were from you! By the time you get around to reading this blog posting, May Day might have come and gone, but not to worry. Maybe this is the year to ditch serving Derby Pie on Kentucky Derby weekend or forego making an angel food cake for Mother's Day. Maybe it's time to start a new dessert tradition. The Peach Pecan Squares with Cinnamon Whipped Cream is a worthy contender.


While it is technically not yet peach season, these Peach Pecan Squares can be made with the peaches and/or nectarines currently available in the grocery stores. Or (brace yourself) it also be made with frozen peaches. As much as I like cooking with seasonal ingredients, there are times when I have a taste for something 'not in season'. My peach cravings don't always adhere to seasonal availability. And sometimes there are exceptions to the rule 'fresh is best'.


The recipe calls for three cups of sliced peaches. I 'cheated' and used frozen peaches. And it just so happens that a pound of frozen peaches equals three cups. So if you are using either fresh peaches or fresh nectarines, you probably want to buy at least one and a half pounds.


Rather than making a traditional pie crust for these squares, I thought a slightly sweeter, shortbread like crust would work better (Spoiler alert: It did). This one made with unsalted butter, flour, confectionary sugar and sea salt and baked until lightly golden. The recipe for the crust gave me just enough dough to cover the bottom of a 9"x9" pan, however, I really wanted it to come up the sides of the pan. The proportions of the ingredients for the crust listed in the recipe here should make me (and you) happy.


The custard for the squares is made by whisking together three egg yolks, a cup of granulated sugar, 2/3 cup of sour cream and two Tablespoons of all-purpose flour. The sour cream gives the custard a slightly tangy flavor, one that pairs perfectly with the sweetness of the peaches.


After arranging the sliced peaches on the partially baked crust, pour on the custard. In a 350 degree (F) preheated oven the squares are baked until the custard is set. The recipe I used indicated this baking time would be approximately 30 minutes. Whether this was because I took a recipe for a pie and made it into squares or because I used frozen instead of fresh peaches, my baking time was 45 minutes. Note: Check at 30 minutes if using fresh peaches.


After the custard is set, the squares are removed from the oven, topped with a pecan crumb topping and baked for additional 20-25 minutes (or until the top of the squares are golden brown).

As much as you might want to dig into these squares after they come out of the oven, it needs to cool for at least 45 minutes before it's cut.


I loved these Peach Pecan Squares served both slightly warm and room temperature. You can also serve them chilled.


In keeping with a bit of a non-traditional theme, serve with freshly whipped cream flavored with a pinch of cinnamon instead of vanilla ice cream. Pure yummy deliciousness.

You really don't need a holiday or occasion of make these Peach Pecan Squares. When you serve them, the day will turn into one. Heck you don't even need to wait until peach season. And unless you are prone to giving away all of your baking secrets, no one needs to know you may have used frozen peaches.

Recipe
Peach Pecan Squares with Cinnamon Whipped Cream (reciped inspired by the Peach Pecan Pie recipe in Nancie McDermott's 'Southern Pies' cookbook)

Ingredients
Crust
1 1/2 cups all-purpose flour
3/4 cup unsalted butter (12 Tablespoons), chilled but not cold
3/8 teaspoon sea salt
1/4 cup plus 2 Tablespoons confectionary sugar

Filling/Topping
3 cups peeled, sliced peaches or nectarines (fresh or frozen). Notes: A one pound bag of frozen peaches equates to 3 cups. Approximately 6 medium sized peaches or 1 1/2 pounds equates to 3 cups).
1 cup granulated sugar
2/3 cup sour cream
3 large egg yolks
2 Tablespoons all-purpose flour

1/2 cup unsalted butter, chilled
1/2 cup granulated sugar
1/3 cup all purpose flour
1/2 teaspoon Saigon cinnamon
1/2 cup chopped pecans

Cinnamon Whipped Cream: One cup of heavy cream, one tablespoon confectionary sugar and a generous pinch of Saigon cinnamon whipped until light peaks form.
Optional: Confectionary sugar for dusting

Directions
1. Preheat oven to 350 degrees (F). Line a 9 inch baking pan with parchment paper.
2. Pecan Crumb Topping: Combine butter, sugar, flour and cinnamon in the bowl of a food processor. Pulse machine on and off until mixture forms small clumps (pea size). Stir in chopped pecans. Set aside.
3. Add flour, confectionary sugar, and sea salt to a food processor. Mix briefly. Add butter and process until mixture forms clumps (approximately 30-45 seconds). Transfer dough to prepared pan. Press evenly on bottom and up sides of pan.
4. Bake crust for approximately 15 minutes or until just golden. Remove from oven.
5. In a medium bowl, whisk the sugar, sour cream, egg yolks and flour until smooth and thick. Set aside.
6. Layer peaches on bottom of crust. Pour custard mixture evenly over the peaches. Bake until custard is set, approximately 45 minutes. Note: Check at 30 minutes if using fresh peaches.  
7. Top squares with pecan crumb topping and return to oven. Continue to bake for 20-25 minutes or until top of pie is golden brown. Remove from oven.
8. Allow squares to cool for at least 45 minutes. Serve slightly warm, room temperature or chilled.
9. Top each square with a generous dollop of cinnamon whipped cream. Dust lightly with confectionary sugar.


Daffodils in bloom.


Photos taken at Morton Arboretum in Lisle, Illinois.