Monday, August 3, 2015

Rustic Strawberry Tart


'The Queen of Hearts, she made some tarts, all on a summer day. The Knave of Hearts, he stole those tarts, and took them clean away!" (Alice's Adventure in Wonderland) After having slices of the delicious key lime and chocolate pecan pies at the Bang Bang Pie Shop in Chicago last week, I had my temporary fill or rather self-imposed quota of pie. But it was pie week in the blog world and it occurred to me this was not intended to mean one was supposed to only eat pie. Real pie, not humble pie.

Technically a tart is not a pie, however, I had my heart set on making this Rustic Strawberry Tart, pie week not withstanding. Sometimes you just need to listen to and follow your heart. Mine hasn't failed me yet, except when I choose not to listen to it.

The Rustic Strawberry Tart didn't exactly turn out as I thought it would. The mascarpone cream was the main culprit (more on that later). I am not sure if I can say it turned out better than I had hoped or expected. And it certainly, most definitely wasn't worse. It was just different. And in my world different is a good thing.

Practice can indeed make things perfect. The first time I attempted rye puff pastry was in the making of the Blueberry and Rye Slab Pie. I fell deeply, hopelessly in love with the taste of the pastry crust (and the pie). However, I was not as enamored with the process of making the dough. In spite of reading the the dough can be a little fussy, I had hoped I would be given an exemption. Wishful thinking. Fast forward to this past weekend when the rye pastry dough making stars came into alignment. All of the anxiousness I had been secretly harboring over the making this dough was suddenly replaced with the kind of fearless courage I thought was reserved only for the Flying Wallendas. I won't go so far as to say I have now mastered this dough, but I can at least say I love everything about it.

When you hear the words rye pastry, the next words your brain almost immediately hears is rye bread. Other than having at least one common ingredient (rye flour), there are no other other similarities between them. Unlike the hearty, slightly sour taste of a (caraway) rye bread, the rye pastry dough has both sweet and nutty flavor tones, making it the perfect choice for use in both pies and tarts. Especially ones made with fruit. I would strongly encourage you to wait until your family and friends taste anything made with this pastry dough before revealing rye flour, actually dark rye flour was one of the ingredients. I am all for advocating for the adoption of the 'don't tell before you taste' mantra when serving something 'new'.


The number of turns made in rolling out the dough significantly affects the flakiness of the layers. More turns translates into more layers. At a minimum, the dough is rolled and turned twice. However, for this open-faced, baked until a deep golden brown tart crust, it was turned four times. In most contexts, flaky doesn't necessarily have a good connotation. But in the case of this dough, the highest compliment one could give to the baked tart crust is flaky.


The rolled out dough is brushed with an egg wash and pricked with a fork before going into a preheated 400 degree (F) oven. Sprinkling the edge of the tart with sanding sugar is optional, but makes for a nice as well as delicious finishing touch. If making a more rustic looking, rectangular or oval in shape tart, you won't need the sanding sugar.

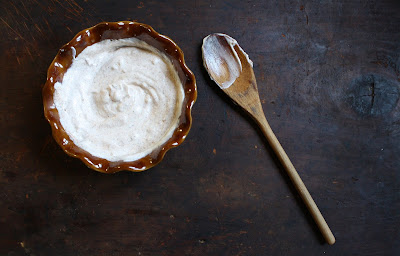
Mascarpone cheese generally has a consistency similar to a softened cream cheese. For some unknown reason, the one I bought from Whole Foods had a much creamier consistency. Only because it had such a delicious taste I decided to use it. Little did I know how much more challenging the tart assembly was going to be. I needed to keep reminding myself I was supposed to be going for a rustic, not refined rustic look to the strawberry tart. In the end it all worked, however, the next time I make this open-faced tart, I will definitely use BelGioioso's mascarpone as it has a 'thicker, more spreadable' consistency. Staying with the brand I had used before versus going with one I was unfamiliar would have been the wiser option. Lesson learned.

If you create a more free form tart using almost all or all of the rye puff pastry, you will most likely need more than a pound of freshly sliced strawberries. For this tart, the strawberries were cut into 1/4 inch slices, then layered in a circular pattern (starting at the edge of the tart and working toward the center) on top of the mascarpone cream layer. Another tart finishing option would be to cut the strawberries in half, arranging in either a circular pattern or in rows. This is one of those 'no hard and fast' rules, anything goes kind of tarts. And almost any kind of berry or mixture of berries would pair perfectly with both the crust and lightly sweetened mascarpone cream. After you make and taste the rye puff pastry, you will find a reason to make this tart often. 


Baked to a deep golden color, the buttery, crisp creates more of a hand-held versus fork eating kind of tart. Use your sharpest knife or even a pizza cutter to cut the tart into wedges, slices, squares, or any free form shape.

The Rustic Strawberry Tart is best served immediately after completely assembled as the dough will lose some of its' crispness if allowed to absorb the mascarpone cheese layer for more than a couple of hours. With the exception of cutting up and arranging the strawberries, the rye pastry dough could be rolled out and baked early in the day and the mascarpone cream mixture kept in the refrigerator until ready to use. 

Making the strawberry tart round created a more refined rustic than rustic look. However, the arrangement of strawberries definitely made it look more rustic than refined. It tasted absolutely delicious. I would go so far as to say it was one of those 'steal' worthy tarts. 


Note: This rye puff pastry is so flavorful it would be a punishable kind of sin to throw any of the dough away. After cutting a 10 inch circle out of the dough, I had enough left to make a half-dozen 'pie crust' cookies. Brushed with the egg wash and sprinkled with a coarse sanding sugar, the cookies baked to a deep golden color in 12-15 minutes. 

Recipe
Rustic Strawberry Tart (Rye Pastry adapted from Kim Boyce's recipe in her Good to the Grain cookbook, Super Simple Strawberry Tart recipe adapted from Yossy Arefi)

Ingredients
Dough
4.25 ounces dark rye flour (recommend Bob's Red Mill)
4.25 ounces all-purpose flour
3/4 teaspoon kosher salt
1/2 ounce (3 teaspoons) granulated sugar
6 ounces cold unsalted butter, cut into chunks
1 teaspoon cider vinegar
4 ounces ice cold water

Tart
1 to 1 1/2 pounds fresh strawberries, stems removed, cut into 1/4 inch slices
8 ounces mascarpone cheese (recommend BelGioioso Mascarpone cheese)
3 Tablespoons caster sugar, divided (can use superfine or granulated sugar)
1 large egg, for egg wash
Sanding sugar, optional
Note: Could use a mixture of berries (blackberries, raspberries and/or strawberries)

Directions
Dough
1. In a large bow, mix together the flours, salt and sugar. Add in the cold butter and using either a pastry cutter or your fingers, rub it into the flour mixture until it breaks up into small pieces. Note: If the day is exceptionally hot, the pastry cutter might be the better option. 
2. Combine the cold water and cider vinegar in a measuring cup.
3. Make a well in the center of the flour/butter mixture, and slowly pour the water into the dough all while you are mixing gently. Continue mixing until the water is evenly distributed and the dough holds together when you squeeze it. Note: It may look a little dry. Do not worry as long as it holds together when you form it into a square. If it does not hold together, add a bit more cold water.
4. Transfer the dough onto a piece of plastic wrap, wrap tightly and refrigerate for at least one hour (or overnight). Note: I removed the dough after 90 minutes.
5. On a lightly floured surface, roll out the dough into a 9" x 11" (or thereabouts) rectangle. With the long side of the dough facing you, gently fold the dough into thirds. Then turn the dough so the seam is at the top or parallel to your body. Roll out the dough into another rectangle. Repeat the folding and rolling process for a total of 4 times. Wrap the dough in the plastic wrap and refrigerate for at least 2 hours or overnight. Note: I removed it after 3 hours.

Tart and Assembly
1. Preheat oven to 400 degrees (F). Line a baking sheet with parchment paper and set aside.
2. On a lightly floured surface, roll out dough into a rectangle, oval, circle or random shape to 1/8" or 1/4" thickness. Trim edges, if necessary, and transfer to baking sheet.
3. Using a fork, prick the crust to prevent the dough from puffing up too much. Brush with a beaten egg. Note: At this point, if using a coarse sanding sugar to create a finished edge, sprinkle on before placing in the oven.
4. Bake dough until it is a deep, deep golden brown (approximately 25-30 minutes of baking time). Remove baked dough from oven and allow to cool completely.
5. Combine the mascarpone cheese with two tablespoons of caster sugar (or superfine or granulated sugar). Spread the cheese mixture over the cooled crust. 
6. Arrange strawberries in a decorative pattern. Sprinkle with remaining tablespoon of caster sugar.
7. Serve immediately. Notes: Cut with a sharp knife or pizza cutter when serving. Tart is best served the day it is fully assembled. 


 Currents, gooseberries and strawberries at the farmer's market.

Wednesday, July 29, 2015

Frozen Chocolate Covered Bananas w/ Sea Salt


"Summer is the annual permission slip to be lazy. To do nothing and have it count for something. To lie in the grass and count the stars. To sit on a branch and study the clouds." (Regina Brett) With an extended heat wave continuing here in the midwest, I have given myself permission to have moments of laziness. Rather than take on the making of an ambitious recipe or turning on the oven to bake a pie (because it's pie week in the foodblog world) or a cake (because it's birthday week in my world), I am instead taking the time to actually read and not skim through some of the cookbooks bought in recent months. Which not so unpredictably has caused my heart to race and brain go into overload. With a pretty high degree of confidence, I don't think this is what laziness is supposed to feel like. Trying to refrain from turning on the oven feels more like a punishment than a welcome, if only a short-lived, reprieve. Because after all, what would a birthday be without a homemade cake?


Earlier last week I dipped some slices of banana in dark chocolate, sprinkled them with flaky sea salt and then put them in the freezer. Many have claimed a frozen banana very closely resembles ice cream. Epicurious ranked them first on their list of the eleven foods that taste amazing frozen. While we can't believe everything we read on the internet or in the opinions of foodbloggers, this would be one of those times when fact and opinion were in complete sync with one another. Taking somewhat of a slight departure here, my dissertation advisor and friend recently posted the article "No It's Not Your Opinion, You're Just Wrong". Regardless of the arena you work in, but especially if you work in higher education, you might enjoy this quick read. You might even make it required reading.


Okay, back to the chocolate covered bananas. As much as I loved these 'little' bites, warm hands, hot weather, and chocolate don't play nice with each other. So I wanted to try putting the bananas on a popsicle stick. Of course, I didn't want to use the 'normal', long, slender popsicle sticks, I wanted those shorter, shapely, 'bowtie' ones. Nor did I want to cut the bananas in half widthwise and insert the stick in the cut end of the banana, because I wanted them to be a little more like a three-bite healthy, slightly indulgent snack versus one bordering on the 'healthier than ice cream' meal size. In the spirit of full disclosure, I probably made it a little harder on myself, but I absolutely loved how they turned out. 


These can be either a three ingredient or a four ingredient Frozen Chocolate Covered Bananas w/ Sea Salt treat. Having recently read somewhere (and now I cannot find the resource to give credit where credit should be given), adding a small amount of white chocolate to dark and/or semi-sweet chocolate creates a creamier, glossier finish to the set chocolate. However, if you have had great success tempering dark and/or semi-sweet chocolate without the use of white chocolate, then making these bananas becomes a three ingredient endeavor.


Your choice of bananas matters significantly. Like Goldilocks search for the perfect bed to sleep in, don't choose a banana that is too hard (or underripe) and don't choose one that is too soft (or overripe, banana bread making perfect). Choose bananas that are 'just right', somewhere between too hard and too soft. I understand this may not be precise enough for those of you who have never made chocolate covered frozen bananas before. So my best guidance on 'just right' is simply 'almost ripe but still firm' and with the peels being mostly yellow but still having a tinge of green. I know this still may not be precise enough. If anyone out there has a better description of 'just right' bananas for dipping and freezing, please enlighten all of us and share!


Cutting bananas on the diagonal, in approximately 2 1/2-3" lengths and with a thickness of approximately 3/4", made it possible to successfully insert the bowtie popsicle sticks through the center or side of the banana. In choosing to insert the popsicle stick in two different places, the finished bananas looked more whimsical than uniform. In my world, whimsy is a good thing. Once the sticks are inserted into the bananas, place on a parchment paper or foil lined baking sheet and put in the freezer. The tray of bananas should be uncovered and remain in the freezer for at least two hours.


Within five minutes, the frozen bananas will begin to thaw when removed from the freezer. So when dipping them into the chocolate work in batches. Trust me, I learned this the hard way. 

After dipping all of the bananas, drizzle some of the remaining chocolate over the dipped bananas and immediately sprinkle lightly with flaky sea salt. Return the bananas to the freezer until they are fully set (approximately 20 minutes). Remove from the baking sheet and place in a tightly sealed freezer safe container or in freezer plastic storage bags. You can also wrap them in cellophane and tie off with a ribbon or string.

If you like your frozen chocolate covered bananas firm when you bite into them, serve them right out of the freezer. If you like them to be a little on creamy side, allow them to sit out for 5 minutes before serving. Either way you serve them, they are incredibly delicious. Perfect to satisfy a sweet tooth craving for 'ice cream' on a hot summer day. They definitely fall into the category of a guilt-free pleasure.

If the summer heat is just too much and you can't bring yourself to turn on the oven to make a homemade birthday cake, at least make something chocolate, something that tastes like ice cream. Because a birthday without cake is one thing, but a birthday without both cake and ice cream is a whole different story. These homemade Frozen Chocolate Covered Bananas w/ Sea Salt for the ice cream part of the birthday celebration should be more than enough to salvage the day. 
Recipe
Frozen Chocolate Covered Bananas

Ingredients
4-5 large bananas, almost ripened but still firm, cut on the diagonal in 3/4" widths (if inserting popsicle sticks) or cut into 1/2" widths (if dipping only)
1 pound dark or semi-sweet chocolate
1/4 cup white chocolate, chopped
Flaky Sea Salt for finishing
Alternate and probably easier way to cut bananas: Using 6-7 medium bananas, cut the bananas in half, widthwise, and insert the popsicle stick through the cut end of each half. 

Directions
1. Line two baking sheets with either parchment paper or foil. 
2. Place cut bananas (either with or without a popsicle stick inserted in) on one of the prepared baking sheets. Place in freezer, uncovered, for at least two hours.
3. Melt dark or semi-sweet chocolate in either the microwave or over a double boiler. Note: Add chopped white chocolate to melted dark or semi-sweet chocolate to temper the chocolate. Stir until smooth.
4. Working in batches, dip bananas one at a time into the melted chocolate and place on the second prepared baking sheet.
5. Drizzle remaining chocolate over dipped bananas and sprinkle lightly with flaky sea salt.
6. Return dipped bananas to the freezer. When completely set (approximately 20 minutes) place frozen bananas in a sealed container or in freezer ziplock bags.
7. Enjoy directly out of the freezer or set out for at least five minutes before serving.


Farmer's Market Cinnamon Cake Donuts and Pretzels. 

Monday, July 27, 2015

Elotes Callejeros (Grilled Mexican Street Corn)


By most definitions, my life growing up in the midwest might be considered a safe, sheltered one. Whether this was due to the town I lived in or the time period I grew up in or some combination of both, I have not yet been able to commit to a definitive answer to my working theories. The first glimpse into the new and different windows of the world, so to speak, occurred on the first day of my freshman year in college. While my would-be alma mater was only a hundred and thirty miles from my hometown, it felt more like I had taken a transcontinental journey to get there. Only instead of ending up at the edge of the ocean, I would end up spending the next five years of my life surrounded by cornfields. The frames of reference I had grown up with were suddenly being challenged and expanded. And that was even before my first official day of class. While there were so many different and significant experiences and individuals influencing my thinking back then, the one giving me yet another glimpse into the world and maybe into my soul came from living with one of my sorority sisters during my senior year. She was what I would call a voracious reader. I would have been at that time someone who read because they had to. As I watched her as she read (it seemed like she always had a book with her) and listened to her talk about the books she was reading, I realized there was another way to experience the world, gain perspective, become more empathic, make connections, and strengthen my vocabulary (if I had only met her four years earlier maybe my rhetoric grade wouldn't have brought down my GPA). Books, I came to discover, could take your mind, heart, and soul to all sorts of places, regardless of the place or time one lived in. And from that moment on, I knew books would always be a constant, significant part of and influencer in my life. Anna Quindlen captured it best when she wrote "Books are the plane, the train, and the road. They are the destination, and the journey. They are home."

While I sometimes think myself as a little more worldly when it comes to food, I get the 'you are not quite as worldly as you think' reality check every now and then. Up until this past weekend my idea of eating grilled corn was lathering it with butter and sprinkling it with salt. But then I had my first taste of Elotes Callejeros otherwise known as Grilled Mexican Street Corn. Momentary speechlessness was followed by a close imitation of the restaurant scene in 'When Harry Met Sally'. My grilled corn world was never going to be the same again.


Elotes Callejeros (Grilled Mexican Street Corn) is salty, sweet, creamy, nutty, smokey, and savory with a bit of tartness. As brazen as this may sound, let me put myself out there and say it should be the only way grilled corn should be made. While I have no plausible explanation as to how it was possible this deeply flavored, charred corn never before made an appearance in my life, I offer no apologies for making what may sound like an audacious grilled corn making claim to some of you. None whatsoever. Seriously, this corn is that good. And honestly, after you taste grilled corn made this way, you will realize I really wasn't taking any risks with my opinion here at all.


This recipe is an amalgamation of the dozens of recipes I came across in cookbooks and online when researching Elotes Callejeros (Grilled Mexican Street Corn). All of the recipes had lime juice, either queso fresco or cotija cheese, and some kind of 'hot' spice listed in their ingredients. Melted butter, mayonnaise, Mexican Crema, sour cream, or a mixture of them made up the base of the creamy sauce. Garlic, salt, and/or cilantro appeared in some of the variations.

This version uses both mayonnaise and Mexican Crema, minced garlic, kosher salt, cayenne pepper and a Mexican Spice Blend from Morton and Bassett. I chose the spice blend because it was made up of cumin, garlic, paprika, white pepper, thyme and onion allowing me to control the heat by supplementing with cayenne pepper. As for the cheeses, I thought using both the fresh queso fresco and aged cotija would add the right amount of creaminess to the texture and nuttiness to the flavor of the elotes. Rather than putting lime juice in the sauce, I reserved it to squeeze over the grilled corn. 


Most varieties of yellow corn and bi-color corn tend to be on the sweet side. Based on years living in corn country, my personal preference is bi-color corn. Yellow in color corn tends to have larger, fuller flavored kernels (as compared to white corn). While there are are varieties of white corn sweeter in flavor than yellow corn, their kernels tend to be smaller. Large kernels seem to work better for this grilled corn recipe. 

It is essential the corn in its husk be soaked in water for at least 45-60 minutes before being placed on the grill the first time. Technically the corn gets grilled twice, but I am getting ahead of myself. Water soaked husks are less likely to catch on fire when placed on the grill. 


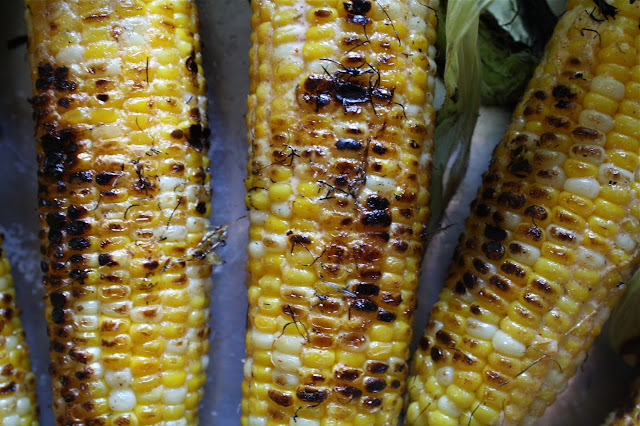
The water soaked corn is placed on a medium-high grill for 15-20 minutes. While grilling, rotate all sides of the corn to ensure they are evenly exposed to the heat. Some charring will occur in the first grilling. When the grilled corn is easy to handle (approximately 5-10 minutes of wait time), the husks are pulled back and the silk is removed. You can completely remove the husk along with the silk, but in doing so you will have less of a 'handle' to the corn.


The prepared 'sauce' is brushed on each piece of the shucked, grilled corn and then returned to the grill a second time. This return to the grill allows the sauce to begin to flavor the kernels while giving the kernels another chance to become slightly more charred.


This second grilling takes less than 5 minutes and requires you carefully watch and rotate.


Lime juice is squeezed over the corn before the sauce is brushed on for a second time. The second application of the sauce not only deepens the flavor of the corn but becomes the adhesive for the grated queso fresco and cotija cheeses.


The Elotes Callejeros (Grilled Mexican Street Corn) would pair well with grilled steaks or grilled chicken, Fish Tacos with Chipotle Slaw, or enchiladas. With some ice cold beer, it can become a meal. Plan on making more than one ear of this corn when serving. Two ears might be too much for some, but one and a half, well that should be just about right.


If you happen upon a Farmer's Market in the week or weeks ahead, pick up some freshly picked corn. Because if there is only one new recipe you make off of the blog this month, make this one. If by any chance you have never before had Elotes Callejeros (Grilled Mexican Street Corn), it would make me incredibly happy to be the one opening up the window to this incredibly delicious, decadent grilled corn world for you. Because in one taste, similar to the experience of reading a great book, this way of grilling and serving corn will take you to either new or familiar places. Buen apetito!

Recipe
Elotes Callejeros (Grilled Mexican Street Corn)

Ingredients
6-8 ears of corn, in the husk (bi-color corn if it is available, if not a sweet yellow corn)
3 Tablespoons mayonnaise
3 Tablespoons Mexican Crema or Mexican Style Sour Cream
1 teaspoon Mexican Blend Spice (recommend Morton and Bassett brand)
1/4 teaspoon cayenne pepper (optional if you don't like any heat at all)
3/4 teaspoon kosher salt
1 clove of garlic, minced
1/2 cup freshly grated queso fresco
1/2 cup freshly grated cotija cheese
2 limes

Directions
1. Soak corn in their husk in a deep pan of water or clean sink for approximately 45-60 minutes. Weight corn down with a pan or heavy plate so it is completely submerged. Note: It is important for the husks to have time to absorb the water as this will prevent them for catching on fire on the grill. 
2. In a small bowl, mix together the mayonnaise, Mexican Crema, Mexican Blend Spice, cayenne pepper, kosher salt and minced garlic. Set aside.
3. Mix grated queso fresco and cotija cheese together in a medium-sized rectangular or oval bowl. Set aside.
4. Remove corn from water and place on grill set to medium-high heat. Grill for approximately 15-20 minutes, turning until all sides have had the chance to begin to cook. Remove from grill.
5. When cool enough to handle, pull down silk and husks (remove silk but keep husks to use as a handle). Or remove both silk and husks.
6. Lightly brush corn with the mayonnaise/creme/spice mixture and grill until the corn begins to char/brown (approximately 2-3 minutes). Remove from grill. Note: Watch the corn carefully, turning at least once to prevent burning.
7. Squeeze lime juice over grilled corn. Using a pastry brush corn again with mayonnaise/creme/spice mixture. Roll in or sprinkle grated cheeses evenly over corn. Serve immediately.

Additional notes: (1) Can use sour cream in place of the Mexican Crema and/or Mexican Style Sour Cream, (2) Can use only grated queso fresco or grated cotija cheese rather than a mixture of the two, and (3) If bi-color corn is not available, choose a large kernel sweet corn.


Lego Sculptures at Morton Arboretum in Lisle, IL


Thursday, July 23, 2015

Tara's Chocolate Chip Cookies


Seemingly in an attempt to simplify the world and eliminate all shades of gray, we have been grouped into or defined by a myriad of classifications. Very few of us left high school without being willingly or unwillingly bound to one group or another. Almost daily there is some unscientific, yet ridiculously entertaining BuzzFeed survey feeding into our underlying need to feel connected to a group, regardless of how fiercely independent, unique, or different we believe ourselves to be. I can't help but wonder if we secretly wish these surveys would tell us something different, validate what we already know, or prove to some of the people in our lives they just don't really know us. It's okay if you don't want to admit being lulled into taking at least one of these surveys for any, some, or all of the aforementioned reasons. For those of you who have not yet been tempted, what are you afraid of? That the survey results will get hacked and everyone will discover your personal theme song, what country music cliche you exemplify, or which 80s movie girl you are? Spoiler alert: Everyone already knows. 

Regardless of our chosen profession, there are yet another set of groups to belong to, to define us. The Innovators, the Early Adopters, the Second Wave Followers, and the Laggards. The smallest of these groups are the innovators, the risk-takers, the ones quick to adopt new and innovative approaches or strategies. The Early Adopters, perennially young and restless are the ones paying attention to the discoveries and lessons learned by the innovators. The Second Wave Followers, skeptics who prefer to take the wait and see if this too shall pass approach before finally caving. And then there are Laggards, the traditionalists, content with the way things are, the last to change. In the food world, I find myself in awe of some of the innovators and going in and out of all of the other groups. Yes, even the laggards. In the spirit of self-disclosure and the risk of skewing to TMI, I must confess to being in a state of kicking and screaming over kale, adding sriracha sauce to almost everything, or topping my favorite foods with kimchi. 


However, I am happy to announce I have joined the group of early adopters of innovator foodblogger Tara O'Brady's chocolate chip cookie recipe. As loyal to and enamored as I have been with the Jacques Torres chocolate chip cookie recipe, I am now completely smitten with Tara's as close to chocolate chip cookie perfection as is possible recipe. They are the complete package. Beautiful, crispy around the edges, chewy in the center, chocolatey, addictive, incredibly easy to make. There is nothing high-maintenance about these cookies, yet you might think only high end kitchen tools and ovens could create such chocolate chip cookie perfection. 

Who knew that all it took was a large bowl, a whisk and a wooden spoon. Well Tara knew.


Chopping the chocolate might be the most time-consuming part of the recipe. If you have yet to give up using chocolate chips for your chocolate chip cookies, you should know chopped chocolate is not a passing, this too shall pass trend. There are not enough adjectives to describe the taste and texture Trader Joe's Pound Plus Dark Chocolate Bars bring to this cookie. I would put it in a throwdown against any of the high-end, pricey dark chocolate bars out there.

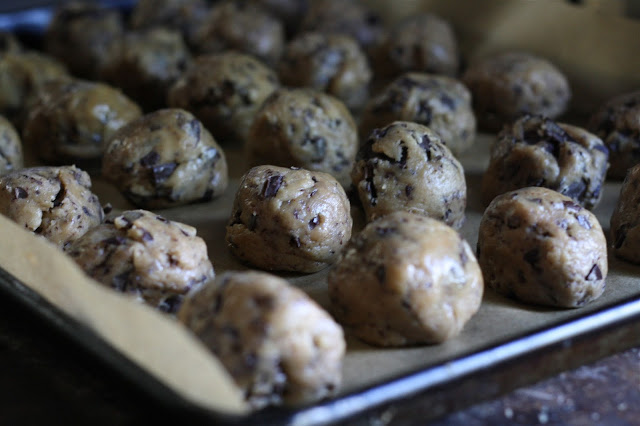
After reading the advice of other foodbloggers, I decided to wait to bake the cookies until they had a chance to chill in the refrigerator overnight. Forming the dough into balls, placing them on a parchment paper lined tray, and lightly covering them with a plastic wrap before chilling, makes baking the cookies feel effortless.

Approximately three tablespoons of dough goes into making the cookies. To ensure as uniform of a cookie as possible, I used an almost three tablespoon ice cream scoop and then rolled the dough into balls. However, you don't even need an ice cream scoop to make these cookies. 


A light sprinkling of flaky sea salt is the finishing touch.


The cookies spread when they bake. Allow for at least 3 inches of space between each of the balls of dough.


The cookies are baked in a preheated 360 (F) degree oven. Yes, 360 (not 350, not 375). My oven doesn't have a digital temperature setting, so I set it a smidge over 350 degrees. This lack of oven temperature precision may have been responsible for increasing my baking time by a couple of minutes. Before placing the cookies on a cooking rack, they remain on the cookie tray for two minutes.


One taste of Tara's Chocolate Chip Cookies and you won't be able to resist giving up your favorite chocolate chip cookie recipe. Unless of course, you take great pride being set in your ways or in belonging to the group known as the chocolate chip cookie laggards. If it has been awhile since you felt real bliss, make these cookies. Because cookie bliss is better than no bliss at all. And feel free to call them your own. 

Recipe
Tara's Chocolate Chip Cookies (inspired by Seven Spoons blogger Tara O'Brady's Basic, Great Chocolate Chip Cookies recipe)
Makes 28-32 large golf ball sized cookies
Updated December 2021

Ingredients
1 cup (225 g) unsalted butter, cut up into 8 pieces (European style butter highly recommended)
3 1/4 cups (415g) all-purpose flour
1 1/4 teaspoons baking powder
1 teaspoon baking soda
1 1/2 teaspoons kosher salt
1 1/4 cups (260g) light brown sugar, firmly packed (See Notes)
1/4 cup (60g) dark brown sugar, firmly packed 
1/2 cup (100 g) granulated sugar
2 large eggs, room temperature
2 teaspoons vanilla
12 ounces (340 g) semi-sweet or bittersweet chocolate, chopped (Recommend Trader Joe's Pound Plus Dark Chocolate)
Flaky sea salt for finishing (Recommend Maldon Sea Salt)

Directions
1. In a heavy bottomed saucepan, melt butter on lowest heat possible to ensure the butter does not sizzle or lose any of its' moisture. Stir occasionally. Once the butter has melted, remove from heat and set aside.
2. In a medium sized bowl, whisk together the flour, baking powder, baking soda and kosher salt. Set aside.
3. In a large bowl, pour in melted butter. Add brown sugars and granulated sugar, whisking until sugar has melted. 
4. Add eggs, one at a time, whisking after each addition.
5. Stir in vanilla.
6. Using a wooden spoon or silicone spatula, stir in flour mixture until barely blended and still a bit floury.
7. Stir in chopped chocolate until all ingredients are combined.
8. Using a large ice cream scooper (large golf ball sized), scoop dough and place on parchment paper lined cookie sheet. Leave at least 3 inches between the cookies. Note: For best results, the dough balls should be refrigerated at least 6 hours or overnight on a lightly covered tray.)
9. Before baking sprinkle each cookie with a bit of flaky sea salt.
10. In a preheated 360 degree (F) oven, bake cookies until the tops are cracked and lightly golden rotating pan halfway through the baking process. Baking time is approximately 10-12 minutes, however, mine ranged from 13-14 minutes. This could be due in part to not having a digital oven. Recommend checking the cookies at 10 minutes and making any time adjustments as necessary.
11. Allow cookies to cool on pan for at least 2 minutes before transfering to a wire rack to cool completely.
12. Enjoy immediately! Store cookies in a sealed container.

Additional notes: (1) You can alter the amounts of light and brown sugars used, but recommending not increasing your dark brown sugar to more than 1/2 cup or reducing the light brown sugar to less than 1 cup. The total amount of brown sugars used will be 1 1/2 cups or 320 g. (2) Chilling the balls of dough at least 6 hours or overnight is a game-changer. When baking each sheet of cookies (about 8-9 will fit on a sheet pan), keep the remaining dough( formed into balls) in the refrigerator. (3) Once chilled, cookie dough balls can be transferred to a freezer ziplock bag and stored in the freezer. When baking, remove frozen cookie balls, place on baking sheet, sprinkle with sea salt, and bake. Baking time may be one or two minutes longer. (4) If you are not a big fan of dark brown sugar, use all light brown sugar. The inspiration recipe called for the use of light brown sugar only.


The windmill in the Children's Garden at Morton Arboretum in Lisle, Illinois.