Monday, December 5, 2016

Glazed Poppy Seed Cake


The simplest and benign of occurrences can often evoke a past memory. Ones so deeply buried we sometimes wonder what triggered their resurfacing. The onset of the holidays almost always takes me back to other points and places in time. Feelings of nostalgia are often brought on when putting together the list of confections to be made in the weeks ahead. Which is how I came to remembering a cake from my childhood. One I had not thought about, made, or eaten in a very, very long time. Apparently my brain is hardwired to recall all things associated with the smells and tastes of food. Many of the memories I have of my father revolve around, yes, food. Especially Sunday and holiday dinners. The meals usually made by most of the mothers of my small circle of childhood friends. Yet, for some reason it didn't seem unusual that our family dinners were prepared by my father. Nor did it seem odd that he did most of the holiday baking. It was our normal. Nowadays the lines between the roles of mothers and fathers are gray, blurred versions of the more traditional parental roles I observed growing up. With few exceptions Sunday dinners were served around noon. Every once in awhile or when we had company we didn't eat until one in the afternoon. Meats were always cooked medium-rare, actually closer to rare than to medium. To this day I still can't imagine eating prime rib, beef tenderloin, steaks, and, even hamburgers any other way.


While most of my siblings never had any difficulty cleaning our plates, we weren't allowed to leave the table until there wasn't a morsel left on them. 'Eat your vegetables' could be heard with predictable regularity at the kitchen table. My father sometimes pretended to be oblivious to my strategy of spreading mashed potatoes ever so thinly across my plate, almost making them appear invisible. Of course, I believed I was getting way with something.

Almost everything I learned about cooking and baking growing up I learned from my father. From making a white sauce (creamed tuna on toast was one of my favorite lunches), to making a smooth, flavorful gravy (as good as it was it I still couldn't swallow mashed potatoes), to whipping egg whites to stiff peaks and folding them into cakes. In retrospect, this early culinary education had a significant impact on me. Everything was made from scratch when my father was cooking and baking. A Poppy Seed Cake dusted with confectionary sugar was one of his favorites. And because it was his favorite, it was mine too.

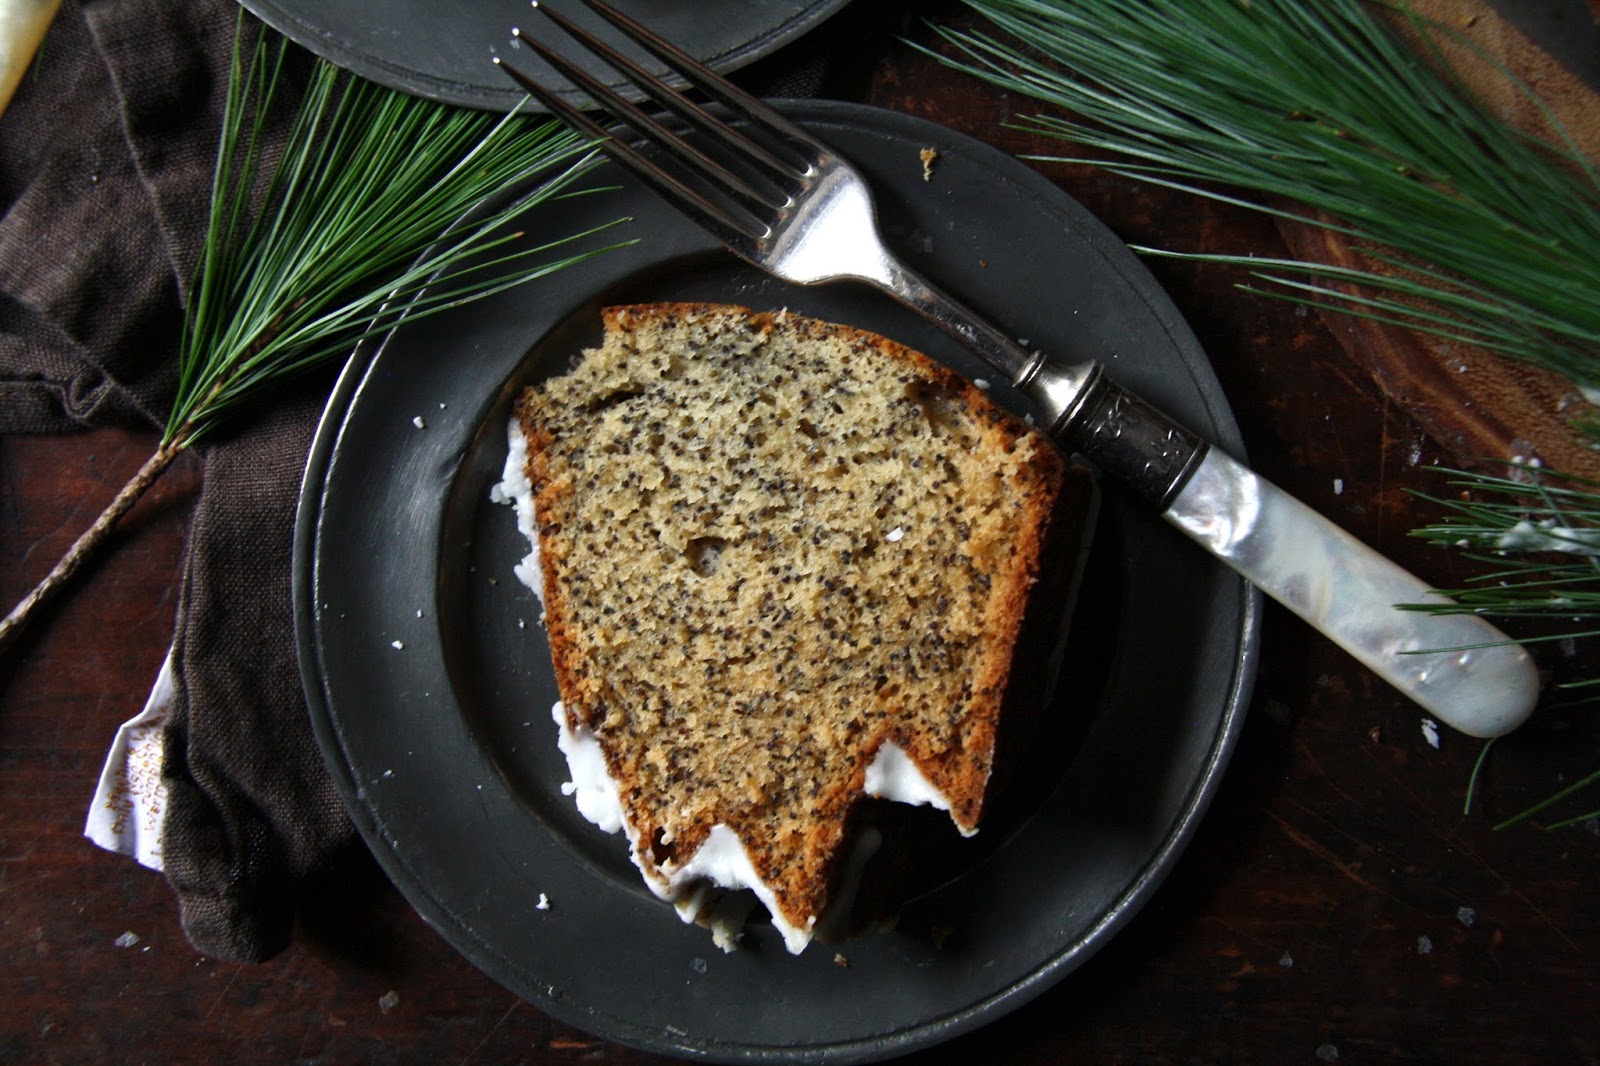
In my traveling back in time moment, I seemed to recall the recipe for this cake was on the back of the Solo Poppy Seed Filling can. The packaging of the can for this filling has changed over the years. No longer is the recipe, one with directions beginning with the words 'follow recipe carefully and slowly', printed on the label. Fortunately in a Google search I found a copy of that original label, the one with the recipe for the Poppy Seed Cake. Within a few days of finding this recipe, I was making 'the' Poppy Seed Cake from my childhood. Except instead of a sifted confectionary sugar finish, I decided a confectionary sugar glaze would be its' finishing touch. And rather than use a tube pan with a removable bottom (otherwise known as the Angel Food cake pan in our house), I chose to use a recently purchased gorgeous Nordic Ware pan. Two changes my father would have at least pretended to approve. Being the oldest of four, I believed being the favorite meant I could do no wrong. Although my siblings might have conflicting opinions.


There was a reason the recipe started with the cautionary 'read carefully' words. Unlike many cakes, the eggs are separated. The egg yolks are added into the batter one at a time, while the egg whites are beaten to stiff peaks and folded in to the finished batter. 


Like most cakes, the dry ingredients are sifted before they are added to the batter. 


Truth: It's easier to separate eggs while they are still cold. However, there are two points of view relative to an egg white's temperature when a recipe calls for them to be beaten. Either beat them cold or beat them at room temperature. Beating egg whites cold produces smaller, tighter bubbles not easily deflated when folded into a batter. The volume of whipped egg whites increases significantly when they are room temperature. However, their larger bubbles slightly reduces the stability of the beaten egg whites. The size and stability of the bubble matters more for some baking applications. For this cake, either option would work. If you have a copper bowl to beat your eggs in, great. But it's not an egg beating deal breaker. Note: My separated egg whites sat out for about an hour before I started baking. They weren't cold and they weren't room temperature, just somewhere in between.


Use a spatula to gently fold the beaten egg whites into the batter.


Having had a few unmolding bundt pan disasters in my baking lifetime, I am extra careful about preparing the pan with vegetable spray and a dusting of flour. Once all of the batter has been spooned into the bundt pan, smooth the top with the back of a spoon or off-set spatula.


The Poppy Seed Cake bakes in a preheated 350 degree (F) oven for 60 to 75 minutes or until a cake tester comes out clean when inserted in the deepest part of the cake. Note: My baking time for this bundt pan was 65 minutes. Once removed the oven the cake pan should be placed on a cooling rack and allowed to rest for 25 minutes before the cake is unmolded. Removing it too early or leaving it in the pan too long could result in an umolding disaster. 


To ensure your confectionary sugar glaze is smooth, always sift the confectionary sugar. The amount of liquid (whole milk) used to make this glaze will range from 2 to 4 tablespoons. Three (3) Tablespoons gave me the consistency I wanted. Just remember to add in additional milk 1 Tablespoon at a time. To give the glaze a purer white look, I used a clear vanilla extract.


Wait at least 30 to 45 minutes before spooning glaze over the top of the Poppy Seed Cake.


No matter how old we are, parental approval almost always causes us to feel happy, proud, loved. I wished my father were still here to tell me what he thought of my version of 'his' cake. 

A wave of emotions came over me as I took a bite of this Glazed Poppy Seed Cake. The kind simultaneously causing me to be both happy and sad weepy. Making of this cake not only reminded me of my father, but it reaffirmed the power memories can have on maintaining and strengthening the relationships we have with the people in our lives we love, we want to keep close. Life can, at times, be hectic. Giving us reasons or excuses to let it get it in the way of letting memory making opportunities slip away. Remembrances, those photographs forever imprinted in our minds and on our hearts, might well be one of the most endearing gifts we can both give and receive. And, if by chance food is somehow involved, well that would be the proverbial 'icing on the cake'.

And oh yes, this Glazed Poppy Seed Cake was as moist, as dense, as flavorful, and as good as I remembered. 

Recipe
Glazed Poppy Seed Cake (several adaptations to the original recipe printed on the Solo Poppy Seed filling can)

Ingredients
Cake
1 cup unsalted butter, room temperature
1 can (12.5 ounce) Solo Poppy Seed Cake and Pastry Filling
1 1/2 cups granulated sugar
4 large eggs, separated 
1 teaspoon vanilla
1 cup sour cream
2 1/2 cups all-purpose flour
1 teaspoon baking soda
1 teaspoon kosher salt

Confectionary Sugar Glaze
1 1/2 cups confectionary sugar, sifted
2 to 4 Tablespoons whole milk
1/2 teaspoon vanilla
Pinch of kosher salt

Optional: Edible glitter flakes to sprinkle over the confectionary glaze. 

Directions
Cake
1. Preheat oven to 350 degrees (F).
2. Sift together the flour, baking soda and salt in a medium sized bowl. Set aside.
3. In a standing mixer fitted with a paddle attachment, beat butter and sugar until light and fluffy (approximately 3 to 5 minutes).
4 Mix in the can of Solo poppy seed cake and pastry filling.
5. Add egg yolks, one at a time, beating well after each addition.
6. Mix in sour cream and vanilla.
7. Gradually add sifted flour, baking soda and kosher salt keeping mixer on low and beating until fully incorporated.
8. In a separate bowl, beat egg whites until stiff peaks form, but be careful not to dry out.
9. Fold egg whites into cake batter. 
10. Pour batter into a prepared bundt pan or 9-10 inch tube pan. 
11. Baking time is 60 to 75 minutes or until a cake tester comes out clean when inserted into the cake.
12. Transfer cake to wire rack and allow to cool for 25 minutes. Note: Baking time may be slightly longer if baked in a tube pan or if cake mold is very deep.
13. Invert and transfer to a cake stand or platter. Allow to cool for at least 30-45 minutes before pouring Confectionary Sugar Glaze over the top.
14. Slice and serve. Store cake tightly covered. Flavor continues to improve on the second day.

Glaze
1. In a medium bowl, combine confectionary sugar, 2 Tablespoons of milk, vanilla and salt. Using either a hand mixer or whisk, blend ingredients until the icing is smooth. If too thick, add milk, 1 Tablespoon at a time.
2. Pour glaze over cake. Allow to set.

Notes: (1) Cake can be made in two 9" cake pan. Reduce baking time to 45 minutes or until done. (2) For a pure white icing use clear vanilla. (3) The flavor of the cake further develops if you make the day/night before serving. (4) Instead of the Confectionary Sugar Glaze, simply dust with confectionary sugar. (5) The original recipe printed on the Solo can called for the use of shortening instead of unsalted butter. (6) This is the perfect cake to serve with coffee or tea, to eat for breakfast, to eat as a snack. 

Monday, November 28, 2016

Swedish Butter Cookies


"The first fall of snow is not only an event, but it is a magical event. You go to bed in one kind of world and wake up to find yourself in another quite different, and if this is not enchantment, 'where is it to be found?' J.B.Priestley Wreaths are on the house windows, cedar roping is draped around the front door, urns are filled with greens, Christmas stockings hung by the fireplace, and holiday pillows scattered in rooms throughout the house. The extent of my holiday decorating efforts this past weekend. The trees, lights, ornaments, chalkware Santa collection, indoor wreaths, and goodness knows how many other holiday items are still up in the attic waiting. Waiting for me to get in the decorating spirit. Not yet sure when that will happen. Quite possibly I am waiting for the first snowfall. While I may not yet be inspired to get the house dressed in all of its' Christmas finery, I have had an overwhelming urge to begin making an assortment of cookies, chocolate covered caramels, marshmallows, chocolate covered coconut balls, toffee, chocolate bark, orangettes, and of course, candied walnuts and pecans. There is only one problem with all of this unbridled enthusiasm. I need to reign my baking desires in as its' still too early and too dangerous (at least in my world) to begin putting the boxes of homemade confections together.


Sometime next week I will put together a recipe recap of some of my favorite cookies and candies while interspersing my blog posts with a couple of new holiday cookie recipes. Like this one. On Thanksgiving, my sister had made these Swedish Butter Cookies (Vaniljkakor), only she called them her version of a Kolachke. I suppose it's because these Swedish Butter Cookies closely resembled a Kolachke. Like the apricot and/or poppy seed filled ones my Polish father lovingly made every Christmas. The Kolachke is usually made with a cream cheese or yeast rolled out dough and filled with either a jam/preserve or cream cheese filling. These cookies are made with butter. While I am calling these bites of deliciousness Swedish Butter Cookies (Vaniljkakor) they are actually missing an ingredient found in the genuine, bona fide, official ones. My apologies to those of you who treasure your grandmother's Swedish Butter Cookie recipe, the family heirloom passed down through the generations, and are a little concerned this derivation lacks some authenticity due to the missing egg yolk. But whether I named these cookies Swedish Butter Cookies or Kolachkes I would be a little bit right and little bit wrong, invariably upsetting someone. Although less wrong on one of them. Seriously though, I am not convinced anyone would notice the missing egg yolk. Heck, if their centers weren't filled with jam, they might easily pass as Scottish or Irish Shortbread cookies.


We all need these cookies in our lives.

The cookie batter has only five ingredients: unsalted butter, confectionary sugar, vanilla, kosher salt and sifted all-purpose flour. Having room temperature butter is key when assembling the batter.

While I usually prefer to make a cookie dough in my standing mixer (with paddle attachment), the dense cookie batter came together perfectly using a hand held mixer.

I used a 1 1/4" ice cream scoop to form the dough balls, although once scooped I didn't roll them into balls. If I had, the finished edges of my cookies would have been smoother. Personally I wanted a more 'rustic, ragged edge, homemade' versus 'bakery finish' look to my cookies. I used a glass to flatten them to approximately 1/3" thickness and a shot glass (instead of my thumb or a spoon) to make the indentations to hold the preserves.


I used apricot and raspberry jams for these cookies. But feel free to use any of your favorite preserve flavors. The Bonne Maman preserves are my store-bought go-tos. Crane's Orchard's preserves are my new favorite small batch go-tos. The well of each cookie will hold about 1 to 1 1/2 teaspoons of preserves.

In a preheated 325 degree (F) oven, the cookies bake for 18-22 minutes or until set and very lightly brown on the bottom.


The Swedish Butter Cookies are sprinkled with confectionary sugar once they have cooled to room temperature. If sprinkled while still warm, the sugar will melt.

The melt in mouth buttery richness of these crisp, vanilla and preserve flavored cookies is what makes them addictively delicious. They are destined to be your new favorite cookie! How good are these cookies? Well if cookie maven Dorie Greenspan, cooking goddess Ina Garten, or pastry chef extraordinaire Mindy Segal read my blog, I would secretly be wishing they would invite me to bake with them someday after they make and taste these cookies. They are that kind of good.

Of all of the cookies I make for the holidays, these by far are one of the easiest. Additionally, I would rank them really high on the best tasting cookie list. If you are looking for one of those 'gets rave reviews' cookies, make a batch of these Swedish Butter Cookies. Like now. Then make another batch or two when you are putting your cookie exchange or holiday cookie platter/packages together. You need these Christmukkah cookies in your life sooner rather than later. Just like I need a little snow, sooner rather than later, to get me started on decorating the house for the holidays.

Recipe
Swedish Butter Cookies 
Makes about 18 cookies

Ingredients
1 cup unsalted butter, room temperature
1/2 cup confectionary sugar
2 to 2 1/2 teaspoons vanilla
2 cups all-purpose flour, sifted
1/4 teaspoon kosher salt
Approximately 1/2 cup of Apricot, Cherry, Mixed Berry, Peach, and/or Raspberry Preserves, divided
Additional sifted confectionary sugar for dusting

Directions
1. Preheat oven to 325 degrees (F). Line two baking sheets with parchment paper and set aside.
2. In a standing mixer fitted with a paddle attachment or with a hand mixer, beat butter, confectionary sugar and vanilla at medium speed until light and fluffy. 
3. Beat in flour and salt on low speed. Mix until blended.
4. Using an ice cream scoop, create generous 1" balls of dough. Flatten to about 1/3" thick. Using the bottom of a flat bottomed shot glass, press dough down in center to make a well. Note: If you want a more finished edge to your cookies, roll the balls of dough before pressing down with the glass.
5. Fill each well with 1 to 1 1/2 teaspoons of preserves.
6. Bake 18-22 minutes until set, but not browned. Remove cookies from pan and transfer to a cooling rack. Allow cookies to cool. Note: Rotate cookie sheet halfway through baking.
7. When cool, sift with confectionary sugar. Serve immediately.
8. Store in a tightly covered container. Note: May need to re-sprinkle with confectionary sugar to refresh if covered for more than 24 hours.


Barager Pines, a Christmas Tree Farm in Fennville, Michigan (November 2016)


Wednesday, November 23, 2016

Roasted Butternut Squash Salad w/ Warm Cider Vinaigrette


Ready, set, it's almost time to get your stretchy pants on! In less than twenty-four hours the Thanksgivings festivities, food fest, annual Turkey Trot races, football binging, and family drama begins! As this is my most favorite holiday, I can hardly contain my excitement for the day. Ours will be a somewhat non-traditional day, one without turkey (be still my traditional heart), one without my niece at the dinner table (unfortunately collegiate swimmers going to school on the east coast don't get to come home for this holiday), one drama free (we didn't invite our individual politics to the table), one beginning with a hometown 5K run with some of my friends, and one where this Roasted Butternut Squash Salad with Warm Cider Vinaigrette will be served for the 'first' time on Thanksgiving.

If your Thanksgiving menu isn't yet carved in stone or if you have been asked to bring a dish to a gathering, consider making this Roasted Butternut Squash Salad with Warm Cider Vinaigrette. And if for some reason, you can't bring yourself to make yet another trip to the grocery store or couldn't possibly add one more 'new' dish to your Thanksgiving holiday meal, then plan to make this salad for your next dinner party while butternut squash is still in season. It took me six years to make this salad (this is what happens when one has too many cookbooks, cooking magazines, recipes clipped from newspapers, or recipes shared by friends). Hopefully it won't take you that long. I have already made it twice and will be making it for a third time for Thanksgiving (my contribution to this year's family dinner at my sister's house). 


The benefit of now making this salad a couple of times is figuring out the adjustments to the recipe albeit relatively minor ones. The first time I made it I tossed the arugula, roasted squash, cranberries, roasted walnuts and grated cheese with the dressing. While still delicious, it felt that the salad become a little 'overdressed' and didn't have as much as the visual 'wow' factor on the platter. The second time I tossed the arugula only using about a 1/4 cup of the dressing then arranged the squash, cranberries, walnuts and cheese on top. The remainder of the dressing was served on the side. I liked it even more the second time.

The second adjustment may or may not be an adjustment at all, more like a preference. And it involves the cranberries. More on that later.


Technically butternut squash is a fruit, although we treat it more like a vegetable. It's tan-yellow skin is easily peeled with a vegetable peeler. Normally it is sliced lengthwise (be sure to have a good sharp knife), but for this salad you can (if you want) cut half-inch slices starting at the smaller/top end of the butternut squash. When you get near the bottom of the squash, the place where all of the seeds are, it is much easier to cut in half. Scoop out the seeds and cut into one half inch slices. Keep cutting the slices of squash until you have beautiful deep orange little 1/2 inch diced bites. 

The diced butternut squash is tossed with extra-virgin olive oil, pure maple syrup (use the real stuff), kosher salt and pepper and baked for 22-24 minutes in a preheated 400 degree (F) oven. At least once during the baking the process use a spatula to turn over the squash. To test for doneness, insert a sharp knife into several pieces of the squash. If the knife goes through easily, your butternut squash is done. 

Okay here's the part where I talk about the cranberries. In the original recipe the cranberries were added to squash during the last 5 minutes of baking. I did this the first time I made this salad. Somehow I forgot to add them the second time and instead simply added them to the salad. Either way worked, but I think I liked them added to salad instead of being baked.


The dressing can be made a day ahead, brought to room temperature and slightly reheated or it can be made while the butternut squash is roasting. The apple cider, cider vinegar and shallots are cooked over medium-high heat until the mixture reduces to about a 1/4 cup. The dijon mustard, kosher salt, pepper, and extra-virgin olive oil are whisked in after you take the pan off the heat. 


Walnuts are always better toasted. In a 350 degree (F) oven they toast up beautifully in 8-10 minutes. If you don't have a thin slicing grater to create chards of the Parmigiano-Reggiano cheese, use a vegetable peeler. And if all else falls, use a boxed grater.  


Lightly dress your arugula with about a 1/4 cup of the dressing and taste. If it needs more, add more. Season with kosher salt and pepper. Serve the remaining dressing on the side.


Evenly scatter the roasted butternut squash, cranberries (baked or unbaked), toasted walnuts and grated cheese and serve. 


The Roasted Butternut Squash Salad w/ Warm Cider Vinaigrette is what I would call a 'platter' versus a 'bowl' salad. Whether you make it for Thanksgiving, for a dinner party, or even a weeknight meal, bring out one of your favorite platters so everyone can first eat with their eyes before they actually taste the sweetness of the butternut squash, the tartness of the dried cranberries, the nuttiness of the cheese and walnuts, and the peppery bitterness of the arugula all dressed in a warm cider vinaigrette. Pure beautiful deliciousness!


Wherever or however you are celebrating the Thanksgiving holiday this year, may your day be filled with joy, harmony, peace, contentment, abundance, and gratefulness. As you take time to be thankful for the family you love, for the friends you cherish, and for all of the blessings received and yet to come, take some time to spread the holiday spirit to others. Happy Thanksgiving wishes to all of you!

Recipe
Roasted Butternut Squash Salad w/ Warm Cider Vinaigrette (slight adaptations to Ina Garten's Roasted Butternut Squash Salad with Warm Cider Vinaigrette as shared in the Barefoot Contessa's Bake to Basics: Fabulous Flavor from Simple Ingredients cookbook)

Ingredients
1 1/2 to 2 pounds butternut squash, peeled and cut into 1/2 inch dice
1/2 cup plus 2 Tablespoons extra virgin olive oil, divided
2 teaspoons kosher salt and 1 teaspoon black pepper, divided
1 Tablespoon pure maple syrup
1/4 cup dried cranberries
3/4 cup fresh apple cider
2 Tablespoons cider vinegar
2 Tablespoons minced shallots
2 teaspoons Dijon mustard (recommend Maille)
4 - 5 ounces baby arugula, washed and dried
1/2 cup walnut halves, toasted
1/4 cup freshly grated Parmigiano-Reggiano

Directions
1. Preheat oven to 400 degrees (F).
2. Place diced butternut squash on a baking sheet. Add 2 Tablespoons extra-virgin olive oil, the maple syrup, 1 teaspoon kosher salt and 1/2 teaspoon black pepper and toss.
3. Roast squash for 22-24 minutes, turning once, until tender. Note: Add cranberries to the pan for the last five minutes of roasting or save cranberries to toss in salad.
4. While squash is roasting, combine apple cider, cider vinegar, and shallots in a small saucepan. Bring to a boil over medium-high heat. Cook for 8-10 minutes, or until cider is reduced to about 1/4 cup. Remove from heat.
5. Whisk in dijon mustard, 1 teaspoon kosher salt and 1/2 teaspoon black pepper. Whisk in 1/2 cup extra-virgin olive oil until dressing is emulsified.
6. Place arugula on a large platter. Spoon about 1/4 cup of the dressing over the arugula and toss. 
7. Top with the roasted squash mixture, walnuts, cranberries (if not already combined with the roasted squash) and grated Parmigiano-Reggiano. Sprinkle with salt and pepper. Serve extra dressing on the side.
8. Serve immediately.

Notes: (1) My butternut squash was cut into a 1/2 inch. Original recipe called for cutting into a 1/4 inch dice. If cut smaller, adjust roasting time. (2) Use a good quality fresh apple cider, the kind found in the refrigerator section of a grocery store or orchard. (3) Toss salad in the dressing right before serving. (4) The butternut squash can be peeled, diced, put in a ziplock bag and stored in the refrigerator several hours or the night before roasting.


The edge of Lake Michigan in South Haven before sunrise. (November 2016)

Monday, November 21, 2016

Oatmeal Raisin Cookies


"Some of the most beautiful places in the world, your true soulmate, or obvious answers are staring you right in the face, and you don't even notice them." On a gorgeous unseasonably warm day in November, a friend and I went hiking in Starved Rock State Park. A first for me, a second return trip for her. With no knowledge of the terrain or trail conditions, we embarked on an ambitious 5 mile "catch your breath, break a sweat, took only one wrong turn" hike. Not sure if we felt more accomplished or ravenous when we finished. How or why it took me so long to discover the incredible canyons, bluffs, rock formations, waterfalls, views of the Illinois River, and multi-layered landscapes of a place only the eight-four miles away from my home is the proverbial '$64,000 question'. If I hadn't spent all but about three years of my semi-long life in Illinois, maybe I could come up with a credible answer. If I was someone who didn't drive hundreds of miles to hike through parks in surrounding states, maybe I would be able to put forth a plausible reason why I overlooked the one located in my own backyard. If I didn't own two pairs of hiking shoes, a set of hiking poles, and more outdoor running/hiking gear currently in inventory in any number of athletic stores, I could hide behind having a lack of gear. Well, the simplest answer is I wasn't able to see what was almost right in front of me. With my 'virtual' blinders now off, I am already planning a return trip as well as an overnight stay in one of the rustic cabins. I need to make up for all of the years of lost opportunities of embracing all of the park's wonders. Although I could do without another getting lost experience.


Which brings me to talking about this "on a scale of 1 to 10, it's a 38" Oatmeal Raisin Cookie. With my nephew returning home for an extended Thanksgiving visit, I texted him to ask if there was a cookie he wanted me to make. I thought or was rather pretty certain he would request Irish Shortbread. What he texted back was 'oatmeal raisin'. My first thought was 'yikes, I don't think I have a really great oatmeal raisin cookie recipe'. Seriously. With his plane set to land twelve hours after the text exchange, I didn't have time to go on a down the rabbit hole Oatmeal Cookie recipe hunt. But I did have one for a killer Oatmeal Currant Cookie. Which meant the over the top Oatmeal Raisin Cookie recipe was almost staring me right in the face. Cookie crisis and failure to live up to the best aunt in the universe reputation averted!


All I needed to do was to gather up the ingredients and make a few minor tweaks to a cookie recipe where, fortunately the dough didn't need to chill for several hours or overnight. It's also one of those recipes where all of the ingredients are almost always in your refrigerator and cabinets. 


A simple cookie needs simple ingredients. Save the fancy raisins and imported steel cut oats for something else. These Oatmeal Raisin cookies want, need, must, have to be made only with Thompson Seedless Raisins and Quaker Old-Fashioned Oats.

If you are seeking Oatmeal Raisin Cookie perfection, use pastry flour. This high starch, low protein flour creates a fluffy, meltingly tender, crumbly texture in cookies. Most bakeries use either cake flour or pastry flour which may explain in part why bakery cookies usually are nothing short of beautiful deliciousness. With whole wheat pastry flour now readily available, we all can now create our own bakery perfect cookie confections! 


After sifting the dry ingredients (pastry flour, baking soda, cinnamon and kosher salt), the butter and sugars are beat until light and fluffy. This usually takes at least 5 minutes. Don't be tempted to shorten the sugars-butter beating time. Eggs are added one at a time. After adding the vanilla, the sifted dry ingredients are added in eight additions until just incorporated. With the mixer on low, the oats and raisins are added. Be careful to not over beat the really, really thick batter. 

There is almost a 2 to 1 brown sugar to white sugar ratio in these cookies. However, dark brown sugar accounts for the majority of the 'brown sugar' used. Dark brown sugar has a slightly more complex flavor than light brown sugar resulting in a toffee or caramel like finish to a baked good. I might even go so far as to say the molasses in the dark brown sugar adds a kind of nutty flavor to this Oatmeal Raisin cookie.


Like a bakery cookie these Oatmeal Raisin Cookies are ginormous (approximately 3" to 4" in diameter). Containing slightly more than two tablespoons of dough, the cookie dough balls are golf ball sized. Before putting the baking sheet in a preheated 350 degree (F) oven, the cookies are slightly flattened. You will slightly flatten them again when you rotate the cookie sheet after they have baked for 7 minutes. Total baking time for the Oatmeal Raisin Cookies ranges from 17-20 minutes.


If you love a crunchy, slightly chewy in the center Oatmeal Raisin Cookies, cookie delirium awaits you. Allowing the baked cookie to cool on the baking sheet for about 2-3 minutes before transferring to a cooling rack further contributes to their crunchy texture. For a slightly less crispy texture, transfer the baked cookies to a cooling rack immediately after they come out of the oven. 


Another dominant flavor in these Oatmeal Raisin Cookies is cinnamon. If I tell you there are three tablespoons of cinnamon in these cookies, you might think I be sending you down the wrong cinnamon path. But I wouldn't do that to you. I am reluctant to suggest backing down the amount of cinnamon to two tablespoons (if you aren't the biggest fan of cinnamon in your oatmeal cookies) as the three tablespoons is what further differentiates these Oatmeal Raisin Cookies from all others. 

You can reduce the amount of cinnamon if you want to, but would encourage you to stay the course on this recipe and use the three tablespoons. It's what a '38 on a scale of 1 to 10' Oatmeal Raisin Cooking needs.


The next time I want to bring a batch of cookies to a gathering, make a welcome home treat, assemble a gift for friends, put life sustaining snacks in a hiking backpack, the decision to make either Tara's Chocolate Chip Cookies or these Oatmeal Raisin Cookies is going to be a really difficult one. Although, if I had to make that decision today, these throw down worthy Oatmeal Raisin Cookies would win out. 


If there is room for only one bold, spicy, crispy, soul satisfying, addictive Oatmeal Raisin Cookie recipe in your life, it should be this one. Quite possibly after one bite of these cookies, they may be the only ones you will ever want. With this amazing recipe now staring you in the face, what will you do?

Recipe
Oatmeal Raisin Cookies (slight adaptation to the Corner Bakery Cafe Oatmeal Raisin Cookie recipe)
Makes 40-46 large 3" to 4" sized cookies.

Ingredients
3 1/2 cups whole wheat pastry flour
4 teaspoons baking soda
3 Tablespoons cinnamon
1 1/2 teaspoons kosher salt
3/4 pound (3 sticks) unsalted butter, room temperature
1 1/4 cups plus 1 teaspoon granulated sugar
2 cups dark brown sugar, firmly packed
1/3 cup light brown sugar, firmly packed
2 large eggs, room temperature
2 teaspoons vanilla
Scant 4 1/2 cups old fashioned rolled oats (Recommend Old-Fashioned Quaker Oats)
2 to 2 1/2 cups Thompson dark seedless raisins

Directions
1. Preheat oven to 350 degrees (F). Line two  baking sheets with parchment paper and set aside.
2. Sift flour, baking soda, cinnamon, and kosher salt in a medium bowl. Set aside.
3. In a standing mixer fitted with a paddle attachment, beat butter and sugars together until light and fluffy (at least 5 minutes). Do not rush this step.
4. Add eggs in one at a time, beating until fully incorporated.
5. Beat in vanilla.
6. Add sifted flour mixture in 8 batches, just until incorporated.
7. Slowly mix in oats and raisins.
8. Using an ice cream scoop, scoop up the equivalent of 2 generous tablespoons (approximately the side of a golf ball). Place on prepared baking sheet (no more than 9 dough balls to a tray). Flatten balls slightly.
9. Bake for 17-20 minutes, rotating the sheet after 7 minutes and slightly flattening again, to ensure even making. Bake until cookies are golden and set.
10. For a crunchier cookie, allow the cookies to cool on baking sheet for at least 2-3 minutes before transferring to a cooling rack. For a slightly softer cookie, immediately transfer baked cookies to the cooling rack.
11. Store cooled cookies in a tightly covered container or package in cellophane bags tightly tied.

Notes: (1) For a less molasses flavored cookie, use 1 cup dark brown sugar and 1 1/3 cups light brown sugar, firmly packed. (2) I used 2 generous cups of Thompson seedless raisins, but may want to increase to 2 1/2 cups to ensure each cookie has a greater raisin presence. (3) These cookies have a great cinnamon flavor. If you desire a more subtle cinnamon flavor, reduce cinnamon to 2 Tablespoons. But you may be sorry for making that decision. (4) Recommend placing baking tray in the center of the oven and baking one tray at a time.


Views of the Illinois River and changing/falling leaves seen from the trails at Starved Rock State Park in Utica, Illinois (November 2016)