Monday, February 6, 2017

Raspberry Truffle Brownies


"All you need is love. But a little chocolate now and then doesn't hurt." (Charles M. Schultz). With Valentine's Day just around the corner, tulips seem to make a welcome return in abundance and appearance at the florists or in the floral section of the grocery stores. Other than deep blue hydrangeas and pink peonies, tulips are one of my three most favorite flowers. There is something almost magical about having a vase or pitcher filled with a beautiful monochromatic bouquet of flowers filling a room, particularly during the winter months. And when the groundhog forecasts six more weeks of winter, who doesn't want to get a daily dose of spring? Fresh flowers have a way of reminding us to persevere as 'this season too shall pass'? And what would Valentine's day be without some chocolate? Not that we actually need a holiday to encourage us to indulge in it, any holiday telling us we need more chocolate in our lives is one we all need to celebrate.


Given the choice between a homemade cookie and brownie, I tend to lean toward the brownie. But if given the choice between a box of chocolates from any of my favorite chocolatiers and these Raspberry Truffle Brownies, without hesitation, I would choose these brownies. And if there was ever a brownie screaming to be paired with some champagne or prosecco, this would be the one. Save the milk for a plate a cookies.


Similar to a flourless chocolate cake, these Raspberry Truffle Brownies are an incredibly dense, fudgy, rich, not for the faint of chocolate heart confection.


These brownies are made with two kinds of chocolate: unsweetened chocolate and semi-sweet (68-72% cocoa content). The unsweetened chocolate gets melted into the batter while the semi-sweet is chopped and mixed into it. Made with only one cup of all-purpose flour ensures these Raspberry Truffle Brownies are dense, rich, and truffle-like.


Adding another layer of flavor are the raspberry preserves (or jam) and black raspberry liqueur (e.g., Chambord). They provide a detectable hint of flavor without detracting from the lushness of the chocolate.

Allowing the melted chocolate, butter, and sugar to cool slightly ensures the (room temperature) eggs will not cook when whisked in.


When we think of brownies we often think of squares, not wedges. However, simply serving them in wedges transforms the 'ordinary' brownie into an 'extraordinary' dessert. Whether you use an 8" inch square pan or 9 inch springform pan will all depend on how you want everyone to feel when you serve them.  Note: Square and round pans of the same size (e.g., 9 inches) are not the same. It may sound a bit confusing, but being aware of pan size conversions is important particularly when you want to maintain the same depth of a baked good.


In a 350 degree (F) oven, the Raspberry Truffle Brownies bake for approximately 45 minutes. Begin checking them at 35 minutes and continue checking every 3 minutes to ensure you do not overback them. You might think when a tester inserted in the center of the brownies comes out with a few moist crumbs means they aren't done. But they will be. Baking them for 5 to 10 minutes longer may result in brownies having a very crisp bottom.


Once cooled to room temperature, dust the brownies with confectionary sugar. You can serve them with a side of lightly sweetened whipped cream, some vanilla or raspberry ice cream, or fresh raspberries to dress them up, but you don't have to as they are insanely delicious all on their own.


When serving, begin with cutting small wedges. These are really rich.


Serve them at room temperature or chilled. Chilling them makes them taste even fudgier and even more irresistible.


There are already four brownie recipes posted to the blog: Decadent Chocolate Brownies, Chocolate Brittle Brownies,  Marbled Cheesecake Brownies, and Coffee Blondies. With this recipe for Raspberry Truffle Brownies, you now have at least five brownie options to make for your brownie loving family and friends. Don't feel as if you have to wait until Valentine's Day to make any of them. A homemade gift of chocolate is a welcome gift 365 days a year.

Recipe
Raspberry Truffle Brownies (based on the recipe from The Castle Inn Riverside in Wichita, Kansas)
Easily serves 10-14 people

Ingredients
12 Tablespoons (1 1/2 sticks) unsalted butter
4 ounces unsweetened chocolate
2 cups granulated sugar
3 large eggs, room temperature
3 Tablespoons black raspberry liqueur (e.g., Chambord)
1/3 cup raspberry preserves or raspberry jam
3/4 teaspoon kosher salt
1 cup all-purpose flour
1 cup (170g) semi-sweet chocolate (68-72% cocoa content) chopped or chocolate chips
Confectionary sugar for dusting
Optional: Fresh raspberries

Directions
1. Preheat oven to 350 degrees (F). Line a 9 inch springform or 8 inch square baking pan with parchment paper. Set aside.
2. Melt butter and unsweetened chocolate over medium heat. 
3. Remove from heat and whisk in granulated sugar. Allow to cool for 5 minutes.
4. Whisk in eggs, raspberry preserves and raspberry liqueur.
5. Stir in flour and salt.
6. Transfer batter to the prepared pan.
7. Bake for approximately 45 minutes or until tester inserted into the center comes out with moist crumbs.
8. Cool on wire rack. Run small knife around edges of pan. Remove brownies from pan, transfer to serving platter and dust with confectionary sugar. Cut into wedges. Note: If using a square pan, but brownies into squares.

Notes: (1) Begin checking for doneness at 35 minutes and continue checking every 3 minutes to ensure you do not over bake them. (2) If you want to enhance the subtleness of the raspberry flavor, increase the amount of preserves/jam from 1/4 cup to a generous 1/3 cup.

Wednesday, February 1, 2017

Superbowl Appetizer Round-Up

Super bowl Sunday is right around the corner. An whether you are a football fan or not, it's almost impossible to not be drawn into some of all of the hoopla. Come Monday morning, some of us non-hard core football fans may not remember the final score, the MVP, or the most controversial call of the game. However, we will remember the commercials, the half-time show, and, of course, the food we noshed on during the game. Especially the food we didn't get enough of or over indulged in. Just in case you haven't yet decided what to serve this weekend or what else to make to go with some your standby favorites, here are some savory, hearty, crowd-pleasing appetizers your friends and family won't be able to stop talking about for days, weeks, maybe even a month later. These are so incredibly delicious, it wouldn't surprise me if some of them made a repeat appearance at an upcoming Academy Award party.


Sloppy Joe Sliders with Avocado Crema and Jalapeños


Pretzel Style Pigs in the Blanket


Deviled Eggs


Deviled Ham


Monday, January 30, 2017

Coffee Blondies


There are some things in life you missed out on and you wish you hadn't. And then there are other things you missed and are grateful you did. For me those two things would be coffee and 90's hip hop rap music. Somehow I managed to get through college and a significant part of my life without beginning or getting through the day with a cup of coffee. My caffeine infusion came from diet soda. With the rituals along with the distinctive aromatic and taste characteristics of coffee finally finding a way into my life, an affinity for almost anything having the flavor of coffee came with it. While reading through Sarah Kieffer's recently released cookbook, The Vanilla Bean Baking Book: Recipes for Irresistible Everyday Favorites and Reinvented Classics, I immediately knew it would be impossible to resist making the Coffee Blondies. After taking a bite of them, I again asked myself 'so how was it you managed to live so long without coffee in your life?'. Which, of course, happens to be of those questions not having a simple answer. Suffice it to say coffee in any form won't ever be leaving my life. And after listening to 90s hip hop rap for several hours this past weekend, I was reminded just how grateful I was for missing out on this musical genre. Although not knowing any of the words to the songs everyone else did made me wonder if I had gone missing for a decade.

Blondies are described as a cross between a cookie and a cake. While somewhat similar to a brownie in texture and presentation, they are typically vanilla rather than chocolate based. The combination of vanilla and brown sugar often gives blondies a 'caramel-like, butterscotch-like' flavor. Just as there are a myriad of variations to brownies, there are with blondies as well. The addition of dried fruits, chopped candies, and chocolate are the common variations. Infusing the batter with strong coffee or espresso is less common. Which maybe explains why these may be the most uncommingly addictive, flavorful blondies ever created.

Did I mention these mouthwatering Coffee Blondies also have chocolate and toasted pecans in them? 


Even without the vanilla ice cream, you need these Coffee Blondies in your life. Unless, of course, you want to add one more regret.


More than likely you have everything you need in your cupboard and refrigerator to make these Coffee Blondies. And, if by chance, you don't have any room temperature strong coffee in the house, combine some instant espresso with hot water. In other words, there should be nothing preventing you from making them.

After the butter and brown sugar have melted, the pot is removed from the hot stove top before the coffee is stirred in. Allow this mixture to cool to room temperature (or at least barely warm to the touch), before whisking in the egg and vanilla. Because if your mixture is too hot, you will end up scrambling the egg.

To create the batter, the dry ingredients (flour, baking powder, kosher salt) are mixed together with the butter/sugar/coffee/vanilla mixture. Be careful not to over mix before adding in the chocolate and pecans. Your batter will be very thick.


Having swapped out chocolate chips for chopped chocolate in my chocolate chip cookie and brownie recipes awhile back, I made this relatively minor change to these Coffee Blondies. Call it a personal preference. Although, chopping the chocolate allows it to have a more even distribution in the batter and ultimately in each bite. Whether you decide to use chocolate chips or chopped chocolate, toast the pecans before chopping them and adding them to the better. Not only do toasted nuts have a greater depth of flavor, their texture, especially when added to a batter, significantly improves as well.


In a preheated 350 degree (F) oven, the Coffee Blondies bake for 18 to 24 minutes if made in a 9"x12" parchment paper lined pan. Because I used a slightly different sized pan, my baking time was closer to 30 minutes. 


The most difficult part of this Coffee Blondie recipe is having the patience to wait for them to cool before you cut them into squares. Or maybe it's having the will power to stop eating them. The combination of the coffee, chocolate, brown sugar, and toasted pecan flavors are heavenly and slightly addictive.


Every now and then a cookbook comes along having the genuine intention of making you a better cook or a better baker whether you are a novice or consider yourself accomplished. Then there the cookbooks having the power to compel you to make every single recipe in the book. This is one of them. Forget about the personal satisfaction or therapeutic value associated with baking, making something everyone raves about is almost better than any caffeinated high you can get from either coffee or chocolate. Sarah Kieffer's cookbook, The Vanilla Bean Baking Book: Recipes for Irresistible Everyday Favorites and Reinvented Classics, is one of those rare books giving you all of that and more. Like these Coffee Blondies, you also need this cookbook in your life. I swear it's not something you should miss out on having.

Recipe
Coffee Blondies (slight adaptation to Sarah Kieffer's Coffee Blondie recipe from her book The Vanilla Bean Baking Book: Recipes for Irresistible Everyday Favorites and Reinvented Classics)

Ingredients
1 1/2 cups (213g) all-purpose flour
1 1/2 teaspoons baking powder
12 Tablespoons (1 1/2 sticks, 170 g) unsalted butter, cold
1 1/2 cups (297g) light brown sugar
3/4 teaspoon kosher salt
1/4 teaspoon instant espresso and 2 Tablespoons hot water or 2 Tablespoons strong coffee, room temperature
1 large egg, room temperature
1 1/2 Tablespoons vanilla
3/4 cup (86g) pecan halves, toasted and coarsely chopped
3/4 cup (128g) dark or semi-sweet chocolate coarsely chopped or dark or semi-sweet chocolate chips

Directions
1. Preheat oven to 350 degrees (F). Line a 9"x12" or an 8"x13" baking pan with parchment paper. Set aside.
2. In a medium bowl, whisk together flour, baking powder and kosher salt.
3. In a medium saucepan over medium heat, melt butter and brown sugar. Remove from heat and stir in espresso and/or coffee until well blended. Allow the mixture to cool to room temperature.
4. Whisk in egg and vanilla until well combined. Transfer to a large mixing bowl.
5. Add the dry ingredients to the wet ingredients, stirring until just combined. 
6. Add the pecans and chocolate, stir gently. Note: Batter will be very thick.
7. Spread batter evenly into the prepared pan. Smooth top with an offset spatula.
8. Bake 18-24 minutes or until the blondies are set on the edge and top is golden and beginning to form cracks. To test for doneness insert a wood toothpick or wooden skewer into the blondies. When removed it should come out with just a couple of crumbs. Note: My baking time was closer to 30 minutes, however, I used an 8"x13" baking pan.
9. Transfer to a wire rack. Allow to cool completely. Remove blondies from pan and cut into squares.
10. Serve immediately. Store any remaining blondies in a covered container.

Notes: (1) I combined the kosher salt with the dry ingredients instead of stirring into the butter and brown sugar mixture. The original recipe calls for adding the salt to wet ingredients. (2) My favorite chocolate to chop and use in cookies, bars, and brownies is Trader Joe's Pound Plus 72% Dark Chocolate. Whichever chocolate you use, make sure it's a semi-sweet or bittersweet one. (3) The original recipe called for 2 Tablespoons of room temperature strong coffee. I used hot water and instant espresso and it worked incredibly well.


Bisbee, Arizona (March 2016)

Wednesday, January 25, 2017

Superhero Muffins


Until recently, the words healthy, nutritious, and delicious seemed highly unlikely to be used together to describe anything on any list of favorite, crave worthy foods. At least in my world. Additionally, the idea of reaching for a muffin not slathered in icing or cream cheese frosting would have caused someone to ask 'are you alright?' If a couple of my running friends had not sung the praises of these Superhero Muffins, I may have continued to make delicious, unhealthy, and relatively nutritious muffin choices. Ones more than likely having a thick layer of topping made of either confectionary sugar or cream cheese or both. Pre- and post-run eating decisions have always been a bit of a challenge for me. Worries about how my body would react or what my stomach would tolerate generally has led me to make one of two choices: Eat nothing or eat something not likely to aid in optimizing my running performance or recovery. Fortunately change is possible.


In their recently released cookbook, "Run Fast Eat Slow", Shalane Flanagan and Elyse Kopecky shared their recipe for Superhero Muffins. These two highly accomplished runners have not only shattered my healthy/nutritious/delicious theory but they have gifted me with a long overdue nourishment option. I would be doing a great disservice to these muffins if I led to you believe they should only be eaten by runners, cyclists, swimmers, hikers, yogis, or athletes of any kind. Regardless of our level of physical activity (or non-activity), we all need these Superhero Muffins in our lives.


What makes these dense, flavorful, moist, satisfying, insanely delicious muffins so healthy and nutritious? Grated zucchini, grated carrots, toasted walnuts, raisins, cinnamon, nutmeg, vanilla, sea salt, eggs, melted butter, maple syrup, oatmeal, and almond meal. In other words, they are not made with processed sugars or processed white flour.


These Superhero Muffins are super easy to make. Two bowls, a whisk, and a spoon are all you need to create the batter. Wet and dry ingredients are mixed separately before being combined.

If you don't want to buy a whole bag of Almond Meal, stores like Whole Foods allow you to buy what you need. Although after you taste these muffins, you might decide it's more convenient to buy a bag of Almond Meal so you don't have to keep running back to the store to get some. Spoiler Alert: You will make these muffins more than once.

Grated zucchini can add 'too' much moisture to your batter, resulting in a 'wet mess' of a muffin. There are two things you can do to minimize this. Begin making this recipe by first grating the zucchini and allowing it to drain in a colander. When getting ready to measure, press down with a paper towel to remove more of the moisture. Using these two techniques resulted in a perfect muffin consistency.


Not willing to leave well enough alone, I made several changes to the original recipe. First, I toasted the walnuts before chopping and adding them to the mixture of dry ingredients. Second, I reduced the amount of nutmeg from 1/2 teaspoon to 1/4 teaspoon. As much as I like nutmeg, I wanted the cinnamon flavor to shine through. And lastly I used Grade A instead of Grade B maple syrup. So what's the difference other than flavor between the two of them? While both grades of maple syrup have many nutritional benefits and contains no fat, 'the potency and richness of Grade B maple syrup amplifies its health benefits'. If you want the absolute healthiest version of these Superhero Muffins, use the Grade B maple syrup.


Some have recommended adding a half cup of dark chocolate chips to the muffins. The nutritional value of dark chocolate comes into play when it's cocoa content ranges from 70-85%.

The are innumerable benefits to these Superhero Muffins, including but not limited to, the intoxicating aroma they have while baking. If, or rather when, you make them for friends and/or family, withhold telling them they are 'healthy and nutritious' until they taste them. Just in case they too operate under the assumption healthy and nutritious means they have a low deliciousness factor.

Recipe
Super Hero Muffins (Slight adaptation to the Superhero Muffins recipe shared in the cookbook Run Fast East Slow by Shalane Flanagan and Elyse Kopecky)
Makes 12 standard sized muffins

Ingredients
2 cups almond meal
1 cup old fashioned rolled oats
1/2 cup walnuts, toasted and chopped
1/2 cup raisins or currants (optional)
2 teaspoons cinnamon
1/4 to 1/2 teaspoon ground nutmeg
1/2 teaspoon sea salt
1 teaspoon baking soda
3 large eggs, lightly beaten
1 cup unpeeled and grated zucchini, drained and squeezed to remove any remaining moisture (about 1 medium sized zucchini)
1 cup peeled and grated carrot (about 2 medium sized carrots)
6 Tablespoons unsalted butter, melted and cooled slightly
1/2 cup Grade A or B (real) maple syrup 
1 teaspoon vanilla
Optional: 1/2 cup chopped dark chocolate (at least 70% cocoa)
Optional: 12 walnut halves for topping each muffin

Directions
1. Preheat oven to 350 degrees (F). Line a 12 cup stand muffin tin with paper muffin cups.
2. In a large bowl combine the almond meal, oats, walnuts, raisins, cinnamon, nutmeg, baking soda and salt. Also add chopped chocolate, if using.
3. In a medium sized bowl, mix together the eggs, grated zucchini, grated carrots, melted butter, maple syrup and vanilla.
4. Add wet ingredients to dry ingredients. Mix until just combined.
5. Using an ice cream scoop, spoon the batter into the muffin cups, filling each to the brim. Top each with a walnut half if using.
6. Bake for 25-35 minutes, or until tops are nicely browned and lightly spring back when pressed in the center and/or a cake tester comes out clean when inserted into the center of the muffin.
7. Transfer muffins to a cooling rack. Allow to cool completely before serving.
8. Individually wrap with plastic wrap or bag and store any remaining muffins in either the refrigerator or freezer.

Notes: (1) If you use gluten-free oatmeal, these muffins will be completely gluten free. (2) Grate, drain and press dry your zucchini before measuring. (3) Muffins can be stored in the freezer. Can defrost in the microwave on low power for 20-30 seconds.

Thursday, January 19, 2017

Hummus (Ottolenghi)


"There is something about words. In expert hands, manipulated deftly, they take you prisoner. Wind themselves around your little finger like spider silk, and when you are so enthralled you cannot move, they pierce your skin, enter your blood, numb your thoughts. Inside you they work their magic" (Diane Setterfield) The other day I was talking with a friend about the first episode in the new season of "Homeland" and found myself getting weepy. The transformation of one of the main characters along with how I anticipated parts of the new season to evolve had struck an emotional chord. I tried to tell myself to get a grip, this was a television show. But it didn't matter. Because I am someone who can be deeply moved words. And particularly by those found in a well-written article or book or heard in a film, and yes, even a television series. I have always been in awe of those with the ability, the talent, the power, the gift, to draw our emotions, imaginations, and thoughts in with their words. There have been times when I have had to temporarily take pause or walk away from a book because it had evoked either a new or deeply buried thought. I feel this same way watching films, but unlike watching a film or a television show at home, I can hardly walk out of a movie theatre without missing something or be so bold as to ask them to please stop the reel while I finish processing my thoughts (that would be too much even for me to ask). I love equally those books validating things I hold dear or believe as well as those shifting my perspective. "Angela's Ashes" changed the way I looked at poverty, "Columbine" changed the way I looked at the challenges and heroism existing in schools, "A Little Life" validated there can be a destructive element to resiliency, and "The Kite Runner" gave me some early insights into a culture I may have pre-judged but knew very little. Being able to share your thoughts and, yes, even emotions about a book, movie or television show, regardless of what they are one of the ways to make great connections with others. In the same way as sharing a meal does.


Four years ago I posted a recipe for Gameday, Everyday Hummus on the blog. It was one inspired by the person I believe has significantly shifted the way we cook, the way we entertain. No, not Martha Stewart. But rather culinary goddess extraordinaire, Ina Garten. Not only was I incredibly effusive in my praise for her recipe, I genuinely believed it would be the 'one' I would be making forever. Call me what you will, but over the Christmas holidays I (gasp) made a different hummus recipe. One heavily based on the recipe appearing in "Jerusalem: A Cookbook" written by Yotam Ottolenghi and Sami Tamimi.


In a single bite of the creamiest hummus I had ever tasted, I knew I would be (dare I say permanently?) switching my hummus loyalties. However, should Ottolenghi ever come across this blog (anything is possible, right?), he might say his original version is even creamier than the slightly modified one I made. So technically I may have yet to experience real hummus nirvana. Although for the moment, I am quite happy to be in this new state of hummus delirium.


So what was the change I made to this hummus recipe? Well, I used canned chickpeas instead of soaking dried chickpeas overnight and then cooking them the next day. It is quite possible that would have been less work than peeling the skins off of the canned chickpeas. But it isn't just the preparation of the chickpeas responsible for creating such a deeply flavorful, immensely addictive. The outrageous amount of tahini (one cup plus two tablespoons) is one of the genius aspects of this hummus.


Peeling the skins off of three and two-thirds cups of canned chickpeas may seem a tad tedious and time consuming. However, removing the skins completely transforms the texture of the hummus and takes it to a completely new hummus level. To keep yourself from going over the edge when peeling off the skins, replay the last episode of "This is Us" (because watching it once isn't enough); phone a friend who likes to talk or phone a friend who likes to listen; or just let let your thoughts wander for awhile. I didn't keep track of how much time I spent skinning the chickpeas, but I am pretty sure it didn't take a half hour. Maybe just 10 minutes. Trust me when I tell you the rewards you will reap from what sounds like a bit of insanity are inversely proportional to the investment of your time. And all you need to peel a chickpea is your thumb and the next two fingers. Put a chickpea between them and gently press and twist. How easy is that? Well much easier than and not nearly as dizzying as my summer college job of using my fingers to put the Cracker Jack prizes in the tiny slots of a conveyor belt. Yes, that really was my job one summer. And yes, peeling the chickpeas is critical.


Also key to the smoothness and creaminess of this hummus is how long it is processed in the food processor. After the chickpeas have been processed to a paste and the lemon juice, salt, garlic and tahini has been fully incorporated, the ice cold water is drizzled in. Set your timer for five minutes and let the food processor work its' magic.


Before transferring the hummus to your serving bowl, taste for seasoning. I added a tiny bit more salt and about a teaspoon of lemon juice. But having served some friends some over the top garlic-y hummus before the holidays, I dared not any more. So if you think your hummus doesn't seem to have a strong enough garlic presence, wait. In about an hour and definitely overnight, its' presence will be known to your palate. Would highly recommend the first time you make this hummus to use only four medium sized cloves of garlic. Depending on your affinity for garlic, make the adjustments the second time around.

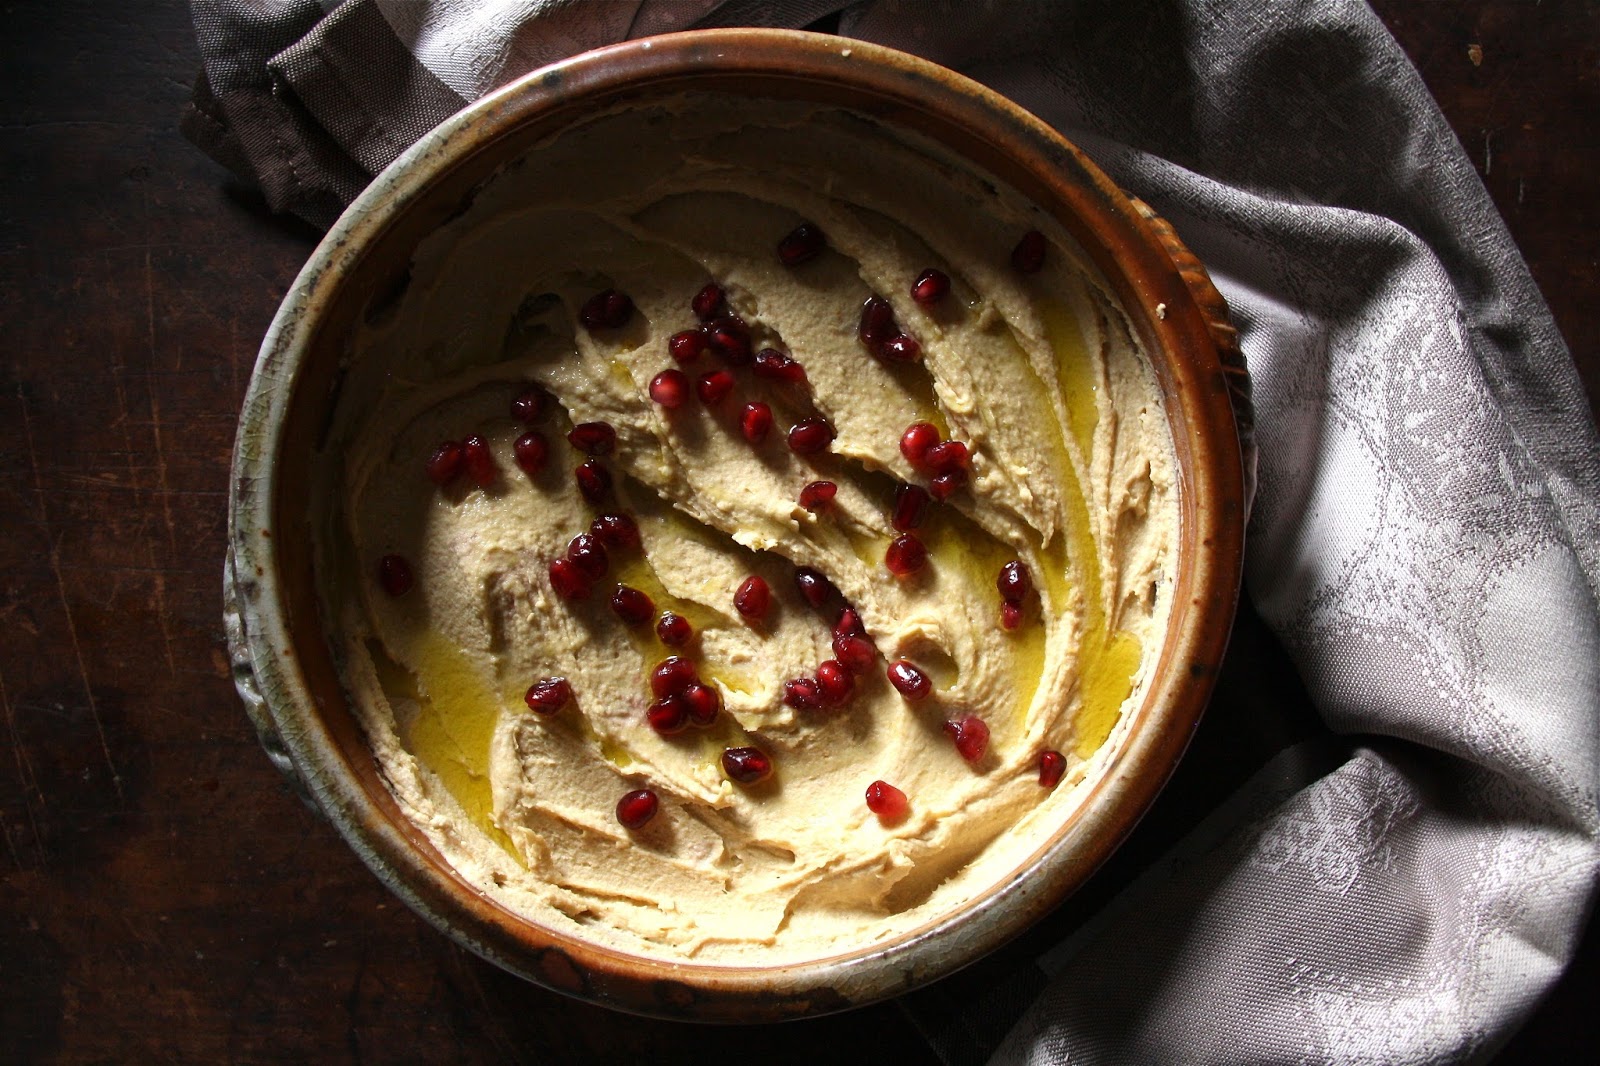
Cover the surface of the hummus with plastic wrap and chill for at least an hour or overnight before serving. When ready to surface, generously drizzle with extra-virgin olive oil and top with pomegranate seeds, toasted pine nuts, caramelized onions, or chopped parsley and paprika. Serve with toasted pita chips or vegetables. Sliced carrots, strips of red pepper, or cauliflower are some options.

Sometimes you have to let go of what you believe to be your favorite, best recipe. Sometimes you need to take a leap of faith and try a new one, maybe even one pushing you outside of your comfort zone. Because sometimes you and everyone else around you will discover a new definition of best exists.

Recipe 
Hummus (Ottolenghi) (a slight adaptation to the Basic Hummus recipe shared by Yotom Ottolenghi and Sami Tamimi in their cookbook Jerusalem)

Ingredients
3 2/3 cups canned chickpeas, drained and skins removed
1 cup plus 2 Tablespoons tahini
2-4 garlic cloves, crushed
4 Tablespoons freshly squeezed lemon juice, plus more to taste
1 1/2 teaspoons sea salt, plus more to taste
4 to 7 Tablespoons ice cold water
Extra-virgin olive oil to finish
Optional garnishes: Pomegranate seeds; pine nuts; caramelized onions; or chopped parsley and paprika
Homemade or store-bought toasted pita bread, pita chips, fresh vegetables (carrots, red peppers, cauliflower)

Directions
1. Put chickpeas in the food processor. Process until a thick paste forms.
2. Add the tahini, garlic cloves, sea salt, and freshly squeezed lemon juice. Process until ingredients are well blended.
3. Add the ice cold water and process for at least 5 minutes or until smooth and creamy. Note: Begin with 4 1/2 Tablespoons of ice cold water. If mixture isn't creamy, enough (and it might not be) slowly add the additional ice cold water to reach an ultra creamy consistency.
4. If necessary season to taste with additional lemon juice and/or sea salt.
5. Transfer hummus to serving dish cover its' surface with plastic wrap and chill for at least one hour or overnight.
6. When ready to serve, remove from the refrigerator at least 30 minutes before serving. Top with a generous drizzle of extra-virgin olive oil. Serve as is or garnish with chick peas; pomegranate seeds; pine nuts; caramelized onions; chopped parsley; and /or paprika.

Note: (1) To make this hummus using dried chickpeas, put 1 /14 cups of chickpeas in a large bowl and cover them with water at least twice their volume. Leave to soak on the counter overnight. The next day, drain the chickpeas; place in a medium/large saucepan over high heat adding the drained chickpeas and 1 teaspoon baking soda. Cook for 3 minutes, stirring constantly. Add 6 1/ 2 cups of water and bring to a boil. Cook, skimming off any foam and any skins that float to the surface. The chickpeas need to cook for 20 to 40 minutes, depending on type and freshness, sometimes longer. Once done, they will be very tender, breaking up easily when pressed between your thumb and next two fingers (almost but not quite mushy). Drain the chickpeas. Measure out 3 2/3 cups. 

Sculptures at the Sydney and Walda Bestoff Scuplture Garden in New Orleans, Louisiana