Monday, March 19, 2018

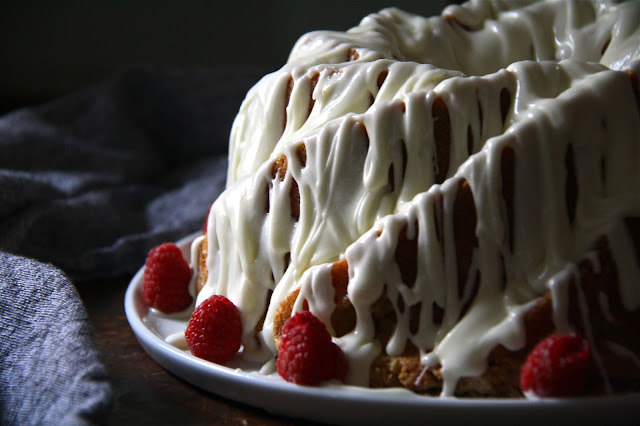
Raspberry Buttermilk Pound Cake with Vanilla Glaze


This past weekend we celebrated a significant 'milestone' birthday of one of our friends with a homemade five course meal interspersed with a couple of competitive games of Prosecco Pong (oh yes, we did!). The menu was intended to be one of the surprises for the birthday girl but her wish for a cheesecake as the 'birthday cake' was our command. Given her love of fresh fruits and famous for her fresh fruit salads, the Creamy Cheesecake Topped with Fresh Berries seemed like it might be the perfect choice. For those of you who have read the blog over the years, you know how much honoring and remembering birthdays means to me. It's the one day of the year where your friends let you know you matter to them and where you let your friends know they matter to you.

Keeping track of the likes and dislikes of friends has been something I have tried to do over the years. Sometimes I learn these things by listening, sometimes by asking, and sometimes by simply paying attention. Although there have been occasions when I have forgotten some of them. Usually not intentionally. But truth be told I relish the opportunity to shift a dislike into a like. Bu when planning the birthday menu I had honestly 'forgotten' one of my friends doesn't like anything made with tomatoes. It wasn't until we were plating the Lasagna Bolognese I relearned this. All I could hope for was this Lasagna Bolognese, one made with the less acidic tomato paste, would appeal to her non-tomato liking palate. Unless she was just trying to alleviate my angst over my forgetfulness, I think I may have successfully pushed her into reconsidering this dislike going forward. But there was one dislike I did remember, but intentionally tried to shift to the like column. In a casual conversation, I learned the birthday girl wasn't a fan of polenta. And a Mushroom and Herb Polenta was one of the courses planned for her birthday dinner. I had a choice. Either change that course or take the risk I could actually shift her thoughts about it. It was a potentially risky choice, given the fact it was her birthday dinner. But I decided to be a risk taker, as I felt pretty confident this recipe would turn any polenta 'disliker' into a polenta 'liker', possibly into a polenta 'lover'. I suppose I could have always feigned forgetfulness if she had politely taken only one bite. My only problem would be trying to repress what I knew (and I knew that wasn't going to happen). So it was with fingers crossed when the Mushroom and Herb Polenta was brought to the table and served. As it turned out, everyone, including the birthday girl, ate every morsel of the polenta on their plates. Maybe it was the infusion of the grated Parmigiano-Regianno cheese into the polenta or the melted Taleggio Cheese over it or the herb and truffled sautéed mushrooms responsible for decidedly turning one of her dislikes into a like. Whatever it was, I was happy to be two for two for the day.

A couple of weeks ago the birthday girl shared a beloved family recipe for a Buttermilk Pound Cake with me. Before making this recipe, I first had to figure out how to quantify the 'pinches of' measurements for two of the ingredients. Which meant spending some time going down the proverbial buttermilk pound cake rabbit hole. My search results for determining what a pinch of salt and pinch of baking soda should be was, as expected, not as easy as I hoped it would. Amounts ranged from 1/4 teaspoon to 1/2 teaspoon for each of them. Small differences between them, but sometimes small differences make big differences. Decisions, decisions.

Whenever someone gives me a recipe to make, especially one I haven't tasted, I have a tendency to tinker with it. Adding a thick Vanilla Glaze and along with layers of raspberry preserves were going to be my changes to the original Buttermilk Pound Cake recipe. It's been a risk taking couple of weeks.


Unlike many pound cake recipes following the 1-2-3-4 formula (1 cup butter, 2 cups sugar, 3 cups flour, 4 eggs), this one uses a 1-3-3-4 (1 cup butter, 3 cups sugar, 3 cups flour, 4 eggs). The result is a slightly moister, perfectly sugary, more delicious pound cake.


While spending time looking for guidance on salt and baking soda amounts, I discovered some recipes recommended beating the sugar and butter for upwards of 11 minutes. At first I thought this sounded a bit excessive, however, seeing how the butter/sugar mixture transformed into incredible fluffiness and a perfect consistency for the eggs to be incorporated one at a time, I was thankful for having stumbled upon this recommendation. Instead of adding both dry ingredients and buttermilk in two additions, I began with mixing in 1/4 of the dry ingredients followed by 1/3 of the buttermilk. This sequence was repeated for a total of three additional times, finishing with the dry ingredients. The result was a smooth, thick, creamy, beautiful batter.


This Raspberry Buttermilk Pound Cake with Vanilla Glaze can be made in either a tube (angel food cake) pan or bundt pan. Aesthetically I think a bundt pan creates a more eye-appealing cake. But that's just me. After spooning one-third of the batter into the pan, I piped one-half of the raspberry preserves over the first layer using a pastry bag (you could also use a ziploc bag and cut one of the corners to create a tip). Without disturbing the first layer of raspberry preserves, I added another third of the batter, then the remaining raspberry preserves, and finally finished up with the batter as the top layer. Note: When adding the raspberry preserves stay away from the interior and exterior edges of the pan to avoid having the preserves bleed into the edges of the pound cake.

When putting the bundt pan into the oven, place it on a baking sheet to catch any of the batter that may spill over (a lesson learned after the fact). In a preheated a 325 degree (F) oven, the Raspberry Buttermilk Pound Cake bakes for approximately 1 hour and 25 minutes or until a testing stick inserted into the cake comes out clean. My baking time was exactly 1 hour and 25 minutes. Note: Do not open the oven to check on the cake for the first 60 minutes of baking time.

Allow the baked pound cake to cool in the pan for 20 minutes before carefully unmolding it. Depending on your bundt cake pan or your preferences, you can serve this Raspberry Buttermilk Pound Cake as is (with or without a dusting of confectionary sugar). But if you want to 'dress' it up at bit, I would strongly encourage you to make the Vanilla Glaze.


You can make the Vanilla Glaze as thick or as thin as you like. Less or more heavy cream will give it the desired consistency. You could also probably swap out whole milk for the heavy cream. Just add either of those liquids slowly to the sifted confectionary sugar, particularly if you want your glaze to have a thicker consistency.

Once the glaze sets, the cake is ready to serve!


Honestly, this is the best pound cake I have ever tasted! And if pound cake is one of those things on your 'dislike' list, this Raspberry Buttermilk Pound Cake with Vanilla Glaze will definitely have you reconsider changing your view of it. Take the risk and make it for your family and friends. It really, truly is an incredibly flavorful, moist, perfect crumb cake. One that definitely won't last long after it's made.

Recipe
Raspberry Buttermilk Pound Cake with Vanilla Glaze (slight twist to Aunt Faulie's Pound Cake recipe)

Ingredients
Buttermilk Pound Cake
1 cup unsalted butter, room temperature
3 cups (600g) granulated sugar
4 large eggs, room temperature
1/2 teaspoon kosher salt
3 cups (390g) all-purpose flour
1 cup buttermilk
1/4 teaspoon baking soda
2 teaspoons vanilla
1/2 cup (166g) raspberry preserves

Vanilla Glaze
1 pound confectionary sugar, sifted
1 pint (8 ounces) heavy whipping cream, added slowly
3 Tablespoons corn syrup
1 teaspoon vanilla
pinch of kosher salt

Directions
Buttermilk Pound Cake
1. Preheat oven to 325 degrees (F). Prepare a tube or bundt pan. Set aside.
2. In a medium sized bowl, mix together the all-purpose flour, salt, and baking soda. Set aside.
3. In a standing mixer fitted with a paddle attachment, beat the butter until smooth (approximately 1-2 minutes). Slowly add the granulated sugar and continue to beat on high. Continue beating the butter sugar mixture for approximately 11 minutes or until your mixture is light and fluffy.
4. Add in the eggs one at a time, beating well after each addition.
5. Mix in the vanilla.
6. Beginning with the flour mixture, add the dry and wet (buttermilk) ingredients in a total of 7 alternate additions. Note: Begin with 1/4 of the flour mixture, followed by 1/3 of the buttermilk.
7. Scrape 1/3 of the batter into the prepared pan. Using a pastry bag or ziplock bag with one tip cut, add 1/2 of the raspberry preserves, being careful to pipe at least 1 inch from the interior and exterior edges of the pan. Do not use a knife to swirl in the preserves, leave as piped. Add another 1/3 of the batter, followed by the remaining 1/2 of the raspberry preserves. Finish with the last 1/3 of the batter. Smooth top of the pound cake with an offset spatula. Place bundt pan on a baking sheet and place in the preheated oven.
8. Bake the pound cake for 1 hour and 25 minutes or until a testing stick comes out clean. Do not open the oven during the first hour of baking.
9. Remove the baked pound cake from the oven. Allow to cool for 20 minutes in the pan before unmolding onto a cake platter or cake stand
10. Allow the unmolded pound cake to cool completely before glazing.

Vanilla Glaze and Assembly 
1. In a medium sized bowl, add the confectionary sugar, corn syrup, salt, and vanilla. 
2. Using a hand mixer on medium speed, slowly add the heavy whipping cream until it reaches the desired consistency.
3. Pour or spread the vanilla glaze over the cooled pound cake. Allow the glaze to set before serving.
4. Store the pound cake covered at room temperature. It's best enjoyed within 48 hours, however, if by chance you have any left after that, enjoy it.

Notes: (1) If you don't want to make the vanilla glaze, sift confectionary sugar over the top. (2) The raspberry preserves added another flavor dimension to this poundcake, however, it would still be delicious without them. (3) The original recipe called for one teaspoon of vanilla, but I increased it to 2 teaspoons.

Tuesday, March 6, 2018

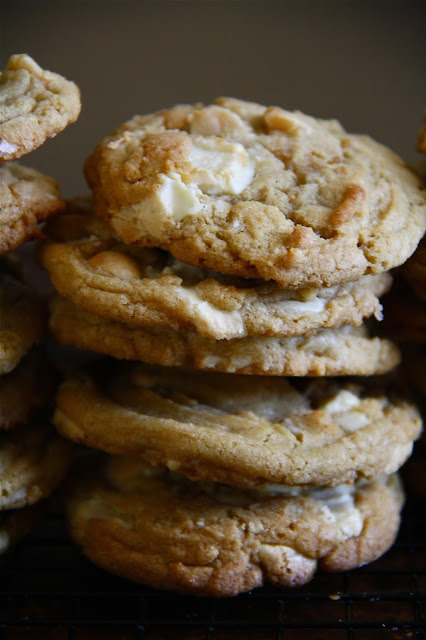
White Chocolate Chunk and Macadamia Nut Cookies


Spring will be here in less than three weeks. It cannot get here soon enough. Beside the shift in the weather, spring brings one of my favorite flavors. Tulips. Given the choice between a bouquet of roses and a bunch of tulips, tulips always win. If given the choice between hydrangeas and tulips, it would be a draw. I wouldn't, couldn't choose between them. Of the many things on my ever evolving bucket list is spending time walking through and capturing the beauty of rows upon rows of tulips found in an orchard. If given the choice between traveling to the tulip farms in either Michigan or Washington, I would lean toward Washington. Mostly because I long to return to the captivating, breathtaking beauty of the northwest. Although a less than three hour drive to the tulip farms in Michigan seems the most practical option this spring. Choosing practical isn't necessarily one of my strong suits.


Until I decide where and when I can check off one of the things high on my bucket list, I will be buying bunches of tulips at least weekly. At least until the hydrangeas come into season.


As I was doing some early spring cleaning in my cupboards, I discovered I had several unexpired packages of macadamia nuts. They were bought with the intention of being used to make my Key Lime Pie with Macadamia Nut Crust. A Christmas dessert request that wasn't granted (too many competing requests this year). Rather than have the macadamia nuts go to waste, I thought 'Why not use them to make White Chocolate Chunk and Macadamia Nut Cookies?' instead. 

After years or rather I should say decades of using chocolate 'chips', I discovered chopped chunks of chocolate create a more satisfying and even more beautiful cookie. Uneven, chopped pieces create pools of intensely satisfying bites of chocolate. 


Like all of the chocolate chip cookies I make these days, an ice cream scoop is used to create perfect round balls and they get some chilling time in the refrigerator before going into the oven. I have chilled dough for as a little as two hours and as long as overnight. But if not waiting until the next day to bake, I prefer to let the dough chill for at least four hours. I can't really explain why I think four hours is better than two hours or three hours. I really do wish I could give you a credible culinary answer to this recommendation. If there is one.


The dough for these White Chocolate Chunk and Macadamia Nut Cookies is made in a large bowl. No mixer required. In other words, they couldn't be easier to make. But before mixing up a batch, make sure to roast your macadamia nuts to further enhance their flavor. See the roasting time recommendation in the notes below.


Instead of baking up the entire batch of these cookies, I froze about dozen of the balls of dough. I love being able to bake up a batch of cookies for an impromptu gathering or to satisfy a craving. 


I would like to go so far as to say these are the BEST White Chocolate Chunk and Macadamia Nut Cookies in the universe. But sometimes the use of the word 'best' as a descriptor is a double-edge sword. So instead I will say they are an irresistibly addictive, indulgence. Quite possibly falling into the 'to die for' or 'make you go weak in the knees' cookie categories. The combination of white chocolate and macadamia nuts in a cookie will take your cookie loving palate to places it may have never gone before. Additionally these White Chocolate Chunk and Macadamia Nut Cookies are as refreshing of a change from a 'chocolate' chip/chunk cookie as there is with a change in seasons. If you like white chocolate and macadamia nuts, you fall in love with these cookies. Especially if you make them with chunks versus chips of white chocolate. 

Recipe
White Chocolate Chunk and Macadamia Nut Cookies

Makes 28-30 large cookies

Ingredients
1 cup unsalted butter, cut up into pieces
3 1/4 cups (416 g) all purpose flour
1 1/4 teaspoons baking powder
1 teaspoon baking soda
1 1/2 teaspoons kosher salt
1 1/4 cups (250 g) light brown sugar, firmly packed
1/4 cup (50 g) dark brown sugar, firmly packed 
1/2 cup (100 g) granulated sugar
2 large eggs, room temperature
1 1/2 to 2 teaspoons vanilla
12 ounces white chocolate chopped into chunks (recommend Ghiradelli White Chocolate)
1 cup (126 g) macadamia nuts, roasted and coarsely chopped
Optional: Flaky sea salt for finishing

Directions
1. In a heavy bottomed saucepan, melt butter on lowest heat possible to ensure the butter does not sizzle or lose any of its' moisture. Stir occasionally. Once the butter has melted, remove from heat and set aside.
2. In a medium sized bowl, whisk together the flour, baking powder, baking soda and kosher salt. Set aside.
3. In a large bowl, pour in melted butter. Add brown sugars and granulated sugar, whisking until sugar has melted. 
4. Add eggs, one at a time, whisking after each addition.
5. Stir in vanilla.
6. Using a wooden spoon or silicone spatula, stir in flour mixture until barely blended and still a teeny bit floury.
7. Add in chopped white chocolate and roasted/chopped macadamia nuts. Stir until all ingredients are combined.
8. Using a large ice cream scooper (large golf ball sized), scoop dough and then roll into balls. Place on a parchment paper lined cookie sheet. Chill at least 4 hours or overnight.
9. Before baking sprinkle each cookie with a bit of flaky sea salt. Or bake without the addition of the sea salt.
10. In a preheated 360 degree (F) oven, bake cookies until the tops are cracked and lightly golden. Rotate the pan halfway through the baking process. Baking time is approximately 10-12 minutes, however, mine ranged from 13-14 minutes. Note: Midway through the baking process tap the cookie sheet several times on a large flat surface.
11. Allow cookies to cool on pan for 5 minutes, then transfer to a wire rack to cool completely.
12. Enjoy immediately! Store cookies in a sealed container.

Notes: (1) Chilling the balls of dough overnight is a game-changer. When baking each sheet of cookies (about 8-9 will fit on a large baking sheet pan), keep the remaining dough in the refrigerator. If you are not a big fan of dark brown sugar, use all light brown sugar. (2) To roast the macadamia nuts, place a baking pan in a preheated 325 degree (F) oven and and bake for 10-12 minutes or until lightly browned and fragrant. (3) Balls of dough can be frozen in a freezer ziplock bag for up to a month. When ready to bake, place the frozen balls of dough on a parchment paper lined cookie sheet. Baking time may need to be increased slightly.

Thursday, March 1, 2018

Meatballs in Marinara


Over the course of the last seven years, Italian style meatballs seem to have reinvented themselves. No longer is their presence reliant or co-dependent on a large platter of pasta. No longer are they satisfied with their second billing status. No longer are they relegated to the 'sides' section of a menu. No, meatballs have asserted their independence and taken center stage. Whether served as appetizers or as the main course, one can't help but wonder why it took so long for meatballs to finally take their rightful place on menus and our tables. Regardless of the plausibility of any one of the working theories aimed at trying to explain this long overdue meatball paradigm shift, meatball madness doesn't seem to be going away anytime soon. 


These aren't your average bite-sized meatballs. No, they fall into the 'go big or go home' category. 


I have been looking for a new meatball recipe for awhile now. In the process, I discovered there are quite a few myths and mistakes surrounding them. Bon Appetit shared a number of them in an article published six years ago. From salt doesn't matter, to who needs fresh herbs, to eggs are the source of moisture, to mixing with a spoon, to one size fits all meatballs, to rolling them dry, to skipping the sear, I would venture to bet very few of us would agree they should all be universally dispelled. Particularly the 'to sear or not to sear' meatball making method. Spoiler Alert: These meatballs are first browned at high heat in the oven and then braised in marinara sauce.


If you don't yet have a favorite, beloved, to-die-for meatball recipe in your arsenal, then today is your lucky day. 


Honestly I was tempted to use a jarred tomato sauce when making these meatballs. You know, the semi-homemade, how is easy is that approach we have all found ourselves doing at one time or another. But this wasn't going to be one of those times. And the decision to stay on the completely homemade course allowed me to discover the deliciousness of this marinara sauce. Seriously, is there anything easier to make than a marinara? This one comes together in less than hour and delivers big, bold flavors. One the best things about a homemade marinara sauce is that it can be made early in the day or the day before. Enhanced flavor is an added benefit of giving it some rest time. 


Making meatballs is a messy business. But using your hands instead of a spoon or food processor helps to ensure you don't end up with an over mixed paste. So get ready to get your hands dirty! These meatballs are made with the trifecta of ground meats (beef, pork, and veal), fresh bread crumbs, whole milk ricotta, eggs, fresh herbs, spices, kosher salt, and pepper.


Using an ice cream scoop helps to create uniform size meatballs. Using a scoop 2 1/4" in diameter, this recipe makes 20-22 meatballs. Twenty of them fit perfectly in a lightly oiled 9"x13" pan (I threw the other two in the freezer.) In a preheated 425 degree (F) oven, the meatballs first bake for 15-20 minutes or until the tops are lightly browned. Before adding the marinara sauce to the pan, it's critical you drain the liquified excess fat. Once drained, pour three cups of the marinara sauce over the meatballs and bake them for approximately one hour at a lowered 325 degree (F) temperature. You might think the meatballs would dry out with such a long baking time, but they don't. The marinara sauces serves as a braising liquid and keeps them moist. An added benefit to the long baking time further is an even deeper flavor to the marinara sauce. Notes: The meatballs can be formed early in day. Cover and store in the refrigerator until ready to bake. Remove from oven for approximately 30 minutes before baking.


There are a number of finishing options for these meatballs. The simplest one is sprinkling them with freshly chopped parsley and freshly grated Parmigiano-Reggiano cheese. Don't forget the garlic bread and/or garlic bread sticks.


To kick them up a notch, top the meatballs with thinly sliced pieces of fresh mozzarella, return to a hot oven (450 degrees F) for approximately 5 minutes to let the cheese melt. Then finish with freshly grated Parmigiano-Reggiano cheese and chopped fresh herbs (parsley and/or basil). Whether you serve them just like this or turn them into meatball sliders, everyone will be swooning over them.


When plating the meatballs, serve with either a side of remaining warmed marinara sauce or set them atop a small pool marinara sauce. Have some garlic bread and/or garlic sticks within reach so everyone can mop up the marinara. Trust me when I say it would be akin to committing a sin to leave any of this mouthwatering marinara sauce on the plate.


Invite some of your family and friends over and make these Meatballs in Marinara. Soon! Open up a couple bottles of a great red wine and make some garlic bread/garlic breadsticks or slice up a dense Italian bread. You will be guaranteed a memorable, fun, 'they will be talking about this for days' evening. Unless, of course, your choice of wine is, well, how shall I put it.....lackluster. 

I will venture to guess these Meatballs in Marinara are destined to become your favorites. However, in case you ever get tired of making THESE meatballs, there are several other meatball recipes on the blog: Swedish Meatballs with Lingonberries; Chile-Cumin Lamb Meatballs with Yogurt and Cucumbers; and Bucatini and Meatballs. Wishing you many happy meatball moments!

Recipe
Meatballs in Marinara (inspired by Fine Cooking's Spaghetti and Meatballs recipe)
Makes 20-22 very large meatballs

Ingredients
Marinara Sauce
Marinara
3 Tablespoons olive oil
1 large onion, diced
4-5 cloves garlic, minced
2 teaspoons fresh oregano or 1 teaspoon dried oregano
1 bay leaf, fresh or dried
1 Tablespoon tomato paste
2 cans (26-28 ounce sized) diced tomatoes
1 teaspoon kosher salt

Meatballs
1 pound ground beef (80-85%)
1 pound ground pork
12 ounces ground veal
2 cups fresh coarse bread crumbs
1 cup whole milk ricotta
4 large eggs
4 Tablespoons chopped parsley
2 Tablespoons chopped fresh oregano or 1 Tablespoon dried oregano
1 1/2 - 2 teaspoons fennel seeds
1/4 to 1/2 teaspoon Aleppo pepper or red pepper flakes
3 teaspoons kosher salt
1 teaspoon ground pepper

Directions
Marinara
1. Heat olive oil in heavy duty large saucepan over medium heat. Add onion, garlic, oregano, and bay leaf. Cook, stirring often until the onion is soft (approximately 6-10 minutes).
2. Add the tomato paste and cook, stirring constantly, until darkened (approximately 3-4 minutes).
3. Add the diced tomatoes and salt. 
4. Bring to a boil, then simmer over low heat, stirring frequently, until the sauce has reduced by about a third (approximately 40-60 minutes).
5. Remove bay leaf and season to taste with additional salt.
6. Transfer sauce to a food processor and puree. Return sauce back to pan, cover, and keep warm.

Meatballs
1. Preheat oven to 425 degrees (F). Oil a 9"x13" baking pan with olive oil. Set aside.
2. In a large bowl, combine the ground meats, breadcrumbs, ricotta, eggs, parsley, oregano, fennel seed, Aleppo pepper, salt and pepper. Mix gently but thorough with your hands.
3. Using a large ice cream scoop, make 20-22 meatballs 2 1/4" in diameter. Roll the meatballs to make them round. Arrange snugly in the baking pan.
4. Bake for 15-20 minutes or until the tops of the meatballs have lightly browned. Remove from oven, remove and drain the excess fat.
5. Decrease oven temperature to 325 degrees (F).
6. Pour 3 cups of the sauce over the meatballs. Return to oven and continue to bake for 60 minutes.
7. Choose a finishing option. Serve with additional Marinara Sauce and garlic bread sticks or on top of buttered/grilled small rolls to make Meatball Sliders.
8. Wrap any leftover meatballs and marinara sauce and store in the refrigerator for up to 3 days. They reheat beautifully.

Finishing Options:
1. Sprinkle top of the meatballs with chopped parsley and freshly grated Parmesan Cheese.
2. Place thin slices of fresh mozzarella over the meatballs, place in a 450 degree (F) oven and bake until cheese begins to melt (approximately 5 minutes. Sprinkle top of the meatballs with chopped parsley and/or thinly sliced basil and freshly grated Parmigianno-Regianno Cheese.

Notes: (1) Make your breadcrumbs in a food processor. I like to use ciabatta rolls when making fresh, coarse breadcrumbs. If ciabatta is not available, use another dense bread. (2) The marinara sauce can be made earlier in the day or the day before. Cover and refrigerate until ready to use. After removing three cups of the sauce to pour over the meatballs, reheat remaining sauce when ready to serve. (3) If you don't have time to make your own marinara, use your favorite jarred marinara sauce. But don't tell anyone I told you to do this. (4) I used BelGioioso's whole milk ricotta and fresh mozzarella.


Sunday, February 25, 2018

Chocolate Sheet Cake with Milk Chocolate Buttercream Icing


After an almost two month hiatus from running, one that felt like an eternity, I ran for the first time last weekend. As I was getting ready for this long awaited return to running, you would have thought I was about to run some high stakes or challenging course race. I felt queasy, nervous, and overly anxious about a two mile run. Yes, just two short freakin' miles. But in my post injury head, it wasn't only this distance I was worried about. No, what was taking up even more worry space in my mind was whether or not I would re-injure myself. As well as whether my body was truly healed or was it a case of wishful thinking. The bad news, relatively speaking, was my running pace was slower and much more labored than it had been before the injury. And the good news? After getting myself into a pre-run tither, it was a pain free run. I was simultaneously bummed about my pace and elated over the absence of wincing discomfort. Which I suppose you could say the glass was half-full, maybe a little more than half full. Having this 'first' post-injury run now behind me, I continue to be hopeful any lingering trepidation, including the queasiness, will continue to fade each time I go out for a run. I have only three months to rebuild up my endurance and speed (again relatively speaking). In early June, we have a destination run on the east coast. A ten miler. Piece of cake, right?

Speaking of cake, I have only recently become a big fan of the homemade sheet cake. This would be a significant shift from my love for and loyalty to layer cakes. Like a slab pie, there is something irresistible about a sheet pan cake. It's rustic and humble in its' presentation, yet so incredibly appealing. And so much easier to cut than a layered cake! Particularly when someone says they only want a very small sliver (really? chocolate cake with chocolate frosting and someone requests only a sliver? crazy!). This, however, may be one of those cakes where anyone with unswayable self-control will be requesting a second sliver. The taste of the icing alone will have them giving it up.


As much as I love this chocolate cake, it's the 'icing on this cake' that I am deeply, madly in love with. Paired together they are a match made in heaven.


After indulging myself with a small piece of this Chocolate Sheet Cake with Milk Chocolate Buttercream Icing I cut it up into pieces and gave it all away. I regretted this random act of kindness as soon as I got home with my empty baking sheet. Oh, how I wanted to have another piece of this insanely delicious cake!

The recipe for this one bowl chocolate cake has become one of recent favorites. Previously I had only made it as a two layer cake. However, there is enough batter in the recipe to make a 9"x12" or 9"x13" sheet pan cake.


This cake's deep, dark color comes from both the Dutch-processed cocoa and the coffee. These two ingredients create a cake with the most perfect color to contrast to the Milk Chocolate Buttercream Icing. As a side note, if you ever come across a recipe for a chocolate cake calling for warm water, replace with it a cup of coffee. Not only will the coffee intensify the flavor of the chocolate, it will deepen the color of the baked cake.


This Milk Chocolate Buttercream Icing is velvety smooth, glossy, and creamy delicious. The recipe makes enough to generously frost the sheet cake. You might even have a spoonful or two left to secretly enjoy.


Whip the icing using either a standing mixer with a whisk attachment or with a hand held mixer. The addition of heavy whipping cream adds suppleness, lusciousness, and richness to this Milk Chocolate icing.


The use of an offset spatula or large spoon to swirl the icing on top of the sheet cake makes the most beautiful swoopy looking cake. If you want a fancy, fussy finish, pipe on the icing using a pastry bag and your favorite pastry trip.


Top with sprinkles or not top with sprinkles? That was the question. After some deliberation, I decided the Chocolate Sheet Cake looked sexier without them and more whimsical with them. So depending on your mood or the one you are trying to create, either leave them off or sprinkle them on. Or if you can't really decide, serve the cake with a bowl of them on the side and let everyone choose for themselves. Several years ago, I came across the Callebaut's Chocolate Crisp Pearls for the first time in an incredible chocolate shop in Boulder, Colorado. Ever since then, they have been my favorites.


The next time you want to make a cake for your family and friends or to simply give it away, make this Chocolate Sheet Cake with Milk Chocolate Buttercream Icing. Or ice it with the Peanut Butter Frosting used in the making of the layered Chocolate Peanut Butter Cake. I promise, whether you frost this cake with a rich, creamy milk chocolate icing or a smooth, lush peanut butter icing, everyone will go wild for your sheet cake! 

If serving to a large crowd, consider serving it on a large wooden board rather than in the pan or on a platter. Note: Don't remove the parchment paper if serving it on a wooden board.

Recipe
Chocolate Sheet Cake with Milk Chocolate Buttercream Icing (minor changes to Julia Turshen's Happy Wife, Happy Life Chocolate Cake recipe as shared in her cookbook "Small Victories: Recipes, Advice, and Hundreds of Ideas for Home-Cooking Triumphs")

Serves 16-20  people, depending on how you slice it

Ingredients
Cake
1 1/4 cups (160 g) all-purpose flour 
1 cup (200 g) granulated sugar
3/4 cup (75 g) Dutch-processed cocoa powder, sifted if lumpy
1 teaspoon baking soda
1 teaspoon baking powder
1/2 teaspoon kosher salt
8 Tablespoons (113 g) unsalted butter, melted and cooled
2 large eggs, room temperature
1 cup strong black coffee cooled or 1 rounded teaspoon espresso powder mixed into 1 cup boiling water then cooled
1 cup buttermilk
1 teaspoon good quality vanilla

Icing
1 cup (8 ounces) unsalted butter, room temperature
1 1/2 cups (188 g) confectionary sugar, sifted
2 teaspoons vanilla
8 ounces good quality milk chocolate, chopped, melted. and slightly cooled
Pinch of sea salt or Kosher salt
2-3 Tablespoons heavy whipping cream
Optional: Chocolate Crisp Pearls (Recommend the ones made by Callebaut) or Chocolate Sprinkles

Directions
Cake
1. Preheat oven to 350 degrees (F). Line a  9"x13" or 9"x12" baking pan with parchment paper. Lightly butter and/or spray top of parchment paper and sides of pan if not covered with parchment paper.
2. In a large bowl, whisk together the flour, sugar, cocoa powder, baking soda, baking powder, and salt.
3. Add melted butter, eggs, coffee, buttermilk, and vanilla. Whisk until batter is thick and smooth.
4. Pour batter into prepared baking pan. Lightly tap the cake pan to remove any air bubbles.
5. Bake until top of cake spring back when lightly pressed and edges begin to come away from the pan. Approximately 25-30 minutes of baking time.
6. Transfer cake pan to a wire rack and allow to cool completely before icing.

Icing and Assembly
1. In the bowl of a standing mixer fitted with a whisk attachment (or a hand held mixer), beat butter and confectionary sugar on medium-high speed until creamy (approximately 2 minutes).
2. Scrape down sides of the bowl, add vanilla and salt. Mix on low until incorporated. 
3. With the mixer on low speed, beat in melted, cooled milk chocolate until all is incorporated. Stop to scrape the bowl as needed. Increase speed to medium high and beat until light and fluffy (approximately 2-3).
4. Add heavy whipping cream and beat until light and fluffy. Approximately 3-4 minutes.
5. Spread icing evenly over the top of the cake. Swirl icing with a spoon or offset spatula. Alternately put icing in a pastry bag fitted with pastry tip of choice. Optional: Top with Chocolate Crisp Pearls or Sprinkles.
6. Serve immediately or store in the refrigerator until ready to serve. Allow the chilled cake to sit out at least 30 minutes before serving.

Notes: (1) For the flour weight calculation, I used the 128 g per cup equivalent. (2) I am partial to a chilled cake, so I like to eat it right out of the refrigerator. (3) Can melt chocolate over a double boiler or in the microwave. Make sure to chop the chocolate evenly before melting. I used the Trader Joe's Milk Chocolate for the icing.