Saturday, June 16, 2018

Triple Chocolate Milky Fudgy Brownies


Not every day is great, best ever, or outstanding. Some days are really, really good; some are just good enough;, some are not so good; and, some are downright bad. Just as in life, not every brownie is oh-my-god so crazy good; best-ever; mouthwatering; over the top; killer; drop the mic delicious; beyond amazing; or epic. Some of them are just okay; some leave us wondering why we even took a bite; some are overdone; some are underbaked; and, some are just not very good at all. So when we come upon a brownie encouraging us to plant our faces into the entire platter, we realize we have discovered brownie nirvana. And shortly after the first bite of what we consider a 'to-die-for' brownie, we start doing out best day ever happy dance. Who knew that simply indulging in rich, chocolately, fudgy brownies could shift how we perceive the day. These unicorn brownies are like magical 'makes everything better' bandaids. They can make a bad day good or turn a good day into a great one.


Last week I had one of those brownie inspired great days. And I am giving all the credit to these euphoria inducing Triple Chocolate Milky Fudgy Brownies.


The day I discovered Ina Garten's Outrageous Brownies, I thought I didn't need any other brownie recipe in my life. But then I made some Marbled Cheesecake Brownies and decided I could make room in my brownie loving life for another one. Mindy Segal's Chocolate Brittle Brownies (aka Barter Brownies) forced me to reconsider living a two brownie life. Then along came the Raspberry Truffle Brownies and Raspberry Brownies. Well, aren't chocolate and raspberries an almost irresistible flavor combination? With five brownie recipes already competing for my brownie loving attention, did I really need one more? Maybe it was my curiosity over the taste of sweetened condensed milk swirled through a brownie batter made with three kinds of chocolate that had me saying yes, yes, yes.


These Triple Chocolate Milky Fudgy Brownies were either going to be an epic win or epic failure. There is no gray in my brownie world. In an effort to discount my personal bias, I decided to bring them to the Thursday night running group. My overly confident, tentative epic designation turned out to be validated by more than eight runners. Clearly I this used a highly scientific taste testing methodology for vetting these brownies! Based on both their feedback and my own personal high, persnickety brownie standards, I have decided to shift my favorite brownie recipe order of preference. Additionally, it would now be safe to say I have now reached my brownie recipe limit. 


Technically there are three kinds of chocolate in these brownies. Unsweetened cocoa powder and dark or bittersweet chocolate are combined with melted butter before being mixed into the lusicous batter. Dark or bittersweet chocolate chips add even more chocolate flavor and texture to the baked brownies. If you can, use a larger sized chocolate chip in these brownies (I like the Ghiradelli Bittersweet Chocolate Chips). Before assembling the batter, make the butter/chocolate mixture as it will need a little time to cool slightly.


The assembly technique is a bit different from all of my other favorite brownie recipes. In the bowl of a standing mixer fitted with a whisk attachment, the granulated sugar, brown sugar, vanilla, kosher salt, instant espresso powder, and eggs are all beaten together until the batter is thick and fluffy. It will take at least eight minutes for the batter to achieve this consistency. After the butter/chocolate mixture is blended in, the flour is folded in (in three additions). Finally, the chocolate chips are hand mixed in. The brownie batter is much thicker than a cake batter but not as uber thick as I thought it might be. 


The idea for the addition of sweetened condensed milk to the brownies actually came from a Stella Parks brownie recipe. Although, originally I was going to make them using dulce de leche. Only I couldn't find the brand I wanted to use. In hindsight, I am glad I made these Triple Chocolate Milky Fudgy Brownies using the sweetened condensed milk first. 

After dropping 12 large dollops of sweetened condensed milk on top of the brownie batter, I used a chopstick (you could also use a butter knife) to gently swirl it in. Some of the sweetened condensed milk will sink into the brownie batter (and you want that to happen). However, be careful not over swirl as you want some of the sweetened condensed milk to be visible on top of the brownies after they are baked.


In a preheated 350 degree (F) oven, it will take somewhere between 45-50 minutes for these Triple Chocolate Milky Fudgy Brownies to bake. When the edges of the pan begin to show some crackling and the center is set (not wobbly), the brownies are ready to be removed from the oven. Once cooled completely, they can be cut into squares or small bites. However, I would highly recommend you place the cooled brownies in the refrigerator to allow them to chill. Not only are they easier to cut, their texture and flavor increases exponentially. 


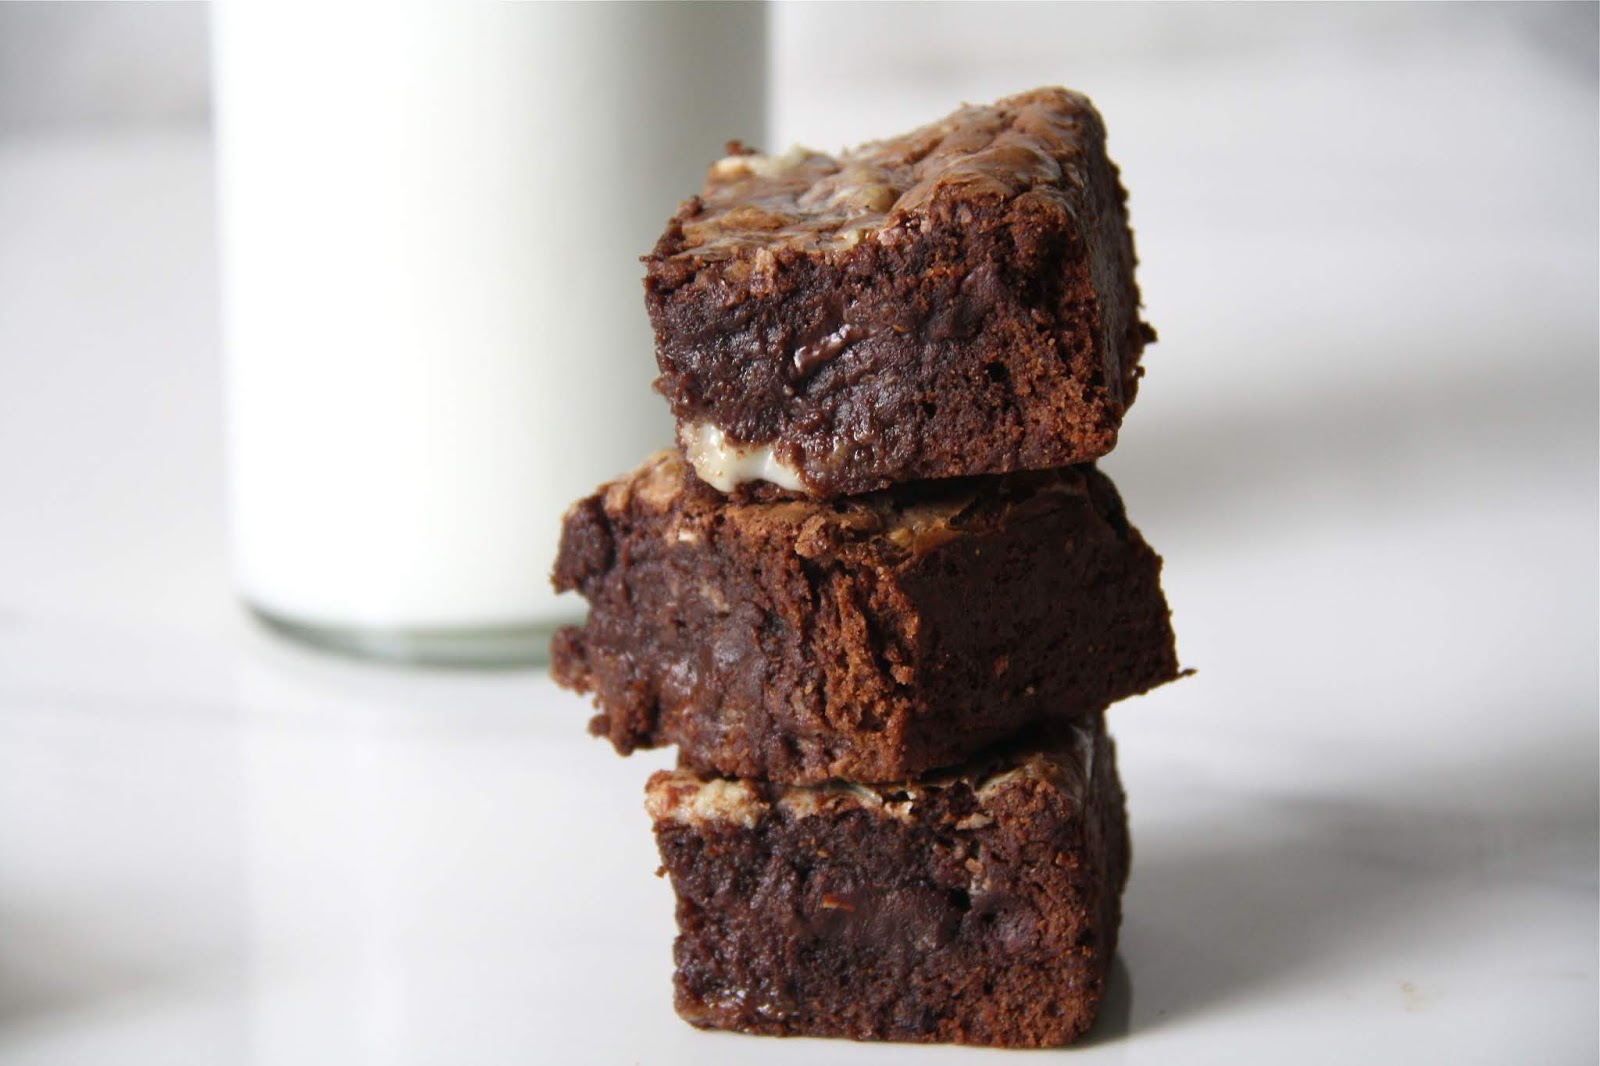
Some of the sweetened condensed milk will pool into the middle and bottom of the brownie. The taste of the creaminess of the sweetened condensed milk inside the dense, fudgy brownie texture is what makes these brownies so dangerously delicious. 

I tasted these brownies cooled to room temperature and chilled. It took all of my restraint and then some not to eat them warm right out of the pan. Honestly, I think they are at their bestest after being chilled. But I wouldn't refuse to eat one at room temperature.


As with any baked good, we all have our own definition of what makes something epic. Particularly when it comes to brownies. Case in point. My sister and I are perfect examples of two people who share the same DNA, yet who sometimes have very different opinions on cookies, cakes, candies, and, of course, brownies. In spite of not seeing whether or not she agreed with me about these brownies, I am still confident your level of brownie fussiness will permanently change after you take a bite of these. Whether you throw out all of your other brownie recipes or rearrange their order from bestest to goodest, you will want these brownies in your life. Especially if want to turn a bad day into a good day or a good day into a great one!

Recipe
Triple Chocolate Milky Fudgy Brownies

Ingredients
8 ounces dark or bittersweet chocolate (at least 60% cocoa), chopped
2 Tablespoons unsweetened cocoa powder
1 cup (16 Tablespoons, 226g) unsalted butter
1 cup (200 g) granulated sugar
1/4 cup (52 g) light brown sugar, firmly packed
1 Tablespoon vanilla
1 teaspoon kosher salt
1 teaspoon instant espresso
4 large eggs, cold from the refrigerator
1 cup (130 g) all-purpose flour
1 cup (6 1/2 ounces) semi-sweet or bittersweet (60% cocao) chocolate chips 
1/2 to 2/3 cup sweetened condensed milk (approximately a half can of sweetened condensed milk)

Directions
1. Preheat oven to 350 degrees (F). Line a 9" inch square metal baking pan with parchment paper. Set aside.
2. In a medium sized pan, melt the butter completely. Reduce heat to low and add in the chopped chocolate and cocoa powder. Stir until chocolate is completely melted. Remove from heat and allow to cool slightly.
3. In the bowl of a standing mixer fitted with a whisk attachment, add granulated sugar, brown sugar, salt, vanilla, instant espresso, and eggs. Beat until thick and fluffy (approximately 8 minutes).
4. Reduce speed to low and pour in slightly cooled, but still warm chocolate mixture. Mix until no chocolate streaks remain.
5. Using a spatula, fold the flour mixture in three additions until well combined.
6. Mix in the chocolate chips.
7. Pour the batter into the prepared pan. 
8. Dollop 9-12 Tablespoons of the sweetened condensed milk evenly over the batter. Using a chop stick or knife, create swirls by dragging the milk through the batter.
9. Bake the brownies for 45-50 minutes or just until center has set. Note: The center will not be as firm as the sides of the brownies. 
10. Let brownies cool completely. Remove from pan and cut into even squares. Highly recommend chilling the brownies before cutting and serving so they are at their fudgiest!
11. You can serve these brownies at room temperature, but they are at their epic best chilled.
12. Store brownies covered in the refrigerator.

Notes: (1) Instead of using sweetened condensed milk could also use Dulce de Leche and/or peanut butter. (2) I used Trader Joe's unsweetened cocoa powder. (3) I used the Ghiradelli bittersweet (60% cocao) chocolate chips. They are a slightly larger sized chocolate chip.


A harbor in Newport, Rhode Island on a gray day and a blue sky day. (June 2018)


Wednesday, June 13, 2018

Herb Roasted Pork Tenderloin, Fingerling Potatoes and Red Grapes


On the last day of the recent trip back east, we tried to pack in as much as possible yet not feel hurried or rushed. A leisurely early morning walk in the lush woods helped to set the pace for the hours we had left. With the sounds of birds and rushing water providing a kind of background music, it was impossible not to take in the unspoiled landscapes lying beneath the canopies of the trees. For a brief moment, with the light casting shadows on the trail and on the abundant greenery, it felt magical. Almost as if we had traveled back to another time in history. One much simpler and with limited distractions. Working up a bit of an appetite, we headed out to breakfast before driving to the beach for a last walk along the ocean. After having the woods all to ourselves, we were thrilled to discover, with the exception of a few seagulls, there wasn't anyone else there. For more than an hour we foraged for shells and lucky rocks as we walked along the shoreline. The public beach was our very own private beach. It could not have been a more perfect morning, more perfect end to the trip. Even getting temporarily locked out of house couldn't spoil the day. And yes, that would have been the fault of the most key obsessed person in the group. Me.

Sometimes when I return back from an ocean or mountain view trip, I wonder why I still live in the midwest. A place where neither of these zen-inducing landscapes exist. Unless you squint your eyes and pretend the clouds in the horizon look like a mountain range or drive to a lake having a sandy beach. Although there is a world of difference between a lake and an ocean. Maybe someday I can bring myself to get over the complacency hurdle I have my found myself in. Until then, I will have to figure out how to increase the number of days per year I spend in 'the happy places'.


A few weeks back, a good friend shared and gave rave reviews to the Food and Wine Roast Pork with Fingerling Potatoes and Red Grapes recipe. She made us all laugh when she said only she would consider turning on her oven to a temperature of more than 400 degrees (F) on a sweltering day. Little did she know, several of us would have done the same thing. Having made Lemon Thyme Roasted Grapes as an appetizer before, the combination of roasted pork, fingerling potatoes, and red grapes served in a single dish sounded like the perfect combination of sweet and savory. 


Using the Food and Wine recipe for inspiration, I decided to change it up a bit. Because why not turn a simple sheet pan dinner into a slightly less simple one?

To add even more flavor to the pork tenderloin, I made a marinade using dijon mustard, olive olive oil, chopped rosemary and chopped thyme. From my experience making pork, marinades infuse great flavor into the meat. And this one lived up to all of my marinade flavoring expectations.


After spreading the marinade evenly over the pork tenderloin, it's wrapped and refrigerated for at least 4 hours or up to overnight. If you are making the Herb Roasted Pork Tenderloin, Fingerling Potatoes and Red Grapes for dinner, you can prepare the pork early in the morning or the night before and let the flavor magic happen in the refrigerator.


The overall baking time for this dish ranges from 30-35 minutes, with the most baking time given to the fingerling potatoes and garlic.


Before you begin mixing the potatoes, garlic, freshly chopped herbs, and olive oil together, place the large baking sheet in the preheating 425 degree (F) oven. A hot baking sheet will help to sear the (cut lengthwise) fingerling potatoes. With the potatoes roasting in the oven for 10 minutes, you have more than enough time to sear the pork tenderloin.

Using a cast iron pan, heat 2 tablespoons of olive oil. Scrape the marinade off the pork tenderloin before placing the pork in the heated pan. Sear the tenderloin on all sides until just lightly browned. The entire browning process takes about 6-8 minutes. Not only does searing add color to the pork tenderloin, it seals in flavor and adds texture.


After giving a quick toss to the roasting potatoes, the seared, salt/pepper seasoned pork tenderloin and thyme/olive oil/red grape mixture are added to the sheet pan. Everything roasts for 20-25 minutes or until the internal temperature of the pork reaches 135-140 degrees (F) when a thermometer is inserted in the thickest part of the pork. 


For the juiciest pork tenderloin, allow it rest 8-10 minutes before slicing into thick 1/2 inch slices. While the pork is resting, keep the potatoes and grapes warm in the oven (immediately reduce the oven temperature to 200 degrees after removing the pork from the tray) as they cool rather quickly.


For a casual presentation of the Herb Roasted Pork Tenderloin, Fingerling Potatoes and Red Grapes, return the sliced pork to the sheet pan and serve. For a slightly more dressed up version of this sheet pan dinner, arrange the pork slices, potatoes and red grapes on a large platter.  Note: If you go the sheet pan presentation route, have a basket of some great, hearty fresh bread available as some might want to sop of some of the highly flavorful pan juices or to schmear on the roasted garlic. 


If you ever needed a reason to turn the oven on to 425 degrees (F) on a hot, humid day, this Herb Roasted Pork Tenderloin, Fingerling Potatoes and Red Grapes would be one of them.  In addition, to having great flavors, this simple, yet elegant dinner can be either a weekday and celebratory meal. 

If you have never had roasted grapes before, you are in for a treat as roasting intensifies their flavor to an incredible level of deliciousness. When picking out red seedless grapes at the farmer's market or grocery store, choose medium to large sized ones as you want the grape clusters to remain slightly intact during the roasting process.

Sheet pan dinners have been trending for awhile now and roasted grapes should never go out of style. The added tweaks of marinating and searing the pork tenderloin are ones you shouldn't skip. And consider the freshly chopped herbs non-negotiable ingredients. Fingerling potatoes roast up beautifully. Their crispy edges and creamy centers will cause everyone to fight over any remaining few. The pork tenderloin is tender, juicy, and rich in flavor. In other words, every element in this savory, sweet Herb Roasted Pork Tenderloin, Fingerling Potatoes and Red Grapes works beautifully. Don't let a hot, humid day deter you from turning on the oven to 425 degrees (F) in order to make it. Because this dish is as blissfully perfect as being able to have the woods and beach all to yourself or shared with a few of your friends.

Recipe
Herb Roasted Pork Tenderloin, Fingerling Potatoes and Red Grapes
Serves 4 to 6

Ingredients
Marinade
2 Tablespoons dijon mustard 
1 Tablespoon finely chopped fresh rosemary
1 Tablespoon finely chopped fresh thyme
2 Tablespoons olive oil

Roasted Pork Tenderloin, Fingerling Potatoes and Red Grapes
1 1/4- 1 1/2 pounds fingerling potatoes, cut lengthwise
1 1/4 - 1 1/2 pounds pork tenderloin
1 to 1 1/4 pounds red seedless grapes, medium to large sized, cut into clusters of 4-5 grapes
8 cloves of garlic, peeled
5 Tablespoons olive oil, divided
1 Tablespoon finely chopped fresh rosemary
1 Tablespoon  finely chopped fresh thyme
5-6 fresh sprigs of thyme
Rosemary sprigs and thyme sprigs for garnish
Kosher salt and black pepper

Directions
Marinade
'1. Combine marinade ingredients in small bowl. Stir to combine. 
2. Brush marinade evenly over the pork tenderloin. Place tenderloin on dish. Cover and refrigerate for 4 hours or as long as overnight.

Roasted Pork Tenderloin, Fingerling Potatoes and Red Grapes
1. Preheat the oven to 425 degrees (F). Place baking sheet in the oven (at least 10 minutes).
2. Toss the grapes with 1 Tablespoon of olive oil and 1 Tablespoon of finely chopped fresh thyme. Set aside.
3. Toss the fingerling potatoes and garlic cloves with 2 Tablespoons olive oil and 1 Tablespoon finely chopped fresh rosemary. Transfer potatoes (cut side down) to heated baking sheet. Roast for 10 minutes.
4. While potatoes are beginning to roast, scrape the marinade off the pork tenderloin. Using a cast iron pan sear the pork tenderloin in 2 Tablespoons of olive oil until lightly browned on all sides. Remove pork from pan, season with salt and pepper, and place on the baking sheet with potatoes. Add grape mixture along with several sprigs of thyme to the pan. Return sheet pan to oven and bake for 20-25 minutes or until an instant read thermometer inserted in the thickest part of the pork reads 135-140 degrees (F). Note: Turn potatoes over before returning the baking sheet back in the oven.
5. Reduce oven temperature to 200 degrees (F).
6. Transfer the roasted pork to a cutting board. Allow to rest for 8-10 minutes. Keep the potatoes and grapes in the reduced temperature oven while the pork is resting.
7. Slice pork into thick (half-inch slices). Arrange pork slices on large platter.
8. Remove potatoes and grapes from the oven. Arrange on platter with the pork. Season potatoes with salt and pepper. Garnish with thyme and rosemary sprigs. 
9. Serve immediately.

Wilbur Woods, Little Compton, Rhode Island (June 2018)


Friday, June 8, 2018

Cranberry White Chocolate Chip Cookies


For the weeks and days leading up to an east coast destination running trip with friends, I became obsessed with checking the weather. And once we arrived, there probably wasn't an hour that went by that at least one of us was checking it. We weren't just consumed with race day weather conditions, but with the weather for each of the five days we planned to be there. Considering the fluidity of weather reports, why would we spend any time worrying about something completely out of our control? Mostly because we looked forward to doing everything on our itinerary. But partly because running has made weather watching part of our daily (and in some instances hourly) routines. Race day conditions were as close to perfect as possible. So not even two days of rain and one day of high humidity spoiled or deterred us from having fun. I would, however, have loved for my friends first trip to Martha's Vineyard to be one having a calm sea and slightly breezy, sunny day rather than one dominated by continued waves of rain and a roller coaster fast ferry ride. Up until the ferry ride to the Vineyard, I had always said to anyone who asked or was anxious about being on a ferry that you could barely feel the ocean waves during the hour long trip. Going forward I may have to reframe how I describe what that fast ferry ride could feel like.


Being the only one in the group having first hand familiarity with the part of Rhode Island we would be spending most of our time in (as well as the Vineyard), creating the trip itinerary fell to me. As much as I love being in control (what Type A personality doesn't?), I felt some self-imposed pressure to create a plan which would allow my friends to not only understand why this part of the world was one of my happy places, but also have them leave feeling touched by its' beauty and enchantment. For me, sharing a place in the world where I feel such a deep emotional connection is akin to giving the most unselfish, priceless gift imaginable. Yet just as important, sharing such a meaningful place can further strengthens the bonds of a friendship. And as close as I felt to my friends before the trip, I felt even closer to them after it ended.


Weighing more heavily on me than whether or not my friends would really, really like the sites and food venues I had chosen for us (including the local coffee shop), was the 10 mile race. The real reason for the trip. The combination of an injury plagued winter/spring, a long run of only 6 miles, and a work emergency preventing my running partner from joining us had me more than a little anxious on the couple of days prior to as well as the morning of the race. I had mentally linked my race endurance and finish to being able to run it with a friend. Running the 10 miles on my own seemed like an insurmountable distance. As someone who doesn't have the best running 'head' game, I needed to figure out how to not only get through it but finish it before the course closed. I decided early on I would not judge my performance by my time, but rather by my effort. Additionally, I was committed to not being the one doing the 'coming home without race medal bling' walk of shame. With the time pressure off my shoulders, I surprised myself by being able to finish the race fifteen minutes earlier than I anticipated. It might have been eighteen minutes if I hadn't stopped several times to take some photos of the spectacular scenic course. Better than having the finishers race medal placed around my neck as I crossed the finish line was realizing I didn't need anyone to push me, to keep me focused. I only needed me. Reconnecting with my inner strength may have been the best race reward to come in my second running life. Proof that anything is possible if you want it bad enough.


On the fast ferry ride to the Vineyard, I had bought some Cranberry White Chocolate Chip Cookies for us to nibble on during the ride over. As soon as I tasted the cookie, I knew I would be making some when I returned home. After learning the cookie maker used cake and bread flours in his cookies, I knew which cookie recipe I would adapt. the Jacques Torres chocolate chip cookie recipe. One I shared on the blog more than five years ago.


With the exception of increasing the amount of vanilla, using white chocolate chips instead of (dark) chocolate chips, adding dried cranberries, and eliminating the sea salt finish, almost everything about the recipe remained the same. Some might put these Cranberry White Chocolate Chip Cookies in the fussyterian category as it uses both cake and bread flours versus the more common all-purpose flour. Two flours one might not normally buy or keep unless cake baking and/or bread making is your passion. But whatever you do, don't let this little bit of fussiness stop you from making these cookies.


Using a standing mixer fitted with a paddle attachment, the butter, granulated sugar, and brown sugar are beat until light and fluffy. This will take approximately 5 minutes. The eggs are beaten in one at a time, followed by the vanilla. After reducing the mixer speed to low, the dry ingredients are added and beaten just until incorporated. Lastly the white chocolate chips and dried cranberries and mixed in. Instead of white chocolate chips, you could also use coarsely chopped white chocolate.

Now comes the second somewhat fussy part. The dough has to be chilled for 24 to 36 hours before baking. When making the chocolate chip and sea salt version of the Jacques Torres cookies, I simply covered the bowl of dough with plastic wrap and refrigerated it. What I have learned from making hundreds of dough chilling cookies is shaping the dough into balls before refrigerating makes the baking process so much easier. Just remember to tightly cover the trays of dough balls.

In a preheated 350 degree (F) oven, the cookies bake for 15-17 minutes. Turn the tray midway and tap it gently on the counter before returning to the oven. Upon removing the baked cookies from the oven, I gave the tray another light tap. After 10 minutes of cooling on the cookie sheet, transfer the cookies to a wire rack to allow them to cool completely.


Honestly, these Cranberry White Chocolate Chip Cookies were better than the ones we had on the ferry.


From this point forward, this will be my Cranberry White Chocolate Chip Cookie recipe. Why mess with perfection when you find it? These cookies are crunchy, chewy, and oh so satisfying. The taste of the dried cranberries balances nicely with the cookie itself as well as the flavor and texture of the white chocolate. It's a complete package of deliciousness!


Store the baked cookies in a tightly sealed container. If you place the cookies in a ziplock bag, you can freeze them and thaw just before serving. It's always good idea to have some home baked cookies on hand without having to go through all the work of making them. You never know when you are going to get a craving for them or have unexpected guests.

Seriously, these Cranberry White Chocolate Chip Cookies are swoonworthy delicious. They are also slightly addicting.

Recipe
Cranberry White Chocolate Chip Cookies, an adaptation of the Jacques Torres chocolate chip cookie recipe
Makes 46-48 (3") cookies 

Ingredients
2 cups cake flour with 2 Tablespoons removed (8 1/2 ounces)
1 2/3 cups bread flour (8 1/2 ounces)
1 1/4 teaspoons baking soda
1 1/2 teaspoons baking powder
1 1/2 teaspoons Kosher salt
1 1/4 cups (or 2 1/2 sticks) unsalted butter, room temperature
1 1/4 cups (10 ounces) light brown sugar, firmly packed 
1 cup plus 2 Tablespoons granulated sugar (8 ounces)
2 large eggs, room temperature
1 Tablespoon high quality vanilla extract
1 pound white chocolate chips or chopped white chocolate
9 ounces dried cranberries

Directions
1. Take butter and eggs out of the refrigerator the night before so they can come to room temperature.
2. Sift together the flours, baking soda, baking powder, and salt. Set aside.
3. Using a mixer fitted with a paddle attachment, cream butter and both sugars until very light and fluffy (approximately 5 minutes)
4. Add eggs in one at a time, beating well after each addition.
5. Mix in vanilla.
6. Reduce speed to low and add dry ingredients. Mix until just combined 15-30 seconds.  Do careful to not over mix.
7. Drop in white chocolate chips and dried cranberries. Mix until incorporated in the dough.
8. Using a large (1 3/4") ice cream scooper, make and place dough balls on a parchment paper lined baking sheet. Cover tightly plastic wrap and refrigerate for 24-36 hours. Alternately place plastic wrap directly against the dough in the bowl. Chill dough in the refrigerator for 24-36 hours.
9. Preheat oven to 350 degrees (F).
10. Line cookie sheets with parchment paper.
11. Place 9-10 balls on a cookie sheet. Press dough down oh so lightly, just to flatten the top. Note: If you had chilled the entire bowl of dough, use a large (1 3/4") ice cream scooper, make and place dough balls on a parchment paper lined baking sheet.
12. Bake in upper top third of oven for 16-18 minutes (turning tray around midway through the baking process) or until they are lightly golden but still soft.
13. Transfer cookie sheet to wire rack and let cookies rest for 10 minutes. Remove slightly cooled cookies to another wire rack to cool further.
14. Serve and enjoy!
15. Store cookies in a sealed container and/or store baked cookies in the freezer. If frozen, allow to come to room temperature before serving.

Notes: (1) If you don't want to bake all the cookies at once, freeze the dough balls in a ziplock bag after they have chilled in the refrigerator for at least 24 hours. Baking time may need to increase by 1 or 2 minutes. (2) In addition to white chocolate chips and coarsely chopped white chocolate, could also use white chocolate discs. If discs are used, recommend coarsely chopping them. (3) I use Ghiradelli white chocolate chips in these cookies.


South Shore Beach, Little Compton, Rhode Island (June 2018)