Monday, June 10, 2019

Milk & Honey Cake w/ Sweetened Whipped Cream and Fresh Berries


Between holidays, birthdays, graduations, anniversaries, book club gatherings, and weddings, there are no shortage of reasons to make a cake. Although does anyone really need a reason to bake a cake?  My sources of cake baking inspiration range anywhere from finding the most beautiful berries at the market or receiving a dozen fresh Farmer's Market eggs from a friend. Either one of those things is more than enough to cause a non-linear cake baking reaction in my world. But when they both happen simultaneously, I feel compelled to bake a cake. Nothing complicated or fancy, just a simple everyday cake. Like this Milk and Honey Cake with Sweetened Whipped Cream and Fresh Berries.

Admittedly I am someone who spends a bit too much time reading recipes and browsing through food photos. However, this investment of time isn't without its' benefits. Beyond discovering new ways to prepare or present food, it has led to some rather significant shifts in my thinking. Particularly about cakes. Layered cakes, ones beautifully iced, have always been my idea of the 'perfect cake'. Single layer cakes, especially rectangular ones, were ones I didn't necessarily find spellbinding or irresistible. If there was one word I would use to describe them it be 'ordinary'. That is, up until now. Amazing things happen when there is a paradigm shift in your 'cake' thinking. Things like this Milk & Honey Cake w/ Sweetened Whipped Cream and Fresh Berries. 


A cake's deliciousness isn't and shouldn't be dependent on its' shape, size, or number of layers. Ingredients are what matter most. Single layer rectangular cakes can be as stunning as a layered cake. But they have one huge advantage. They are the easiest to cut and serve. If someone dares to ask for just a sliver, single layer rectangular cakes make cake cutting simple and uncomplicated. Even better is the ratio of cake to icing doesn't change based on the size of the piece of cake (especially if you don't ice the sides of the cake). How did it take me so long to come to embrace all of these things? 


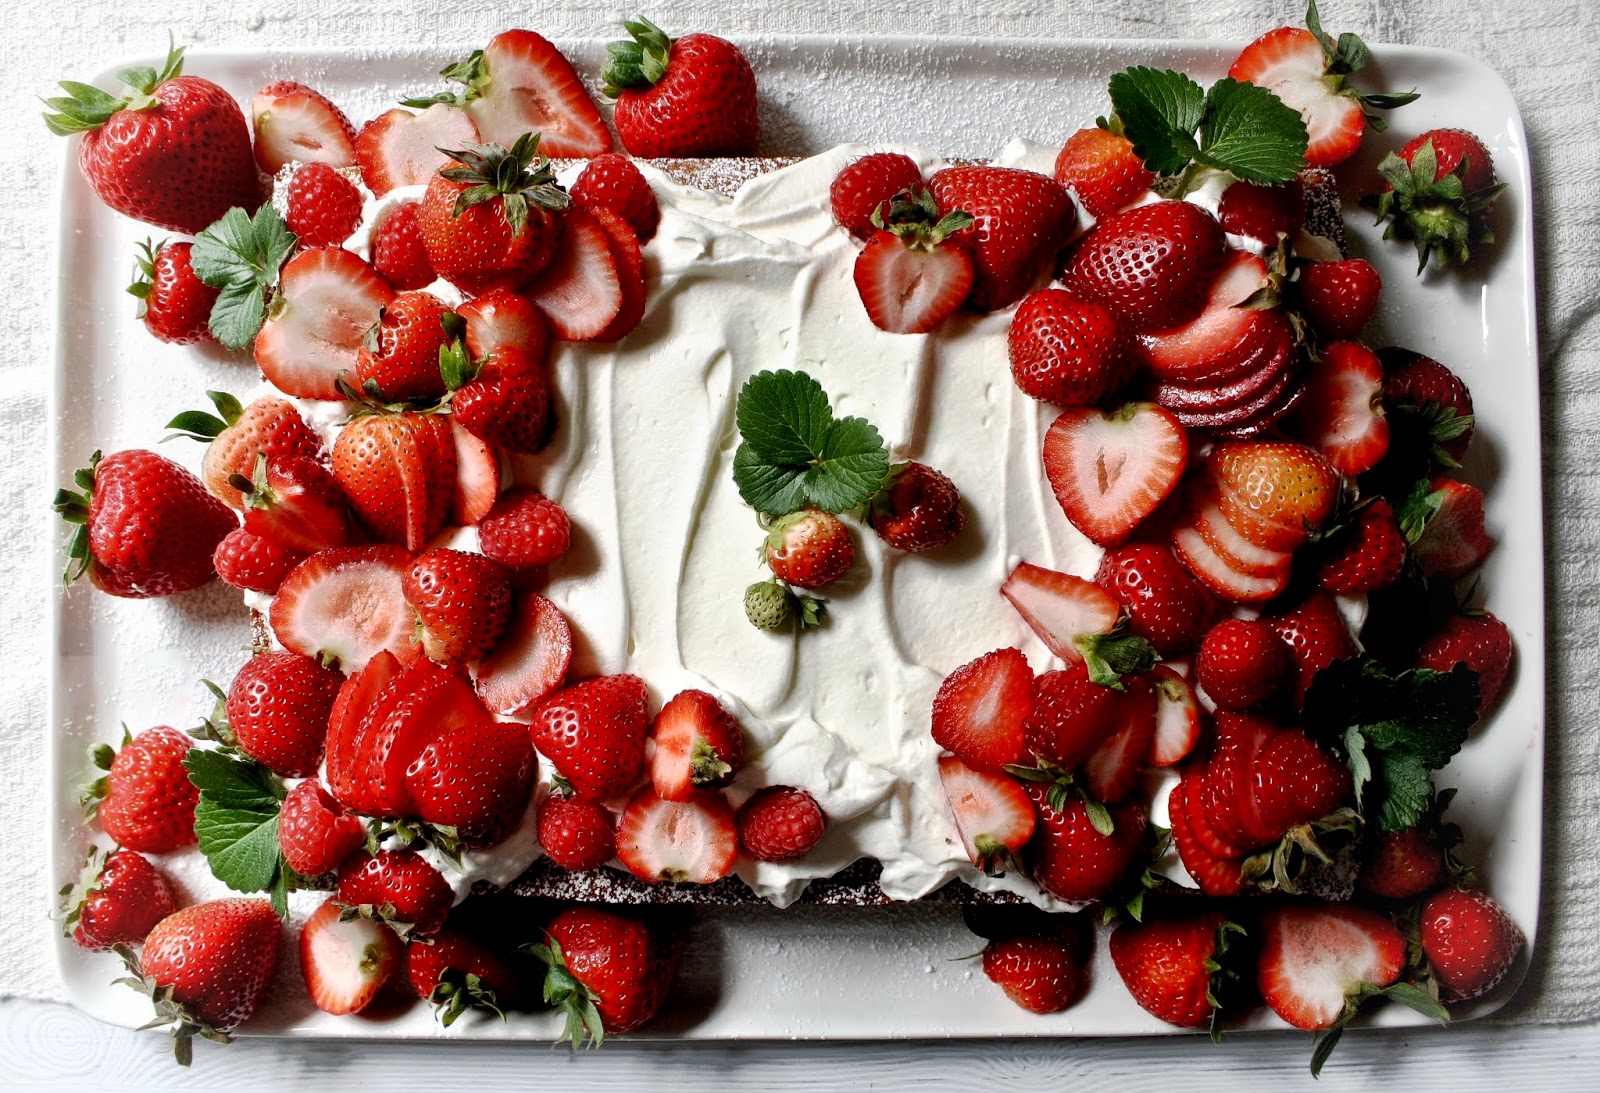
When browsing through Odette Williams new cookbook "Simple Cake", I was intrigued by the recipe for a (two-layer) Milk and Honey Cake. One I had never before made. Other than slightly increasing the amount of vanilla in the recipe, I decided to make it as a single layer cake. Not much of a risk but a significant departure from my idea of what a cake should be. It didn't take long to decide it would be topped with a light dusting of confectionary sugar,  a generous spread of sweetened whipped cream, and some fresh strawberries and raspberries. 


The milk in the cake is actually buttermilk. If you want a cake with a moist and tender crumb, buttermilk will help you get it. Honey not only adds a subtle sweetness to the cake, it contributes to the cake's tenderness and taste. If you want a cake that tastes even better the second day, use honey. And for this cake, use a good honey. If you want to go all out on a fancy honey, you can. But the flavor imparted from that honey from those cute little bear jars works perfectly.

The golden color of the baked milk and honey cake made me giddy with anticipation. If the cake baked up this beautifully, how wondrously delicious would it be? Spoiler alert: It was mouthwatering delicious. Even without the lightly sweetened whipped cream and fresh berries.


Lightly sweetened whipped cream is a perfect finishing touch to almost any cake. It's creamy, not overly sweet, and can create an 'oh and ah' look. To sweeten up freshly whipped cream, I have almost always used confectionary sugar. Rarely have I used honey or sweetened condensed milk. Having now tasted whipped cream sweetened with sweetened condensed milk, I don't know if I will ever use confectionary sugar again. I won't say never, but it will be a long time before confectionary sugar is my whipping cream sweetener. But I will use it to lightly dust a cake iced with freshly whipped cream.


Any number of summer berries would pair well with the Milk and Honey Cake. Strawberries, raspberries, blueberries, and/or blackberries. Freshly sliced peaches would work as well. Already I am thinking this cake will be the base for this year's Fourth of July Flag Cake. Stripes of sliced strawberries and raspberries and blueberries for the stars. 


Or you don't have to top with fresh berries at all. Just the dusting of confectionary sugar and the lightly sweetened whip cream. Swirled on with an offset spatula or piped on with a pastry bag.


I may have been remiss in not telling you how heavenly the house smelled when this cake was baking in the oven. Yet another reason you should bake this cake. 

You can bake this cake early in the day and ice it shortly before you serve it. Before whipping up your heavy cream to soft, fluffy but stable peaks, put your bowl in the refrigerator to let it get chilled. A chilled bowl helps you achieve the pillowiest whipped cream.


This truly is a simple cake to make. Yet, there is nothing simple about its' taste, texture, flavor, or appearance. If single layer, rectangular cakes have never spoken or appealed to you before, I hope this Milk & Honey Cake w/ Sweetened Whipped Cream and Fresh Berries does. Once you see a beautiful single layer cake, you can't unsee it. 

Recipe
Milk & Honey Cake w/ Sweetened Whipped Cream and Fresh Berries (an ever so slight adaption to Odette Williams Milk and Honey Cake recipe shared in her cookbook 'Simple Cake: All You Need To Keep Your Friends and Family in Cake')
Serves 12-16 people, maybe more if some ask for just a sliver

Ingredients
Cake
2 1/4 cups (290 g) all-purpose flour
2 teaspoons baking powder
1/2 teaspoon baking soda
1/4 teaspoon kosher salt
3 large eggs, room temperature
1 cup (240 ml) buttermilk
3/4 cup (255 g) honey
1 teaspoon vanilla
12 Tablespoons (170 g) unsalted butter, room temperature
3/4 cup (150 g) granulated sugar

Sweetened Whipped Cream
1 1/2 cups heavy whipping cream
4 1/2 Tablespoons sweetened condensed milk
Pinch of kosher salt

Confectionary Sugar for dusting the top of the cake
Two pints of fresh strawberries and less than a half pint of fresh raspberries (Note: Use all strawberries, any mixture of berries, or no berries at all)

Directions
Cake
1. Sift the flour, baking powder, baking soda and salt, twice. Set aside.
2. In a small bowl, whisk the eggs. Set aside.
3. In a medium sized bowl, whisk together the honey, buttermilk and vanilla. Set aside. Note: Shake the bottle of buttermilk before measuring out the one cup.
4. Preheat the oven to 350 degrees (F). Line a 9"x 12" baking pan with parchment paper. Spray the bottom and sides of the pan and parchment paper. Set aside.
5. In a standing mixer fitted with a paddle attachment, beat the butter at medium speed for 45-60 seconds. Gradually add in the sugar, beating until the mixture is light and fluffy (approximately 4 minutes). Note: Scrape down the sides of the bowl midway through the beating process.
6. Add in the whisked eggs, one tablespoon at a time. Beating each tablespoon until it becomes incorporated. Beating time will be approximately 3 minutes. If the mixture curdles (and it might), add in a couple of tablespoons of the flour mixture to bring it back together.
7. Beginning and ending with the flour, alternately add in the flour mixture and buttermilk/honey mixture. Note: I did this in 5 additions of dry and 4 additions of wet. Mixture should be combined and smooth but not over beaten.
8. Before pouring the batter into the prepared pan, scrape down the sides and bottom of the bowl with a spatula to make certain the ingredients are well combined.
9. Pour the batter into the prepared pan. Smooth top with an offset spatula. Bake for 35-38 minutes rotating the pan midway through the baking process or until the top is golden and a toothpick inserted in the center comes out clean. Remove from the oven. Let the cake rest in the baking pan for 10 minutes before inverting it onto a cooling rack. Remove the parchment paper. Allow the cake to cool completely.

Sweetened Whipped Cream and Assembly
1. In the chilled bowl of standing mixer fitted with a paddle attachment whip the cream, sweetened condensed milk, and pinch of salt until soft, but firm peaks form. 
2. Transfer the cooled cake to a serving platter. Lightly dust with confectionary sugar.
3. Spoon some of the whipped cream over the top of the cake or use a pastry bag to create a fancier version of this simple cake. Note You will have more than enough of the sweetened whipped cream. Serve the extra on the side.
4. Arrange the berries on top. Serve immediately and enjoy. Note: Can assemble the cake up to 1 hour before serving.
5. Store any leftover cake lightly covered in the refrigerator.

Notes: (1) Use a more everyday versus highly flavored honey in this cake. The kind of honey that comes in the bear jar worked well. (2) Instead of a making a sheet cake, you can make a two layer cake. For a two layer cake use 8" cake pans. Prepare pans accordingly. Baking time will still be 35-38 minutes. (3) Sweetened condensed milk now comes in squeeze bottles. Which means you don't have to open and/or waste a whole can just to sweeten your whipping cream with it. (4) Top the cake with any kind or combination of summer berries and/or freshly sliced peaches.

Thursday, June 6, 2019

Steak and Arugula Flatbread with Marinated Red Onions


As much as I like to accommodate everyone's likes when it comes to food, because isn't that what a gracious hostess with the mostest should do? But I am not always considerate, benevolent, or well-mannered. Particularly when it comes to serving steak. In other words, I can not, am unable to bring myself, but more like will not, grill steak past the medium rare point. Which means if you come here for dinner, please know all the steaks will be grilled to medium-rare perfection. You are more than welcome to stand at the grill and cook your steak to the point of no return or rather to a tasteless state, if you so desire. But regrettably I will not be your co-conspirator. I am not saying there is a best way and wrong way to grill steak. Well maybe I sort of, kind of am. For those you who haven't yet clicked off the page (or worse yet decided this blog isn't for you), the recipe for this Steak and Arugula Flatbread with Marinated Red Onions is definitely for you. Because this is one of those recipes destined to become one of those regular, most requested summer grilling season staples at your house. It is nothing short of being exceptional in flavor and presentation. Your friends and family will be asking what time they should be over and if you want them to bring wine, beer, or tequila. Hint: You may subtly suggest one never goes wrong with the two out of three option. 


Let me get you through the next potential hurdle in this recipe. This would be the kalamata olive hurdle, otherwise known as 'I dislike olives syndrome'. Given my affinity for olives, I have a hard time understanding why anyone wouldn't want to be in the front seat on the olive train. Their nutritional value alone makes them a super food. Okay, okay, as I write this even I am already getting a sense I may be starting to wear out my blog welcome here if I continue on the course of dissing other's food dislikes or telling you what you should be eating. So let me redeem myself a tad and tell you a very short olive story. 

The person who shall remain nameless is one of those non-olive eaters (as well as a non-medium rare steak eater). As he was eating his second piece of this flatbread AND after he declared it to be 'a winner', I told him there was some kalamata spread (I used a kalamata bruschetta spread) on the flatbread. He proceeded to take a third piece. Which meant the layers of flavors in this Steak and Arugula Flatbread with Marinated Red Onions are so incredible, even non-olive eaters will be taken in by them. Rather than being taken aback by them. Hint: Do not reveal all of the flatbread ingredients before you serve it. In case this makes you a bit nervous, remember restaurants don't list all of their ingredients on their dishes on a menu and more than likely everyone sitting at your table has eaten at more than a few.

For the most impressive and most flavorful flatbread, use a ribeye rather than a sirloin steak. A one pound ribeye steak, yes one pound, will be enough to make three flatbreads and serve 6 to 8 people. When was the last time you made one steak for that many people?


You can use either a plan naan or a garlic naan. I used a garlic naan. You can use feta or a creamy gorgonzola. I used a creamy gorgonzola. You can use a kalamata spread or a kalamata bruschetta spread. I used the kalamata bruschetta spread (see notes below). This is one of the highly flexible ingredient recipes with one exception. When using parmesan cheese splurge on a wedge of parmigiano-reggiano cheese. You won't be sorry.


The recipe for the marinated red onions comes from the recently released cookbook "No Crumbs Left" by Teri Turner. The idea of marinating thinly sliced red onions in olive oil, dried oregano and salt for at least twelve hours at room temperature is brilliant. I could have eaten the entire bowl of these red onions. And if you make fajitas, Cobb salads, or just like red onions as a side dish, you are definitely going to want to make THESE marinated red onions.


The assembly of the flatbread is easy. Grill the steak. Slice into strips and set aside. Brush some olive oil and crushed garlic on the naan, grill oiled side down until you get grill marks (about 2-3 minutes). Spread some of the kalamata bruschetta spread on the grilled side of the naan. Next, layer on 4 or 5 strips of the steak on each naan. Sprinkle with the grated parmigiano-reggiano and gorgonzola. Return to the grill and cook only until the cheese begins to melt (about 3-4 minutes). Would recommend not placing the naan directly on the grill as the bottom may crisp up too much. If you have a rack, place the naan on the rack. If you don't have a rack, place the naan on aluminum foil until the cheese begins to melt, then let sit directly on the grill for 1 minute before removing to a cutting board. Top with some lightly lemon and olive oil dressed arugula, some of the marinated red onions, and some pitted kalamata olives. Sprinkle with kosher salt and pepper. Cut into slices or edges (about 4 or 5 per naan) and serve.


How super easy is that?

Each piece of the cut flatbread should have a slice of that perfectly grilled medium-rare steak! I used a ribeye on these flatbreads because I believe it is one of the tenderest, most flavorful cuts of meat. But sirloin steak would work here too. 


When making the flatbread, think of it as a hearty appetizer for 4-6 people or a light supper for 3-4 people. This is the kind of flatbread everyone, and I really do mean everyone, will want at least a second piece of to savor. 


I certainly hope my rather strong opinions on steak and olives weren't a bit 'too much' and you got to this point in the blog. Maybe some of you could relate, maybe even laugh. But more importantly I really hope you are inspired to make this Steak and Arugula Flatbread with Marinated Red Onions. This could be the start of the most delicious summer of your life thus far!

Recipe
Steak and Arugula Flatbread with Marinated Red Onions (Recipe for the Marinated Onions from the new cookbook 'No Crumbs Left: Whole 30 Endorsed Recipes for Everyday Food Made Marvelous' by Teri Turner. Recipe inspiration for the Steak and Arugula Salad from Joanna Gaines, Magnolia Journal, Summer 2019)
Makes 3 flatbreads
Serves 4-6 as a hearty appetizer or a light supper for 3-4 

Ingredients
Marinated Red Onions
1 small or 1/2 medium red onion, thinly sliced into rounds
3/4 cup extra virgin olive oil
1 Tablespoon red wine vinegar
1 Tablespoon dried oregano

Flatbreads
3 - 9" garlic or plain naan
1 pound ribeye steak, about 1" thick, grilled to medium rare (could also use sirloin steak) and cut into 1/2" strips
2 Tablespoons olive oil
2 teaspoons minced garlic
1/3 to 1/2 cup of Kalamata Bruschetta or Kalamata Olive Tapenade
4 ounces good quality gorgonzola or feta cheese, bought whole but crumbled
2 ounces (1 cup) freshly grated Parmiganno-Reggiano Cheese
1/2 cup pitted kalamata olives
2-3 cups loosely packed baby arugula
2 Tablespoons olive oil
1 Tablespoon freshly squeezed lemon juice
Kosher salt and black pepper

Directions
Marinated Onions
1. Put the onion in a small, shallow bowl.
2. In a separate bowl or glass measuring cup, mix the olive oil, vinegar and oregano, whisk until well combined. Pour over the onions. Note: The marinade should completely cover the onions. If some are peaking out you either have too many onions or your bowl isn't the right size.
3. Cover with plastic wrap and let marinate on the counter for at least 12 hours before using. The onions will keep for up to 2-3 days. Do not refrigerate. (But you can refrigerate the oil for another use after the onions are gone! You can also sauté any leftover onions for crispy bites of deliciousness for use on a burger, in a salad or in a frittata.)

Flatbreads
1. In a small bowl, combine the olive oil and minced garlic. Brush on tops of the naan. Grill naan oiled side down, over indirect high heat for about 2 minutes or until you have deep brown grill marks on the bread. Transfer to a flat baking sheet, grilled side up. Note: I grilled my naan directly on the grill. Yes, the little bits of garlic will fall off.
2. Spread the kalamata bruschetta (or tapenade) over the grilled naan, leaving about 1/2 inch border around the edges. Top the naan with strips of the steak, gorgonzola, and Parmigiano-Reggiano cheese.
3. Return the naan to the grill. Grill, covered, over indirect heat for 4-6 minutes or until the cheese begins to melt. Remove from the grill and transfer to a cutting board. Note: I grilled my naan on aluminum foil until the cheese just started to melted, then transferred directly onto the grill for about 1 minute.
4. Top naan with the arugula tossed in the lemon juice and olive oil dressing and some pitted kalamata olives. Sprinkle with salt and pepper. Cut into strips or wedges and serve immediately.

Notes: (1) Instead of a kalamata tapenade, I used this kalamata bruschetta spread from Tassos. I found mine at Whole Foods but you can probably find it in a well-stocked grocery store. (2) Use a softer instead of a hard gorgonzola cheese so that it melts nicely on the flatbread. I used an Emmi Roth Buttermilk Blue Cheese (found at Whole Foods). (3) To make the dressing for the arugula, simply whisk together the freshly squeezed lemon juice and the olive oil. (4) Instead of topping the flatbread with additional kalamata olives, feel free to serve them on the side. 


Farm views in Door County, Wisconsin (June 2019)


Sunday, June 2, 2019

Rhubarb Strawberry Crisp


After getting on the road at five in the morning, my first stop on my trip up to Door County (WI) was at the Sturgeon Bay Canal North Pierhead Light in Sturgeon Bay. Stopping there has become somewhat of a ritual. However, this was the first time I was there in the early morning hours. But more importantly, it was the first time I could walk all the way to the edge of pier. In prior trips, weather conditions made it either impossible or unsafe for me to do so. Yet, in spite of an almost perfect weather day, my unexplainable, relatively recent fear of being near an edge decided to make an appearance. As a self-diagnosed acrophobiac (one having an extreme or irrational fear of heights and/or fear of falling), it usually takes all of my will power and then some not to let my fears completely paralyze me. Or prevent me from hiking on steep trails or trying to get photos. However, my over cautiousness is its' own kind of Achilles heal. A walk down the pier to get as close as possible to the Pierhead Light would take most people just a few minutes. For me, it took twice maybe three times as long. Fortunately I wasn't in a more than usual hurried state. Nor did I have to worry about inconveniencing anyone but myself on this solo trip. In spite of all of the trepidation I felt, I could actually focus and photograph the lighthouse from the up close vantage point I longed to have from the moment years ago when I first saw it from a distance. 

Less than twenty-four hours later, I found myself at the edge of the cliffs along Lake Michigan trying to get photos at Cave Point. As much as I wish I could have tethered myself to a tree, I again mustered all of my courage to stand as conservatively as close as possible to the edge. Just watching others hop from rock to rock or sit with their feet dangling from a jutting rock sent my heart racing. Those at Cave Point on that particular day went home with more than memories of the incredible views. They left with memories of that seemingly 'odd' woman telling them to please be careful. Because when you have acrophobia, you sometimes make it your personal mission to keep everyone around you safe. So the next time a stranger tells you to be careful, just know the aren't annoying, odd, or eccentric. They are probably someone like me who has your best interests at heart. 


Since discovering I actually like, maybe even love, rhubarb I have been slightly obsessed with it. Even my friends are now snapping photos of rhubarb at Farmer's Markets asking me if or rather how much I want. But little did I know rhubarb was a vegetable, not a fruit. Well technically it still is, although a 1947 New York court case rendered the decision to legally designate rhubarb as a fruit. While arguing rhubarb was usually cooked as a fruit, the real motivation for bringing rhubarb's status into question had more to do with money. More specifically tax avoidance. Apparently imported vegetables were taxed at higher rates than fruits way back when, so businesses sought to change rhubarb's scientific classification. So in a collegegate-like move, money and influence bought rhubarb's entry into a previously ineligible species status. The next time you play a trivia game where someone asks the question 'Is rhubarb a fruit or a vegetable?' you now know the answer. 


Rhubarb pairs well with a variety of (real) fruits, but strawberries may be the most perennially favorite combination. And, in this Rhubarb Strawberry Crisp the combination of sweet strawberries and tart rhubarb is insanely delicious. Throw in the crispy, buttery oatmeal cookie-like topping along with some vanilla ice cream and you have the most heavenly end of spring, beginning of summer dessert. If you love or just like the tartness of rhubarb, then you definitely need this crisp in your life! 

Crisps may be one of the easiest, stress-free to make desserts on the planet. And they are even easier to fall in love with.


Depending on where you live, your best bets for the freshest, just harvested rhubarb will be at Farmer's Markets. With strawberries just coming into season now, it was impossible to leave this year's first trip to the Farmer's Market without both of these beauties. 


Added to the rhubarb (cut into one inch pieces) and the strawberries (cut in half or quarters if they are large) is cornstarch, kosher salt, vanilla, and sugar (caster, superfine or granulated). Mix these ingredients together only after you have made your oatmeal topping in order to minimize the pre-baking amount of juices coming from the rhubarb and strawberry mixture.


I love  both the flavor and depth of sweetness light brown sugar brings to the crisp's topping. In a pre-heated 350 degree (F) oven, the crisp is baked for 50-60 minutes or until the top is a golden brown and the fruit is bubbling up along the sides. Note: The juices should have a thick, almost jam-like quality to them.

Allow the crisp to rest for at least 10 minutes or up to 30 minutes if you plan on serving it warm. Or make it a couple of hours in advance, if serving it as a room temperature dessert. Note: To ensure your crisp has the crispiest topping and doesn't get soggy, don't make it early in the day to serve in the evening. While any leftovers of the Rhubarb Strawberry Crisp heat up beautifully in the microwave, the topping will not retain it's crispy texture. As it will begin to absorb the moisture from the baked fruits.


Serve the Rhubarb Strawberry Crisp with a good quality vanilla ice cream. I generally remove the ice cream from the freezer about 15 minutes before scooping it onto the bowls of the crisp. As I love how the ice cream begins to slightly melt, creating a kind of creme anglaise kind of sauce. 


While the Rhubarb Strawberry Crisp is a seemingly humble dessert, it's flavor and texture will create both and impressive and memorable end to your dinner party. Simple is the new fancy. 

If. by chance, any of your family or friends tell you they aren't big fans of rhubarb, encourage them to take just a small bite. Simultaneously remind them you always have their best interests at heart.

Recipe
Rhubarb Strawberry Crisp

Ingredients
3/4 cup (65 g) old-fashioned oatmeal (not quick oats), plus 1-2 additional tablespoons
7/8 cup (116 g) all-purpose flour
3/4 cup (130 g) light brown sugar, firmly packed
1/2 teaspoon baking powder
1/2 teaspoon kosher salt
6 Tablespoons unsalted butter, melted

1 pound rhubarb, cut into 1" pieces
1 pound strawberries, cut in half or quarters (depending on size)
2 1/2 Tablespoons cornstarch 
1/2 cup (100 g) caster, superfine, or granulated sugar
1 teaspoon vanilla
1/2 teaspoon kosher salt

Good quality Vanilla Ice Cream for serving

Directions
Topping
1. In a medium sized bowl combine the oatmeal, flour, brown sugar, baking powder, kosher salt, and butter. Mix together until well combined. Set aside.

Crisp and Assembly
1. Preheat oven to 350 degrees (F).
2. In a small bowl, combine the sugar, salt, and cornstarch. Set aside.
3. In a large bowl, add in fruit. Sprinkle the sugar mixture over the rhubarb and strawberries. Stir to coat the berries.
4. Add in the vanilla, stirring just until blended in.
5. Transfer the berry mixture to a 9" or 10" round baking dish or 9" x 12" inch oval/square baking dish, Top with the crisp mixture. Sprinkle 1 or 2 Tablespoons of additional oatmeal on top.
6. Bake in the center of the oven for 50-60 minutes or until the topping is golden brown and the berry mixture begins bubbling through the sides and middle of the crumble. Note: The berry mixture should have a thick consistency.
7. Remove from oven and let rest for at least 10-15 minutes or up to 30 minutes before serving.
8. Spoon the Rhubarb Strawberry Crisp into serving individual ramekins or bowls and top with a generous scoop of vanilla ice cream. If serving 6-8 people who like to share, place several scoops of the vanilla ice cream in the middle of the Rhubarb Strawberry Crisp and hand out spoons.

Notes: (1) Make the crisp topping before you assemble the fruit mixture. (2) The crisp is best the day it is made as the topping will become soggy over time. Personally, I like to serve the crisp within an hour of baking it.


Sturgeon Bay Canal North Pierhead Light, Sturgeon Bay, WI (May 2019)


Friday, May 31, 2019

Crepes with Honey Whipped Cream Cheese & Blueberry Sauce


After weeks of anticipation, having the up close experience of seeing Door County (WI) cherry trees in full bloom for the first time did not disappoint. Walking through the cherry orchards was mesmerizing. The seemingly endless seas of white blossoms were beyond captivating, regardless if they were set against blue, silvery, or dusk skies. In my whirlwind thirty-six hour trip, the beauty of the cherry orchards was almost too much to take in. If there is such a thing as being on cherry blossom overload, I came perilously close to experiencing it. Taking a few short hikes in places where spring wildflowers covered the forest floor, chartreuse leaves emerged from branches, and sunlight filtered through the trees, along with stops at a couple of antique shops, were my antidotes. My quest to see cherry trees in full bloom took me to places and down two lane country roads in Door County I had never been before. Unexpected added bonuses for this trip. At the end of this post are just a few of my cherry orchard photos (I am still sifting through all of them). Hopefully, they are enough to give you a taste of 'cherry blossom' flavor. However, if you ever have the chance or desire to experience a cherry orchard in full bloom first-hand (aka cherry blossom heaven), take it. Photos don't do the delicacy of the blossoms or the elegance of the orchards complete justice. 

I can only imagine the insanity of what seeing all of those trees dripping with ripe, red cherries feels like. Guess that means I need to go back in a few months. Coming home with freshly picked cherries might be the best bonus of all.


Strawberries, cherries, blueberries. What is not to love about the summer berry season? It makes me giddy to just think about all of the berry deliciousness coming in the months ahead. These Crepes with Honey Whipped Cream Cheese & Blueberry Sauce would be a great way to kick it all off!


If for any reason you don't like or don't want to make crepes, make the Blueberry Sauce. Swirl it in your yogurt, top your panna cotta with it, spoon it over your pancakes, drizzle it over ice cream, or eat it off a spoon. While the recipes for Crepes and the Honey Whipped Cream are the stars of this blog post, the blueberry sauce is the icing on the cake recipe bonus. 


Seriously though, making crepes is easy. And crepe pans are relatively inexpensive. Once you start making crepes, it's hard to stop making these incredibly versatile 'pancakes'. Filled or unfilled, sweet or savory, crepes are not just a breakfast food. They make for really good peanut butter and jelly sandwiches or should I say crepewiches?

When it comes to making crepes, there is no one way or one set of ingredient ratios. Some advocate using a blender to make the batter, others recommend whisking the ingredients in a bowl. I am currently in the bowl camp. Some recipes will tell you to let your batter rest (anywhere from several hours to overnight), while others will tell you the batter is ready to use immediately. At the moment, I am in the let it rest overnight camp. Although if you twist my arm, I will join in the let it rest (in the refrigerator) for a couple of hours. A side advantage of giving it the overnight rest is that you are ready to make crepes first thing in the morning (after the first cup of coffee of course).


Room temperature eggs, melted but slightly cooled butter, and slightly warmed milk will help ensure your batter is smooth and you won't have little clumps of butter permeating it.

A well-seasoned crepe pan make it unnecessary to cook the crepes in butter. This recipe makes a dozen eight inch crepes. 


Making the Honey Whipped Cream Cheese and Blueberry Sauce ahead of time makes the assembly of the crepes easy. Having said that, if your crepes get too 'cool' before you get ready to serve them, I have a couple of suggestions. After spreading a couple of tablespoons of the honey whipped cream cheese on them, place them on a platter you can put in the microwave. You can reheat your filled crepes in the microwave for as long as it takes to reheat them (about a minute or two). The added bonus to the microwave reheat method is the filling gets a little warm and tastes even more delicious (if that is even possible). Note: Alternately you can place your crepes (unfilled) on a baking sheet in an oven set to a low temperature to keep them warm.


Spoon the warmed blueberry sauce over the crepes just before serving them. A light dusting of confectionary sugar is optional, but adds to the wow factor of the presentation. Serve the extra blueberry sauce and honey whipped cream on the side. Some of your family and friends will appreciate it!


Bring a platter of Crepes with Honey Whipped Cream Cheese & Blueberry Sauce and your breakfast game will never be the same. Light, delicate crepes, filled with a slightly decadent, creamy honey whipped cream cheese filling, and topped with a luscious homemade blueberry sauce are almost impossible to resist. You don't have to wait for a special occasion or special guests to make this dish. This could be your signature weekend breakfast or brunch dish. One making regular appearances on your table!
Recipe
Crepes with Honey Whipped Cream Cheese & Blueberry Sauce
Makes 12 crepes. Serves 4-8 depending on hunger levels

Ingredients
Blueberry Sauce
2 1/2 cups fresh blueberries
1/4 cup water
2 - 3 Tablespoons granulated sugar
2 Tablespoons finely grated lemon zest
2 Tablespoons freshly squeezed lemon juice
1 teaspoon vanilla
2 teaspoons cornstarch
pinch of kosher salt

Honey Whipped Cream Cheese
8 ounces cream cheese, room temperature
8 ounces heavy whipping cream
2 Tablespoons honey
1 teaspoon vanilla

Crepes
1 3/4 cups whole milk, room temperature (use the microwave or stovetop to just take the chill of the milk off)
3 large eggs, room temperature
3 Tablespoons granulated sugar
1 teaspoon kosher salt
5 Tablespoons unsalted butter (70 g), melted and slightly cooled
1 teaspoon vanilla
1 cup (140 g) all-purpose flour
Optional: Confectionary sugar for dusting and 1 cup of fresh blueberries

Directions
Blueberry Sauce
1. In a medium sized saucepan, bring the blueberries, sugar, lemon zest and 1/4 cup of water to a boil over medium high heat. 
2. Reduce the heat to low-medium, and continue cooking until the blueberries begin to burst (approximately 3-5 minutes). 
3. In a small bowl, whisk together the lemon juice and cornstarch. Stir into the blueberry sauce. 
4. Continue cooking for approximately 1 minute or until the sauce has started to thicken. 
5. Remove from the heat and whisk in the vanilla and salt. If not serving immediately, allow to cool to room temperature, cover and store in the refrigerator.  The sauce will continue to thicken as it cools.
Note: Reheat sauce before serving.

Honey Whipped Cream Cheese
1. In a medium sized bowl, beat cream cheese until smooth.
2. Beat in honey and vanilla.
3. Beat in whipping cream in three additions. Beat until thick and fluffy. 
4. Store in the refrigerator while making the crepes. Note: Can be made several hours ahead.

Crepes and Assembly
1. In a medium sized bowl, whisk eggs lightly. Pour in milk and cooled melted butter. Whisk to combine and set aside.
2. In a large bowl whisk together the dry ingredients. Create a well in the center and add in egg/milk/butter mixture. Whisk until smooth.
3. Cover and refrigerate for at least one hour or up to overnight.
4. Heat crepe pan over medium-high heat. 
5. Pour 1/3 cup of the batter in the pan, quickly tilting the batter to spread an even layer in the pan. Cook for one to two minutes or until the bottom is lightly browned (when edge is lifted).
6. When crepe is browned, flip and cook another minute (or slightly less) until the other side is lightly browned.
7. Remove from pan. Continue making crepes until all of the batter is used. Stack cooked crepes on top of another.
8. Spread two tablespoons of the Honey Whipped Cream Cheese on one half of the crepe. Fold in half, then fold in half again. Place on platter. Continuing filling crepes overlapping crepes on the plater.
9. Reheat the blueberry sauce while filling the crepes.
10. Lightly dust with confectionary sugar. Pour some of the blueberry sauce over the crepes. Sprinkle fresh blueberries on the platter. Serve with sides of additional Blueberry Sauce and Honey Whipped Cream Cheese. (See Notes)

Notes: (1) Keep the crepes warm in a low temperature oven until you have made all of them. Alternately, place the filled crepes on a microwave proof platter and reheat until warm. Then top with the blueberry sauce. (2) If you have any leftover filled crepes, they reheat up in the microwave beautifully. (3) Making the batter and blueberry sauce the night before makes this dish easy to come together in the morning.


Cherry Blossom Orchards, Door County, Wisconsin (May 2019)