Monday, January 3, 2022

Red Chicken Enchiladas


It's a new year! It's the start of a new chapter!  And believe it or not, it's the 9 year anniversary of the blog! I'm not certain which of those things I am most excited about. But hey, it's 2022 so I don't have to choose just one. I can choose them all! It's anyone's guess what the year ahead may hold for all of us, but if I have any influence, then I hope it brings a healthier world, a kinder world, a less divisive world, and, in the words of poet Amanda Gorman "let us not return to what was normal, but reach toward what is next." Just the idea of 'next' makes one want to believe an infinite number of possibilities lie ahead of us. 

With regard to the blog, I have given some thought to 'what's next?'. Although to be completely honest, I haven't yet set clear, measurable goals for the year ahead. While the blog is definitely what I call a labor of love, it's been more of a creative outlet rather than a livelihood. Over the years I have given some consideration to turning it into a lucrative venture, but have stopped short of making that decision. But who knows, maybe this is the year. Over the past several years, I have worked to improve my photography and food styling skills. But I still have much work to do. It's almost hard to believe there are more than 700 recipes posted to the blog! Yet, I don't yet feel done. Some are really easy to make and some are as one of my friends recently said 'should be labeled as advanced'. What I do know is that in the year ahead I want to continue to share recipes in both the sweet and savory categories as I feel we all need to have both in our lives. And maybe I try to figure out a way to explain where the recipes fall on the easy to difficult continuum. Although if rating recipes is anything like the ratings of trails or hikes taken (or not taken) in Rocky Mountain National Park or the Great Smokies, then that could be a challenge. But whatever is 'next' here on saltedsugaredspiced.com I hope you stay along for the ride in the year ahead. 


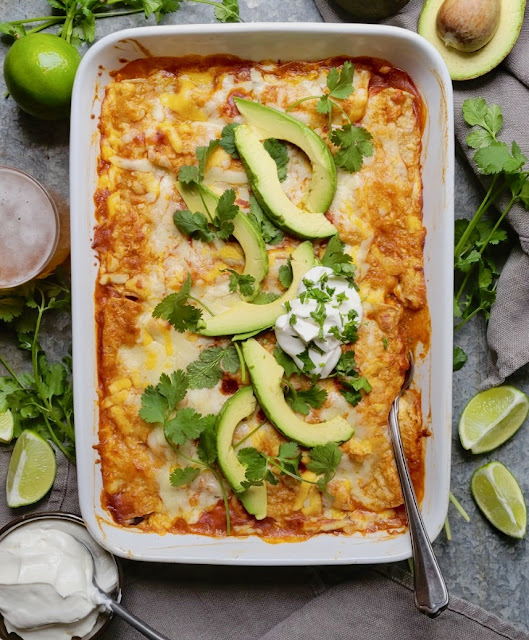
In the past eight years the first recipe of the year has fallen evenly in the sweet and savory categories. With the Red Chicken Enchiladas recipe being the first one of the new year, the scales are now slightly tipped toward savory. The kind of hearty, comfort food savory and the kind easy enough to make for a weeknight dinner or assembled early in the day for a perfect weekend gathering dinner. And, if by chance, you are cooking meals for one or two, the assembled enchiladas can be frozen and thawed for cooking later. If there were ever a perfect recipe to kick off the new year, this would be the one!


Having only eight ingredients with all or most of them store-bought (see notes below), it's the kind of impressive, semi-homemade recipe that looks and tastes like you were cooking for hours. Using a store-bought rotisseire chicken instead of roasting some chicken and using canned mild Enchilada Sauce instead of making your own significantly simplifies this dish. And while you can buy already shredded mozzarella and Pepper Jack cheeses, grating your own isn't hard at all. However, if there is any non-negotiable in this recipe it's the use of corn tortillas. Not only do they make this dish look and taste more authentic, they are significantly more flavorful than flour tortillas as well as sturdy enough to hold up in the assembly process. The best way to soften up the corn tortillas so they can filled and rolled is to wrap them in a damp paper towel and microwave them on high for one minute. This method is almost fail proof.

With the exception of the red enchilada sauce and reserved four ounces of the shredded mozzarella and Monterey Jack cheeses, all of the ingredients get mixed together in a large bowl. The messiest part of assembling the enchiladas comes next. After dipping a softened corn tortilla in the red enchilada sauce, they are hand filled with the chicken mixture, rolled and then placed seam side down in a baking dish. To make the assembly process a little easier and slightly less messy, place a small sheet pan between the pan with the sauce and bowl with the chicken mixture. This will help catch any sauce that drips off of the tortilla and make the rolling process much simpler. 


After all of the enchiladas are made and placed in the baking dish, pour all of the remaining red enchilada sauce over the top and sprinkle on the reserved cheese. If you are not baking the dish immediately, cover with plastic wrap and place in the refrigerator. Otherwise place the baking dish on a large sheet pan and place in the preheated 375 degree (F) oven and bake for 25-35 minutes.


The Red Chicken Enchiladas are done when the sauce is bubbling along the edges and the cheese has melted.


For garnishes I like to serve the enchiladas with some sliced avocado, a dish of crema, fresh lime wedges, crumbled queso fresco cheese, chopped cilantro, and a side of Cilantro or Mexican Rice. 


For a complete Tex Mex dinner experience, heat up or make some queso, mix up a large bowl of this guacamole, and make some Cilantro or Mexican Rice. For beverages mix up some margaritas, chill some bottles of beer and/or Topo Chico, or chill some cans of ranch water. This gives you all the makings of a mouthwatering, hearty, memorable, almost epic meal! So invite some Tex Mex loving friends over in the weeks ahead and serve them Red Chicken Enchiladas with all the fixins. More than likely this will be one recipe in 2022 you will be putting on repeat! It might even become your signature dish! 

Recipe
Red Chicken Enchiladas
Serves 6-8

Ingredients
4 cups of cooked, shredded chicken, then cooled considerably (meat can come from a 2 pound rotisseire chicken or two pounds of roasted chicken)
12 ounces shredded mozzarella, divided
12 ounces shredded Monterey Jack Cheese, divided (see notes)
1 cup plus 2 Tablespoons sour cream
2 Tablespoons store bought taco seasoning
1/2 teaspoon Kosher salt
12 corn tortillas (use 8' or 10" sized)
28-30 ounces Mild Red Enchilada Sauce
1/2 cup (220g) black beans, drained (about a half of 15.5 oz/439g can) - optional but really good

Fresh cilantro
Crema or additional sour cream
Sliced avocado
Queso fresco cheese, crumbled
Fresh lime wedges
Cilantro or Mexican Rice

Directions
1. Preheat the oven to 375 degrees (F). Have a 9" x 12"/13"baking dish ready.
2. Combine 8 ounces of the shredded mozzarella, 8 ounces of the shredded Monterey Jack Cheese, the sour cream, the taco seasoning, Kosher salt, the shredded chicken and the black beans (if using). Mix until well blended.
3. Slightly warm the red enchilada sauce in a small sauce pan, but one large enough to dip in the corn tortillas. Note: Do not warm the sauce too much or your will burn your fingers.
4. Wrap the tortillas in a damp paper towel. Heat in the microwave on high for one minute.
5. Dip the warmed, softened tortillas in the red sauce one at a time. Place a generous 1/3 cup of the chicken mixture in the center of the tortilla, roll, and place seam side down into the baking dish. Repeat until all of the tortillas have been filled. Note: You might have about a half cup of leftover chicken left. You can refrigerate, reheat and eat with tortilla chips as a snack.
6. Pour the remaining red enchilada sauce over the enchiladas. Top with the remaining 4 ounces of shredded mozzarella and 4 ounces of Monterey Jack cheeses.
7. Bake for 25-35 minutes or until the sauce is bubbling and the cheese has melted.
8. Let rest for 5 minutes before serving.
9. Serve with some Cilantro or Mexican Rice, sliced avocado, crema, chopped cilantro, and/or Queso Fresco cheese.

Notes: (1) I used the farmstyle thick cut Spicy Mexican Blend from Tillamook. A Monterey Jack cheese with Jalapeños and Cheddar Cheese. If you can't find it, use a good quality Monterey Jack cheese and grate it on the large hole side of the grater. (2) I used the El Milagro Corn Tortillas (sold in packages of 12). (3) I used a 10 ounce (283g) and 19 ounce (538g) can of Old El Paso (mild) Red Enchilada Sauce. (4) I used Old El Paso Taco Seasoning. The package contains more than the two Tablespoons called for in this recipe. (5) I used a rotisseire chicken but would also recommend roasting some chicken thighs as dark meat is much more flavorful than white meat. Shred the chicken while it is still warm but let it cool off considerably before you mix it with the other ingredients, particularly the cheeses. (5) If freezing the enchiladas, take out of the freezer and let thaw in the refrigerator overnight. Wait to put the cheese on top until ready to bake.

Wednesday, December 29, 2021

Potato Chip Cookies


Some cookies are meant to be enjoyed with or dunked in milk and some are meant to be paired with prosecco or champagne. I would put these Potato Chip Cookies in the 'best enjoyed with some bubbly' category, although I won't tell you they couldn't be eaten with a tall glass of milk. They are a little bit sweet, a little bit salty, perfectly crunchy, and with a shortbread-like quality to them, these cookies are nothing short of being irresistibly, borderline addictive. And, if you are someone who happens to have a fondness for potato chips, you will understand when I say it's hard to just eat only one of these cookies. 


Almost every recipe for Potato Chip Cookies I have looked at attributed its' origin to a teacher, an aunt, a grandmother, or a church cookbook. In other words, they all came with a story, but none of them actually identified the actual Potato Chip Cookie creator. There are only two things for certain I learned with regard to this cookie. First, it was created long after 1853, the year George Crum invented the potato chip. And second, it wasn't until the 1940s or 1950s when potato chip cookie recipes started appearing in magazines and newspapers. 


Not unlike all of the other Potato Chip Cookie recipes I found out there, this one too has a story. As a rule, I am not a big fan of cookie exchanges. But had I decided not to go the running group's cookie exchange night a few weeks back, I may have never gotten the recipe for 'this' Potato Chip cookie. One coming from the aunt of my very good friend Rose. If I told you that both of these women grew up in Ireland, you might be wondering why or how the place of birth has anything to do with this cookie recipe. Well let me tell you.


If you were lucky enough to grow up eating Irish butter, you learned very early on what a game changer it was in cookies, cakes, and all things baked. Some of us (like me) didn't learn how Irish butter takes almost any cookie recipe from ordinary to extraordinary until it became readily available here on this side of the pond. But Rose and her aunt discovered the 'butter secret' growing up in Ireland. So, of course, the cookies I had tasted at the cookie exchange, the cookie I couldn't wait to get the recipe for, were made with Irish Butter. So it wasn't only the tablespoon of vanilla (yes, a tablespoon!) that took these Potato Chip Cookies to a whole new level of deliciousness, it was the cup of Irish unsalted butter. And I'm told using Irish potato chips instead of Lay's Classic Potato Chips creates an even more epic cookie! 


The recipe for making the cookies is pretty straightforward. With only six ingredients, it's an easy, unfussy cookie to make. In spite of the fact it called for chilling the dough for an hour before forming into 1' balls and baking in a preheated 350 degree (F) oven.


However, instead of forming the balls of dough from chilled dough, I formed and then chilled the balls of dough. Which I have to say worked out perfectly.


The recommended baking time for the cookies ranges from 15 to 20 minutes or until the cookies are lightly browned on the edges but still a bit soft in center. My baking time was about 18 minutes.


Dusting the cookies with some confectionary sugar while they are still slightly warm turned out to be the perfect finishing touch of sweetness.


If there was ever an ultimate cookie to bring in, to ring in the new year, it would be these Potato Chip Cookies! 


But I am guessing once you taste how irresistible they are, you will be making them again and again in the year(s) ahead. Because once you know, you know how such an unlikely ingredient can create the most scrumptious rustic shortbread-like, sweet-salty cookie.


Wishing you all a very happy, healthy, filled with an abundance of sweetness new year! Looking forward to continuing to share new recipes and yes, even updated recipes with you in 2022! 

Recipe
Potato Chip Cookies
Makes 24-26 cookies

Ingredients
1 cup (75g) crushed Lay's Potato Chips (see notes)
1 cup (226g) Irish or European-style unsalted butter, room temperature (recommend Kerrygold Unsalted Butter)
1 cup (200g) granulated sugar
1 large egg yolk
1 Tablespoon good quality vanilla
2 cups (258g) all-purpose flour
Confectionary sugar, for finishing

Directions
1. In the bowl of a standing mixer fitted with a paddle attachment, cream the butter for about 1 minute.
2. Add in the granulated sugar and beat until light and fluffy (about 2-3 minutes).
3. Beat in the egg yolk until incorporated.
4. Beat in the vanilla just until mixed in.
5. Add in the all-purpose flour in three (3) additions. Mix just until flour is absorbed into the dough.
6. Using a spatula, mix in the crushed potato chips.
7. Using an ice cream scoop, form the dough into 1 to 1 1/4" balls and place on a sheetpan. Wrap tightly with plastic wrap and chill for 55-60 minutes.
8. Preheat the oven to 350 degrees (F). Line two baking sheets with parchment paper.
9. Place twelve of the balls of dough on one cookie sheet. Bake for 15-18 minutes (rotating the baking sheet midway through the baking process) or until lightly golden around the edges (and still slightly soft in the center). Remove from the oven and let sit on making sheet for 5 minutes before transferring to a cooling rack and generously sifting confectionary sugar over the top of each cookie.
10. Place the remaining 12 balls of dough on the other baking sheet. Bake accordingly.
11. Let the cookies cool completely before packaging or plating. Store cookies in a tightly sealed (tin) container.  The cookies will be good for up to 5 days, if they last that long

Notes: (1) I found it was easier to weigh out the potato chips before crushing them in a bowl or in ziplock bag.  (2) This recipe, like most other Potato Chip Cookie recipes, called for the use of Lay's Potato Chips. So, unless you have a bag of Irish Potato Chips in your cupboard, only use Lay's Classic Potato Chips when you make these cookies. (3) And, last but not least, use only unsalted Irish Butter when you make them. I promise it makes a difference. I used Kerrygold.

Monday, December 20, 2021

Peppermint Crunch


With slightly less than five days left before Christmas, I am still decorating, baking, trying new recipes, wrapping gifts, doing some last minute shopping, deciding what the holiday table should look like this year, planning the Christmas dinner menu, and wondering how I will get it all done. Thankfully I have pilates and running to help keep me sane in this self-imposed madness and second-guessing myself. Although I am still struggling with my decision to let the beloved collections of beautiful glass ornaments and chalkware Santas remain in their boxes in the attic again this year. Naked trees are a thing, right?  


One of the things included in the holiday cookie and confection boxes made for friends this year, was this Peppermint Bark. A version similar to (but maybe even better than) the one sold at Williams-Sonoma. This Peppermint Crunch may be a better version. It's part bark, it's part cookie. In other words, it's the best of both worlds.

In addition to sandwiching a cookie layer between the dark and white chocolate layers, the dark chocolate layer also has some crushed peppermints mixed in. Creating what I think is the ultimate holiday peppermint confection. It also happens to be one of those things that falls into the 'easy to make, not overly time intensive' category.

The cookie layer is made with broken pieces of Famous Chocolate Wafers. You can find them in the cookie aisle at most grocery stores. Because you need only a half of box of the wafers, you will have enough left over to make a second batch as the first one is likely to quickly disappear!


If you are looking for one more thing to make for your holiday homemade love gift boxes or to serve on your cookie platters, make this Peppermint Crunch as it looks and tastes like Christmas! It's destined to become one of you holiday traditions! But I should warn you, it can be slightly addictive.

Recipe
Peppermint Crunch

Ingredients
16-18 ounces (452g- 508g) dark or semi-sweet chocolate (55-62% cocoa), coarsely chopped
16-18 ounces (452g- 508g) white chocolate, coarsely chopped
Half of a 9 ounce (225g) package of Famous Chocolate Wafers, broken into pieces
4.5 ounces/125g crushed candy canes, divided (Crushed Candy Canes, Andes Peppermint Crunch Baking Chips or Brach's Crushed Candy Canes)
3/8 teaspoon pure peppermint extract (recommend Nielsen-Massey Pure Peppermint Extract)
Optional: Edible white glitter flakes

Directions
1. Line an 15"x 10" baking pan with parchment paper.
2. Over a pot of simmering water, melt the coarsely chopped dark or semi-sweet chocolate. Stir in 1.8oz/50g of the crushed candy canes. Pour onto prepared baking and spread evenly using an offset spatula. Immediately top with the broken pieces of the Famous Wafers, pressing down lightly so the cookies are embedded in the melted chocolate. Leave a small amount of space between each cookie piece. Let the bottom layer set up while you melt the white chocolate.
3. Over a pot of simmering water, melt the coarsely chopped white chocolate.
4. Stir in peppermint extract and 1.8 oz/50g crushed candy canes into the melted white chocolate. Stir until combined. Pour evenly over the partially set dark or semi-sweet chocolate. Carefully and evenly spread using an offset spatula.
5. Immediately sprinkle remaining .9 oz/25g over the white chocolate. 
6. Allow the pan of Peppermint Crunch to set up. Note: Peppermint Bark is easier to cut into shapes before it has completely hardened.
7. Store Peppermint Bark in a tightly sealed container or wrap in the cellophane bags tied with a pretty ribbon or baker's string.

Notes: (1) If you don't have a scale to measure out the crushed candy canes, 1.8 ounces/50 g is equivalent to a slightly rounded 1/4 cup. .9 ounces/25g is equivalent to a slightly rounded 1/8 cup. (2) Use a good quality chocolate (not chocolate chips or melting candy wafers). I buy mine from a local chocolatier, but Ghiradelli sells dark and white chocolate wafers.

Saturday, December 18, 2021

Old Fashioned


While almost everyone in the blog world has been posting recipes for holiday cookies and confections in recent weeks, we took a first time whirlwind trip Nashville with friends for several days. I could say it has taken me a week to recover and catch my breath from three days of non-stop concert going, bar hopping, eating, sightseeing, as well as hat and boot shopping, but I would be lying. In spite of uncharacteristically day drinking on this trip, I'm happy to report it took me less than a day to get caught back up in the holiday shopping and baking frenzy. But honestly, I wish I was back in Nashville sipping a cocktail and listening to some really good music. Okay, and maybe going on the hunt for a third pair of cowboy boots. From listening to music in the iconic Blue Bird Cafe and Ryman Auditorium as well in some of the more famous honky-tonks on Broadway, to spending a few hours at the Cheekwood Estate and Gardens, to eating hot chicken at Prince's and Hattie B's (jury is out on which is better), to enjoying breakfast and dinner at some pretty amazing places, to just taking in Nashville's interesting architecture, I loved everything about that city. So why had it taken me so long to get there? Not sure I even know. But I am now available to be a tour guide to the capital city of country music! 


My relatively recently acquired taste for Bourbon whiskey served me well while I was in Nashville. Along with trying a Bushwacker for the first time (talk about a boozy milkshake) and drinking Ranch Waters, the timeless, classic Old Fashioned was my cocktail of choice on this trip. After sampling them at several different places, I discovered I am a bit of an Old-Fashioned fussytarian (is anyone surprised?). I definitely prefer them being made with a good Bourbon whiskey, garnished with both an orange peel and cherries (Luxardo cherries please), and a little on the sweeter side. 


Old Fashioned cocktails have been around since the 1800s. Some might say the Old Fashioned isn't really a cocktail. Just a glass of whiskey sweetened with some sugar and bitters. However, if you have ever had a great Old Fashioned you know it's a whole lot more than just a glass of whiskey. 


Like pretty much everything, great food and great cocktails usually begins with great ingredients. With a little bit of personal preference thrown in there too. And when it comes to the Old Fashioned there are no shortage of opinions on the brand of Bourbon (or rye) whiskey to use, the type of sweetener (sugar cubes or simple syrup), the kind and quantity of bitters, the citrus fruit (orange or lemon) garnish, the ice (one large cube or a handful of smaller cubes), and last but not least, the cherries. There are even a plethora of opinions on the amount of time the Old Fashioned should be stirred. 
 

The ingredient having the biggest influence on the taste of the Old Fashioned is going to be the bourbon whiskey. I happen to love the flavors of vanilla, molasses, toffee, mint, dark fruit, and anise found in Buffalo Trace Bourbon. For me it's my absolutely first choice when making this cocktail. But you will find a number of the 'best bourbons for an old-fashioned' recommendations if you look for them. Among some of those frequently mentioned are Elijah Wood Small Batch, Four Roses Small Batch or Single Barrel, Basil Hayden, Angel's Envy, and Maker's Mark. The flavor profile of the Old-Fashioned will differ slightly depending on which bourbon you choose. More expensive bourbons generally have a deeper oak, caramel and vanilla notes. So choose well and wisely.


Some Old-Fashioneds call for the use of a sugar cube muddled in water, while others call for the use of a simple syrup. This one uses a simple syrup made with equal parts Turbinado sugar. and water (see notes) to add a nuanced complexity and depth of flavor to the cocktail. 


To muddle or to spritz, that is the question with regard to the orange peel. And the answer is.....spritz! Spritzing gives the Old-Fashioned just the right amount of sweetness. Now to the cherry garnish. Which one and how many? The options for cherries include maraschino or ones in heavy syrup (like Maraska or Luxardo). If you are looking to create a really great Old Fashioned, use cherries in heavy syrup (save the maraschino for topping a sundae). And three of them on a cocktail skewer just seems to be the perfect number. Now to the bitters. You will find some Old Fashioned recipes call for the use of only kind of bitter and anywhere from 2 to 6 dashes. In the spirit of more is better, this one uses two different kinds: Orange bitters and Peychaud's Aromatic Cocktail Bitters. And three dashes of each. Last, but not least, is the ice. One large cube or a handful of cubes? The benefits of using one large ice cube is it is slow to melt and less likely to water down the cocktail. You want your Old Fashioned chilled, but not diluted. 


Like taking forever to get myself to Nashville, my appreciation and affinity for a really good (dare I say great?) Old Fashioned took almost as long. While I should have been influenced by my Old Fashioned loving friends (especially the girl from Minnesota aka the one who sometimes dons a 'Just call me Old-Fashioned' t-shirt) some years back, I only loved to drink bourbon a few short years ago. But like they say 'good things come to those who wait'. Although if you love bourbon or bourbon whiskey, think 'sooner rather than later' to enjoy this classic, timeless cocktail. Cheers!

Recipe
Old Fashioned
Makes 1 really good cocktail

Ingredients
2 teaspoons chilled simple syrup (see Notes)
3 dashes Orange bitters
3 dashes Peychaud's Aromatic Cocktail Bitters (or can use Angostura Aromatic Bitters)
1 large ice cube
2 ounces of Bourbon or Rye Whiskey (Buffalo Trace, Russell's, etc.)
1 orange peel (about 1 inch wide and about 3 inches long) 
3 Luxardo cherries

Directions
1. Add the two teaspoons of simple syrup followed by three dashes of the Orange and Aromatic bitters to a cocktail glass. 
2. Add in one large ice cube.
3. Pour in two ounces of a good quality bourbon or bourbon whiskey. Gently stir for at least thirty, but preferably sixty seconds.
4. Give the orange peel a squirt and add to the glass.
5. Place three Luxardo cherries on a cocktail skewer and place in the glass. Alternately drop a couple of cherries into the glass.
6. Now sit back and savor. Maybe put on some Old Dominion, The National, Carly Pearce, Dan and Shay, Zac Brown, Little Big Town, Lady A, Jason Aldean, or Chris Stapleton to create a bourbon whiskey drinking mood.

Notes: (1) Some like a little sweeter Old Fashioned. If you do, use 1 Tablespoon of simple syrup. (2) To make the simple syrup add one cup of water and one cup of Turbinado sugar to a saucepan. Bring to a boil, whisking occasionally, until the sugar has melted. Let cool. Store in a bottle or jar. Store in the refrigerator. Simple syrup will be good for at least one month. 

Broadway in Nashville (December 2021)

Friday, December 3, 2021

Dark Chocolate Peanut Butter Fudge Sauce


I had every intention of kicking off the month of December, aka holiday baking season, with a new cookie recipe. But those plans changed after I made this ridiculously delicious, drop-the-mic, shut the front door Dark Chocolate Peanut Butter Fudge Sauce. I thought you needed this sinfully luscious fudge sauce in your life sooner rather than later. Because instead of, or maybe in addition to gifting your family and friends with a box of homemade cookies, you just might want to gift them a jar of this Dark Chocolate Peanut Butter Fudge Sauce. Throw in a gift certificate to their favorite ice cream store and you will be in contention for the best ever, most thoughtful gift giver!


And, if by chance, they happen to have a serious soft spot for chocolate and peanut butter, this simple gift will prove the best gifts are not always the most expensive, the most sought after, or the trendiest ones. They are often the simplest, most thoughtful ones. And, the best part of gifting friends/family with a jar of this sauce is that everything you need to make it is not sitting in a container docked offshore somewhere. 


If there was ever a fudge sauce to take serving a bowl of ice cream for dessert from good to great, it would be this Dark Chocolate Peanut Butter Fudge Sauce. 

The fudge sauce takes less than twenty minutes to make. Other than chopping the unsweetened chocolate and cutting the butter into pieces, there is no other advance prep you need to do. No letting ingredients come to room temperature, no letting it rest for hours or overnight, or no patiently waiting for the mixture to reach a certain temperature. All you need a good heavy bottomed saucepan, a whisk. a scale to measure out your ingredients, and some good quality glass jars.

The directions for making the fudge sauce are pretty straightforward. In other words, it's really easy to make.


One taste of this insane, heavenly Dark Chocolate Peanut Butter Fudge Sauce and you may never again want to adorn your ice cream with a jar of store-bought fudge sauce. 

While I think it's the perfect topping for a bowl of ice cream, you could also pour this fudge sauce over brownies, a slice of pound cake, or a bowl of sliced bananas. I would tell you to try resist eating it right out of the jar but as a chocolate-peanut butter lover that would be foolish advice.


This Dark Chocolate Peanut Butter Fudge Sauce checks off all of the holiday 'food' gift giving boxes. It's a gift made with love, it's the right kind of decadent, it's easy to make, it's ridiculously scrumptious, it's perfect for the person who has everything or wants for nothing, and it's destined turn anything it's poured on into a euphoric eating experience. And more than likely you will be making this fudge sauce long after the holidays are over. 

Recipe
Dark Chocolate Peanut Butter Fudge Sauce
Makes 2 cups

Ingredients
1 1/4 cups (250g) granulated sugar
2/3 cup whole milk
5/8 teaspoon Kosher salt
1/3 cup (28g) unsweetened Dutch chocolate cocoa (see notes)
3 ounces (88g) unsweetened chocolate, finely chopped
4 Tablespoons (57g) unsalted butter, cut into 16 pieces
1/4 cup (56g) creamy peanut butter (I used JIF)
1 teaspoon vanilla 
Flaky sea salt for finishing

Directions
1. In a heavy bottomed medium sized saucepan, heat the sugar, milk, and Kosher salt over medium heat. Gently whisk until sugar has dissolved and sugar has completely dissolved. When the mixture begins to bubble around the edges of the pan (about 4-5 minutes), reduce heat to low, and whisk in the cocoa until smooth.
2. Remove from the heat and stir in the chocolate. Let stand for 3 minutes. Whisk sauce until the chocolate is fully melted.
3. Add in the butter and whisk until the sauce thickens slightly.
4. Whisk in the peanut butter until fully incorporated.
5. Whisk in the vanilla.
6. Pour into glass jars (see notes). Top each jar with a lightly sprinkling of flaky sea salt.
7. Unless serving immediately, let the sauce cool. Cover and store in the refrigerator. Sauce will keep up to one month in the refrigerator.
8. Heat the chilled sauce in a small pan or in a microwave and pour over your favorite ice cream.

Notes: (1) Use good quality glass jars (e.g., Weck, Ball) for store the sauce in. The recipe makes 2 cups. Use pint or half pint jars. (2) I used the King Arthur Double Dutch Dark Cocoa Powder but would highly recommend Droste Dutch Processed Cocoa. (3) Do not use a 'natural' peanut butter when making this sauce.