Monday, January 22, 2024

Red Chicken Chili


This past week brought a significant amount of snow, single digit temperatures and below zero wind chills here in the Midwest. Other than dressing in layers or sitting by the fire, it seems the only other way to warm up are savoring either a hot bowl of soup or chili. Great soup and chili recipes are not only soul satisfying, they are labors of love. With the added benefits of infusing intoxicating aromas in the kitchen and yielding plenty of leftovers, investing the time into making them is almost enough to temporarily keep the winter blues at bay. Rather than making some Three Bean ChiliBeef and Bean ChiliTexas Style Chili, Beef Chili, or Chipotle Turkey Chili, I wanted to make a chili that was a little more on the healthy side yet still a comforting, crowd pleasing, deeply satisfying one. Which explains what inspired this Red Chicken Chili recipe.


There are hundreds of thousands of chicken chili recipes out there. You will find white and red versions, quick and slow cooked versions, as well as ground and shredded chicken versions. No offense to white chicken chili lovers, but I happen to like my chili 'red'. And it just so happens I LOVE this Red Chicken Chili. It's a recipe I would gladly enter into a chicken chili contest! But wait, I actually think it might even be a ribbon contender in any chili contest!


Making homemade chili is easy. Once the chicken is cooked, the vegetables sautéed, the spices allowed to toast, and the other remaining ingredients are added in, all you need to do is let it simmer (with occasional stirring) for four hours. Yes, four hours. The low, slow cooking process helps to meld and deepen all of its' flavors. 

If you happen to be a beef loving chili eater, you are going to be more than pleasantly surprised with the flavors and textures of this Red Chicken Chili. You might actually switch from being a beef chili to a chicken chili lover. So how good is this hearty, perfectly spiced chili? It's 'second helping please' good.


Other than deciding which of your friends to invite over for a weekend chili dinner, you only have decide on the array of toppings to serve along with the Red Chicken Chili. Grated white cheddar cheese, sour cream, chopped green onions, sliced or chopped avocado, and/or Fritos Scoops all compliment the chili perfectly. I would have bowls of all of them!

But you don't need to host a gathering to make this chili, you can make it just for you as it freezes beautifully. So when you crave a bowl of hot chili and don't have four hours to spend making a batch, all you have to do is pull some out of the freezer. Does this chili sound even more enticing?

Last, but not least, I promise eating a bowl of this scrumptious chili will not only warm you up, but it will be good for your soul. So what are you waiting for?

Recipe
Red Chicken Chili
Serves 6-8

Ingredients
1 3/4 to 2 pounds ground chicken (see notes)
2 tablespoons olive oil, divided
1 large yellow onion, finely chopped
1 large green pepper (seeds removed), finely chopped
1 large jalapeño (seeds removed), finely minced
2 Tablespoons chili powder
2 teaspoons cumin
1/2 teaspoon red chili flakes or red pepper flakes
15 ounce (425g) can crushed tomatoes
10 ounce (283g) can diced tomatoes with green chiles
15 ounce (425g) can black beans, drained and rinsed
15 ounce (425g) can dark red kidney beans, drained and rinsed
16 ounce (454g) bag of frozen whole kernal corn
16 ounces beer (see notes)
2-3 Tablespoons light brown sugar
2 Tablespoons worcestershire sauce
2 teaspoons Kosher salt, plus more to taste
1/2 cup chicken broth (and more if necessary)

Chopped green onions, sour cream, grated white cheddar cheese, chopped avocado, Fritos Scoops

Directions
1. Heat a large Dutch oven. Add in one Tablespoon of olive oil and heat. Add in the ground chicken. Cook until chicken is cooked through. Stir often but keep as many bite sized bits as possible. Transfer the cooked chicken and drippings to a bowl. Set aside.
2. Add 1 Tablespoon of olive oil to the pan and heat. Add in the chopped onions, green pepper and jalapeño. Cook until vegetables have softened and become lightly browned (approximately 10 minutes).
3. Add the chili powder, cumin, and red chili flakes to the cooked vegetables. Stir and cook for 90 seconds to toast the spices.
4. Add in the crushed tomatoes and diced tomatoes. Stir until well blended.
5. Add in the cooked chicken, black beans, dark red kidney beans, corn, brown sugar, Kosher salt, worcestershire, and beer. Stir until well mixed.
6. Place the cover on the Dutch oven. After one hour of cooking time add in the half cup of the chicken broth and stir.
7. Place lid back on but allow the steam to escape so the chili thickens. Stir the chili periodically. Cook for an additional three hours. Note: If the chili is too thick, add a little more chicken stock.
8. Serve with your favorite toppings and enjoy.

Notes: (1) For a very chunky chili, use up to 2 pounds of ground chicken. I used the full 2 pounds in this recipe. (2) Use a lighter beer. I used Stella Atrois. Most bottles of beer are approximately 11 ounces. You will need one full bottle and almost half of another bottle. (3) Store leftovers covered in the refrigerator or freezer so you can enjoy a bowl on another chilly day.

Tuesday, January 9, 2024

Classic Pound Cake (aka Emergency Pound Cake)


Once upon a time pound cakes were made with a pound of flour, a pound of butter, a pound of sugar, and a pound of eggs. Hence explaining how it came to be known as a pound cake. However much has changed since 1747, when a recipe for pound cake was first published. The concept of the pound cake has remained over the last several centuries, but it's ingredients have been altered in a variety of ways. From the addition of extracts to salt, to the use of buttermilk or sour cream instead of milk, to the use of cream cheese in addition to butter, to the addition of baking powder and/or baking soda, there have been a number of variations to the original pound cake recipe. What makes a pound cake 'great' might vary from person to person. Although I think almost everyone could agree it may be one of the most versatile desserts to have ever been created. Whether it's served simply with a dusting of confectionary sugar, drizzled with icing, frosted, topped with a generous dollop of freshly whipped cream, topped with fresh berries or a berry sauce, used to make ice cream sandwiches, used to make fruit trifles, or used to make a stuffed french toast, pound cake may be the best thing ever invented since sliced bread. 


The inspiration for this recipe Classic Pound Cake recipe (affectionately known as the Emergency Pound Cake) came from a woman named Susan. In her circle of friends, Susan is considered to be an incredible baker. She's the person who makes the desserts and cakes for almost all of their gatherings. Her legendary pound cakes are cut into slices, wrapped, and stored in the freezer. So on days when either she or her friends need a pick me up, slices of her velvety, dense crumbed, deeply flavorful pound cake are ready to be enjoyed or shared. Hence explains the origin of the name Emergency Pound Cake.


I first learned of her pound cake recipe in early December at a fundraising event. Just listening to her friends give it high accolades, I knew I wanted or rather needed her recipe. Through the help of one of our mutual friends, I was able to get it. But in typical fashion, I decided to make two very subtle changes to her recipe (see notes) in spite of never having tasted one she had made. I added a small amount of Kosher salt because in my world all baked goods need it to offset the sweetness and deepen the flavor. Her recipe included almond, coconut, and lemon variations. All of those flavors appealled to me, but I decided to go with an almond version on the first go-round. Rather than using all almond extract, I used a combination of vanilla and almond as I wasn't sure how almond forward the flavor would be if I had used all almond.


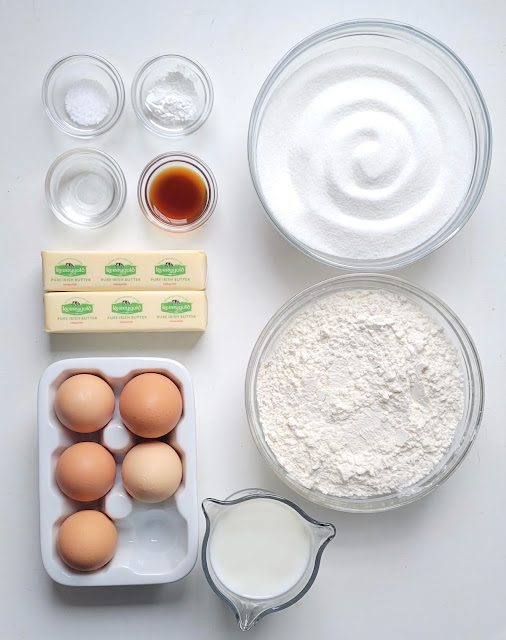
There are so many things I loved about this pound cake. To begin with, it's made with ingredients I always have on hand. Which makes it one of those cakes you can make on whim. Three cups of sugar may sound like a significant amount, but this cake has some heft to it and can feed an army. European or European style unsalted butter contains more fat, which yields more flavor. So if possible, use it. Eggs do all the heavy lifting in this pound cake and one of its' essential ingredients. Having your butter and eggs at room temperature are two of the keys to a successful pound cake. Baking powder isn't a typical ingredient in many pound cake recipes, however, just a half teaspoon helps to lift the crumb and prevents it from being grainy. While the recipe didn't specify which kind of milk to use, I presumed it to be whole milk as I wanted to ensure it was a moist cake. So I used whole milk. The higher fat content in whole milk helps to ensure as well as contribute to a more tender crumb. If there was ever a case where the type of ingredients matter, this would be one of them.

A 10 cup capacity bundt pan worked perfectly for this pound cake. Before pouring the batter into the pan, generously butter it to help prevent the baked pound cake from sticking. Preheat your oven to 325 degrees (F) for at least 10 minutes before putting the pound cake in the oven. Always place your bundt pan on a large baking sheet before inserting on the middle rack. Placing your pan on a baking sheet keeps the bundt pan stable and will catch any overflow.


Baking time for the cake is 1 hour and 25 minutes or until a skewer inserted into the center comes out clean or with a few light crumbs. I recommend checking for doneness at the 1 hour and 20 minute mark as some ovens may run a little hot. The pound cake will continue to bake in the hot pan once you remove it from the oven, so you want to be careful to not over bake it. 


The recommended amount of time necessary to successfully remove a pound cake from the bundt pan ranges anywhere from 10 minutes to 2 hours. Everyone has a strong opinion on what works for them. However, the longer the cake cools in the pan the greater the risk of having the sugar in the cake harden and stick to the sides of the pan. For that reason, I recommend giving the baked pound cake a rest time of 15 minutes before inverting onto a platter.

Once the cake has completely cooled, lightly dust with some confectionary sugar. Not only does it give some added sweetness, it will hide any imperfections that may happen during the unmolding process.


So what's the verdict? It's an 11 on a scale of 1 to 10. It's the most divinely delicious pound cake I have ever tasted. The crunchy exterior and the moist, buttery, velvety, dense, tender crumb are what make this pound cake a hands down blue ribbon winner. With the added benefit of slices freezing well (because we all have emergencies in our lives!), I don't think there is another pound cake recipe that comes close to this one. In other words, it's a throw down worthy recipe. Bake one of these pound cakes for your family and friends and will love you more than they already do. The next time I see Susan, I am going to thank her profusely for sharing her recipe with me (even though I ever so slightly tinkered with it). 

Recipe
Classic Pound Cake (aka Emergency Pound Cake)
Inspired by Susan

Ingredients
1 cup (226g) unsalted butter, room temperature (recommend using a European or European style butter)
3 cups (600g) granulated sugar
5 large eggs, room temperature
3 cups (390g) all-purpose unbleached flour
1/2 teaspoon baking powder
1/2 teaspoon Kosher salt
1 cup whole milk
1 Tablespoon Vanilla
1 Tablespoon Almond Extract (or 1 Tablespoon Coconut Extract or 1 Tablespoon Lemon Extract)
Confectionary sugar, for dusting

Optional: Serve with fresh fruit, a fruit sauce, freshly whipped cream, ice cream, or a dollop of your favorite icing. But honestly, it's pretty gosh darn good served 'plain'.

Directions
1. Preheat the oven to 325 degrees (F) for at least ten minutes before baking the pound cake.
2. In the bowl of standing mixer fitted with a paddle attachment, cream butter (about 1-2 minutes).
3. Slowly add in the granulated sugar, beat until creamy (about 2-3 minutes).
4. Add in eggs, one at a time. Beat until incorporated.
5. Sift together the flour, baking powder and Kosher salt. Don't skip the sifting.
6. Add in the sifted dry ingredients in three additions.
7. Add the vanilla and almond extracts to the milk.
8. Slowly pour the milk mixture into the batter. Beat just until well blended.
9. Generously butter a 10 cup capacity bundt pan. (I used this one from Nordicware). Note: Instead of using butter to prepare the pan, heavily spray with Baker's Joy.
10. Pour the batter into the prepared pan. Smooth the top of the batter with an off-set spatula.
11. Place bundt pan on a baking sheet. Place in the middle of the oven.
12. Bake 1 hour 25 minutes or until done. Note: Check for doneness at the 1 hour and 20 minute mark. Cake is done when a skewer inserted in the cake comes out clean or has a few crumbs attached.
13. Remove cake from oven and place on a cooling rack.
14. After 15 minutes, insert a knife along the edges of the pan. Then invert cake onto a serving platter.
15. Allow the pound cake to cool completely before dusting with confectionary sugar.
16. Cut into thick slices and enjoy. But cut several slices, wrap in parchment or sandwich paper, then place in a freezer ziplock bag. Place your 'emergency' pieces of pound cake into the freezer.

Notes: (1) Susan's recipe called for 3 Tablespoons of either Almond, Coconut or Lemon Extract. I reduced the total amount of extract to 2 Tablespoons and divided it between 1 Tablespoon Vanilla and 1 Tablespoon of Almond Extract. If I was making a coconut version, I would use 1 Tablespoon Vanilla and 1 Tablespoon of Coconut. And if I was making a lemon version, I would use 1 Tablespoon Vanilla and 1 Tablespoon Lemon Extract. (2) Additionally, I added 1/2 teaspoon of Kosher salt to the recipe. (3) I used the vanilla and almond extracts from Nielson-Massey and Gold Medal unbleached all-purpose flour.

Thursday, January 4, 2024

Sticky Toffee Pudding


Happy New Year! In 2024 we will have one additional day to live our best lives. Which may or may not include include savoring something sweet. Now considering some of you are starting the new year eating cleaner, it might be considered a form of sabotage to have the first post of the year be a recipe for something wickedly rich, decadent, and delicious. Alternately it might also be one of those good intentioned gestures encouraging and helping you to truly live your best life! If you have ever had Sticky Toffee Pudding before, you know it's one of those desserts you wouldn't ever want to live without. It's definitely a dinner party worthy dessert, but it's also humble enough to be considered comfort food at its' finest. 


Some (like me) might have thought that Sticky Toffee Pudding has been around for centuries. Surprisingly (for me) it hasn't. Rather it has been around for either a little more than 120 years or slightly more than 70 years, depending on which source you want to believe. Three different regions of the United Kingdom lay claim to having invented this decadent, mouthwatering, scrumptious dessert. But whether it was created in 1907 (in Yorkshire), in 1960 (in Cumbria) or in 1967 (in Scotland) doesn't really matter. What matters is that it made its' way here to the states and has recently begun to garner the attention it deserves. If for some reason Sticky Toffee Pudding hasn't made way into your life, let me help you give it a grand entrance. 


In spite of its' relatively short history, there are a plethora of Sticky Toffee Pudding recipes out there. Some include the addition of spices (cinnamon, ginger, cloves, nutmeg), some include molasses or treacle, and some are made with self-rising versus all purpose flour. This recipe doesn't use any of those ingredients. Maybe someday I will tinker around and include some of them, but at the moment, I am deeply, madly in love with the version here. 


In addition to aiding in the breaking down of the dates, cooking them in baking soda 'brings out the inherent toffeeness of the dates as well as softens their skins.' (Taylor and Arguin). It may sound a bit unusual, but it works. Medjool dates have a rich dark color and rich caramel flavor making them the most optimal choice. And the dark brown sugar is another one of the keys to a moist, dense, chewy Sticky Toffee Pudding. The batter is comprised of two components: the cooked dates and the sugar/butter/flour/eggs/baking powder/salt/vanilla mixture. When making the Sticky Toffee Pudding, begin with cooking the dates as they need time to cool before getting mixed in to the batter.


While the Sticky Toffee Pudding bakes, make the luscious sauce. Once the cake is finished baking, you will pour one cup of the sauce over a skewer holed cake. Then return to the oven for another 3-4 minutes of baking. 


The remaining sauce will be used when serving the warm Sticky Toffee Pudding. Serve pieces of the sauce drenched pudding with a large scoop of vanilla ice cream or better yet, some salted caramel gelato. 


Whether or not Sticky Toffee Pudding makes it way as one of the 'it' desserts of 2024 is anyone's guess. However, if any dessert should go viral this year and remain viral for years to come, it is this heavenly, luscious, scrumptious Sticky Toffee Pudding. In other words, you absolutely must have it in your life. But I have a word of caution for you. Do not tell your family and friends what is in this cake until they have had their first bite or maybe until after they have cleaned their plates. Trust me when I tell you there won't be any crumbs or sauce left behind as it may be one of the most irresistible desserts to grace your table. And at the end of the night everyone will leave as immensely happy (unsuspecting) date loving people!

Recipe
Sticky Toffee Pudding
Serves 8-10

Ingredients
Caramel Sauce
1 3/4 cups (350g) dark brown sugar
1 1/2 cups heavy whipping cream
3/4 cup (170g) unsalted butter (preferably European or European Style)
2 teaspoons vanilla
1/4 teaspoon Kosher salt

Sticky Toffee Pudding
12 ounces (340g) Medjool dates, pitted and coarsely chopped
1 cup water
1/4 teaspoon baking soda

1 3/4 cups (228g) all-purpose flour
1/2 teaspoon baking powder
1/2 teaspoon Kosher salt
1 cup (200g) dark brown sugar
3/4 cup (170g) unsalted butter, room temperature (preferably European or European Style)
3 large eggs, room temperature
2 teaspoons vanilla

Vanilla Ice Cream or Salted Caramel Gelato

Directions
Caramel Sauce
1. In a medium sized saucepan, melt the butter.
2. Add in the dark brown sugar and heavy whipping cream. Bring to a boil.
3. Turn the heat down to a low simmer. Stirring frequently, continue to simmer for 5-8 minutes, until the sauce has thickened and a bit sticky. Note: To check for doneness, dip a spoon in the sauce. Swipe your finger down the center of the spoon. If the finger swipe remains, the sauce is done.
4. Stir in the vanilla and Kosher salt. Remove from the heat. Set aside.

Sticky Toffee Pudding
1. In a medium sized heavy bottomed saucepan, combine the dates and 1 cup of water. Bring to a boil.
2. Reduce heat to simmer and cook until dates are soft and most of the liquid is absorbed (but the mixture remains moist). This takes about 3-4 minutes.
4. Remove from the heat and stir in the baking soda.
5. Transfer the mixture to a bowl and let come to room temperature. Or to speed up the cooling process place the bowl in the refrigerator.
6. Preheat the oven to 350 degrees (F). Line a 9" square baking pan with parchment paper. Generously butter the paper. Set aside.
7. Sift flour, baking powder and salt. Set aside.
8. In the bowl of a standing mixer fitted with a paddle attachment beat the butter until creamy (about 2-3 minutes).
9. Add in the dark brown sugar and beat until light and fluffy (about 3-4 minutes). Scrape down the bowl as needed.
10. Beat in the eggs one at a time.
11. Mix in the dry ingredients, mixing just until combined.
12. Add in the cooled dates and vanilla. Stir to combined.
13. Transfer the mixture to the prepared baking pan. Smooth top with an offset spatula.
14. Place pan on a large baking sheet. Bake for 35-38 minutes until browned and slightly firm to the touch but still spongy. Note: A toothpick inserted in the center of the cake may have a few crumbs attached, but it should not be wet.
15. Remove from the oven and generously pierce the top of the cake with a skewer. Pour one cup of the caramel sauce over the top and  and return to the oven.
16. Bake for an additional 3-4 minutes or until the caramel sauce bubbles.
17. Remove from the oven and let cool on a wire rack. Let cool to slightly warm or room temperature.
18. To serve, pour some of the sauce on a plate, place a square of the Sticky Toffee Cake on top, then top with Vanilla Ice Cream or Salted Caramel Gelato. Top with a little more of the sauce.
19. Store any leftover cake covered in the refrigerator for up to 5 days.
20. Important note: If cake has been chilled or is at room temperature. Reheat in the microwave until warm before serving. It's absolutely scrumptious served warm.

Notes: (1) 12 ounces of coarsely chopped Medjool dates equals two cups. (2) If at all possible, buy your dates from a Mediterranean store. Especially one that imports Medjool dates. (3) The Sticky Toffee Pudding and Sauce can be made early in the day. Reheat pieces of the pudding and the sauce before serving.

Wednesday, December 20, 2023

Peppermint Chocolate Crinkle Cookies


With the house decorated for the holidays and my cookie boxes shipped out, the short getaway into the city with friends last week was a much needed, most welcome Christmas season adventure. We had so much fun going to theater, walking not once, but twice through the crowded Christkindlmarket, taking a brisk morning walk to the Starbucks Roastery Reserve, and having a long, leisurely lunch at one of my favorite restaurants we decided it should become an annual tradition. Much to my surprise, in only took just two whirlwind wind days to energize me to take on another two days of herculean baking and inspire me to create a new cookie recipe! It was actually seeing the Peppermint Chocolate Crinkle Cookies at the holiday market to push me into creating this pillowy, fudgy, minty confection. And in all honesty, I think they might be my new favorite, most irresistible, most festive 'holiday' cookies!  


With the holidays already in full swing, I am going to keep this post uncharacteristically short! Here are some helpful ingredient and direction hints to ensure your baking success. If possible, weigh your ingredients (e.g. some flours weigh more than others). When choosing the cocoa powder, would highly recommend using Dutch Process Cocoa, however, a dark unsweetened cocoa powder would also work. Eggs should be at room temperature. Use a pure peppermint extract for the most optimal minty flavor. Melt your chocolate and butter on low heat rather than in the microwave. Use real candy canes. When crushing the candy canes, be careful to not pulverize them into a powder. You want small chunks of candy canes in your cookies to give it that surprise little crunch.

There is no need to chill the thick batter. Use a 1 1/4" sized cookie scoop to create your cookie balls. If you don't have one, they should be the size of a ping pong ball. Roll your cookies first in granulated sugar, and then in confectionary sugar. Don't over bake them. They are done when the edges have set and they have formed cracks. They should feel slightly soft in the center. Letting the baked cookies cool on the baking sheet for 5-6 minutes before transferring to a cooling rack will finish them off. 

Once the cookies have cooled, either store them in a sealed tin or wrap in cellophane bags. For the most optimal eating experience, enjoy them within two days of baking.

Like the old adage 'I have saved the best (cookie) for last'. Because if there was ever a cookie to bring an abundance of joy to the holiday season, it would be these Peppermint Chocolate Crinkle Cookies. From the perfect hint of peppermint, to the fudgy, pilllowy centers, to the snowy signature cracked tops, this cookie wins in both the flavor and beauty categories. The best way to describe the texture of these cookies is to have you think of them as a cross between a cookie and brownie. In other words, they are absolutely heavenly and ridiculously satisfying. I promise you will be obsessed with them. Especially if you love the flavor combination of peppermint and chocolate!

Wishing you all the happiest, merriest, sweetest, and most blessed holiday! 

Recipe
Peppermint Chocolate Crinkle Cookies 
Makes 18-20 cookies

Ingredients
1 1/4 cups (163g) all-purpose flour
2 Tablespoons (18g) unsweetened Dutch cocoa powder
1 teaspoon baking powder
1/4 teaspoon baking soda
1/2 teaspoon Kosher salt
6 ounces (170g) dark chocolate (60-72% cacao), coarsely chopped or 6 ounces bittersweet (60-64% chocolate chips. Note: Can use any semi-sweet or dark chocolate containing 60-72% cocoa)
4 Tablespoons (57g) unsalted butter, cut into chunks
2 large eggs, room temperature
3/4 cup (150g) dark brown sugar, firmly packed
3/8 teaspoon pure peppermint extract (if you want a more pepperminty flavor, use up to 1/2 teaspoon)
2 to 3 ounces (56g to 84g) peppermint candy canes, coarsely crushed (from about 12-17 mini candy canes)

1/2 cup confectionary sugar
1/2 cup granulated sugar

Directions
1. Preheat oven to 325 degrees (F). Line two baking sheets with parchment paper and set aside.
2. In a medium sized bowl, sift together flour, cocoa powder, baking powder, baking soda, and salt. Set aside. 
3. Melt butter and coarsely chopped chocolate in a heatproof bowl set over a pan of simmering water or use a small heavy bottomed saucepan. Stir occasionally until almost completely melted and combined.. Remove from heat and continue stirring until chocolate has completely melted. Allow to cool.
4. In the bowl of a standing mixer fitted with a paddle attachment, beat eggs and dark brown sugar together on medium speed until smooth (approximately 3-4 minutes).
5. Add the peppermint extract and beat again until incorporated.
6. Scrape chocolate mixture into the bowl and beat until combined. Scrape down sides and bottom of the bowl.
7. Add in flour mixture. Beat on low speed until flour is just incorporated but some streaks remain. Add in the crushed candy canes and finish mixing until flour is incorporated (do not overmix).
8. Let batter rest for 10-15 minutes.
9. Put granulated sugar and confectionary sugar into two separate bowls.
10. Using an ice cream scoop, form the dough into balls approximately 1 - 1 1/4 inch in diameter. 
11. Roll dough balls first in granulated sugar, then in confectionary sugar. Place on prepared baking sheet (8-9 cookies per sheet).
12. Bake, rotating baking sheets halfway through the baking time, until cookies crackle and begin to firm up along the edges (approximately 10-12 minutes). Note: Cookies will still be slightly soft in the center, giving them a moist brownie-like texture). Start checking for doneness at the 11 minute mark.
13.Allow cookies to rest on baking sheet for 5 minutes before transferring to a cooling rack. Allow to cool to room temperature.
15. Store cookies in a tightly sealed container. Note: Cookies are at the best if eaten within 2 days of baking.

Notes: (1) You can also add up to 1/2 cup miniature chocolate chips to the cookies. This addition is optional.

Wednesday, December 6, 2023

Red Velvet Crinkle Cookies


Before delving into process for making these fudgy, insanely delicious, gorgeous, perfect for the holidays Red Velvet Crinkle Cookies I first want to share something with you. Believe it or not, I have a love-hate relationship with the magic of Christmas. Yes, I know some of you claim it as your favorite holiday of the year and begin counting the days until Christmas arrives as early as July. A part of me envies that anticipation and joy you feel. Yes, I know the holiday also symbolizes hope, love and redemption for many of you, especially my friends having a strong sense of faith. And yes, I know there are some who experience as much child-like euphoria in giving as they do in receiving gifts. Particularly those who put a high value on material things. So what sort of curmudgeon (like me) dislikes any part of Christmas? Well here goes. As much as I love how the house looks decorated and all gussied up for the holidays, the process of taking down and opening up more than twenty boxes from the attic makes me anxious. One look at all of the Christmas decorations collected over the decades and I often wonder what was I thinking when I bought some of them! And as much as I love baking and creating cookie boxes to give to friends, the anticipation of spending several twelve hour days in a Willy Wonka, cookie palooza kitchen can often be more stressful than joyful. Perfection is my self-imposed Achilles Heel. Yet, in spite of the ying-yang of emotions the holiday brings, I have figured out how to create some holiday balance. All I need to do is watch "It's a Wonderful Life" and/or "Miracle on 34th Street" for the millionth time to get me into the Christmas loving groove and lessen my holiday angst. Taking that first batch of Christmas cookies out of the oven or cutting into a perfectly set pan of caramels may play a role too. 


If ever there was a cookie to emulate the joy, beauty, and festiveness of Christmas it would definitely be these homemade Red Velvet Crinkle Cookies. Studded with white chocolate chips for added decadence, they are destined to become a holiday favorite. A tray or package of these scrumptious cookies are certain to evoke the sense of Christmas wonder.


There is nothing quite like a homemade Red Velvet Crinkle Cookie. The doctored up cake mix versions of this cookie don't even come close to the dense, brownie like fudgy texture of ones made from scratch. 


Instead of using liquid food coloring, this recipe calls for gel food coloring. Gel combined with a small amount of fresh squeezed lemon juice is what gives these cookies the most vibrant red color. The addition of the white chocolate chips is what sets them apart from any other Red Velvet Crinkle Cookie! 


When all mixed together, the dough will be very thick. Which means there is no need to chill the dough. Use a 1 1/4" to 1 1/2" cookie scoop to create your cookie balls (balls should weight about 30g) . First rolling the balls in granulated sugar and then rolling in confectionary sugar is what gives these cookies their swoonworthy, signature crinkles. 

The baking time for these Red Velvet Crinkle Cookies is relatively short. Only 11-12 minutes in a preheated 350 degree (F) oven. The cookies are done when they have puffed up, are crinkly and have their edges set. The center of the cookies will still look a little wet, but allowing the cookies to rest on the hot baking sheet for 5-6 minutes will finish off the baking process. And prevent you from over baking them!


If there was one new cookie to add to your collection of holiday confections and to spark holiday joy, let it be this one. Bring the Red Velvet Crinkle Cookie to a cookie exchange and your platter will be the first to disappear. Add them to your cookie platters and/or cookie gift boxes to bring added holiday delight to your friends and family. Especially to the ones who may need a little boost in their holiday spirit. If you don't get your fill of these delicious, decadent cookies, make then again for Valentine's Day. You will be sure to win the hearts of everyone you give them to! 

Recipe
Red Velvet Crinkle Cookies
Makes 18 cookies

Ingredients
2 cups (260g) all-purpose flour 
1/3 cup (32g) unsweetened cocoa powder 
1 1/2 teaspoons baking powder
1/2 teaspoon Kosher salt
1/2 cup (113g) unsalted butter, room temperature
3/4 cup (150g) granulated sugar
1/2 cup (100g) light brown sugar
2 large eggs, room temperature
2 teaspoons vanilla
1 teaspoon lemon juice
1 Tablespoon (20-21g) red gel food coloring
3/4 cup (128g) white chocolate chips

1/2 cup (100g) granulated sugar
1/2 cup (60g) confectionary sugar

Directions
1. Preheat oven to 350 degrees (F). Line two, large rimmed baking sheet with parchment paper. Set aside.
2. Sift together the flour, cocoa powder, baking powder and salt. Set aside.
3. In the bowl of a standing mixer fitted with a paddle attachment, beat the butter, 3/4 cup granulated sugar and brown sugar until light and fluffy (approximately 2-3 minutes). Scrape down the bowl before adding in the eggs.
4. Beat in the eggs, one at a time.
5. Mix in the vanilla, lemon juice, and red food coloring. Scrape the bowl again before adding in the dry ingredients.
6. Reduce speed to low and mix the sifted dry ingredients into batter. Mix until blended in.
7. Fold in the white chocolate chips. Note: The batter will be very thick.
8. Place the 1/2 cup of granulated sugar and 1/2 cup of confectionary in two separate bowls.
9. Using a 1 1/4" to 1 1/2" cookie scoop, scoop out balls of the dough. Roll each ball first in the granulated sugar, then in the confectionary sugar. The balls should be completely coated. Note: Balls of dough will weigh approximately 30g.
10. Place 9 or 10 dredged cookie balls, spaced at least 2 inches apart, on each baking sheet. But bake only one baking sheet at a time.
11. Bake the cookies for 11-12 minutes or just until the cookies have cracked, puffed up and the edges are set. (they may look a little wet in the center). Let cool on the baking sheet for 5-6 minutes before transferring to a cooling rack.
12. Store the cooled cookies in a sealed container or wrap in cellophane bags. Cookies are best enjoyed within 3-4 days. But they probably won't last that long.

Notes:  (1) I used Ghiradelli Cocoa Powder. (2) You can find red food coloring gel in most grocery stores or other specialty food stores. (3) Recipe was inspired from multiple sources.

Monday, November 20, 2023

Herbed Stuffing


With Thanksgiving just days away, many of us are already anticipating the first bite of our favorite holiday foods. Often it's a specific side dish or dessert. But sometimes it's the combination of flavors on our plates we look forward to eating. While I can't say with absolute certainty, I would however venture to say many of us can hardly wait to enjoy a heaping helping of stuffing. Whether it's adorned with a healthy spoonful of gravy or not, stuffing is almost always the real star on Thanksgiving tables across the country. 


If you grew up devouring an herby, buttery bread stuffing on Thanksgiving Day and making sandwiches with it the day after, it's probably the one you love best. I have nothing against cornbread or meat stuffings. But in all seriousness, nothing compares to the depth of flavor only a bread stuffing made with fresh herbs can deliver. Especially one with a crispy, crunchy exterior and moist, custardy like interior. Which means to make a best of both worlds stuffing, it must be baked outside of the turkey.


To achieve that rustic, homemade look, a loaf of a Tuscan or Hearty White Country Bread must be torn up into one inch, craggy edged pieces. Not cut into cubes. The days of letting your torn up pieces of bread dry for days are over. Baking the bread pieces in a 250 degree (F) oven for about an hour will not only dry out the bread, but will turn it into crispy pieces of deliciousness.

For the most herbaceous stuffing, only fresh herbs will do. Dried herbs won't do this stuffing justice. In other words, there are no recommended substitutions for the fresh herbs. Parsley, sage, rosemary and thyme chopped up and mixed in with the bread, sautéed onions and celery, Kosher salt, pepper, chicken broth and eggs create a stuffing so insanely delicious you will find yourself wondering why you don't make stuffing year round. Or at least when you are serving a roasted (homemade or store bought) chicken or a grilled ribeye.

If you want to make your own chicken broth you can. But a really good quality chicken broth can be found on your grocery store shelves.


To achieve its' craveworthy crispy, crunchy and moist, almost custardy textures, the Herbed Stuffing is first baked covered for 40 minutes, then uncovered and baked for another 35-40 minutes. This two part baking process is key to making the most feast worthy stuffing.


If there was ever an Herbed Stuffing standing head and shoulders above all others, this would be the one. From taste to texture, it has all of the bells and whistles a classic, impressive bread stuffing should have. 


If there is one new dish you bring to or swap out at your Thanksgiving table this year, let it be this Herbed Stuffing. Because no matter what dessert you serve this year, I promise everyone will be talking about this stuffing. You just need to hope you have a bit leftover so you can enjoy it the day after along with a few slices of turkey, some gravy, a scoop of mashed potatoes, and/or maybe cranberry chutney (or sauce).

Happy Thanksgiving wishes and blessings to all of you!


Recipe
Herbed Stuffing
Serves 8

Ingredients
20-22 ounces good quality day old hearty white bread (unsliced) loaf (see notes), torn into 1 inch pieces
3/4 cup (170g) unsalted butter
2 1/2 cups (325g) chopped yellow onions (from one large onion)
1 1/2 cups (197g) chopped celery (from 4 large stalks)
1/2 cup chopped fresh flat leaf parsley
2 slightly heaping Tablespoons fresh sage, chopped
1 Tablespoon fresh rosemary, chopped
1 Tablespoon fresh thyme, chopped
2 teaspoons Kosher salt
1 teaspoon black pepper
2 3/4 cups chicken broth, divided
3 large eggs
Butter for preparing the pan

Directions
1. Spread the torn pieces of bread out on a large rimmed baking sheet. Bake at 250 degrees (F) for one approximately hour or until dried out and lightly golden on the edges. Let cool.
2. Increase the oven temperature to 350 degrees (F). Generously butter a 9" x 12" baking dish. Set aside.
3. In a large skillet melt the butter over medium heat. Add in the onions and celery. Cook until the vegetables are softened and lightly golden (approximately 10 minutes).
4. In a large bowl, combine the bread, sautéed onions and celery, parsley, sage, rosemary, thyme, Kosher salt, and black pepper. 
5. Heat 1 1/4 cups of the chicken broth until warm to the touch. Pour the warmed broth over the ingredients in the bowl. Mix well. Let cool slightly.
6. Whisk together the remaining (unheated) 1 1/2 cups chicken broth and eggs together. Pour over the mixture. Mix well. You can use your hands here!
7. Transfer the stuffing to the prepared dish. Cover with aluminum foil. Place dish on a baking sheet and place in the preheated oven. Bake for 40 minutes.
8. Remove the foil and continue baking for an additional 40-45 minutes or until the stuffing is set and the top is crispy and golden brown.
9. Serve and savor.
 
Notes: (1) Look for a larger sized Tuscan or Country Style White Loaf in your grocery store.  If you buy a 20-22 ounce loaf, you will not need all of it. If you can only find 16 ounce loaves of bread, you will need two but will have leftovers to use for making sandwiches or toast. (2) Stuffing can be made a day ahead. Take out of the refrigerator at least one hour prior to baking. Bake as directed. (3) If you like a sage-y stuffing, use up to 3 Tablespoons of freshly chopped sage. 

Thursday, November 16, 2023

Popovers with Strawberry Butter

For those of you who grew up savoring the classic popover at your Thanksgiving or Christmas dinner tables, consider yourself both blessed and lucky. My first bite of a popover didn't come until well into my adulthood. Way back when, Neiman-Marcus took the concept of the bread basket to the next level by serving a small basket of popovers at lunch. The light, airy, crunchy on the outside, yet slightly hollow and soft on the inside popover was one of the most heavenly bites I ever had. At the time, I was convinced those swoonworthy, lofty popovers had to be one of the most difficult things in the world to make. Yet, after doing a bit of research I discovered they were well within my reach. 


Making the most gorgeous, high topped, golden, scrumptious popovers requires only a little bit of patience and following a few rules. The patience portion is two fold. Allowing the mixed batter to rest for 15-30 minutes before baking and not opening the oven door at any time during the 30-32 minute baking process. 

There are a few other rules for making the most perfect popovers. They involve both the ingredients and baking process. One of the keys to the lightest, airiest popovers is room temperature eggs and milk. Taking your eggs out of the refrigerator the night before will ensure they are popover batter ready. Heating the milk over low heat in a pan until just barely warmed is one of the safest ways to get your milk to room temperature. Mixing your room temperature ingredients in a blender rather than whisking by hand helps to ensure you have a lump-free batter.


Another important key to a making a perfect popover is heating the popover pan in the preheated 450 degree (F) oven for five minutes before either brushing the wells with melted butter or spraying with canola oil. The butter and/or oil promotes browning. The moment the room temperature batter hits the hot metal, steam begins to form. As a result the hot pan creates the ideal environment to maximize the amount of steam. And it's that steam that helps push the batter upwards while also creating the soft texture and partially hollow interior.

Steam is your friend only during the baking popovers. As soon as the popovers come out of the oven, insert a sharp knife into the top of popover to let the steam out in order to prevent the popovers from collapsing. Releasing the steam will not only help the popovers keep their shape, it helps ensure you don't end up with a soggy popover.

Popovers are traditionally baked in a popover pan. Their straight sides and taller, skinnier cups are the shape producing the best desired, most dramatic effect. However, popovers can also be made in a muffin pan. While the popover pan might give the popover wow-factor a slight edge, ones made in muffin pans are just as delicious. Having said that, good popover pans are relatively inexpensive and worth splurging on. Especially if you plan on serving popovers year round and not only on special occasions.


Popovers are meant to be enjoyed immediately after they come out of the oven. If by chance you have any leftovers, store them in a sealed plastic bag. Reheat them in a preheated 350 degree (F) oven for 5-10 minutes to rewarm and slightly re-crisp them up.


Popovers can be simply enjoyed with a generous slathering of butter. Or you with a large dollop of some delicious homemade Strawberry Butter. How you choose to eat your popovers will depend in large part on whether they are being served for breakfast, lunch or dinner.


Popovers are classic for a reason as they make every meal feel a little extra special. Replacing your bread or muffin basket with a magical basket of hot, towering, airy, golden popovers is bound to be a jaw-dropping moment at your table. Does it get any better than that?

Recipe
Popovers with Strawberry Butter
Makes 12

Ingredients
Popovers
1 1/2 cups whole milk, room temperature or heated just gently warm to the touch 
4 large eggs, room temperature
2 heaping teaspoons (10g) confectionary sugar
1 teaspoon Kosher salt
3 Tablespoons unsalted butter, melted, cooled slightly
1 1/2 cups (192g) all-purpose flour (I use Unbleached Gold Medal Flour) - See Notes
Melted butter or canola spray for preparing the pan

Strawberry Butter
1/2 cup (113g) unsalted butter, room temperature
1 Tablespoon (15g) confectionary sugar
1/8 teaspoon Kosher salt
1/2 cup (165g) strawberry preserves or lingonberry preserves

Directions
Popovers
1. Preheat oven to 450 degrees (F).
2. In a blender, add in the room temperature/gently warmed milk, eggs, confectionary sugar, and Kosher salt. Blend until smooth.
3. Add in the melted butter, blending until incorporated.
4. Add in the flour and blend until the batter is smooth.
5. Let the batter rest for 15-30 minutes.
6. Put an empty (unprepared) popover pan on a baking sheet. Insert into the oven and let heat up for 5 minutes.
7. Remove pan and baking sheet. Working quickly either brush each well with melted butter or spray with canola oil. Note: I prefer using melted butter.
8. Immediately pour the batter into the hot popover pan until it is about 2/3's full. Note: If using a muffin pan, fill slightly past the halfway mark.
9. Bake popovers for 20 minutes at 450 degrees (F). Do Not Open the Oven. Reduce the temperature to 350 degrees (F) and bake for an additional 10-12 minutes or until the popovers have risen and are a deep golden brown. Note: You can check for doneness at the 30 minute mark but not a minute earlier. My oven required an additional couple of minutes.
10. Remove the pan from the oven. Insert a sharp knife into the top of each popover. Immediately remove from the pan.
11. Serve immediately with the strawberry butter.

Strawberry Butter
1. In a medium sized bowl, beat the butter until creamy (about 2 minutes).
2. Add in the confectionary sugar and Kosher salt.  Beat until incorporated.
3. Add in the strawberry preserves. Mix until blended.
4. Let the strawberry butter chill for at least 30 minute in the refrigerator. Note: You can make the strawberry butter several days ahead. Remove from the refrigerator when you begin baking the popovers to soften it up and make it easier for spreading.

Notes: (1) I used a 128g per cup measurement for the all-purpose flour for this recipe because I used Gold Medal Unbleached All-Purpose Flour. If you are using a different flour, use a weight measurement of 180g. (2) I used a popover pan but you can also use a muffin tin. Fill the well of the hot, prepared muffin tins a little more than half full. You should use up all of your batter, but if not, pour whatever is left evenly into each well. (3) If you have only one six well popover pan and you are serving 2-4 people, you can cut the recipe in half.