Tuesday, June 11, 2024

Levain Style Lemon Cookies


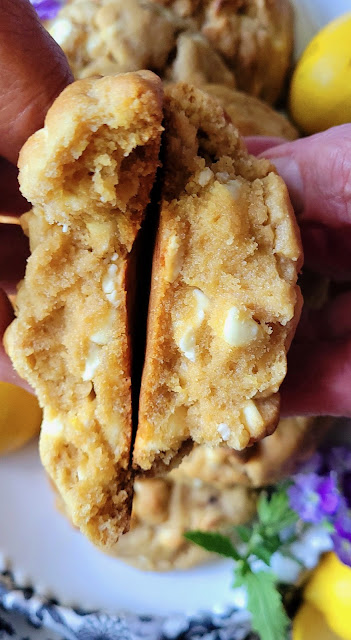
Every now and then I surprise myself. While I am almost always happy with how a new recipe turns out, there have only been a few times when I wanted to stand in the middle of street with a megaphone and announce to the neighborhood that I have just created the absolutely best thing in the universe. This would be one of those rare 'forget having any sense of humility' moments. Rather it would be one of those unabashedly, shamelessly hubris moments. The creation of these Levain Style Lemon Cookies has unleashed a monster in me. Because this is absolutely, unequivocally the BEST, GREATEST, MOST INSANELY DELECTABLE, CRAVEWORTHY, GORGEOUS lemon cookie on the planet. Possibly the universe. There I said it. I have never been so bold in my entire life. But this cookie, well this freaking amazing cookie has brought out the best of the worst in me.


I could take complete responsibility for the creation of this cookie had I not been gently pushed (in the best of ways) by my dear friend Linda. It was she who asked me months ago if I could re-create the Levain Lemon Cookie as she absolutely loves all things lemon flavored. In spite of having created several Levain style cookies for the blog, I wasn't exactly sure I could replicate this one without creating a 'break the bank' confection. Lemon flavored chips were the sticking or rather should I say sticker shock point. Once I learned others had used white chocolate chips as an alternative, I knew my next biggest challenge would be to create a cookie having the 'right' amount of lemon flavor. Not one overpowering or cloyingly sweet with the flavor of lemon, but one having a more subtle, but still discerning lemon flavor to be detected in each mouthwatering bite.  


There were a myriad of options to consider for infusing lemon flavor into the cookie dough. Freshly squeezed lemon juice, lemon zest, lemon extract, lemon paste and/or any combination of the aforementioned. My gut was telling me to use only lemon zest and lemon paste. Some will say there isn't any difference between lemon extract and lemon paste, but I happen to be one that disagrees. The thicker lemon paste delivers a much better, less acidic lemon flavor. And while lemon juice can add some bitterness. lemon zest infuses concentrated amounts of sweet, citrus flavor. But figuring out the quantities of each was going to take a bit of thinking.
 

Having made Levain style cookies before I knew I would be using a combination of all-purpose and cake flours, granulated sugar, light brown sugar, baking powder, baking soda, Kosher salt, eggs (one large egg, one large egg yolk), unsalted butter, and alot of chips. Compared to my other Levain style cookies, this recipe uses different amounts of sugars, baking powder, baking soda, Kosher salt and chips. Some less, some more. I knew I would get a sense of whether or not I made the right decisions when I mixed and then tasted the batter. If there was thing I learned very long time ago is that 'the batter never lies'. If the consistency doesn't look or feel right, the cookie won't turn out right. If the batter doesn't taste right, the cookie won't have an optimal flavor. In other words, a bad batter isn't salvageable. 


To chill or not to chill the dough was yet another decision I needed to make. I decided to let the balls of dough chill for slightly over an hour. Just enough time for the to dough rest and hold its' shape when it went into a hot preheated oven. I knew i didn't want the tops of my cookies to be smooth, so I used the roll into a ball, break in half, bring the halves together method so I would have cookies with that beautiful bakery style craggle-y top. 


This recipe makes 8 ginormous cookies. In order to get them to bake evenly, the balls of dough must be weighed. Each ball of dough weighs a little more than 6 ounces. Because they are so huge, it's important to bake only four cookies at a time. When baking, I decided to use the two tray method. One tray turned upside down and the tray with the cookie balls set on top (so two tray bottoms are touching one another). I am not certain I can explain the science behind why this works with large over-sized cookies, but it does.


Baking time for the Levain Style Lemon Cookies ranged from 17-18 minutes in a preheated 375 degree (F) oven or just until the cookies were a beautiful golden brown. Key to their doneness was to allow the cookies to rest on the hot cookie sheet for at least 8-10 minutes before transferring them to a cooling rack. The heat from the pan helps to continue to bake the cookies without drying them out or burning their bottoms. Additionally that rest time makes it easier to transfer them to a cooling rack.


The texture and flavor and these cookies are perfect. You can definitely smell and taste the flavor of the lemon. We absolutely loved the level of lemon flavoring in theses cookies. It was detectable, yet subtle in the best of ways. 

If the Pancake Princess ever did a Levain Style Lemon Cookie bake-off I want to enter this recipe. If I ever wanted to brighten the day of friend who loved lemon flavored cookies, I would bake up and deliver a batch of these cookies. Or if I ever wanted to enter (and win) a cookie contest, I would make these cookies. Which speaks volumes since I absolutely love my chocolate chip cookies

In all seriousness, I take a big risk when I shamelessly gush about how fabulous these cookies are. In part because not everyone follows 'the' recipe, measures the ingredients, or bakes in an elevation similar to the one in the midwest. Yet, in spite all of these factors, I will end by saying this may be BEST, MOST SCRUMPTIOUS, TO DIE FOR, SHOW STOPPING, DIVINE cookie I have ever made in my entire life. There I said it!

Recipe
Levain Style Lemon Cookies
Makes 8 humungous cookies

Ingredients
1 cup (226g) unsalted butter, room temperature
3/4 cup (150g) granulated sugar
2/3 cup (134g) light brown sugar
1 large egg
1 large egg yolk
Zest from one large lemon
1 1/2 teaspoons Lemon Paste (See Notes)
2 1/4 cups (293g) all-purpose, unbleached flour
1 cup (118g) cake flour
1 teaspoon baking powder
3/4 teaspoon baking soda
3/4 teaspoon Kosher salt
16 ounces (453g) white chocolate chips

Directions
1. In the bowl of a standing mixer fitted with a paddle attachment, beat butter for approximately 1 minute.
2. Add in the granulated sugar and brown sugar. Beat until light and fluffy (approximately 4 minutes).
3. Add in the egg, egg yolk, lemon zest, and lemon extract. Beat until well blended.
4.In a medium sized bowl, whisk together the all-purpose flour, cake flour, baking powder, baking soda and Kosher salt. Add in the dry ingredients to the mixing bowl. Beat on low-medium speed until the dry ingredients are almost all incorporated.
5. Add in the white chocolate chips. Mix until completely blended (and no white streaks of flour remain).
6. Roll in 8 balls, slightly more than 6 ounces (171g) each. Break each ball in half and press sides into each other to create a round ball with a top of the craggle-y edges.
7. Place balls of dough onto a platter or baking sheet. Cover and chill for 60-90 minutes.
8. Preheat oven to 375 degrees (F).
9. Line two baking sheets with parchment paper. Note: You will bake only one sheet at a time (unless you have a double oven).
10. Place 4 balls of dough on a baking sheet.
11. Turn a baking sheet upside down. Place the baking sheet with the balls of dough on top of it. Insert onto the middle rack of the oven and bake for 17-18 minutes or until the cookies are golden brown. Note: Rotate the baking sheet midway through the baking process and check for doneness at the 16 minute mark.
12. Remove from the oven and let the cookies remain on the hot cookie sheet for at least 8 minutes before transferring to a cooling rack.
13. Bake the remaining cookie sheet.
14. Let the cookies cool before devouring.
15. Store the baked cookies at room temperature. Ideally store them individually in a cellophane bag or waxed bag. To recreate the just out of the oven taste, reheat in the microwave at high for 8-10 seconds.

Notes: (1) I used the lemon paste from Neilson-Massey. (2) If you would like a slightly stronger lemon flavor either increase the lemon paste to 2 teaspoons or add some additional lemon zest. (3) I used the Ghiradelli white chocolate chips.


Wildlife in Yellowstone, May 2024

Monday, June 10, 2024

Roasted Bone Marrow w/ Gremolata &/or Roasted Tomato Vinaigrette


"When someone cooks for you, they are saying something. They are telling you about themselves: where they come from, who they are, what makes them happy." (Anthony Bourdain). Serving good food beautifully presented and enjoyed by everyone at the table has always made me happy. But making simple food look and taste like something you might find at a (really good) restaurant or see in a magazine gives me a level of excitement akin to taking in a breathtaking landscape or wandering through an antique store filled with early 19th century treasures. After ordering roasted bone marrow, not once but twice, while in Jackson Hole, Wyoming I was delirious. And not just because of the guilt-free moments of savoring the rush of fatty pleasure. It was discovering how unbelievably easy this sexy, rich, and impressive appetizer was to make. When the roasted bone marrow was spooned over some grilled bread and topped with either the gremolata or roasted tomato vinaigrette my taste buds were sent into a euphoric state. It might have been after the second bite when I decided Roasted Bone Marrow would become one of the happiest, most satisfying starts to my future dinner parties. 


It wasn't long after I returned home from the best-ever western adventure that set off to learn all I could about roasting bone marrow. As it turned out, high heat, Kosher salt, black pepper and fresh herbs (thyme being the one used most), beef marrow bones cut lengthwise, slices of grilled bread, and a cast iron pan was all that was needed to make one of those 'best things I ever ate' kind of dishes. 


Finding a source for the lengthwise cut beef bones was much easier than I thought it would be. Meat markets and butcher stores are the best places to find them. If you are lucky, they will already be cut lengthwise. If they aren't, kindly ask the butcher to cut them for you. Cutting the bones lengthwise is often called the canoe cut. This cut makes it easier to get at the roasted marrow with a spoon. You can roast bones cut crosswise (about 3 inches in height), but then you need one of those fancy spoons to get at the roasted marrow. Note: Approximately three pounds of beef bones will give you enough for two hearty, appetizer servings. 

The seasoned bones are roasted in an oven preheated to 450 degrees (F). Preheating is key as you want your oven to be really hot when you put your cast iron pan in the oven. Roasting time is short. Somewhere between 20-24 minutes. Or until the ivory white bones are lightly browned and only some of the fat from the marrow will be in the bottom of the pan. If cooked too long, too much fat will be rendered from the marrow. And you want as much marrow left in the bones as possible!

Before you roast your beef bones, make the gremolata and/or the roasted tomato vinaigrette. Again these are very easy to make. If you are making Roasted Bone Marrow for the first time, I highly recommend you make only the gremolata. Eating the roasted bone marrow on (good quality) bread lightly grilled along with the refreshing flavor of the gremolata best showcases the richness of the marrow.


If you have had roasted bone marrow before, serve it with both the gremolata and the roasted tomato vinaigrette. You won't be sorry. Neither will your guests.

If you are looking for a mouthwatering, impressive, decadent, irresistible appetizer, make this Roasted Bone Marrow w/ Gremolata &/or Roasted Tomato Vinaigrette. It happens to be one of those appetizers made with simple ingredients yielding insanely delicious results. There's a reason its' been enjoyed for centuries and has become a featured appetizer on the menus of some really great restaurants. Once you taste it, you will understand why.

Recipe
Roasted Bone Marrow w/ Gremolata &/or Roasted Tomato Vinaigrette
Serves 2 as an appetizer

Ingredients
3 pounds beef bone marrow, split lengthwise (recommend 5" to 7" inch pieces) - See notes
Kosher salt
Black Pepper
3 teaspoons freshly chopped thyme, divided

3/4 cup Italian parsley, minced
1 garlic clove, minced
Zest of a large sized lemon (about 2 teaspoons)
1/4 teaspoon Kosher salt
1 Tablespoon olive oil

24 cherry tomatoes
1 Tablespoon olive oil
1 large clove garlic, minced
1/2 teaspoon Kosher salt
1/4 teaspoon black pepper
1 Tablespoon red wine vinegar
1-2 teaspoons sugar

Grilled baguette sliced on the diagonal or ciabatta slices (buy a good quality bread)

Directions
Roasted Bone Marrow
1. Preheat oven to 450 degrees (F).
2. In a medium-large sized cast iron pan, place the bones (cut side up) in. Season with Kosher salt, black pepper, and two teaspoons of the chopped thyme.
3. Roast for 20-24 minutes or until the bones are lightly browned. Note: Some of the fat will render from the marrow, but the majority of the marrow should stay in the bone.
4. Transfer roasted bone marrow to serving platter. Sprinkle with remaining one teaspoon of the chopped thyme (or with thyme sprigs).
5. Serve with grilled baguette or ciabatta slices and sides of gremolata and/or roasted tomato vinaigrette.

Gremolata
1. In a medium sized bowl, mix together the parsley, garlic, lemon zest, Kosher salt, pepper and olive oil. Stir to mix. Keep at room temperature until ready to serve. Note: Can be made shortly before or an hour before ready to serve.

Roasted Tomato Vinaigrette
1. In a medium sized skillet, heat the olive oil or medium-high heat. Add in the cherry tomatoes. Cook the tomatoes for about 3-4 minutes (or until they begin to soften). Note: If you can press down on the tomatoes and they start to break up, you are ready to add the additional ingredients.
2. Add in the minced garlic, salt, pepper, sugar and vinegar. Cook for another 2-3 minutes (stirring frequently).
3. Transfer the mixture to a small food processor. Process until the vinaigrette has a chunky, but blended consistency. Let cool before serving. Note: It can be made early in the day or the night before. Cover and refrigerate until ready to serve.

Notes
1. Most butcher shops sell split beef marrow bones. If the bones are left whole, ask your butcher to cut them, preferably lengthwise. 2. Instead of plating the roasted bone marrow, serve in the cast iron pan it was roasted in. Let everyone dip their bread in the drippings!


Mormon Row, Grand Teton National Park, May 2024

Tuesday, June 4, 2024

Lemon Blueberry Muffin Bread


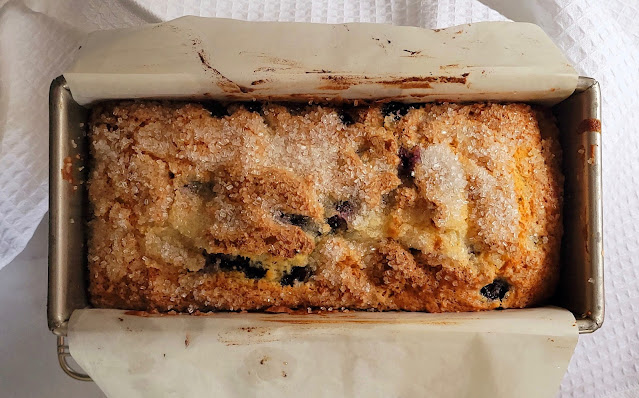
I am still dreaming about our recent trip to Yellowstone and the Tetons. From the surreal, jaw dropping landscapes to the abundance of wildlife, I was in a continual state of visual overload. Every day brought unforgettable images, experiences, and moments. More than anything, this trip affirmed that I am a mountain girl at heart. The mountains are my happy place. Already I wondering how long it will be before I return to those spectacular, beautiful, stunning, awe-inspiring vistas. As John Muir once said 'The mountains are calling and I must go." But certainly not before I tell you about this dreamy, crunchy, densely blueberry filled Lemon Blueberry Muffin Bread. This absolutely delicious bread just might have affirmed I am more of a bread girl than a muffin girl. What is not to love about a thick slice of sugar topped, lemony, fruit filled, moist, dense crumbed Lemon Blueberry Muffin Bread? It's one of those breads that will have you swooning before you take a second bite.


And simplicity strikes again. As this is a one bowl, one pan bread. The assembly is quick and the baking time just slightly over an hour. If made early in the morning, you will be enjoying it before noon. If made the night before, you will have ensured a perfect start to the day. With blueberry season only just beginning, you won't be able to resist making this Lemon Blueberry Muffin Bread on a regular basis. It might even be the best hostess gift you can bring when visiting a friend.

To achieve the perfect lemony flavor, all you need is the zest from one medium sized lemon. The amount of fruit you use will depend on how dense you want your bread. Don't use any less than 2 cups or any more than 2 1/4 quarter cups. Mixing the blueberries and flour into the batter at the same time, helps to coat the blueberries and prevent them from falling to the bottom of the bread. You could toss the blueberries with some of the flour before mixing everything together, but you don't have to.


For me, a thick batter is a sign of a great bread. And this batter is lusciously thick.


If there is one thing that matters when making this Lemon Blueberry Muffin Bread, it's the type and size of pan. Definitely use metal, not glass. And using an 9" x 4" (not a 9" x 5") baking pan will yield a bakery perfect kind of loaf. I have found the pullman loaf pans (like this one), make the best-ever quick bread. If you like making quick breads, this pan will be put to great use.

Begin preheating your oven right before you begin measuring and mixing the ingredients. By time you are ready to put the bread into the oven, your oven will be perfectly heated. Baking time ranges from 60 to70 minutes. Begin checking for doneness at the 60 minute mark as ovens can vary (especially it's been awhile since you had it calibrated). I always put my baking pan on a sheet pan. Not only in case there is any spillage, but it makes it easier to rotate the pan midway through the baking process.

This Lemon Blueberry Muffin Bread is as scrumptious on day one as it is on day four (if it lasts that long). Keeping the top of the bread uncovered (at room temperature) will help to keep its' sinfully good crunchy, sugary top. To extend the life of the bread, you can always store it in the refrigerator. Just reheat a thick slice in the microwave before enjoying.

If there was ever a bread you will dream about, it will be this Lemon Blueberry Muffin Bread. There may be no sweeter way to start your summer.

Recipe
Lemon Blueberry Muffin Bread
Serves 10-12

Ingredients
1/2 cup (113g) unsalted butter, melted
3/4 cup (150g) granulated sugar
Zest of one medium sized lemon
1 cup (225g) plain, unsweetened Greek yogurt
2 large eggs
2 teaspoons baking powder
1/2 teaspoon baking soda
1 teaspoon Kosher salt
2 cups (260g) all-purpose, unbleached flour
2 to 2 1/4 cups (285-320g) fresh blueberries (I used 2 1/4 cups)
3 Tablespoons sparkling sugar

Directions
1. Preheat oven to 375 degrees F. Line an 9" x 4" baking pan with parchment paper. Butter any exposed sides of the pan. Set aside. Note: Pan measurements taken from the bottom of the pan, not from across the top of the pan.
2. In a medium sized bowl, whisk together the melted butter, sugar and zest.
3. Add in the yogurt and eggs. Whisk until well blended.
4. Sprinkle the baking powder, baking soda and Kosher salt on top of the batter. Whisk in.
5. Add in the flour and blueberries together. Use a spatula to mix in. Batter will be very thick.
6. Spoon batter into the prepared pan.
7. Smooth the top of the batter with an offset spatula. Sprinkle with the sparkling sugar (use it all). Let batter rest for 10 minutes before putting into the preheated oven.
8. Place baking pan on a baking sheet. Place in oven and bake for 60-70 minutes. Begin checking for doneness at 60 minutes (a skewer inserted into the center of the bread should come out clean or with a couple of crumbs.
9. Remove from the oven and place baking pan on a cooling rack. Let bread come to room temperature before removing from the pan and cutting into thick slices.
10. Store bread (uncovered) at room temperature to ensure the top of the bread remains crunchy. Alternately store in the refrigerator. Bread will be good for 3-4 days at room temperature and up to a week if refrigerated.
11. When serving, cut into thick slices! Slathering on butter is optional!

Notes: (1) I used Fage Total (5%) Plain Yogurt. (2) King Arthur is my preferred flour.


Grand Teton National Park, May 2024