Showing posts with label Main Dish. Show all posts

Tuesday, July 18, 2023

Creamy Roasted Red Pepper Ricotta Pasta


If there is anything I love eating more than chocolate, it's pasta. Clearly my food preferences don't lie in the 'lower in calories' end of the food spectrum. But I don't let that spoil any of the pleasure I derive from eating either of them. Because I do my best to keep in mind the adage 'everything in moderation'. With continued weeks of heat and humidity around here, dishes that don't require turning on the oven are a godsend. Consider this platter of Creamy Roasted Red Pepper Ricotta Pasta to be one of them. 

Some pasta dishes are meant to be served as the entree, while others can either be a side dish or a separate course. The Creamy Roasted Red Pepper Ricotta Pasta can be any of these. The versatility of this pasta dish makes it even more appealing. And that's even before telling you how delicious and easy it is to make.

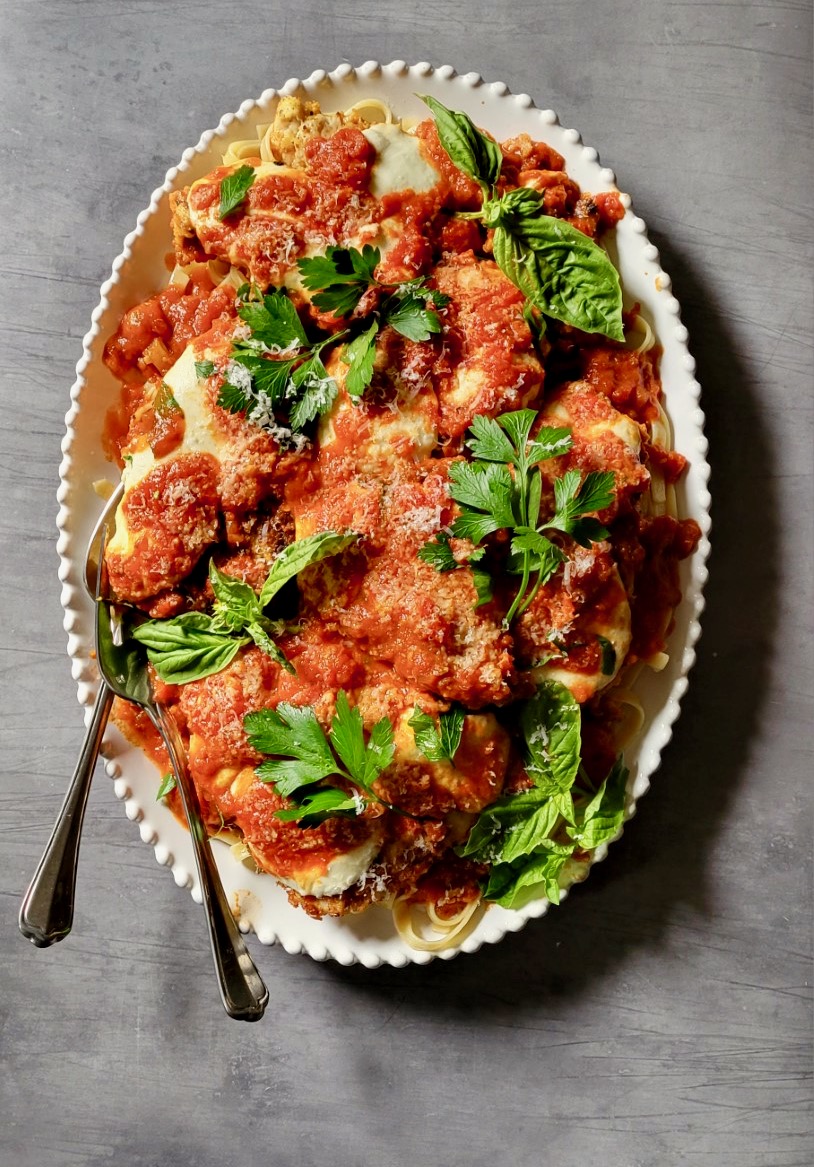
I am going to tell you now that you want, not you need, to serve the Creamy Roasted Red Pepper Ricotta Pasta with some thick slices of a great loaf of Italian bread. Because you will want something to mop up any of the rich, luscious, creamy sauce left in your bowl. 


With many pasta dishes, it sometimes doesn't always matter what kind or type of pasta you use. However, there are times when pairing the 'right' type of pasta with a sauce really does matter. And with this dish it definitely matters. Using a paccheri or large rigatoni-type tube pasta not only helps the sauce adhere to its' surface, it seeps into the long wide tubes creating the most swoonworthy bite. Paccheri pasta could not be a more perfect partner with the creamy roasted red pepper ricotta sauce. However, if for some reason you can't find it, then look for the biggest rigatoni pasta you can find. 


You only need to use your stovetop to make the pasta.The sauce comes together in a food processor or blender. Yes, it's a no-cook sauce. The creaminess of the sauce depends on how long you process it. If you want small chunks of the roasted red peppers and sun dried tomatoes, then you won't process it as long (like I did). But if you want it to have that smooth, luscious, velvety look, then by all means process it longer. The consistency of the sauce is dependent on how much pasta water you add to the sauce. For a thicker sauce, you are going to use less and for a thinner sauce, you will use more. In retrospect, I would have added much more than a half-cup of pasta water because it would have slightly lightened the sauce up. And there would have been a little more sauce to mop up with the bread. In the recipe below I give you a range of 1/2 cup to 1 cup of reserved pasta water. Landing in the middle (3/4 cup) might actually be your best starting point. Note: This sauce is intended to be slightly on the thicker side, so be certain not to add to much pasta water to give it a soupy consistency.

This Creamy Roasted Red Pepper Ricotta Pasta is more of a mildly warm, room temperature dish. Which makes it perfect for serving on a blazing hot day. It is meant to be served immediately after it has been assembled. Although, if you leave the platter out at room temperature before wrapping up any leftovers to put in the refrigerator, don't be surprised if you find yourself or others grabbing a piece of two of the sauce ladened pasta. Note: When heating any leftovers, heat just until they are warm to the touch.


If served as an entree, choose a favorite platter, garnish with some fresh basil and pair the Creamy Roasted Red Pepper Ricotta Pasta with a gorgeous salad, one dressed in an oil and vinegar type of dressing. If serving it as a side dish, serve it with some roasted chicken, salmon, or maybe even a perfectly grilled and sliced ribeye. Whatever you do, don't forget to serve it with some bread. It would be borderline sacrilegious not to.


Recipe
Creamy Roasted Red Pepper Ricotta Pasta
Serves 6 to 8

Ingredients
1 pound bag of paccheri pasta, cooked to a point past al dente but not to a fall apart one. 
2 cloves of garlic, smashed
1 Tablespoon extra-virgin olive oil, plus more for finishing
16 ounces (451g) whole-milk ricotta
12 ounce (340g) jar of drained roasted red peppers (in water, not oil)
1/4 to 1/3 cup of sun-dried tomatoes (about 5-6 whole pieces of sun-dried tomatoes or 66g)
1/2 teaspoon Kosher salt
1/2 cup to 1 cup of the reserved pasta water (recommend beginning with 3/4 cup)
Fresh stems of basil or parsley for garnish

Loaf of an Italian bread, thickly sliced

Directions
1. While you are cooking the pasta, start making the creamy roasted red pepper ricotta sauce.
2. In the bowl of a large food processor (or blender) add in the garlic, olive oil, ricotta, red peppers, sun-dried tomatoes, and Kosher salt. Process until smooth. Note: Process longer for the smoothest sauce.
3. Drain the cooked pasta, reserving at least 1 cup of the pasta water.
4. Add 1/2 cup to 3/4 cup of the reserved pasta water to the sauce in the food processor. Blend well. Check for consistency. If you want it slightly thinner (although this is a sauce on the slightly thick side) sauce, add in a little more of the pasta water.
5. Transfer the sauce to a large bowl. Toss in the pasta. Mix until well blend.
6. Transfer the mixed pasta to a large serving platter or bowl. Drizzle with some extra-virgin olive oil. Garnish with fresh sprigs of basil and/or parsley. Serve immediately.

Notes:  (1) I used jarred red pepper to make the sauce, but you could easily roast your own red peppers. Look for roasted red peppers in water, not oil. (2) Most Italian grocery stores will sell imported bags of paccheri pasta. But sometimes you can find it a specialty store or a Whole Foods. If you can't find it, use the largest size rigatoni you can find.

Wednesday, June 21, 2023

Classic BLT

Summer has officially arrived! Which means the return of Farmer's Markets, summer fruits and vegetables, lemonade stands, outdoor gatherings, and cravings for BLTs. Anyone who has made BLTs for years might be wondering why in the world does there need to a recipe something that is nothing more than an elevated tomato sandwich? The simple answer is that not all BLTs are created equal. If you are looking to make a truly great classic BLT, keep reading. Believe it or not there are rules to creating a sandwich worth drooling over. I use the word 'rules' loosely because I know that doesn't always sit well with everyone. I could have used 'strong suggestions' instead, but those words sound as if there are options to making a truly, great, epic, classic BLT. 

For me, the BLT might be the ultimate, seasonal sandwich. And lucky for all of us the summer tomato season is just getting started. Sweet, vine-ripened, meaty, juicy tomatoes sold at Farmer's Markets or harvested off of backyard homegrown tomato plants are key in the BLT worth writing home for. Seasoning thickly sliced tomatoes with Kosher salt and black pepper as well as quickly marinating them an olive oil-vinegar mixture will make the tomatoes even sweeter, juicer, and delicious. Let's call this rule one.

Rule two: Use a high quality, pre-sliced thick, slightly more dense bread. Look for loaves of country white, hearty white or brioche bread found in the bread aisle of your grocery store (see notes). Lightly toasting the bread will give it the strength it needs to keep this hearty sandwich from falling apart. 


Rule three: When it comes to choosing the bacon, look for a good quality thickly sliced bacon. Even though the tomatoes are the star of the BLT, the bacon is an important supporting player. Cook your bacon on the grill (my preferred way), in the oven, or in a skillet until it's closer to the crisp end of the spectrum. Your bacon will crisp up as it cools, so be careful not to either overcook or undercook it. A great BLT sandwich needs really only needs three to four slices of cooked bacon. Any less or any more and you completely change the sandwich. I am partial to four slices of bacon on my BLT. 

Rule four: The classic BLT calls for a crisp lettuce. Iceberg lettuce is the perfect compliment to the juicy tomatoes and crisp bacon. Cut into either strips or shredded, iceberg lettuce will give the sandwich the perfect amount of crunch, structure, and sweetness. Save the arugula, spring mix, baby lettuce, romaine, and/or spinach for your salads. The BLT needs the crispy, iceberg lettuce. 

Rule five: The BLT calls for a real mayonnaise. Hellman's (Best Foods) and Duke's should be the only mayonnaises slathered on both sides of the toasted bread. This isn't a suggestion. Consider this a hard and fast rule. 

Last, but not least, let's talk about layering the ingredients. Believe it or not, layering matters. To keep the juicy tomato from soaking into the toasted bread, it needs buffers. The bacon and lettuce are great buffers as they help to keep the BLT from falling apart as well as from the juices of the tomato from soaking into the bread. If you want to create an even more structurally sound BLT, create a sandwich with four layers: iceberg lettuce, tomatoes, bacon and iceberg lettuce. This will put the tomatoes and bacon in the center of the sandwich.  

I won't even risk telling you the best way to cut your BLT. I have probably pushed a few of your BLT making buttons already. So cut your BLT in half or cut it on the diagonal. Team rectangle and team triangle can both be winning teams. However you cut your BLT will be the way you believe it not only tastes better, but is the easiest way to eat! 

I hope your summer is filled with these Classic BLTs! Don't forget the chips and lemonade!

Recipe
Classic BLT
Serves 3-4

Ingredients
12 ounces thick cut bacon, cooked slightly crispy, and drained on a paper towel
3 large ripe tomatoes, preferably homegrown or found at a Farmer's Market, cut into thick slices (suggest cutting the tomatoes somewhere between 1/3" and 1/4" thick)
Small head of iceberg lettuce, cut into wide strips or shredded (I prefer the wide strips)
6 slices of a thick sliced, hearty lightly toasted bread, such as Pepperidge Farm Farmhouse Brioche Bread or Hearty White
1 1/2 Tablespoons of olive oil
2 teaspoons red wine vinegar
Mayonnaise (i.e., Hellmans's (Best Foods) or Duke's
Kosher salt and pepper

Directions
1. Whisk together the olive oil and red wine vinegar. Pour over the sliced tomatoes. Season with Kosher salt and pepper. Let marinate while you cook the bacon and toast the bread.
2. Generously lather mayonnaise on both sides of the toasted bread.
3. On one piece of the toast begin by layering the iceberg lettuce. Place the 3-4 slices of the marinated tomatoes on top of the lettuce. Top the tomatoes with 3-4 slices of bacon. Top with the other piece of toast. Cut in half. (See Notes).
4. Put each BLT half between a layer of sandwich paper, place on a platter and serve immediately. Serve with your favorite potato chips and a pitcher of ice cold lemonade.

Notes: (1) My favorite breads for a great BLT are Pepperidge Farm's Farmhouse Brioche Bread or Hearty White. (2) I made a three layered BLT (lettuce, tomatoes, and bacon), but a four layer BLT (lettuce, tomato, bacon, and lettuce) is a really great option! (3) Depending on you are serving the BLTs, I like to cut them in half (team rectangle), then place each half in a piece of sandwich paper before arranging on a platter. 


Farmer's Market Tomatoes (June 2023)

Tuesday, May 30, 2023

Baked Tortellini and Sausage Casserole


We all need to have easy to make, hearty, mouthwatering delicious, one dish wonders in our repertoire. Especially the kind worth turning the oven on for even when the warm weather returns. There may be no better crowd pleasing dishes than ones made with pasta. And this Baked Tortellini and Sausage Casserole will have everyone hoping there is enough left for seconds. 


Whether you are looking for a great weeknight meal, an impressive weekend entertaining dish, or the perfect Sunday supper, this Baked Tortellini and Sausage Casserole is one of those worth their weight in gold recipes you can make for any of them!


I am having one of those cooking moments where simple, semi-homemade(ish) dishes are the only things I want to make. No, I am not giving up my favorite, multi-step, semi-labor intensive recipes. I have just decided to give myself permission to see the beauty in simplicity. Yes, I have taken the proverbial fork in the road. Because if I have learned anything over the (many) years, it's this. With great ingredients, flavor is never sacrificed in simple recipes. 

And great ingredients doesn't always mean made from scratch. It means using fresh herbs over dried herbs; whole milk fresh mozzarella over low-moisture mozzarella; and freshly grated Parmigiano-Reggiano over packaged generic grated parmesan cheese. And believe it or not, there are even some great jarred marinara and pesto sauces out there (see notes). But if nothing compares to your made from scratch, homemade marinara sauce or pesto, then by all means make this Baked Tortellini and Sausage Casserole using them. When looking for the pasta, look for smaller sized cheese tortellini, not the large sized cheese tortelloni. 

When buying Italian sausage I tend to by the 'mild' sausage in the casings (versus in bulk). I shy away from the spicier Italian sausage mostly because I don't want some dishes overpowered by it's 'heat'. After removing the sausage casings, I break off bite sized pieces before browning them in a large skillet. Even though the casserole bakes in the oven, you want to make certain you cook the sausage pieces through. You don't want to them to have pink centers. 


You can mix everything together in a large bowl or in the casserole dish. Just mix in the shredded mozzarella cheese in last and remember to reserve 1/4 of the sauce. 

Once the mixture is transferred to the baking dish, it's topped with the reserved sauce and the bocconcini (cut in half). Instead of the bocconcini you can top it with freshly grated fresh mozzarella. The choice is yours.


One of the best things about this Baked Tortellini and Sausage Casserole is that you can make it early in the day. Cover and refrigerate until you are ready to bake it. Total baking time ranges from 45-55 minutes. For the majority of the baking time, you will keep it covered with aluminum foil. This will help to keep everything from drying out.

A generous sprinkle of freshly minced Italian parsley and dollops of basil pesto are the finishing touches to the Baked Tortellini and Sausage Casserole after it's removed from the oven. You can top it with some freshly grated Parmigiano-Reggiano or serve it on the side in a bowl. I opted for the on the side option here. 

This is one of those saucy casseroles enticing you to clean your dish with a thick piece of Italian bread. I would be surprised if everyone also dipped their bread in the casserole dish where rivers of sauce were left behind. 

One bite of this cheesy dish might leave you temporarily speechless as it's so incredibly flavorful. Sure you might feel dangerously full after you eat it, but you will never feel more satisfied. And isn't having your family and/or friends leave your table felling happy and full what it's all about? I seriously doubt you could find anything coming close to this 'great' in a restaurant. 

Recipe
Baked Tortellini and Sausage Casserole
Serves 6-8

Ingredients
1 to 1 1/4 pounds of mild Italian sausage, broken up into small bite sized pieces
24 ounces frozen small sized cheese tortellini, cooked al dente, drained and cooled very slightly
2 - 24 ounce jars of Tomato Basil Marinara, divided (see notes)
8 ounces of fresh (whole milk) mozzarella grated
8 ounces of fresh bocconcini mozzarella, cut in half (or use 4 ounces of fresh (whole milk) shredded mozzarella
7-9 basil leaves, julienned
1/4 cup fresh Italian parsley, minced
3-4 Tablespoons basil pesto (fresh or good quality jarred)
Freshly grated Parmigiano-Reggiano for serving

Directions
1. Preheat oven to 350 degrees (F) 
2. In large skillet, cook Italian sausage until browned and no longer pink. Remove from heat and cool slightly.
3. In a large bowl, mix together the cooked tortellini, 3/4 of the marinara sauce, julienned basil, and cooked sausage. Then mix in the shredded mozzarella. Transfer mixture to a large (heatproof) baking dish or pan (recommend a 10"x13" or similar sized pan)
4. Top the casserole with the remaining 1/4 (or half of one 24 ounce jar) of the marinara sauce and the bocconcini halves or shredded mozzarella. Cover with aluminum foil (keep the foil slightly doomed). 
5. Bake the casserole for 35-40 minutes.
6. Remove the aluminum foil and bake for additional 10-15 minutes or cheese has melted.
7. Remove from the oven. Top with minced fresh parsley and evenly dollop fresh pesto over the top. 
8. Serve with grated Parmigiano-Reggiano and thick slices of Italian bread.

Notes: (1) The inspiration for this hearty, scrumptious recipe came from Instagram food blogger Diane Morrissey. (2) I used Rao's Tomato Basil Marinara. (3) I generally buy my cheese tortellini from a local Italian store. Cooking times is about 3 minutes for the smaller sized frozen tortellini. (4) You can make this casserole early in the day. Cover and store in the refrigerator. Remove from the refrigerator about 30 minutes before placing in the preheated oven. Baking time might need to increase slightly.

Friday, May 19, 2023

Steak Cobb Salad w/ Shallot Vinaigrette


The unofficial start to summer that's just around the corner means the welcome return of Farmer's Markets and summer's bounties, outdoor gatherings and grilling along with more casual meals and entertaining. For me it's a time of year where freshly made, large, beautifully assembled salads are the perfect single course meal. The kind having a variety of textures and flavors that all work to compliment one another. And where every bite sings on your palate.


As much as I love the classic versions of certain salads, I like changing things up a bit. Inspired by the classic cobb salad, the Steak Cobb Salad w/ Shallot Vinaigrette has an even greater appeal and heartiness. Besides being one of those impressive, wow-factor salads, it is simple to make. 


Maybe one of the best parts of this salad recipe is its' adaptability and flexibility. Serving only a handful of people, simply decrease the amount of ingredients. Cherry tomatoes can be swapped out for thick slices of ripe heirloom tomatoes. Grilled filets of beef can be replaced by grilled ribeye. Jammy eggs can be used instead of the more traditional 11 minute hard boiled eggs. Instead of assembling the salad on a bed of the peppery baby arugula, make it on a bed of spring greens or large leaves of baby lettuce. In other words, the recipe below is meant to inspire you.


The Shallot Vinaigrette is light, bright, and incredibly delicious. Made with only a handful of ingredients, it quite possibly might become your new favorite salad dressing! 

The assembly and presentation of this salad matters as much as the quality and freshness of the ingredients. If you do a google search on cobb salads, you will literally find hundreds of different ways  in which they are plated. While I am partial to the way this Steak Cobb Salad is assembled as it makes serving really easy (think of serving the salad from lengthwise rows), you can arrange the ingredients in ways that might appeal to you more.


I would highly recommend doubling the recipe for the vinaigrette (because it's so gosh darn good) and serving it on the side. So everyone could drizzle on as much or as little as they want. 

I could easily put this salad on weekly or bi-monthly repeat forever (as I tend to fall hard for foods I love). This Steak Cobb Salad w/ Shallot Vinaigrette definitely ranks as one of those craveworthy, crowd pleasing salads! What better way to kick start the summer season!

Recipe
Steak Cobb Salad w/ Shallot Vinaigrette
Serves 6-8

Ingredients
Salad
4-6 hard boiled eggs, cut it half (or quartered)
1 large perfectly ripe avocado, halved, cut into slices
12-16 cherry tomatoes or 2-3 sliced heirloom tomatoes
1 medium red onion, very thinly sliced
2 ears of fresh corn, grilled, then cutting off the kernals
1/2 pound wedge blue cheese, cut into slices (e.g., Maytag, Point Reyes, etc)
12-16 ounces beef tenderloin (aka filet mignon) or ribeye, grilled to medium-rare (or medium), then cut into slices
4-6 handfuls of baby arugula
Kosher Salt and Black Pepper

Vinaigrette (recommend doubling the ingredient amounts)
1/2 cup good quality extra-virgin olive oil
3 Tablespoons aged red wine vinegar
1 Tablespoon dijon mustard
1/2 teaspoon Kosher salt
1/4 teaspoon black pepper
1 medium sized shallot, very thinly sliced
Kosher salt and black pepper for seasoning

Directions
Salad
1. On a large (12"x16") platter, sprinkle on 4-6 large handfuls of baby arugula.
2. Starting at the top, arrange your cobb salad in rows in this sequence: Hard boiled eggs, sliced avocado, blue cheese slices, sliced (warm) beef tenderloin (aka filet mignon), grilled corn, tomatoes, thinly sliced red onion.
3. Lightly sprinkle with Kosher salt and black pepper.
4. Serve the Shallot Vinaigrette on the side.

Vinaigrette
1. In a small-medium bowl, whisk together the red wine vinegar, dijon mustard, Kosher salt, and black pepper.
2. Slowly drizzle in the extra-virgin olive oil and blend until the dressing is emulsified.
3. Stir in the very thinly sliced shallots.

Notes: (1) I can't make any recommended swaps for the grilled corn. Boiled corn on the cob or canned corn doesn't have the same flavor profile. (2) Because it's a steak cobb salad, I am also not offering up any other protein alternatives. Having said that, grilled salmon would pair well with the other flavors in the salad. (3) Highly recommend using a mandolin for cutting the shallots and red onion. (4) Many grocery stores have regular sales on filet mignon and ribeyes. When you see them, pick them up and freeze them. You will be happy you did.

Monday, May 8, 2023

Chicken Parmesan


Whether you call it Chicken Parmesan or Chicken Parmigiana doesn't really matter. They are the same thing. Mouthwatering deliciousness served either over fettuccini (my favorite pasta for this dish) or in a lightly toasted roll may be one of the most satisfying, flavorful dishes on the planet. Because seriously, what is not to love about a fried panko crusted chicken cutlet smothered in a luscious marinara sauce and topped with melted fresh mozzarella and freshly grated Parmigiano-Regianno?


Quite possibly the only reason you wouldn't put this dish near the top of one of your favorite comfort food meals is that you have been underwhelmed by ones you have tasted in a restaurant. And I get that. After years of being disappointed by the chicken parmesan served in a variety of restaurants (even in some good Italian ones), I am extremely hesitant to order it when dining out. But making Chicken Parmesan at home is a completely different story.  Here's the good news. You no longer have to settle for mediocrity or good enough. Because now can have the most spectacular, incredibly scrumptious, seriously craveworthy homemade version! This cheesy, crispy, hearty, saucy dish is one of those rare rustic, yet elegant dishes that is as much family dinner friendly as it is both Sunday supper and dinner party worthy. If there was ever a dish to put on regular repeat rather than relegating it only to special occasions, this is the one!

Served with a beautiful salad, some thickly sliced fresh Italian bread, and a great wine, a platter of Chicken Parmesan set over a bed of fettuccini is the makings of one of the most impressive, satisfying meals you can serve to your family and friends.


When it comes to breading the pounded, skinless, boneless chicken breasts (aka cutlets), there are no shortage of opinions as to which type of breading is best. Freshly made breadcrumbs, canned breadcrumbs, or Panko-style breadcumbs each have their own fan club. For me, it's Panko-style breadcrumbs as they add the right about of crispiness and crunch to the fried chicken breast. And rather than open up jars of dried spices to season plain panko bread crumbs, I prefer using (Italian) seasoned panko and adding additonal some garlic powder and freshly grated Parmigiano-Reggiano cheese to further boost the flavor.

Keys to getting a perfectly cooked, crisp, yet moist chicken cutlet include: (1) pounding the chicken breasts to a 1/2" thickness; (2) dredging the cutlets in flour, then egg, then panko breadcrumbs; (3) frying in olive oil; and (4) cooking the cutlets (in batches) in a cast iron skillet for approximately 2-3 minutes per side. Follow those simple rules and your golden brown Chicken Parmesan cutlets will be next level amazing!


If you have a favorite marinara sauce recipe, use it. But also feel free to use a high quality jarred marinara sauce (i.e., Rao's). It may sound a bit sacrilegious to even suggest using a jarred marinara sauce when making Chicken Parmesan, but there is much to be said about semi-homemade dishes. I mean, if Ina Garten (food goddess extraordinaire) can, well you can too! While the recipe below calls for only 24 ounces of marinara, I highly recommend you either make or buy more to serve warm on the side. As there will be some who like an even saucier Chicken Parmesan.


But when it comes to the mozzarella, use only fresh mozzarella for the absolute best flavor. Either the prepackaged one or the one you buy at your favorite specialty grocery store will work perfectly. Do not buy the ones labeled as low-moisture or low-fat mozzarella (this falls into the strong opinion category). 


When baking the Chicken Parmesan, begin by putting a layer of the marinara on the bottom of the heatproof baking dish before adding in the cooked chicken cutlets. Next, top with the slices of the fresh mozzarella. Finish with the marinara and freshly grated Parmigiano-Reggiano cheese. Bake the dish for 10 minutes at 400 degrees (F), then increase the oven temperature to 500 degrees (F) and bake for an additional 3-5 minutes or until you can see that the cheese has melted. Remove from the oven, top with more freshly grated Parmigiano-Reggiano, some freshly chopped parsley and maybe even some fresh basil. Note: When baking the Chicken Parmesan, make certain to use a baking dish that can hold up to high temperatures. 


There are many ways to serve this Chicken Parmesan. You can serve it directly from the baking dish (with pasta on the side) for a casual, slightly rustic presentation. You can serve it over a bed of cooked fettuccini tossed in olive oil (or marinara) for a kind of wow factor presentation. Or you can serve it on lightly toasted Italian rolls for a casual, yet hearty lunch option. The choice is all yours! 


Recipe
Chicken Parmesan
Serves 6-8

Ingredients
4 skinless, boneless chicken breasts (approximately 2 pounds), pounded to 1/2" thickness and cut in up to 8-9 even sized pieces
1/2 cup (65g) all-purpose flour + 1 teaspoon Kosher salt + 1/2 teaspoon black pepper
1 cup (88g) Italian seasoned Panko + 1/2 teaspoon garlic powder + 3 Tablespoons grated Parmigiano-Regianno
3 large eggs + 1 Tablespoon water
1/4 cup olive oil, plus more for finishing
1 pound (453g) fresh mozzarella, cut into generous 1/4" slices
24 ounces (680g) jarred marinara, highly recommend Rao's - SEE NOTES
1/4 cup grated Parmigiano-Regianno, divided (plus more for finishing)
1 pound (454g) fettuccini cooked to your liking and tossed with olive oil when placed on the platter
Fresh basil leaves and chopped fresh parsley for garnish

Directions
1. Preheat oven to 400 degrees (F).
2. Set up your dredging assembly line: (1) shallow bowl with flour, Kosher salt and black pepper whisked together (2) eggs whisked with water and (3) Panko mixed with garlic powder and Parmigiano-Regianno.
3. Coat both sides of the chicken breasts with flour (shake off excess). Dip into the egg mixture. Lastly dredge in the panko mixture. Transfer to a sheet pan and repeat until all of the chicken cutlets have been coated.
4. In a cast iron skillet, heat 1/4 cup of olive oil over medium heat. Placing 2 -3 pieces of the chicken in the pan at a time, cook 2-3 minutes per side or until lightly golden. Repeat until all pieces of the chicken have been cooked.
5. Pour approximately 1/3 of the marinara sauce on the bottom of a large heatproof baking dish. Arrange the cooked chicken cutlets on top of the sauce. Top each of the breasts with the sliced fresh mozzarella cheese. Spoon the remaining sauce over the tops of the cheese and chicken. Sprinkle on some grated Parmigiano-Regianno.
6. Bake for 10 minutes at 400 degrees (F). Increase the oven temperature to 500 (F) and cook for another 3-5 minutes or until the cheese has melted.
7. Remove from the oven. Grate more Parmigiano-Regianno on top, lightly drizzle with some olive oil, and garnish with fresh basil and parsley. Serve with the cooked fettuccini either lightly tossed with olive oil or additional marinara.
8. Alternate serving options: (1) Place cooked pasta on a large serving platter. Top with the chicken parmesan.  Grate some additional Parmigiano-Regianno on top, lightly drizzle with some olive oil, and garnish with fresh basil and parsley. (2) Make Chicken Parmesan sandwiches using lightly toasted Italian Rolls.

Notes: (1) Highly recommend having another 12-20 ounces or more of marinara sauce, heated and served on the side. The extra sauce can be used to toss with the pasta or slather on bread. (2) I tossed my fettuccini in olive oil before putting on the platter and served the extra sauce on the side. (3) I used BelGioioso presliced fresh mozzarella cheese here.


Sakonnet Vineyard, Little Compton, RI (April 2023)

Monday, April 17, 2023

Herbed Tuna, Pea & Pasta Salad


It's been more than a hot minute since I posted a recipe for a main dish salad. But like the old adage says 'some things are worth the wait'! And in all honesty, the timing of sharing this recipe (one you are destined to put on repeat) could not be more ideal. With warmer temperatures finally arriving, cravings for cold, scrumptiously satisfying salads seem to go into overdrive. And for those of you looking for a new way to combine your loves of albacore tuna and salad, this Herbed Tuna, Pea & Pasta Salad is one worthy of rewarding your patience. If there was ever a tuna salad worthy of an endless litany of accolades, this version would be the one.


This Herbed Tuna, Pea and Pasta Salad might just rank up there as one of the best tuna pasta salads you will ever have. What could more perfect than an incredibly delicious, refreshing salad made of freshly chopped herbs, peas, celery, red onion, and albacore tuna all mixed together with a great real mayonnaise? Sharing it with friends is my guess. 


With so many different things competing for our time and attention, who doesn't want a recipe for a salad that can be made early in the day or even the night before? Resting and chilling time is necessary for the flavors to fully develop.


There are many tuna pasta salads out there using a variety of pastas. But in my opinion, farfalle or bowtie pasta is the absolute BEST choice for this salad. Not only does it hold the dressing well, it is aesthetically one of the most pleasing pastas to ever grace a platter. When the time comes for you to make this salad, start with cooking the pasta as it needs some time to cool down before being mixed in with the other ingredients.


This particular combination of ingredients is destined to be a timeless classic. With a milder flavor and firmer texture white albacore tuna is the best choice for salads in general, but for this one in particular. Choose an albacore tuna packed in water not oil. After draining the tuna, use a fork to break up into chunks (do not mash the tuna) so when it's mixd together there will be some nice sized bites. Frozen peas, either briefly rinsed under hot water or briefly dipped in the pasta water, are the optimal choice. Canned peas are too mushy and fresh peas require some cooking time. 

The chopped fresh parsley, dill, and chives are the herb trifecta in this salad. Each bringing a different kind of savoriness to the salad. Celery and onions add both crunch and flavor. While I prefer the flavor minced red onions brings to the salad, you could also use shallots. And, last but not least, let's talk about mayonnaise, real mayonnaise. Hellman's is my go to in salads. In other parts of the country it's packaged under the name of Best Foods Mayonnaise. Duke's is another real mayonnaise option. Miracle Whip is not an option. Helpful Hint: The pasta will absorb some of the mayonnaise (especially if you make it the night before) and affect the salad's creaminess. You can solve that problem by adding in another 1/4 cup of mayonnaise when you get ready to serve it. Additionally, take the salad out of the refrigerator at least 15 minutes before you get ready to serve it for the optimal eating experience.


The salad ingredients are blended together in three stages. First, the mayonnaise, Kosher salt, pepper, and herbs are whisked together. Followed by mixing in the tuna, peas, celery and onions. Lastly, the cooked pasta gets folded in until it's well coated. How easy is all of that? 


The finished salad can be garnished with some additional minced dill and chopped chives. Sprigs of fresh parsley and halved sugar snap peas make for a beautiful, but optional finishing touch garnish. 


The recipe makes enough to serve at least eight. However, it can easily be halved if you have a small household. Or make the full recipe, package half of it up and deliver to a friend!

Not sure why it has taken me so long to be someone who gets overly excited about salads. But this exceptional salad has me shifting my allegiances. I wouldn't be surprised if this gorgeous, game-changing Herbed Tuna, Pea & Pasta Salad becomes one of your most favorite crowd pleasing dishes! Even those who normally wouldn't choose a salad as a main dish or aren't big fans of salads in general will be surprised at how filling, flavorful, and delicious it is! You even might be surprised at how quickly it disappears.


Recipe
Herbed Tuna, Pea & Pasta Salad
Serves at least 8

Ingredients
16 ounces (454g) Farfalle Pasta (highly recommend Rummo #85 Farfalle)
2 to 2 1/4 cups mayonnaise (begin with 2 cups, add more if you want it creamier)
1 cup (138g) diced celery (from about 4 stalks)
2/3 cup (85g) diced red onion (from about 1/2 of a large red onion)
3-4 Tablespoons freshly minced parsley
3-4 Tablespoons freshly minced chives
2 Tablespoons freshly minced dill
2 cups (330g) frozen green peas (rinsed in hot water or briefly dipped in the hot pasta water)
2 cans (5 ounce/142g sized) Albacore Wild Tuna, drained and broken into pieces (e.g., Wild Planet)
1 1/4 teaspoons Kosher salt
1/2 teaspoon white pepper (or can use black pepper)
Optional: Sugar Snap Peas and additional chopped herbs for garnish

Directions
1. Cook the farfalle according to package directions. Rinse, drain, and set aside to cool.
2. In a large bowl, whisk together the mayonnaise, parsley, chives, dill, Kosher salt and pepper until blended.
3. Add in the celery, red onion, green peas, and tuna. Mix to blend.
4. Add in the cooked pasta. Use a spatula to mix everything together.
5. Transfer the Herbed Tuna, Pea and Pasta Salad to a serving dish. Cover tightly with plastic wrap and refrigerate for at least 4 hours or overnight.
6. Take the salad out of the refrigerator at least 15 minutes before serving. Give it a good stir and add the additional 1/4 of mayonnaise, if needed. Garnish the salad with some chopped chives, minced dill, chopped parsley, and (optional) halved snap peas.
 
Notes: (1) This was the tuna I used in salad. It's packed in water, not oil. (2) This was the pasta from Rummo I used. (3) If you don't like red onions, use shallots. (4) Use only fresh, not dried herbs in this salad. 


Morton Arboretum, Lisle, IL (April 2023)