Thursday, April 24, 2014

Blue Cheese Spread

Apparently looking back in the rear view mirror is now being called Throwback Thursday. The day where one selectively posts a photo or shares a memory of themselves on any one of the social media venues out there. Up until now I haven't jumped in this relatively new phenomenon. Could it be I am slow to be 'hip' or worse yet, a social 'outlier'? Shudder the thought. But just in case I am delusional about myself, I decided to throw myself into this phenomenon and change my social status, so to speak. However, technically this throwback doesn't belong to my collection of memories, it belongs to one of my friends. The discovery of this Blue Cheese Spread recipe goes back twenty-five years when she and her husband were at Domaine Chandon in Napa. While they were definitely not there for the Blue Cheese Spread, it was one of the many memorable takeaways and it also became a timeless classic recipe in their household. And one (along with some champagne) that could be guaranteed to throw them back to their first visit there (and not only on Thursdays).


There really isn't anything better than having an easy go-to, can be put together in minutes recipe. As much as I have a tendency to skew to the more labor intensive appetizer recipes (a glutton for punishment or more is better thinking?), I secretly love simple. Especially when simple involves a great blue cheese, fresh herbs and a baguette.

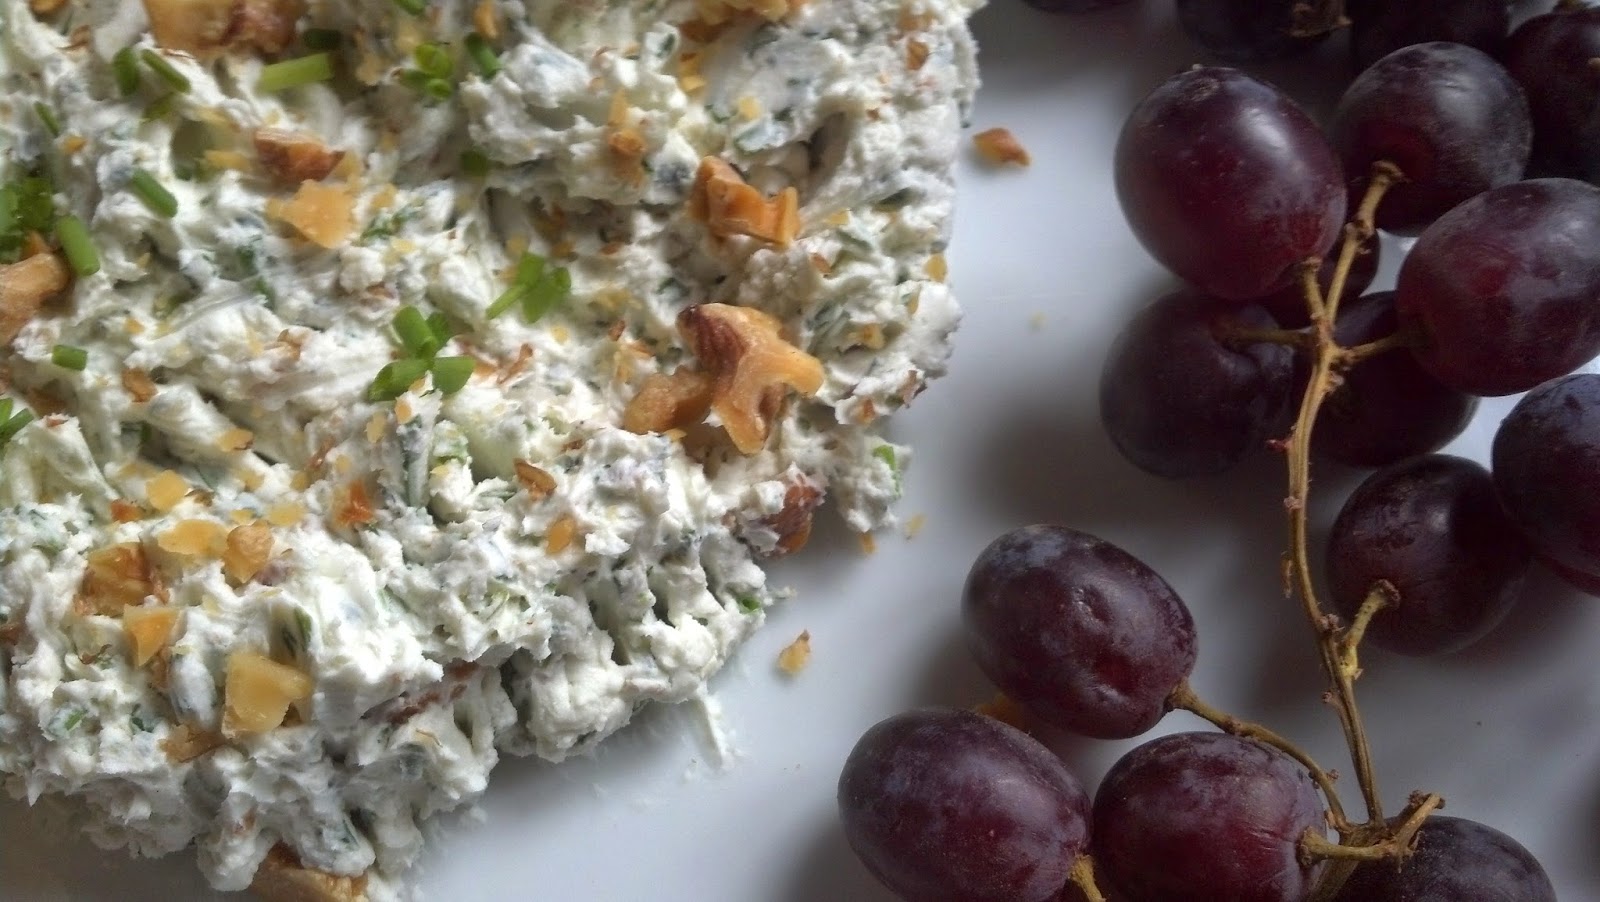
You can make the Blue Cheese Spread look retro (or should I say a little throwback) by shaping it into a ball. Or you can spread it out on a platter or serve in a bowl. So many presentation options for something that takes so little time to make. 


My two favorite blue cheeses are Maytag (made in Iowa) and Point Reyes Blue (made in California). Both would work perfectly in this spread. I generally prefer to buy a wedge of blue cheese versus blue cheese crumbles. One can always turn a wedge into crumbles, but cannot turn crumbles into a wedge. Because sometimes you just want to serve a wedge of cheese.


Softened cream cheese is mixed with a half-cup or two ounces of the blue cheese of your choice in a small bowl. To soften the cream cheese, you can leave it out of the refrigerator for several hours or overnight.


Two tablespoons of finely chopped chives and flat leaf parsley are added next. When I was making this spread I was wishing I had the chives and parsley I had planted at the east coast farmhouse. So until I grow pots of herbs here in the midwest, the herbs available at the grocery store have to do.


Two to three tablespoons of chopped, roasted walnuts (baked for 10-12 minutes in a preheated 350 degree oven) are mixed in last. And that is it. You are done. It doesn't get any easier. You can make this spread early in the day or make it just before serving. If you make early in the day, remove from the refrigerator about an hour before serving so it spreads easily.


The only 'hard' part of this recipe is making the what to serve with the Blue Cheese Spread decision. A sliced baguette, crostini, crackers, sliced apples, sliced pears? So many delicious options. 

Recipe
Blue Cheese Spread (aka Patty's world famous spread inspired by a recipe created by Domaine Chandon)

Ingredients
8 ounces cream cheese, softened (recommend Philadelphia Brand)
2 ounces (weighed on scale) or 1/2 generous cup blue cheese, crumbled (recommend either Maytag Blue or Point Reyes Blue Cheese)
2 Tablespoons flat leaf parsley, finely chopped
2 Tablespoons chives, finely chopped
1/4 cup walnuts, toasted and chopped (plus additional for sprinkling on top)
Baguette slices, crostini, crackers and/or freshly sliced pears or apples
Champagne, wine, beer
Optional: Serve along with dried apricots and/or fresh seedless grapes.

Directions
1. Mix softened cream cheese and blue cheese crumbles until thorough combined.
2. Mix in chopped herbs and half of the toasted walnuts.
3. Arrange spread on platter or place in bowl. 
4. Sprinkle top of blue cheese spread with remaining chopped walnuts and/or some additional chopped chives.
5. Serve immediately with baguette slices, crostini or crackers.
Note: If refrigerated, allow to sit out at least one hour before serving.


There is another back story to this recipe. Recently my friend's husband posted a picture of a plate of crackers and a smear of the blue cheese spread on his Facebook page. It wasn't the photo that captured my attention (even though it really did look delicious), it was the words accompanying the picture. He was giving a shout out to his wife for her world famous spread. I mean seriously, how cool is that? You might say he is definitely a man who knows how to make his wife feel like no one else could possibly compare to her (or her Blue Cheese Spread). More importantly, he is someone who also knows both words (he is probably one of the best storytellers on the planet) and actions matter.

A quote found this week "We can't always find the right words to say, but our actions often say enough. After all, they tend to speak louder than words" along with reading the Facebook posting resonated with me. They reminded me how great it is when you have those in your life where their words are inseparable from their actions. But if expecting to give or receive both is too much, well then at the end of the day, remember actions might really matter most and might just be the most telling.

Sunday, April 20, 2014

German Chocolate Cake

For weeks I have had a terrible craving for German Chocolate cake. And for weeks I have been resisting the urge to make it. 'Wait' (my most unfavorite four letter word) I kept saying to myself. This was followed by wait for 'what'? A birthday, a holiday, a gathering? Does one really need a reason to make cake? Couldn't the reason be 'just because'? Well the answer is YES, however, I did wait until Easter to make it (thankfully the world did not come to an untimely end before this cake was made). I was assigned dessert with the expectation it would be something made of chocolate. In other words 'Go chocolate or go home'. So I thought a German Chocolate Cake would be the most perfect Easter dessert and I must confess it would also deal with the craving I was restraining myself from satisfying. A win-win! But really, what is not to like about a lush, deep dark chocolate cake, rich coconut and toasted pecan filling, and a little bit of chocolate frosting?

As a kid growing up my father used to bring home a German Chocolate cake (back in the days when grocery stores made cakes from scratch) from the grocery store (he was the one who did all of the grocery shopping). I was the culprit in the family who would scrape off the coconut and pecan frosting leaving the cake behind. One would think for as many times as I got in trouble for eating just the frosting that I would have learned to eat both the cake and frosting. For whatever the reason, I didn't. It wasn't until years later that I learned to appreciate the eating of both the frosting and the cake, all at the same time. What I finally discovered was that as decadent as the coconut and pecan frosting is, it really does taste even better when combined with a deep chocolate cake. Although I can't help but save a spoonful of the frosting in the bowl to enjoy all in the spirit of re-living a part of my childhood, the part without any repercussions.

So you probably know that German Chocolate Cake is not German in origin at all. Not to discount the recorded history of this cake, but I would go so far as to say it is German in origin, in an odd not what you think sort of way. The cake probably should have been named German's Chocolate Cake in honor of the American man by the name of Sam German who in the mid 1850s developed the rich dark baking chocolate that almost a century later was one of the key ingredients in the making of this cake. One version of the cake recipe goes back to 1957 when a woman named Mrs. George Clay (did women not have first names back then?) submitted a recipe for German's Chocolate Cake to a Dallas newspaper. Her recipe ultimately appeared on the boxes of Baker's German Chocolate. And for some of you this was the recipe that might have been the version of German Chocolate Cake made in your house. Over time this recipe has been changed and modified by many cooks and pastry chefs. One of the most significant changes was the use of both Dutch Process Cocoa and dark chocolate (semi-sweet or bittersweet) in the cake batter instead of the use of Baker's German Chocolate. Yet in spite of the absence of 'German's Chocolate' in some of today's German Chocolate Cake recipes no one seems to want to change its' name. And in the spirit of sharing a bit more cake trivia with you, June 11th is National German Chocolate Cake day. But seriously I would not wait that long to make this version of the cake. Unless of course you are someone for whom waiting is your middle name.


Okay, you might be thinking 'This looks like a lot of work' or 'This looks challenging'. It really isn't. Or you maybe you are thinking 'The one I buy from Market Day is probably just as good." Really? Okay, I will go out on a limb and say it probably isn't. Or you might even be thinking 'The one at the bakery is phenomenal." Okay, maybe it is. But then it probably doesn't have the homemade love factor as one of the ingredients. Seriously, you can and really should make this version of German Chocolate Cake, it is that over the top, possibly legendary, wicked good.


The filling can be made the day before but should be made at least several hours before making the cakes to ensure it has time to chill and set up. The toasted chopped pecans are not added to the coconut pecan filling until right before you are ready to frost the cake.


This cake uses two kinds of chocolate: Dutch-processed cocoa powder and melted semi-sweet chocolate. The Dutch-processed cocoa will result in a cake with a darker color and more complex flavor. David Lebovitz wrote a great piece on the difference between Dutch-processed and natural cocoa powder.


The batter for this cake should be light and fluffy. The cooled melted semi-sweet chocolate is folded in last. Evenly dividing the batter between three 9 inch cake pans prepared and lined with parchment paper, the cakes are baked in a pre-heated 350 degree oven for 30 to 35 minutes until a toothpick inserted in the center of the cake comes out clean. To ensure the layers are even I weigh each cake pan. There was approximately 1 pound 6 ounces of batter in each pan.

The cakes are cooled for 20 minutes in the pan. Each layer is removed from the cake pan, placed on a cake rack and allowed to cool completely. I find that is often easier to handle the cake layers when they are slightly chilled in the refrigerator.


There is enough coconut pecan filling to frost each layer of the cake. Divide the filling evenly amongst the three layers. 


The chocolate icing is optional but makes for a great finished look. You can make the chocolate icing when the cakes are baking in the oven as it needs a little time to cool and set up.

Fill a pastry bag fitted with a star tip with the chocolate icing and create a pattern along the edge of the cake.


The finished cake can be kept at room temperature but my preference is place the finished cake in the refrigerator. The cake can be removed from the refrigerator at least one hour before serving. This cake is equally delicious served at room temperature or chilled. Personally I like my German Chocolate Cake chilled, not just because it evokes some childhood memories, but because it seems as if the flavors of the chilled cake are further enhanced.

Recipe
German Chocolate Cake (cake inspired by the German Chocolate Cake recipe from Matt Lewis and Renato Poliatifo in Baked; coconut pecan filling inspired by an old Cook's Illustrated recipe; and chocolate icing loosely inspired by recipe from David Lebovitz)

Ingredients
Coconut Pecan Filling
4 large egg yolks
12 ounces evaporated milk
1 cup (200g) granulated sugar
1/4 cup (50g) light brown sugar, firmly packed
6 Tablespoons unsalted butter, cut into 6 pieces
1/8 teaspoon Kosher salt
2 teaspoons vanilla 
8 ounces sweetened shredded coconut
1 1/2 cups toasted pecans, finely chopped

Cake
2 1/4 cups cake flour
3/4 cup Dutch process cocoa powder
1 1/2 teaspoons baking powder
1/2 teaspoon baking soda
3/4 teaspoon Kosher salt
1 cup hot coffee
1 cup buttermilk
1 1/4 cups (2 1/2 sticks) unsalted butter, room temperature
2 1/4 cups (450g) granulated sugar
5 large eggs, room temperature
1 1/2 teaspoons vanilla
4 ounces semisweet chocolate (I used Ghiradelli semi-sweet), melted and cooled

Chocolate Icing
8 ounces of semi-sweet or bittersweet chocolate, chopped
2 Tablespoons light corn syrup
3 Tablespoons (1 1/2 ounces) unsalted butter, room temperature
1 cup heavy cream
pinch of sea salt
3 cups sifted confectionary sugar

Directions
Coconut Pecan Filling
1. Whisk egg yolks in medium saucepan over low heat gradually whisking in the evaporated milk.
2. Add sugar, butter and salt. Cook over medium-high heat, whisking constantly, until mixture is boiling, frothy, and slightly thickened (takes about 6 minutes to get to this stage).
3. Transfer mixture to large heatproof bowl, whisk in vanilla.
4. Stir in coconut.
5. Cool until just warm, cover with plastic wrap and refrigerate until cool or cold (at least 2 hours and up to 3 days).
6. Right before getting ready to frost the cake, stir in the chopped toasted pecans.

Cake
1. Preheat oven to 350 degrees. Prepare three 9 inch cake pans lining each with buttered parchment paper.
2. Sift cake flour, cocoa powder, baking powder, baking soda and salt into a medium sized mixing bowl. Set aside.
3. In a small bowl, whisk together the hot coffee and buttermilk. Set aside.
4. Using a stand mixer fitted with a paddle attachment, beat butter and sugar until light and fluffy (approximately 4 to 5 minutes).
5. Add eggs one at a time beating until each egg is incorporated. 
6. Add vanilla and beat to incorporate. Note: The mixture should look light and fluffy.
7. Add flour mixture, alternating with coffee/buttermilk mixture, in three additions, beginning and ending with the flour mixture.
8. Remove bowl from the mixer and fold in the melted chocolate.
9. Divide batter evenly among the prepared pans and bake cakes for 30-35 minutes or until a toothpick inserted in the center of the cake comes out clean.
10. Transfer baked cakes to wire rack and allow to cool for 20 minutes. Remove cakes from pans and let cool completely.
11. To assemble cake, place one layer on cake platter. Dividing the coconut pecan filling in thirds, spread evenly on each layer. Finish the cake with chocolate icing. 
12. Store finished cake in the refrigerator. Allow to sit out at least one hour before serving. Cake can be served chilled or at room temperature.

Chocolate Icing
1. Place chopped chocolate, corn syrup, pinch of sea salt and butter in medium sized bowl.
2. Heat cream until it just begins to boil. Pour heated cream over chocolate. Let stand one minute.
3. Stir until smooth. Allow icing to cool slightly.
4. Gradually vigorously stir in 3 cups of sifted confectionary sugar. Icing is finished when it thickened to the point it can hold a peak. 
5. Put icing in pastry bag fitted with star tip to decorate top of cake. Optional: Icing along the bottom edge of cake (Note: This makes more icing than you need for this cake. Refrigerate unused icing for later use.)


I absolutely love when I come across a quote that takes my breath away. And a few weeks ago my breathing was temporarily suspended when I read this one: "It's impossible, said pride; it's risky, said experience; it's pointless, said reason, give it a try, whispered the heart." On both a personal and professional level this quote just spoke to me. I am one who believes we sometimes need to listen to our hearts rather than relying primarily on our heads when making life decisions. If we have to learn to live in a gray world, then my preference would be to live in the darker shades of listening to one's heart gray world. And once we make a decision with our hearts to at least try, we always have our heads to figure the rest of it out.

Friday, April 18, 2014

Brown Butter Pecan Granola

Yogurt was not a food in my diet until three years ago. I didn't understood what all the fuss about. And then one day I got it and it became a daily must have. Sometimes I would add dried fruit or nuts to it and sometimes not. But then after two years of having a yogurt a day, I woke up one day and decided I had had my fill of yogurt. Or rather I decided to consciously uncouple yogurt from my life. Fast forward to a few weeks ago. I was standing in line at the grocery store and a woman in front of me was buying a brand of yogurt (or should I say yoghurt) I had not seen before. I couldn't resist asking her about it. Based on the opinion of a complete random stranger (who for all I knew she thought things like soy milk and almond milk tasted blissfully delicious) I left my place in line at the grocery store, headed to the dairy section and added some of the made in Colorado yoghurt to my cart. Learning of where it was made for some unexplainable reason suddenly took all the risk out of buying this yoghurt and before even tasting it I was convinced it would be the best tasting yoghurt on the planet (if you have ever been to Colorado you might understand this thinking, I mean before the proliferation of microbreweries and better food distribution systems didn't people who lived east of the Mississippi drive hundreds of miles to buy that Colorado made Coors beer?)


All I will say is that after my self-imposed year long hiatus from eating yogurt, I seriously think I could eat this made in Colorado yoghurt for breakfast, lunch and dinner. And oh by the way the name of this insane deliciousness it is called Noosa. But this blog posting isn't an advertisement for a specific brand of yoghurt even though up to this point it may seem like it is. No it is about making granola, although admittedly I am taking a rather long time getting there. Just bear with me a little longer.

Although yoghurt has now returned to my life, I wasn't certain I wanted to go back to only adding dried fruit and nuts to it every now and then. As if the universe was listening, I came across a granola recipe I knew I had to make. This yoghurt deserved something more than a store bought granola added to it. It was one homemade granola worthy. More specifically, only a Brown Butter Pecan Granola. One created by the critically acclaimed Cassandra Shupp, a pastry chef working at the Topping Rose House restaurant in the Hamptons, would be. Fortunately for me (and you) she shared her granola recipe. But let me clear about something. This granola isn't just for topping yoghurt. It is a cereal, it is an ice cream topping, one of the layers in a yoghurt parfait, and it is a snack food.

This isn't one of those overly sweet granolas. The combination of dark brown sugar and honey create just the right amount of sweetness. Coconut flakes, raw pumpkin seeds and dried cranberries make it feel almost like a health food.


Browning the butter adds to a depth of flavor you don't get with just melted butter. To brown the butter melt a stick of unsalted butter in a medium sized saucepan, allow it to foam and then while stirring constantly allow it to brown (about 5 to 7 minutes of total cooking time). Transfer browned butter to a medium sized bow and whisk in the dark brown sugar, honey, and vanilla.


This granola recipe calls for placing the pecans in a food processor and processing until they turn into a fine powder or are finely ground.


I love the hint of flavor the orange zest adds to this granola. It combines perfectly with the flavor of dried sweetened cranberries and cinnamon.


Once the pecans have been finely ground and the orange zested, add them to the unsweetened coconut flakes, raw pumpkin seeds (pepitas), old-fashioned oatmeal, cinnamon and salt in a large bowl. Drizzled the butter mixture over the dry ingredients, stirring this mixture until all of the dry ingredients are coated. Spread the granola out on a parchment paper lined baking sheet.


In a preheated 275 degree oven, the granola is baked for 40 to 50 minutes (baking time for me was 45 minutes). Stir the mixture frequently (for me this was every 10 minutes). When the granola is a golden brown remove from oven and allow it to cool on the baking sheet. The baked granola will still look wet when finished baking, however, it will dry as it cools.


When the granola has cooled, break into pieces and add a half cup to three-quarter of a cup of dried cranberries. Or you can mix in dried cherries, whatever your preference. The granola should be stored in covered jars or a sealed bag. I bet that after you make this granola you won't be buying the store bought version anymore. And your yoghurt parfaits and breakfast buffets will become legendary ones.

Recipe
Brown Butter Pecan Granola (inspired by the granola recipe created by Cassandra Shupp) 

Ingredients
1/2 cup (1 stick) unsalted butter
1/4 cup dark brown sugar, firmly packed
1/4 cup honey
2 teaspoons vanilla extract
1/2 cup pecans, ground finely
2 cups old-fashioned oats
1/2 cup raw pumpkin seeds (pepitas)
1/2 cup unsweetened coconut flakes
1 teaspoon finely grated orange zest
1/2 teaspoon Saigon cinnamon
1/2 teaspoon Kosher salt
1/2 to 3/4 cup dried sweetened cranberries (or dried cherries)

Directions
1. Preheat oven to 275 degrees. Line a baking sheet with parchment paper and set aside.
2. Melt butter in a medium sized saucepan and cook (stirring often) until butter foams and then browns (approximately 5-7 minutes). 
3. Transfer browned butter to a medium sized bowl. Stir in brown sugar, vanilla and honey. Set aside.
4. In a large bowl, mix together the oats, pumpkin seeds, coconut flakes, orange zest, cinnamon and salt.
5. Drizzle butter mixture and stir to combine.
6. Spread granola out on the parchment paper lined baking sheet. Bake until golden brown (40-50 minutes). Let granola cool on baking sheet. Note: Mixture will be golden brown but will still look wet. Not to worry, it will dry as it cools.
7. Break cooled granola into clusters. Stir in dried cranberries and store in an airtight container.


I have been fortunate to have a circle of women friends who are wise, insightful, kind, non-judgmental, funny, beautiful, and thoughtful. Individually and collectively they have influenced me in so many different ways, have pushed me to think and reflect (never giving me the answers to my questions or solving my dilemmas), have accepted and helped support me in all of the life choices I have made, have nurtured my spirit during those times when it was wounded, and have unselfishly given of themselves with no expectation of receiving anything in return. I often pinch myself for being so blessed as to have this amazing circle of friends in my life.

Last week I had the chance to spend some time with one of these friends. Sitting by the fire (this has been a cold spring) and having a glass of wine, she listened to me reflect on something that I have been struggling with for a very, very long time. The light bulb finally went on in my head as I listened to her questions and her observations. If it wasn't for the wine I drank I am not sure I would have fallen asleep  that night as I had so many thoughts running through my head. When I woke up in the morning, I realized she captured perfectly what I it was I had been struggling with or rather I should say not dealing with. Unbeknownst to her, her words resonated with me on many levels. They also served to remind me how incredibly blessed I am that these women friends of mine have always valued me in their life as much as I have valued them. I cannot think of a moment when any of them were indifferent to me or my issues even when they too were balancing so many plates in their own lives. The absence of indifference is what has enabled these friendships to grow and strengthen over time. I hope all of you are lucky enough to have friends in your life who show you in both their words and actions just how much you matter to them. Because those are the friends you need, should have, deserve, and want in your life.

Thursday, April 10, 2014

Polenta Cake with Honey Mascarpone Icing

Just looking at the boxes filled with recipes I have collected over the years (or rather over the decades or for that matter over the scores) is what could only be described as heart racing overwhelming. Of course, organizing these recipes into files when I first started collecting them would have been made it so much easier and less time consuming to sort through them. Hindsight as they say is 20/20. Yet, rather than dwell on what I coulda, shoulda did, I would like to think there is an upside to this organized chaos (the proverbial glass as half full view of the world). And that upside would be the euphoria I experience when I find a recipe I didn't remember I had or thought I had lost. This euphoria is akin to finding the perfect four inch black heels (for those of you with shoe obsessions you will understand this). So it was one of those 'four inch heel finding euphoric heart racing in the best of ways' days when I rediscovered the Polenta Cake with Honey Mascarpone Icing recipe, a recipe I thought I had lost.


The Polenta Cake with Honey Mascarpone Icing is one of those rustic cakes as well as what I will call one so deliciously flexible you can enjoy it for breakfast (come on, have you not eaten cake for breakfast before?), at lunch, at dinner or just served with a glass of Moscato. The honey mascarpone icing has a creamy, rich but not too sweet flavor, complimenting perfectly the taste and texture of this cake. The combination of the polenta cake with honey mascarpone icing on your palate is enough to keep you from leaving any crumbs behind. It is possible this cake will have you abandoning your good table manners when you use your fingers to get every morsel off the plate.


What makes this cake a little different than most other cakes is that in addition to all-purpose flour, it contains both instant polenta and almond or almond meal flour. When I first made this cake eons ago almond flour wasn't easily accessible. Nowadays I can usually find it my local grocery store (Bob's Red Mill is my favorite brand). 

The dry ingredient base for this cake is made up of instant polenta, almond flour, all purpose flour, 1/4 cup granulated sugar, 3/4 teaspoon baking powder, and 1/2 teaspoon sea salt. All of the dry ingredients are combined in a bowl, mixed and set aside.


This cake batter comes together well using a hand mixer (no need to pull out the standing mixer). I like to take the eggs and butter out of the refrigerator the night before so they are at perfect room temperature when I begin to bake. After the butter and 1/2 cup granulated sugar are mixed until light and fluffy, the eggs are added in one at a time just until blended. Lastly you will mix in the vanilla. The batter might look a like curdled but this is how it should look, not to worry.

The dry ingredients are blended into the butter/sugar/egg mixture using a spatula until combined. Be careful not to over mix.


Transfer the batter to a prepared 9 inch pan (pan is buttered and floured as well as lined with parchment paper also lightly buttered). Smooth the top of the batter using an offset spatula. Other than my ice cream scoops, my next favorite nice to have kitchen tool is an offset spatula. It makes the making and frosting of cakes so much easier.

In a preheated 325 degree oven, the Polenta Cake is baked in a nine inch cake pan for 35-40 minutes or until a tester comes out clean. I suggest you begin checking on your cake at the 30 minute mark so you don't over bake it. The finished cake has a beautiful golden color.


The baked cake remains in the pan for 15 minutes before it is unmolded and transferred to a wire rack to continue to cool. The cake needs to be fully cooled before you begin to slather the honey mascarpone icing on it.


I used an Acacia honey for the icing because of it is mildly sweet, light in color and has a hint of vanilla. Because this is a mild honey I used three tablespoons of it, however, if you use a darker or much sweeter honey I would recommend you begin with one tablespoon, taste and then decide whether or not your icing needs any more.

The honey mascarpone icing is one of the easiest, simplest to make. And who does not love easy and simple? Just three ingredients blended with a hand mixer create an incredibly delicious icing. The kind of deliciousness that makes you want to lick the beaters and the bowl. Mascarpone is sweeter than but not as dense as cream cheese. In spite of its' creamy texture you can might want to remove from the refrigerator at least an hour before you begin mixing with the honey and lemon juice. This honey mascarpone icing is also a great alternative to cream cheese frosting.


One your cake has cooled it is ready for the insanely delicious Honey Mascarpone Icing. Again because this is a simple, rustic cake you need only a spatula to lather on the icing. In other words, this is definitely not one of those cakes calling for the use of a either pastry bag or a cake decorating tip. The finished cake may look and should look homemade, but it tastes like it came from one of those Italian bakeries you would be willing to out of your way to get to. 

Recipe
Polenta Cake with Honey Mascarpone Icing

Serves 8-10

Ingredients
3/4 cup instant polenta
2/3 cup almond flour or almond meal flour (recommend Bob's Red Mill almond meal flour)
1/4 all-purpose flour
3/4 cup granulated sugar, separated (1/4 and 1/2 cup respectively)
3/4 teaspoon baking powder
1/2 teaspoon sea salt
10 Tablespoons unsalted butter, room temperature
2 eggs, room temperature
1 teaspoon vanilla

8 ounces mascarpone cheese (remove from the refrigerator about an hour before making the icing)
1/2 teaspoon freshly squeezed lemon juice
2-3 Tablespoons honey (I used 3 Tablespoons of an Acacia Honey, use less if you are using a darker honey)

Directions
1. Preheat oven to 325 degrees.
2. Prepare a 9 inch cake pan and line with parchment paper and set aside.
3. Put polenta, flours, 1/4 cup sugar, baking powder and sea salt in a large bowl. Whisk ingredients and set aside.
4. Using either a stand mixer or hand mixer, mix together 1/2 cup sugar and butter until light and fluffy.
5. Beat in eggs, one at a time until just blended.
6. Add vanilla (note: mixture may look curdled).
7. Add in dry ingredients stirring with a spatula until combined.
8. Transfer batter to prepared pan, smoothing top with an off set spatula.
9. Bake until tester comes out clean, about 35-40 minutes.
10. Allow cake to cool for at least 15 minutes before removing. Transfer to wire rack to cool completely.
11. In a medium sized bowl, mix together the mascarpone cheese, lemon juice and honey using a hand mixer. Spread on top of cooled cake and serve.


The sky has been blue and the sun has been out for the past two days. What is it about seeing and feeling the sun that can make one feel downright giddy? But if the weather forecasters are accurate all of this giddiness will be replaced with a bit gloom if they are right about there being snow coming next week.  But that is next week, so there is no point in spending any time worrying about what might or might not be. Besides, the weather is way outside the sphere of my influence. And these days, my time is better spent on what it is or who I really can influence. Not all attempts to positively influence can be seen immediately, sometimes it is years before we see (if we are lucky) the impact of our efforts. But whether or not we receive any acknowledgement or reward from the investment of our time and energy we give to our communities, to our professions, and even to those we care very much about shouldn't be what determines how much of ourselves we are willing to give. Hopefully the intrinsic rewards that go with the gift of giving should be enough to sustain us. Although to hear a 'thank you' every now and then, well that can make one feel beyond downright giddy. If you haven't made someone giddy lately, what are you waiting for?