Monday, March 22, 2021

The Boulevardier Cocktail


In times of duress I don't often say something like "I need a drink!". A piece of chocolate is often my go-to antidote to either dealing with stress or coping with disappointment. But watching March Madness basketball this weekend, specifically the Illinois vs Loyola game, I actually uttered those words. The classic, iconic Boulevardier Cocktail was supposed to the post-game celebratory drink. Instead it became the post-game recovering from shock and wallowing in defeat cocktail. For those of you have a fondness for Bourbon Whiskey, you know it has a way of putting a disappointment into perspective. So in spite of watching my Alma Mater lose, the Boulevardier Cocktail was a winner.


First invented and served during Prohibition at Harry's Bar in NYC, The Boulevardier is Bourbon's answer to the gin made Negroni. The original recipe was made with equal parts Bourbon Whiskey, Campari, and Sweet Vermouth, but over the years the ratios has been nuanced. In addition to increasing the amount Bourbon, the more traditional orange peel garnish is often replaced with a lemon twist, with a maraschino cherry or with the more decadent Luxardo cherries.


However, unlike the Paper Plane, my other favorite Bourbon based cocktail, The Boulevardier is a stirred not shaken cocktail. Unlike a shaken drink where water is often one of the added 'secret' ingredients, a stirred cocktail is the more gentler, perfect way to keep your cocktail Bourbon forward. 


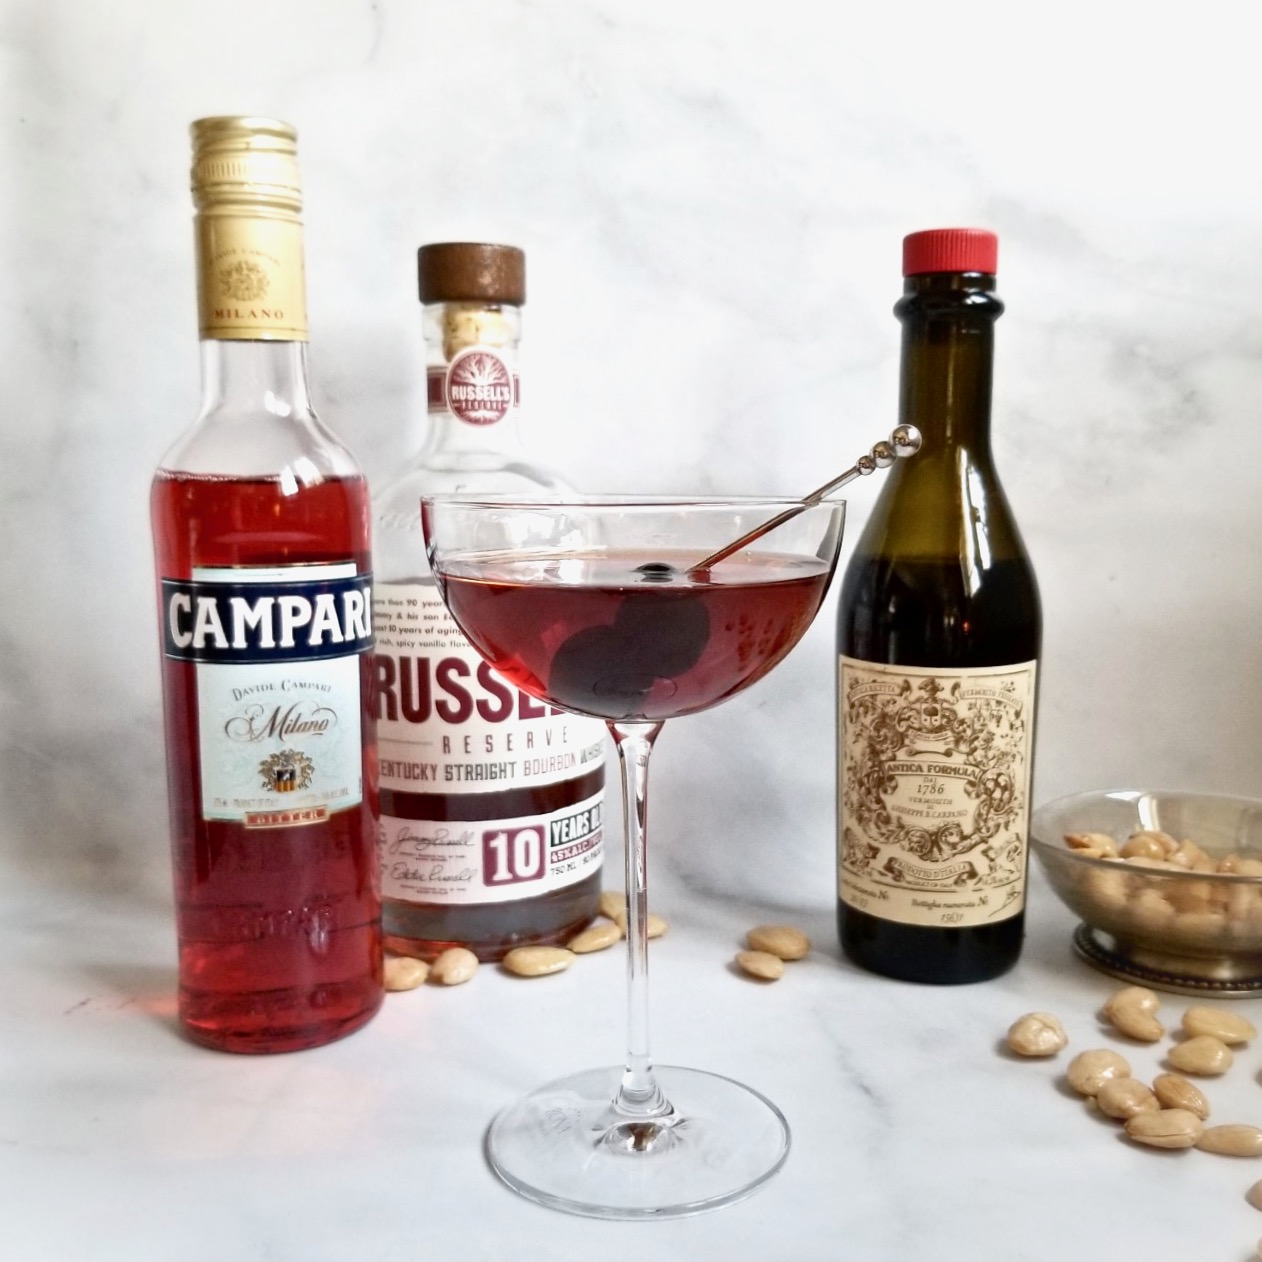
Instead of the more common Martini and Rossi Sweet Vermouth, this cocktail was made with Antica Formula, the exquisite Italian Sweet Vermouth. Considered to be a standard in any highly respectable bar. In addition, to being the perfect ingredient for a refined cocktail, it has just the right amount of richness, vanilla notes, and spice to hold up to the Campari. Either an orange peel or Luxardo Cherries perfectly compliments the flavor profile of this sweet vermouth. And if you ask me, a cocktail made with Italian made Campari and Antica Formula Vermouth calls for a luxe Italian maraschino cherry as the garnish.

Serving The Boulevardier Cocktail in a coupe glass rather than a lowball glass isn't just a more elegant presentation. It encourages sipping. In other words, you don't want to rush the experience of savoring this classic cocktail.


Serve The Boulevadier with a bowl of Marcona Almonds or your favorite cocktail nuts. 


Soon we will again be able to host gatherings with family and/or friends. Which means it's time to up your Bourbon cocktail game. Boulevardier Cocktails or Paper Planes are both perfect beverages to welcome the return of a new, better normal. And speaking of game, the Boulevardier is a perfect cocktail whether your team advances in or loses during March Madness. Becausee Bourbon based cocktails make everything a little bit better. And given the choice between a piece of chocolate of a Boulevardier I think I would choose the latter.

Recipe
The Boulevardier Cocktail
Makes 1 cocktail

Ingredients
2 ounces Bourbon Whiskey (I have a fondness for Russell's Reserve.)
1 ounce Campari
1 ounce Sweet Vermouth (highly recommend the Italian Antica Formula Vermouth)
Ice Cubes
Luxardo Cherries or an Orange Twist

Optional: Marcona Almonds or your favorite mixed nuts

Directions
1. Pour the Bourbon, Campari, and Sweet Vermouth into a cocktail shaker.
2. Add a generous handful of ice cubes. Stir until the liquids are blended and chilled (no more than 30 seconds).
3. Strain into a coupe glass.
4. Garnish with either Luxardo Cherries or an Orange peel.
5. Sip and savor. And as always, drink responsibly.

Notes: (1) The original Boulevardier Cocktail was made with 1.5 ounces of Bourbon whiskey, 1.5 ounces Campari, and 1.5 ounces of Sweet Vermouth. Alternately it can be made with 3 parts Bourbon whisky, 2 parts, Campari, and 1part Sweet Vermouth. You can decide which version of The Boulevardier Cocktail is your favorite.

Friday, March 19, 2021

Chocolate Guinness Cake with Cream Cheese Icing


What better way to welcome in the arrival of spring than with a piece of cake! More specifically, with a piece of this sinfully delicious Chocolate Guinness Cake with Cream Cheese Icing. Just in case you didn't celebrate St. Patrick's Day with a bottle or two of Guinness Stout, you can now 'have your Guinness and eat it too!'. If anyone asked me to choose between an ice cold bottle of Guinness and this cake, I would more than likely take the cake. Because in a way I wouldn't be choosing at all. 


Technically there are eleven chocolate cake recipes posted to the blog. So the recipe for this Guinness Cake with Cream Cheese Icing now makes it an even dozen. Even without having the other eleven cakes in front of me, I am going to say this one may rank up there as one of the fudgiest, moistest, densest, richest chocolate cakes ever to come out of my kitchen. At the moment, it's my current favorite. And not just because it's made with Guinness or topped with the most ethereal cream cheese icing. It is seriously a really, really great, borderline best ever, chocolate cake.


This humble Chocolate Guinness Cake with Cream Cheese Icing is dinner party, birthday party, even wedding cake worthy. But it doesn't need to be made only for a special occasion as it's a perfect every day cake as well. Because if we have learned anything in the last 371 days, it's that we need more cake.


In addition to being made with chocolate and Guinness, what is not to love about a cake essentially made using a whisk and a saucepan? One might never expect a cake made in a saucepan to have such a depth of flavor or more perfect texture. Quite possibly the cake's simplicity is responsible. 


For those of you who don't particularly enjoy drinking beer, ale, or even a stout, you might put this Chocolate Guinness Cake with Cream Cheese Icing in the 'not for me' category. If only I didn't have to tell you it was made with Guinness. Because I am certain if you are open to possibility and/or take just one taste of this divinely delicious cake, you will start looking at stout very differently. 

As you will see in the recipe below, the cake batter comes together in a saucepan. Yes, a saucepan! After the Guinness and butter are heated until the butter has melted, the pan is removed from the heat. First to be added to the Guinness/butter mixture is the granulated sugar and Dutch-processed cocoa, followed by the mixture of the eggs, sour cream and vanilla. And lastly, the flour, baking soda and Kosher salt are whisked in. The consistency of the batter will be on the thin side.

After pouring the batter into a prepared nine inch cake pan, the cake bakes in a preheated 350 degree (F) oven for 45-50 minutes or until done (it should spring back when lightly pressed). While the cake is baking make the cream cheese icing.


The addition of a small amount of heavy whipping cream is what contributes to the icing's creaminess. The cream gets whipped into icing after the cream cheese, confectionary sugar, and vanilla and have been well blended. You might initially think the addition of the heavy whipping cream will make for a 'soupy' icing. However, whipping the cream into cream cheese/sugar mixture until it is light and fluffy actually helps to an incredibly light, fluffy, creamy icing. Giving the icing some time to chill in the refrigerator (about 30 minutes) before icing the cake helps to further set it up. 


While the icing chills in the refrigerator, let the cake come to room temperature.


For some reason this simple cake called for the luscious cream cheese icing to be simply swirled on top.


The cream cheese icing is the perfect compliment to this deeply flavored, dense, rich chocolate cake. I am not certain I would top the cake with any other icing. Why mess with perfection?

If there was ever a cake to satisfy a craving for something sweet or to celebrate the arrival of spring, this swoonworthy Chocolate Guinness Cake with Cream Cheese Icing would be all that and then some. 

Recipe
Chocolate Guinness Cake with Cream Cheese Icing
Makes one 9" round single layer cake
Serves 10-12

Ingredients
Chocolate Guinness Cake
10 Tablespoons (142g) unsalted butter, if possible, use a European style butter
1 cup (8 ounces) Guinness Stout (
3/4 cup (80g) Dutch-processed cocoa
2 cups (400g) granulated sugar
3/4 cup (180g) sour cream
2 large eggs, room temperature
1 Tablespoon vanilla
2 cups (260g) all-purpose flour
2 1/2 teaspoons baking soda
1/2 teaspoon Kosher salt

Cream Cheese Icing
1 7/8 cups (234g) confectionary sugar
12 ounces (339g) cream cheese, room temperature
1/4 cup heavy whipping cream
1 teaspoon vanilla

Directions
Chocolate Guinness Cake
1. Preheat oven to 350 degrees (F). Butter and line a 9" round cake pan with parchment paper. Set aside.
2. In a medium-large sized saucepan, add in the Guinness and unsalted butter. Over medium heat, whisk occasionally until the butter melts.
3. Remove the pan from the heat.
4. Whisk in the sugar and Dutch-processed cocoa. 
5. In a medium sized bowl, whisk the sour cream, eggs, and vanilla until smooth and well blended.
6. Add to the Guinness/butter mixture. Whisk to incorporate.
7. Add the all-purpose flour, baking soda and Kosher salt. Whisk until fully blended. 
8. Pour batter into the prepared pan. 
9. Place the pan on a large baking sheet and then place in the oven. Bake for 45-50 minutes or until the cake is firm (and springs back when lightly touched). Place cake pan on a cooling rack.
10. Allow cake to rest in pan for at least 20-30 minutes before unmolding onto a platter. Let the cake cool completely before icing.

Cream Cheese Icing and Finishing
1. In a medium sized bowl, beat the cream cheese until creamy using a hand mixer.
2. Add in the confectionary sugar and vanilla. Beat until well blended.
3. Pour in the heavy whipping cream and beat until light and fluffy.
4. Place bowl of icing in the refrigerator for about 30 minutes before using.
5. Using a large ice cream scoop, scoop icing onto the top of the cake.
6. Use an offset spatula to spread icing evenly on top of the cake (do not ice the sides of the cake). 
7. Cut into slices and serve.
8. Store any leftover cake covered in the refrigerator. 

View of the iconic Marina Towers along the dyed green Chicago River, March 2021

Saturday, March 13, 2021

Irish Soda Bread


Growing up I always thought my ancestral roots were half Polish and half Irish, with a little bit of Swedish thrown in for good measure. And up until recently if you asked me what my ethnic make-up was, that is what I would have told you. My youngest brother recently decided to have his DNA evaluated by one of the more popular genetic testing companies. And since we both share the same birth parents (although I secretly want to believe I was switched at birth in the hospital), I am going to assume we have exactly the same ethnicity make-up. And guess what? My ethnicity isn't what I thought or was told it was. Seems 44% of my ethnicity is Eastern European and Russian. As a side note, I only recently learned my father's grandfather was Russian not Polish so that explains some of that. But clearly I am not half Polish. As for being Swedish for good measure, well it seems my Swedish ethnicity estimate is 29%. And along with a 4% Norwegian estimate (I suppose you could say good measure), I am much closer to being about a third Scandinavian. As for my Irish heritage, well the analysis showed my DNA had only a 7% Irish ethnicity estimate. A far cry from that half Irish blarney I was told growing up! If the saying 'if you are lucky enough to be Irish, you are lucky enough' holds true, how lucky enough should some with 7% Irish ethnicity be? Guessing it might not be as lucky as being at least 50% or 100% Irish. 


Yet regardless of our ethnic make-up, the one we think it is and the one it really is, we all seem to love some of the St. Patrick's Day traditions. Both the Irish ones as well as the American Irish ones. More than likely you won't find either green beer, corned beef and cabbage or rivers dyed emerald green on this holiday if you were lucky enough to be spending the holiday in Ireland. But you might find a warm loaf of Irish Soda Bread being served up with some Irish butter and a cuppa. Although truth be told, Irish Soda Bread is actually made year round in Ireland. And honestly, I think we should all be making it more than one week or one month a year.

If you don't have a treasured family recipe, one passed down through the generations, or don't have a mother-daughter annual Irish Soda Bread making tradition, this is the recipe to change all of that.


This craggily topped loaf studded with raisins is dense, moist, tender, and a tiny bit sweet. A plate with thick slices served warm or toasted and slathered with some really good Irish butter is almost impossible to resist. 


Made with only eight ingredients, Irish Soda Bread is essentially a quick bread. Grating ice cold butter makes the process of incorporating it into the dry ingredients quick and easy. Using an Irish or European Style butter isn't an absolute necessity, but for some reason Irish Soda Bread wouldn't be Irish without it. The use of 1 1/8 teaspoons of baking soda reflects the rounded teaspoon used by so many authentic Irish home bakers. And always, always shake your buttermilk before measuring it. This recipe uses only raisins. Some recipes use both caraway seeds and raisins. There is another Irish Soda Bread recipe on the blog using both of those ingredients. You can find that recipe here.


Once the dough comes together, it's kneaded only long enough to get it formed into a ball. It's important to not over knead the dough or you will let some of the air out of the dough. If the dough is a bit too sticky, add in a little more flour, one tablespoon at a time. A little bit of stickiness isn't a bad thing. If you are able to pick up the ball with your floured hands and place in your parchment paper lined cast iron pan, it's perfect.


Use a sharp knife to cut an "X" into the top of the loaf before putting it in the oven. There's some folklore saying if you cut an "X" in the top of the loaf it lets the fairies out and ensures a bit of good luck. You can bet I am not messing with any Irish folklore!


In a preheated 450 degree (F) oven, the Irish Soda Bread bakes for 40-45 minutes or until beautifully golden and will spring back when lightly pressed.


Allow the bread to remain the pan for 10-15 minutes before transferring it to a cooling rack.


Then try to let it rest another 30 minutes before you cut it into thick slices. Allowing the bread to rest and cool down slightly makes it easier to cut.


Before sharing this recipe with you I asked my 100% Irish friend who was originally from County Mayo to taste it as I needed her Irish blessing. I can now consider this heavenly loaf of Irish Soda Bread officially blessed! 


Homemade is almost always better than store bought. So make a loaf or two of this Irish Soda Bread in honor of St. Patrick's Day. Definitely serve it with some room temperature Irish butter and a cuppa (tea). And I promise, after just a few bites of this irresistibly delicious bread your day will be destined to get a wee bit luckier. No matter what your ethnic make-up might actually be!

Recipe
Irish Soda Bread
Makes 1 large delicious loaf
Updated: March 14, 2022

Ingredients
1 3/4 cup (400ml) buttermilk (well shaken before measuring)
1 large egg
4 1/2 cups (567g) all-purpose flour, plus more as needed
6 Tablespoons (90g) granulated sugar
1 1/8 teaspoons (6g) baking soda
1 teaspoon Kosher salt
5 1/2 Tablespoons (78g) ice cold unsalted butter grated, preferably an Irish or European style butter
1 cup (150g) dark raisins (add in an additional 1/4 cup (38g) of raisins if you like your bread heavily studded with raisins)
Optional: White Sparkling Sugar

Room temperature Irish butter for serving

Directions
1. Preheat oven to 400 degrees (F). Line an 11-12 inch cast iron pan with a sheet of parchment paper. Lightly butter top of parchment paper.
2. In a large bowl, whisk together the flour, sugar, baking soda, and Kosher salt.
3. Add in grated butter, using your fingers to just work it into the flour.
4. Stir in the raisins.
5. Whisk together the buttermilk and egg. Slowly pour the mixture into the dry ingredients, stirring with a dough whisk or wooden spoon as you pour. Continue stirring until well incorporated. Dough may be sticky. If too sticky lightly dust with and mix in one Tablespoon of flour at a time.
6. Turn the dough a lightly floured surface.
7. Lightly dust your hands and knead (or rather shape) the dough into a ball (this should take less than a minute). 
8. Transfer the ball to the prepared pan. Use a sharp knife and cut a large "X" in the center of the dough ball. Because you must let the fairies out! Brush the top with some heavy cream and generously sprinkle with sparkling sugar if using. Let rest for 10-15 minutes before placing in the oven.
9. Bake for 40-45 minutes or until the bread is golden brown, springs back when lightly pressed with your finger and the center looks cooked through. Be careful to not over bake.
10. Remove from the oven and let the bread rest for 10-15 minutes before transferring to a cooling rack.
11. Let the bread cool for another 30 minutes before cutting into thick slices. Serve with room temperature Irish butter.
12. The bread is best on the day it's made but slices can be reheated in the microwave or toasted.

Notes: (1) I used Kerrygold Unsalted butter for the bread dough but Kerrygold Salted Butter for serving. (2) When measuring the flour I used a 1 cup to 126g ratio. (3) The originally published recipe called for 4 Tablespoons of granulated sugar and baking at 450 degrees (F). This updated version increases the amount of sugar to 6 Tablespoons and reduces baking temperature to 400 degrees (F). (4) Optional, a splash of vanilla to the egg and buttermilk mixture.

Chicago River dyed Green, Chicago, Illinois (March 2021)

Sunday, March 7, 2021

Baked Soft Pretzels


Do you remember the first time you tasted a warm, pillowy, buttery, salty pretzel? For some of us, that first delicious bite came from an Auntie Anne's. Once the aroma of freshly baked pretzels was detected, it is almost impossible to restrain oneself from following that heavenly scent to the store's door. Many years back, it was equally impossible to say 'no' to my young niece and nephew who always seemed to want a warm pretzel every time we brought them to the mall with us. Twenty something years ago it never occurred to me that I could make fresh baked pretzels at home.


Had I known, Auntie Lynn's Baked Soft Pretzels possibly could have been in contention for their most favorite, most memorable childhood pretzels.


With St. Patrick's Day right around the corner, wouldn't some freshly Baked Soft Pretzels go perfectly with a bottle of Guinness, hard cider or your favorite ale?  I might be a bit biased, but I say YES they would!


The pretzel dough is made with only six ingredients: bread flour, Kosher salt, instant (rapid rise) yeast, melted European-style butter, and sugar. After the yeast, melted butter and sugar are mixed together and rest for five minutes, bread flour and Kosher salt are mixed in with a dough whisk or wooden spoon. The shaggy dough is transformed into a smooth, slightly sticky ball of dough after about five minutes of kneading in a standing mixer fitted with a dough hook. Shape the dough into a ball and place in a lightly oiled (or sprayed) medium sized bowl. Tightly cover with plastic wrap and let rest for 45-60 minutes (or until doubled in size) in a warm place.


After dividing the dough into eight equal pieces, each piece is rolled out into a rope of approximately 18 inches. To shape the rope into a pretzel, form each dough rope into a "U' shape. Then cross the two ends over each other and fold down to the bottom of the "U" for form a pretzel shape. To get the hang of it, I did a few practice rounds with a piece of string. Once all of the pretzels have been formed, bring the mixture of water, baking soda and sugar to boil. Reduce the heat to a simmer and lower each pretzel into the baking soda/sugar solution for 20 seconds per side. The process of dipping the pretzels in this mixture not only alters the pH level of the outside of the dough, it contributes to creating that beautiful brown pretzel finish as well as gives it that much loved pretzel flavor. In other words, you don't want to skip this step.

For a deeper golden brown finish, make an egg wash using one large egg, one large egg yolk and one Tablespoon of water. The egg wash will not only allow the pretzel salt to adhere to the dough, but it will give it a beautiful golden brown sheen. The best salt to use for these Baked Soft Pretzels is coarse pretzel salt as it doesn't melt at high temperatures.


Baking time for the pretzels ranges from 14-16 minutes or until the pretzels are golden brown. After removing the pan of pretzels from the oven, brush them with some melted European-style butter to give them a buttery flavor.


Transfer them to a large platter containing bowls of mustards and/or warm melted cheese. These Baked Soft Pretzels are best when served warm (although they can be reheated). If by chance you have any leftover, place in ziplock bag to keep them fresh. Leftover pretzels are great for making sandwiches.


Once you serve your family and friends some freshly Baked Soft Pretzels, it's highly likely they will be asking you to put them on repeat.  

And these pretzels will definitely put you in contention for the best ever hostess/host. 

Recipe
Baked Soft Pretzels
Makes 8 generously sized pretzels

Ingredients
1 cup and 2 Tablespoons warm water (110-115 degrees F)
2 1/4 teaspoons (9g) instant (rapid rise) yeast
1 teaspoon (6g) granulated sugar
3 Tablespoons (43g) unsalted European style butter, melted and cooled slightly
3 1/2 cups (448g) bread flour, plus more for rolling
1 teaspoon Kosher salt

2 quarts water
1/4 cup (72g) baking soda
2 Tablespoons (36g) granulated sugar

1 large egg
1 large egg yolk
1 Tablespoon water
Pretzel Salt for sprinkling

2 Tablespoons unsalted European style butter, melted

Serving suggestions: Grainy mustard, yellow mustard, melted cheese, and beer.

Directions
1. In the bowl of a standing mixer fitted with a dough hook, combine the water, yeast, sugar, and melted butter. Whisk to combine. Let rest for 5 minutes.
2. Add the flour and Kosher salt. Using a hand held dough whisk or wooden spoon, stir until combined. Dough will be shaggy.
3. Knead in the mixer (using the dough hook) until the dough is smooth, slightly elastic and clears the sides of the bowl (approximately 5 minutes).
4. Remove dough and shape into a ball. 
5. Lightly oil or spray a medium sized bowl. Set the ball of dough in the bowl and tightly cover with plastic wrap. Place bowl in a warm place and let the dough to rise until double in size (approximately 45-60 minutes).
6. Line a baking sheet with parchment paper. Preheat the oven to 450 degrees (F.)
7. Divide the dough into 8 equal pieces. Roll and stretch each piece to a length of rope approximately 18 inches. Note: The dough may be a bit resistant to being stretched. So first shape each piece of dough into a chunky tube shape, then gradually lengthen each piece into a long thin rope.
8. Form each piece into a U shape. Cross the two ends over each other and fold down into a pretzel shape. Place on the baking sheet (leaving at least 2 inches between pretzels). Repeat with remaining pieces of dough.
9. Bring the water, baking soda and sugar to a bowl in a medium sized saucepan. Reduce the heat level to a simmer.
10. Gently place a pretzel on a large spatula and lower into the water for 20 seconds per side. Remove with spatula gently shaking off any excess water. Place on baking sheet. Repeat with remaining pretzels.
11. Whisk together the egg, egg yolk, and water. Brush each pretzel with the egg wash and generously sprinkle with pretzel salt. 
12. Bake for 14-16 minutes or until golden (rotating tray midway). Remove from oven.
13. Brush each pretzel with some melted butter.
14. Serve warm with some melted cheese and/or assortment of mustards.
15. The baked pretzels are best the day they have been baked and right out of the oven. Use any leftover pretzels for sandwiches and/or reheat in the microwave to warm up for a few seconds.

Notes: (1) Slightly adaptation of Shauna Server's Big Soft Pretzel recipe from the cookbook "Midwest Made: Big, Bold Baking from the Heartland. (2) Pretzel salt doesn't melt at high temperatures, however, some coarse sea salts will. If at all possible, use pretzel salt. (3) If you make the dough into pretzel bites versus pretzel shapes reduce your baking time to 12-14 minutes.

Tuesday, March 2, 2021

Roast Chicken & Baby Red Potatoes Salad w/ Mustard Vinaigrette

It's hard to believe but this month marks the anniversary of when the world as we knew it changed. Movie theaters (at least in my hometown) are still closed, (legally) eating inside a restaurant has just recently returned, some stores continue to limit the number of people allowed in, depending on the time of day you can expect to wait in line to get into a store, face masks are required everywhere, and drinking from water fountains may soon become a thing permanently remaining in the past. While we can now readily find yeast, flour, chicken, ground beef, hand sanitizer, Clorox wipes, face masks, and toilet paper, the days of scarcity are permanently etched in our memories. Yet, in spite of the return of stocked shelves, some of us have given serious consideration to becoming hoarders. This has not been a good year for those of us who already had some underlying hoarding tendencies (although who knew we should have been stockpiling toilet paper and hand sanitizer). Coping with this temporary new normal has caused us to reimagine life as we knew it, while still holding on to the belief that things like the days of gathering (without masks) are somewhere out on the horizon. I, for one, can hardly wait to have my family and posse over for a meal (oh the recipes I want to make for them) as well as to reconnecting with friends in person (around food and. beverages of course!).


One of the things going on the top of the list will be this almost effortless Roast Chicken & Baby Red Potatoes Salad w/ Mustard Vinaigrette. Along with a loaf of freshly baked homemade bread. Because if the past year has taught me anything, it's that nothing tastes better than a loaf of great homemade bread. Especially when paired with a really great salad.


And this is a really, really great salad! One taking very little effort (a store bought rotisserie chicken is your new best friend) but with an impressive presentation! It's perfect for lunch yet hearty enough to serve for dinner.


Just like there is nothing like homemade bread, there is nothing like a homemade vinaigrette. Especially this Mustard Vinaigrette. Made with shallots, garlic, two kinds of mustard, sherry vinegar, Kosher salt, black pepper, a pinch of sugar, water, and extra-virgin olive oil this is a highly flavorful, luscious dressing. And it pairs perfectly with the ingredients in this salad.


Thinly sliced radishes and spring greens give this salad some crunch, warm or room temperature baby red potatoes marinated in the vinaigrette add some creaminess, and the shredded rotisserie chicken adds the protein. A bowl of crumbled blue cheese (preferably Point Reyes blue cheese) adds yet another layer of flavor to this delicious, mouthwatering salad. Because not everyone is fan of blue cheese (hard to believe I know), I recommend serving it on the side.

The vinaigrette and potatoes can be made earlier in the day. Shredding the rotisserie chicken while it is still warm is always a good idea. Additionally the shredded pieces of chicken (versus slices) gives this salad such an inviting rustic look.


This Roast Chicken & Baby Red Potatoes Salad w/ Mustard Vinaigrette is the perfect main course salad to serve to both family and friends. And one you don't need to spend all day in the kitchen making. Simultaneously casual and elegant, it is a great weeknight or weekend meal, but it definitely qualifies as a company worthy dish! 

Recipe
Roast Chicken & Baby Red Potatoes Salad w/ Mustard Vinaigrette
Serves 4

Ingredients
Mustard Vinaigrette
1 large shallot, finely chopped
1 medium sized garlic clove, finely minced
3 Tablespoons Sherry vinegar
1 Tablespoon water
Pinch of granulated sugar
1/2 teaspoon Kosher salt
Several grinds of black pepper
1 Tablespoon smooth dijon mustard
1 Tablespoon Whole-Grain dijon mustard
1/2 cup extra-virgin olive oil

Roast Chicken Salad 
10-12 small baby red potatoes (potatoes should be slightly larger than golf balls)
1 teaspoon Kosher salt
4-6 large handfuls of a spring mix 
3-4 pound rotisserie chicken (from your grocery store), meat and skin removed and shredded
2-3 radishes, thinly sliced
Kosher salt
4 ounces of blue cheese (recommend Point Reyes Blue Cheese)

Directions
Mustard Vinaigrette
1. Add all ingredients, except extra-virgin olive oil, into a medium sized bowl and whisk together.
2. Slow whisk in the extra-virgin olive oil until the vinaigrette is emulsified.
3. Use dressing immediately. Can be made several hours ahead. Just cover with plastic wrap and let rest at room temperature. If prepared early in the day or the night before, cover with plastic wrap and refrigerate. Take out at least 30 minutes before serving and whisk before using. 

Roast Chicken and Red Potato Salad 
1. In a medium sized saucepan add the potatoes and cover with cold water. Add a teaspoon of Kosher salt. Bring the water the boil and continue cooking until the potatoes are knife tender (approximately 20 minutes). Remove the potatoes from the pan and set cool slightly before cutting in half.
2. Lightly toss the potato. halves in about 1/4 of the mustard vinaigrette. 
3. Line a large platter with the spring greens. Drizzle with about 1/4 of the vinaigrette. Lightly salt.
4. Place the chicken down the center of the platter.
5. Place the lightly marinated potatoes around the chicken.
6. Scatter the radishes along the side of the platter.
7. Spoon 2-3 tablespoons of the mustard vinaigrette down the center of the platter. Pour remaining dressing in a small bowl.
8. Crumble the blue cheese and place in a small bowl.
9. Serve the Roast Chicken & Baby Red Potatoes Salad with the sides of blue cheese and remaining dressing. Enjoy immediately.

Notes: (1) Serve the salad with a fresh loaf of bread. Maybe like some No Knead Artisan Bread or Everything but the Bagel No Knead Bread. (2) If you have a mandolin, use it to slice the radishes. (3) I used the Maille dijon and whole-grain mustards for the vinaigrette.