Showing posts sorted by relevance for query irish soda bread. Sort by date Show all posts

Friday, March 10, 2017

Irish Soda Bread with Raisins and Caraway


In the event I ever travel to Ireland (a place high on my bucket list), I fully expect to be detained, deported, or deterred from entering the country for posting this recipe for Irish Soda Bread with Raisins and Caraway. And, if by some chance, the authorities do not prevent me from leaving the airport, I anticipate a contingent from The Society for the Preservation of Irish Soda Bread will be there to greet me. Not to welcome me, but rather for the purpose of very politely informing me a true Irish Soda Bread is made with only four ingredients: flour, buttermilk, salt and baking soda. Calling my "Americanized" version "Irish" was a bit of stretch. And, of course, they would be right. In this paranoid fantasy moment I imagine I would have at least two options: graciously ask for their forgiveness or ever so kindly attempt to explain myself by sharing a bit of soda bread's history. Because leaving without having explored the lush landscapes, cliffs along the seashores, charming towns, and a couple of authentic Irish pubs, would not be an option.


While it's true the earliest reference to Irish Soda Bread appeared in the November 1836 edition of Farmer's Magazine (referencing a newspaper article for the bread in County Down) the origin of Soda Bread technically was not Ireland (the American Indians actually made the earliest version of soda bread using pearl ash to leaven the bread). The Irish Soda Bread tradition actually began shortly after baking soda was invented in the mid-1800's. It was quickly adopted by Irish women, as it allowed Irish flour to rise setting off the creation of closely guarded family Irish Soda Bread recipes. History aside, the wisest option would be to ask for forgiveness for taking liberties with a revered, traditional Irish Soda Bread recipe. All the while keeping my fingers crossed the old saying 'it's always best to beg for forgiveness than ask for permission' would actually work. My only default to earn their good graces would be to pray the fairies were with me.

One of the concerns about Irish Soda Bread is dryness and crumbly-ness. This one is neither. There are literally hundreds of Irish Soda Bread recipes to choose from. In addition to the four ingredient traditional Irish Soda Bread, variations include the use of both all-purpose and whole wheat/whole wheat pastry flour; raisins or currants soaked in Irish Whiskey; eggs or no eggs; melted instead of cold butter; and ,orange or lemon peel. Narrowing down my choices to three, I went back and forth between them before deciding on the recipe originally shared in Bon Appetit. Even after making a decision, I wasn't sure about the use of both caraway seeds and raisins. In the end, I decided not to eliminate either of them. It turned out to be a really good decision.


If there is one way to make this "Americanized" version of Irish Soda Bread with Raisins and Caraway a little more Irish, it would be to serve it with some softened Irish butter.

In a large bowl, whisk together the flour, sugar, baking soda, baking powder and salt. I used a fine sea salt instead of my usual Kosher salt. In lieu of using only all-purpose flour, you can use a combination of all-purpose flour and whole wheat pastry flour. See note below.


Instead of cutting the butter into small cubes, grating the butter makes it much easier to incorporate into the flour, sugar, baking soda, baking powder, and salt mixture.

Using your hands, blend the butter into dry ingredients until it looks like a coarse meal. Stir in the raisins and caraway seeds with a wooden spoons. You might think two and a half cups of dark raisins is too much. Trust me, it's not. The proportions in this Irish Soda Bread are pretty close to perfect.


Whisk together the buttermilk and egg. Pour into the dry ingredients. Begin to bring the dough together with a wooden spoon. Once the flour has been fully incorporated, knead very gently. Note: The dough will be very sticky. Flouring your hands before kneading makes it slightly less messy.

Transfer the dough to your prepared baking pan and shape into a mounded round loaf.


"You have to cut a cross in the dough to let the fairies out." There are actually two schools of thought on the cross cut into the dough. Some say it's to let the fairies escape, others say it brings blessings from above. You can choose to believe one or the other, or both, but I dare not upset the fairies. Altering the ingredients in an Irish Soda Bread recipe is one thing, not respecting the fairies is another. When making the cross on the top of the dough, cut deep into (apparently I did not cut deep enough as my finished bread had a barely discernible cross).


This recipe makes either one really large loaf or two perfectly size loaves. One of the benefits of dividing the dough into two loaves is that you will have one to give away.

If you have a cast iron pan, use it to get the crispiest edges to your soda bread. If you don't have them, use cake pans. Whichever pan you use, generously butter the pan and line the bottom withe parchment paper. Many Irish Soda Breads are baked at a high heat (i.e., 400 degrees (F) or higher. This Soda Bread is baked in 350 degree (F) oven, at temperature contributing to a moister bread. A single loaf will bake in approximately 70-80 minutes while two smaller loaves will bake in approximately 50-55 minutes.


To test for doneness, insert a tester into the center or side of bread. If the tester comes out clean, the bread is done. A less technical way of testing for doneness is to tap on the top of the bread. If it sounds hard but hollow, the bread is done. The baked bread remains in the baking pan for 10 minutes before it is removed and placed on a wire rack to cool. Cut into slices, serve with some room temperature (Irish) butter, then sit back and savor.

Although I was initially reluctant to use both raisins and caraway seeds, but I can't imagine making this soda bread using only or the other or omitting them completely. The sweetness of the moist bread with its' crunchy exterior combined with the sweet/savory contrast of the raisins and caraway seeds makes this Irish Soda Bread mouth-watering delicious. While it may not be a technically traditional Irish Soda Bread, it is one definitely worthy of being made well after St. Patrick's Day.
Recipe
Irish Soda Bread with Raisins and Caraway (slight adaptation to the Irish Soda Bread with Raisins and Caraway as shared by Bon Appetit, October 2002)
Updated March 2019

Ingredients
5 cups (640 grams) of all-purpose flour
1 cup (200 grams) granulated sugar
1 Tablespoon baking powder
1 slightly rounded teaspoon (8 grams) baking soda
1 1/2 teaspoons fine sea salt
8 Tablespoons (1 stick) cold European unsalted butter, grated (Recommend Kerrygold Butter)
2 1/2 - 3 cups dark raisins
2 1/2 to 3 Tablespoons caraway seeds
2 1/2 cups buttermilk
1 large egg
Best quality Irish butter for serving 

Directions
1. Preheat oven to 350 degrees (F). Generously butter one 11 or 12 inch cast iron pan or two 8"cast iron or cake pans. Line bottom of pan with parchment paper and lightly butter.
2. In a large bowl, whisk together the flour, sugar, baking powder, baking soda and sea salt.
3. Add grated butter. Using your fingertips, rub in butter until coarse crumbs form.
4. Stir in raisins and caraway seeds.
5. Whisk together buttermilk and egg in a medium bowl to blend. Add to dough. Using a wooden spoon, stir until well incorporated (dough will be sticky). Flour your hands and lightly knead the dough in the bowl for 3 to 5 minutes or until the dough comes together. 
6. Transfer dough to prepared pans. Smooth top, mounding slightly in the center. Using a sharp knife dipped in flour, cut a 1 inch deep cross into top center of the dough.
7. Bake until bread is cooked through and tester comes out clean when inserted into the center of the bread. For a single loaf, baking time will be approximately 70-80 minutes, for two loaves baking time will be 50-55 minutes.
8. Allow the bread to cool in the pan for 10 minutes before turning out onto a rack to cool completely.
9. Cut into slices and serve with room temperature (Irish) butter.
10. Wrap bread tightly with plastic wrap. Store at room temperature. The bread is best on the day it is baked and remains delicious, although slightly chewier, for two additional days.

Notes: (1) I measured the dry ingredients on a digital scale. If you decide to use both all-purpose flour and whole wheat pastry flour, measuring on a scale is critical as the wheat flour has a greater density, weighing less (120 grams per cup) than all-purpose flour. (2) Make sure to make a deep cross into your dough before putting in the oven. Not only will be this ensure the fairies are let out, your finished loaf will have a beautiful, rustic look to it. (3) I used Kerrygold Irish butter for the dough and for serving. (4) This makes one really large loaf of soda bread. Would recommend making two and giving one or both of them away to a friend!

Saturday, March 13, 2021

Irish Soda Bread


Growing up I always thought my ancestral roots were half Polish and half Irish, with a little bit of Swedish thrown in for good measure. And up until recently if you asked me what my ethnic make-up was, that is what I would have told you. My youngest brother recently decided to have his DNA evaluated by one of the more popular genetic testing companies. And since we both share the same birth parents (although I secretly want to believe I was switched at birth in the hospital), I am going to assume we have exactly the same ethnicity make-up. And guess what? My ethnicity isn't what I thought or was told it was. Seems 44% of my ethnicity is Eastern European and Russian. As a side note, I only recently learned my father's grandfather was Russian not Polish so that explains some of that. But clearly I am not half Polish. As for being Swedish for good measure, well it seems my Swedish ethnicity estimate is 29%. And along with a 4% Norwegian estimate (I suppose you could say good measure), I am much closer to being about a third Scandinavian. As for my Irish heritage, well the analysis showed my DNA had only a 7% Irish ethnicity estimate. A far cry from that half Irish blarney I was told growing up! If the saying 'if you are lucky enough to be Irish, you are lucky enough' holds true, how lucky enough should some with 7% Irish ethnicity be? Guessing it might not be as lucky as being at least 50% or 100% Irish. 


Yet regardless of our ethnic make-up, the one we think it is and the one it really is, we all seem to love some of the St. Patrick's Day traditions. Both the Irish ones as well as the American Irish ones. More than likely you won't find either green beer, corned beef and cabbage or rivers dyed emerald green on this holiday if you were lucky enough to be spending the holiday in Ireland. But you might find a warm loaf of Irish Soda Bread being served up with some Irish butter and a cuppa. Although truth be told, Irish Soda Bread is actually made year round in Ireland. And honestly, I think we should all be making it more than one week or one month a year.

If you don't have a treasured family recipe, one passed down through the generations, or don't have a mother-daughter annual Irish Soda Bread making tradition, this is the recipe to change all of that.


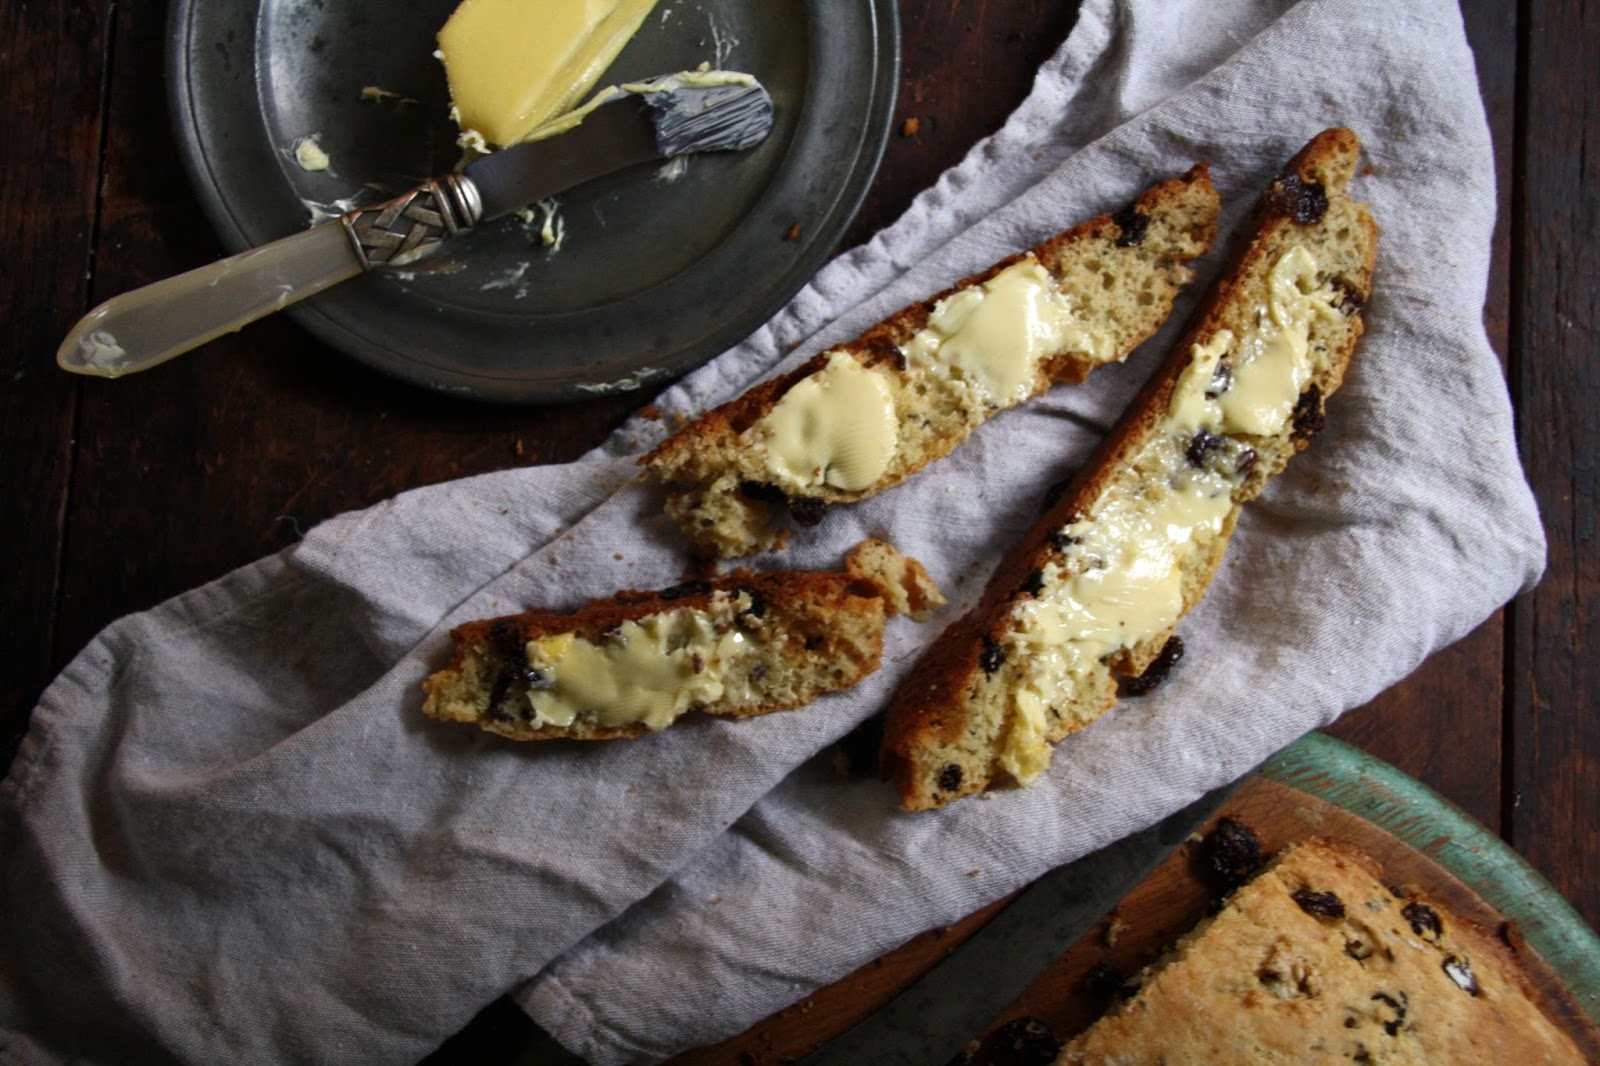
This craggily topped loaf studded with raisins is dense, moist, tender, and a tiny bit sweet. A plate with thick slices served warm or toasted and slathered with some really good Irish butter is almost impossible to resist. 


Made with only eight ingredients, Irish Soda Bread is essentially a quick bread. Grating ice cold butter makes the process of incorporating it into the dry ingredients quick and easy. Using an Irish or European Style butter isn't an absolute necessity, but for some reason Irish Soda Bread wouldn't be Irish without it. The use of 1 1/8 teaspoons of baking soda reflects the rounded teaspoon used by so many authentic Irish home bakers. And always, always shake your buttermilk before measuring it. This recipe uses only raisins. Some recipes use both caraway seeds and raisins. There is another Irish Soda Bread recipe on the blog using both of those ingredients. You can find that recipe here.


Once the dough comes together, it's kneaded only long enough to get it formed into a ball. It's important to not over knead the dough or you will let some of the air out of the dough. If the dough is a bit too sticky, add in a little more flour, one tablespoon at a time. A little bit of stickiness isn't a bad thing. If you are able to pick up the ball with your floured hands and place in your parchment paper lined cast iron pan, it's perfect.


Use a sharp knife to cut an "X" into the top of the loaf before putting it in the oven. There's some folklore saying if you cut an "X" in the top of the loaf it lets the fairies out and ensures a bit of good luck. You can bet I am not messing with any Irish folklore!


In a preheated 450 degree (F) oven, the Irish Soda Bread bakes for 40-45 minutes or until beautifully golden and will spring back when lightly pressed.


Allow the bread to remain the pan for 10-15 minutes before transferring it to a cooling rack.


Then try to let it rest another 30 minutes before you cut it into thick slices. Allowing the bread to rest and cool down slightly makes it easier to cut.


Before sharing this recipe with you I asked my 100% Irish friend who was originally from County Mayo to taste it as I needed her Irish blessing. I can now consider this heavenly loaf of Irish Soda Bread officially blessed! 


Homemade is almost always better than store bought. So make a loaf or two of this Irish Soda Bread in honor of St. Patrick's Day. Definitely serve it with some room temperature Irish butter and a cuppa (tea). And I promise, after just a few bites of this irresistibly delicious bread your day will be destined to get a wee bit luckier. No matter what your ethnic make-up might actually be!

Recipe
Irish Soda Bread
Makes 1 large delicious loaf
Updated: March 14, 2022

Ingredients
1 3/4 cup (400ml) buttermilk (well shaken before measuring)
1 large egg
4 1/2 cups (567g) all-purpose flour, plus more as needed
6 Tablespoons (90g) granulated sugar
1 1/8 teaspoons (6g) baking soda
1 teaspoon Kosher salt
5 1/2 Tablespoons (78g) ice cold unsalted butter grated, preferably an Irish or European style butter
1 cup (150g) dark raisins (add in an additional 1/4 cup (38g) of raisins if you like your bread heavily studded with raisins)
Optional: White Sparkling Sugar

Room temperature Irish butter for serving

Directions
1. Preheat oven to 400 degrees (F). Line an 11-12 inch cast iron pan with a sheet of parchment paper. Lightly butter top of parchment paper.
2. In a large bowl, whisk together the flour, sugar, baking soda, and Kosher salt.
3. Add in grated butter, using your fingers to just work it into the flour.
4. Stir in the raisins.
5. Whisk together the buttermilk and egg. Slowly pour the mixture into the dry ingredients, stirring with a dough whisk or wooden spoon as you pour. Continue stirring until well incorporated. Dough may be sticky. If too sticky lightly dust with and mix in one Tablespoon of flour at a time.
6. Turn the dough a lightly floured surface.
7. Lightly dust your hands and knead (or rather shape) the dough into a ball (this should take less than a minute). 
8. Transfer the ball to the prepared pan. Use a sharp knife and cut a large "X" in the center of the dough ball. Because you must let the fairies out! Brush the top with some heavy cream and generously sprinkle with sparkling sugar if using. Let rest for 10-15 minutes before placing in the oven.
9. Bake for 40-45 minutes or until the bread is golden brown, springs back when lightly pressed with your finger and the center looks cooked through. Be careful to not over bake.
10. Remove from the oven and let the bread rest for 10-15 minutes before transferring to a cooling rack.
11. Let the bread cool for another 30 minutes before cutting into thick slices. Serve with room temperature Irish butter.
12. The bread is best on the day it's made but slices can be reheated in the microwave or toasted.

Notes: (1) I used Kerrygold Unsalted butter for the bread dough but Kerrygold Salted Butter for serving. (2) When measuring the flour I used a 1 cup to 126g ratio. (3) The originally published recipe called for 4 Tablespoons of granulated sugar and baking at 450 degrees (F). This updated version increases the amount of sugar to 6 Tablespoons and reduces baking temperature to 400 degrees (F). (4) Optional, a splash of vanilla to the egg and buttermilk mixture.

Chicago River dyed Green, Chicago, Illinois (March 2021)

Wednesday, March 24, 2021

Irish Brown Bread aka Kathleen's Irish Brown Bread


A recent comment about my Irish Soda Bread post got me thinking about what makes a recipe traditional. If you do a search for recipes containing the word 'traditional' in them, the number of variations for a single recipe are mindboggling. As an example, what a traditional Irish Soda Bread or a traditional lasagna is to one person isn't necessarily traditional to another. If we think of a traditional food or dish as one passed on through generations, then the traditional version of any recipe might heavily depend on the family or place you grew up in. But then what happens when those 'traditional' recipes get nuanced over time based on personal taste or the availability/quality of ingredients? Do they become the 'new traditional' or our own personal 'traditional'? Regardless of how you answer those questions, maybe believing the version you are making is the most delicious one is what truly matters most. 


So what do you do when you want to make a 'traditional' food but it's one you didn't grow up eating or making? You can go on the hunt for one by scouring the internet and/or books/magazines and try to decide which one to make or modify, you can ask a good friend (specifically a friend coming from a family making it for generations), or you can do both and then decide. Spoiler alert: I made the recipe given to me by a very good friend.


Sheila was first a neighbor, then a good friend when I lived in my rented farmhouse in Little Compton, Rhode Island. I can't even to begin to count on two hands the number of kindnesses she has extended to me over the years. After talking on the phone with her last week I came away with her mother Kathleen's recipe for Irish Brown Bread. One beloved by everyone in Sheila's family. Before moving to the states years ago, Sheila grew up in County Clare. It's the place where her mother still resides. So there were a myriad of reasons why I decided to make this Irish Brown Bread recipe. It was one having a bit of tradition to it; it came from Ireland; and, last but not least, Sheila happens to be a really, really good cook. Yet, in spite of all of those compelling reasons, I still felt the need to go down the Irish Brown Bread recipe rabbit hole. 


The ingredients for this Irish Brown Bread recipe were unlike any others I had found. First, it was made using only all-purpose flour, not whole wheat flour or a combination of all-purpose and whole wheat flour. Second, wheat bran, yes wheat bran, was a significant ingredient. Wheat bran happens to be rich in fiber and protein, has very little fat, and adds a slight nutty flavor to baked goods. And lastly, there were no sweeteners in this brown bread recipe. No granulated sugar, no brown sugar, no molasses. All of which had me wondering how this dense bread might taste. But I wouldn't know if I didn't make it.


Kathleen's Irish Brown Bread is traditionally shaped in an oval, not as a round loaf. Like most Irish Brown Breads it has a deep cross cut into it as well as deep cuts into each of the quarters. And before going into the preheated 450 degree (F) oven, the loaf of bread is ever so lightly dusted with flour.


Rather than bake the bread in a pan lightly dusted with flour, I opted to bake it in a cast iron pan lined with parchment paper. The bread bakes in 35-40 minutes, although my loaf was done right at the 35 minute mark.


The most difficult part of making this recipe (other than having to search for Wheat Bran) was waiting for it cool down just long enough for it to be cut into thick slices.

If Irish Soda Bread is on the sweet side with a scone like taste, then the denser in texture Irish Brown Bread is on the savory side with a deep nutty flavor. Both are delicious slathered with room temperature Irish butter. However, the Irish Brown Bread is equally delicious topped with both butter and jam, toasted and topped with some soft scrambled eggs and smoked salmon, and or topped with a slice of fresh mozzarella sprinkled with sea salt. 

Irish Brown Bread is a simple, hearty, rustic bread. With fat coming only from the buttermilk along with it being made with wheat bran, it's a little on the bread healthier side. But most importantly, it also happens to be satisfyingly delicious. This treasured recipe is one that will be repeated around here.

Had I never moved to Rhode Island for a few years and had I never became friends with Sheila, I would have never been able to make Kathleen Arkins from County Clare Irish Brown Bread. Seems things always happen for a reason.

Recipe
Irish Brown Bread aka Kathleen's Irish Brown Bread
Makes one loaf

Ingredients
3 cups (390g) all-purpose flour (recommend Gold Medal)
2 cups (120g) wheat bran (recommend Bob's Red Mill)
2 teaspoons baking soda
1 teaspoon Kosher salt
2 cups well-shaken buttermilk

Serving options: Room temperature Irish butter, your favorite preserves or jam, scrambled eggs/smoked salmon, slice of fresh mozzarella sprinkled with flaky sea salt

Directions
1. Preheat oven to 450 degrees (F).  Line a cast iron baking pan with parchment paper.
2. In a large bowl combine the dry ingredients. 
3. Make a well in the center and pour in the buttermilk.
4. Using your hands or a dough whisk bring the dough together. Once the dough begins to form, use your hands to shape it into a round or an oval loaf. Be careful to not overwork the dough.
5. Press down so the height of dough is somewhere between 2" and 3".
6. Cut a deep cross over the top of the dough. Make a deep slit into each quarter.
7. Place dough on parchment paper.
8. Place pan in oven and bake for 35-40 minutes or until loaf sounds hollow when tapped on the bottom (my baking time was 35 minutes).
9. Remove the bread from the oven and transfer to a cooling rack.
10. Let bread rest for at least 10-15 minutes before slicing.
11. Keep any leftover bread at room temperature. Wrap in plastic wrap or keep in a sealed container.

Notes: (1) If you would like your Irish Brown Bread to have a tad amount of sweetness to it, consider adding 2-3 Tablespoons of granulated sugar, 2 Tablespoons of light brown sugar, or 2 Tablespoons of molasses.

Wednesday, March 13, 2019

Alfajores (Dulce De Leche filled sandwich cookies)


Other than feeling like it was the middle of the night as I left the house to get to a 6 AM yoga sculpt class this week, the spring forward time change hasn't left me feeling physically or emotionally out of sorts. Instead I have felt slightly more energized this week. Whether I will experience a delayed reaction to the time change adjustment remains to be seen. Considering my ambitious baking schedule this week, I am keeping my fingers crossed I won't be hitting the proverbial 'wall' by the end of the week. In addition to all of the cookie baking planned, a couple of loaves of my favorite Irish Soda Bread need to be baked up. Because St. Patrick's Day wouldn't be same without it! 


I may have discovered yet another new favorite cookie. Alfajores (pronounced AL-fa-HO-res) are wondrous bites of irresistible deliciousness. These elegant, melt in your mouth cookies are made with two buttery shortbread-like cookies sandwiched around a luscious mound of dulce de leche. If you have never had them before, they may be one of the best cookies you had never heard of before. For those of you who have been indulging in alfajores for years, consider yourself lucky! Popular in Spain, Argentina, and throughout Latin American, alfajores are claimed to have Middle Eastern origins. It's claimed the Moors are responsible for bringing alfajores to Spain when they invaded the country centuries ago. These heavenly cookies ultimately made their way to South American by Spanish immigrants. As with most cookie recipes spanning centuries and cultures, there are a number of the variations to them. Some alfajores are filled with jam, some rolled in coconut, some dusted with sifted confectionary sugar, and some dipped either dark or white chocolate. However, by far the most popular filling is a thick, rich, ambrosial dulce de leche. It's no wonder why afajores are considered to be an irresistible confection.


In addition to the variations of fillings, there are a number of recipes for the cookies themselves. In addition to flour, salt, granulated sugar, butter, and egg yolks, cornstarch, baking powder, and baking soda are the most common ingredients. However, my version of alfajores uses confectionary sugar instead of granulated sugar and completely omits using cornstarch, baking powder, and baking soda. The result is a crispy, tender, buttery, melt-in-your-mouth shortbread-like cookie.

The dough for the cookies comes together easily using a standing mixer fitted with a paddle attachment. While the texture of dough appears as if it could be rolled out immediately, allow the dough to rest in the refrigerator for 30 to 60 minutes. Then on a lightly floured surface, roll out the dough to a thickness ranging from 1/6" to 1/4". Note: If you roll the dough out to 1/4", your yield of cookies will be reduced and your baking time might increase ever so slightly.

After cutting the dough in either round or fluted rounds (recommend using a 2" cookie or biscuit cutter), the cookies are baked on parchment paper lined baking sheets in a preheated 350 degree (F) oven for 12-13 minutes or until the bottoms are lightly golden. The cookies will (and should) hold their shape during the baking process allowing you to bake approximately 20 cookies at a time (leaving about an inch between them).


As soon as the cookies cool completely, you are ready to top them with the dulce de leche. If at all possible, use a pastry bag fitted with a medium-sized round pastry tip instead of spoon (or small knife) when placing dollops of the dulce de leche on the bottom (lightly browned side) of one of the cookies. Top with another cookie and very gently press the cookie sandwich together. 


How much dulce de leche you fill the cookies with is simply a matter of taste preference. You might choose to have a thicker layer of dulce de leche than what you see here.

Serve a platter of the alfajores with some freshly brewed hot coffee or a tall glass of iced coffee any time of the day. They are bound to quickly disappear. And, if by chance the time change has left you a little sluggish this week, these cookies might be what re-energizes you.

Recipe
Alfajores (Dulce De Leche filled sandwich cookies)
Makes approximately 32-34 (2" sized) cookie sandwiches
Recipe updated: February 2020

Ingredients
1 cup plus 2 Tablespoons (255g) unsalted butter, room temperature
1 1/4 cups (156 g) confectionary sugar
1 large egg yolk, room temperature
2 teaspoons good quality vanilla
1 teaspoon kosher salt
2 3/4 cups (358 g) unbleached all-purpose flour
13.4 ounce can of Dulce de Leche (or a similar sized jar of Salted Maple Caramel, see note below)
Optional: Additional confectionary sugar for sifting over the finished cookies

Directions
1. In the bowl of a standing mixer fitted with a paddle attachment, beat butter for 10-15 seconds. Scrape sides of the bowl.
2. Add in confectionary sugar and beat until light and fluffy (approximately 2 minutes).
3. Mix in egg yolk and vanilla. Beat only until incorporated.
4. Add in flour and salt. Mix until dough comes together and begins to form a ball.
5. Scrape dough onto a large sheet of plastic wrap. Flatten and shape into a 6" x 8" rectangle. Wrap tightly and refrigerate for 30 minutes to 1 hour. Updated note: If the dough is easy to work with right away, skip the chilling process and roll out. The dough can sometimes have a crumbly texture. Knead a large ball of dough until smooth (about 1 minute) before rolling out.
6. Preheat oven to 350 degree (F). Line two baking sheets with parchment paper and set aside.
7. Remove the dough from the refrigerator. Cut in half. Return one half back to the refrigerator.
8. Lightly flour a surface. Roll out the piece of dough to a thickness of approximately 1/6". Note: You could also roll the dough out to a thickness of 1/4".
9. Using a 2" round cookie cutter, cut out circles and place cookie rounds on a prepared baking sheet. Form scrapes of dough back into a ball to roll out to continue cutting out circles. If your dough is soft, chill your cookies in the refrigerator while you are rolling out the other half of the dough. 
10. Rotating the pan midway through the baking process, bake the cookies for 12-13 minutes or until they are very lightly browned on the edges. Immediately transfer cookies to a cooling rack. Bake second tray of cookies, again transferring the baked cookies to a cooling rack. Allow the cookies to cool completely.
11. Spoon Dulce de Leche (or Salted Maple Caramel) in a pastry bag fitted with a medium sized, round, plain tip. 
12. On the bottom or baked side of the cookie, pipe about a half-dollar sized amount of filling, leaving a slight border along the edge. Top cookie (top side up) to create a sandwich cookie. Lightly press and twist the cookies together.
13. Serve immediately or store in a tightly sealed container for 3-5 days. Note: Store cookies laying flat. Do not store cookies standing up.

Notes: (1) I used American Spoon's Salted Maple Caramel (9.5 ounce jar) the first time I made these cookies. However, I prefer using Dulce de Leche. You should be able to find Dulce de Leche in some grocery stores, in most Spanish grocery stores, or online. Dulce de Leche has a much thicker consistency than the caramel I used. (2) When placing cookies on the baking sheet, leave only one inch of space between them as they hold their shape and do not spread. (3) The more traditional Alfajores are finished with a dusting of confectionary sugar. (4) As an optional finish, lightly dust each cookie with some sifted confectionary sugar.

Monday, March 30, 2020

Oven Roasted Tuscan Frites


"In a dark time, the eye begins to see." (Theodore Roethke) As each day goes by, my perspective on what really matters to me is slowly beginning to shift. Kindness is one of those things that has always mattered to me. The genuine, unselfish kind. Doing something for someone else just because it makes you feel good or brings your heart pure joy. Small or large, the size of the kindness doesn't matter. Knowing you may have brought a smile to a friend's or stranger's face does. Lately, everyday around here my heart feels an even greater need to do some random act of kindness. Having moments of experiencing pure joy help to make it a little easier to cope with all of the uncertainty before us. Although I will admit there have been days when I have felt so overwhelmed with the gravity of this new normal, the thought of doing even the smallest of kindnesses seems to be mentally and physically challenging. On those days it makes my heart happy just to hear of others showing genuine kindness. Like the guy who offered to pay for the gas of my nephew's girlfriend just because he wanted to thank her for being a health care worker (she happened to be wearing her hospital clothing at the gas station). Or like the woman who brought her friend all of the ingredients to make Irish Soda Bread so she could continue her tradition of making it for St. Patrick's Day. Just hearing those stories of random acts of kindness not only reaffirmed my hope for humanity, they almost made me weep. In all of this reflection, I realized my concept of kindness has shifted even further. For example, when a kindness comes with strings attached, with an agenda, or the expectation of a favor in return, well, let's just say (or maybe we agree to disagree) in this 'new normal' world, those aren't kindnesses at all. They are something completely different. Not a bad different, just different, but not to be confused with kindness or a generous heart. I can't really explain why all of this matters to me, but staying mindful of all of this just feels really important to me, especially now. However, what really matters even more to me is the need for us to keep looking for, finding, doing, and acknowledging kindnesses so we can create an even better culture, better world. One overflowing with genuine kindnesses.


And how about living in a world where french fries are not only addictively scrumptious, but healthy too? Are you thinking that healthy and french fries don't belong in the same sentence? You might be right. But what if you put oven roasted fries or frites and healthy together in the same sentence? Maybe we could all agree these words really can belong together!


What if I told you these Oven Roasted Tuscan Frites have so much flavor, you may never want to eat another 'fried' french fry again? Well I am going to tell you they do! Between the olive oil, herbs, garlic, and a little bit of Parmigiano-Reggiano cheese, they are mouthwatering, deeply flavorful delicious. 


All you need to make these Oven Roasted Tuscan Frites are some Idaho russet potatoes, olive oil, fresh rosemary, fresh sage, garlic, paprika, a small amount of butter, some Parmigiano-Reggiano cheese, kosher salt, and flaky sea salt. And to serve them all you need is some ketchup, garlic aoili, and/or mayonnaise. 

The keys to making crispy oven roasted frites are (1) cutting the potatoes into 1/4" matchsticks and (2) roasting them at a high (425 degrees F) temperature. 

Tossing the potatoes in olive oil adds flavors, gives color, and prevents sticking. Once tossed in olive oil, the potatoes are then tossed with the paprika and kosher salt. The fresh rosemary, fresh sage, and smashed garlic cloves get tossed in just before the pan goes into the preheated 425 degree (F) oven. After roasting the potatoes for 15-20 minutes, the potatoes are flipped and roasted for another 20 minutes. But they aren't done yet.


The roasted potatoes are tossed with softened room temperature butter along with some finely grated Parmigiano-Reggiano cheese and returned back to the oven for only 5 more minutes. Sprinkle with some flaky sea salt and get ready to be dipping your Oven Roasted Tuscan Frites into your favorite condiment! Or just eat them plain!

These frites are herby, salty, crispy, and tender! Everything a frite is supposed to be! 


This is a two condiment household. After discovering how delicious a warm frite dipped in a garlic aioli was, I permanently and without regret gave up dipping them in ketchup. However, someone else here is a ketchup monster and would think it sacrilegious if frites (or fries) weren't served with it.


I could literally gush over these Oven Roasted Tuscan Frites endlessly. But I will try to show some restraint and not describe them with every possible adjective. You are just going to have to make them! Serve them on a brown paper bag or parchment paper lined platter (or room temperature baking sheet) and watch them be disappear! Serving these Oven Roasted Tuscan Frites to your family (and someday your friends when we are no longer social distancing) will bring them a whole new level of pure, simple joy!

Recipe
Oven Roasted Tuscan Frites (inspired by the Oven Roasted Tuscan Fries recipe from Half Baked Harvest)
Serves 2-4

Ingredients
2 large Idaho russet potatoes, unpeeled, cut into 1/4" thick matchsticks
3-4 Tablespoons olive oil
3-4 sprigs of fresh rosemary
12-14 fresh sage leaves
5-6 garlic cloves, peeled and smashed
1/2 teaspoon Hungarian Paprika
Kosher salt
2 Tablespoons unsalted butter, very room temperature
3 generous Tablespoons grated Parmigiano-Reggiano cheese
Flaky sea salt
Ketchup and/or Garlic Aoili for dipping

Directions
1. Preheat oven to 425 degrees (F).
2. Place the potatoes on a large rimmed baking sheet. First toss with the olive oil, paprika, and generous pinch of kosher salt. Then toss with the rosemary, sage leaves and smashed garlic cloves. Spread the potatoes evenly on the pan, being careful to not overcrowd them.
3. Place the baking sheet in the oven and bake for 15-20 minutes.
4. Flip the potatoes and bake for another 20 minutes.
5. Toss the potatoes with the butter and grated Parmigiano-Reggiano cheese. Return to the oven and bake for additional 5 minutes. Potatoes should be golden, tender, and crispy.
6. Remove from the oven and sprinkle with flaky sea salt.
7. Serve immediately with ketchup, garlic aioli or mayonnaise, and some additional flaky sea salt.

Notes: (1) You can easily double this recipe. If you do, use two baking rimmed baking pans. (2) I like serving the Oven Roasted Tuscan Frites on a large piece of crumbled parchment paper. You could also serve them on a brown paper bag! (3) I removed the skins from the smashed garlic cloves, but you could leave them on.