Wednesday, June 21, 2023

Classic BLT

Summer has officially arrived! Which means the return of Farmer's Markets, summer fruits and vegetables, lemonade stands, outdoor gatherings, and cravings for BLTs. Anyone who has made BLTs for years might be wondering why in the world does there need to a recipe something that is nothing more than an elevated tomato sandwich? The simple answer is that not all BLTs are created equal. If you are looking to make a truly great classic BLT, keep reading. Believe it or not there are rules to creating a sandwich worth drooling over. I use the word 'rules' loosely because I know that doesn't always sit well with everyone. I could have used 'strong suggestions' instead, but those words sound as if there are options to making a truly, great, epic, classic BLT. 

For me, the BLT might be the ultimate, seasonal sandwich. And lucky for all of us the summer tomato season is just getting started. Sweet, vine-ripened, meaty, juicy tomatoes sold at Farmer's Markets or harvested off of backyard homegrown tomato plants are key in the BLT worth writing home for. Seasoning thickly sliced tomatoes with Kosher salt and black pepper as well as quickly marinating them an olive oil-vinegar mixture will make the tomatoes even sweeter, juicer, and delicious. Let's call this rule one.

Rule two: Use a high quality, pre-sliced thick, slightly more dense bread. Look for loaves of country white, hearty white or brioche bread found in the bread aisle of your grocery store (see notes). Lightly toasting the bread will give it the strength it needs to keep this hearty sandwich from falling apart. 


Rule three: When it comes to choosing the bacon, look for a good quality thickly sliced bacon. Even though the tomatoes are the star of the BLT, the bacon is an important supporting player. Cook your bacon on the grill (my preferred way), in the oven, or in a skillet until it's closer to the crisp end of the spectrum. Your bacon will crisp up as it cools, so be careful not to either overcook or undercook it. A great BLT sandwich needs really only needs three to four slices of cooked bacon. Any less or any more and you completely change the sandwich. I am partial to four slices of bacon on my BLT. 

Rule four: The classic BLT calls for a crisp lettuce. Iceberg lettuce is the perfect compliment to the juicy tomatoes and crisp bacon. Cut into either strips or shredded, iceberg lettuce will give the sandwich the perfect amount of crunch, structure, and sweetness. Save the arugula, spring mix, baby lettuce, romaine, and/or spinach for your salads. The BLT needs the crispy, iceberg lettuce. 

Rule five: The BLT calls for a real mayonnaise. Hellman's (Best Foods) and Duke's should be the only mayonnaises slathered on both sides of the toasted bread. This isn't a suggestion. Consider this a hard and fast rule. 

Last, but not least, let's talk about layering the ingredients. Believe it or not, layering matters. To keep the juicy tomato from soaking into the toasted bread, it needs buffers. The bacon and lettuce are great buffers as they help to keep the BLT from falling apart as well as from the juices of the tomato from soaking into the bread. If you want to create an even more structurally sound BLT, create a sandwich with four layers: iceberg lettuce, tomatoes, bacon and iceberg lettuce. This will put the tomatoes and bacon in the center of the sandwich.  

I won't even risk telling you the best way to cut your BLT. I have probably pushed a few of your BLT making buttons already. So cut your BLT in half or cut it on the diagonal. Team rectangle and team triangle can both be winning teams. However you cut your BLT will be the way you believe it not only tastes better, but is the easiest way to eat! 

I hope your summer is filled with these Classic BLTs! Don't forget the chips and lemonade!

Recipe
Classic BLT
Serves 3-4

Ingredients
12 ounces thick cut bacon, cooked slightly crispy, and drained on a paper towel
3 large ripe tomatoes, preferably homegrown or found at a Farmer's Market, cut into thick slices (suggest cutting the tomatoes somewhere between 1/3" and 1/4" thick)
Small head of iceberg lettuce, cut into wide strips or shredded (I prefer the wide strips)
6 slices of a thick sliced, hearty lightly toasted bread, such as Pepperidge Farm Farmhouse Brioche Bread or Hearty White
1 1/2 Tablespoons of olive oil
2 teaspoons red wine vinegar
Mayonnaise (i.e., Hellmans's (Best Foods) or Duke's
Kosher salt and pepper

Directions
1. Whisk together the olive oil and red wine vinegar. Pour over the sliced tomatoes. Season with Kosher salt and pepper. Let marinate while you cook the bacon and toast the bread.
2. Generously lather mayonnaise on both sides of the toasted bread.
3. On one piece of the toast begin by layering the iceberg lettuce. Place the 3-4 slices of the marinated tomatoes on top of the lettuce. Top the tomatoes with 3-4 slices of bacon. Top with the other piece of toast. Cut in half. (See Notes).
4. Put each BLT half between a layer of sandwich paper, place on a platter and serve immediately. Serve with your favorite potato chips and a pitcher of ice cold lemonade.

Notes: (1) My favorite breads for a great BLT are Pepperidge Farm's Farmhouse Brioche Bread or Hearty White. (2) I made a three layered BLT (lettuce, tomatoes, and bacon), but a four layer BLT (lettuce, tomato, bacon, and lettuce) is a really great option! (3) Depending on you are serving the BLTs, I like to cut them in half (team rectangle), then place each half in a piece of sandwich paper before arranging on a platter. 


Farmer's Market Tomatoes (June 2023)

Friday, June 16, 2023

Ted Lasso Shortbread


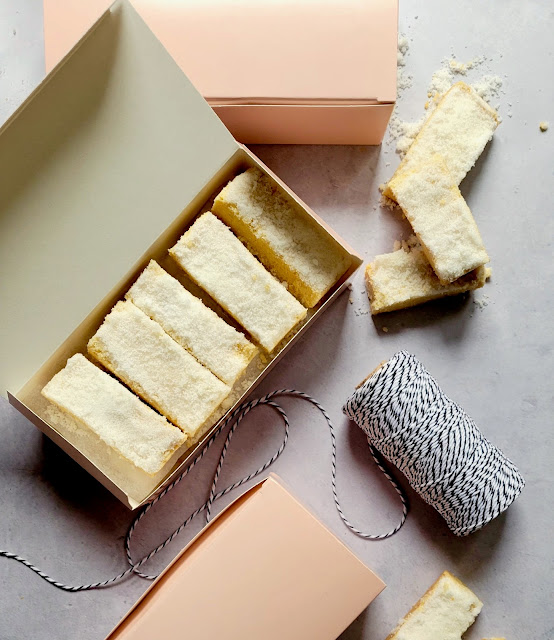
"Believe." If you are a fan of Ted Lasso you know that single word may be the most iconic quote in the entire series. A seemingly simple word. Yet, it's one having the power of making a profound impact in our lives. And speaking of having a profound impact. Would you believe a box of homemade shortbread (aka biscuits) in a pale pink box could have one? It's a seemingly simple gift.  Yet, in Ted Lasso it symbolized the power of kindness and connection. 


So it's not surprising that a plethora of recipes for Ted Lasso Shortbread, all claiming to be the 'official' one, have been popping up on food blog feeds over the past couple of years. While I can make no so such claims and I may be late to the Ted Lasso Shortbread game, I believe this version of the shortbread is THE ONE you need in your life. 

One of the key ingredients in a great shortbread is the butter. The flavor imparted by unsalted European style butter exceeds the flavor of any other kind of unsalted butter. Especially when a confection is made with only a handful of ingredients. Surprisingly there isn't a significant amount of granulated sugar in the shortbread dough. So don't skimp on the sugar sprinkled on top of the dough both before and after it's baked. What differentiates this shortbread from all of the others is the use of both all-purpose and semolina flours. Semolina flour gives the shortbread a slightly sweet, richer flavor, a finer, more cake-like crumb, and a slightly yellow color. Along with some Kosher salt, these five simple ingredients come together to create the most epic shortbread.


Unlike my Irish Shortbread recipe, this dough comes together in a standing mixer fitted with a paddle attachment. After beating the butter until it's light and fluffy, the sugar is mixed in until fully incorporated. The sifted all-purpose flour, semolina flour, and Kosher salt mixture is added in three additions. When the dough forms small clumps, it's ready to be transferred to the baking pan. To evenly flatten the dough, use a sturdy flat bottomed glass or the flat side of a meat tenderizer. Sprinkle the top of the dough with a third cup of granulated sugar and chill in the refrigerator for thirty minutes before baking.


To achieve the most optimal results, use a metal baking pan (9" x 12"), line the pan with parchment paper, chill the dough slightly before baking in a preheated 300 degree (F) oven, and cut the shortbread in the pan before it has cooled completely. 


You can certainly cut the shortbread freehand, but using a ruler and strips of one inch wide paper will help give you the most beautiful 3" x 1" shortbread fingers. It will take a bit of patience to cut the shortbread in the pan, but trust me, the effort is worth it. Ten of those shortbread fingers fit perfectly in these pale pink boxes

Granulated sugar gets sprinkled on the shortbread dough before it bakes and again after it's been cut. The sugary top and dense, buttery, rich shortbread make for the most scrumptious, craveworthy bites. You are going to be obsessed with my version of Ted Lasso shortbread! Believe!

Recipe
Ted Lasso Shortbread
Makes 33 pieces of shortbread (1" x 3")

Ingredients
18 ounces (506g) unbleached all-purpose flour
6 ounces (170g) semolina flour
6 ounces (170g) granulated sugar
15 ounces (424g) unsalted European style butter, room temperature (see notes)
1/4 teaspoon Kosher salt

2/3 cup (133g) granulated sugar divided

Directions
1. Line a 9" x 12" metal baking pan with parchment paper. Set aside.
2. In the bowl of a medium sized standing mixer, beat the butter until smooth and creamy (approximately 3-4 minutes).
3. Add in the sugar and beat until blended in.
4. Sift together the all-purpose flour, semolina flour, and Kosher salt. Add to the butter/sugar mixture in three additions. Beat just until small clumps of dough begin to form.
5. Transfer the dough to the baking pan. Flatten the dough using the bottom of heavy, flat bottomed glass. Evenly spread 1/3 cup of granulated sugar over the top of the flattened dough.
6. Place the pan of dough in the refrigerate for 30 minutes.
7. Preheat oven to 300 degrees (F). 
8. Set baking pan on a large cookie sheet before placing on the middle rack in the oven. Bake for 55-65 minutes or until the shortbread looks lightly golden brown along the edges. 
9. Remove from the oven and place the pan on a cooling rack. Let rest for 8-10 minutes before cutting into even 1" x 3" pieces while the baked shortbread is still warm. See Notes.
10. Lightly sprinkle the remaining 1/3 cup of granulated sugar over the top.
11. Carefully remove from the pan and pack into pale pink boxes. The shortbread will be good for up to two weeks, if it lasts that long.

Notes: (1) The amount of unsalted butter used equates to 3 sticks plus 6 Tablespoons. (2) In addition to Kerrygold, there are a variety of European style unsalted butters available in the grocery stores now. Look for ones with a milk butter fat of 82%. (3) To get the most evenly cut pieces of shortbread, I use both a ruler and strips of paper cut into 1" widths cut to the length and width of the pan. Gently lay the strip of paper on top of the shortbread. Using a sharp knife, cut along the edge of the paper. Repeat until the entire pan is cut into 33 pieces. 

Wednesday, June 7, 2023

Marbled Chocolate Chip Cookies - Jacques Torres Style


There might come a day when I will decide I don't need another new cookie recipe in my life. Because seriously, how many cookie recipes does one really need to have? However, fortunately (for both of us) today is not that day! While I can sometimes be over the top effusive in my proclamations about the deliciousness of some of the cookie recipes here on the blog, this just might THE cookie where I should show absolutely no restraint. None. In all honesty, I could devote the entire blog post to listing all of the adjectives and descriptors this Marbled Chocolate Chip Cookie (Jacques Torres Style) deserve. In the absence of the ability to inhale of the aroma of these cookies while they are baking in the oven or being able to taste them, other than setting up a cookie stand at the end of my driveway, how else would I be able to entice you to drop everything and make this cookie? 


Rather than list out every worthy available adjective to describe them, let me try to show some restraint and pick only the top ten. So here goes. These viral worthy cookies are heavenly, luscious, mouthwatering, stellar, substantial, delectable, scrumptious, ambrosial, divine, and eye-candy gorgeous. Enticed yet?


I have often been intrigued by 'marble' cookies. Not only for how beautiful they look, but by wanting the joy experience of eating a "two for one" cookie. Ever since posting the recipe for my favorite Chocolate Chip Cookies - Jacques Torres Style last year, I have thought about taking them up another notch by turning them into a marbled cookie. After taking a deep dive into the marble cookie world and dwelling on it for months, I finally figured it out.


Think of these irresistible Marbled Chocolate Chip Cookies - Jacques Torres Style as part chocolate chip cookie and part rich chocolate (chip) cookie. It's a cookie that doesn't make you choose between the two!


If there was ever time when using a scale comes in handy, this would be the time. In addition to the benefits of measuring out the ingredients themselves, weighing the dough before dividing it in half will yield the best results. To make the balls of dough, I used two ice cream (cookie) scoops. One measuring about 3/4" and one measuring about 2 1/4". Once I created an even number of balls of each dough using the smaller scoop, I first picked up four balls (two of each kind and alternating between light and dark) and tightly laid them out in a row.  I then very gently rolled them just until I got a ball shape. Next I broke the ball in half, turned the halves against each other, and placed the dough and pressed it into the larger cookie scoop. This created the perfect round ball of dough. Like the Chocolate Chip Cookies - Jacques Torres Style, you should end up with about 18 or 19 balls of dough.


Once you have your cookie dough balls, place them on a cookie sheet, wrap well with plastic wrap and refrigerate for 36-72 hours before baking them. The cookies here were baked after a 48 hours chill time. 


If there was ever time I wished I had a million followers on Instagram (okay, may just a few thousand), this would be the time as these Marbled Chocolate Chip Cookies - Jacques Torres Style would be the one going viral! Maybe even the cookie getting the attention of Ina Garten, Taylor Swift, and/or Katie Couric. But if never gets their attention, I hope this cookie gets yours!

Recipe
Marbled Chocolate Chip Cookies - Jacques Torres Style
Makes 18 - 4" bakery style sized cookies

Ingredients
1 1/4 cups (283g) European or European style unsalted butter, room temperature
1 cup plus 2 Tablespoons (226g) granulated sugar
1 cup (200g) light brown sugar
1/4 cup (50g) dark brown sugar
1 Tablespoon vanilla
2 large eggs, room temperature
2 cups less 2 Tablespoons (214g) cake flour
1 2/3 cups (226g) bread flour
1 1/2 teaspoons Kosher salt
1 1/2 teaspoons baking powder
1 1/4 teaspoons baking soda
1 1/4 pounds (500g) dark, bittersweet or semisweet chopped
6 Tablespoons Dutch Process Cocoa or Double Dark Dutch Process Cocoa
Flaky sea salt (e.g., Maldon Sea Salt)

Directions
1. In a large mixing bowl, whisk together the cake flour, bread flour, Kosher salt, baking powder, and baking soda. Set aside.
2. In the bowl of a large standing mixer fitted with a paddle attachment, beat the room temperature unsalted butter for about 2 minutes.
3. Add in the granulated sugar, light brown sugar, and dark brown sugar. Beat until light and fluffy (approximately 4-5 minutes).
4. Mix in the vanilla.
5. Beat in the eggs one at a time, beating well after each addition.
6. Reduce the mixer speed to low and mix in the flour mixture in three additions. When all of the flour has been added in and it is no longer visible.
7. Divide the dough in half. Recommend using a scale to measure. Place one half in a large bowl and the other half back into the mixer. Note: The total weight of my batter was 1,274 grams. When divided in half they weighed 637g each. 
8. Add the Dutch processed cocoa to the batter in the mixer. Mix just until blended. 
9. Divide the chopped chocolate in half. Mix in half to the 'plain' dough in the bowl and the other half to the cocoa infused dough.
10. Using a small (3/4" sized ice cream scoop), form balls from both batters. Each ball should weigh around 18-19 grams. 
11. Create a 'string' by alternating between two plain and two cocoa doughs. Roll the 'string' into a large ball. Break the ball in half, flip, and press into a large (2 1/4") ice cream scoop or a 1/4 cup measuring cup. Rolled cookies should be about 2 1/4" in diameter. Yield should be about 18 balls of dough. Important note: If you over roll your balls of dough, you will lose the ribbons of each of the doughs!
12. Place balls of dough onto a baking sheet. Wrap well with plastic wrap and refrigerate for 36-72 hours. Recommend chilling for at least 48 hours.
13. Preheat oven to 350 degrees (F). Line two baking sheets with parchment paper. Note: Bake only one pan of cookies at a time.
14. Place six balls of the dough (spaced at least 3 inches apart) on a baking sheet. Sprinkle each cookie with flaky sea salt.
15. Bake the cookies on the center rack of the oven for 17-20 minutes (rotating the pan midway through the baking process) or until golden on top and along edges but still a bit soft in the center. Remove the pan from the oven. Use a small bowl or extra-large round cookie cutter to swirl the cookie to create a perfectly round cookie. Let cookies remain on the baking sheet for up to 10 minutes before transferring to a cooling rack.
16. Savor these beautiful bakery style looking marbled chocolate chip cookies immediately (you have waited long enough!) or store them in a tightly sealed container once they have come to room temperature. Note: I like to put them in glassine bags to keep them fresh. I buy these from Amazon.

Notes: (1) For calculating weight measurements, I use the following base formulas: 200g = 1 cup brown sugar, 200 g = 1 cup granulated sugar, 115 g = 1 cup cake flour, 136g = 1 cup bread flour, 226g = 1 cup unsalted butter, 371g = 1 pound chocolate (2) I chopped up the 17.6 ounce bar of the Trader Joe's Dark Chocolate for these cookies. (3) I used either the King Arthur Double Dark Dutch Process Cocoa or Droste Dutch Chocolate. (4) I don't always bake up the entire batch. After the cookies have chilled for at least 48 hours, I put into a freezer zip lock bag and store in the refrigerator for up to 4 weeks.

Tuesday, May 30, 2023

Baked Tortellini and Sausage Casserole


We all need to have easy to make, hearty, mouthwatering delicious, one dish wonders in our repertoire. Especially the kind worth turning the oven on for even when the warm weather returns. There may be no better crowd pleasing dishes than ones made with pasta. And this Baked Tortellini and Sausage Casserole will have everyone hoping there is enough left for seconds. 


Whether you are looking for a great weeknight meal, an impressive weekend entertaining dish, or the perfect Sunday supper, this Baked Tortellini and Sausage Casserole is one of those worth their weight in gold recipes you can make for any of them!


I am having one of those cooking moments where simple, semi-homemade(ish) dishes are the only things I want to make. No, I am not giving up my favorite, multi-step, semi-labor intensive recipes. I have just decided to give myself permission to see the beauty in simplicity. Yes, I have taken the proverbial fork in the road. Because if I have learned anything over the (many) years, it's this. With great ingredients, flavor is never sacrificed in simple recipes. 

And great ingredients doesn't always mean made from scratch. It means using fresh herbs over dried herbs; whole milk fresh mozzarella over low-moisture mozzarella; and freshly grated Parmigiano-Reggiano over packaged generic grated parmesan cheese. And believe it or not, there are even some great jarred marinara and pesto sauces out there (see notes). But if nothing compares to your made from scratch, homemade marinara sauce or pesto, then by all means make this Baked Tortellini and Sausage Casserole using them. When looking for the pasta, look for smaller sized cheese tortellini, not the large sized cheese tortelloni. 

When buying Italian sausage I tend to by the 'mild' sausage in the casings (versus in bulk). I shy away from the spicier Italian sausage mostly because I don't want some dishes overpowered by it's 'heat'. After removing the sausage casings, I break off bite sized pieces before browning them in a large skillet. Even though the casserole bakes in the oven, you want to make certain you cook the sausage pieces through. You don't want to them to have pink centers. 


You can mix everything together in a large bowl or in the casserole dish. Just mix in the shredded mozzarella cheese in last and remember to reserve 1/4 of the sauce. 

Once the mixture is transferred to the baking dish, it's topped with the reserved sauce and the bocconcini (cut in half). Instead of the bocconcini you can top it with freshly grated fresh mozzarella. The choice is yours.


One of the best things about this Baked Tortellini and Sausage Casserole is that you can make it early in the day. Cover and refrigerate until you are ready to bake it. Total baking time ranges from 45-55 minutes. For the majority of the baking time, you will keep it covered with aluminum foil. This will help to keep everything from drying out.

A generous sprinkle of freshly minced Italian parsley and dollops of basil pesto are the finishing touches to the Baked Tortellini and Sausage Casserole after it's removed from the oven. You can top it with some freshly grated Parmigiano-Reggiano or serve it on the side in a bowl. I opted for the on the side option here. 

This is one of those saucy casseroles enticing you to clean your dish with a thick piece of Italian bread. I would be surprised if everyone also dipped their bread in the casserole dish where rivers of sauce were left behind. 

One bite of this cheesy dish might leave you temporarily speechless as it's so incredibly flavorful. Sure you might feel dangerously full after you eat it, but you will never feel more satisfied. And isn't having your family and/or friends leave your table felling happy and full what it's all about? I seriously doubt you could find anything coming close to this 'great' in a restaurant. 

Recipe
Baked Tortellini and Sausage Casserole
Serves 6-8

Ingredients
1 to 1 1/4 pounds of mild Italian sausage, broken up into small bite sized pieces
24 ounces frozen small sized cheese tortellini, cooked al dente, drained and cooled very slightly
2 - 24 ounce jars of Tomato Basil Marinara, divided (see notes)
8 ounces of fresh (whole milk) mozzarella grated
8 ounces of fresh bocconcini mozzarella, cut in half (or use 4 ounces of fresh (whole milk) shredded mozzarella
7-9 basil leaves, julienned
1/4 cup fresh Italian parsley, minced
3-4 Tablespoons basil pesto (fresh or good quality jarred)
Freshly grated Parmigiano-Reggiano for serving

Directions
1. Preheat oven to 350 degrees (F) 
2. In large skillet, cook Italian sausage until browned and no longer pink. Remove from heat and cool slightly.
3. In a large bowl, mix together the cooked tortellini, 3/4 of the marinara sauce, julienned basil, and cooked sausage. Then mix in the shredded mozzarella. Transfer mixture to a large (heatproof) baking dish or pan (recommend a 10"x13" or similar sized pan)
4. Top the casserole with the remaining 1/4 (or half of one 24 ounce jar) of the marinara sauce and the bocconcini halves or shredded mozzarella. Cover with aluminum foil (keep the foil slightly doomed). 
5. Bake the casserole for 35-40 minutes.
6. Remove the aluminum foil and bake for additional 10-15 minutes or cheese has melted.
7. Remove from the oven. Top with minced fresh parsley and evenly dollop fresh pesto over the top. 
8. Serve with grated Parmigiano-Reggiano and thick slices of Italian bread.

Notes: (1) The inspiration for this hearty, scrumptious recipe came from Instagram food blogger Diane Morrissey. (2) I used Rao's Tomato Basil Marinara. (3) I generally buy my cheese tortellini from a local Italian store. Cooking times is about 3 minutes for the smaller sized frozen tortellini. (4) You can make this casserole early in the day. Cover and store in the refrigerator. Remove from the refrigerator about 30 minutes before placing in the preheated oven. Baking time might need to increase slightly.

Wednesday, May 24, 2023

Aperol Lemon Drop


I go through these phases where giving something the designation of a signature meal, a signature dessert, and/or a signature cocktail makes for an even more fun reason to invite friends over for a gathering. While they change with the seasons, the underlying intent of having these 'signature' foods and beverages is my sincerest attempt at making everyone who walks through my front (or side) door feel special, feel loved. With all my heart I believe creating beautiful, delicious meals for others is the simplest, yet most powerful gesture of unconditional love. Food and beverages have been and will always be my love language. 

So when I discover and/or create a new dish and/or new cocktail, I get giddy with excitement over the anticipation of sharing them with my favorite people. Preferably in person, but virtually too! My level of giddiness over this refreshing Aperol Lemon Drop is almost undefinable. And as much as I love an Aperol Spritz and swoon over a Paper Plane, this Aperol Lemon Drop is going to give them both a run for their money. If I had to describe it, I would say it's part Cosmopolitan, part adult slightly tart lemonade, and part irresistible. Whether you call it an Aperol Lemon Drop or Aperol Cosmopolitan, you might easily want to immediately start calling it your summer signature cocktail.

Other than having some ice cold vodka, freshly squeezed lemon juice, and Aperol, you will need some simple syrup. Make it the night before or early in the morning so it has time to chill. Homemade simple syrup is easy to make and so much better than any store bought bottled simple syrup (see notes below for directions).

In addition to how incredibly delicious it is, the Aperol Lemon Drop is one of those cocktails you can make in a big batch. Just quadruple the ingredients, pour into a pitcher, and keep chilled in the refrigerator. When your guests arrive, you are ready to hand them a glass filled with some ice of your 'signature' cocktail within minutes of their arrival! You might only need to ask if they like their 'lemon drops' sugared or unsugared. 

Cheers to getting your summer entertaining season off to a fabulous start!

Recipe
Aperol Lemon Drop
Makes 1 refreshing cocktail

Ingredients
2 ounces ice cold vodka
1 ounce freshly squeezed lemon juice
1/2 ounce Aperol
1/2 ounce simple syrup
Slice of a lemon peel

Directions
1. In a cocktail shaker, add in the vodka, lemon juice, Aperol, simple syrup and 10-12 ice cubes. Shake vigorously for 18-20 seconds.
2. Strain and pour into a coupe or martini glass. Add in 5-6 ice cubes and a slice of lemon.
3. Sip, savor, and swoon.

Notes: (1) Make the simple syrup in advance as it needs time to cool and chill. To make simple syrup add in 1 cup of water and 1 cup of granulated sugar. Cook over medium heat until the sugar dissolves. Transfer to a heatproof jar (preferably one with a tight fitting lid). Cool to room temperature and then place in the refrigerator. The simple syrup will be good for 2-3 weeks. (2) You can rim the coupe or martini glass in sugar for those who like a sugared 'lemon drop' rim.

Friday, May 19, 2023

Steak Cobb Salad w/ Shallot Vinaigrette


The unofficial start to summer that's just around the corner means the welcome return of Farmer's Markets and summer's bounties, outdoor gatherings and grilling along with more casual meals and entertaining. For me it's a time of year where freshly made, large, beautifully assembled salads are the perfect single course meal. The kind having a variety of textures and flavors that all work to compliment one another. And where every bite sings on your palate.


As much as I love the classic versions of certain salads, I like changing things up a bit. Inspired by the classic cobb salad, the Steak Cobb Salad w/ Shallot Vinaigrette has an even greater appeal and heartiness. Besides being one of those impressive, wow-factor salads, it is simple to make. 


Maybe one of the best parts of this salad recipe is its' adaptability and flexibility. Serving only a handful of people, simply decrease the amount of ingredients. Cherry tomatoes can be swapped out for thick slices of ripe heirloom tomatoes. Grilled filets of beef can be replaced by grilled ribeye. Jammy eggs can be used instead of the more traditional 11 minute hard boiled eggs. Instead of assembling the salad on a bed of the peppery baby arugula, make it on a bed of spring greens or large leaves of baby lettuce. In other words, the recipe below is meant to inspire you.


The Shallot Vinaigrette is light, bright, and incredibly delicious. Made with only a handful of ingredients, it quite possibly might become your new favorite salad dressing! 

The assembly and presentation of this salad matters as much as the quality and freshness of the ingredients. If you do a google search on cobb salads, you will literally find hundreds of different ways  in which they are plated. While I am partial to the way this Steak Cobb Salad is assembled as it makes serving really easy (think of serving the salad from lengthwise rows), you can arrange the ingredients in ways that might appeal to you more.


I would highly recommend doubling the recipe for the vinaigrette (because it's so gosh darn good) and serving it on the side. So everyone could drizzle on as much or as little as they want. 

I could easily put this salad on weekly or bi-monthly repeat forever (as I tend to fall hard for foods I love). This Steak Cobb Salad w/ Shallot Vinaigrette definitely ranks as one of those craveworthy, crowd pleasing salads! What better way to kick start the summer season!

Recipe
Steak Cobb Salad w/ Shallot Vinaigrette
Serves 6-8

Ingredients
Salad
4-6 hard boiled eggs, cut it half (or quartered)
1 large perfectly ripe avocado, halved, cut into slices
12-16 cherry tomatoes or 2-3 sliced heirloom tomatoes
1 medium red onion, very thinly sliced
2 ears of fresh corn, grilled, then cutting off the kernals
1/2 pound wedge blue cheese, cut into slices (e.g., Maytag, Point Reyes, etc)
12-16 ounces beef tenderloin (aka filet mignon) or ribeye, grilled to medium-rare (or medium), then cut into slices
4-6 handfuls of baby arugula
Kosher Salt and Black Pepper

Vinaigrette (recommend doubling the ingredient amounts)
1/2 cup good quality extra-virgin olive oil
3 Tablespoons aged red wine vinegar
1 Tablespoon dijon mustard
1/2 teaspoon Kosher salt
1/4 teaspoon black pepper
1 medium sized shallot, very thinly sliced
Kosher salt and black pepper for seasoning

Directions
Salad
1. On a large (12"x16") platter, sprinkle on 4-6 large handfuls of baby arugula.
2. Starting at the top, arrange your cobb salad in rows in this sequence: Hard boiled eggs, sliced avocado, blue cheese slices, sliced (warm) beef tenderloin (aka filet mignon), grilled corn, tomatoes, thinly sliced red onion.
3. Lightly sprinkle with Kosher salt and black pepper.
4. Serve the Shallot Vinaigrette on the side.

Vinaigrette
1. In a small-medium bowl, whisk together the red wine vinegar, dijon mustard, Kosher salt, and black pepper.
2. Slowly drizzle in the extra-virgin olive oil and blend until the dressing is emulsified.
3. Stir in the very thinly sliced shallots.

Notes: (1) I can't make any recommended swaps for the grilled corn. Boiled corn on the cob or canned corn doesn't have the same flavor profile. (2) Because it's a steak cobb salad, I am also not offering up any other protein alternatives. Having said that, grilled salmon would pair well with the other flavors in the salad. (3) Highly recommend using a mandolin for cutting the shallots and red onion. (4) Many grocery stores have regular sales on filet mignon and ribeyes. When you see them, pick them up and freeze them. You will be happy you did.

Sunday, May 14, 2023

Cucumber Elderflower Cosmo


It's been a fun, adventurous, memorable, exhilarating couple of weeks. From first traveling to bucolic Little Compton RI, a place that always feels like home, to traveling to Colorado, a place that never fails to fill me with great joy, I ran myself ragged. So it's not surprising that I caught a cold. More like bronchitis. But hey, doesn't everyone hike in the mountains when they are sick? With only four days to take in as much of the jaw-dropping beauty of nature, nothing was about to slow me down. Fortunately for me I traveled to Colorado with a friend who put up with my compromised hearing and hacking. While many travel to new places each year, I tend to like returning to beloved, familiar places. Although unlike my previous trips back to RI and Colorado, there were new places to experience and discover this time. From walking through thousands of blooming daffodils at Parsons Reserve in Dartmouth, MA, to a day trip to Marblehead, MA, to a breathtaking five mile hike from Little Compton to Westport, MA, to new hiking trails in RMNP and Breckenridge, CO, to having incredible meals at both new and familiar places, I am hoping my state of blissful happiness lingers on for awhile longer. 


While in RI, I had dinner one night with Kathy, a good friend I met through Instagram more than a few years ago. In addition to catching up on our life stories, I learned about the new favorite cocktail she recently recreated. A Cucumber Elderflower Cosmos. From her description alone, I was sold. I immediately knew I needed to make one (or two or three) when I returned back home. It would be more than a week before I discovered how the crisp flavor of cucumber combined with the sweetness of the elderflower, the tartness of the lime and cranberry juices come together to create a really light, refreshing, thirst quenching cocktail. The kind perfect to sip and savor on a hot day.  


Up until Kathy told me about the Cucumber Elderflower Cosmo I didn't even know such thing as a cucumber vodka existed. Rather than muddling cucumber with vodka or letting cucumber infuse in vodka to create a cucumber vodka, Effen Vodka sells one. Which makes it even easier to make this impressive, seductive cocktail.

Think of the Cucumber Elderflower Cosmo as an elegant, elevated version of the classic cosmopolitan. The floral notes of the elderflower pair perfectly with the slightly herbal cucumber vodka. While the addition of the lime and cranberry juices add a hint of tartness. Those are the four ingredients used in Kathy's recipe. After enjoying my first ever Cucumber Elderflower Cosmo, I couldn't help but wonder what difference the addition of some Grand Marnier (or Triple Sec) would make. So, of course, I had to fiddle with her recipe a bit (because that's what I do).


In all honesty, I loved the Cucumber Elderflower Cosmo made both without and with the addition of the Grand Marnier. So I suggest you make both versions and decide for yourself which one is your favorite.  The only other decision you need to make is whether to serve the cosmo in a cocktail, coupe or martini glass. 

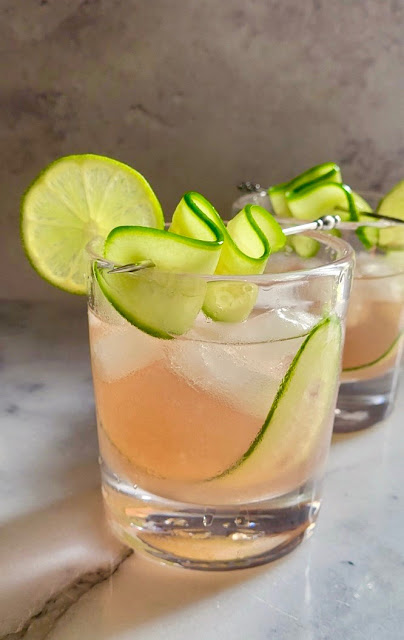
Garnishing the Cucumber Elderflower Cosmo with a thin slice of a baby cucumber definitely adds to the allure of this cocktail. In addition to giving it a high-end, cutting edge crafted cocktail look, it makes for a delicious bite. I used a mandolin to create the beautiful, thin slices, but you could easily use a knife.

Little did I know I would bring back more than photographs, memories, and (regrettably) a very bad cold from my recent adventures. Being generously gifted a recipe for a new cocktail from a friend definitely ranks as one of the best ever 'souvenirs'. However, more treasured than the refreshing (slightly lethal) Cucumber Elderflower Cosmo recipe is my friendship with Kathy. While we only have dinner together once every couple of years, it always feels as if no time had passed between visits. A simple reminder that the benefits and joys of returning to favorite, familiar places are endless.

Recipe
Cucumber Elderflower Cosmo (inspired by my friend Kathy Reis)
Makes 1 lethally refreshing cocktail

Ingredients
2 ounces chilled Cucumber Vodka
1 ounce elderflower liqueur (St. Germaine or Belvoir Fruit Farms Elderflower Cordial)
1/2 ounce freshly squeezed lime juice
A splash, 1/2 ounce or 1 ounce of 100% cranberry juice (see notes)
Optional, but really good: A generous splash or 1/2 ounce of Grand Marnier or Triple Sec
Ice Cubes
Sliced mini cucumbers for garnish
Sliced lime for garnish (optional)

Directions
1. Add the cucumber vodka, elderflower liqueur, lime juice, cranberry juice and Grand Marnier (if using) to a shaker. Add in 10-12 ice cubes. 
2. Shake vigorously for 30-35 seconds.
3. Strain into a cocktail glass filled with ice. OR strain into a coupe or martini glass.
4. Garnish with a thinly sliced miniature cucumber (using either a mandolin or sharp knife) and/or slice of lime.
5. Sip and savor.
6. And as always, drink responsibly.

Notes: (1) Effen makes a great Cucumber Vodka. For the most optimal flavor, I keep my vodka in the freezer. (2) St. Germaine is an elderflower liqueur. I made the cocktail using both St. Germain and Belvoir Fruit Farms Elderflower Cordial and liked the later one slightly more. (3) There are three options for the cranberry juice. Very light, light, and medium light. Choose the amount you like best. I liked the cocktail made with 1/2 ounce of the cranberry juice. (4) The addition of the splash of Grand Marnier (or Triple Sec) is my add to Kathy's recipe. It's optional, but a deliciously worthy addition.


Chautauqua, Boulder, Colorado (May 2023)


Rocky Mountain National Park, Estes Park, Colorado (May 2023)