Showing posts with label Main Dish. Show all posts

Monday, May 2, 2016

Spaghetti Alla Gricia


It has been thirty days since I have had a diet soda. Or rather almost a month since I removed the diet soda IV from my arm. Considering this beverage has been my primary form of morning, noon, and night liquid intake for decades, it is nothing short of a miracle I have had enough willpower to end this addiction. Weaning myself from this diet soda addiction was not an option (been there, done that). Cold turkey was the only painful choice. Needing an alternative source of hydration, I had no other choice than to turn to water. Over the course of the past several weeks my consumption of water has surpassed the amount of water passing my lips in a very, very long time. If I told you I drank more water in the last 30 days than I had since I was 18 years old you might think this a bit of an exaggeration, rather than a claim much closer to the truth. Just remember truth is almost always stranger than fiction. Had I not decided to fingers crossed finally eliminate diet soda from my life I may have never discovered the deliciousness and thirst quenching qualities of water. Who knew water could be so satisfying? Well certainly I didn't. Not surprisingly I have begun to develop an affinity for some of the European waters, although I am not ready to declare a commitment to any of the English, Swedish, French, or Italian waters I have been trying just yet. No reason to hurry or even make this decision as there is a lot of water drinking catching up to do. Besides I was a 'will drink only one kind of diet soda snob' for decades, so this time around I will forego becoming one of those 'will drink only one kind of water snobs'.


Speaking of water, we have heard over and over again never to throw away the (salted) pasta water before finishing a pasta dish. This Spaghetti Alla Gricia proved this to be true and was a perfect example of the sauciness value pasta water has to finishing off a pasta dish.


As much as I had promised myself to stop buying new cookbooks (another addiction), I was weak in the knees when I came across two new recently published Italian cookbooks: Tasting Rome: Fresh Flavors and Forgotten Recipes from an Ancient City and Florentine: The True Cuisine of Florence. In the event that I never get to either of these two cities, I can vicariously experience them both through the recipes, stories, and photographs in these two books. More than simply great inspirational cookbooks, they are gastronomic guides and visual tours of Rome and Florence.


Without going into a long story as to why I decided to first make a pasta dish from Tasting Rome, I will share my 'think I have died and gone to heaven' experience making and eating Spaghetti Alla Gricia, a dish somewhat like a carbonara. Only this one is made with guanciale instead of pancetta or bacon, Pecorino Romano instead of Parmigiano-Reggiano, and white wine instead of eggs.


So what exactly is guanciale? Whole cured pork jowl and one of the key elements of the cucina romana. The rendered fat from guanciale adds both flavor and thickness to many of the classic pasta dishes like Carbonara and this Gricia. 


I thought if water from Italy could be imported to the states, then guanciale should too. And the good news: it is! You may have to seek out a grocery store with an extensive array of Italian foods, but it can be found. Note: Substituting guanciale with unsmoked pancetta or bacon will not yield the same or texture to a pasta dish as guanciale is quite a bit fattier.


Pecorino Romano is a hard, salty sheep's milk cheese, a staple in the diet in ancient Rome. Cheese labeled as 'Romano' is not the same as Pecorino Romano (so buyer beware). Freshly grated and pre-packaged grated cheeses are two different animals, ones performing and tasting differently. For the purest flavor and the best consistency in sauces (or any dish calling for grated cheese) always, always grate your own cheese.


Spaghetti Alla Gricia is the kind of dish you don't have to wait for the weekend to make. It all comes together in well under an hour, making it perfect for a mid-week dinner or a last minute dinner party. Paired with a simple salad and wine, it is a dish destined to make you feel as if you brought Rome home.


The rendered fat from the guanciale, white wine, and some of the reserved pasta water not only helps to create the sauce but it also continues to cook the al dente spaghetti. I was a little reluctant to cook the spaghetti to very al dente (approximately 6 minutes of cooking time) as I worried I would end up with an inedible dish. Turns out I worried needlessly as the spaghetti cooks to the perfect consistency after added to and cooked over medium-high heat with the 'sauce'.

The original recipe called for the use of only 1 cup of grated pecorino romano cheese. I ended up using almost 1 1/4 cups. While I loved the lightness, taste and texture of this dish using that amount of cheese, the next time I make Spaghetti Alla Gricia I will more than likely increase it to at least 1 3/4 cups to create an even creamier coating of cheese/sauce on the spaghetti. Depending on how that works I may end landing on an amount somewhere in the middle. If it is your first time making it, begin with 1 1/4 cups, taste it and then decide if you want to add more grated cheese before plating it.


If I tell you I inhaled a bowl of this Spaghetti Alla Gricia it might give you the wrong impression of my table manners. Well I actually took three very quick bites but then decided I should slow down, sit back, and savor the absolute deliciousness of this pasta dish. If it were possible for a dish to allow you to time travel to another time and place, this Spaghetti Alla Gricia would open that portal. And maybe someday when I finally travel to Italy, I can consume as much wine, pasta, and of course, water as possible. Until such time, I can at least begin working my way through these two cookbooks.

Recipe
Spaghetti Alla Gricia (slight adaption to the Spaghetti Alla Gricia recipe in Tasting Rome: Fresh Flavors and Forgotten Recipes from an Ancient City by Katie Parla and Kristina Gill)

Ingredients
1 pound spaghetti (recommend using a premium brand Italian pasta)
1 teaspoon extra-virgin olive oil
7 ounces Guanciale, cut into 1 1/2" x 1/2" inch strips
1/2 cup white wine (recommend a Pinot Grigio)
1 3/4 cups Pecorino Romano, freshly grated (plus more for serving) Notes: (1) A 6-7 ounce block of Pecorino Romano will yield the amount of grated cheese needed and (2) Original recipe called for 1 cup of grated cheese, so depending on taste, use anywhere from 1 to 1 3/4 cups of grated cheese.
Freshly ground black pepper

Directions
1. Bring a large pot of water to a rolling boil over high heat, salting the water. Add the pasta and cook until very al dente or partially raw (approximately 6 minutes). Drain reserving the cooking water. Note: The pasta will continue to cook when it is added to the liquid in the skillet.
2. Heat the olive oil in a large skillet over low-medium heat. When oil begins to shimmer add the guanciale, stirring until golden brown (approximately 8 minutes). 
3. Add white wine and cook until the alcohol dissipates (about 1 minute).
4. Add a small ladle of the pasta cooking water and bring to a simmer. 
5. Add pasta and another small ladle of the pasta cooking water. Cook over medium-high heat, stirring vigorously, until a thick sauce forms (add more water if necessary to achieve the desired consistency).
6. Remove the skillet from the heat, and add 1 1/2 cups of the grated Pecorino Romano. Mix thorough and season to taste with salt and pepper.
7. Transfer to a large platter or plate in individual pasta bowls. Sprinkle each portion with additional  1/4 cup grated Pecorino Romano and pepper to taste. Serve immediately with additional Pecorino Romano. 

Important Notes:
1. Keep pasta water heated as warm or cooled pasta water will create clumps in the cheese instead of creating a creamy sauce.
2. Do not use already grated Pecorino Romano cheese. Buy a block of cheese and freshly grate. There is a night and day difference between the two.
3. Can add a sunny side up fried egg to each individual portion for a more traditional carbonara.
4. Only use a white wine you would be willing to serve and drink. 
5. Freshly ground pepper is the only spice you need as the rendered fat from the guanciale, the Pecorino Romano, and the salted pasta water give the dish enough of a salty finish. 

Sheep on farms in Northern Wisconsin and in Little Compton, Rhode Island.

Tuesday, March 22, 2016

Yogurt Marinated Chicken Skewers with Tzatziki


"The beautiful Spring came, and when nature resumes her loveliness, the human soul is apt to revive also." Harriet Ann Jacobs. Of the four seasons, spring had long been my least favorite. Yet over the last several years, I have developed a deeper appreciation and fondness for nature's rebirth and renewal. Beyond having color restored to the landscape, spring's return symbolically reminds us we have another chance to renew those friendships we have allowed to go dormant, to resurrect those lists of resolutions we have made over the years, and to recommit to making time for what reenergizes us physically, emotionally, and spiritually. Spring truly is the season of perennial second chances.


While going through the stacks of food magazines I have acquired over the years, I recently spent time revisiting the dog-earred pages of recipes I never got around to making. Maybe it was a brief conversation about food with someone who had recently been to the Middle East or maybe I am always drawn to recipes made with interesting spices responsible for gravitating me toward one of the famed Istanbul chef Musa Dagdeviren recipes shared in a July (2009) edition of Bon Appetit. If I ever needed a legitimate reason to rationalize my magazine saving (aka hoarding) tendencies, especially in this day and age, Musa's recipe for Yogurt-Marinated Chicken Kebobs with Aleppo Pepper would qualify. 


It has been quite awhile since any of the recipes posted to the blog were worthy of being placed on my highly selective 'last meal' list. That hiatus ends today. One bite of this Yogurt Marinated Chicken Skewers with Tzatziki had me seriously wondering if I died and gone to (wishful thinking) heaven.


Seriously, this may be the best grilled chicken dish ever! As much as I have been reluctant to serve the same dish to family and friends over and over again, this Yogurt Marinated Chicken Skewers with Tzatziki just might be the exception. The grilled spiced marinated chicken served with a cool Tzatkiki sauce (along with warm, grilled Naan) will transport your palate to a culinary world you may have never experienced. And one you probably will never want to leave.

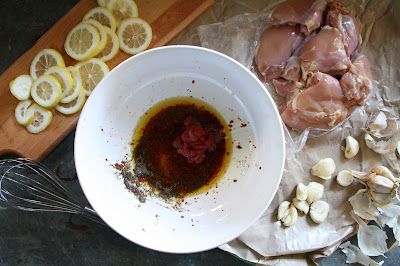
One of the many beauties of this recipe is that everything can be prepared the morning or day before you are ready to serve it. And actually, marinating the chicken longer than three hours in a mixture of (full-fat) yogurt, Aleppo pepper, garlic, lemon, salt, pepper, red wine vinegar, tomato paste and extra-virgin olive oil further deepens its flavor.

Miss Bossy Pants, my alter ego, says 'for optimal flavor and moistness use full-fat yogurt (Fage Total) in your marinade and only skinless, boneless chicken thighs'. Miss People Pleaser, another alter ego, completely agrees with Miss Bossy Pants' recommendations. There is more than enough marinade for at least 2 1/2 pounds, if not 2 3/4 pounds, of chicken instead of the original 2 1/4 pounds recommendation in Musa's original recipe as once the chicken is marinated it is discarded. Being someone who skews to 'the more garlic the better', I used 8 cloves of garlic. If you don't live at that end of the garlic continuum, use 6 (large) cloves.

While the chicken is marinating, you can make the Tzatziki. There are many versions of Tzatziki recipes out there, but not surprisingly, Ina's seems to be best.

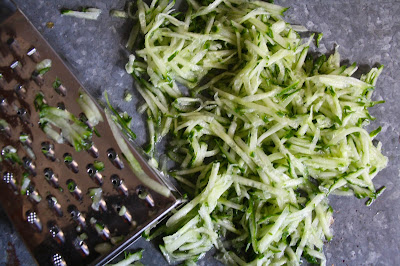
For the thickest, creamiest Tzatziki Sauce use an English (seedless) cucumber and yes, the full-fat yogurt (Fage Total). The cucumber can either be coarsely grated on a box grater or in a food processor (but why make more of a mess when you don't have to). Whichever option you choose, as much of the grated cucumber's moisture needs to be squeezed out (a paper towel or cheesecloth works) or the sauce will end up being too watery. And again, the longer it marinades the better the flavor.

Don't forget to soak the wooden skewers in water for at least 30 minutes before you skewer on pieces of chicken (I put 3 three pieces on each one) or they may catch fire on the grill.

The chicken skewers cook for 12-16 minutes on a medium-hot grill (turning frequently to ensure they cook evenly).


The flavors of the spices along with the char of the moist marinated grilled chicken thighs pair perfectly with the creamy, dilled Tzatziki Sauce. This is a chicken destined to awakened your senses in the best of ways. Served with a Curried Israeli Couscous Salad and/or roasted spiced carrots (recipe coming soon) along with plenty of grilled Naan, this Yogurt Marinated Chicken Skewers with Tzatziki is an absolutely perfect, beyond deliciousness, almost effortless, mouth-watering, last-meal worthy meal for entertaining family and friends. It doesn't get any easier or better than that. Happy Spring, happy renewal!
Recipe
Yogurt Marinated Chicken Skewers with Tzatziki (slight adaptions to the Yogurt-Marinated Chicken Kebabs with Aleppo Pepper recipe shared in Bon Appetit (July 2009) and to Ina Garten's Tzatziki recipe)

Ingredients
Chicken
1 1/2 Tablespoons Aleppo Pepper plus 1 Tablespoon warm water*
8 ounces whole-milk (full-fat) plain Greek yogurt (highly recommend Fage Total)
3 Tablespoons extra-virgin olive oil
2 Tablespoons red wine vinegar
2 Tablespoons tomato paste
2 teaspoons kosher salt
1 teaspoon black pepper
6-8 garlic cloves, peeled and smashed (I like garlic, so I went with 8 cloves)
1 lemon, thinly sliced into rounds 
2 1/4 to 2 3/4 pounds skinless, boneless chicken thighs (or a combination of chicken thighs and/or chicken breasts) cut into 1 1/4" strips (depending on how much chicken used, yield will be 10-12 skewers)

For serving: 
1 lemon cut into wedges
Naan or soft pita bread 

*Note: Instead of the Aleppo pepper you can use 2 teaspoons dried crushed red pepper plus 2 teaspoons Hungarian sweet paprika combined with 2 Tablespoons warm water.

Tzatziki
14 ounces whole-milk (full-fat) plain Greek yogurt (highly recommend Fage Total)
1 large English cucumber, unpeeled 
1/4 cup sour cream
2 Tablespoons fresh squeezed lemon juice
1 Tablespoon white balsamic vinegar or white wine vinegar
2 Tablespoons minced fresh dill
1 1/2 teaspoons minced garlic (from 3-4 garlic cloves)
2 teaspoons kosher salt
1/2 teaspoon black pepper

Directions
Chicken
1. In a large bowl, add Aleppo pepper and water. Stir and let stand until thick paste forms (approximately 5 minutes).
2. Add yogurt, olive oil, red wine vinegar, tomato paste, kosher salt, and black pepper. Stir to combine and whisk to blend.
3. Stir in garlic and lemon slices.
4. Mix in chicken. Cover and chill at least 3 hours (or up to overnight).
5. Prepare barbecue (medium-high heat).
6. Thread 3 pieces of chicken on skewers (if using wooden skewers soak in water at least 1 hour before assembly in order to prevent them from catching fire on the grill). Discard marinade.
7. Sprinkle skewers with kosher salt, pepper, and Hungarian paprika (or additional Aleppo pepper).
8. Grill chicken skewers until golden brown and cooked through, turning skewers occasionally (approximately 12-16 minutes). 
9. Transfer to a platter, surround with lemon wedges.
10. Serve with warmed naan (or pita bread) and tzatziki.

Tzatziki
1. Place yogurt, sour cream, lemon juice, vinegar, dill, garlic, salt and pepper in a medium bowl. Stir to combine.
2. On a box grater coarsely grate the cucumber. Put grated cucumber in a cheesecloth or paper towel to squeeze out as much liquid as possible. Add to yogurt mixture.
3. Cover and chill at least 2 hours (or overnight).

Spring images from Tohono Chul Park, a Botanical Garden in Tucson, Arizona.


Sunday, March 20, 2016

Baked Praline French Toast Casserole


"A mind that is stretched by a new experience can never go back to its' old dimension." Oliver Wendall Holmes, Jr. My bucket list remains in a constant state of revision with more things being added rather than being removed from it. Recently one of those significant 'must visit' places was finally checked off of my ever-changing, organic bucket list. Finally all my vicarious trips to the South Rim of the Grand Canyon came to their timely end. Needless to say they paled in comparison to staying in and witnessing the canyon's incredible beauty close-up and firsthand. With access to the rim's hiking trails just a short walk from our lodge, we spent from sun up to sun down walking the trails in the canyon. As the sun rose and set, we were mesmerized by canyon's vistas as they transformed into breathtaking works of nature's art. Neither my imagination nor the iconic images legendary photographer Ansel Adams shared with the world truly captured the majestic beauty and aura of what should be one of the seven wonders of the world.


On the drive from the Grand Canyon to the home of friends inTucson we stopped in Sedona. Although technically removed from the bucket list many years ago, the striking red stone formations and the intensely spiritual aura of Sedona puts it on my list of those 'worthy of multiple return visits' places. In other words, once is not enough. Signs of spring's return along with the panoramic views of the scenic red rocks had me wishing we had more time to spend in this magical paradise. With my head spinning and heart racing from the time spent in the Grand Canyon and Sedona, being on sensory overload never felt so good.

And after spending several days with close friends in Tucson (along with a road trip to Bisbee and Tombstone) on this relatively short-lived vacation, it was time to return to life in the midwest. Thankfully Mother Nature helped to ease this transition by gracing us with several days of spectacular cloud filled blue skies. Not that they compared to those Arizona skies, but something was better than nothing.


Not only does my bucket list contain places to go and experiences to have, there are, what else, foods to eat and dishes to make (for the first time as well as again and again). For awhile now I have been wanting the Baked Praline French Toast Casserole to make a repeat appearance at the breakfast table. The perfect opportunity (to be the perfect aunt) came when my niece stayed over for a couple of days during her spring break last week.


This is one of those casseroles you partially assemble the night before. Making it one of those perfect for entertaining kinds of dishes.


The inspiration recipe called for using a sixteen ounce loaf of french bread. However, you could also make it with challah or brioche. Having made this casserole using all of these breads before, trust me when I say you will not go wrong with whichever bread you choose.

One inch thick slices of bread are quickly dipped into an egg-milk mixture and arranged in overlapping slices in a buttered casserole dish. Any remaining liquid is poured evenly over the bread. The important take away here is that you want the bread fully coated before covering the dish and refrigerating overnight. Note: You can also first arrange the bread slices in the dish and then pour over the egg mixture, spooning it between each of the slices and ever so lightly pressing down on the bread so it briefly submerges into the liquid. Either option works.


The praline topping is assembled and put onto the casserole right before baking. However, you can make it the night before, covering the bowl with plastic and refrigerating. While this makes the final assembly much easier, remember to take the butter-brown sugar-pecan mixture out of the refrigerator at least 30 minutes before spooning over the casserole. Don't forget: Toast your pecans before chopping them.


The Baked Praline French Toast Casserole bakes in a preheated 350 degree oven for 40 minutes or until the bread has puffed and the top is a medium golden brown.

If there was ever a breakfast casserole to cause your heart to race and head to spin, this Baked Praline French Toast Casserole would be the ONE! When soaked overnight and baked the next day, the bread takes on a custard like (almost bread pudding like) texture while the crunchy praline topping sends your taste buds into a state of pure bliss. And who doesn't want to serve a wickedly delicious, indulgent, memorable, easy to make breakfast (or brunch) to their family and/or friends?

To add to the casserole's decadence, serve with pure maple syrup or honey. Once you taste this Baked Praline French Toast Casserole, you may never look at ordinary french toast the same again. Not even if its' topped with freshly whipped cream and strawberries. This casserole will forever (for the better) change your french toast taste buds. So if there was ever a breakfast/brunch dish to move to the top of your food bucket list or one to send your heart racing and head spinning, this would be the one.

Recipe
Baked Praline French Toast Casserole (slight adaption to Baked French Toast Casserole shared in Marcia Adams' Heirloom Recipes cookbook)
Serves 7 generously but up to 10 if serving in a buffet

Ingredients
Casserole
1 loaf (16 ounces) french bread, challah, or brioche (day old if possible)
8 large eggs
2 cups half and half
1 cup whole milk
2 Tablespoons granulated sugar
2 teaspoons vanilla
1/2 to 1 teaspoon cinnamon (I used 3/4 teaspoon of cinnamon)
1/4 teaspoon Kosher salt

Praline Topping
1 cup unsalted butter, room temperature
1 cup light brown sugar, firmly packed
1 1/4 cups toasted, then chopped pecan halves
2 Tablespoons light corn syrup
1 teaspoon cinnamon
Pinch of kosher salt

Optional but highly recommended: Maple syrup or honey for serving

Directions
1. Generously butter a 9"x13" (or equivalent) casserole dish. Set aside.
2. Slice bread into 1 inch thick slices. Set aside.
3. In a large bowl, combine the eggs, half-and-half, milk, sugar, vanilla, cinnamon, and kosher salt. Mix until well combined (no yellow egg streaks).
4. Dip each slice of bread into egg mixture and begin to line the prepared casserole dish in overlapping slices. Pour remaining egg mixture evenly over the bread slices. Cover dish tightly with plastic wrap and refrigerate overnight.
5. To make praline topping, mix the butter, brown sugar, chopped pecans, corn syrup and cinnamon in a medium bowl until well blended. Note: If making night before baking the casserole, cover and refrigerate overnight.
6. Preheat oven to 350 degrees (F).
7. Place casserole on large baking sheet.
8. Spread or drop spoonfuls of the praline topping evenly over the bread.
9. Bake for 40 minutes or until the casserole is puffed and medium golden brown. Remove from the oven and serve with maple syrup or honey.
Note: Serves 7 generously and 10 adequately.

Sunrise in the South Rim of the Grand Canyon at Maricopa Point.


 Nearing sunset at Yavapai Point on the South Rim of the Grand Canyon.


Desert View Watchtower, designed by American architect Mary Colter (1932), on the south rim of the Grand Canyon.

Tuesday, January 26, 2016

Homemade Chicken Soup


Running in the cold with a cold wasn't exactly what I thought I signed up for or what being a Winter Warrior was supposed to mean. To say I was miserable during a run this past weekend would be an understatement. Descending further into a state of delirium along with having an encouraging, understanding running partner were the two things enabling me to get through the five mile run. Funny things happen to your perceptions when you are in a cold-induced delirious state. Any bump in the road feels like a steady incline and steady inclines feel like steep hills. So while I was running 'uphill' I wondered whatever possessed me to willingly put myself through such torture. Apparently I took the word 'warrior' a little too literally when I signed up for a 10k training program. And clearly I either get some perverse pleasure out of being a glutton for punishment or am beginning to remember what the addiction to running felt like all of those years ago. But as E. L. James once wrote 'There's a very fine line between pleasure and pain. They are two sides of the same coin, one not existing without the other."

Nothing really cures the common cold, but that doesn't mean we just let it run its' course (no pun intended). From claims going back as far as the 12th century along with new research studies in the 21st century, there is a preponderance of evidence supporting the claim that a bowl of chicken soup is the nutritional elixir to soothe all of a cold's symptoms. Even if you still think this is nothing more than a myth (although it has lasted more than nine centuries), at the very least, this 'miracle-cure-in-a-bowl', this 'liquid healing gold' is good for one's soul. Not only was I in desperate need to have this cold come to an end, I needed to feel better.


Sure it would have been easier to buy a few cans of chicken soup, but by now you should have figured out I don't really do 'easy' that often. If there is real scientific truth to the powers of chicken soup having the ability to improve one's health, well then homemade certainly has to be more powerful (and more delicious) than anything available on a grocery store's shelf.


The broth for the Chicken Soup is made with a whole fresh chicken, two yellow onions (skins on) halved, a parsnip (halved), two garlic cloves (peeled), two stalks of celery, a very large carrot (skin on), a bay leaf, kosher salt, tomato paste, aleppo pepper, dried thyme, and four quarts of water. Keeping the skins on the onions as well as the other vegetables helps to give the broth a deep golden color.


Smitten Kitchen's recipe for chicken soup, my source of inspiration, called for the use of either four pounds of leftover chicken carcass bones or four pounds of a combination of fresh chicken wings, necks, backs, and feet. I opted for a whole almost four pound fresh chicken.


Once the broth comes to a boil, the heat is reduced to a simmer and the lid placed on top of the pot. Over the course of approximately 2 1/2 hours, the magic begins to happen. I would like to tell you about the incredible aroma coming from this simmering broth, but my sense of smell wasn't working while I was making this soup.

After the 2 1/2 hours, three bone-in, skin-on chicken breasts (approximately 2 pounds) are added to the simmering stock. The breasts will cook in approximately 20-25 minutes. Be careful not to overcook them because the meat from the chicken will be going back into the 'soup'. Allow the chicken breasts to cool enough so you can remove the skin and bones and either shred or cut into pieces. If you are wondering what to do with all of the meat on the whole chicken you had poached in the broth, I would suggest you use it to make chicken salad rather than shred it to use in the soup. Note: The pieces of chicken breast are returned to the stock after the chopped vegetables and egg noodles have been added and cooked.


After straining and returning the broth to the pot, the chopped carrots, celery, and leeks are added. Cooking time will range from 6-10 minutes (you want them firm-tender) depending on how small/large you cut/dice the vegetables.


The most common noodle used in chicken soup is the egg noodle. Of all of the egg noodles available, the most frequently used are the German short, corkscrew shaped noodles. The other prevailing option is the shorter, straighter noodles. These usually come in thin, medium, and wide thicknesses. Not only do I like my chicken soup noodles to have a little substance, I like to be able to get them on the spoon without making a big splashy mess. For that reason, I prefer the medium-width over the thinner egg noodles. Once the chopped vegetables have simmered in the broth, the egg noodles are added (allow to cook for 7-10 minutes or in accordance with package directions).


Egg noodles usually come in a bag versus a box (usually in a 12 ounce size). If you like a very noodle rich soup, use 11-12 ounces. If you still like a soup with a noodle presence, use 9-10 ounces. If the entire package of the noodles is used, please know they will continue to absorb the chicken broth if leftovers are refrigerated overnight. That isn't necessary a bad thing, but this broth has such incredible flavor it would be somewhat of a waste to have it all absorbed into the egg noodles (trust me on this).


Before serving the soup you will need to taste to determine how much additional salt is needed (remember only 1 Tablespoon of kosher salt was used in the broth).  I added an additional 1 1/2 teaspoons to the pot of chicken soup, but then added a tiny bit more after it was ladled into a bowl. Two tablespoons of freshly chopped parsley can be added to the pot of soup or lightly sprinkled on the bowls of soup.


After tasting this Homemade Chicken Soup, I will never buy a can of chicken soup ever again. Never ever. Regardless if I have a cold or not. The medicinal and nutritional values of this 'liquid healing gold' are increased exponentially when homemade. Eating a bowl of hot, homemade soup is incredibly satisfying, even slightly intoxicating. Especially one having such a great depth of flavor. January just happens to be National Soup Month (hmmm....I wonder why). You still have some time to make a pot of homemade soup. Why not make this Homemade Chicken Soup? You will make everyone deliriously happy!

Recipe
Homemade Chicken Soup (inspired by SmittenKitchen's Ultimate Chicken Soup Recipe)

Ingredients
Broth
2 medium-large yellow onions, unpeeled and cut in half
2 large garlic cloves, peeled and slightly smashed
1 large carrot, unpeeled
1 large parsnip, unpeeled
1 large celery rib
4 quarts water
3 1/2-4 pound chicken (or 4 pounds of chicken wings)
1 Tablespoon Kosher salt
1/2 teaspoon dried thyme (or 2 teaspoons fresh thyme)
1/8 teaspoon Aleppo pepper (or red pepper flakes)
1 Tablespoon tomato paste
1 bay leaf

To Finish
2 pounds bone-in, skin-on chicken breasts (approximately 3 large chicken breasts)
2 large carrots, peeled and diced
1 large leek, trimmed, thinly slicing green and white parts
2 large celery ribs, diced or chopped
9-12 ounces egg noodles (medium or fine noodles) Recommend Gia Russa egg noodles. I used the medium sized noodles.
2 Tablespoons finely chopped flat leaf parsley
Kosher salt to taste

Directions
1. Combine all broth ingredients in a large stock pot (6-8 quart). Place over high heat and bring to a boil. Immediately reduce to gentle simmer, skim any foam, cover and simmer for 2 1/2 hours.
2. Add whole chicken breasts to simmering broth, simmer for 20-25 minutes until they are cooked through (do not overcook). Remove cooked breasts and allow to cool slightly. When cool enough to handle, remove skin and bones. Either shred or chop into small chunks. 
3. Strain broth. Return strained broth to stock pot and turn heat to simmer.
4. Add diced vegetables and cook for 7-10 minutes, or until vegetables are firm-tender.
5. Add egg noodles to the broth and cook for 7-10 minutes or until tender. Note: For a very, very noodle-y soup use 11-12 ounces of the egg noodles, for a less noodle-y soup use 9-10 ounces. 
6. Add shredded/chopped chicken breasts to broth, simmer for 2-3 minutes until heated through.
7. Add chopped parsley to the finished soup or add chopped parsley to soup after it has been ladled into bowls.
Note: If using a full 12 ounce bag of the medium egg noodles, a significant amount of the broth will be absorbed by the noodles if any leftovers have been refrigerated overnight.