Friday, February 8, 2013

Decadent Chocolate Brownies aka Outrageous Brownies


When you hear the phrase 'death by chocolate' associated with a recipe, are you someone who becomes giddy at the prospect of learning of an intense chocolate concoction or are you someone for whom this would be on the 'too much' end of the chocolate dessert eating continuum?  If you are on the giddy end of the continuum, you might just want to read on. And for those of you who are on the 'too much' end, maybe today is the day where you can appreciate just a small dose of 'too much'.

When Ina Garten's first cookbook, The Barefoot Contessa Cookbook, came out I did not want to share this new discovery with anyone until I had time go through many of the recipes.  Her recipe for Outrageous Brownies was one that I wanted to keep as a temporarily guarded secret. In retrospect I wonder what I was thinking.  

Everyone who has tasted these brownies has declared they were the best brownies they had ever eaten.   One bite of these brownies and you are immediately transported to an incredible euphoric state.
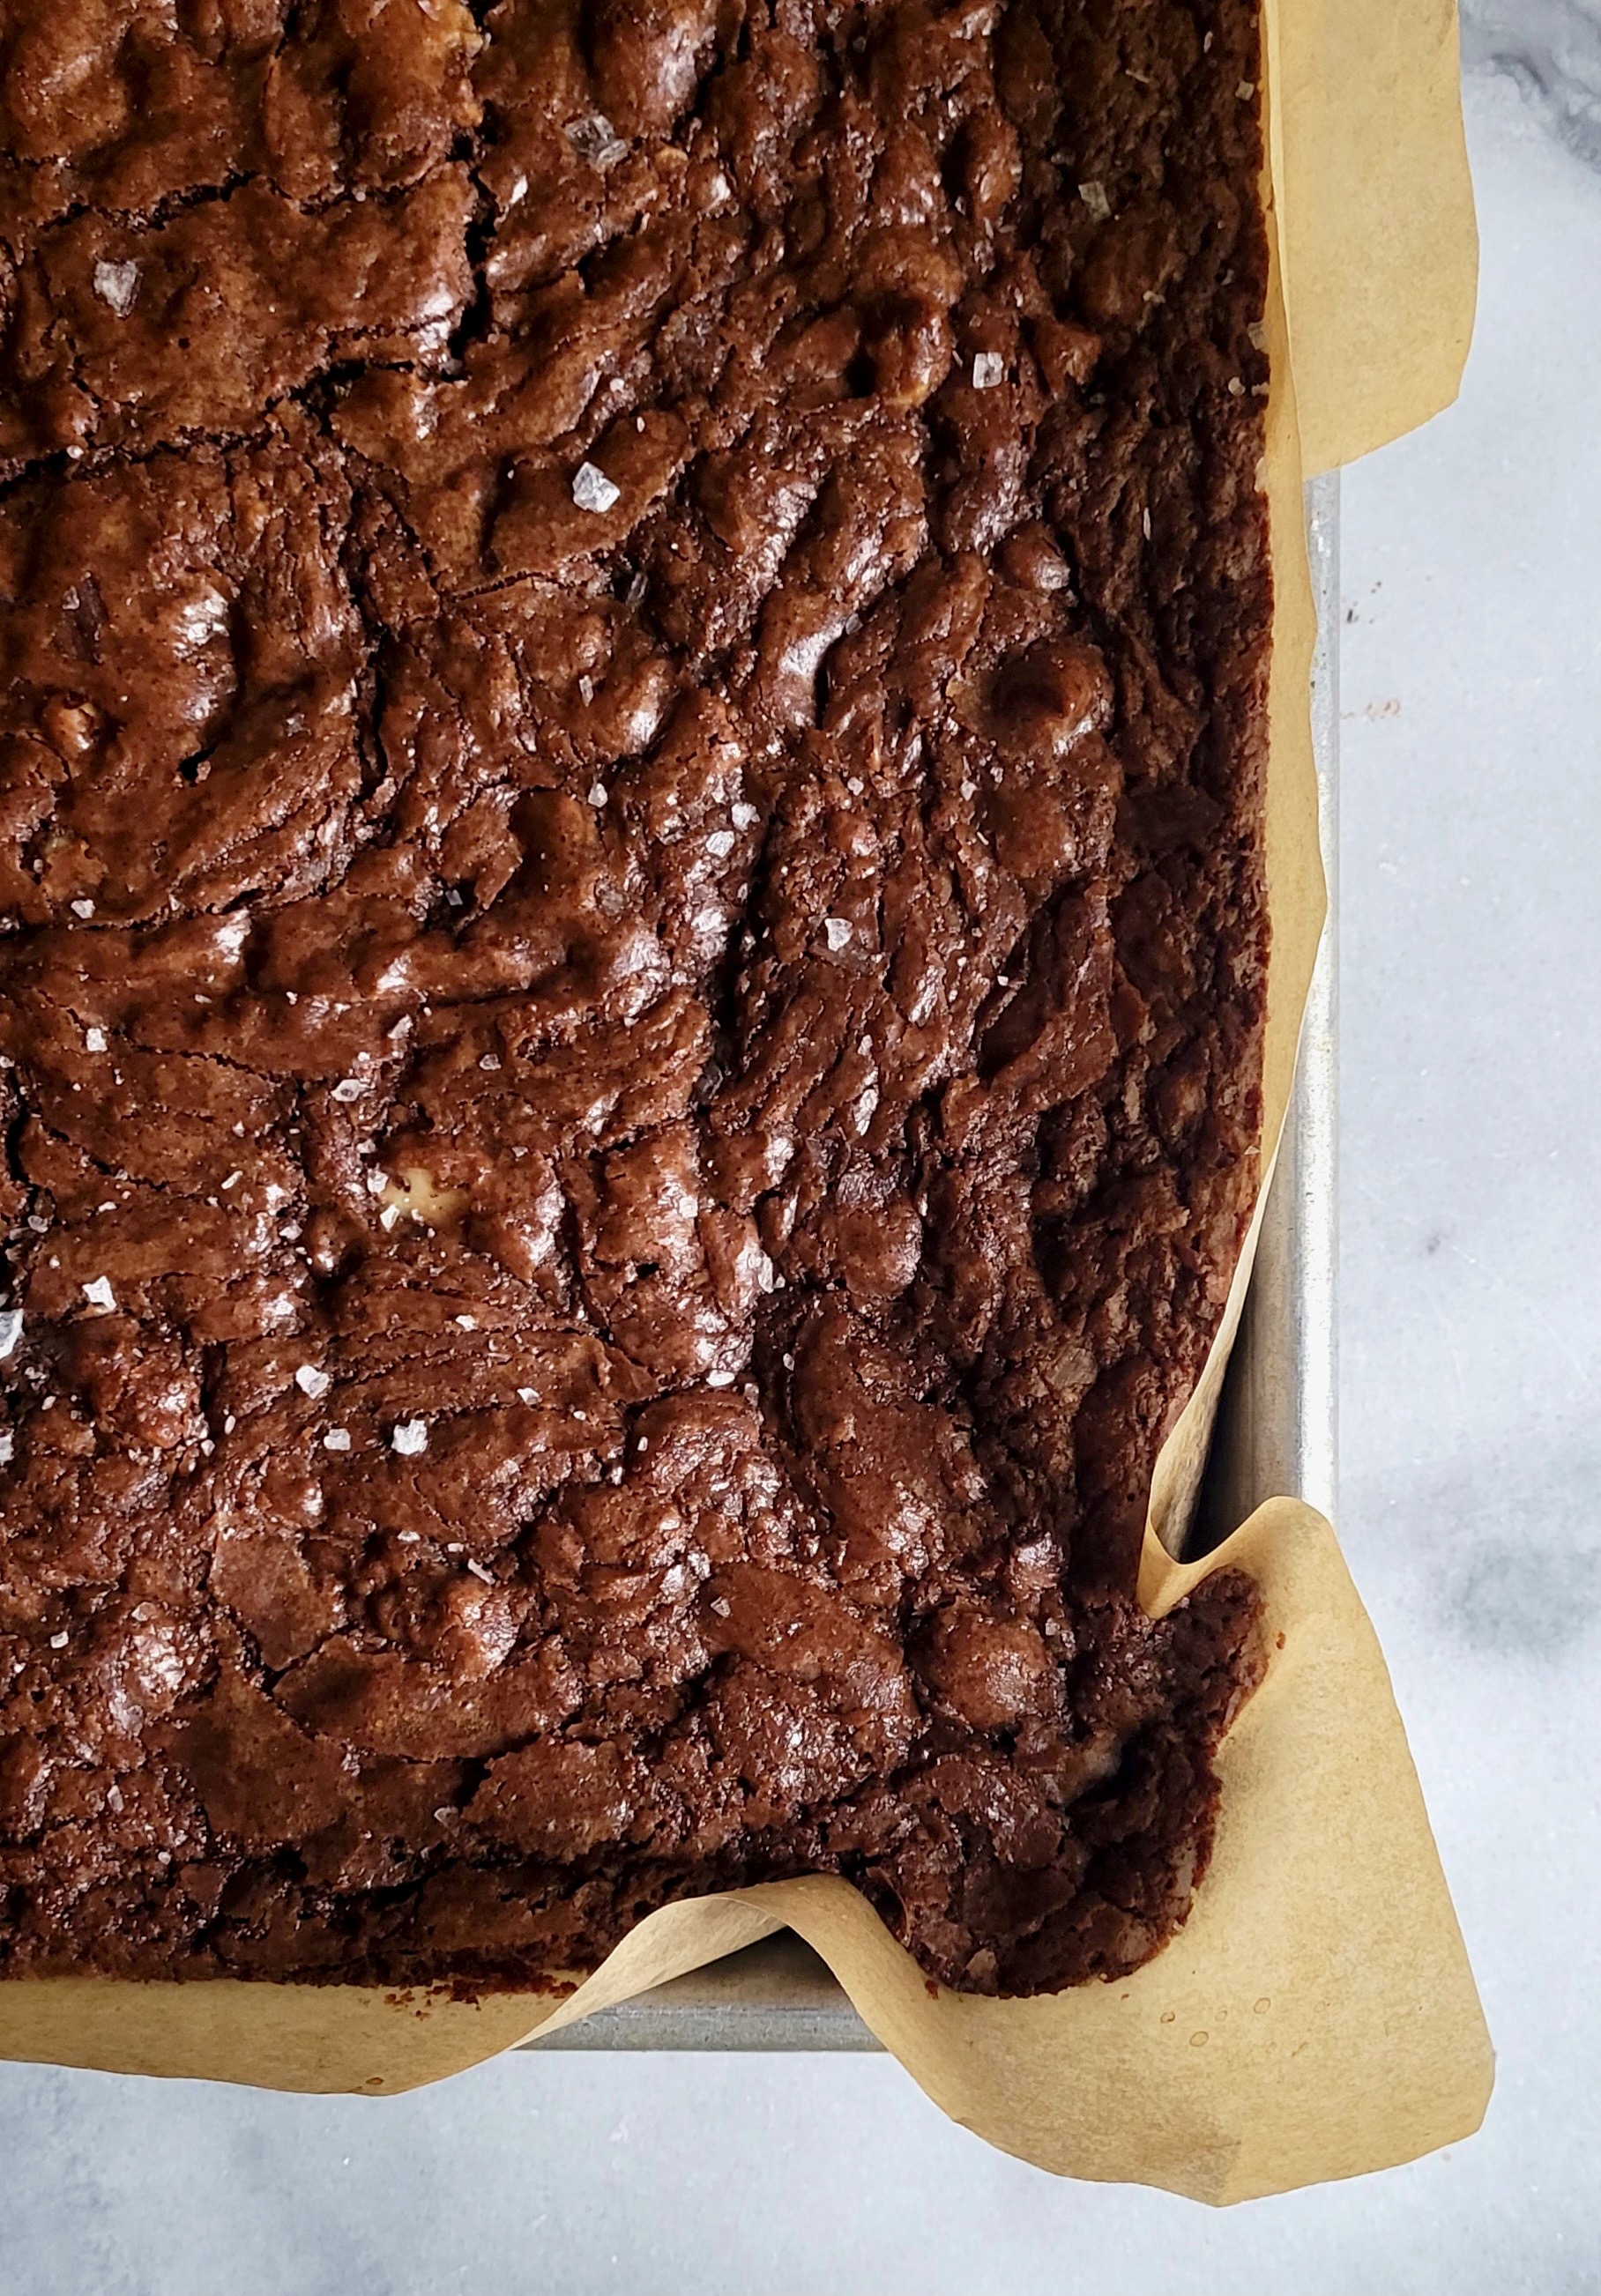
When I finally succumbed to sharing the recipe with others, almost everyone was amazed at how much chocolate was actually in them.  There was one person who upon reading the ingredients jokingly said 'my mortgage payment is less than the cost of the chocolate in this recipe'.  While there was some humor in this exaggeration, the recipe actually does call for a little more than two pounds of chocolate, which explains in part why these brownies are so insanely decadent.

There are many words to describe these brownies.  Dense, moist, chocolately, nutty, rich, and decadent are just some of them.  Served all by themselves or with some vanilla ice cream, they are a perfect death by chocolate eating experience.  Once you get rave reviews from your family and friends for this decadent brownie, I wonder if you too will want to temporarily guard the recipe.


The set of graduated glass bowls available from Williams-Sonoma are my favorites and I use them constantly.  They are the only bowls I use for melting chocolate over simmering water.

Once the butter and chocolate is melted, it is stirred until combined to a beautiful, thick, shiny consistency. Whisk this mixture gently.


For a long time I didn't believe that lightly toasted nuts made a difference to the taste of the finished product because it just seemed like one more step in a recipe.  But one day just for the heck of it I decided to just do a little taste test comparing a raw nut with a lightly toasted nut.  The difference was more than subtle for walnuts, pecans and macadamias.  From that point on if a recipe called for lightly toasting the nuts before combining with the rest of the ingredients, the additional step and time was well worth the effort.  Remember to always toast your nuts first before chopping them.


If you have ever made recipes from any of Ina Garten's cookbooks you will note she almost always uses extra-large eggs in her recipes.  So when shopping for the ingredients for these brownies, remember extra-large (not jumbo, not large) eggs.  


The original recipe called for instant coffee granules as one of the ingredients.  When I first started making these brownies I was using one of those instant flavored coffees. However, over the years shifted from instant coffee (Sanka) to instant espresso coffee.  The brand I like to use is Medaglia D'Oro as it not only works perfectly in recipes calling for 'instant coffee', it makes a great cup of instant espresso as well. The addition of the espresso adds to the richness of the chocolate and is the game changer ingredient that separates this recipe from all other brownie recipes.

The recipe calls for a one and a quarter cups of flour.  One cup is used for the batter and the quarter cup is mixed into the chocolate chips and nuts.  Coating the nuts and chocolate chips with flour prevents them from sinking down to the bottom of the brownies.  The result is a brownie with chocolate chips and nuts mixed perfectly throughout.

When finished baking the brownies should have a beautiful sheen to them.  If they come out with a dull finish, you have overworked the batter.
 
After the brownies have cooled they should be refrigerated before cutting.  The brownies should spend at least a couple of hours in the refrigerator.  You will them be able to simply lift up the parchment paper out of the pan and then cut them into whatever size of squares or rectangles you like. I like to put the cut brownies into white cupcake papers as it makes for a great presentation on a platter or stacked in a cellophane bag.

Recipe
Decadent Chocolate Brownies aka Outrageous Brownies (oh so slight adaption of Ina Garten's Outrageous Brownie recipe appearing in The Barefoot Contessa Cookbook)

Ingredients
1 pound (454g) unsalted butter
1 pound (454g) semisweet chocolate 
12 ounces (340g) semisweet chocolate chips
6 ounces (171g) bittersweet chocolate
6 extra large eggs, room temperature
2 Tablespoons instant espresso or 3 Tablespoons instant coffee granules
2 Tablespoons vanilla
2 1/4 (450g) cups granulated sugar
1 1/4 (163g) cups all-purpose flour, divided
1 Tablespoon baking powder
1 teaspoon salt
3 cups (340g) lightly toasted walnuts, chopped
Flaky Sea Salt

Directions
1. Preheat oven to 350 degrees (F).
2. Place walnuts on baking sheet and toast for approximately 6-8 minutes.  Cool and then chop coarsely.
3. Line a 12" x 18" x 1" rimmed baking sheet with parchment paper.
4. In a medium sized bowl placed over simmering water melt butter, one pound of semisweet chocolate and six ounces of bittersweet chocolate.  When melted, stir, remove from heat and let cool slightly.
5. Mix together the eggs, instant espresso granules, vanilla and sugar in a large bowl using a whisk.  Do not over beat.
6. Add slightly cooled chocolate/butter mixture.  Stir gently until mixed.  Set aside.
7. Sift together 1 cup flour, baking powder and salt.  Mix into batter.
8. In a separate bowl mix together the 12 ounces of chocolate chips and chopped walnuts with 1/4 cup flour.
9.  Add chocolate chips and nuts into the chocolate batter.
10.  Pour batter into prepared pan. Sprinkle lightly with flaky sea salt.
11.  Bake for 20 minutes.  Remove from oven and tap baking sheet at least twice on counter.  Return to the oven and bake for up to an additional 15 minutes or 20 minutes or until a toothpick comes out clean.  Be careful to not over bake as they are intended to be moist brownies.
12.  Once the brownies have cooled, cover, and place in the refrigerator.
13.  Cut chilled brownies into the size or shape of preference.  Serve room temperature or chilled.

Notes: (1) I used Ghiradelli chocolate bars and chips in these brownies. (2) To toast the walnuts, place them on a baking sheet. Bake in a preheated 350 degree F oven for 7-9 minutes. Allow to cool before chopping and mixing into the batter.

Unlike cooking there is a precision to the measuring of ingredients in the making and/or baking of desserts. European recipes usually list ingredients in weights where here in the US we generally use the measures of teaspoons, tablespoons, cups, etc.  However, there is a movement here now with some chefs like Thomas Keller who advocate for weighing ingredients when baking. Until I fully transition to the weighing of ingredients, I will use my trusty measuring tools to get the perfect measured spoonful or cup.

Last week I went looking for my favorite Williams-Sonoma measuring spoons and could not find them.  I was beside myself.  I tore apart every drawer not just once but twice and then looked in the dishwasher at least three times. I even looked in drawers where I would not even think to put my baking tools. I couldn't imagine that I would have inadvertently thrown them out, but my efforts to find them were unsuccessful.  If there was no rationale explanation for their whereabouts, maybe there was an irrational one.  I live in an 80 year old farmhouse so in my active imagination world, I momentarily wondered if the house had a ghost that 'took' these treasured measuring spoons from me.

After my unsuccessful search, I made the hour drive to the Williams-Sonoma in Wrenthem, Massachusetts to buy a new set of metal measuring spoons.  I couldn't just use any measuring spoons. Yes, I have an affinity for measuring spoons made not of thin, light-weight metal that bends easily or of plastic, but for spoons crafted with more substantial metal, making them difficult to bend out of shape.  All was again right with the world when I bought the new set of Williams-Sonoma spoons.  These simple little spoons had the amazing ability to make me happy.

Today as I was making the brownies I used my new measuring spoons to get the precision I wanted. In cleaning up the bowls and spoons, I opened the dishwasher, took out the KitchenAid bowl and to my amazement there were the measuring spoons I so frantically looked for last weekend.  I could hardly believe my eyes. So just in case there really is a ghost here, it now will have to hide two sets of spoons before I have the need or time to spend another two hours of my life buying a third set

Sunday, February 3, 2013

Eggplant Caponata Bruschetta


Recipe updated in September 2023.  Often on a long drive to make the time pass a little faster, we used to play a game. One where we each named the vegetables served at the dinner tables of our youth. Invariably when it was my turn, iceberg lettuce, tomatoes, onions, potatoes, carrots, cabbage, cucumbers, sweet potatoes, corn, peas, mushrooms and green beans were the only twelve things on my list.  And most, if not many of them, were the canned version only. There was some humor in this rather short, limited list as it now represents only a small portion of the vegetables I now eat and cook with.

It was my Italian best friend's family who nurtured my appreciation for eggplant. And without a doubt her eggplant parmesan remains the best I have ever tasted.  But other than eating eggplant cooked in this way, it was not a vegetable I knew existed in any other recipe until I was at a holiday open house one year, very long ago.  Quite by accident I tasted something called caponata. Not only had I not ever heard that word before, I had no idea what it was.  But at long last, I discovered that caponata was a dish that had eggplant as one of its main ingredients.  The deliciousness of eggplant caponata bruschetta is experienced in the first bite.  And eggplant went from being a "nice to have" to a 'must have' on my list of vegetables to be consumed.


It took me a while to get a copy of the caponata recipe from the person who had made it for the party, but persistence is one of my virtues or Achilles' heels, it's all a matter of perspective.  The recipe came from her aunt who had lived somewhere on the east coast.  When she had written the recipe out she titled it "Hennrietta's Caponata".  So for years I had a little piece of paper with the recipe on it.  Since I usually don't memorize recipes, I was beside myself one weekend when I looked for the recipe and couldn't find it.  Again I had to ask the same person to get me a copy of the recipe. No let me rephrase this, I had to relentlessly ask the same person to get me another copy of the recipe.  This time it was written out on a slightly larger piece of paper.  I figured out a way not to lose this recipe as I could not bear to ask for it a third time.


The recipe begins with preparing the eggplant, green peppers, onions and garlic.  I like using Italian eggplant in this recipe as its a little firmer and less seedy. However, you can use regular eggplant but you will just have to scoop out and discard the seedy parts.


Eggplant is a beautiful aubergine on the outside and when you cut it, it is a beautiful white on the inside.  Before getting the olive oil hot, make sure you prepare all of the vegetables: the eggplant, green peppers, onions, and garlic.  Once the oil is hot, you add all of your chopped vegetables, turn the heat to low, cover, and cook for approximately 10 minutes.  The vegetables will begin to soften slightly in this first phase of the cooking process.


Yes, this is another recipe with olives, this time the Spanish olives stuffed with pimentos. Measure out the olives before you cut them.  You can either coarsely chop or slice them.

The original version of the recipe called for dried oregano.  When I went to make the recipe I could not find my jar of dried oregano, even after tearing apart the cabinets thinking it might be hidden.  I did not want to drive to the store, so I went out to the herb garden to see if there was some fresh oregano still growing under the light covering of snow.  And yes, there were clusters of green leaves still growing. Guess it was my lucky day.


I know I shared that if a recipe calls for fresh herbs, dried herbs don't live up.  However, the inverse is not always true. The fresh oregano is definitely better than the dried oregano in this caponata.  The standard fresh versus dried conversion is for every one teaspoon of dried you use three teaspoons of fresh.
And oh by the way, I would not be surprised if within the next few months my cupboard has several bottles of dried oregano.  It will be like the pecans, when I go to the grocery store I will think 'do I have any dried oregano?' and then just throw a bottle in the basket.


You add the tomato paste, water, red wine vinegar, olives, sugar, salt and pepper all at once.  Continue to cook on low heat for approximately 15 minutes.  If you want the savory and sweet version of the caponata, you add a half cup of golden raisins in the last 5 minutes. Remove from heat, allow to cool to room temperature.

I like to cut the French baguette on the diagonal and then grill on the stove.  There is something about the grill marks that gives the dish a rustic look and feel to it.  Caponata is not a fancy food.  But not to worry, the bread will still taste delicious if you toast it in the oven.

Recipe
Eggplant Caponata Bruschetta (an adaptation of Hennrietta's Caponata)

Updated September 2023

Ingredients
1/3 cup extra virgin olive oil
1 medium or 2 small Italian eggplants for a total weight of 1 pound (472g), should yield 4 cups of peeled and diced eggplant
1 medium yellow onion chopped or 2/3 cup (88g) chopped yellow onion
1/3 cup (48g) chopped sweet green peppers
1 jar (4.5 ounces/127g) of sliced mushrooms, drained
2-3 cloves of garlic, minced
1 six ounce (170g) can of tomato paste
1/2 cup (75g) Spanish olives (the green pimento stuffed ones), first measured and then halved
1/2 cup water (add more as needed)
2 Tablespoons red or balsamic wine vinegar
1 1/2 teaspoons of sugar
1 1/2 teaspoons freshly chopped oregano (or 1/2 teaspoon dried oregano)
1 teaspoon Kosher salt
1/4 teaspoon pepper
1/2 cup (72g) golden raisins (my personal favorite addition, but they are optional)

French baguette, sliced on the diagonal, lightly toasted or grilled

Burrata or Whipped Ricotta

Directions
1.  Heat olive oil in large skillet (one that has a lid).  Add eggplant, onion, green pepper, mushrooms and garlic.  Cover and cook on low heat for 10 minutes, stirring at least once.
2. Stir in tomato paste, olives, water, vinegar, sugar, oregano, salt, and pepper.  Cover and simmer for 15 minutes, stirring several times and checking for consistency.

 Note: If the mixture gets too thick, add in small amounts of water. The consistency of the caponata should be chutney like.
3.  If adding the raisins, add them in the last 5 minutes.
4.  Remove from heat, cool to room temperature.
5. Transfer to a bowl placed on a platter.  Surround the platter with the bread.  Serve caponata at room temperature.
6. Optional:  Serve with burrata cheese or whipped ricotta to kick it up a notch.

Notes: (1) Most of the updates in the recipe include small and weight specified changes to the ingredients. Additionally, I originally recommended the Eggplant Caponata Bruschetta be served with burrata. Now I would also highly recommend it be served with Whipped Ricotta as option. (2) I prefer the caponata warm at room temperature. So, if you make it ahead, bring to room temperature before serving.


Two years ago we celebrated the 21st birthday of my best friend's daughter in New Orleans.  On our first day there we had lunch at A Mano, one of the city's Italian restaurants.  We ordered Caponata Bruschetta as a first course to share.  Their version of the recipe had golden raisins in it and was topped with burrata cheese.  When I tasted this sweet and savory caponata topped with the burrata cheese, I like everyone at the table, suddenly wanted the entire appetizer for themselves.  We had to place a second order.
If you have never had burrata cheese you should absolutely, definitely, add it to the list of cheeses you eat. Really, seriously, this cheese is that good. The name burrata means 'buttered' in Italian.  And what is not to like about butter?  It is actually a fresh Italian cheese made from mozzarella and cream.  The outer shell is solid mozzarella but when you slice it open the thick, rich cream oozes out.  Burrata and mozzarella are two very different cheeses. Once you taste burrata you will immediately know the difference.

So if you can find burrata in the grocery store you must buy it.  The addition of this cheese when serving will completely change your experience eating the Eggplant Caponata Bruschetta.  Trust me, the Eggplant Caponata Bruschetta is wonderful all on its own, but with the addition of the burrata, well, let me just say that your palate and appreciation for eggplant will never be the same again.  And if eggplant wasn't on your vegetable list growing up or on your current list, what are you waiting for?

Saturday, February 2, 2013

Fig, Olive and Walnut Tapenade

Ever since I discovered the tangy, creamy taste of goat cheese, I have been immediately drawn to any recipe that calls for it as an ingredient. And if there isn't a recipe using it, I find a use for it. I love goat cheese on scrambled eggs, on roasted asparagus, on pasta, and in salads.  Thank goodness goat cheese is now so readily available in the grocery store so I don't have to drive far to buy some or wait for the cheesemaker at a weekend Farmer's market.
So when I discovered a recipe for a fig based tapenade served with goat cheese in a Bon Appetit magazine many, many years ago, I knew it was one that I had to make.  From the first bite of this tapenade I was in love, if there is such a thing as being in love with a food. The combination of the figs, olives, and capers along with the balsamic vinegar, olive oil, thyme and walnuts is absolutely heavenly.  Then topped over a sliced baguette spread with softened goat cheese, this tapenade will make you think you have actually died and gone to heaven.  This is food for the Gods.


This morning when I went to my favorite market to pick up a package of dried Calimyrna figs there wasn't a package to be found, or least that is what I thought. I first looked in the section with dried fruits, no luck.  I then went to the produce section as containers or bags of dried fruits can often be found there, again no luck.  So I asked the produce manager if he had any.  He went over to a rack containing packages of dried fruit only to tell me that they must be out, however, he would look in the back but returned empty handed.  Not certain if Turkish figs were the same as Calimyrna figs, I started to do a google search using my phone (ah, if I only had an iPhone where I could ask my questions and have them answered instantaneously).  Between the two of us, I entered every possible question to get the answer I wanted, but to no avail.  So I thanked the produce manager for his time and continued to do some other shopping.  As I was shopping on the other side of the store, I looked up and there was the produce manager holding a bag of the dried Calimyrna figs.  After making a small gasp, I didn't know whether to hug him or high five him.  I went with the high five.  Was this luck I wondered, the finding of this last bag of figs on the rack he had first searched?  Maybe, but his persistence was my good fortune today.
Tapenade was originally a dish consisting of pureed or finely chopped olives, capers, anchovies and olive oil.  Its name comes from the Provencal word for capers, tapenas, and is a food often served with bread as an appetizer.   There are so many different variations of recipes for tapenade, however, without a doubt, the addition of figs and walnuts and the omission of anchovies makes it divinely delicious. If I only took French in high school instead of Spanish, I might have had my first taste of tapenade way back when on a day when everyone would be asked to bring in a French food to serve in class.

Hopefully you will have an easier time finding the dried Calimyrna figs or you will come shop in a store with great customer service.  They really are not that hard to find. Trader Joe's and Whole Foods usually carry them.  For this recipe, a 7 ounce bag will give you a few more than you need, leaving you with a couple to snack on.  The figs are chopped into little bite size pieces.  Try to go for uniform  pieces if you can, but by no means 'do not obsess about this'.

The chopped figs are cooked with some water.  The figs are perfectly softened when the water evaporates.  Because they hold their shape during this cooking process, the little bites add to the texture of the tapenade.

Once the figs are softened they are put into a bowl where you then add the chopped olives, chopped capers, olive oil, balsamic vinegar and chopped thyme.  And oh, don't forget the very slight pinch of sea salt.  Kosher salt works too, but the sea salt just melts into this mixture.  If you are making this recipe early in the day, stop here, cover the bowl and refrigerate.  If you are making it before your guests arrive, you add in the chopped toasted walnuts.  The mixture is then placed on a platter prepared with goat cheese medallions arranged in a circular pattern.
I must warn you about something.  Be careful not to take more than one taste of the tapenade at this point. I guarantee you will not be able to stop.  The sweetness of the figs combined with the tartness of the olives, capers and vinegar is an absolutely wonderful combination of one bite flavors. Remember you are making this as an appetizer.  Explaining to your guests that you had made a fabulous tapenade earlier in the day, but then something went awry.  After sharing you made them something but are not able to serve it, won't get you any points for good intentions.  Particularly if you consumed the tapenade yourself.
So if you can show restraint and are able to refrigerate the mixture at this point, you will need to bring to room temperature to finish before serving.  This tapenade is good cold, but at room temperature it is a completely different dish.  All of the flavors come through when it is room temperature.  Remember to take your goat cheese out for a little while so that it spreads perfectly on bread or crackers.

Recipe
Fig, Olive and Walnut Tapenade (oh so slight adaptation from the Fig and Walnut Tapenade recipe appearing in Bon Appetit, 2001)

Ingredients
1 cup dried Calimyrna figs chopped (about 5 ounces)
1/3 cup water
1/3 cup chopped pitted Kalamata olives
2 Tablespoons extra-virgin olive oil
1 Tablespoon balsamic vinegar
1 Tablespoon drained capers, chopped
1 1/2 teaspoons fresh thyme, chopped
1/2 cup walnuts, toasted and chopped
Pinch of sea salt

10-12 ounces of soft goat cheese 
1/4 cup toasted walnut halves for garnishing
Fresh thyme springs for garnishing

French baguette or crackers

Directions
1. Chop figs into small pieces.  Combine with water in a heavy saucepan and cook at medium to high heat until water evaporates and figs are softened, about 5 to 7 minutes.  Remove from heat and transfer to a bowl.
2. Add olives, capers, olive oil, vinegar and thyme. (If not serving immediately stop here and put in a covered dish in the refrigerator for up to 2 days.  If you refrigerate you must bring to room temperature before continuing.)
3. Mix in 1/2 cup toasted chopped walnts.
4. Arrange goat cheese medallions in a circular pattern on a platter.  Spoon tapenade into center of the large goat cheese circle.
5. Garnish with 1/4 cup toasted walnut halves and fresh thyme sprigs (optional)
6. Serve with sliced French baguette or your favorite crackers.  
7. Remember to serve room temperature.

I like to serve things that are a little out of the ordinary but have ingredients that are familiar to most.  Sometimes there is comfort and safety in serving the more predictable appetizers.  And sometimes this can be a little boring.  So I encourage you to show your family and friends that you are a little unpredictable.  Could it be a good thing to keep everyone just a little off balance about you?  Maybe, it just might depend on your friends.
And oh yes, this tapenade is so good that it may enable you to make converts out those who are not wild about olives. This may sound a tad wicked, but unless you have guests who are allergic to olives, don't tell them what is in this.  Let them first have the experience of this tapenade.  It could there lucky day! It may even give those who have never eaten goat cheese a reason to.  Such gifts you would be giving your friends in this one simple appetizer!
Served with a french baguette sliced you have a perfect appetizer for a dinner party, cocktail party or just an impromptu gathering of friends.  Thank goodness I had enough restraint to take only one taste this morning.  Otherwise, it might be just the usual cheese platter tonight!

Tuesday, January 29, 2013

Cinnamon Glazed Pecans

There just had to have been a reason why I had so many bags of pecans in the cupboard.  I must have had overly ambitious, unrealized goals of making Cinnamon Glazed Pecans to add to gifts over the holidays. 

And then there is the pecan pie recipe I have been wanting to try for awhile now.  Or maybe I could just never remember if I had pecans each time I went to Costco or Sam's Club and so I just threw another bag in the cart. Whatever the reason or reasons, I thought it was time to put some of those bags of pecans to good use (god-forbid I let them expire) and make a batch of the Cinnamon Glazed Pecans.  The pecan pie recipe will just have to wait.

Yes, this is the second nut recipe I am posting on the blog in less than a month.  You must be thinking 'what's up with the nuts?'  Not sure I have a good answer for that question, however, with a relative high degree of certainty please know there will be some savory and spicy recipes with nuts as the main ingredient posted on saltedsugaredspiced in the months ahead.
The first time I tasted a cinnamon glazed pecan was when a very talented baker brought them to work.  They were devoured within a couple of hours of being put out on the table, one strong indicator that they were well received. Recipes for baked nuts had previously not been on my radar but after I tasted those nuts, I realized I had never seen a recipe for them.  This would have been in the days before online versions of food magazines, FoodNetwork recipes, foodblogs, and the proliferation of recipe postings on the internet were readily available. I received her recipe the old-fashioned way, written on a piece of paper.  
With a new found interest in cinnamon glazed pecans, I have since discovered a few more recipes along the way.  My favorite recipe version at the moment is one found in a Nordstrom cookbook. This recipe could not be easier or more simple.  Pecans, egg whites, sugar, and cinnamon.  More on the cinnamon in a bit.  Baked in the oven on a relatively low temperature, these nuts are transformed into an addictive little treat.

The egg white and water are whisked until foamy and no liquid remains.
You will find that a room temperature egg combined with water can attain a pretty good volume of foam. There is no need to pull out a mixer, you can do this with a whisk.  Even my whimpy mixing arm can get the egg whites to the perfect foamy texture.  But feel free to pull out the mixer if you are not up for the whisking challenge. The pecans are then added to the whisked egg mixture.

All cinnamons are not created equal.  My hands down favorite is often marketed as Saigon cinnamon (also known as Vietnamese cinnamon). Vietnamese cinnamon is generally sweeter so it can be eaten like candy and its spiciness is often judged to be full-bodied without a hint of bitterness. If you have yet to use this cinnamon in your baking and/or cooking, you just might want to try it, so you too can experience the difference.  The sugar, salt and cinnamon are mixed together and added to the pecan mixture.

For the best results when baking, I always bake nuts in the top third of the oven in order to get that beautiful dark brown coloring.  There have been times when I haven't paid attention, threw the pan in the oven and was disappointed with the outcome.  There is nothing worse that having to throw out a pound of baked nuts. Okay, yes there are worse things.

Recipe
Cinnamon Glazed Pecans (slight adaptation of the pecan recipe appearing in the Nordstrom Entertaining at Home Cookbook)

Ingredients
1 pound of pecans 
1 large egg white (room temperature if possible, but not a deal breaker)
1 Tablespoon water
1 cup sugar
1 teaspoon of ground Saigon cinnamon
1 teaspoon of Kosher salt

Directions

1. Preheat oven to 225 degrees (F)
2. Whisk together egg white and water until the mixture is foamy and no liquid remains.  Add pecans and toss to ensure all pecans are coated.
3. Mix together the sugar, cinnamon and salt.  
4. Add the sugar mixture to the egg white covered pecans stirring to ensure all pecans are covered.
5. Scatter pecans on a parchment paper lined baking sheet and put in top third of the oven.
6. Bake pecans for approximately one hour, stirring every 15 minutes. Pecans will be a dark brown and nicely glazed when finished.
7. Remove from oven and allow to cool.  Or spread on a platter and serve warm.
8. If allowed to cool, store in a covered container or put in cellphone bags tied with ribbon.

I would characterize these cinnamon glazed pecans as having a you need to eat more than one quality to them. Not only are they great as snacking food, they are equally wonderful served with cocktails, added to salads or sprinkled on top of vanilla ice cream. I love putting them in cellophane bags tied with a beautiful ribbon as they make a great hostess, housewarming, or a 'just for the fun of it' gift.

This blog is now officially one month old, not yet anniversary or birthday celebration worthy, but a milestone worth noting.  Since its launching saltedsugaredspiced has had more than 500 viewings. I am thrilled, I think. Because I really don't know whether this is a thrill worthy number or not as I have no basis of comparison. It could be there are just ten of you out there who have looked at this blog fifty times or maybe there were a hundred of you who each looked at it five times.  Whatever the real number of viewers or return visitors actually is may not really matter. The number itself is inspiring enough for me to keep going on this journey of sharing my passion for baking and cooking.

Have you ever been simultaneously energized and overwhelmed when you are learning something new?  I am at that place and feeling a little off-balance at the moment or I should say a little more off-balance than normal.  But not to worry as I have decided to look at this blogging world adventure as a marathon and not a sprint.  Being someone who really has never really adapted to the concept of 'pacing oneself', much to the chagrin of a few, I am focusing on the many unintended benefits of this new experience.  Where this blog goes, I really don't know, although there is one thing for certain. I genuinely believe the possibilities are endless.
Lastly, I have a confession to make.  For those of you who have looked at the blog more than once, you may sometimes notice I do some post publishing editing. Sometimes I get a post publishing epiphany and sometimes I see some glaring errors.  As much as I try to proof the writing, I am a little too close to it at times to catch all of the missing words and/or grammatical errors.  So to those of you who wanted me to know there were some tweaks to be made, particularly the ones I had missed, I thank you for your supportive eye, for your encouragement.

Sunday, January 27, 2013

A Bolognese to Warm Your Soul


The winter weather here has been relatively mild, however, this week it turned wicked cold.  Almost too cold for anyone to want to be outside for any reason. Using the weather as an excuse, I thought I would make a bolognese sauce.  Without a doubt the making of bolognese is a labor of love and an investment of time.  This is one sauce that cannot be rushed or ignored. The flavors develop and deepen as the sauce simmers.  There is nothing more satisfying as being rewarded for your efforts than with a richly flavored bolognese to serve over pasta or eat all on its' own with some great bread.


I did not grow up in household where either bolognese or meat sauce or Sunday gravy was made. Another one of those childhood deprivations. Okay, this is only partially true. The 'spaghetti sauce' served during my childhood years was one where you could see a reflection of yourself if you looked in the pan. Not having any exposure to 'red sauce' would have been better than having the sauce I experienced.


My appreciation for all food Italian has increased over the years with my love for a great bolognese sauce satisfied by the recipes of Mario Batali and Anne Burrell.  Both recipes are incredible, yet so very different in their ingredients and tastes. I go back and forth between making both of them, preferring to use Mario's bolognese sauce for lasagna and Anne's sauce to serve over pasta. Having made Mario's Lasagna Bolognese for Christmas dinner (a huge departure from the traditional holiday meal, but one that was well received by everyone), I have been craving the taste of Anne's bolognese sauce.


It all begins with carrots, celery, onions and garlic.  The first three ingredients are first cut into one inch and/or half-inch pieces and then thrown into the food processor.  For some reason it took me years to figure out the best way to cut an onion if a recipe wanted it chopped or minced.  So here's the trick, you cut an onion from end to end and not through the middle.  If you cut it this way, you will make the cutting of an onion a more pleasurable experience.


Once the vegetables are cut you add the four cloves of garlic and process until they are somewhere between finely minced and a paste.  I prefer for my vegetables to be closer to the finely minced end of the continuum as I like seeing small bits of carrots in the finished sauce. This mixture then goes into a large pan heated with some olive oil.  When the vegetable mixture hits the oil you immediately take in the scent of garlic.  If you like garlic, this will be your first thrill in the making of the sauce.  The mixture then cooks for about 15 minutes or until all of the liquid is absorbed and the vegetables take on a golden, almost brown color.

You can use ground chuck or ground brisket or a combination of the two for this sauce. The ground meat is added to the vegetables and cooked for 15 to 20 minutes until well browned.  Longer is better here.


At my favorite market in Westport, Massachusetts the butcher was kind enough to give me a lesson in the difference between ground chuck and ground brisket.  Essentially its all about its source and where the fat is located in the meat. Ground chuck comes from the shoulder and neck area while brisket is the breast of the steer. Between the two, the fat in the ground chuck adds an immense amount of flavoring.  So for my bolognese, ground chuck wins.

Keep your tomato puree, crushed tomatoes or whole tomatoes in the cabinet for this sauce.  Tomato paste is what this bolognese calls for, yes only tomato paste, rich thick, intensely flavored tomato paste.


After adding in and slightly cooking down the hearty red wine (I use Zinfandel, Chianti or Merlot), the thyme bundle and the bay leaves go into the pot. Always, always, always bundle the thyme or you will be picking out the stems when the sauce is finished.

Speaking of herbs, I sometimes take for granted everyone can identify fresh herbs like thyme, rosemary, and oregano.  This long held assumption was shattered recently when I asked a friend to cut a few sprigs of thyme out of the garden.  When she said didn't know what it looked like, I think my not so sensitive response was 'seriously?'.  So, for those of you who cook only with dried herbs and frequently substituting dried for fresh ones, please know there really is a difference in the finished taste of a recipe between the two.  I don't think I am going out on too much of a limb when I say that when something calls for the use of a fresh herb, the dried equivalent never really lives up.  Its sort of like using Miracle Whip when a recipe calls for mayonnaise.


The sauce simmers for 3 1/2 to 4 hours, again longer is better. Water is added to the sauce and allowed to cook out.  Depending on your simmering temperature, you may be adding water to the pot more than twice. The color of this sauce is so beautiful that I wish there was Crayola crayon to capture it.  But it is not just the color of the sauce that will make you swoon. It is the taste! Let me just simply say the taste of this sauce is scream worthy and a lose your manners desire to lick the plate when you are finished eating.  It is deliriously, soul satisfying good.

Because the bolognese is a hearty sauce, it calls for a pasta that can stand up to it.  I absolutely love using pappardelle pasta noodles with this sauce.  In Italian, pappare means 'to gobble', which describes perfectly what you will be doing when serving this Bolognese. If you can't find pappardelle pasta, the sauce is also great served over gnocchi, penne rigate or ziti pasta.  Just remember, choose a pasta that can hold the robust flavor of this hearty bolognese sauce.

Finish the bolognese with grated Parmigiano-Reggiano cheese and some extra virgin olive oil. This may be one of the best comfort foods ever.

Recipe (updated March 2020)
Bolognese (a slightly adapted version of Anne Burrell's Bolognese recipe published on the FoodNetwork)

Ingredients
1 large onion, cut into 1 inch dice
2 large carrots, cut into 1/2 inch dice
3 ribs celery, cut into 1 inch dice
4 large cloves garlic
Extra virgin olive oil for cooking vegetables and finishing
Kosher salt
3 pounds of ground chuck or ground brisket or combination of the two (See Note below)
2 3/4 cups tomato paste (I used five 6 ounce cans)
3 cups (24 ounces) of a hearty red wine (Zinfandel, Cabernet Sauvignon, or Merlot)
3 bay leaves
1 large bunch of fresh thyme tied in a bundle
Water
Pasta of choice
1/2 cup grated Parmigiano-Reggiano 

Directions
1. Place onions, carrots, celery and garlic in food processor until very finely minced or a coarse ground paste.
2. Add olive oil to a large pan placed over medium heat.  Add vegetables and season with salt.  Cook at medium-high until all liquid has evaporated and they are golden, lightly browned.  This takes about 15-20 minutes.
3. Add beef, season again and brown beef.  Cook at least 15 to 20 minutes, make sure it is really browned.
4. Add tomato paste, mix in thorough and cook about 4 to 5 minutes or until paste changes to a brown color.
5. Add wine and cook another 4 to 5 minutes or until wine has reduced by half.
6.  Add enough water to pan to cover sauce by approximately 1inch.  Toss in bay leaves and thyme bundle stirring everything together.  Bring to boil and then reduce to a simmer, stirring occasionally.  As water evaporates you will gradually add more, up to 2 or 3 cups at a time.  You will do this approximately 2 times during the course of the 3 1/2 to 4 hour simmering.  When finished remove the bay leaves and bundle of thyme stems.
7.  If serving immediately, make pasta of choice reserving one cup of pasta water. Divide bolognese sauce and place up to half in a separate pan.  Add cooked pasta stirring to coat pasta with the sauce.  8. Serve on a platter and/or in individual bowls, topping with Parmigiano-Reggiano cheese and splash of olive oil.

Note: Instead of 3 pounds of ground chuck and/or brisket, I used 2 pounds of ground round and 1 pound of ground veal. The result was a deeply flavored, richer bolognese. From now on this will be my go to combination of meats. (Updated October 2016)


We have all heard the old adage 'all good things come to those who wait'.  As long as it isn't a lifetime one has to wait. For me the wait for eating and making a great bolognese sauce was not a lifetime, but too long for my own liking.  So if you are still waiting, wait no more.  Your time and attention in making this sauce will take your tastebuds to places they may have never been.

The only reflection you will see is the look of pure joy on your face as you take in the flavor of this amazing sauce.  This is a dinner party worthy, Sunday supper worthy, mid-week dinner worthy soul satisfying Bolognese.

Saturday, January 26, 2013

White Chocolate Dipped Pistachio and Dried Cherry Cookies

When I went to bed last night I was planning to make dried cranberry pistachio biscotti (the version created by Giada De Laurentiis) as soon as I woke up in the morning.  Not sure if the full moon had anything to do with it, but my plan changed once I saw daylight.  Suddenly I remembered it had been awhile since I had made the White Chocolate Dipped Pistachio and Dried Cherry cookies.  Given the choice between making biscotti and these cookies, well, in the end there really wasn't much of a choice.
These cookies are very much similar to a Mexican Wedding Cake cookie only they are neither round nor crescent shaped, but have more of a, for lack of a better word, football oval shape to them. They can be dredged in confectionary sugar, however, they become transformed into a beyond bundle of goodness cookie when dipped in white chocolate.

Sometimes you come across a recipe and you want to make it immediately. This was one such recipe, found in Bon AppĂ©tit about six years ago. Initially upon reading the recipe I saw it called for both cake flour and all-purpose unbleached flour.  I thought 'oh great, I don't have any cake flour in the cupboard'.  So much for the impulsive thought of rushing to make these cookies as the reality of this baking endeavor was going to be one of those delayed gratification experiences.  Once I finally had all of the ingredients and made the cookies, cake flour became a must-have staple.  And oh yes, these cookies were definitely worth the wait.

Leaving butter out the night before makes it room temperature perfect.  The butter and confectionary sugar are whipped together until light and fluffy.  It helps to begin creaming the butter before adding the confectionary sugar so as to minimize the sugar dust storm.


The recipe works well with either dried cherries or dried cranberries although I prefer the taste of the dried cherries. The pistachios are measured first, then chopped.  You can rough chop them with a knife or in a food processor.  Just make certain you do not pulverize the pistachios.


Make certain you start with a large mixing bowl as the flours are to be stirred into the dough all at once.  This a really dense dough making the stirring a little bit of an arm workout.  Tending to not having a strong stirring arm (Jennifer Aniston's arms I unfortunately do not have), I usually begin the process using the mixer, but am careful not to take it too far as the dough will become tough if over-mixed.


Once you get the hang of making the football shaped ovals of the dough, it will not take you long to get them into the oven.  Remember to bake them in the top third of the oven and bake only one cookie sheet at a time.  You want the bottoms to be lightly browned.  There is nothing worse than the taste of a burnt cookie, even those where you try to hide the imperfections with sugar or chocolate.  Because we all know, burnt imperfections cannot be hidden.


The original recipe only called for these cookies to be dredged in confectionary sugar.  If you dredge them right out of the oven you risk having the confectionary sugar melt completely as well as risk the cookies breaking.  Let them sit at least 10 minutes before you dredge them.


The cookies in this recipe adaptation are dipped in melted white chocolate.  Once dipped, take a fork to drizzle the remaining white chocolate over the cookies or leave them with a smooth dipped finished.  As I have shared before, the Ghiradelli white chocolate melts perfectly and gives your cookies that bakery finished look.  The cookies have an incredible taste either dredged in sugar or dipped in melted chocolate, the choice you make will be based on your personal preference and time.

Recipe
White Chocolate Dipped Pistachio and Dried Cherry cookies (Adaption of the Pistachio and Cherry Mexican Wedding Cookies appearing in Bon AppĂ©tit)

Ingredients
2 cups or 4 sticks of unsalted, room temperature butter 
1 cup confectionary sugar, plus more for dredging if you choose that finishing option
2 Tablespoons of vanilla extract
1 teaspoon Kosher salt
1 cup pistachios chopped (measure first, then chop)
1 cup dried tart cherries or dried cranberries
3 1/3 cups sifted cake flour
1 2/3 cups sifted all-purpose unbleached flour
Optional:  6-8 ounces White Chocolate melted (Ghiradelli, Lindt)

Directions
1.  Preheat oven to 350 degrees.  Line baking sheets with parchment paper and set aside.
2.  Sift and measure out flours.  Combine together and set aside.
3.  In a mixer, combine the butter and 1 cup of confectionary sugar until light and fluffy.  
4.  Mix in vanilla and salt, followed by the chopped pistachios and cherries.
5.  Using a wooden spoon or spatula, still in all of the flour.  This will take some work but be careful not to overmix the dough.
6.  Shape generous tablespoonfuls of dough into football shaped ovals.  Place on prepared pans, spacing at least 1 inch apart.  
7.  Place tray in top third of the oven and bake for 16 minutes or until the bottom of the cookies just begins to turn light brown in color.  
8.  Finishing options:
     If coating in confectionary sugar, cool cookies for approximately 10 minutes before dredging the 
     cookies in the sugar.
     If dipping the cookies in white chocolate, let cool completely (at least 20 minutes).  After dipping in 
     chocolate, let chocolate harden before serving or packaging.


Most of my friends know I have a tendency to lean toward creating a monochromatic look in my surroundings with shades of white the color of choice. For me color should only come into a room from art, the carpets, and collections of all things both old and new.  And when flowers are brought in to a room, those too need to be monochromatic.  As much as a I absolutely love a white arrangement or bouquet, I am already anxiously awaiting the return of the hydrangea season.  It takes your breath away to see a large bouquet of deep blue hydrangeas sitting on a table or dresser.
The White Chocolate Dipped Pistachio and Dried Cherry cookies have an almost perfect winter white look to them.  But then they surprise you.  Because once into the first bite you get to see and experience color provided by the dried cherries and pistachios.  So no matter what your color preferences are, this cookie satisfies (al)most everyone.