Sunday, March 17, 2013

Irish Shortbread


Before the holidays I had bought Thomas Keller's newest cookbook, Bouchon BakeryNot only are Keller's books beautiful, they are filled with information written in a way that makes you feel like he is talking to you, not at you.  As I started reading through this book, I thought to myself Keller approaches the art of baking with the same precision and attention to detail that an architect designs a building.  With regard to precision, Keller believes in weighing dry ingredients and he provides what I call the American measured version amounts.  Although I have been baking for quite some time, I thought baking like a professionally trained pastry chef was maybe taking me down a path I wasn't certain I wanted to go.  Until the day I tasted a shortbread cookie made by a parent in one of my schools. In just one bite I thought to myself 'this woman must be a baker'.  What I didn't know at the time was that she weighs her ingredients, just like Keller.

At the holiday time there is an abundance of baked goods brought into schools by parents.  On the last day of school before the winter break, I was visiting each of my schools wishing staff a happy holiday. I always first stop into the school office to let them know I will be in their building.  On the office counter at a school, I saw a platter of cookies that not only looked incredibly delicious, they were beautifully presented. I must have been in a hurry or distracted as I still don't why I did not take a photo of those artfully arranged cookies.  As I was admiring, probably drooling actually over those cookies, the school secretary said 'have a cookie'.  Which one to choose was a bit of challenge, but having an affinity for shortbread made the decision just a little easier. In the first bite, I was in shortbread heaven. They were without a doubt the best homemade shortbread I had ever eaten.  


Later that evening I sent the parent an email to let her know I thought she was a phenomenal baker.  As much I was hoping to get her recipe, at the time it was more important to let her know one of the best parts of my day was taking a bite of her amazing shortbread cookie. The next morning I received an email reply. Not only was she appreciative of the accolades, she shared her recipe! One she had brought with her from Ireland when she moved here. As I read through the recipe, I thought, oh my goodness, she bakes as Keller suggests one should.  The dry ingredients were all listed in ounces, not cups or variations thereof.  Her Irish Shortbread recipe and the new insights I had gained in Keller's book pushed me to move out of my baking comfort zone. It was finally time for me to take out the scale I had purchased more than a year ago and put the measuring cups off to the side. At least for this recipe.


When I think of shortbread I generally associate the cookie having its origins in either Scotland or England but not Ireland.  However, because this recipe came all of way from Derry, Ireland, I decided its name had to take on its origin, in honor of the heritage of the woman who so graciously shared the recipe with me.

This shortbread recipes uses a combination of butter and margarine.  The original recipe didn't specify whether to use salted or unsalted butter so I just decided to the use the Kerrygold Pure Irish Butter.  It is after all a recipe that came from Ireland.  Remember, the butter and margarine both need to be room temperature.

After the butter and margarine are weighed, they are mixed together in a large bowl or on a plate with a fork until well blended.

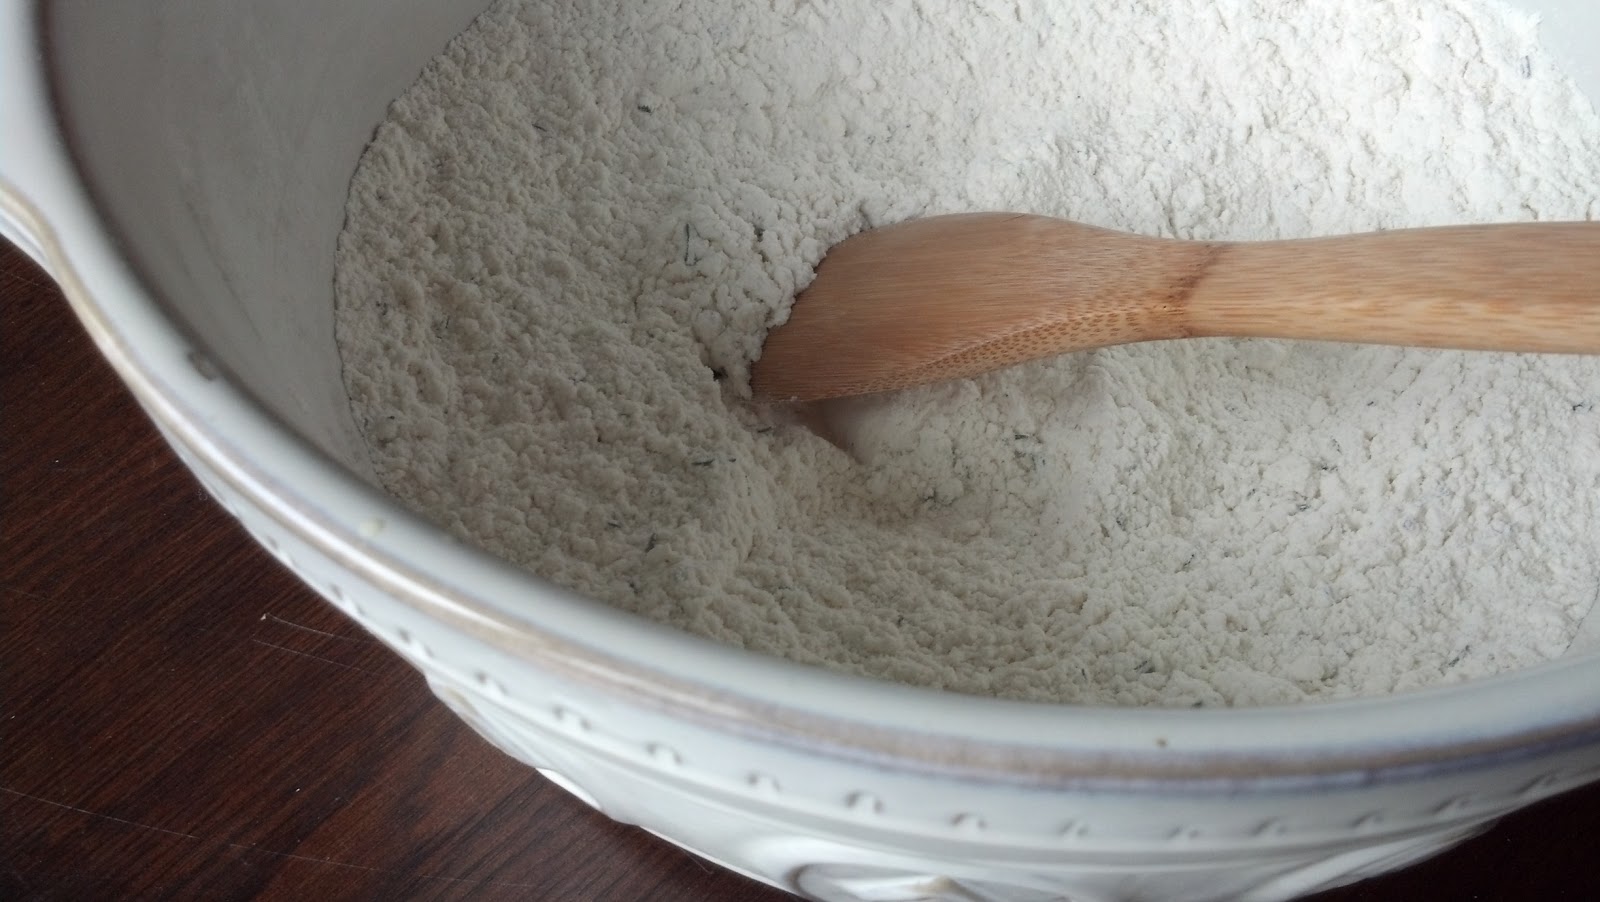
Not only are there two kinds of fat in this shortbread, there are two kinds of flours:  all-purpose and semolina. After the flours and sugar are all weighed, they are sifted into a bowl.

Make certain the bowl or plate you use to mix the butter and margarine together is large enough for you to add the flour to it. The butter and margarine mixture is combined with the flours and sugar mixture.  This is where you get to use your fingers!  Mix until it all comes together.  You can work this mixture until you get small balls of dough or one large ball of dough.

The dough is then pressed into a parchment paper-lined 9" by 9" pan.  I used a tart pan with a removable bottom because I like how easy it is to press in and remove the shortbread.  Once you have the dough evenly pressed in, use a fork to make indentations into the dough. 


The shortbread is baked at 300 degrees (F) in the upper third of the oven for approximately 45 minutes or until lightly browned on the sides and bottom. When you get close to 40 minutes, check your shortbread for color.  If you are not using a removable bottom pan, then form a square on a baking sheet so that you can easily check the dough for doneness.  Baking time could be as long as 60 minutes depending on your oven.  My cooking times have ranged from 45 to 55 minutes.

Remove the shortbread from oven and sprinkle with granulated sugar.  While the shortbread is still warm, cut into fingers or squares, whichever is your preference.  Let the shortbread come to room temperature.  If not serving immediately, it keeps well in a covered container for several days. That is if it lasts that long. Once everyone tastes the rich buttery flavor of these shortbread cookies, you will be making them often. And you might just never buy packaged shortbread cookies ever again!
Recipe
Irish Shortbread (an ever so slight adaptation of a recipe from a generous baker born in Derry, Ireland)
Updated November 2021
Makes 14 1"x 4" shortbread fingers (but cut to your desired size to make more)

Ingredients
9 oz (253g) all-purpose flour
3 oz (85g) semolina flour
3 oz (85g) granulated sugar, plus more for finishing
7 1/2 oz (212g) fat divided: 4 oz unsalted butter (113g) and 3 1/2 oz (99g) margarine
1/8 teaspoon Kosher salt

Directions
1.  Preheat oven to 300 degrees (F).
2. Take butter and margarine out the night to bring them to room temperature.
3.  Weigh butter and margarine and mix together with a fork on a plate until well blended.
4.  Weigh all purpose flour, semolina flour and sugar.  Sift all ingredients.
5.  Add the dry ingredients and the Kosher salt to the butter/margarine mixture.  Using your fingers rub together until it is very well blended.  Note: The original recipe called for the forming of a ball, but I just mix until I can create large chunks of dough.
6.  Press into a 9" by 9" (or 8" x 8") pan lined with parchment paper.  Note: The original recipe called for forming a square on a cookie sheet.
7.  Once the dough is flattened, crimp edges, prick all over with a fork and lightly dust with granulated sugar (about 1-2 Tablespoons). Note: Crimping the edges is optional. 
8.  Bake at 300 degrees (F) in the upper third of the oven for approximately 45 minutes and until lightly browned on sides and bottom.  Baking time could range from 45 to 60 minutes.
9. Remove from the oven and generously dust with sugar. Let rest on a cooling rack for about 5 minutes. Cut the shortbread into fingers or squares while still warm but not hot. Note: If you are not using a pan with a removable bottom, I strongly suggest you cut the warm shortbread while it is still in the pan.
10.  Let cool completely before serving.  Serve or place in a covered tin.

Note: (1) Using a smaller pan (or 8" x 8") will result in slightly thicker slices of shortbread. (2) For the very best flavor, use a European style unsalted butter. (3) Shortbread is kept in a sealed container will be good for at least two weeks. Maybe longer if it lasts that long.


The first time I made this shortbread was at the Christmas holidays when I traveled back to the Midwest to visit family and friends.  The shortbread was one of the cookies I made for the annual holiday cookie platter. Not surprisingly, it got rave reviews from everyone and was the first cookie to disappear. About a week later, I received a text from my nephew who had returned back to college. He asked me to send him the shortbread recipe! I actually read the text twice as this was a 'first' from him.  Then I thought, well I had been reluctant in making any recipe with ingredients that needed to be weighed and here was this college kid not even thinking twice about it.  So, if like me, you had previously discarded those recipes that looked like something only a professionally trained pastry chef would make, just remember, if a nineteen year old college kid could make this recipe, so can you!  Trust me, this may become one of your favorite cookies to make and eat year round!

Some say that on St. Patrick's Day everyone is a little bit Irish.  Whether on this day you drink a Guinness or eat either a corned beef sandwich or corned beef and cabbage, maybe the time has come to consider a new adding a new food tradition, the one of making Irish Shortbread.  But this is one cookie you won't want to make only once a year.

Saturday, March 16, 2013

Roasted Red Pepper and Goat Cheese Crostini

Plagued by power outages due to the hurricane this fall and the blizzard this winter I decided a gas grill was not just a nice to have, but a must have for the east coast house.  Having a grill would mean that I would at least have the ability to cook something if the power went out again.  Yet regardless if I there is ever another power outage or not, I have missed being able to cook year round on a gas grill.  Since I have moved to a place where the assortment and accessibility of fresh vegetables at roadside tables and farmer's markets from spring through fall is incredible, I have been longing to again experience the flavors that grilling brings to foods.

Seems that many of the purchases I have made lately have become an adventure all unto themselves. This adventure began when I found a last season floor sample gas grill on sale. The added bonus was that it was already assembled, a very good thing for me as assembling things with many parts isn't something I like to do, nor am I really good at.   So buying the grill was one thing, getting the grill home was another. Luckily the stars were aligned on the day I went to pick up the grill as my neighbor just happened to walk in the store the exact same time I did.  Considering the store is about a 25 minute drive from where we both live, being in the same location at the same time was a perfect synchronistic moment. And thankfully she offered to put the gas grill in the back of her large SUV, while I only had to put the filled propane tank in the trunk of my Saab. Later that day we took the grill out of her vehicle, connected the propane tank, and then both watched to see if the grill worked. Learning that this last season floor sample actually did work did not rise to the occasion of a scream worthy moment, just a smile worthy one.


As it had been more than a year since I had even cooked on a grill I wasted no time in using it. Since I was having some guests over for cocktails, I thought I would make Roasted Red Pepper and Goat Cheese Crostini.  The peppers are not roasted in the oven, they are grilled, charred then marinated in olive oil, balsamic vinegar, and of course a little crushed garlic served with softened chèvre or goat cheese on top of a sliced baguette.  It makes for a great appetizer.


This amazing bite of goodness all begins by roasting the red peppers on the grill, getting them charred then letting them steam to make for the easy removal of skin.  To get the peppers ready for peeling, I either put the charred peppers in a bowl covered with saran wrap or put them in a brown paper bag that is sealed tightly.  For this crostini there is no substitute for freshly grilled red peppers no matter how much you might spend on a jar of them.  Trust me, I think I have tried almost every brand of jarred red peppers and have never found anything tasting better than freshly grilled peppers.


Once the peppers are charred and steamed it is easy to remove the blackened skins.  A little messy but easy.


The peppers are then sliced into long quarter inch strips.  The long strips are then cut in half so each one is about two to three inches long.  After all of peppers are cut put into a medium sized bowl.

I like to add a couple of cloves of fresh garlic to the oil and vinegar mixture.  Sometimes I slice the garlic, sometimes I mince it, sometimes I leave it whole.


This recipe has a 3 to 1 extra virgin olive oil to balsamic vinegar tablespoon ratio giving it a perfect balance of the oil with the vinegar.  The oil and vinegar are whisked together until emulsified and then poured over the peppers and garlic.  After gently mixing everything together add about a half-teaspoon of sea salt.  If it is not salty enough for you, season to your liking.


The flavors are enhanced if you let this sit for at least an hour before serving.  I generally put leftovers, if there are any, in the refrigerator.  Just know you will have to bring the mixture to room temperature if serving again the next day. If I forget to take the mixture out of the refrigerator, I put it in the microwave at half power for a minute or two or until its the consistency is the same as the day it is made.


Spreading softened chèvre or goat cheese over a sliced baguette forms the base of the crostini. The red peppers are then spooned over the top.  If you don't want to make individual crostinis, you can serve the roasted red peppers alongside a log of softened goat cheese and a sliced baguette allowing everyone to make their own.
Recipe
Roasted Red Pepper and Goat Cheese Crostini (slight adaptation of a recipe found in a newspaper long, long ago)

Ingredients
2 pounds of red peppers (approximately 3 to 4 red peppers)
6 Tablespoons of good quality extra virgin olive oil
2 Tablespoons of balsamic vinegar
1-2 garlic cloves, sliced thinly or kept whole
1/2 teaspoon of sea salt (or more to taste)
pinch of pepper
1 french baguette
4 to 8 ounces of softened chèvre or goat cheese

Directions
1. Heat grill and place peppers on grates.  Turn the peppers as they blacken ensuring the entire pepper has been blackened.
2.  Place blackened peppers in a bowl and cover tightly with saran wrap. Let sit for about an hour or until peppers are cooled enough to handle.
3.  Remove skins from the red peppers and slice into quarter inch strips.  Place in medium sized bowl.
4.  Add sliced, minced or whole garlic cloves (up to two cloves).
5.  Mix 6 Tablespoons of extra virgin olive oil with 2 Tablespoons of balsamic vinegar together until emulsified. 
6. Combine the red pepper strips with the olive oil mixture.  Season with sea salt and pepper to taste.
7.  Let the peppers marinate in the olive oil mixture for at least one hour.  
8.  Serve with softened goat cheese and a sliced french baguette.

Spring hasn't even arrived and I am already planning for the return of summer or I should say getting the house here ready for summer.  I spent last weekend painting one of the attic bedrooms changing the yellow walls and a gray floor to lightly shaded tan walls and a white floor.  Three coats of paint later the room took on a completely different feel and look. I think it would have been easier to assemble the grill than to paint this room, particularly the floors. It is amazing how paint transforms a room.  Just as it is equally amazing how grilling transforms the taste of food.

I am looking to turn this attic bedroom into a visually beautiful luxurious little retreat for everyone who will be visiting. Now that the room is painted I have an excuse, like I need one, to drive up to Maine next weekend and browse through the antique stores. This excursion will not be like the gas grill purchase adventure as I am pretty sure that I will not be rescued by one of my neighbors. So this time I plan to drive up in a vehicle with a trunk larger the one in my Saab.  Hopefully when this project is over I can relax before I start the next project, well maybe.

Sunday, March 10, 2013

Garlic-Rosemary Focaccia

My addiction to carbohydrates most likely started when I was young or quite possibly it is in my DNA.  If I had to make a choice, I would say it is in my DNA, meaning I am not completely responsible for my bread intake. While I have come to learn there are good carbs out there to eat, my affinity is for the group of carbohydrates in the bread group.  For me, the meal at a restaurant could be over once the basket of warm bread and olive oil or butter is set on the table.  In spite of my love of breads, I have usually resorted to buying and not making them. Maybe I had been intimidated by bread baking or maybe I was just procrastinating. And then one day I discovered a Garlic-Rosemary Focaccia in one of Nick Malgieri's cookbooks and I thought why has it taken me so long to make something from one of my favorite food groups?


Finding a recipe for bread with garlic, rosemary and olive oil in it is liking finding a great pair of four inch black patent leather high heels on sale in my size no less.  Yes, my love of bread is ranked just slightly below my love of shoes.  In my world there is no such thing as too much of either although if I had to cut back on something it probably would be bread. But seriously I thought making bread was a little difficult but making focaccia completely changed that perception and was a paradigm shift that I never thought would happen. Yes, shift really can happen, well for most of us anyway.


If you don't have a thermometer I would encourage you to buy one just to ensure you get the water temperature right.  If you have a meat or candy thermometer either will work.  The yeast and three tablespoons of olive oil are added to the 110 degree temperature water, whisked together and then set aside.

This past summer when I moved into this little farmhouse I planted some rosemary. Although we have had alot of snow this winter, the climate near the ocean is milder than in the midwest so my rosemary bushes have not only survived but they have thrived.  There is something seductive about the smell of fresh rosemary, okay maybe seductive is too strong of a word, maybe I should have said it is intoxicating.  For this recipe you will need two tablespoons of freshly chopped rosemary.

Next to rosemary, garlic is my next favorite food aroma. The smell of freshly chopped garlic, garlic roasting in the oven or garlic being sautĂ©ed in olive oil, well this would be intoxicating too.  This recipe uses eight cloves of garlic chopped to a mince.


Five cups of flour and two teaspoons of Kosher salt are added to a large bowl.  When measuring flour add the flour to the measuring cup and then with a knife smooth over the top to get the perfect cup.  If you dip your measuring cup into the flour it will pack which means you will actually end up with more than one cup of flour.

The garlic and rosemary are added to the flour salt mixture.  Using a whisk or wooden spoon combine thoroughly.


The water-yeast mixture and milk are then added to the flour mixture.  Using a wooden spoon mix combine the wet and dry ingredients.  Once combined beat vigorously for about a minute until it all comes together in a ball.


Cover the bowl with plastic wrap and let sit for approximately one hour or until it has doubled in size.


Using an 11 by 17 inch jelly roll pan spread 1 1/2 Tablespoons of olive oil over the bottom.  Remove dough from bowl and using your hand press on dough so the pan is covered completely.  If the dough is resisting, let it set for a minutes before continuing to press and stretch it out.  Once it is all spread out, use your thumb to make indentations every two inches.


Top the dough with 1 1/2 Tablespoons of olive oil and one teaspoon of sea salt.  Additional sprigs of rosemary can be be added as well.  Let the dough rest uncovered for about an hour or until it has doubled in bulk.

Place in the lower third of the oven and bake at 450 degrees for 20 to 25 minutes.  If the is browning too quickly place another jelly roll pan underneath.  Rather than take any chances or getting distracted I begin the baking with the use of two jellyroll pans.


The focaccia bakes to a most beautiful golden brown.  The aroma coming out of the oven is incredible but the taste of this bread dipped in olive oil is so over the top delicious flavored.  The garlic and the rosemary don't overpower the focaccia but you can taste these flavors in each bite.  And as it turns out making this focaccia is pretty easy, really.

Recipe
Garlic-Rosemary Focaccia (slightly adapted version created by Nick Malgieri's "How to Bake" cookbook)

Ingredients
1 cup warm water (about 110 degrees)
1 envelope active dry yeast
6 Tablespoons of good quality extra virgin olive oil (divided)
5 cups unbleached all-purpose flour
2 teaspoons Kosher salt
2 Tablespoons chopped fresh rosemary
8 cloves fresh chopped garlic
1 cup whole milk
1 teaspoon of sea salt

Directions
1. Measure water in a bowl. Immediately whisk in yeast and 3 tablespoons of olive oil.  Set aside.
2. In a separate large bowl, combine flour with 2 teaspoons Kosher salt, rosemary and garlic.  Combine thoroughly.
3. Using a wooden spoon or spatula, stir the water-yeast mixture and milk into flour mixture stirring thoroughly until the flour is thoroughly moistened.  Then beat vigorously for one minute, as it will come together in a ball.  Cover the bowl with plastic wrap and let the dough rise  until it has doubled in bulk, about one hour.
4. Pour 1 1/2 tablespoons of olive oil onto a 11 by 17 inch jelly roll pan.  Spread olive oil with your fingers to cover the pan.
5. Turn the dough out to the bowl onto the pan and pat to press it to fill in completely.  If the dough resists let it rest for a few minutes before continuing to press it out to stretch it to fill the edges of the pan.
6. Dimple the surface of the focaccia with your thumb to poke cavities in the dough at 2 inch intervals.
7. Drizzle the remaining 1 1/2 tablespoons of olive oil and sprinkle with sea salt and fresh rosemary sprigs. 
8. Allow the dough to rise until doubled in bulk, about 1 hour.
9. About 20 minutes before baking set a rack in the lower third of the oven and preheat to 450 degrees.
10. Bake the focaccia for 20 to 25 minutes or until a deep golden color.  Lift a side of the focaccia with a spatula about 15 minutes into the baking to see if it is coloring too quickly.  It it is, slide another pan under it to insulate the bottom.
11. If you are serving immediately or serving later, slide the focaccia off the pan to a rack to cool.
12.  Cut into narrow long slices about 1 1/2 or 2 inches thick if serving for dinner or as an appetizer.  Serve with plenty of good quality olive oil for dipping or softened butter topped with sea salt. 
13. If making for sandwiches cut into the size squares of your choice, then cut horizontally when making the sandwich.
Note:  The focaccia is best on the day it is made.


Finding a new recipe that takes your cooking or baking to new places is like finding an interesting antique or treasure.  Just like I thought I had no interest in baking bread, I never in my wildest dreams thought that I would buy a set of real deer antlers.  But last fall I was up in Maine antiquing and there sitting on a table in an antique shop were a set of deer antlers.  I noticed them but kept on browsing.

When I am on the hunt for a particular item I tend not to see everything in front of me so I end up walking around and around an antique shop several times over. But as I kept walking around, I kept seeing the antlers. They were not anywhere on my list of must haves. Yet there was something alluring about them.  If they could have talked they would have been calling my name, no they would have been shouting my name. So about the fourth and last time around the antique store I decided I wanted them, that I needed to have them.  Suddenly all of my preconceived notions about antlers flew out the window. In some ways there is connection between these antlers and making of the focaccia.  After I let go of my preconceived notions about both of them, I wondered why it took me so long to open myself up to possibilities.


Saturday, March 9, 2013

Turtle Cheesecake aka Pixie Cheesecake

In the midwest there was a chain of candy stores or I should say stores selling all kinds of 'finely made' chocolates that was a favorite destination. Receiving chocolates from this store in our Easter baskets, Christmas stockings or as a gift was a treat as we were thrilled to get what we thought to be the best chocolates in the world. This store we grew up with was called Fannie May Candy and their chocolates were contained in their distinctive white box with gold lettering. It is still around but it is not the same store I grew up with even though they carry the candies made by the 'original' Fannie May.  My personal favorites were the vanilla buttercreams dipped in dark chocolate and the caramels, but it seemed that everyone else in my family had as their perennial favorite, the Pixies.  A pixie was made of creamy caramel topped with pecans and then covered in milk chocolate.  Some of you know this candy confection by another name, turtles.  And when you look at them, I suppose they do sort of look like a turtle.


One day a few years in an office where the number of females outnumbered the number of males, one of the male staff members brought in what he called a Turtle Cheesecake. Everyone asked if he could ask his 'wife' to share the recipe.  He said no he couldn't.  You could have heard a pin drop as this was a place where everyone willingly shared their recipes. So to fill the void of silence, someone then said 'please will you ask her?' He laughed and said 'well I can't ask her because it isn't her recipe, it's mine'. Up until that point, no one knew he had a passion or talent for cooking and baking. And honestly if he wasn't married, I do think every 'single' female in the room would have wanted to be invited to dinner or at least for dessert.


So this Turtle aka Pixie cheesecake recipe has it all, the chocolate, the caramel and the pecans.  It is easy to want to skip the step of toasting the pecans before chopping them.  But just know that the taste and fragrance of the pecans is incredibly enhanced when lightly toasted.  So I beg you, do the toasting.


A box of vanilla wafers will yield more than the two cups of crumbs you need for the crust, leaving you some cookies to nibble on while you are making this recipe.  You can use a food processor to make the crumbs or place them in a large ziplock baggie and crush with a rolling pin.


The melted butter and crushed wafers are mixed together and pressed into a springform pan.  I always line my springform pan with parchment paper as it makes the removal of the cheesecake from the pan so much easier. Make the crust so it comes up about an inch on the side of the pan as you will need it to contain the melted caramel. The crust is baked at 350 degrees for 10 minutes and then cooled.


Maybe the most tedious part of making this cheesecake is the unwrapping of the caramels.  But not to worry, it goes fast.  Once unwrapped the caramels are combined with the evaporated milk in a bowl over steaming water on the stove.  Stir periodically until it is a creamy melted caramel mixture.


The melted caramel mixture is poured over the baked and cooled crust.  Adding a sprinkling of sea salt over the caramel adds a great depth of flavor. The toasted chopped pecans are then added on top of the sea salted caramel mixture.  The crust-caramel-pecans are then refrigerated for at least 10-15 minutes or just until caramel sets.  This helps to ensure the caramel remains in place when pouring the batter on top.


While the crust is chilling, the cream cheese and sugar are mixed together until smooth.  Having room temperature cream cheese is really important otherwise it won't cream well and you will have little clumps of cream cheese in the finished batter. After adding the vanilla, the room temperature eggs are added one at a time until completed blended in.
Once the cream cheese, sugar, eggs and vanilla are mixed together you add the slightly cooled chocolate.  If your chocolate is too hot it will clump up in the cheesecake batter, if it is too cold it will also appear like clumps in your batter. Its all about getting the chocolate to the right not too hot, not too cold balance.

The cheesecake batter is then poured into the pan.  Using an offset spatula, smooth the top before placing in the oven.

The cheesecake is baked for approximately 40 minutes or until the filling is barely set. You should have some movement in the middle.  But not to worry, this is how you want it.  Remove from the oven and allow to cool.  Cover and refrigerate overnight.  Use a knife to release the cheesecake from the sides of the pan when unmolding.

Place on a cake stand or platter. Cut into slices and enjoy.

Recipe
Turtle Cheesecake aka Pixie Cheesecake (slight adaptation to a recipe share by a colleague from long ago)

Ingredients
2 cups vanilla wafer crumbs
6 Tablespoons unsalted butter, melted

14 ounce package of wrapped caramels (unwrapped)
5 ounces evaporated milk
1 cup pecans, toasted and chopped
24 ounces cream cheese, room temperature (three 8 ounce packages)
1/2 cup sugar
1 1/2 teaspoons vanilla
2 large eggs, room temperature
1/2 cup semi-sweet chocolate, melted
sea salt

Directions
1.  Preheat oven to 350 degrees.
2.  Line a 9 inch springform pan with parchment paper.
3.  Toast pecans for 6 minutes.  Cool, chop and set aside.
4.  Mix vanilla wafer crumbs and melted butter.  Press into the prepared springform pan.  Bring some of the mixture up the sides of the pan.  Bake for 10 minutes. Allow to cool.
5.  Unwrap caramels and place in the top of a double boiler (or a glass bowl over steaming hot water).  Add the evaporated and milk.  Melt the caramels in the milk.  Could take up to 10 minutes.
6.  Pour melted caramel over the cooled crust.  Sprinkle very lightly with sea salt. Top with the chopped pecans.  Place pan in the refrigerator to allow caramel to set, about 10-15 minutes.
7. Melt chocolate chips over a double boiler, allow to cool but not harden.
8. In a mixer using a paddle attachment, mix the cream cheese and sugar until smooth.
9. Mix in vanilla.
10. Add eggs, one at a time until mixed in.
11. Add slightly cooled melted chocolate.
12. Pour batter over the caramel and nut layer of the crust.
13.  Bake for approximately 40 minutes, or until barely set in the center. Remove from oven and cool.
14. Cover the cooled cheesecake and refrigerator overnight.


When I was in college, my dad used to send me a pound sized vanilla cream filled egg from Fannie May Candies. It usually was sent after Easter as my economical dad would buy it on sale the day after the holiday. When it arrived at the dorm and ultimately at the sorority house, it didn't last long as everyone came in asking if they could have just a small slice. I suppose I should have been happy to be saved the intake of so many calories, but secretly I wanted to make this cream filled egg become a daily treat for all of the studying I was doing on Mondays, Tuesday, Wednesdays, Fridays, Saturdays and Sundays. Thursday nights at the University of Illinois were reserved for going out to the bars. Somehow beer and chocolate did not seem like a good combination on those nights.

Easter would not be Easter if I didn't buy Fannie May candy as gifts for family members or put out on a tray at the holiday dinner.  There are no Fannie May Candy stores out here on the east coast, so when I travel back to the midwest I usually try to pick up a box to keep for 'company'. Childhood memories are always pretty powerful.  So even though I have gone on to appreciate other chocolate candies (Donaldson's in Lebanon, Indiana and Haven's Candy in Maine), Fannie May candies will always be my favorites. Its funny how making this turtle cheesecake aka pixie cheesecake brings back a set of great memories from a long time ago, especially the ones involving my dad.