Saturday, September 7, 2013

Zucchini Bread

No eye rolling please as what I am sharing with you is not your ordinary zucchini bread recipe. I know there may be a few of you making some facial expressions right now because quite possibly we have all been served a zucchini bread that just didn't do it for us. Making us dread seeing it on the table or brought to us as a gift. For some, zucchini bread can even fall into the much aligned fruitcake category. But no one will be making any faces when you bring them or serve them a loaf of this zucchini bread. Even people who say they don't eat zucchini bread will become converts. I promise. Girl Scouts honor.


Yes, I know there are hundreds of zucchini bread recipes out there all claiming to be moist and delicious. But this recipe really does yield a most delicious and moist zucchini bread, one filled with raisins and toasted walnuts and enhanced with a generous teaspoon of cinnamon. The result is a zucchini bread perfect for breakfast (with a schmear of cream cheese), as a mid-day snack (with or without a schmear of cream cheese), or a before bed treat (definitely without the schmear of cream cheese).

The recipe makes two beautiful loaves. One for keeping, one for giving away. I am not big on freezing baked goods, with the exception of chocolate chip cookies. But I have known people who freeze loaves of zucchini bread. With a recipe is as simple as this one, and after having a taste of it warm, you might reconsider freezing a loaf.

The farm stand and road side stands are filled with beautiful zucchini now, making them a perfect end of summer, beginning of fall vegetable to cook, bake or make pickles with. And if you have friends how grew zucchini in their gardens, they are probably looking to give their bountiful harvest away. Which you can turn around and regift to them in the form of a freshly baked loaf of bread. The perfect win-win!


This zucchini bread calls for three cups of shredded zucchini. Depending on the size of the zucchinis you have, you will need anywhere from two to three of them. No peeling necessary as the skins remain on the zucchini when you grate them, adding bits of color to the finished bread. I used a hand grater to shred the zucchini but you can easily grate in your food processor.


Many zucchini breads have nuts in them, but not many of them have raisins. Whether you use golden or dark raisins or a combination of the two will not matter. The sweetness of the dried raisins further transforms this bread from ordinary into extraordinary.


All of dry ingredients, including the shredded zucchini, chopped toasted walnuts and raisins are mixed together in a large bowl. However, I like to first mix together the flour, sugar, baking soda, baking powder, salt and cinnamon before adding in the zucchini, raisins, and chopped walnuts.


In a separate bowl you will mix together three eggs, two teaspoons of vanilla and one cup of vegetable oil until well combined. You can mix the wet ingredients with a hand mixer or a whisk. When the eggs, vanilla and oil is thorough combined, you pour over the dry ingredients and stir using a wooden spoon until well blended.  The result will be a very dense, thick batter.


The recipe makes two loaves of bread if you are using 5x9 inch pans. If you line the pans with parchment paper the breads will be so easy to remove from the pan. When having to divide batter between two pans I like to weigh them on my kitchen scale so that both loaves come out looking exactly the same. Equally important is that your baking time will also be the same for both loaves. In 5x9 inch pans  at 350 degrees these loaves will bake anywhere from 55 to 65 minutes. I recommend you check them for doneness at 50 minutes, just in case your oven runs a little hot.


Recipe
Zucchini Bread (several adaptations to the Aunt Rose Zucchini Bread recipe shared by Dom DeLuise in his cookbook Eat This It'll Make You Feel Better)

Ingredients
3 cups all-purpose flour
1 1/2 cups granulated sugar, plus some additional for sprinkling on top of loaves
3 cups shredded, unpeeled zucchini (2-3 zucchini will yield this amount)
1 cup raisins (golden or dark)
1 cup walnuts, toasted and coarsely chopped
1 heaping teaspoon Saigon cinnamon
1/4 teaspoon Kosher salt
1 teaspoon baking soda
1 teaspoon baking powder
2 teaspoons vanilla
3 large eggs, room temperate
1 cup vegetable oil

Directions
1. Preheat oven to 350 degrees (F) and line two 5x9 inch loaf pans with parchment paper.
2. In a large bowl first mix in the flour, sugar, salt, baking soda, baking powder and cinnamon. Stir to combine. Then stir in shredded zucchini, raisins and nut. Mix to blend.
3. In a separate bowl, mix the eggs, vanilla and oil using a hand mixer or whisk.
4. Pour wet ingredients over dry ingredients and stir until thorough mixed.
5. Equally divide the batter into the two loaf pans (unless you have a really good eye, suggest you weigh them).
6. Optional: top loaves with a sprinkling of granulated sugar
7. Bake for 55-65 minutes until done. Use a cake tester or toothpick to test for doneness.
8. Remove from oven and let cool on a wire rack.


While fall is not yet officially here, September has already had a few sunny, crisp days. Without a doubt, the fall is my absolutely most favorite season and not just because my birthday falls in it (although that would be a good enough, slightly narcissistic though, reason to love it). No really, the weather (especially those cool perfect sleeping weather nights), the flowers, the changes to the landscape, the autumnal fruits and vegetables and of course, the holidays (Halloween and Thanksgiving) are all of the reasons that make me love this season more than the others. 

As I was driving the other day, the apple orchard/pumpkin farm had it's 'open' sign up. It may be a little too early, but I can hardly wait to fill the window boxes and decorate the porch with pumpkins. Of course, not the deep orange pumpkins, but the white, green and pale orange ones. And when combined with the flowering kale, they add such a great feel to the farmhouse here. Let's see how long I can wait until I go shopping for pumpkins. My guess is that it won't be too long.


Thursday, September 5, 2013

Sea Salted Caramels

Admittedly I love chocolate. Not all chocolate as I have grown to be a tiny bit little fussy as to what chocolate I will or will not eat. Nowadays I have a leaning toward dark chocolate as I have convinced myself it has medicinal qualities. Although I might not necessarily pass up a piece of any good quality milk chocolate. Yet in spite of my love for chocolate, caramels are the one confection that I have an even deeper affection for. Caramels without nuts, with nuts, dipped in dark chocolate, dipped in milk chocolate, with sea salt, or without sea salt. The choices of caramels are endlessly delicious. But if I had to choose just one to eat for the rest of my life (and I am not one who likes to choose only one), without giving it a second thought, I would choose a sea salted caramel. Yes, the deliciousness of a sea salted caramel is beyond amazing. I would call it scream worthy but if I use scream worthy too often when describing some foods, it will lose it's impact. But just know these really are scream worthy. It almost feels sinful to indulge oneself in this buttery, creamy, melt in your mouth confection. With almost being the operative word here as it would be a sin in of itself not to allow oneself to enjoy them, in moderation of course.
It was more than thirty years ago when I made my first batch of caramels. It was my first time using a candy thermometer and my first time making 'candy' (unless of course fudge counts as candy). The recipe was given to me by a woman who I worked with in the china department at Marshall Field's (I was a temporary Christmas employee working primarily to get the employee discount for my holiday shopping). Little did I know at the time that as a result of my time in the china department that I would develop both an obsession (oh I really mean appreciation) for caramels as well as for china. Up until that time I had never tasted a homemade caramel and would often pass over the chocolate covered caramels in the Fannie May Candy box in favor a dark chocolate covered vanilla cream. But after tasting a homemade caramel, the choices I made when receiving a box of chocolates changed. And a gift of a box of caramels has become more treasured than a box of chocolates.

While I no longer have the small piece of paper on which the recipe was beautifully written, the recipe itself lives on. In part thanks to one of my friends who re-shared my recipe with me as I had misplaced the even smaller piece of paper I had typed (yes, typed) the recipe on. In the last several years I have made one change to this recipe. After discovering how sea salt even further elevates the taste of caramel, the caramels I make these days are now finished with sea salt.

I don't know if it was the anticipation of fall, seeing caramel apples, or the humidity finally breaking, that made me want to make the sea salted caramels this week or not. I do know that this is one of those cooler, not overly humid weather making confections. Although I recall making them in the August heat for a county fair years back. It must have been my lucky day (or the reward for suffering through the making of these caramels on a wickedly hot day) as the caramels not only won the blue ribbon in the candy division, they won a grand prize ribbon as well. I am not sure what compelled me back then to enter a county fair (with women who take these contests rather seriously), but that bucket list experience has now been checked off.


Having a good heavy sauce pan is as important as having an accurate candy thermometer when making caramels. My personal pan preference is All-Clad, however, any heavy duty stainless pan should work.  If you have not yet bought a candy thermometer, consider getting a digital one as they take the guessing out of knowing when you have reached your desired temperature. The caramel making process all begins when one pound of unsalted butter is melted over low to medium heat.

Once the butter is melted, one pound of light brown sugar and a pinch of Kosher salt is added and mixed until the brown sugar has melted into the butter. Stir with a wooden spoon to ensure there are no lumps. Why wooden spoon? The mixture is going to gradually increase in temperature so it is best to begin and end with using a wooden spoon as a metal spoon will begin to take on the heat as the cooking process continues. Trust me, I have learned this from experience.

The corn syrup is added, followed by the sweetened condensed milk. Each time you add an ingredient, stir until well blended. Cooking over medium-low heat it will take anywhere from 20 to 25 minutes before the caramel reaches 248 degrees. You do not need to stir it constantly, but whatever you do, do not walk away from the cooking caramel. I generally stir the mixture every 2-3 minutes, making certain there is no burning at the bottom of the pan. Once the caramel reaches 248 degrees, remove from the burner and quickly stir in 1 teaspoon of vanilla.


Your parchment paper lined 9x12 inch pan should be ready and waiting as you want to immediately pour the hot caramel mixture into the prepared pan. Allow the poured caramel to set for several minutes before lightly sprinkling sea salt over the top. Some of the sea salt will melt into the caramel, so be careful to sprinkle very lightly here. You will be adding more sea salt once the caramels have cooled completely and you are ready to cut.


You can cut the caramels into any size. I like to cut mine into 1 inch squares as it makes for a perfect bite. Remember, a light sprinkling of sea salt is added to the cooled caramels right before you get ready to cut and wrap.


Wrapping the caramels in cellophane makes for a great presentation and also keeps them fresh. I usually cut squares from a roll of cellophane unless I had some store bought precut squares (which is not very often). Once all of the caramels are wrapped, you can package them on platters or in bags. Once the weather turns much cooler and there is no humidity, I will store the caramels in a tin in the house. Until that time, I will store them in a container in the refrigerator, bringing them to room temperature before serving. If you are looking for the perfect gift to bring to your friends, you have now found it.

Recipe
Sea Salted Caramels (adaptation of a recipe given to me more than 30 years ago)

Ingredients
1 pound light brown sugar
1 pound unsalted butter
1 cup corn syrup
1 can sweetened condensed milk
1 teaspoon vanilla
pinch of Kosher salt
sea salt for finishing (recommend Maldon sea salt)
Optional: 1 cup walnuts, toasted and chopped

Directions
1. Melt butter in a heavy medium sized saucepan over low to medium heat.
2. Add brown sugar and pinch of Kosher salt. Stir so that no lumps remain.
3. Add corn syrup and stir until blended.
4. Add sweetened condensed milk. Stir until blended.
5. On medium heat cook mixture until it reaches 248 degrees on a candy thermometer. Immediately remove from heat when it reaches this temperature.
6. Add vanilla and stir with a wooden spoon. Optional: If you like your caramels with nuts in them, you will quickly stir them in after you have added the vanilla. Remember to toast and chop them before adding to the caramel mixture.
7. Pour mixture into 9x12 inch pan lined with parchment paper.
8. Allow to set for 5 minutes and lightly sprinkle with sea salt (don't over do it here as you will be adding more later).
9. Allow to cool. Continue cooling in refrigerator.
10. Remove from the refrigerator and lightly sprinkle caramels with sea salt. Using a long sharp knife, cut caramels into 1 inch squares and wrap with cellophane.
11. During warmer weather store in refrigerator. Bring to room temperature before serving or eat chilled.
12. During cooler weather, place wrapped caramels in a tin or container.


When the fall came when I was in elementary school there were taffy apples for sale every Friday. I think they were called affy tapples and while not having much caramel on them, they transformed an apple and were a welcoming end of the week treat. At the time it was the only way I would eat an apple. Since experiencing the mass produced, pre-packaged taffy apples, I have found candy stores (the mom and pop ones) who make some rather amazing caramel apples. Probably my favorites are the caramel apples made by Dan's Homemade Candies in Joliet, Illinois. While its been more than 7 years since I had one of their apples, I haven't come across a hand dipped caramel apple I like better (and it is not for the like of trying). Recently a friend told me they shipped their apples, but there is something about going into a store and picking 'just the right one'.

Isn't it funny how we remember the foods from our childhood? Maybe these foods have left a permanent impact on our taste buds. And while history is the enemy of memory, I would venture to say that if I were to eat some of those exact same favorite childhood foods today I might wonder what it was that made me think they were the best things ever. And whether it's a memory of really good or really bad food, we also seem to have the uncanny ability to remember not only what we ate growing up, but also the foods of a holiday meal or those experienced at a meal with a friend. I may not remember what I had for lunch last week, but I can remember almost all of the meals that had some significance or affected me in some way. Because sometimes it wasn't the food that mattered at all. It was who the meal was shared with that made the food seem like the best one ever. Regardless if that food was an incredible confection or even just a late night McDonald's cheeseburger.

Tuesday, September 3, 2013

Cowboy Cookies

With the Labor Day weekend now over (unfortunately) this week begins the first few days of school for the kids who live near me. So as the long weekend ended, I thought I would bake up a batch of cookies to have them ready to be delivered at the end of their first day. Is there anything better than homemade cookies and milk after a long day? Okay there are other options, like wine and cheese, but don't we all still get a certain euphoria from recalling (and even better re-experiencing) some of our youth? Hopefully as adults we have retained our curiosity, our creativity, and especially our hunger for sweets to nurture that inner childhood! The consumption of sweets might be one of the things that actually keeps our spirits and hearts young. This could be a theory with some merit.

Okay, back to the cookies. I wanted to bake a cookie for the kids that I have not yet sent on the platter over the stone fence. As much as I love (and they love) the chocolate chip cookies, I wanted to make something different (even though I am who one does not believe there is ever such a thing as too much of a good thing. I just wanted to make sure everyone knew my cookie making repertoire went beyond the chocolate chip cookie!).  I found the inspiration I was looking for in one of my cookbooks. It is a cookie that has many variations but, in each variation there are at least three common ingredients: chocolate chips, oatmeal and dried cranberries. Some recipes call for nuts and/or coconut, but this version of the Cowboy Cookie is my favorite. And since the kids next door aren't fond of nuts or coconut in their cookies, I thought this might be the perfect first day of school cookie. To go with a glass of milk, of course.


While I am no June Cleaver (for those you who have never seen Leave It to Beaver, June was the matriarch of a family of four), I think the image of her serving freshly baked cookies and milk to her sons after school was permanently imprinted into my memory. At the time I wondered if it was only kids on television who came from school to warm, freshly baked cookies. For those of you whose parent embodied the best of June Cleaver and Aunt Bee, you would have known this not to be true. Consider this wondering part of my sheltered childhood.


Whenever a recipe calls for brown sugar, I like to either exchange light brown sugar for dark brown sugar or use a combination of both. There is something about the depth of flavor in dark brown sugar that transforms the taste of a cookie. So in my modified version of Rebecca Rather's Cowboy Cookie recipe I use equal parts dark and light brown sugar.


I love the combination of oatmeal, chocolate and dried cherries. These ingredients create a cookie so different from chocolate chip and oatmeal cookies but yet so insanely delicious you may never make another oatmeal cookie again. You can use dried cranberries, but there is something about the taste of the dried cranberry that takes them a little over the top.


Room temperature unsalted butter and the sugars and mixed until light and fluffy followed by adding the room temperature eggs and vanilla. Once the eggs are mixed in, all of the dry ingredients are added at once. The result will be a very thick, stiff batter. I mix in the chocolate chips and dried cherries using the paddle attachment on the mixer, but you can mix them in with a wooden spoon.


If you have not yet discovered the wonderfulness of using an ice cream scoop to make your cookies, maybe this is the cookie that will convince you to get one. I used a 1 1/2 inch diameter ice cream scoop to form the cookies and was able to have 12 cookies spaced two inches apart on each cookie sheet.


The cooking time for these cookies is 10 to 14 minutes. Yes, I know that is a wide range, but mine took 14 minutes to bake in a preheated 350 degree oven although I started checking them at 12 minutes. The cookies will be a light golden brown when ready to remove from the oven.


The baked cookies should be transferred to a cooking rack. I used to not think the step of transferring cookies to a cooling rack wasn't important, but learned over time that the hot cookie sheet will continue to 'bake' the cookies resulting in a sometimes drier cookie. When cooled, these cookies are supposed to be chewy in the middle. That is part of their deliciousness. 


Recipe
Cowboy Cookies (slight adaptation of Rebecca Rather's Cowboy Cookie recipe from The Pastry Queen Christmas cookbook)

Ingredients
1 cup unsalted butter, room temperature
1 cup brown sugar (1/2 cup dark brown and 1/2 cup light brown) Note: you can use all light brown sugar
1 cup granulated sugar
2 large eggs, room temperature
1 teaspoon vanilla extract
2 cups all-purpose flour
1 teaspoon baking soda
1/2 teaspoon baking powder
1/2 teaspoon Kosher salt
2 cups old-fashioned rolled oats
12 ounces of chocolate chips
1 1/2 cups dried cherries (could use dried cranberries)
Optional: 1 cup chopped walnuts, toasted

Directions
1. Preheat oven to 350 degrees. 
2. In a mixer fitted with a paddle attachment, cream the butter and sugars until light and fluffy (approximately 1 to 2 minutes).
3. Add eggs and vanilla and beat at medium speed for another minute.
4. In a separate bowl, combine the flour, baking soda, baking powder, salt and oatmeal. Stir to combine.
5. Add the mixed dry ingredients and beat at a lower speed until combined.
6. Stir in chocolate chips and dried cherries. The batter will be thick.
7. Using a 1 1/2 inch diameter ice cream scoop, drop the cookie dough 2 inches apart on cookie sheets lined with parchment paper. You will get 12 cookies per sheet.
8. Bake for 10-14 minutes or until cookies are golden. 
9. Transfer baked cookies to a rack to cool.
10. Serve immediately, package as gifts, or put in a covered jar or tin to enjoy.


It feels like forever since I posted a recipe to the blog even though it has been a little more than a week. The process of posting for the blog is very different than everyday cooking and entertaining and my energies last week were spent on creating meals for my sister and brother-in-law and not on creating posts for the blog. Go figure! Although I wished I had just taken just a few photos of the Plum and Raspberry Crumble we had for dinner one night as it was crazy delicious. This will be a recipe that you will see in the weeks ahead because it was that good that I need to share it with you. And plums are in season right now.

As I was making meals this past week I realized just how much my cooking has started to change over the past year. I am beginning to be so much more influenced by the vegetables and fruits that are in season when deciding on a recipe than I am about making a recipe because I like it. I already know I am going to be heart sick when the tomato season is over. And even though I have frozen some of the blueberries I had picked at the blueberry farm, I am already missing the taste of warm off the bush fresh blueberries. So as I was browsing through one of my Canal House cookbooks, I know understood why their recipes were organized by season. What I don't understand is why it took me so long to understand all of this. But better late than never, so they say.

Friday, August 23, 2013

Tomato Crostata with Honey Thyme Glaze


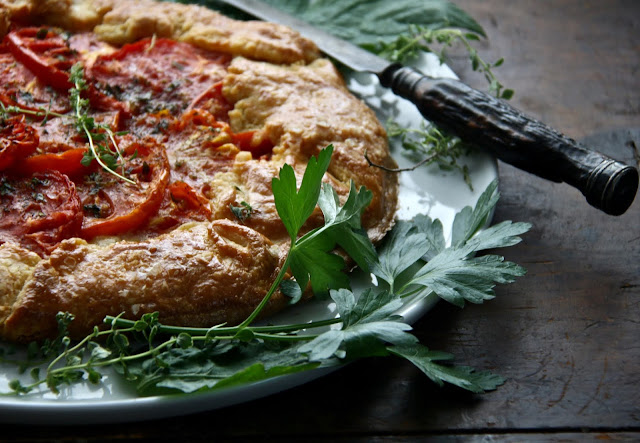
First it was a Panzanella, now it's a Tomato Crostata with Honey Thyme Glaze. I suppose you could say there is a tomato theme going on this month. In spite of this being the second recipe using tomatoes this month, the two could not be more completely different from one another. The Panzanella works perfect as the salad dish. While the crostata can be a main course, a first course, or all its' own with cocktails. It is versatile, has an incredible flavor, and makes a stunning presentation. Making it the trifecta of all crostatas! As Ina Garten might say 'Does it get any better than that?'. But this recipe does not come from the Barefoot Contessa. Instead it comes from the equally amazing Melissa Clark, cookbook author and food writer for the New York Times. She is the who is responsible for creating and sharing this incredibly scrumptious recipe.


This was one those recipes I came across by chance as I wasn't looking for another tomato or even another savory crostata recipe. But after reading the ingredient list, I knew that I had to make it. Especially because tomatoes were in season. And I promise, really promise, that if you serve this crostata to your family and friends it will disappear quickly. It is so good that you might almost wish you had made two of them (because you might not even get a slice). And maybe depending on how many people you are serving, you probably should. The recipe said it could be served warm or at room temperature. It tasted absolutely divine room temperature and unless I was making it for a casual summer luncheon, I think that is how I would serve it again.


A few weeks back I switched out an ingredient without success so it was with a little trepidation that I switched out an ingredient in the dough recipe. However, in switching out the fine cornmeal with corn flour I could not have been happier with the outcome (not to mention having the added benefit of a boost of confidence). Not only is the crust incredibly delicious, the layers of garlic, cheese, thyme and tomatoes make this a rather sinful savory crostata. Note: I have since made the dough using a fine cornmeal and absolutely love the flavor and texture it adds to the baked crust. 


The look of the crostata will vary depending on the colors and varieties of tomatoes you use. Whether you use all of one color or a combination of colors or one or multiple varieties of tomatoes, your crostata will be a feast for the eyes. There were some beautiful locally grown tomatoes at the farm stand I go to and I couldn't resist getting them. And since I have rather monochromatic tendencies anyway, it really wasn't that surprising that I made this crostata with all red tomatoes.

The tomatoes are sliced to a 1/4 inch thickness and placed on a baking sheet lined with two layers of paper towels. A teaspoon of Kosher salt is sprinkled over the tomatoes and they are let to sit for at least one hour or up to three hours. I let them to for two hours as this was the same amount of time the dough needed to be refrigerated. The sliced tomatoes will be brushed with a honey-thyme mixture right before the crostata is assembled.

Awhile back I shared my aversion to making dough, however, it seems I have now gotten (or am still getting) past this unfounded reluctance. I am not sure whether I have just come across some really great dough recipes, ones that help to boost one's dough making confidence or if I am just getting better working with dough. Its' probably a combination of both. What makes this dough just a little different or a little more savory is the infusion of grated New York extra sharp white cheddar cheese. The dough comes together easily using in a food processor. Once made, it is rolled into a ball, flattened, covered in plastic wrap, and allowed to chill for at least two hours.


Once chilled the dough it is rolled out on a floured surface to a 1/4 inch thickness. You should end up with a 12 inch circle, not a perfect circle as this crostata is meant to be just a little bit rustic. After it is rolled out, it is placed on a baking sheet lined with parchment paper and refrigerated for 20 minutes.


The recipe calls for both a honey-thyme as well as an extra-virgin olive oil-garlic mixture. Both are easy to make and each takes less than 5 minutes. For the honey-thyme mixture, you put the cider vinegar, honey and sprigs of thyme into a small saucepan and bring to a simmer. Once made the mixture is placed in a bowl and set aside. Using the same saucepan (wiped out), the extra virgin olive oil and garlic are placed on stove cooking only until the garlic is golden and lightly caramelized. The garlic cloves are removed from the olive oil, chopped and set aside. The remaining garlic infused olive oil is also reserved.

When the crostata is ready to assemble, you will begin by placing one cup of shredded New York extra sharp cheese (I bought a block of cheese and shredded it myself), one tablespoon of chopped thyme and the chopped garlic on the dough, making sure you leave a 3 inch border. Before layering the tomatoes, you will sprinkle some freshly ground pepper over the cheese layer. After layering the tomatoes, the remaining one tablespoon of thyme and the reserved garlic infused olive oil is drizzled over the top.


The crust is gently folded up and brushed with an egg wash. Before placing in a preheated 425 degree (F)oven, sprinkle generously with flaky sea salt. Top with either the sprigs of thyme that were cooked with cider vinegar and honey or some fresh sprigs.


The crostata is baked for 30 to 35 minutes or until the crust is a deep golden brown. If serving warm, allow the crostata to sit for at least 15-20 minutes before cutting. Because it is equally delicious enjoyed warm or at room temperature, it can be made several hours ahead of serving. Take advantage of the summer tomato season and make this crostata!

Recipe
Tomato Crostata with Honey-Thyme Glaze (very slight adaptation to the recipe created by Melissa Clark)
Updated July 2020

Ingredients
Crust:
1 cup (130 g) all purpose flour (plus more for rolling out dough)
1/2 cup (65g) corn flour (or 1/2 cup fine cornmeal)
1/4 teaspoon flaky sea salt
10 tablespoons cold unsalted butter, cut into small cubes
1/2 cup (2 ounces/57g) extra-sharp white cheddar cheese, coarsely grated
4 to 6 Tablespoons ice water

Filling:
1 1/2 - 1 3/4 pounds (590-750 g) of tomatoes (can use a variety or all of the same), sliced to 1/4 inch thickness. Note: If using cherry or grape tomatoes need only 3/4 pounds.
1 teaspoon Kosher salt
2 Tablespoon cider vinegar
1 Tablespoon honey
1 cup (4 ounces/113g) extra-sharp white cheddar cheese (coarsely grated)
2 Tablespoon extra virgin olive oil
3 garlic cloves, smashed and peeled
2 Tablespoons chopped fresh thyme (divided)
4 to 6 sprigs of thyme
Black pepper
1 large egg plus 1 teaspoon water or heavy cream
Maldon sea salt

Optional: Mike's Hot Honey for drizzling over slices of the crostata

Directions
Crust:
1. Add flour, corn flour and salt to food processor. Pulse to blend.
2. Add butter and cheese pulsing until mixture forms chick-pea size pieces.
3. Add ice water 1 Tablespoon at a time, pulsing until mixture is just moist enough to hold together.
4. Form dough into a ball and flatten. Wrap in plastic wrap and refrigerate at least 2 hours.

Filling:
1. Line a baking sheet with two layers of paper towels. Place tomato slices and sprinkle with 1 teaspoon of Kosher salt. Let sit for at least 1 or up to 3 hours (I let sit for 2 hours).
2. In small sauce pan, mix cider vinegar, honey and thyme springs. Bring to a simmer. Transfer to a bowl and set aside.
3. Wiping out the saucepan, add olive oil and garlic. Cook garlic for 2 to 3 minutes or until golden and slightly caramelized. Remove garlic and chop. Reserve the garlic oil.

Assembly:
1. On a lightly floured surface roll out dough to 1/4 inch thickness. The dough should form a 12 inch circle. Place rolled dough on a parchment lined baking pan and place in the refrigerator for 20 minutes.
2. On the chilled dough, sprinkle cheese, chopped garlic and half of the chopped thyme leaving a 3 inch border of dough. Sprinkle with freshly ground black pepper.
3. Pat tomato slices dry with a paper towel and brush each slice with the honey thyme glaze.
4. Layer tomatoes over cheese/garlic/thyme mixture in an overlapping pattern (leaving a 3 inch border of dough). 
5. Over the tomatoes, sprinkle remaining 1 tablespoon of chopped thyme and drizzle with reserved garlic flavored olive oil.
6. Gently fold crust up around tomatoes, creating a 1 1/2 to 2 inch border of dough.
7. In a small bowl, whisk the egg and 1 teaspoon of water (or heavy cream). Brush egg wash over the dough. Season top of crostata with sea salt and the reserved sprigs of thyme (the ones cooked with the cider vinegar and honey).
8. In a preheated 425 degree (F) oven, bake crostata for 30 to 35 minutes or until pastry in deeply golden brown. Let the crostata rest on the baking pan for about 5 minutes before transferring to a platter.
9. Serve warm or at room temperature. Recommend serving at room temperature. Also recommend drizzling the crostata slices with some of MIke's Hot Honey.

Notes: (1) Highly recommend using fine ground cornmeal if you can't find corn flour. It adds great flavor and texture to the baked crust. (2) At the time of the original post, Mike's Hot Honey wasn't yet available. Lightly drizzled on a slice of the crostata, the hot honey is a game changer. Adding another layer of flavor. (3) A combination of regular and heirloom tomatoes were used in this crostata.


I have always loved finding gifts for family and friends, not just birthday and holiday gifts, but you know those impromptu, just for the fun of it gifts. I can be at an antique show, in a store or browsing online and think 'that would be a perfect present for.......'. There is something just so much fun about sending (as well as receiving) an unexpected gift. More fun than sending the sometimes expected birthday or holiday gifts. Sometimes I have sent a gift to someone to let them know I have been thinking about them or because their words or actions made me smile or laugh or even to strengthen a connection.

But regardless of the reason, truth be told, the fun for me is not just in the purchase of the gift but in the reaction of the recipient. Seeing my niece or nephew wear clothes or jewelry I have bought them or having someone listen to a CD, read a book or watch a DVD sent to them are the best kinds of reactions one could hope for. Or that I could hope for. Because a little validation is the best kind of gift to receive in return. When I send a gift to someone I am sharing a part of myself with them.

Thursday, August 22, 2013

Panzanella

Everywhere I go I hear 'the tomatoes are late this year' (makes you wonder what social circles I am traveling in these days). Hearing this tomato chatter made me realize I guess I have not been paying attention all these years to the arrival date of summer tomatoes (or my social circles were ones not having the status of tomato ripeness on the tips of their tongues). So yes, according to my in the know sources, tomatoes indeed have been a little late this year. But as they say 'some things are worth the wait' because the heirloom, cherry and beefsteak tomatoes now at the farm stands are absolutely beautiful and oh so good.

However, in spite of the proliferation of those tomatoes, I was on the hunt for plum tomatoes. Yet I could only find them in the grocery store (they must be making their debut at the farm stands a little later). But I was more than okay with my grocery store plum tomatoes for a panzanella salad, for a very different panzanella that is. And after making it with really, really good results, I can hardly wait to making an even greater one when I can get plum tomatoes that have been picked fresh. I think I have convinced myself that tomatoes fresh from the farm stand or farmer's markets are better than the ones from the grocery store. It could be my imagination, but other than grape or cherry tomatoes I generally don't eat tomatoes in the winter or early spring as they are sort of flavorless.

There are many versions of panzanella recipes with each of them made with at least bread, tomatoes, basil and capers. Some versions call for the addition of onions, cucumber, and/or peppers. Almost every version calls for the use of raw vegetables, except for the one Katie Quinn Davies, author of What Katie Atehas created. In her version the tomatoes are roasted until soft and slightly caramelized, the red peppers are grilled, and the bread (sourdough no less) is lightly drizzled with extra virgin olive oil and toasted in the oven. And if those changes are not enough to transform this salad, the panzanella is made with fresh mozzarella. No, this is not a modified caprese salad and it is not your ordinary panzanella salad. It is an extraordinary panzanella having flavors of roasted vegetables which take it to an OMG level of deliciousness. I seriously doubt I can ever eat a panzanella not made Katie's way.


You will be rewarded for the time and effort (and for enduring a warm kitchen on a warm summer day) that go into the making of this panzenella. While I have always loved the flavor of roasted red peppers, I can now say I absolutely love the flavor of roasted plum tomatoes. I wouldn't go so far as to say I will never eat a raw tomato again, but I don't know if the taste of a raw tomato can even come close to the sweetness of a roasted tomato. Not to mention the aroma of roasted tomatoes is a downright heavenly scent (Could this be what the kitchens in Italy smell like?).


This recipe calls eight plum tomatoes and three red peppers. The next time I make this panzanella I might add at least one or two additional plum tomatoes.


The plum tomatoes are halved lengthwise, placed on a baking sheet, drizzled with extra virgin olive oil and sprinkled with salt and pepper. Now keep reading because when I share with you the length of time they roast for you might say "I am too busy for this". To that I would say "until you taste this panzanella these would not be two wasted hours". Yes, the plum tomatoes roast for 2 hours in a preheated 300 degree oven. But once they are in the oven you don't have to do anything to them, so you can go out for a run, a bike ride, read, or any number of things that make you happy (doing household chores don't make me happy so I didn't list them out here, but you could probably get quite a bit of housework done while these tomatoes are roasting).


The sourdough bread is placed in the oven for the last 30 minutes of the tomato roasting time. I like to cut my sourdough loaf into one inch slices before tearing into bite sized pieces as it just makes it easier. Once you have the bread torn, place on a baking sheet, drizzle with extra virgin olive oil and place in the 300 degree oven or bake until they lightly golden-brown and crispy (mine didn't get lightly golden brown but they did get crispy).


There are many ways to roast peppers. For me the easiest way is to place them on grill, rotating occasionally until the skins are blackened. You can also char the red peppers by placing them in a 425 degree oven and roasting for approximately one hour (remember to coat them with a little olive oil if you choose the oven roasting method). Once roasted, place them in a bowl and cover with plastic wrap until they have cooled. Remove the charred skins and seeds before cutting the red peppers into thin strips. Whatever you do, do not rinse the peppers under the faucet as you will remove some of the flavor of the peppers. The strips of red peppers are placed in a bowl and mixed with one tablespoon of olive oil. They are set aside until you are ready to assemble the salad.

After roasting for two hours, the plum tomatoes become softened and slightly caramelized. They are allowed to come to room temperature before the salad is assembled.

The dressing for this panzanella is a simple balsamic one or should I say an incredibly simple flavorful one. Katie called for first drizzling the sourdough bread croutons with the dressing, however, I put all of the panzanella ingredients on a serving platter (except the torn basil leaves) and then drizzled the dressing over the top. I also doubled the amount of dressing as 4 tablespoons of dressing was not nearly enough to dress the salad. After the dressing was added and the salad lightly tossed, the basil leaves were sprinkled over the top.

Recipe
Panzanella (slight adaptation of Katie Quinn Davies' recipe from What Katie Ate)

Ingredients
8 plum tomatoes, halved lengthwise
3 red bell peppers
8 ounces of fresh mozzarella, torn into bite sized pieces
3 Tablespoons of capers (rinsed)
14-16 basil leaves torn in half
1 small to medium sized loaf of sourdough bread (day old), torn into bite sized pieces
Sea salt and freshly ground black pepper
Extra virgin olive oil

6 Tablespoons extra virgin olive oil
2 Tablespoons balsamic vinegar
pinch of sea salt and pepper

Directions
1. Preheat oven to 300 degrees.
2. Place halved tomatoes on baking sheet, drizzle with extra-virgin olive oil and season with salt and pepper. Roast for 2 hours until softened and slightly caramelized. Remove from oven and allow to cool to room temperature.
3. Place torn sourdough bread pieces on a baking sheet. Drizzle with olive oil and bake for 30 minutes or until lightly golden brown and crispy. Remove from oven and allow to cool. Note: Add bread to the last 30 minutes of roasting time for the tomatoes.
4. Grill red bell peppers until charred. Remove from grill, place in bowl and cover with plastic wrap. When cool enough to touch, remove charred skins and seeds. Slice thinly. Place in bowl and mix with 1 Tablespoon of extra-virgin olive oil. Set aside.
5. For the dressing: Mix 6 Tablespoons of extra virgin olive with 2 Tablespoons balsamic vinegar. Add a pinch of sea salt and black pepper. Whisk until combined.
6. Place tomatoes, peppers, capers, bread, and capers on serving platter. Drizzle dressing over top and mix.
7. Add torn basil leaves on top and serve.


Next to the ocean, mountains, flowers and landscapes in general, I have taken more than my share of sky photos. I love capturing the sky in its various shades of blue and clouds in their different formations. Sometimes I wonder if these sky photos are subliminally representing my every now and then 'head in the clouds' state. For the record, when my head is in the proverbial clouds, I can still separate reality from fantasy (but there are some I know who actually might debate this).

Cumulus clouds are my absolute favorites as they are breathtaking to look at and to photo. There is something magical about those big white puffy clouds when they hover over the sea or the mountains. As a kid (a young one and an older one) I loved to look for the shapes of things in the clouds. As recently evidenced when my niece was recently visiting, we all see different things in the clouds. Just like we often see different qualities to people. Where some see goodness others see a darker side, where some see generosity others see selfishness, where some see selflessness others see self-servingness, and where some see self-confidence others see a lack of confidence. Haven't you ever wondered how it is that we can look at the same person and see completely opposite things? Could our love for or familiarity or interactions with affect our levels of perceptiveness? Do we sometimes see only what others want us to see? While there may be many answers to those questions, one thing is for certain. Like the cumulus clouds in the sky, what we see in others is often a reflection of what we want to see.