Wednesday, September 3, 2014

Applesauce Spice Cake with Cinnamon Cream Cheese Frosting


In a couple of weeks I will be headed out east for a relatively short 'get my fix' of the ocean and all things east coast. My list of everything I want to do while I am out there is getting longer by the day. In addition to a trip to the Vineyard, up to Maine for some antiquing and a lobster roll (seriously no other lobster rolls compare to the ones in Maine), getting in at least one beach day (weather cooperating), as well as spending time with friends, squeezing in some time to pick a few apples in the orchard in the town I had lived in is also one of the must do things. While it will technically not yet be fall during this trip, in my world the first day of September is considered to be the first day of fall. A necessary mind game to extend the season where both summer and winter intrude and invariably seem to shorten the most beautiful season of all.


The arrival of autumn brings the anticipation of cool crisp days and nights, caramel apples, fires in the fireplace, and landscapes magically transformed with various shades of yellow, orange and red. Next to the bright yellow aspens set against the deep blue Colorado sky, the vivid colors of the trees out east are some of the most 'enough to take your breath away, make you want to cry' stunningly beautiful I have ever seen. The most memorable of all fall east coast landscapes experienced were in the Berkshires and the Hudson Valley last year, both places that would be worth enduring the harsh, cold, snowy winters just to be able to take in the best of what autumn brings. 


There are two things I don't think I will ever tire of: photographing autumn landscapes and making apple desserts. From apple crisps, to apple pies, to apple cake, to baked apples, and now to this applesauce spice cake, the days of cooler temperatures, no humidity and an abundance of apples cannot get here soon enough. 

I have been looking for a spice cake recipe for quite some time now, never quite finding one that 'spoke' to me. But then I came across the applesauce spice cake recipe and before even tasting it, I somehow knew my search was finally and thankfully over. A simple cake made with unsweetened applesauce, flavored with cinnamon, ginger and cloves, and topped with a cinnamon cream cheese frosting was akin to finding the pot of gold at the end of the rainbow. I was trying to wait for a slightly cooler day to make this cake, but my impatience got the best of me (it usually does). The applesauce spice cake with cinnamon cream cheese frosting turned out to be falling into the 'life is too short to wait' category.


Toasted walnuts may be optional for some, but are generally a non-negotiable ingredient for me. Not only do they add some texture and crunch, they add an incredible depth of flavor as well as bring out their delicious oils. In a preheated 350 degree oven, walnuts are transformed after 10 to 12 minutes. Whatever you do, don't think of toasting nuts as an extra step, think of it as an absolutely necessary one.


Whenever a recipe calls for a nine inch round or square pan, I immediately think 'springform' pan. Besides being much easier to remove and serve, an unmolded cake on a platter or cake stand seems to increase its' deliciousness factor tenfold. 


Baked only for 40 to 45 minutes, the applesauce spice cake ends up being perfectly moist. Waiting for it to cool before it is can be frosted will only seem like an eternity.

Another confession. I have never worked with marzipan before. My hypotheses of 'it is 'too' difficult and 'sort of' unnecessary' turned out to proven wrong. Once I figured out how to remove the marzipan from the antique cutter that is. Had I not started out making something simple with marzipan, I may have found the necessary proof that I was actually right all along (sometimes it is good to be wrong about something). If there was ever a reason to remember how to create varying colors from our elementary school art classes, this would be one of them. My marzipan leaves didn't exactly come out 'perfect' (or I should say look like they were made by either Martha Stewart or someone with years of marzipan experience), but I rather liked how 'rustic and authentic' they looked (sometimes imperfection can be better than perfection). 


The cream cheese frosting has a slight hint of cinnamon flavor. Initially I thought the addition of cinnamon was unnecessary. Let's just say I thought wrong and we will leave it at that.


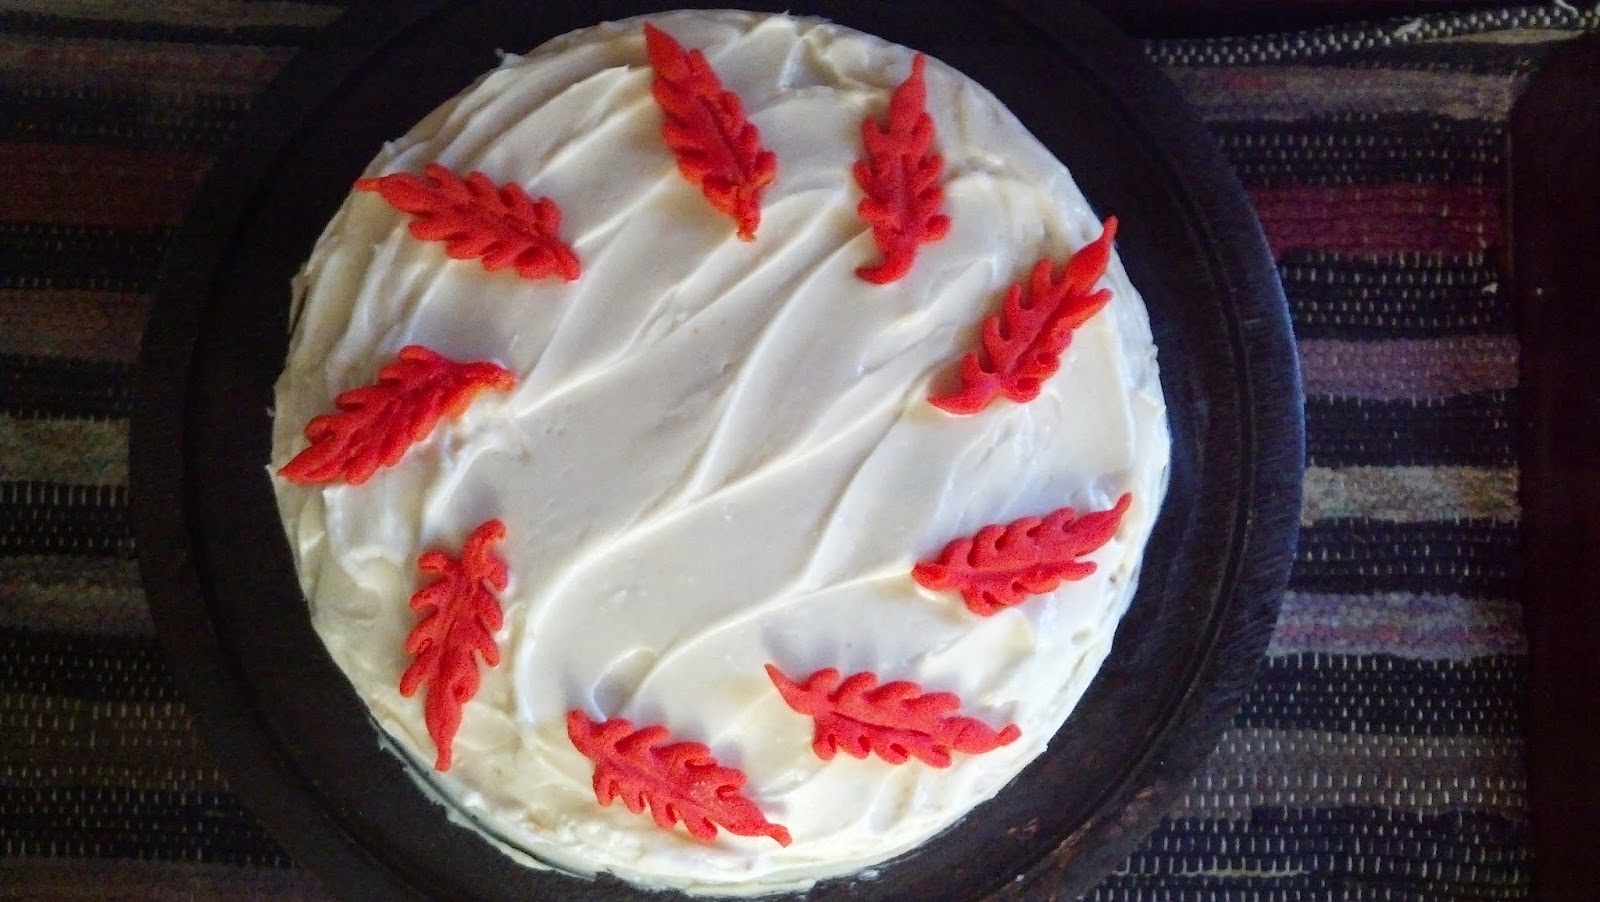
The amount of frosting on this cake is just right.


Although I am not one to commit recipes to memory (too many other things I would rather remember), I have a feeling I will be making this applesauce spice cake with cinnamon cream cheese frosting so often it will become one of those recipes I could make in my sleep. This is one of those cakes made for welcoming in and celebrating the fall. Dense, moist, and just the right amount of spice, it may just be the perfect spice cake.

Already I am trying to figure out how to 'bring' this cake with me when I travel out east. The list of things I want to bring on this trip not surprisingly seems to be getting longer too. Oh well, traveling is an adventure.

Recipe
Applesauce Spice Cake with Cinnamon Cream Cheese Frosting (slight adaptation to Spice Applesauce Cake shared in Gourmet, 2009)

Ingredients
Cake
2 cups all-purpose flour
2 teaspoons baking powder
1/2 teaspoon baking soda
1/2 teaspoon kosher salt
3/4 teaspoon Saigon cinnamon
1/2 teaspoon ground ginger
1/8 teaspoon ground cloves
1/2 cup (1 stick) unsalted butter, room temperature
1 cup light brown sugar, firmly packed
1 teaspoon vanilla
2 large eggs, room temperature
1 1/2 cups unsweetened applesauce
1/2 cup walnuts, toasted and coarsely chopped (optional but highly recommended)

Frosting
8 ounces cream cheese, room temperature
1/2 cup (1 stick) unsalted butter, room temperature
1 1/4 cups confectionary sugar, sifted
1 teaspoon vanilla
1/4 teaspoon Saigon cinnamon

Optional
Marzipan leaves

Directions
1. Preheat oven to 350 degrees. Line a 9 inch springform pan with parchment paper, set aside.
2. Sift together the flour, baking soda, baking powder, salt, cinnamon, ginger and cloves. Set aside.
3. In a standing mixer fitted with a paddle blade, beat butter, brown sugar and vanilla until pale and fluffy (approximately 2-3 minutes).
4. Add eggs in one at a time, beating well after each addition.
5. Beat in applesauce and vanilla.
6. At low speed, gradually mix in flour mixture until fully incorporated.
7. Stir in nuts.
8. Scrape batter into prepared springform pan and bake for 40 to 45 minutes or until pick inserted in center of the cake comes out clean. Allow to cool 15 minutes, run knife around edge of pan to loosen cake, and transfer to plate or platter. Bring cake to room temperature before frosting.
9. For frosting, beat butter and cream cheese in a standing mixer fitted with a paddle blade until smooth. Mix in vanilla and cinnamon. Slowly add sifted confectionary sugar and continue beating until fully incorporated. (Note: This is enough frosting for the top and sides of cake.)
10. Optional: Decorate top of frosted cake with colored marzipan leaves.
Note: Store any leftover cake in the refrigerator. 


Just minutes into the first day of September one of my friends, who also happened to be my doctoral dissertation chair, posted the following on her Facebook page: rabbit, rabbit. My first thought was 'what?'. While she just recently moved into a new home in Colorado, she couldn't possibly be seeing rabbits running around in the dark, or could she? Well maybe she could, but knowing her, there was something meaningful intended by these two words. But what was it? Thank goodness for search engines and the internet as I pretty sure I discovered why she posted those two words, words that take on significance when spoken on the first day of the new month. Or at least there is a pretty powerful superstition associated with them.

If 'rabbit, rabbit' are the first words uttered on the first day of the month, they are thought to bring you (good) luck all month long. They are, in fact, supposed to be the harbinger of good fortune. Rabbits have long been associated with luck of one sort or another (but usually good luck) for more than 2,000 years. But the widespread superstitiousness surrounding rabbits (like a rabbit's foot) emerged sometime in the early 1900s. Not only did President Franklin Delano Roosevelt carry a rabbit's foot, his first spoken words on the first day of the first month were 'rabbit, rabbit'.

If there is any truth around the expression 'an apple a day keeps the doctor away', who knows, there might even be truth around the 'rabbit, rabbit' as the first words spoken on the first day of every month superstition.

Friday, August 29, 2014

Blueberry Buckle with Whipped Coconut Cream


With Labor Day just a few days away, summer comes to an unofficial 'say it isn't so' end. What better way to enjoy the upcoming long weekend than to squeeze in time for a road trip, a long bike ride, a barbecue, sitting out in the backyard soaking in the sun, or if you are lucky enough to live near the ocean, breathing in and listening to the smell and sound of the water. This is definitely not a weekend of doing anything mundane or sitting around doing too much of nothing. There is always enough time to get the most essential of chores done, even if it means a little bit of sleep deprivation.


On Wednesday I couldn't help but notice the changes at the Farmer's market. Tables once dominated primarily by berries have been replaced by tables now filled with concord grapes, apples, pears, plums, and thankfully, still some berries. It won't be long now before there will not be a berry in sight. With that thought in mind I bought a five pound box of Michigan blueberries. Some to use in the making of the rustic Blueberry Buckle and the rest to freeze. Being able to bake with frozen berries as a way of taking the chill off of that first really crisp, chilly fall day, that the first fire in the fireplace kind of day, or on one of those 'if don't have to leave the house don't' kind of days in the winter are why one needs to have berries in the freezer. Already the forecast for the winter in the midwest is higher than average snow accumulations. In hindsight, maybe I should have bought ten pounds of blueberries.


How many desserts or breakfast foods can one make with blueberries without being considered some sort of blueberry savant? Well certainly more than the number of recipes I have posted on the blog this past year (although some of you may have thought 'enough with the blueberries already'). There is something both visually appealing and incredibly addictive about eating and baking with one of the few 'blue' foods found in nature.


When you think of comfort food, think of Blueberry Buckle.Whether you are having guests or are a guest at the home of one of your friends over the long Labor Day weekend, a Blueberry Buckle might just be one of those perfect breakfast foods, desserts or hostess gifts. Dense with blueberries you will find yourself wanting to nosh on any buckle leftovers throughout the course of the day as well as hoping there is at least one piece left to go with with an end of the day cup of coffee. Without being too sweet, it more than satisfies a sweet tooth. 


I have found that whenever I take out the butter and eggs needed for a recipe the night before, they not only become room temperature perfect but I feel compelled to make whatever it is I went to bed thinking I was going to make in the morning. Because if there is anything I hate going to waste more than chocolate it is butter and eggs, especially when the eggs are the fresh from the farm ones. With the exception of fresh blueberries the ingredients for the batter are things one usually has in the cupboard or refrigerator. However, if you always have some frozen blueberries in your freezer the buckle would fall into the category of 'there is no excuse for not making'.


In addition to the batter, the buckle has one of those easy to come together streusel toppings. The kind that adds just another layer of flavor and a little bit of crunch. One of the streusel ingredients is brown sugar. I generally prefer to use a mixture of both light and dark brown sugars whenever a recipe calls for brown sugar (a 2 to 1 light to dark brown ratio was used for this streusel topping). If you haven't yet tried using both light and dark brown sugars before, the streusel topping could be a great place to start.


The batter for the buckle is so thick you might think it nearly impossible to stir in 3 1/2 cups of blueberries without crushing or having them bleed into the batter. With some gentle stirring you can turn the perceived impossible to actual possible.


The original Cook's Illustrated recipe called for mixing all 4 cups of the blueberries into the batter, however, sprinkling a reserved 1/2 cup on top of the batter gives the finished buckle a more beautiful baked finish.


The buckle is baked in a preheated 350 degree oven for 50 to 60 minutes or until a toothpick inserted in the center comes out clean.


The aroma permeating the air while the buckle is baking will wake up even the heaviest of sleepers. Make sure you have a plan to keep everyone at bay while the buckle cools long enough for it to be successfully removed from the springform pan. The buckle can be served warm although its' deliciousness does not diminish at all when served at room temperature.


For a change of pace from lightly sweetened whipped cream, consider making a whipped coconut cream. Both are easy to make and you can't go wrong with either of them. I first learned about coconut whipped cream from one of food blogger Lauren Kodiak's postings. However, the best visual and written step by step tutorial on how to make the whipped coconut cream has been posted by blogger Oh She Glows

If you bring this sinfully good Blueberry Buckle as a hostess gift I can almost guarantee you will be invited back. Unless, of course, you are one of those high maintenance guests where nothing you might bring to the table, both literally and figuratively, would be enough to get you a return invitation. 

Recipe
Blueberry Buckle with Whipped Coconut Cream (Blueberry Buckle recipe an adaption of Cook's Illustrated July/August 2005 recipe; Whipped Coconut Cream as shared by food blogger Lauren Kodiak)

Ingredients
Buckle
1 1/2 cups all-purpose flour
1 1/2 teaspoons baking powder
1/2 teaspoon coarse (kosher) salt
1/2 teaspoon cinnamon
10 Tablespoons unsalted butter, room temperature
2/3 cup granulated sugar
Zest from one lemon
1 1/2 teaspoons vanilla
2 large eggs, room temperature
4 cups fresh or frozen blueberries, divided (Note: If using frozen blueberries, baking time may be slightly longer.)

Streusel
1/2 cup all-purpose flour
1/2 cup brown sugar packed (light brown sugar or a combination of light and dark brown sugars)
2 Tablespoons granulated sugar
1/2 teaspoon cinnamon
pinch of nutmeg
3/4 teaspoon salt
4 Tablespoons unsalted butter, room temperature

Whipped Coconut Cream
1 13.5 ounce can of full-fat coconut milk
1 Tablespoon pure cane, superfine sugar or confectionary sugar
1 teaspoon vanilla

Directions
Buckle and Streusel
1. Preheat oven to 350 degrees. Line a 9 inch springform pan with parchment paper. Set aside.
2. Sift together flour, baking powder, salt and cinnamon. Set aside.
3. In a standing mixer fitted with a paddle attachment, cream butter, sugar, and lemon zest until light and fluffy.
4. Add in eggs one at a time, mixing each until well blended.
5. Blend in vanilla.
6. With mixer speed on low, slowly add in flour mixture and mix just until fully incorporated.
7. Using a spatula, very gently stir in 3 1/2 cups of the blueberries.
8. Scrape the filling into prepared pan and smooth top with an off-set spatula.
9. Sprinkle remaining 1/2 cup of blueberries on top of the batter.
10. For the streusel, begin by stirring together the flour, brown sugar(s), granulated sugar, salt, cinnamon, and pinch of nutmeg. Using a pastry cutter, fork or your fingers, blend in butter until the mixture is crumbly and sand-like in texture.
11. Sprinkle streusel over batter and blueberries.
12. Bake for 50 to 60 minutes or until a toothpick inserted in the center of the cake comes out clean.
13. Remove from oven and allow to cool before removing from pan.
14. Serve with whipped coconut cream or lightly sweetened whipped cream.

Whipped Coconut Cream
1. Place can of coconut cream in the refrigerator overnight.
2. Flip can upside down and open from bottom. Pour out liquid at the top of the can and scoop out remaining hardened 'cream' underneath.
3. Place 'cream' in a chilled bowl on standing mixer and whip with whisk attachment. When smooth, add sugar gradually followed by the vanilla.
4. Whip until fluffy. 
5. Serve immediately and/or store in the refrigerator until ready to use.

Note: Once cooled to room temperature, a slice of the blueberry buckle can be warmed in the microwave and served with some whipped coconut cream or slightly sweetened whipped cream if you want that hot out of the oven taste experience. Otherwise enjoy the buckle at room temperature.


Sunday, August 24, 2014

Ratatouille Crostini


Walking through the aisles of the farmer's market these days is like walking through the best candy store in the world (which for me would be Dylan's Candy Bar in NYC). With so many vegetables now at peak season it is nothing short of a heart racing, head spinning, wide-eyed, weak in the knees, can't decide what to choose experience.

When vegetables are prepared in ways bringing out their sweetness they become transformed into nature's most irresistible of all 'candies'. And anyone with food preferences leaning closer to the carnivore end of the food continuum might easily be persuaded to shift toward the vegetarian end, with the operative word being 'might', when vegetables are prepared in a way that seduces you.


Albert Einstein once wrote 'Everything is determined by forces over which we no control. It is determined for the insect as well as for the star. Human beings, vegetables, or cosmic dust-we all dance to a mysterious tune, intoned in the distance by an invisible piper.' The richness of a ratatouille served on a grilled slice of a baguette lightly brushed with olive oil along with a schmear of homemade ricotta will have you dancing. The savoriness of tomatoes, red bell peppers, onions, zucchini, eggplant and garlic slowly caramelized and seasoned with only coarse salt, herbs de Provence and sherry vinegar pays homage to summer's bounty. Borrowing from philosopher Aristotle a well-made ratatouille can simply be described as a dish whose 'whole is greater than the sum of its parts'.

Ratatouille is a humble, elegant, sophisticated, traditional Provencal dish using vegetables at the height of their ripeness. Culinary credit for the creation of ratatouille is attributed to 18th century peasants living and working the land in present day Nice, France. Variations to the vegetables used as well as in the ways in which they are prepared (ranging from perfect thinly sliced vegetables artfully arranged in a casserole to chunks of vegetables simply served in a dish) have occurred over the years. Early forms of ratatouille were made with tomatoes, onions and bell peppers, however, the number of vegetables in this dish have increased to include zucchini and eggplant. The marriage of all of the vegetables is pure bliss.


After listening to one of my friend's husband sing the praises of Shun knives I decided I would buy one of them. To make the dicing of the onion, red bell pepper, zucchini, roma tomatoes and eggplant easier, I decided to use my Shun knife. Several Band-Aids later, I had perfectly diced vegetables. The cuts to my fingers weren't serious, only visible reminders of how incredibly sharp this knife is. Still retaining some of my competitiveness, this knife may have won this round. But with all of this dicing experience in the preparation of the ratatouille I am pretty confident the knife's winning days are over.


What matters just as much as using the freshest vegetables you can find is the pot you use to make the ratatouille. In order to ensure the vegetables cook slowly without browning, a large heavy pot is needed. If you have not yet invested in a large cast iron enamel pot, I want you to know it will be one of the worthiest investments you make (and one without having the ability to cause you bodily harm). Buy one at full-price or on sale, look for them at estate or tag sales, or put them on the top of your birthday or Christmas wish list. I promise you will not only find it to be incredibly versatile, it will help to create an amazing, can't stop eating ratatouille.

The flavors of the ratatouille is further elevated (if that is really possible) when it is allowed to marinate overnight in the refrigerator. To serve at room temperature, allow the dish to sit out at least one hour before serving. Or if you want to serve the ratatouille warm, you can reheat on a low power setting in the microwave or low heat on the stove. 

Last week I thought a perfect meal starter would be a platter of Marinated Buffalo Mozzarella and Tomato Salad, this week I am thinking it's a Ratatouille Crostini. Served warm or at room temperature along with some homemade ricotta or softened goat cheese and a glass of chilled white wine, it may become your signature summer's bounty signature dish. Even the carnivores sitting around the table won't be in any hurry for the 'meat' dish to be served. 

Recipe
Ratatouille Crostini (ever so slight adaptation of Buvette's recipe for Ratatouille)

Ingredients
1/4 cup extra-virgin olive oil
1 small sweet or yellow onion, peeled and finely diced
3 plum tomatoes, 1/2 inch dice
1 red or orange bell pepper, stemmed, seeded, cut into 1/2 inch dice
2-3 garlic cloves, minced
1 large or 2 small eggplants, peeled, cut into 1/2 inch dice
1 zucchini, ends trimmed, cut into 1/2 inch dice (do not peel)
Pinch of Aleppo pepper (or can use red chili flakes)
1 teaspoon herbes de Provence
2 teaspoons sherry vinegar
Kosher salt
Baguette, lightly brushed with extra-virgin oil then grilled
Homemade ricotta or softened goat cheese

Directions
1. Pour extra-virgin olive oil into large, heavy pot. Turn heat on to medium.
2. Add onion, tomatoes, bell pepper, garlic and pinch of kosher salt. Cook, stirring occasionally until vegetables begin to soften (approximately 10 minutes). Note: Heat should be high enough to keep vegetables cooking, but not so high as they begin to brown. They should be sweating.
3. Add eggplant and another pinch of kosher salt. Cook until eggplant begins to soften (approximately 10 minutes).
4. Add zucchini, pinch of Aleppo pepper and herbes de Provence. Stir and cook for 15 minutes or until all vegetables are wonderfully soft. Note: If mixture is looking a little dry and/or sticking, add another tablespoon of extra-virgin olive oil while cooking.
5. Stir in sherry vinegar and season with additional salt, if needed.
6. Serve warm, at room temperature or chilled. 
Serving suggestions: Serve with a sliced baguette brushed lightly with olive oil and grilled along with either homemade ricotta or softened goat cheese; Serve with a poached egg over warmed ratatouille; Serve with a fresh baguette along with either homemade ricotta or softened goat cheese; Use as a filling for a sandwich and/or omelette.

At dinner with friends this week, I was surprised to learn one of them had raised a couple of sheep. Some mothers get involved with their children's science projects and others become completely invested in their 4-H projects. This friend was the second kind of mother. She had us laughing as she described milking them, feeding them, bringing them to fairs for showings, having them sheered, and helping them deliver their babies. My living on a working farm fantasies always included having some hands-on animal experiences, but they never included helping to deliver their babies. Needless to say I was in awe of my friend's fearlessness and bravery.

As she shared her stories two thoughts immediately came to mind. The first was 'I would do (almost) anything short of milking sheep myself to get some fresh sheep's milk to make homemade ricotta'. The second was remembering my childhood best friend's visit last year when I lived in the farmhouse on the east coast. Early one morning as we went over to see some of the animals being raised by one of my neighbors, she said 'look at those goats'. Only they weren't goats, they were black faced sheep. Needless to say I am thankful we have been friends for such a long time because I couldn't stop laughing. That memory along with the photos taken that day not only continue to make me laugh, it reaffirms my belief that an enduring, great friendship is always made better when it continues to be filled with memories.

Tuesday, August 19, 2014

Chocolate Cake with Chocolate Buttercream Icing, Momofuku Style


My first truism of the week: Every celebration needs cake. Long being the ceremonial dessert of choice for birthdays, weddings, anniversaries, graduations, and almost all other causes of worthy or personal celebration, cake has come to symbolize both love and significance. In her book "Cake: A Global History", Nicola Humble writes "Cakes are simultaneously utterly unnecessary and absolutely crucial. They are both an idea and incontrovertibly material: lusciously spongy or solid with fruit, sticky, creamy, loaded with sweetness, filled and iced and decorated: food layered on food." No matter the shape or kind, cakes have the ability to make us want to scream (hopefully with delight) or leave us speechless (hopefully in the best of ways). There are cakes from our childhood we still remember, we each seem to have a most favorite kind of cake, and the superstitious tradition of making a wish on the piece of wedding cake placed under your pillow is a terrible waste of cake.


My second, less universally acknowledged, truism of the week: A great many things can be resolved with kindness, even more with laughter, but there are some things that just require cake. Cakes have an uncanny, yet inherent ability to make someone feel special. Who does not get wide-eyed when presented with a cake? Sometimes we can be at a loss for words when trying to repair a friendship, to apologize for unintentionally causing someone to be hurt by our words or actions, to help someone cope with a loss, or to brighten someone's day. Could there be any better way to make someone feel valued or loved than by making or bringing them a cake? Possibly, but why not start with cake? The kind of cake may not matter, although the physiological and psychological effects of chocolate may just be enough for it to be considered the perfect cake.


So it is no wonder we can spend so much time fretting over which cake to make or serve for special occasions or for resolving conflicts. The choices of cake may be endless and the preferences may be traditional, but my short list almost always includes homemade and chocolate. Recently discovering the cakes from Momofuku, a bakery in NYC experienced virtually through their book Momofuku Milk Bar cookbook, I was inspired to make a chocolate cake that took 'homemade' to the limits of own baking sanity. The exposed layers of cake and icing style of Momufuku cakes make for an incredibly beautiful and deceivingly simple presentation.

As ambitious as my foray in the world of creating a cake in the Momofuku 'style' was, I decided to show some restraint and hold back from making one of their cake recipes. Instead I sought to create a very simple version of their look. (I have now used the word simple at least twice in this posting. Even I am beginning to wonder if I have been invaded by an alien bodysnatcher as the concept of simple is one rarely used to describe me). Imitation, as they say, is the highest form of flattery.

The cake and icing had to come from none other than Ina Garten. And they had to be chocolate. The recipes for Beatty's Chocolate Cake and chocolate frosting from Ina's Barefoot Contessa at Home cookbook are wickedly chocolately. The cake is dense and moist while the icing is creamy and rich without being too sticky sweet. Paired together they are chocolate cake perfection.


We may forget some of the presents we receive for a special occasion and sometimes we might even forget the cake. However, if there is one cake you want to be permanently etched into everyone's memory, it is this Chocolate Cake with Chocolate Buttercream Icing. Whether decorated simply (there is that word again) with chocolate covered espresso beans or chocolate sprinkles or topped only with a single candle, one look at and one taste of this cake will create one of those 'lasting for a lifetime' memories. And, if there was ever a cake 'style' that everyone will be talking about for days, weeks, months, and years, it quite possibly will be this one. There is no better cake to celebrate the 'unfinished' life of someone, than the playful twist of a cake that looks 'unfinished'. 

By now some of you are probably wondering why I have not spent any time walking through the making of this cake, especially this one (maybe she really has been abducted by an alien bodysnatcher). Yes, this blog posting is a significant departure from all of the others, but sometimes one needs to be a little unpredictable. A 'thinking outside of the box' cake seemed to call for an out of box blog posting. However, if you are a visual learner like I am, then I would suggest you take a few minutes to watch the youtube video of Christina Tosi, Momofuku pastry chef extraordinaire, demonstrating the layering process of the cake. The recipe and directions below should be more than enough for you to create your own version of this cake. The following notes might be helpful as well as make more sense after you watch the video and read through the directions:

1. I found the six inch aluminum cake ring at SurLaTable. The rings come in an assortment of sizes so the sizes of cake you make are almost endless.
2. In an 11x17 baking pan, I was able to cut out two complete 6" and two halves of a 6" circle out of the sheet cake by carefully planning out where to make the cuts.
3. I created my own acetate sleeves by cutting and taping together two pieces of transparency sheets. The height of the sleeve was 7 inches. While it is probably less work to use an acetate sleeve, the homemade sleeve worked great.
4. I placed the completely assembled cake in the freezer for slightly more than an hour. This was enough time for the cake to set and for the cake ring and transparency sleeve to be removed while keeping the cake completely intact. 

This Chocolate Cake with Chocolate Buttercream Icing has only two layers: cake and icing. Depending on the occasion or reason for making another cake, in all likelihood I will probably 'add' more to this cake and/or vary the filings between the layers. I seriously doubt my obsession with this style of cake will begin and end with this chocolate cake. 

No matter what kind of cake you choose to make for the next celebratory event in your life, I hope you will at least make one in the Momofuku style. It can be as simple or as complicated as you want it to be.

Recipe
Chocolate Cake with Chocolate Buttercream Icing, Momofuku Style (inspired by Ina Garten's recipe for Beatty's Chocolate Cake and Chocolate Frosting)

Ingredients
Cake
1 3/4 cups all-purpose flour
2 cups granulated sugar
3/4 cup good quality cocoa powder (recommend Droste, a Dutch processed cocoa)
2 teaspoons baking soda
1 teaspoon baking powder
1 teaspoon kosher salt
1 cup buttermilk, shaken before measured
1/2 cup vegetable oil
2 extra-large eggs, room temperature
1 teaspoon vanilla
1 cup freshly brewed coffee, allowed to cool slightly 

Icing
6 ounces semi-sweet chocolate chips
1/2 pound (2 sticks) unsalted butter, room temperature
1 extra-large egg yolk, room temperature
1 teaspoon vanilla 
1 1/4 cups confectionary sugar, sifted
1 Tablespoon instant espresso (or instant coffee) dissolved in 2 teaspoons of hot water
pinch of sea salt
Optional: Chocolate covered espresso beans for decoration

Directions
Cake
1. Preheat oven to 350 degrees. Line a quarter sheet pan (10"x13") baking sheet with parchment paper lightly buttered and floured. Set aside.
2. Sift the flour, cocoa, baking soda, baking powder and salt into the bowl of standing mixer fitted with a paddle attachment.
3. Adding the sugar to the sifted ingredients, turn the mixer on low to combine.
4. In a separate bowl or large glass measuring cup, combine the shaken buttermilk, oil, eggs and vanilla.
5. With the mixer on low speed, slowly add the wet ingredients to the dry until combined.
6. With the mixer on low, add the coffee, mixing until combined. Scrape the bottom of the bowl with a rubber spatula to ensure all ingredients are full blended.
7. Pour the batter into the prepared sheet pan and bake for 30 to 35 minutes or until a cake tester comes out clean.
8. Cool in pan until cake comes to room temperature. Note: Consider placing the cooled cake in the refrigerator to make cutting and assembly easier.
9. Carefully remove cooled cake from pan, cut into 2 six inch circles and 2 half circles (to create the third six inch circles. Set aside.

Icing
1. Place chocolate chips in a heat-proof bowl set over simmering water. Stir until just melted. Set aside until cooled to room temperature.
2. In the bowl of a standing mixer fitted with a paddle attachment, beat the butter on medium speed until light yellow and fluffy (approximately 3 minutes).
3. Add egg yolk and vanilla and continue beating for 3 minutes.
4. With the mixer on low, gradually add sifted confectionary sugar beating until smooth and creamy.
5. With mixer on low, add cooled chocolate, expresso/coffee, and a pinch of sea salt to the butter mixture. Mix until blended but do not beat.
6. Use to ice cake immediately.

Assembly
1. Clean the cake ring and place on a sheet of parchment paper on a flat firm surface (e.g., baking sheet).
2. Insert acetate sleeve inside of the cake ring.
3. Place the two 6 inch halves inside of the ring. Use any cake scraps to ensure the bottom layer is solid.
4. Spread 1/3 of the chocolate icing over the base layer.
5. Carefully drop in one of the 6 inch round cakes on top of the first icing layer. Press down slightly.
6. Spread another 1/3 of the chocolate icing over the second layer. 
7. Carefully drop the second, final 6 inch round cake on top of the icing layer. Press down slightly.
8. Spread the final 1/3 of the icing over the top layer. (If adding espresso beans or sprinkles on top of the cake, add before proceeding.)
9. Freeze the cake for at least 1 hour and up to 4 hours to set the cake and icing.
10. Before serving, remove cake from the freezer. Placing your hands on the bottom of the cake, remove the cake ring. Place the cake on a serving platter or cake stand.
11. Gently peel off acetate sleeve from the cake.
12. Place cake in the refrigerator to 'thaw'.
13. Serve cake chilled or remove from the refrigerator at least 30 minutes before serving.


We all think of making a birthday cake to celebrate the actual day of one's birth. Yet there are some who have a kind of 'second' birthday, a day marking a second chance at life. There are a myriad of reasons for these 'second' birthdays. They could be the day when one learns they are cancer-free or the day one survived a heart attack. While these second birthdays may not be celebrated with cake, they are sometimes celebrated with a day of deliberate reflection or a day of adventure. Whether any time is spent with thoughts ranging from appreciating the extra blessings they were given or wondering what more were they meant to do or who in their lives they wanted to keep until or beyond the age of 88, nothing may be as important as experiencing the sheer, simple joy that comes with waking up to and taking in all of the possibilities another day brings. And who knows, the proverbial 'icing on the cake' possibilities of the day just also might include having a piece of cake. 

Sunday, August 17, 2014

Marinated Buffalo Mozzarella and Tomato Salad


Summer feels as if it is moving at a lightening speed pace. Signs of the fall are already appearing. The first harvest of pumpkins is already appearing in the grocery stores and it is barely mid-August. Yikes. Quite possibly it is a function of my chronological age, but I want time to slow down just a bit or at least have more days feeling reminiscent of my youth. Days that seemed to go on endlessly, where an hour felt like an eternity, and where summer kept fall at bay for as long as possible. And here in the midwest, with only one season for tomatoes I want it, no I need it, to last as long as possible. Especially now that I have discovered what Yotam Ottolenghi's Marinated Buffalo Mozzarella and Tomato Salad tastes like. My search for the most descriptive culinary adjectives to describe what might be a perfect tomato salad is temporarily hindered by the use of the regressively youthful exclamation: OMG.


I thought the Marinated Buffalo Mozzarella and Tomato Salad would be a great compliment to the Mussels in Roasted Garlic Cream Sauce and a perfect post Saturday Farmer's Market lunch. After picking up beautifully ripened red and heirloom tomatoes, a bunch of fresh basil, and a loaf of sourdough bread at the market, I only needed to make a stop at Whole Foods to pick up the Buffalo Mozzarella and mussels. 


The tomatoes were so beautiful at the Farmer's Market this week I couldn't help but buy more than was needed for this salad. 


Fresh mozzarella di bufula is made from the milk of the Italian water buffalo, considered to be the richest milk in the cheesemaking arsenal. It has more than twice as much butterfat as cow's milk resulting in a cheese that is decadently creamier and more flavorful. It is has been described as being feather-light and unmistakably rich, delicate and assertively full-flavored, and slightly tangy and buttery all at once. Buffalo mozzarella is love at first bite. There is only downside to this cheese: its' accessibility. But I urge you to find a store selling this cheese relatively close to where you live. Even if relatively close means as much as an hour round trip drive.  Because this salad is not the same made with any other kind of mozzarella cheese.


The flavors of this Marinated Buffalo Mozzarella and Tomato Salad play brilliantly in the sandbox with one another. Toasted fennel seeds, lemon zest, freshly chopped oregano and basil, crushed garlic, sea salt, along with grapeseed and extra-virgin olive oils create a marinade for the buffalo mozzarella that will take your palate by complete surprise. One of those best kinds of unexpected surprises. 


Two to four fresh tomatoes are cut into wedges. Whether you choose to use red, yellow, heirloom tomatoes, or any combination of all three, use ones you can get from a garden or a farmer's market. In other words, you want tomatoes that are at their optimal texture and taste (unlike the tomatoes that have been refrigerated). 

After the buffalo mozzarella marinates for 15 to 30 minutes and the lightly sprinkled with sea salt tomato wedges are placed on the platter, the salad is finished with a drizzle of extra-virgin olive oil. 


Served with freshly sliced sourdough or Italian country loaf bread it is hearty enough to be a main course, a great starter to a meal, or the only side you need if serving with fish, chicken or beef. 

The Marinated Buffalo Mozzarella and Tomato Salad and Mussels with Roasted Garlic Cream Sauce made for an amazing lunch. After going to an outdoor concert where the average age of those in attendance appeared to be at least 70 and spending several hours rearranging and moving furniture in the home of another friend earlier in the week, it was not only the perfect reward lunch for me and my childhood best friend, it was a perfect lunch. At the end of our well-deserved leisurely meal, we both agreed the salad and mussels were worthy of being placed on the 'last meal' list. 

Recipe
Marinated Buffalo Mozzarella and Tomato Salad (a Yotam Ottolenghi recipe from Plenty)

Ingredients
1/2 teaspoon fennel seeds
Grated zest of 1 lemon
15 basil leaves, shredded
2 teaspoons fresh oregano, chopped
2 teaspoons high quality extra-virgin olive oil, plus extra for finishing
2 teaspoons grapeseed oil
1 clove garlic, crushed
1/2 teaspoon Maldon sea salt, plus additional for seasoning cut tomatoes
pinch of black pepper
8-9 ounces buffalo mozzarella
2-4 ripe tomatoes (red, heirloom, yellow or combination)
Optional: Loaf of sourdough or hearty italian country bread sliced thickly

Directions
1. Scatter fennel seeds in small frying pan over medium heat. Dry roast until fennel begins to pop and/or the the fragrance is released.
2. Transfer fennel seeds to a mortar and pestle and crush.
3. In a medium sized bowl, mix together the basil, oregano, lemon zest, olive oil, grape seed oil, sea salt, pepper, crushed fennel seeds, and crushed garlic. Set aside.
4. Break balls of buffalo mozzarella roughly with your hands. Smear with marinade and set aside to marinate for 15-30 minutes.
5. Cut tomatoes in wedges.
6. Transfer marinated mozzarella to large platter, scatter cut tomatoes along edges, sprinkle tomatoes with additional sea salt, and drizzle extra-virgin olive oil over cheese and tomatoes.
7. Serve immediately with thickly cut slices of fresh sourdough or country loaf.