Monday, October 27, 2014

Maple Glazed Mini-Pumpkin Doughnuts


With the bathroom remodeling project now behind me, the desire for rearranging rooms, shifting furniture, and reorganizing collections has reared its' ugly head. Not at all ugly for me mind you, just for a certain someone who doesn't always view these 'projects' of mine as fun and as exciting as I do. Mostly because one change leads to another to another, and more often than not they end up being far from just simple changes. To further add to someone's angst, I often make adjustments and changes to my 'preliminary' plan as what it looks like doesn't always match with what I thought it would. The process of doing and undoing may be energizing for me, however, it's a process of coming slightly, temporarily unglued for someone else. Since it is highly unlikely I will ever stop coming up with rearranging, shifting, and reorganizing ideas, I have learned the value of timing. Bribes are good things too.


As I was looking for and comparing baked pumpkin doughnut recipes, all I kept hearing in my head were the words from a childhood game, 'One potato, two potato, three potato..' Most of the ingredients listed in the recipes for pumpkin doughnuts were the same with the only significant difference being in their amounts. I wanted to make a doughnut that was both moist and dense. So I focused on the ratio of liquid to dry ingredients in each of the recipes. Some had one egg, some had two eggs, and some had three eggs (hence why the childhood song was resurrected from my memory). After a process of elimination, I settled on the recipe calling for two eggs. Having no basis of comparison, the Maple Glazed Pumpkin Doughnutss (a two egg version) were everything I wanted them to be and then some.


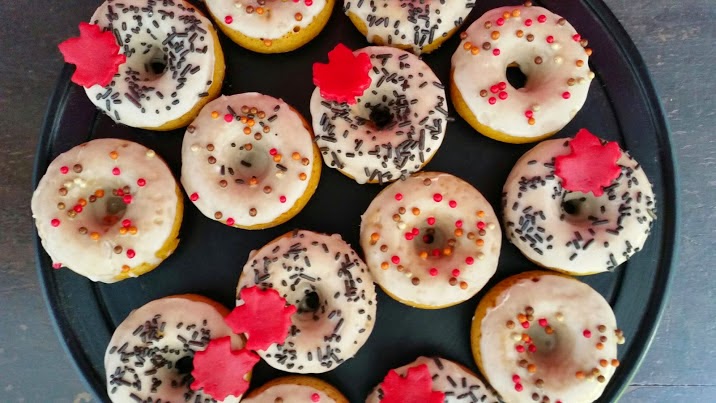
After I finished making the Maple Glazed Mini-Pumpkin Doughnuts, my first thought was they were almost too pretty to eat. My second though was, no, these doughnuts are the kind of 'too hard to resist' pretty. It is almost impossible to eat only just one of them (even for those who pride themselves on self-control). Not because of their size, but because of their flavor and texture. If you are someone who loves the flavor of pumpkin and spices as well as prefers a doughnut with a cake-like texture, you will be delirious after tasting this doughnut (almost the kind of delirious that if someone asked you rearrange, shift or reorganize somethings, you might not even be phased by the requests). Is there anyone who does not like cake? I prefer to live in the fantasy world of 'everyone loves cake', so please don't burst this bubble for me. I don't think I could comprehend someone not liking cake.


If there was another reason to hoard canned pumpkin (besides for making pumpkin pies, pumpkin squares and pumpkin bread), this doughnut would be that reason. But these doughnuts shouldn't have 'another' hoarding reason status, they are so insanely delicious they could be the 'only' reason. Eggs, dark brown sugar, buttermilk, granulated sugar, melted butter, spices, salt, baking powder, salt and canned pumpkin mixed together create a beautiful thick, delicious batter (I am all about predicting the outcome of a baked good based on the taste of the batter). Note: The inspiration recipe called for using both pumpkin spice and cinnamon. Rather than buy pumpkin spice, you can make your own. The recipe for making pumpkin spice is provided in the ingredients list below.)

Whether you use a stand mixer or hand mixer, the batter comes together quickly and easily. These are kind of doughnuts you could make on a Saturday or Sunday morning and not feel you have just lost several hours of your life to baking in the kitchen when you have a full day of errands, activities, and events planned.

Whether you use a pastry bag or a ziplock bag to pipe the batter into the lightly oiled doughnut mold won't really matter. Just don't use a spoon (it is just too tedious and this is supposed to be easy). In a preheated 350 degree oven the doughnuts bake for 13 to 15 minutes (my baking time was 14 minutes) or until the doughnuts spring back when pressed on lightly. This recipe made 18 mini-pumpkin doughnuts.


Once baked the doughnuts remain in the pan for 2 to 3 minutes before unmolded and placed on a cooling rack. They need to be cooled completely if icing them with confectionary sugar. Note: You can choose a cinnamon-sugar finishing option for these doughnuts.


Confectionary sugar, whole milk, maple syrup and cinnamon create a scrumptious glaze. The marzipan leaves are optional, but the sprinkles create the visual 'wow' factor to these doughnuts. India Tree is just one of the companies offering a wide variety of sprinkle shapes and colors (or if you are really ambitious you can make your own) which can make it hard to choose (which is why you will be making these doughnuts more than once).


The cooled doughnuts are dipped in the glaze and placed on rack to set. The glaze sets up quickly so be ready to add your sprinkles as you go (a lesson learned making them).

These are the kind of doughnuts everyone will think you bought at a bakery or the farmer's market or that you slaved hours over making them. They are the perfect start to a fall or winter morning (as well as a great mid-afternoon or late night snack). Not only are these doughnuts 'mini' size, they are also baked. Both factors which might lesson any guilt you feel over consuming them. Besides, there are more important things to feel guilty about. Have I told you how addictive these doughnuts are yet?

I had baked these doughnuts the morning the marble guy and plumber were here to do the installations of the counter, sink, faucet and toilet in my bathroom remodeling project. Installing the toilet wasn't part of their original plan (it was part of my plan), so it may have helped to have the fragrance of cinnamon on a cool autumn day hit them as they walked in the door (I waited for them to be in the house for a few minutes before asking if they could do me the favor of installing one more thing). The platter of doughnuts was waiting for them when they finished. If they were experiencing any angst over the change in plans for their morning, you wouldn't have been able to tell once they tasted the Maple Glazed Mini-Pumpkin Doughnuts. I am beginning to develop a theory about these doughnuts. Will have to test it again next weekend when I need some help moving furniture.

Recipe
Maple Glazed Mini-Pumpkin Doughnuts (slight adaptation to a recipe found on All Recipes)
Makes 18 mini-donuts

Ingredients
Doughnuts
2 cups all-purpose flour (recommend King Arthur)
2 teaspoons baking powder
1/2 teaspoon Saigon cinnamon
2 teaspoons of pumpkin pie spice (you can make your own: 1 teaspoon Saigon cinnamon, 1/4 teaspoon ground cloves, 1/2 teaspoon ground ginger, 1/4 teaspoon ground nutmeg)
1/2 teaspoon sea salt (recommend Maldon)
2/3 cup dark brown sugar, packed
1/4 cup granulated sugar
2 large eggs, room temperature
1 cup canned pumpkin
1/4 cup buttermilk, room temperature
1/4 cup unsalted butter, melted, cooled slightly

Maple Glaze
1 1/2 cups confectionary sugar, sifted
1/4 teaspoon Saigon cinnamon
1 Tablespoon of pure maple syrup (Grade A or Grade B)
At least 2 Tablespoons of whole milk (if too thick add additional milk, 1 teaspoon at a time) - I used 2 additional teaspoons

Directions
Doughnuts
1. Preheat oven to 350 degrees. Lightly spray mini-doughnut pan with oil.
2. Sift flour, baking powder, spices, and salt in a medium sized bowl. Set aside.
3. Whisk buttermilk and melted butter in a small bowl. Set aside.
4. Using either a stand mixer or hand mixer, combine brown sugar, sugar, pumpkin, and egg. Mix on low speed until combined.
5. Alternating between the flour and buttermilk mixture, add each to pumpkin batter in 5 additions (beginning and ending with dry ingredients) until well combined.
6. Fill a pastry bag fitted with a round tube or a ziplock bag with a corner cut, pipe batter into the prepared doughnut pan (each mold will be slightly more than half-full).
7. Bake 13 to 15 minutes or until they spring back to the touch (my baking time was 14 minutes).
8. Allow doughnuts to rest in pan 2-3 minutes before unmolding and cooling on a cooling rack.

Glaze
1. Whisk together the confectionary sugar, maple syrup, milk and cinnamon until mixture is smooth, creamy, good dipping consistency. If glaze is to thin, add more confectionary sugar. If too thick, add additional milk one teaspoon at a time.
2. Dip each doughnut into the glaze, returning to the wire cooling rack. Add sprinkles to glazed doughnuts before the glaze sets (dip 2 or 3, then sprinkle).
3. Allow glaze to fully set up (approximately 10-15 minutes). Transfer doughnuts to a platter and serve.


Wednesday, October 22, 2014

Chicken Liver Pate with Pickled Shallots


I have shared my love of reading here on blog before. What I have not shared is how I come to select the fiction and non-fiction books lining the bookshelves and sitting in stacks in various rooms in the house. Like most everyone I anxiously await books written by my favorite authors, read book reviews, and get recommendations from friends. But I also choose books (written by unfamiliar authors) with covers I find interesting. That old adage 'you can't judge a book by its' cover' isn't always true, because sometimes you really can. The method of selecting a book by its' cover and reading the book jacket has worked more often than not. Recently I came across A Boat, a Whale and a Walrusa new cookbook written by Renee Erickson, a chef from Seattle, and someone who I was not familiar with (gasp). However, in the last month I have bought four new cookbooks (excessive even for me) and decided this was enough for awhile. But this was a book cover and title I was finding hard to resist. Without even skimming through the book or looking at the table of contents, it became the fifth cookbook purchased this month. After finally sitting down to read a few pages of the well written narratives and leafing through the beautiful photos, I thought 'this may be one of the best cookbooks I have bought all year'. Then I made her Chicken Liver Pate recipe. And let's just say it is going to a very long while before I make (or rather if I make) any of the other pate recipes I have made (and loved) over the years.


The discovery of this cookbook and chef is just one example of the incredible, almost 'higher power had a hand in' discoveries (and rediscoveries) made in the last couple of weeks. Every October for the past forty years, there has been an annual fall antique show here attracting dealers from across the country. It also attracts some serious and some not so serious collectors. Living away for the past several years had kept me from what had become an annual antique show tradition (no not for the past forty years, although I wish I had discovered this show forty years ago).

Generally when I am at a really good antique show I see nothing but the antiques on display in the booths. Brad Pitt, George Clooney, or Harrison Ford could be standing right in front of me and I wouldn't see them (I would only be wondering why the noise level around me was elevated). But something made me look up as I was walking down an aisle and standing almost in front of me was a friend I had not seen in a very, very, very long time, you might say, too long. In spite of time (and distance) we were both immediately thrilled to have rediscovered one another. After a short reconnection we made tentative plans to get together before each continuing the search for treasures (she is the more serious collector, one with a really great enviable eye).

Later on in the day I stopped to engage in conversation with a handsome, young antique dealer. After making a small purchase from his booth, I asked where he got his love and eye for antiques. He shared he grew up with them but had learned the most from two antique dealers from New Hampshire. Before I could say anything he asked if I wanted to meet them as they had a booth at the show. Well much to his surprise no introductions were necessary as I had known these two dealers for more than 25 years (but had not seen in a very, very long time). In less than two hours, my path crossed with three friends I had let life get in the way of staying connected with. What are the odds of this happening?

Finding a great antique pewter platter at the antique show paled in comparison to finding these friends. This turned out to be one of those great 'the stars were aligned' kind of days.


Putting the platter and cookbook to good use were my priorities once I got over the incredulousness of reconnecting with friends on the same day, in the same place (although I haven't really gotten over it yet). Whenever I buy a new cookbook I generally like to start with some of the simpler recipes. Because if the simple ones turn out to be amazing, then almost always the more complex ones will as well. By now you should have figured out my logic on most things follows its own path.

The Liver Pate with Pickled Shallots not only sounded delicious, but with ingredients like butter, port and currants, it was one of those irresistible recipes. As someone who happens to love a really good pate, I have been on a quest to find the 'perfect' one for years. My quest has now ended.


There are at least nine different kinds of port. This recipe calls for a tawny port or one with more aging in the barrel time before being bottled. As a result an aging process lasting anywhere from 3 to 40 years, a tawny port develops a dry nutty flavor with raisin overtones and causes the port to take on a more red-brown versus red-purple color. Real tawny ports are marked with its' age. It is not necessary to use the most expensive tawny port in this recipe, just one you would also love drinking.


In almost every pickled onion or pickled shallot recipe I have come across, the vinegar, sugar and salt are heated before the sliced vegetables are added. But not this one.

Thinly sliced shallots need to marinate in champagne vinegar, some sugar and some salt for at least two hours. The result is a crisp, flavorful pickled shallot. However, continuing to marinate over night in the refrigerator further developed the flavor of the shallots. The pickled shallots will last in the refrigerator up to two months in a sealed, covered jar. They won't last more than a couple of weeks here.


Once the chicken livers, finely diced onions, finely diced garlic, salt and port are cooked in a large sauté pan, they need to cool slightly. The recommended cool down time was 5 minutes, but I waited about 10 minutes before transferring the mixture to the food processor. After briefly pulsing the liver/onion/garlic mixture, the remaining ingredients were added. In order to get the mixture as smooth and creamy as possible process for at least two minutes. To add to its' creaminess the mixture is pushed through a fine mesh strainer. Now here is where I wasn't either patient or strong enough. After pushing the half of the processed mixture through the strainer, I decided (rationalized) a little bit of texture to the pate would be a good thing. So I mixed what was left in the strainer with what had been strained.


Lining a 4x6 or 4x8 inch pan with plastic wrap, the mixture is poured in, covered and allowed to chill overnight in the refrigerator. This pate sets up beautifully. 

Toast or grill a hearty bread or baguette brushed lightly with extra-virgin olive oil to go with the pate. 


And thick slices arranged on a plate with the pickled onions, grilled bread or baguettes, and some cornichons make for either a perfect starter to a meal or the perfect accompaniment for cocktails only. The creamy texture of the pate, the pickled onions, and grilled bread is a combination hard to resist, even for those who claim not to be big fans of pate (this pate will make converts of them, seriously it will). Hahn Vineyard's Meritage or Pinot Noir would pair perfectly with this pate, but serve whatever is your favorite red. 

Recipe
Chicken Liver Pate with Pickled Shallots (inspired by Renee Erickson's Boat House Chicken Liver Pate recipe shared in her recently release cookbook A Boat, a Whale and a Walrus)

Ingredients
Pickled Shallots
1 pound shallots, peeled and cut into circular, slightly less than 1/4 inch, slices 
2 cups champagne vinegar
3/4 teaspoon kosher salt
3/4 teaspoon granulated sugar
Pate
1 cup (2 sticks) unsalted butter, room temperature, divided
1 medium onion, finely chopped
3 cloves garlic, finely chopped
1 pound chicken livers
3 Tablespoons of a tawny Port (one at least 10 years old)
1 teaspoon kosher salt
1/4 cup dried currants
1/4 cup heavy cream
1 Tablespoon dry mustard
1/2 teaspoon freshly grated nutmeg
1/4 teaspoon Aleppo pepper
Sea salt for finishing (recommend Maldon)
Grilled sourdough bread or baguette toasts
Cornichons, optional 

Directions
Pickled Shallots
1. Toss the sliced shallots with kosher salt and sugar in a small bowl. Add champagne vinegar and stir. Allow the mixture to marinate for two hours (stirring occasionally) before serving. Note: Would recommend allowing the marinate overnight in the refrigerator (after first marinating at room temperature for two hours).

Pate
1. Melt one stick of salted butter in a large sauté pan. Add finely chopped onions and garlic (sauté for 3 minutes stirring often).
2. Add livers, port and salt. Cook for 6 to 8 minutes (stirring often) or until the livers have cooked evenly and the livers are no longer bleeding (my cook time was 8 minutes). Remove from heat and allow to rest for at least 10 minutes.
3. Transfer liver/onion/garlic mixture to a food processor. Pulse briefly to break up the livers before adding additional ingredients.
4. Add remaining stick of butter, currants, cream, dry mustard, freshly grated nutmeg, and Aleppo pepper. Process for at least 2 minutes or until the mixture is completely smooth.
5. Push mixture through a fine mesh strainer set over a large bowl, using a rubber spatula to press mixture through. Note: I strained half of the mixture, then combined the strained mixture with what was left in the strainer. 
6. Line a 4x6 inch or 4x8 inch pan with plastic wrap. Pour mixture in pan, gently knock pan on counter to release air bubbles, smooth top with an off set spatula, and cover with plastic wrap. Chill overnight.
7. Unmold pate onto a cutting board. Using a knife that has been run under hot water, cut thick slices of the pate and serve. Sprinkle each slice with (Maldon) sea salt .
8. Serve with toasted or grilled bread or baguettes.

Harbor views in New Bedford, Massachusetts and Vineyard Haven on Martha's Vineyard (September 2014).

Monday, October 20, 2014

Pounded Cheese with Port Syrup and Walnuts


For the past several weeks I have been preoccupied with making shades of gray color decisions for a bathroom remodeling project, a project that was supposed to be a simple one. When will I learn that no remodeling project in a seventy year old house is simple? Probably never. But that probably isn't the right question anyway, however, the answer would still be the same. Laboring over color decisions is due in part to once selecting a bedroom wall color that took on very different hues during the day and at night. After three coats of a relatively expensive wall paint painstakingly applied in a relatively large room, I woke up one morning to a bedroom that felt like it was lined with harvest gold refrigerators. Let's just say that wasn't a good feeling on so many different levels. If it was possible for someone to be burned at the stake for spending an unnecessary fortune on paint and making someone spend countless hours painting (and repainting), that someone would have been me. 


It wasn't much of shock (at least to myself) when I decided to make a recipe out of Amy Thielen's "The New Midwestern Table" cookbook. Her recipe for a pounded cheese with a port syrup appealed to me for a variety of reasons. In her book, Amy shared pounded cheese recipes have been found in 'books of early American cookery'. Having an affinity for centuries old things, making a century old recipe was one I couldn't resist. In addition to antiques, I also love wine and especially port. My sister, the wine expert in the family, introduced me (or should I say permanently spoiled me) to the Cabernet Sauvignon Port from Napa Valley's Schweiger Vineyards years ago. While it was probably unnecessary to use a port with such depth of flavor in this recipe, I thought it might make a incredible port syrup (it exceeded even my expectations). And lastly, a recipe calling for an aged Wisconsin cheddar cheese (one at least three years old) was also irresistible. The state of Wisconsin holds a special place in my heart as it was the place of my childhood family vacations. Thankfully I had a sorority sister friend on a girl's weekend  trip in Lake Geneva brought me back a great aged Wisconsin cheddar (it is great to have friends, even greater to have friends on Facebook who read my pleas and posts).


The Pounded Cheese with Port Syrup and Walnuts is one that epitomizes Throwback Thursday. Why? Because it sort of visually reminds one of those cheese spreads they would serve in the restaurants way back when. Only the flavor in this one is in a league of its' own. Maybe I should have waited to post and share this recipe on Thursday, but it would have been a crime (maybe not a burning at the stakes kind of crime) to delay sharing it with you.


This is one of those recipes using simple, quality ingredients and having simple, non-complicated 'invest hours in' directions. If there was ever a dish where its' flavor and beauty in presentation rivaled its' simplicity, this would be the one. If you live within a hundred mile radius of Wisconsin, it would be worth the drive to buy the aged cheddar cheese, unless of course you lucky enough have friends who are there frequently and are willing to do some of your grocery shopping. And if neither of those are practical options, it is likely you can find at least a three year aged cheddar at your favorite cheese shop (or in the cheese section at Whole Foods). Does the aged cheese absolutely need to be from Wisconsin? No, it doesn't. There are some amazing cheeses coming out of Vermont and the Hudson Valley. The only deal breaker in this recipe in the age of the cheese. Just remember, buy one that is at least three years old.


The modern convenience of a food processor makes making this pounded cheese incredibly easy. Imagine the arm strength that went into pounding the cheese with a wooden spoon in a wooden bowl more than a century ago!  After the softened cheddar cheese is processed until pureed, the (salted) butter, dijon mustard, Aleppo pepper and black pepper are added. Scraping the bowl several times, all of the ingredients are processed until reaching a smooth and creamy consistency. If you are not serving the cheese immediately, it can be refrigerated but needs to be brought back to room temperature before serving. I found that whipping it with a hand mixer just before serving restored it back to the right consistency.


The original recipe for the port syrup called for simmering 1/2 cup of port and one tablespoon of light brown sugar for approximately three minutes. Whether I did something wrong here or not, my mixture was not maple syrupy in consistency after three minutes. Not wanting to waste the Schweiger port (this would be a real crime), I increased the tablespoons of light brown sugar to two and simmered for about 15 minutes. The result was a velvety, intense-in-flavor port syrup. The syrup can be made early in the day or the day before as it should be at least room temperature or chilled before drizzling over the pounded cheese. Note: This port syrup would be also perfect served over a beef tenderloin.


No throwback 'deconstructed cheese ball' recipe would be truly throwback unless it was served with Ritz crackers (a cracker first introduced in 1934). The pounded cheese seems to call for a buttery cracker or sliced pretzel rolls. Choose whichever crackers or breads are your favorites. And oh, lest I forget, the Pounded Cheese with Port Syrup and Walnuts pairs well with wine, beer or martinis.


If only choosing paint colors was as easy as making the big life decisions or deciding which recipes to try. I think I will need to remind myself of this thought when I labor over what to make when having some friends over for dinner in a couple of weeks. But at least I already which know which appetizer I will be making. You get one guess.

Recipe
Pounded Cheese with Port Syrup and Walnuts (very slight adaption to Amy Thielen's Old-Fashioned Pounded Cheese with Walnuts and Port Syrup recipe shared in her book The New Midwestern Table)

Ingredients
Port Syrup
1/2 cup port wine (recommend Schweiger's. But choose a port you really like to drink, one that's a good quality but won't break the bank)
2 Tablespoons light brown sugar

Cheese
7 ounces of at least 3 year old aged Wisconsin Cheddar Cheese, at room temperature 
6 ounces (3/4 cup) salted butter, cool but not cold
1 teaspoon Dijon mustard (recommend Maille)
1/4 teaspoon ground black pepper
Pinch of Aleppo pepper (or can use cayenne pepper)

1/2 cup walnut halves, toasted
Crackers (recommend Ritz ,Townhouse, or other good buttery crackers, or ) and/or sliced Pretzel Rolls

Directions
1. For the syrup, combine port and brown sugar in a small saucepan over medium-high heat. Stir until sugar has melted. Reduce heat to low and simmer, stirring occasionally, until sauce has thickened to the consistency of a maple syrup (approximately 12-15 minutes). Remove from heat, allow to cool to room temperature. If not using immediately, cover and place in the refrigerator.
2. For the cheese, cut the cheddar cheese into chunks, place in food processor and process until pureed. Add butter, mustard, Aleppo pepper, and black pepper and process until whipped and smooth (scrape down sides of bowl several times during the processing).
3. Arrange cheese on a shallow dish, drizzle port syrup over top and sprinkle with toasted walnuts. Serve with crackers or sliced pretzel rolls.

Note: Pounded cheese and syrup can be made one day ahead (wrapped separately). To serve, bring cheese to room temperature and whip with hand beaters to restore to its' creamy consistency before serving.

Thursday, October 16, 2014

Chocolate Dipped Sea Salted Caramels


When I read in an email from my favorite local cooking store they were looking for volunteers for their baking or cooking demonstration days, I thought 'this could be a fun first'. Then I thought 'or maybe not'. Sharing my love of cooking and baking in the relative anonymity of a foodblog and sharing it in a large professional kitchen with a live audience; making a mess in my own kitchen and baking and making a mess in someone's kitchen (with an audience); and, baking in my oven versus in an unfamiliar oven for the first time were just some of the rambling variables spinning in my head as I debated over whether or not to volunteer. Having a tendency to just 'do' rather than spending time 'thinking through it', this whole decision making process took less than a couple of minutes (I think fast). As the days to my afternoon as a guest baker got closer, I thought 'what was I thinking?'.


My life is filled with sleepless nights. Add a little anxiousness into the mix and I am lucky to get the equivalent of a power nap in. On the morning of the demonstration the butterflies in my stomach (not a bad thing) turned into a stomach on a high speed roller coaster (not a good thing). Fortunately most of this subsided by the time I got to the store and started setting up. Even a batch of White Chocolate Pistachio Shortbread cookies (aka Amy's Cookies) over baked because the timer wasn't set and a small bowl of white chocolate burned in the microwave didn't unnerve me (another 'first' of the day, not being unnerved that is). All in all it was an exhilarating, exhausting, energizing experience, one I may not have had if I allowed myself to overanalyze and over think it.

All of the good exhaustion from baking and talking for three hours allowed me to get five solid hours of sleep and get my creative energies going. Making caramels is one of my 'fall as soon as the weather turns less humid, cooler' rituals.  For years I have been making the Sea Salted Caramels, always wrapping them in cellophone (the most tedious part of making them).  On their own, these caramels are insanely delicious. But if I 'wrapped' them in chocolate, they would be? Better than the all caramel Milky Way bar? A candy to die for? Almost too beautiful to eat? The answers are yes, yes, yes. Only it would be a crime if you didn't eat them.

Making caramels is easy as long as you have a reliable candy thermometer, a deep heavy saucepan, a long handled whisk or wooden spoon, and use a quality unsalted butter. When buying the butter for these caramels look for an unsalted made with at least 82% butterfat. In a New York Times article, Dorie Greenspan explains butterfat affect a 'butter's flavor, texture, and workability' and why every 'little bit counts'. American butters must contain at least 80% butterfat, however, European butters contain at least 82% butterfat. When making caramels, candies and sauces, the extra 2% of butterfat makes a significant difference.

In addition to the generous pinch of sea salt that goes into the caramels themselves, I like to lightly sprinkle the finished caramels with additional sea salt to further intensify the flavor of the caramel. Just like all butters are not created equal, neither are sea salts. My current favorites are the french Fleur de Sel and Maldon sea salt.

After the caramels were cut, I chilled them in the refrigerator for about 30 minutes before dipping them in the melted chocolate. This made the dipping process easier and it also 'set' the chocolate faster. If you want the sea salt on the chocolate instead of the caramel, you will need to add the sea salt onto each piece immediately after it is dipped. Otherwise if you wait until you dipped several, the chocolate will have already 'set' and the salt will not adhere.


In spite of the burning of the white chocolate in the microwave hiccup in my baking demonstration (the store's microwave was significantly more powerful than mine at home), I still prefer the melting in the microwave over the double-boiler/simmering water method. Considering the amount of caramels to be dipped, I divided the chocolate in half, melting one bowl at a time, in order to ensure my melted chocolate had the same consistency throughout the dipping process.

Why I did not start dipping these caramels years ago I can't understand. Fear of failure? Fear of the unknown? Fear of what? The worst thing that could have happened was that I would have ruined some chocolate and a batch of caramels. Not the end of the world things. 


After all of the caramels were dipped, I used a fork to drizzle the remaining chocolate over the caramels, trying not to make too much of mess or let too much of my inner "Pig-Pen" come out.

There are some chocolate combinations that work better than others. (Disclaimer: This is totally based on my palate's biases and preferences.) Dark chocolate is my current preference for dipping cashews, milk chocolate for dipping macadamia nuts, dark chocolate for coating coconut balls, and milk chocolate for dipping caramels. A month from now this may all change and I might be dipping these caramels in dark chocolate. Unless of course, I decide to over think it.

"It's impossible," said pride. "It's risky," said experience. "It's pointless," said reason. "Give it a try," whispered the heart. If you have never made chocolate dipped caramels before, just try. And if for any reason your caramels aren't perfect the first time or the dipping isn't as perfect as you would like, keep trying. These chocolate dipped sea salted caramels will be worth your time, energy and effort.  Because is there anything better than caramel and chocolate?
Recipe
Chocolate Dipped Sea Salted Caramels

Ingredients
1 pound light brown sugar
1 pound unsalted butter (recommend unsalted Kerrygold, any European style butter, or any butter with at least an 82% butterfat content)
1 cup light corn syrup
1 can (14 ounce) sweetened condensed milk 
1 teaspoon vanilla
generous pinch of Kosher or sea salt (about a 1/4 teaspoon)
sea salt for finishing (recommend Maldon sea salt)
1 to 1 1/2 pounds of milk chocolate, chopped, melted (divided) Or a combination of milk and dark chocolate
Optional: 1 cup of roasted, chopped walnuts

Directions
1. Melt butter in a heavy medium sized saucepan over low to medium heat.
2. Add brown sugar and pinch of Kosher or sea salt whisking so no lumps remain.
3. Add corn syrup whisking until blended.
4. Add sweetened condensed milk whisking until blended.
5. On medium heat cook mixture until it reaches 248 degrees (F) on a candy thermometer. Immediately remove from heat when it reaches this temperature.
6. Add vanilla and stir with a wooden spoon. (Note: If you like your caramels with nuts in them, stir in after you have added the vanilla. Remember to toast and chop them before adding to the caramel mixture.)
7. Pour mixture into 9" x 12" inch pan lined with parchment paper.
8. Allow to set for 5 minutes and lightly sprinkle with sea salt 
9. Allow to cool. Optional: Continue cooling in refrigerator to firm up as it makes cutting them easier or let them cool for several hours or overnight.
10. Remove from the refrigerator. Using a long sharp knife, cut caramels into 1 inch squares. Return caramels to refrigerator for at least 30 minutes. Note: If caramels are too firm to cut after refrigeration, let them sit out for about an hour.
11. Melt milk chocolate (microwaving or over simmering water melting methods).
12. Dip each caramel in the melted chocolate, place on a large cutting board or baking sheet lined with parchment paper. 
13. With remaining chocolate, drizzle melted chocolate over caramels using a fork.
14. Allow to set. Place in small paper cups. Store in a covered container set in a cool place.


Early on in our life we often hear the words 'clean up your mess'. Little do we know or realize when asked to clean our rooms or the mess we made in the house these words would become applicable to cleaning up messes we make in our lives. We all make them, intentionally or unintentionally, as they are sometimes the way we learn about ourselves, our strengths, and our shortcomings. And sometimes we become temporarily paralyzed when trying to figure out to clean up a mess we have made. Ironically, this actually takes more energy than just doing something about it. The state of semi-paralysis has consequences, usually not good ones. Whenever I have ignored one of the 'messes' I have created or have been a party to, it often turns into something bigger, something harder to do, something harder to repair. Never a good life lesson, never a good way to feel good about yourself, and almost never good feelings left with anyone else either.

As I left my baking demonstration, my 'sous chef' said 'one of the best parts of the day is that you don't have to clean up'. While it was nice to not have to clean up the bowls, pans and utensils I used, I sort of missed having the 'closure' to this experience. For me, nothing is worse than not having closure (the proverbial hanging chads in one's life). This need for closure may drive some those around me a little crazy at times because I like to talk through things whenever there is a 'mess'. Because isn't that how we grow and how friendships and relationships grow? For me the answers are yes and yes. Things are always better when you talk though them, when there is closure, no matter if the closure is or isn't what you thought or wanted it to be.